Traxis Digital satellite receiver User manual

'LJLWDO6DWHOOLWH5HFHLYHU

SAFETY PRECAUTION
CAUTION:
The lightning flash with arrowhead
symbol, within an equilateral triangle,
is intended to alert the user to
"dangerous voltage" and to prevent
from a risk of electric shock.
Warning:
To reduce the risk of electric shock,
don't open the cabinet. Turn to
qualified personnel for service only.
The exclamation point within an
equilateral triangle is intended to
alert the user to important operating
and maintenance (servicing).
WARNING: Keep this STB away from water . Do not use it near flower vase, washbowls, kitchen sinks,
laundry tubs, swimming pools, etc.
WARNING: Do not put candle or lamp on the cabinet; otherwise, there is the danger of fire.
WARNING: The unit should be connected to a power supply only of the type described in the operating
instructions or as marked on the unit. If you are not sure of the type of power supply (for example, 120 or
230 V) to your home, consult your local dealer or local power company.
WARNING: This product install diodes. Do not open the cabinet or touch any parts in the inner
mechanism. Consult your local dealer for technical service if the opening is required.
Note: To ensure proper use of this product, please read this User manual carefully and retain it for
further reference.
Note: This product install diodes. Do not open the cabinet to avoid the unit direct exposure to radiation.
Unit Cleaning: After the unit power is turned off, you can clean the cabinet, panel and remote control with
a soft cloth slightly moistened with a mild detergent solution.
Attachments: Never add any attachments and/or equipments without the manufacturer ‘s consent;
because they may result in the risk of fire, electric shock, or other personal injury.
Locating: Slots and openings in the cabinet are provided for ventilation to protect it from overheating. Do not
block these openings or allow them to be blocked by placing the STB on a bed, sofa, or other similar surface,
nor should it be placed over a radiator or heat register.
Power-Cord Protection: keep the power-supply cords away from being walked on. Please pay special
attentions to cords at plugs, convenient receptacles, and the pointwhere they exit from the unit.
Object and Liquid Entry: Never put any kind of objects into this STB through openings, as they may touch
dangerous voltage points or short-out parts that could result in a fire or electric shock. Do not spill any
liquid on the STB.
1

Note: Moisture may be formed on the lens In the following conditions:
when the unit is suddenly moved from a cold environment or an air-conditioning room to a
warm place.
immediately after a heater has been turned on.
in a steamy or very humid room.
If the moisture forms inside the unit, it may not work properly. To solve this problem, turn on the power
and wait for about two hours for the moisture to evaporate.
Parts Replacement: When the unit parts need to be replaced, users should make sure the service technician
use the replacement parts specified by the manufacturer or having the same characteristics as the original
part. Unauthorized replacement may put the unit in the risk of fire, electric shock or other hazards.
Safety Check: After all the maintenances and repairs are done, user is required to request the service
technician to conduct the overall safety check to ensure the machine is in the proper condition.
2

3UHOLPLQDU\&RQILGHQWLDO3URSULHWDU\
&RQWHQWV
&217(176
'(6&5,37,21
5(027(&21752/
)52173$1(/5($53$1(/
%$6,&23(5$7,216
7
85121 67%
6
7$1'%< 02'(
&
+$11(/
9
2/80(
1
80%(5
0
87(
3
$86(
5
(&$//
)$9
=220
$8',2 75$&. $8',2 02'(
,1)250$7,21
(3*
795$',2
&+$11(/ /,67
&+$1*( 6$7(//,7(
08/7,3,&785(6
&+$11(/
79&
+$11(/ /,67
)DYRULWH
0RYH
)LQG
6RUW
79&KDQQHO/LVW(GLW
'HOHWH
6NLS
/RFN
(GLW
&UHDWH
5$',2 &+$11(/ /,67
'(/(7( $//
,167$//$7,21
$
17(11$ 6(783
$872 6&$1
73 6&$1
3
5(6(7 6&$1
6<67(06(783
/$1*8$*(
796
<67(0
&
+$11(/ 6(783
7
,0( 7,0(5 6(77,1*
26'6
(77,1*
3
$5(17$/ /2&.
/1%3
2:(5
722/6
,
1)250$7,21
*
$0(
'
()$8/7 9$/8(
6
2)7:$5( 83*5$'(

)52175($53$1(/
)URQW3DQHO
$
ϥ
3RZHU7KHSRZHUEXWWRQRI67%216WDQGE\
%/(',QGLFDWRU
&
ϧ
ϰ
7KHFKDQQHOEXWWRQVDUHWRFKDQJH FKDQQHOV
'5HPRWHVHQVRU
5HDU3DQHO
$ & &% '
C
FD H
G
J
I
EA
B
$$8',2287387 $XGLROHIWRXWSXW:+,7($XGLR5LJKWRXWSXW5('
%9LGHR 9LGHRRXWSXW<(//2:
&,),1387 &RQQHFWVWKHVDWHOOLWHDQWHQQDFDEOH
'56 8SJUDGHVWKH67%3URJUDPVRIWZDUH
(6SGLI 6SGLIFRD[LDO
)/RRS 8VHLWWRFRQQHFWWRDQRWKHU67%
*$&&RUG3OXJ &RQQHFWWKHKRPHSOXJ
+
,
-
&RD[LDO 'LJLWDOFRD[LDODXGLRRXWSXW
0DLQ3RZHU6ZLWFK 6ZLWFKLQJWKHUHFHLYHUSRZHUVXSSO\
69,'(2 69,'(2FRQQHFWLRQ

Remote Control & Panel Description
1.2.Remote Control
5

Basic Operations
2. Basic Operations
2.1 Turn on STB
Press the Device’s MainόPowerύto turn on the unit.
If the STB is used for the first time, it will play the first
channel from the default Channel List. Otherwise, it will
play the last channel before being turned off.
?Frequently Asked Question
Q: The power of my STB has been turned on and
not in Standby mode, but the TV screen shows
nothing:
A: Make sure the TV set has been set to the correct
video input (not the TV channels). For example, if you
have connected the unit with the Video1 input of the TV
set, the TV set has to be switched to Video1.
Q: The power of my STB has been turned on and
not in Standby mode, but the TV screen shows
nothing except “one ball with No Signal image”.
A: This means the channel you select has no signal.
There could be several causes:
1The channel which you select is not in your
allocated satellite. The solution is to change the
channel.
2The signal of current TV channel is too weak. Try
to switch to other strong-signal channels. If the
problems still exist, please consult your local
dealer or other professionals for technical service.
3You have used the Dual LNB, and need Modify
LNB Type
2.2 Standby Mode:
1Pressing KeyόPowerύcan enter the Standby
mode.
2In Standby mode, pressing KeyόPowerύagain will
exit the standby mode.
3Users can also disconnect the device’s main
power to end the Standby mode.
6

Basic Operations
Let’s start
2.3 Channel
In full screen, press keysόChannel Up/Channel Downύ
to change channel.
2.4 Volume
In full screen, press keysόVolume +/Volume -ύto adjust
volume.
2.5 Number
In full screen, use number keys and pressόOKύon the
Remote Control Unit to change channels.
2.6 Mute
1Press keyόMuteύto mute the sound and the
screen will show .
2Press keyόMuteύagain to restore sound.
2.7 Pause
1In playing mode, press keyόPauseύ, and the
picture will pause, but the sound of the channel
will still remain.
2Press keyόPauseύagain, and the screen’s picture
will skip over to the current playing picture, and
the sound of the channel will correspondingly play.
2.8 Recall
Press keyόRecallύto switch to the previous
channel that you were watching.
2.9 FAV
1In full screen, press keyόFAVύ, and it will display
a window of “Favorite Group on the left of the
screen like below.
2In the window of “Favorite Group”, you can move
highlight by pressing keysǍChannel Up/Channel
Downǎ,then pressǍOKǎkey to set favorite channel
you choose.
3KeysǍCH+/CH-ǎandǍV+V-ǎcan implement the
“Page up/Page down” function.
4The favorite group is the favorite channels you
have marked in Menu “TV channel list”. Please
refer to Favorite.
5PressǍExitǎkey to exit the “Favorite”
menu.
?Frequently Asked Question
Q: Why the screen displays “No Favorite Channel”,
after pressing
ό
FAV
ύ
key?
A: It is because you haven’t set any channels as
“favorite channel”. Please refer to Favorite
7

Basic Operations
2.10 Zoom
1The keyǍZoomǎallows you to magnify a certain
area on the images and the current screen will
show
.
2Press keyǍZoomǎagain, the image will enlarge
as x1, x2, x4, x6, x8, x12, x16.
3In “x2 ~ x16” image,ǍChannel Up/ Channel Down/
Volume +/ Volume -ǎkeys are to move the inner
yellow square you want to see.
4In zoom mode, pressǍExitǎto close “Zoom”
window.
2.11 Audio Track / Audio Mode
1In full screen, pressing keyǍAudioǎcan open the
“Audio Mode” window on the right side of the
screen.
2You can move highlight by pressing keysǍCh+ /
Ch-ǎand switch each selection by pressingǍV +/
V-ǎkeys
2.12 Information
In full screen, pressing keyǍInfoǎcan open information
screen. The window shows the parameters of current
channel.
2.13 EPG
1The STB has an Electronic Program Guide (EPG)
to help you select channels through all the
possible viewing options. The EPG supplies
information such as channel lists and time
starting/ ending for all available channels.
Press keyǍEPGǎto display EPG screen.
Pressing number keyǍ1ǎcan display all programs’
information of the selected channel, then press key
ǍOKǎin each item for more detailed information.
2Pressing number keyǍ2ǎcan see more details of
the selected program.
3In EPG menu, press keyǍExitǎto close EPG
screen.
2.14 TV/RADIO
In TV mode, pressing keyǍTV/RADIOǎcan switch to
Radio mode.
In Radio mode, pressing keyǍTV/RADIOǎcan switch to
TV mode.
2.15 Channel List
1In full screen, pressingǍOKǎkey can enter
“Channel List”, please refer to TV Channel List for
detailed information.
2In “Channel List” menu, pressǍOKǎkey to exit
back to full screen.
2.16 Change Satellite
1In full screen, pressing keyǍCH+/CH-ǎcan switch
satellite directly.
2In full screen, pressing keyǍTV/SATǎcan open
satellite list and switch satellites.
2.17 Multi-Pictures
In full screen, pressing keyǍM/Pǎcan enter the
Multi-Pictures mode like below:
8

Basic Operations
1In Multi-Pictures mode, the screen will display 9
channels’ preview window (static) from the current
channel. And only the highlighted preview
program can play normally.
2Press ǍCh+ / Ch- / V+ / V-ǎkeys can move
highlight among each preview program, and only
the highlighted preview program can play
normally.
3When the highlight moves to the preview program
that you want to play, you can press keyǍOKǎto
enter the full screen play.
9

Basic Operations
3. Channel
When you press keyǍMenuǎto enter “Channel” menu, it
will display the picture like below:
In “Channel” menu:
1Press keyǍV+/V-ǎto select pages among
“Channel”, “Installation”, “System” and “Tools”.
2Press keyǍCh+/Ch-ǎto select menu items among
TV Channel, Radio Channel and Delete All.
3Press keyǍOKǎto enter the selected item.
3.1 TV Channel List
When you enter “Channel List” menu, it will display the
screen like below.
1You can move highlight by pressingǍCh+/Ch-ǎ
keys, then pressǍOKǎkey to preview the current
highlighted program in the right side preview
window.
2You can pressǍCh+/ Ch-ǎkeys to implement the
Page Up/Page Down function.
3You can useǍVolume +/Volume -ǎkeys to switch
“Program Group”.
4You can press keyǍMenuǎorǍExitǎto enter full
screen playing mode.
5Pressing the number key Ǎ1ǎ~Ǎ5ǎcan implement
the corresponding function in “Channel List”.
3.1.1. Favorite
1You can press number keyǍ1ǎto mark your
Favorite channels.
2The favorite channels you mark will be shown like
the picture above.
3Press keyǍ1ǎagain, you can delete the marked
channels.
4In full screen, when you press [FAV], there will be
a “favorite group” according to what you have
marked. Please refer to [FAV].
3.1.2. Move
1Press number keyǍ2ǎ, it will show a “moving
mark” in the right side of the selected channel like
above.
2You can select the channel that you want to watch
by pressingǍChannel Up/Channel Downǎkeys,
and press keyǍOKǎto confirm your decision.
10

Basic Operations
3.1.3. Find
1Press number keyǍ3ǎcan open the “Find” window
like above. You can pressόChannel Up/Channel
Down/Volume +/Volume -ύkeys to move highlight
and press keyόOKύto input the selected symbol.
2After inputting, the program list on the left will
search and list the matched channels according to
your input. Then press keyόOKύto enter the
channel you want to watch.
3Pressing keyǍExitǎcan close “Find” window and
you can still select the channels directly from the
found channels list on the left.
3.1.4. Sort
1Pressing number keyǍ4ǎcan open the “Sort”
window like above. There are five ways of sorting.
You can pressόChannel Up/Channel Downύkeys
to move highlight and pressόOKύkey to confirm
your selection
2The five ways of sorting are:
Default: Sort by scanning results.
Name (A-Z): Sort in Alphabetical Order,
ignoring “$” symbol.
Name (Z-A): Sort in Alphabetical Order,
ignoring “$” symbol.
FTA: Sort out all free channels.
Lock: Accumulate all locked channels and
put them in the rear of TV Channel List.
3.1.5. TV Channel List Edit
1Pressing number keyǍ5ǎwill open a message box
for you to enter a password,and the default
password is “0000”
2There are five items of “TV Channel List Edits”:
Delete, Skip, Lock, Edit, and Create.
3PressingǍExitǎcan exit “TV Channel List Edit”
menu. The system will show a message box to
ask you whether you want to save it or not.
3.1.5.1. Delete
In “TV Channel List Edit” menu, pressing number
keyό1ύcan make a όdeleteύmark in the right side
of the highlighted channel. After you save and exit
“TV Channel List Edit” menu, the marked channel
will be deleted.
3.1.5.2. Skip
In “TV Channel List Edit” menu, pressing number
keyό2ύcan make a “skip mark” in the right side of
the highlighted channel. After you save and exit
“TV Channel List Edit” menu, the channel will be
skipped while you change channels in the full
screen.
3.1.5.3. Lock
In “TV Channel List Edit” menu, pressing number
keyό3ύcan make a “lock mark” in the right side of
the highlighted channel. After you save and exit
“TV Channel List Edit” menu, STB will request you
11

Basic Operations
to input the password if you want to watch the
locked channel.
3.1.5.4. Edit
In “TV Channel List Edit” menu, press number key
ό4ύto enter editing box like below:
1On the “Name” item, pressǍOKǎkey can display
keypad to edit the name of selected channel.
2On the “Video PID”, “Audio PID” and “PCR PID”
items, you can input numerals to modify them
according item’s value.
3After modification, move highlight to “Save” item
and pressingǍOKǎkey can save the modified
value and exit “Edit” mode. Otherwise, move
highlight to ǍExitǎitem and pressǍOKǎkey to
exit “Edit” mode without saving any modification.
3.1.5.5. Create
In “TV Channel List Edit” menu, press number key
ό5ύto enter the creating window like below:
1In “Satellite” item, press keyǍOKǎto display
satellite list and select a satellite that you
want to use.
2In “TP Index” item, you can pressǍVolume
+/Volume -ǎkeys to switch TP number, and the
next three items will show up with corresponding
parameters.
3In “Name” item, pressing keyǍOKǎcan display the
keypad, and you can edit the name for
selected channel.
4In “Video PID”, “Audio PID” and “PCR PID” items,
you can use the number key to directly modify
corresponding parameters of the items.
5After modification, move highlight to “Save” item
and press keyǍOKǎto save parameter and exit
“Edit” mode. Otherwise, move highlight toǍExitǎ
item and press keyǍOKǎto exit “Edit” mode
without saving any modifications.
3.2 Radio Channel List
Basically, the operation of “Radio Channel List” is as
same as “TV Channel List”, but there is one
different point: In “Radio Channel List” mode, there
is no video information, so it will always display
Radio’s logo in the right side of the preview window.
3.3 Delete All
In “Delete All” item:
1Displays a dialogue for users to key in
password. The default Password is “0000”.
2When you input the correct password, you will see
a warrning message box to ask you whether
you want to delete all or not.
3If you select “Yes”, all channels will be deleted.
4In step 1 and step 2, press keyǍExitǎcan exit the
function directly without saving anything.
?Frequently Asked Question
Q: IF I accidently delete all channels, what
should I do?
A: there are two ways to restore:
To re-search all channels in “Installation”
function.
Use “Default Value” function to restore all
channels in “Tools” function.
12
Basic Operations
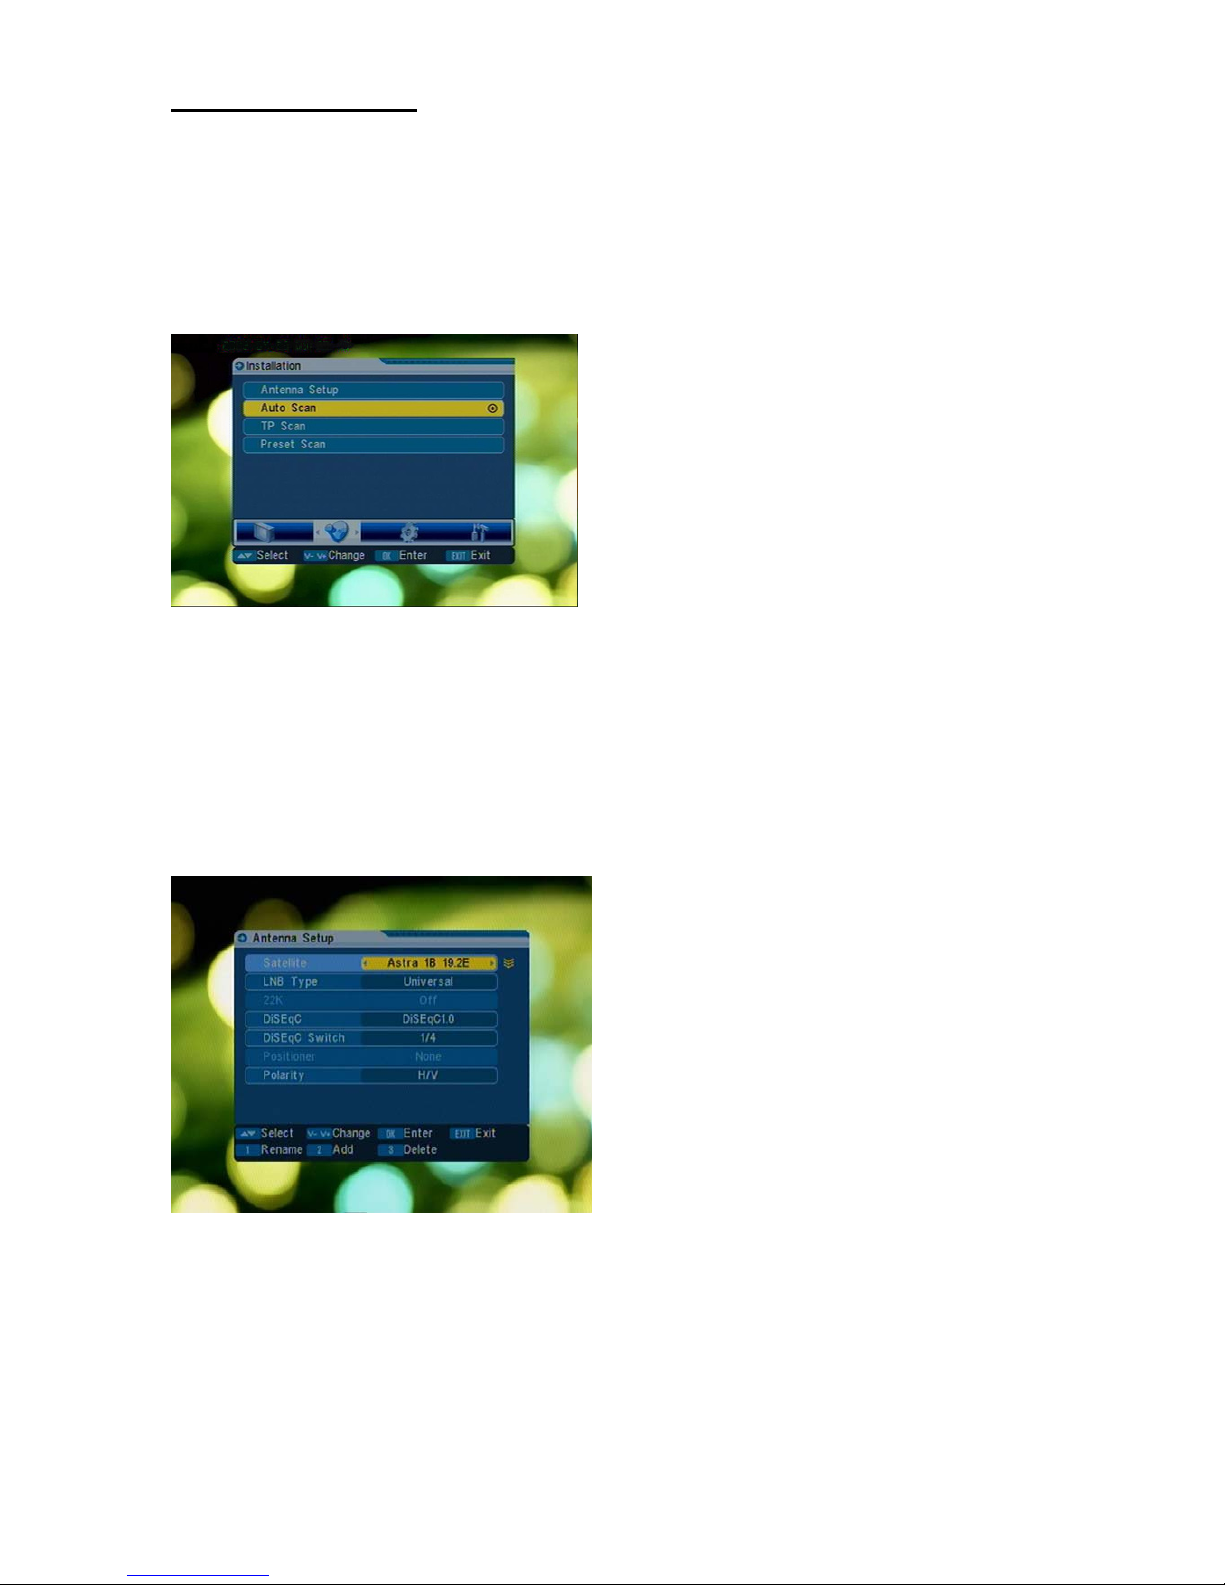
4. Installation
How to enter “installation"menu:
Press keyǍVolume +/Volume -ǎto select "Installation”
from the menu page of “Channel”, "Installation” ,
“System setup” and “Tools”.
When you enter “Installation” menu, it will display the
screen like below:
1PressǍCh+/Ch-ǎkeys to select menu items among
Antenna, Setup, Auto Scan, TP Scan and Preset
Scan.
2Press keyǍOKǎto enter the selected item.
4.1 Antenna Setup
When you enter “Antenna Setup” menu, it will display
the screen like below:
In Antenna Setup mode:
1Satellite: In this item, pressing keysǍVolume +/
Volume -ǎwill switch Satellites and pressing key
ǍOKǎcan enter satellite list for you to select
directly.
2LNB Type: In this item, pressingǍVolume + / Volume
-ǎkeys will switch among “Standard”, “User” and
“Universal” mode.
For Example: If you use the Dual LNB, you should
select “User” option in “LNB Type” and set the
correct frequency in LNB Type, then the channel
will play normally
There are several frequencies for selection: 5150 /
5750 / 5950 / 9750 / 10050 / 10600 / 10700 /
10750 / 11300.
322K: You can useǍVolume +/ Volume -ǎkeys to
switch “ON / Off”. When this item is switched to
“ON”, the receiver will receive TV and radio input
signal from 22K port. If the item is switched to
“Off”, the receiver will receive all signals from 0K
port.
4DiSEqC: You can useǍVolume +/ Volume -ǎkeys
to switch options between “DisEqC1.0” and
“DisEqC1.1”.
DiSEqC Switch: you can press ǍVolume +/ Volume -ǎ
to switch the options below:
Disable: without DiSEqC.
1/2, 2/2: two ports DiSEqC
1/4, 2/4, 3/4, 4/4: 4 ports DiSEqC
1/8, 2/8… 8/8: 8 ports DiSEqC
1/16, 2/16….16/16: 16 ports DiSEqC
5Positioner: In “Positioner” item, you can press
ǍVolume +/ Volume -ǎkeys to switch “None /
DiSEqC 1.2 ” functions.
6Polarity: In “Polarity” item, ǍVolume +/ Volume -ǎ
keys are used to switch “HV/ H / V” functions.
4.2 Auto Scan
When you enter “Auto Scan” menu, it will display the
screen like below:
13

Basic Operations
You can move the highlight from “satellite” to
“search” by pressing
Ǎ
Ch+/Ch-
ǎ
keys
1In “Satellite” item, pressǍVolume +/ Volume -ǎkeys
to select satellite you want to scan. Otherwise,
press keyǍOKǎto open the “satellite list” to select
directly.
2In “Scan Mode” item, pressǍVolume +/ Volume -ǎ
keys to scan all channels or just free channels.
3In “Scan channel” item, pressǍVolume +/ Volume
-ǎkeys to scans TV + Radio Channels, TV
channels or Radio channels.
4In “Search” item, pressǍOKǎkey to start scanning.
The scanning screen will display like below.
(The lower part of the screen will display the
process and show the current scanning
channels.)
5In the “Auto Scan” menu, pressǍExitǎkey to exit
back from the scanning by saving the current
value.
4.3 TP Scan
When you enter “TP Scan” menu, it will display the
screen like below:
You can move the highlight from “satellite” to
“search” by pressing
Ǎ
Ch+/Ch-
ǎ
keys
1In “Satellite” item, pressǍVolume +/ Volume -ǎkeys
to switch satellite that you want to scan.
Otherwise, press keyǍOKǎto enter satellite list for
selection.
2In “TP Index” item, you can use bothǍVolume +/
Volume-ǎkeys in the screen to select
transponders.
In “TP Index” item, when you press keyǍ1ǎ, it
will display “New Carrier”; You should set the
parameters of “TP Frequency” and “Symbol
Rate” for this new transponder. The parameters
of “TP Frequency” and “Symbol Rate” can be set
by number keys orǍVolume +/ Volume -ǎkeys to.
The available ranges are “3000~13000 MHz”
and “1000~45000Ks/s”.
When you press keyǍ2ǎ, it will show a
warning message for reminding whether you will
delete the current transponder or not. If you
select “Yes”, the current transponder will be
deleted, and the total account of transponders will
be reduced by 1 .
3For the existing transponder, you can also use
number keys orǍVolume +/ Volume -ǎkeys to
modify the parameters of “TP Frequency” and
“Symbol Rate”.
4“Polarity” and “Scan Mode” are used for setting
scanning conditions, you can pressǍVolume +/
14

Basic Operations
Volume -ǎkeys to select different modes. “Polarity”
means you want to scan this TP in horizontal
mode or vertical mode. “Scan Mode” means you
want to scan all channels or free channels.
5When you complete your modification, move
highlight to “Search” item and pressǍOKǎkey, and
it will start scanning. The scanning screen is like
below:
6In the “TP Scan” item, press keyǍExitǎto exit the
scanning with saving the current parameters.
4.4 Preset Scan
Basically, the setting of “Present Scan” is as same as
“Auto Scan”, but there is one different point: in Auto
Scan mode, system can scan all channels of the
satellite, but in Preset Scan mode, system can only
scan the channels that have already been set in the
unit.
15

Basic Operations
5. System Setup
How to enter “system setup" menu:
Press keyǍVolume +/Volume -ǎto select "system setup”
from menu pages of “Channel”, "Installation” , “System
setup” and “Tools”.
When you enter “System Setup” menu, you will see the
screen like below:
In “System Setup” menu:
1PressǍChannel Up/Channel Downǎkeys to select
menu items among Language, TV System,
Channel setup, Time & setting, OSD Setting,
Parental Lock and LNB Power.
2Press keyǍOKǎto enter the selected item.
5.1 Language
When you enter “Language” menu, you will see the
screen like below:
1Language: pressǍVolume +/ Volume -ǎkeys to
select languages. The selected languages
include: English, French, German, Russian,
Arabic, Portuguese, Turkish, Spanish, Polish and
Italian.
2First Audio: Some channels have more than one
audio language for selection; by this function you
can set the first audio for this channel. If the
playing channel has the same audio as the “First
Audio” you set, system will play this audio
language as default. Otherwise, the system will
automatically compare with second audio
language. The selections of audio languages
include: English, French, German, Russian,
Arabic, Portuguese, Turkish, Spanish, Polish and
Italian.
3Second Audio: If the channel has no
corresponding audio with “Second Audio” instead
of “First Audio”, system will play the second audio
language as default. If no audio languages
correspond with the “Second Audio”, the default
language of current channel will be played
automatically. The selections of audio languages
include: English, French, German, Russian,
Arabic, Portuguese, Turkish, Spanish, Polish and
Italian.
4Press keyǍExitǎto exit out of “Language”
menu.
5.2 TV System
When you enter “TV System” menu, you will see the
screen like below:
1Display Mode is used for switching the
screen-displaying mode. Now we provide options
below: Auto / PAL-M / PAL-BG / NTSC. You can
pressǍVolume +/ Volume -ǎkey to select each
mode .
2Aspect Mode is used for switching the screen
aspect ratio mode. Now we provide options below:
16

Basic Operations
4:3 PS / 4:3 LB / 16:9. You can press Volume +/
Volume - key to select each mode .
4Press Exit key to exit “TV System”
menu.
5.3 Channel Setup
When you enter “Channel Setup” menu, you will see a
screen like below:
1Startup Channel: Press key OK to enter “Startup
Channel” menu, and you will see the screen like
below:
If the setting of “Boot on Channel” is “On”, it
means the following two items can work. If the
setting is “Off”, it means the function can’t work.
In the “Mode” item, you can set the “Startup
Channel” as “TV channel” mode or “Radio
channel” mode.
In “Startup Channel” menu, you can press key
OK to open the channel list, and select the
channel that you want to start, then press key
OK again to confirm.
Channel Play type: Press key OK to enter “Channel
Play Type” menu, and you can select the “playing
channels” as “Free”, “Scrambled” or “All”.
For Example: If you select “Free”, in full screen
play, all scrambled channels will be skipped when
you change channels by using Channel
up/Channel Down key.
2Press Exit to exit out of “Channel Setup”
menu.
5.4 Time & Timer Setting
When you enter “Time & Timer Setting” menu, you will
see “Time” and “Timer” items.
1Time: When you select “Time” and press key OK
to enter the menu, you will see the screen like
below:
GMT Usage: This item is used for opening
GMT. You can press Volume + / Volume - keys
to switch “On/Off”.
The “GMT Offset” item is valid only when the
setting of “GMT Usage” is “Yes”. You can press
Volume +/ Volume - keys to switch “GMT
Offset” value, and the range is “-12:00 ~
+12:00”, increasing each half hour
progressively.
“Date” and “Time” items are valid only when the
setting of “GMT Usage” is “No”. You can press
Volume + / Volume - keys to move highlight
and use number keys to input directly.
If the current channel provides the correct time,
you will see it while you enter “Time” menu. If
not, you have to input the date and time
manually.
3
Video Output is used to switch video output modes.
We provide the options below: CVBS and S-Video.
Selecting [CVBS] will only have CVBS output from
the video output.Selecting [S-Video] will have both
CVBS and S-Video outputs.You can press [Volume+/
Volume-] key to select each mode circularly.
17

Basic Operations
Press key όExitύto exit out of “Time”
menu.
2Timer Setting: Select “Timer” item and press key
ǍOKǎto enter “Timer” menu.
Current time will be displayed on the first
column; if it is incorrect, please modify the time
in “Time” item.
Timer Number: You can pressόVolume + /
Volume -ύkeys to set Timer number, and there
are 8 timers totally.
Timer Mode: There are several modes for
setting Timer, including Off, Once, Daily,
Weekly, Monthly and Yearly.
Timer Service: There are two options for “Timer
Service”, including Channel (timer setting for
channel change and Wakeup/Sleep) and
Message (reminding message).
When you select “Channel” (timer setting for
channel change and Wakeup/Sleep) option in
“Timer Service”, the screen will display like
below:
Wakeup Channel: press keyόOKύto enter
channel list and select channel that you
want to set.
Wakeup Date: use number keys to input
your wakeup date.
On Time: use number keys to input your
wakeup time. Once the time’s up, no matter
what the system is in standby or playing
mode, the system will automatically switch
to the channel you select and start to play.
Duration: After you set a time for “Duration”
item, once the time’s up, the system will
automatically switch to standby mode. If
you don’t want to make this function work,
set the duration as 00:00.
When you select “Message” (reminding
message) option in “Timer Service”, the screen
will display like below:
Wakeup Message: pressόVolume + /
Volume -ύkeys to select reminding
message as Birthday, Anniversary and
General.
Wakeup Date, you can use number key to
input your wakeup date.
On Time: use number keys to input your
wakeup time. Once the time’s up, no matter
what the system is in standby or playing
mode, the system will automatically pop a
reminding message.
The message will always be displayed on
the screen, you can press keyόExitύto
close it.
PressόExitύkey to exit out of “Timer”
menu.
5.5 OSD Setting
When you enter “OSD Setting” menu, you will see a
screen like below:
18

Basic Operations
1Menu Style: offers five different colors;
you can pressǍVolume +/Volume -ǎkeys to select
your favorite style.
2Subtitle Display: You can pressǍVolume +/Volume
-ǎkeys to select “On” or “Off”. If the current
channel has subtitle information, it will show
up while this function is “On”. If this function is
“Off”, no subtitle information will be shown.
3OSD Timeout: When you switch channels in full
screen, it will show inf ormation about
current channel on the bottom of the screen. In
regards to the duration of this information
showing up on the screen, you can pressǍVolume
+/Volume -ǎkeys to set the time. The range of the
duration is “1 second ~ 10seconds”.
4OSD Transparency: Besides the setting of “OSD
Menu Style”, you can also set the transparency of
OSD. You can pressǍVolume +/Volume -ǎkeys to
select the values. There are 5 levels of
transparency: 10%, 20%, 30%, and 40% and “NO”
(means no transparency function).
5Load OSD Setting Default: If you are not satisfied
with your setting, you can move highlight to this
item and press keyǍOKǎto reset parameters as
default value.
6Press keyǍExitǎto exit out of the “OSD
Setting” menu.
5.6 Parental Lock
You can set a password in the "Installation"
menu, and you can also set the
p assword for the locked channels. (Please refer to
LOCK to see how to set the locked channel) It will
show you how to set and revise the password.
1In “Parental Lock” function, press keyǍOKǎ, it
will show adialogue for you to input the password.
When you input the correct password, you will see
a screen like below:
2Menu Lock determines whether users have to
input password or not when they want to enter
“Installation” menu. If the setting of “Menu Lock” is
“Yes”, it means users have to key in password.
“No” means unlock.
3Channel Lock determines whether users have to
input the password or not when they wish to play
the locked channels. If the setting is “Yes”, play
the channels with lock mark will show a
dialogue on the screen and ask for the password.
If the setting of “Channel Lock ”is “No”, that means
the function of locking will be invalid.
4New Password is used for revising password; you
can input the new password in this item by using
number keys directly. After you fill in 4 digital
numbers, the highlight will automatically skip to
confirm password and ask you to input the new
password again. If the password is correct, the
screen will show a message of “Saving Data,
Please Wait…”. After saving and exiting
back to “System Setup” menu, the revised password
is complete.
19
Table of contents
Other Traxis Receiver manuals


