Tre Spade DCT1001 User manual
FACEM SpA - via Fabbriche - 11/C - 10141 Torino - Italy
tel. +39 011337119 /3858495 - fax. +39 011334889
Berendezés
Droger
Tørkemaskin
Tork
Kurutucu
Használati Útmutató
Gebruiksaanwijzing
Bruksanvisning
Bruksanvisning
Kullanma Tali
matlar
Manuale di istruzione
Instruction for use
Mode d’emploi
Gebrauchsanleitung
Manual de instrucciones
Εγχειριδιο Οδηγιων
Essiccatore
Dehydrator
Sechoir
Dörrgerät
Secador
Ξηραντηρας

CONDIZIONI DI GARANZIA
Consultate le condizioni generali di garanzia dei prodo Tre Spade su www.trespade.it
Sul nostro sito avete inoltre la possibilità di registrare on line i da del vostro prodoo e del vostro acqui-
sto: visitate trespade.it e scoprite tu i vantaggi!
WARRANTY CONDITIONS
Read the general warranty condions for Tre Spade products on www.trespade.it
On our website you can register your product and purchase data:
access trespade.it and discover all the advantages!
CONDITIONS DE GARANTIE
Consultez les condions générales de garane des produits Tre Spade sur www.trespade.it
Sur notre site, vous avez par ailleurs la possibilité d’enregistrer en ligne les données de votre produit et de
votre achat : visitez trespade.it et découvrez tous les avantages !
GARANTIEBEDINGUNGEN
Konsuleren Sie die allgemeinen Garanebedingungen der Produkte von Tre Spade auf www.trespade.it
Auf unserer Webseite haben Sie auch die Möglichkeit, online die Daten Ihres Produkts und Ihres Kaufs zu
registrieren: Besuchen Sie trespade.it und entdecken Sie alle Vorteile!
CONDICIONES DE LA GARANTÍA
Consulte las condiciones generales de la garana de los productos Tre Spade enwww.trespade.it
Además, en nuestro sio web ene la posibilidad de registrar en línea los datos de su producto y de su
compra: ¡visite trespade.it y descubra todas las ventajas!
ΟΡΟΙ ΕΓΓΥΗΣΗΣ
Συμβουλευτείτε τους γενικούς όρους εγγύησης των προϊόντων Tre Spade στο www.trespade.it
Στην ιστοσελίδα μας, θα έχετε επίσης τη δυνατότητα να κάνετε εγγραφή των στοιχείων του προϊόντος
και της αγοράς σας on line: επισκεφτείτε το trespade.it και ανακαλύψτε όλα τα πλεονεκτήματα!
GARANCIÁLIS FELTÉTELEK
A Tre Spade termékekre vonatkozó garanciális feltételeket az alábbi linken olvashatják www.trespade.it
Honlapunkon ezen kívül lehetőségük van az önök által vásárolt termék és a vásárlás adatainak re-
gisztrálására: látogassanak el a trespade.it oldalra és fedezzék fel az előnyöket!
GARANTIEVOORWAARDEN
Raadpleeg de algemene garanevoorwaarden van de producten Tre Spade op de website www.trespade.it
Op onze website kunt u tevens de gegevens van uw product en aankoop registreren: bezoek trespade.it
en ontdek alle voordelen!
GARANTIBETINGELSER
Se i de generelle garanvilkårene l Tre Spade su på www.trespade.it
På nestedet vårt har du også muligheten l å registrere produktet di online: gå l trespade.it og oppdag
fordelene!
GARANTIVILLKOR
Konsultera de allmänna garanvillkoren för Tre Spade produkterna på www.trespade.it
På vår hemsida har du dessutom möjligheten a registrera uppgierna för din produkt och di inköp:
besök trespade.it och upptäck alla fördelarna!
GARANTİ KOŞULLARI
Tre Spade ürünlerinin genel garan koşulları için www.trespade.it adresine başvurun.
Sitemizde ayrıca ürününüzün ve aldıklarınızın çevrimiçi kaydını yaprabilirsiniz: trespade.it adresini ziya-
ret edin ve tüm avantajları keşfedin!

1Made in Italy
LANGUAGE Page
ITALIANO ........................................................... 2
ENGLISH .......................................................... 11
FRANÇAIS ........................................................ 19
DEUTSCH ......................................................... 28
ESPAÑOL .......................................................... 37
ΕΛΛΗΝΙΚΗ ....................................................... 46
MAGYAR .......................................................... 55
NEDERLANDS ................................................... 64
NORSK ............................................................. 73
SVENSKA ......................................................... 81
TÜRK ............................................................... 90

2Made in Italy
ATTENZIONE: REQUISITI PER LA SICUREZZA
• La macchina deve essere ulizzata da un solo operatore poiché
essa non è concepita per un uso in simultaneità da parte di più
persone.
• Ulizzare la macchina solo per lo scopo per il quale è stata pro-
geata.
• Ulizzi diversi dall’essiccazione, oltre a far decadere il dirio di
garanzia (leggere le condizioni indicate nel cercato di garanzia
allegato ad ogni macchina), possono determinare l’insorgere di
condizioni non sicure. Ogni altro uso è da considerarsi improprio
e quindi pericoloso. Il costruore non può essere considerato re-
sponsabile per eventuali danni deriva da usi impropri, erronei
ed irragionevoli.
• Dopo aver tolto l’imballaggio, assicurarsi dell’integrità dell’appa-
recchio.
- In caso di dubbio, non ulizzare l’apparecchio e rivolgersi al
rivenditore.
- Gli elemen dell’imballo non devono essere lascia alla porta-
ta dei bambini, in quanto potenziali fon di pericolo.
• Controllare bene, prima di iniziare ogni lavorazione, che non vi
siano corpi estranei nel tubo di essiccazione e sui vassoi in esso
contenu, e che gli stessi siano sta accuratamente lava.
• Controllare che la tensione e la frequenza di rete corrispondano
a quelle indicate sulla targhea del gruppo motore e che la presa
sia altresì proporzionata alla corrente assorbita dalla macchina
(l’assorbimento è indicato sulla targhea).
• Non sovraccaricare la macchina e averne la massima cura.
• L’apparecchio non può essere ulizzato da bambini di età inferio-
re a 8 anni e da persone con ridoe capacità siche, sensoriali o
mentali.
• L’apparecchio non può essere ulizzato da persone prive di espe-
rienza o della necessaria conoscenza, se non soo sorveglianza
oppure dopo che le stesse abbiano ricevuto istruzioni relave

3Made in Italy
all’uso sicuro dell’apparecchio e alla comprensione dei pericoli
ad esso ineren.
• Mantenere l’apparecchio e il cavo fuori dalla portata dei bambini.
• I bambini non devono giocare con l’apparecchio.
• Mantenere ordine e igiene nel locale di lavoro.
• La pulizia e la manutenzione desnata ad essere eeuata dall’u-
lizzatore non deve essere eeuata da bambini.
• Qualsiasi po di operazione, sia essa di pulizia o manutenzione,
deve essere sempre eseguita con la macchina ferma, cioè con
l’interruore sulla posizione (O) e la spina del cavo di alimenta-
zione staccata dalla presa di corrente, onde evitare ogni possibile
avviamento involontario in fase diversa da quella di lavoro.
• Non immergere mai il gruppo motore nell’acqua ed evitare di
lavarlo con idropulitrici o soo ge d’acqua: è un apparecchio
elerico!
• La presa di corrente a cui viene connesso l’apparecchio deve
essere obbligatoriamente collegata a terra e il relavo impian-
to elerico deve essere munito di interruore magnetotermico
(impianto salvavita bipolare).
• Non introdurre corpi estranei all’interno del gruppo motore,
nemmeno a cavo scollegato: si potrebbe danneggiare irrepara-
bilmente la macchina e diventare ragione di pericolo per l’uliz-
zatore.
• In caso di danneggiamento del cavo di alimentazione o di altre
par eleriche, ogni intervento deve essere eseguito esclusiva-
mente dal Produore araverso il suo Servizio di Assistenza o da
personale specializzato, informato sui rischi derivan da inter-
ven su prodo con alimentazione elerica.
• Non introdurre ogge all’interno del gruppo motore.
• L’uso di qualsiasi apparecchio elerico richiede l’osservanza di al-
cune regole fondamentali, in parcolare:
- NON TOCCARE IL GRUPPO MOTORE CON MANI BAGNATE O UMIDE
- NON LASCIARE L’APPARECCHIO ESPOSTO AD AGENTI ATMOSFERICI

4Made in Italy
- NON TIRARE IL CAVO DI ALIMENTAZIONE O L’APPARECCHIO
STESSO PER STACCARE LA SPINA DALLA PRESA
• Non usare l’apparecchio nelle immediate vicinanze di vasche da
bagno, docce, lavandini, piscine o altre sorgen d’acqua.
• Mantenere l’apparecchio ad una distanza di almeno 50 cm da
ogge o sostanze facilmente inammabili.
• Per qualsiasi intervento sulle par eleriche, rivolgersi al rivendi-
tore.
• Ulizzare esclusivamente pezzi di ricambio, accessori e cavo di
alimentazione originali del produore.
• Si avverte che ogni uso improprio o comunque diverso dall’essic-
cazione, oltre a far decadere il dirio di garanzia, può recare dan-
no ai componen con conseguente impossibilità di svolgimento
della funzione cui è desnato l’apparecchio oppure generare po-
tenziali condizioni di rischio per l’ulizzatore.
• Il produore non si riene responsabile per incomplete o errate
traduzioni in altra lingua di queste istruzioni.
Denizione di “apparecchi per ambiente domesco”: si traa de-
gli elerodomesci per i comuni lavori di casa, ulizza di solito
in contesto domesco, che possono essere ulizza anche da non
esper per lavori “domesci” usuali, in luoghi come:
- negozi, uci e altri ambien di lavoro del genere;
- aziende agricole;
- dai clien in hotel, motel e altri ambien residenziali;
- in ambien come bed & breakfast.
ATTENZIONE: Per evitare rischi dovu alla reimpostazione non au-
torizzata della protezione termica di arresto, il presente elerodo-
mesco non deve essere alimentato tramite disposivi di commu-
tazione esterni, come temporizzatori, o collegato a un circuito che
è regolarmente acceso e spento dal fornitore del servizio.
5Made in Italy
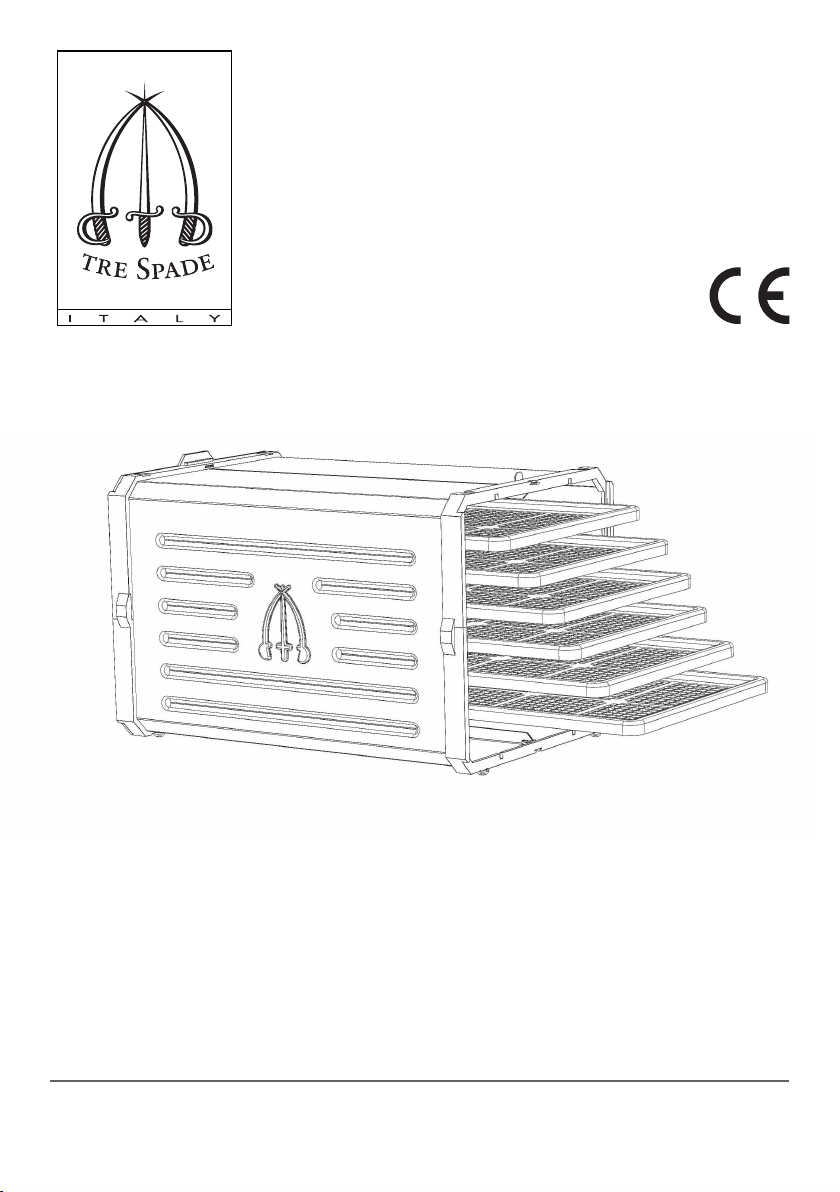
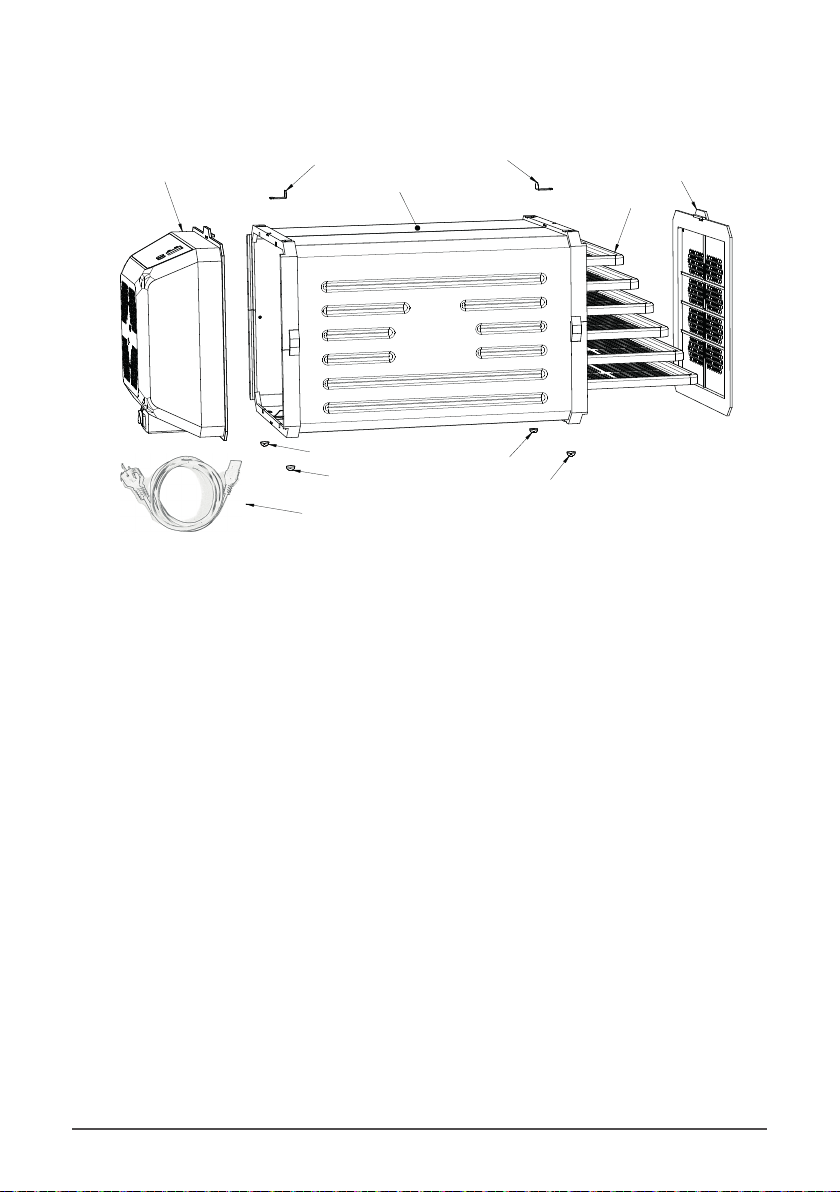
DESCRIZIONE
DELL’APPARECCHIO
L’essiccatore è composto da:
1. un tunnel a sezione quadrata nel quale vengono
colloca i vassoi di essiccazione, inseri sulle
guide di scorrimento;
2. un gruppo motore, internamente al quale sono
applicate un’eleroventola, che spinge l’aria
araverso i vassoi nel tunnel, e una resistenza
elerica, che consente di accelerare il processo
di essiccazione e renderlo sicuro anche di
noe e nei periodi di bassa temperatura e di
elevata umidità atmosferica (in parcolare con
prodo molto acquosi o nella fase che precede
la raccolta del prodoo essiccato). Facendo
scorrere verso l’alto il gruppo motore, lo stesso
può essere scollegato dalla macchina, dopo
averlo liberato dalla linguea di sicurezza a
scorrimento. Questa operazione è da svolgere
SOLO a macchina spenta e scollegata dalla rete
elerica.
3. uno sportello di ispezione per chiudere la
seconda apertura del tunnel. Lo sportello è
dotato di piccoli fori per consenre il passaggio
dell’aria. Lo sportello, se fao scorrere verso
l’alto lungo le guide, permee di accedere al
tunnel di essiccazione per vericare il grado di
essiccatura degli alimen in lavorazione ed ha
lo stesso disposivo di blocco presente sul lato
motore.
4. sei vassoi fora per la collocazione del materia-
le da essiccare, da inserire all’interno del tunnel
ulizzando le guide di scorrimento; il materiale
di costruzione dei vassoi è variabile in conformi-
tà al modello di essiccatore acquistato.
6. Sulla parte superiore dell’essiccatore sono
presen due alee di sicurezza scorrevoli, che
garanscono il ssaggio di sportello e gruppo
motore. Il ssaggio di sportello e gruppo motore
è ule durante la manipolazione della macchina
per impedirne la fuoriuscita dalla guida e quindi
un possibile danneggiamento.
DIMENSIONI E SPECIFICHE:
Versioni PRO e PRO DELUXE:
La sezione massima esterna è cm 27x27; l’interno
del tunnel ha sezione di cm 25x25, mentre la lun-
ghezza è di cm 50.
1
23
66
7
7
7
7
5
4

6Made in Italy
I vassoi misurano ciascuno cm 25x36.
La resistenza assorbe 500 wa e l’accensione è re-
golata eleronicamente con scheda.
Versione CUBE:
La sezione massima esterna è cm 27x27; l’interno
del tunnel ha sezione di cm 25x25, mentre la lun-
ghezza è di cm 35.
I vassoi misurano ciascuno cm 25x18.
La resistenza assorbe 500 wa e l’accensione è re-
golata tramite termostato manuale.
COLLOCAZIONE
DELL’ESSICCATORE:
Come ogni apparecchiatura elerica, il gruppo
motore non deve entrare a contao direo con
acqua o fon di vapore. L’essiccatore deve pertan-
to essere collocato a dovuta distanza da rubine,
lavelli, vasche, piscine ed al riparo dalla pioggia o
da qualsiasi spruzzo d’acqua.
Durante il funzionamento, l’essiccatore espelle
umidità che non deve ristagnare nell’ambiente cir-
costante per non rallentare o impedire l’essicca-
zione. E’ quindi opportuno collocarlo in una stanza
sucientemente ampia o comunque non erme-
camente chiusa.
Evitare ambien già umidi, quali lavanderie, can-
ne ecc.
Non avvicinare a pare od ostruzioni lo sportello
e il gruppo motore; lasciare almeno 25 cm di spa-
zio aorno a ques due elemen per permeere
una correa aspirazione di aria ed espulsione di
umidità.
PULIZIA E MANUTENZIONE:
Non sono richieste parcolari aenzioni. Per la
pulizia si raccomanda comunque di non ulizzare
panni abrasivi o arezzi che ne possano compro-
meere l’aspeo esteco, né solven sulle par
in plasca e sulla carrozzeria verniciata.
Si consiglia l’ulizzo di un panno lievemente inu-
midito con acqua e detergente neutro. Controlla-
re periodicamente che la griglia di aspirazione sia
libera da eventuali lacci e lanugine, che possono
compromeere la normale circolazione d’aria. In
caso di ostruzione, rimuovere con un semplice sof-
o d’aria.
I vassoi possono essere lava con acqua calda e
detersivo, sia a mano che in lavastoviglie.
Importante
- per qualsiasi operazione disinserire il cavo di
alimentazione dalla presa di corrente.
- eeuare un lavaggio completo di tunnel e
vassoi prima del primo ulizzo;
- non rimuovere in nessun caso la protezione
delle par eleriche nel gruppo motore;
- non usare acqua direamente sull’apparecchio
o nelle sue immediate vicinanze;
- non immergere in acqua il gruppo motore;
MODALITA’ DI UTILIZZO
Versione CUBE:
ENTFERNEN DER
SICHERHEITSVORRICHTUNGEN
STRENGSTENS
VERBOTEN
N. 91.001.065
IM BRANDFALL
KEIN WASSER AUF
ELEKTROANLAGEN
DIE UNTER STROM STEHEN
N. 91.001.066
REINIGEN UND/ODER
SCHMIEREN BEI
MASCHINENBETRIEB
STRENGSTENS VERBOTEN
N. 91.001.068
Fig. 1
Portando l’interruore generale in posizione (I)
si alimenta l’essiccatore. La ventola inizierà così a
ruotare al suo regime di giri massimo. Agendo a
questo punto sulla manopola di regolazione (g.1)
si varierà a piacimento la temperatura di esercizio
in una scala che va da 30°C a 68°C. La manopola di
regolazione permee di regolare la temperatura
del usso d’aria operando direamente sul ter-
mostato di regolazione. Durante la fase di lavoro
si senrà un “click” ogni volta che sarà raggiunto
il regime termico impostato tramite il termostato
stesso.

7Made in Italy
Per denire il grado di essiccazione omale è
possibile accedere ai vassoi tramite lo sportello
di ispezione posto sulla parte posteriore dell’ap-
parecchio.
Il ciclo di funzionamento è da arrestare al raggiun-
gimento del grado di essiccazione desiderato.
ATTENZIONE
NON SPEGNERE MAI L’ESSICCATORE
STACCANDO LA SPINA.
RIMUOVERE LA SPINA DALLA PRESA
SOLO A MOTORE FERMO E CON IL PUL-
SANTE GENERALE IN POSIZIONE (O).
PRIMA DI ARRESTARE IL MOTORE CON
IL PULSANTE (I-O) E’ BUONA NORMA
LASCIARE RUOTARE LA VENTOLA PER
ALCUNI MINUTI PORTANDO LA MANO-
POLA DI REGOLAZIONE IN POSIZIONE 0.
Versione PRO e PRO DELUXE:
Interruore generale:
Per alimentare l’essiccatore prima di iniziare una
qualsiasi lavorazione, inserire la spina e portare
l’interruore generale sulla posizione (I). L’es-
siccatore si accende disponendosi in modalità di
stand-by e sul display si visualizza la scria (On).
Portando l’interruore in posizione (O) si toglie
alimentazione elerica alla scheda eleronica.
ATTENZIONE
NON SPEGNERE MAI L’ESSICCATORE
STACCANDO LA SPINA.
RIMUOVERE LA SPINA DALLA PRESA
SOLO A MOTORE FERMO E CON IL PUL-
SANTE GENERALE IN POSIZIONE (O).
Pulsante :
In condizione di stand-by (sul display si legge la
scria On), premere ripetutamente il pulsante
no a visualizzare sullo schermo il numero di
programma (vedi tabella 1) che si desidera impo-
stare (in questa condizione i led lampeggeranno
entrambi).
Pulsante :
Avvia e sospende il ciclo di essiccazione. Per ri-
prendere il processo una volta arrestato (PAUSA),
è suciente premere nuovamente il pulsante .
Il programma riparrà da dove si era interroo.
Se si desidera researe il programma in funzione,
tenere premuto per 3 sec no a visualizzare
sullo schermo la scria (On). Quest’operazione
azzera il ciclo di essiccazione precedentemente
impostato e riporta l’essiccatore in condizione di
stand-by.
ATTENZIONE
Se l’essiccatore è reseato a temperatura di eser-
cizio superiore ai 40°C, la scheda eleronica in-
terromperà il ciclo di lavorazione, ma la ventola
resterà in azione a massima velocità no ad abbas-
sare la temperatura del motore portandola a 40°C
ed evitare così che venga danneggiato. Durante
questa operazione entrambi i led lampeggeranno.
Display e spie luminose:
Durante il processo di essiccazione, lo schermo
mostra alternavamente la temperatura di eserci-
zio rilevata al momento (spia luminosa accesa),
il tempo residuo al termine del programma di es-
siccazione (spia luminosa accesa) e il program-
ma aualmente in uso (spie luminose spente). Il
tempo residuo è espresso in ore no al raggiungi-
ENTFERNEN DER
SICHERHEITSVORRICHTUNGEN
STRENGSTENS
VERBOTEN
N. 91.001.065
IM BRANDFALL
KEIN WASSER AUF
ELEKTROANLAGEN
DIE UNTER STROM STEHEN
N. 91.001.066
REINIGEN UND/ODER
SCHMIEREN BEI
MASCHINENBETRIEB
STRENGSTENS VERBOTEN
N. 91.001.068
ENTFERNEN DER
SICHERHEITSVORRICHTUNGEN
STRENGSTENS
VERBOTEN
N. 91.001.065
IM BRANDFALL
KEIN WASSER AUF
ELEKTROANLAGEN
DIE UNTER STROM STEHEN
N. 91.001.066
REINIGEN UND/ODER
SCHMIEREN BEI
MASCHINENBETRIEB
STRENGSTENS VERBOTEN
N. 91.001.068
ENTFERNEN DER
SICHERHEITSVORRICHTUNGEN
STRENGSTENS
VERBOTEN
N. 91.001.065
IM BRANDFALL
KEIN WASSER AUF
ELEKTROANLAGEN
DIE UNTER STROM STEHEN
N. 91.001.066
REINIGEN UND/ODER
SCHMIEREN BEI
MASCHINENBETRIEB
STRENGSTENS VERBOTEN
N. 91.001.068
Fig. 2

8Made in Italy
mento dell’ulma ora; successivamente verranno
visualizza i minu rimanen (questa funzione è
riconoscibile sul display dal punto illuminato dopo
il valore).
Programmi:
L’essiccatore è dotato di un sistema eleronico di
controllo, che garansce un’oerta di programmi
completa, semplice ed ecace, adaa ad ogni po
di ulizzo e di prodoo. I programmi sono proget-
ta tenendo conto di tue le variabili in gioco nel
processo di essiccazione e in parcolare si die-
renziano per temperatura, durata e velocità del
usso d’aria.
Tu i programmi automaci descri di seguito
riportano la durata in ore e prevedono una fase di
mantenimento nale che permee di conservare
i prodo al livello di essiccazione omale con il
minimo consumo di energia. Una volta che il pro-
cesso di essiccazione è completato l’apparecchio
conserva quindi il prodoo al livello di umidità
raggiunto e ne impedisce la reidratazione no al
prelievo del prodoo.
PROGRAMMA Display Ore T°C
EVO (personalizzato) P1 1-72 20-68
AUTO A1 30 55
THIN A2 18 50
BIO A3 30 45
HOT A4 15 68
PASTA A5 20 40
ECO A6 30 45
DELAY H0 1-9 -
P1 – EVO
(programma a impostazione personalizzata):
è il programma per chi vuole impostare e control-
lare l’essiccazione in tu i suoi parametri.
Si possono impostare il tempo di essiccazione (1h
- 72h), la temperatura di esercizio (20°C - 68°C) e
la velocità di rotazione della ventola (cioè il usso
d’aria) (livelli 1 - 2 - 3 - 4).
Impostazione programma EVO:
• Premendo il tasto si ha accesso al program-
ma EVO. Sul display si visualizza P1 (i led sono
lampeggian).
• Premere il pulsante per accedere al campo di
scriura.
• Il led lampeggia e sul display compare la
temperatura (20°C). Premendo il pulsante si
visualizzeranno in sequenza tue le temperatu-
re impostabili.
• Una volta individuato il valore desiderato con-
fermare con il pulsante .
• Il led lampeggia e sul display compare la
dicitura (- -) . Premendo il pulsante si visua-
lizzeranno in sequenza tue le ore di lavoro
impostabili.
• Una volta individuato il valore desiderato con-
fermare con il pulsante .
• I led sono spen e sul display compare il valore
(L4). Premendo il pulsante si visualizzeranno
i 4 livelli di usso d’aria preimposta.
L4 - 2000 RPM
L3 - 1600 RPM
L2 - 1300 RPM
L1 - 900 RPM
• Una volta individuato il valore desiderato con-
fermare con il pulsante .
• A questo punto i led lampeggiano entrambi e
sul display si visualizza P1. L’essiccatore è pron-
to a parre con il ciclo di essiccazione appena
composto.
• Premendo il pulsante il ciclo di essiccazione
si avvierà con i parametri scel
I parametri del programma EVO imposta non
sono memorizzabili sulla scheda eleronica. Con-
sigliamo pertanto di appuntarli al fondo di questo
manuale nell’apposita sezione NOTE.
A1- AUTO: studiato per essiccare ogni po pro-
doo, è adao sia per chi essicca per la prima vol-
ta, sia per chi non è sicuro su quale programma
ulizzare. Durata 30h a una temperatura media di
55°C.
A2- THIN: il programma breve e con temperature
moderate. Adao per essiccare fru e verdure
tagliate in fee soli (max 5mm). È il programma

9Made in Italy
umidità e temperatura dell’ambiente di lavoro.
Qualche prova iniziale con gli alimen che trae-
rete più comunemente vi sarà suciente a deter-
minarne preparazione, programma e tempische
perfee.
H0- DELAY: questo programma permee di ritar-
dare l’avvio di qualunque programma di essicca-
zione. Il ritardo permee di sfruare le fasce ora-
rie in cui il consumo di energia elerica risulta più
economico.
Nel caso in cui si voglia ulizzare il ritardo di avvio,
è necessario impostare prima questa funzione e
successivamente il programma di lavoro prescelto.
Impostazione DELAY - AVVIO RITARDATO:
• Premere il tasto e scorrere il menu dei pro-
grammi no a visualizzare sul display la scria H0.
• Premere il pulsante per selezionarlo.
• Premendo ripetutamente il pulsante , sele-
zionare il numero di ore di ritardo nell’avvio del
ciclo, da H1 a H9 .
• Per confermare la scelta premere il pulsante .
• Il display visualizza il ritardo selezionato e il led
lampeggia.
• Scorrere con il pulsante i programmi di
lavoro e selezionare quello desiderato.
• Premere il pulsante per confermare il pro-
gramma scelto.
• L’essiccatore resterà in condizione di stand-by
per tuo il tempo di ritardo impostato, no
all’avvio del ciclo di lavoro selezionato. Durante
il tempo di ritardo rimane acceso il led e il
display visualizza alternavamente il ritardo ini-
ziale impostato, il tempo residuo alla partenza e
il programma che seguirà all’avvio.
Mantenimento:
Al termine di ogni ciclo (ad esclusione del program-
ma EVO) si ava la modalità di MANTENIMENTO.
La modalità mantenimento si inserisce automa-
camente restando ava no allo spegnimento
manuale dell’essiccatore, che potrete operare
nel momento in cui sarete pron a raccogliere e
conservare i vostri prodo. Il ciclo di manteni-
consigliato anche per chi ama essiccare i funghi.
Durata 18h a una temperatura massima di 50°C.
A3- BIO: il programma che salvaguarda le proprie-
tà organoleche e i valori nutrivi dei prodo
essicca. Adao per cucine biologiche, crudiste
o in generale per chi non desidera alimen co.
Durata 30h a una temperatura massima di 45°C.
A4- HOT: il programma che raggiunge la tempera-
tura più alta oenibile dall’essiccatore. Consiglia-
to per chi vuole accelerare i tempi di essiccazione.
Ulizzabile anche per la carne, per le meringhe o
per la biscoatura. Sconsigliato per prodo soli
o delica. Durata 15h a una temperatura massima
di 68°C.
A5- PASTA: il programma omizzato per essiccare
la pasta fresca. In base al po di pasta può varia-
re il tempo di essiccazione necessario; si consiglia
quindi di controllare periodicamente il prodoo e
arrestare il ciclo a risultato raggiunto. Durata 20h
a una temperatura media di 40°C.
A6- ECO: il programma che riduce al minimo il
consumo di energia grazie all’assorbimento mas-
simo di 270W. I tempi di essiccazione saranno
lievemente più lunghi, ma il risparmio energeco
sarà considerevole. Perfeo anche per situazioni
di disponibilità limitata di energia e per prodo
leggeri che, grazie alla velocità ridoa dell’aria,
non vengono sposta. Durata 30h a una tempe-
ratura di 45°C.
Ci sono altre variabili che inuiscono direamen-
te sul processo. Ad esempio, la permeabilità di un
fruo ne determina in modo sostanziale la tem-
pisca di essiccazione. Più sarà spessa la buccia,
meno rapidamente avremo il prodoo nito. Mol-
to importante è anche lo spessore delle fee e il
clima circostante la macchina: in un ambiente mol-
to umido l’essiccatore impiegherà maggior tempo
a essiccare uno stesso prodoo traato invece
che in ambiente molto secco.
E’ consigliabile un ciclo di essiccazione di prova
volto a vericare l’eeva essiccazione dei pro-
do a ne ciclo. Ogni prodoo può infa reagi-
re in modo dierente per dimensione, grado di

10 Made in Italy
mento ha una durata massima di 6 ore e prevede
un usso d’aria connuo e leggermente riscaldato
che permee di evitare una re-idratazione dell’a-
limento.
Durante il ciclo mantenimento sul display compa-
rirà la scria 00 lampeggiante.
Per researe il ciclo sarà necessario tenere pre-
muto il pulsante per 3 sec no a visualizzare
sullo schermo la scria (On).
Messaggi di errore:
In caso di errori o danneggiamen dell’essiccato-
re, la macchina si arresta totalmente e sul display
compare uno dei seguen valori:
• E1
• E2
• E3
• E4
• E5
In tu ques casi è necessario un intervento di
riparazione che deve essere eseguito esclusiva-
mente dal Produore araverso il suo Servizio di
Assistenza o da personale specializzato, informato
sui rischi derivan da interven su prodo con ali-
mentazione elerica.
Ulizzare esclusivamente par di ricambio, acces-
sori e cavo di alimentazione originali del produt-
tore.

11
English
Made in Italy
WARNING: SAFETY RECOMMENDATIONS
• Translaon from the original language
• The machine must be used only by a single operator; it is not
intended to be used by several persons simultaneously.
• Use the machine exclusively according to the use it has been de-
signed for.
• Uses other than for drying purposes, besides voiding your war-
ranty rights (read the condions indicated in the warranty cer-
cate aached to each machine), can generate unsafe operaon
condions. Any other use is considered improper and therefore
dangerous. The manufacturer cannot be held liable for any da-
mage resulng from improper, wrong and unreasonable use.
• Check the integrity of the appliance aer having removed the
packaging.
- In case of doubt, do not use the appliance and contact your dealer.
- The elements of the packaging must not be le at children’s
reach, as they represent a potenal source of hazard.
• Prior to operang the appliance, make sure there are no foreign
bodies in the drying tube and on the drawers, and that the later
have been thoroughly washed.
• Ensure the network voltage and frequency values match those
indicated on the motor idencaon plate; make sure the socket
suits the machine current absorpon (indicated on the idenca-
on plate).
• Do not overload the appliance; use it with care.
• The appliance cannot be used by children under the age of 8 and
by persons with reduced physical, sensory or mental capabilies.
• The appliance cannot be used by people having no experse or
the necessary knowledge unless surveyed or aer having recei-
ved the instrucons on how to safely use the machine and which
are the hazards implied.
• Keep the appliance and its cable out of children reach.
• Children must not play with the appliance.

12 Made in Italy
English
• Keep the working place in order and clean.
• Cleaning and maintenance intended to be performed by the user
must not be carried out by children.
• Any type of operaon, be it cleaning or maintenance, must
always be carried out with the machine switch o, i.e. with the
switch in the posion (O), and the power cable unplugged from
the power socket so as to avoid any possible unintenonal star-
ng during other phases than normal operaon.
• Never immerse the motor unit in water; do not wash it with
high-pressure washers or under water jets: it is an electrical
appliance!
• The socket to which the appliance is to be plugged must be con-
nected to the earthing; the electrical system must be equipped
with magneto - thermal circuit breaker (bipolar circuit breaker
plant).
• Do not insert foreign bodies in the motor unit, not even if the
cable is unplugged: the appliance could get irreparably damaged
and become a source of danger to the user.
• In the event of damage to the power cable or other electrical
parts, all intervenons must be carried out exclusively by the
manufacturer through his Technical Assistance Service or by spe-
cialized personnel informed on the risks arising from operaons
on powered products.
• Do not insert objects inside the motor unit.
• The use of any electrical appliance requires observing of certain
basic rules such as:
- DO NOT TOUCH THE MOTOR UNIT WITH WET HANDS
- DO NOT EXPOSE THE APPLIANCE TO ATMOSPHERIC AGENTS
- DO NOT PULL THE POWER CABLE OR THE APPLIANCE TO UNPLUG IT
• Do not use the appliance near taps, sinks and basins, pools or
other water sources.
• Keep the appliance at least 50 cm from easily ammable objects
or substances.

13
English
Made in Italy
• Contact your dealer for any intervenon on the electrical parts.
• Use exclusively original spare parts, accessories and power ca-
bles.
• Be reminded that any improper use or dierent drying, in addi-
on to voiding the warranty, can cause damage to the compo-
nents and consequent impossibility to perform the funcon for
which the appliance is intended or generate potenal risks for
the user.
• The manufacturer is not liable for incomplete or incorrect tran-
slaons into another language of these instrucons.
• Denion of “appliances for household environment”: these are
appliances for typical housekeeping funcons, normally used in
the household environment, that may also be used by non ex-
perts for typical “domesc” acvies, in locaons such as:
- shops, oces and other similar working environments;
- farm houses;
- by clients in hotels, motels and other residenal type environments;
- bed and breakfast type environments.
CAUTION: In order to avoid a hazard due to inadvertent reseng
of the thermal cut-out, this appliance must not be supplied throu-
gh an external switching device, such as a mer, or connected to a
circuit that is regularly switched on and o by the ulity.
MODEL
MODEL NO.
ELECTRICAL RATING
ATACAMA PRO DELUXE
F77000/DL/UK
220-240 V ; 50/60 Hz ; 0,50 kW ; Funcon Rate S1
ATACAMA CUBE
F77000/CU/UK
220-240 V ; 50/60 Hz ; 0,50 kW ; Funcon Rate S1
14 Made in Italy
English
DESCRIPTION
OF THE APPLIANCE
The dehydrator consists of:
1. a square secon tunnel containing the drying
drawers ed on sliding guides;
2. a motor unit, equipped with an electric fan
which draws air inside the tunnel through the
drawers, and a heang resistance, which allows
accelerang the drying process and makes it
safe during the night and during low tempera-
ture and high atmospheric humidity periods (in
parcular with high water content products or
in phases preceding the withdrawal of the dried
product). The motor unit can be disconnected
from the machine by sliding it upwards aer
being released from the safe sliding tab. This
operaon is to be carried out only with the
machine switched o and disconnected from
the mains.
3. an inspecon hatch that closes the second
opening of the tunnel. The hatch is provided
with small holes to allow air passage. If slid
upwards along the guides, the hatch allows ac-
cess to the drying tunnel to check the degree of
drying of the food being processed and has the
same
locking device type provided on the motor side.
4. six perforated drawers on which the material
to be dried is placed; they have to be inserted
inside the tunnel on the sliding guides; the
drawers construcon material varies according
to the dehydrator version.
6. On the dehydrator top are provided two safe
sliding tabs, which ensure the fastening of the
hatch and the motor unit. The hatch and motor
unit fastening ensure safe handling of the appli-
ance since they prevent it from geng released
from the guide and suer damages.
DIMENSIONS
AND SPECIFICATIONS:
PRO and PRO DELUXE Versions:
The maximum outer secon is cm 27x27; the inside
of the tunnel has cm 25x25 secon, and the length
is 50 cm.
The drawers measure cm 25x36 each.
The heang resistance absorbs 500 was and the
switching on is electronically adjusted by the board.
1
23
66
7
7
7
7
5
4

15
English
Made in Italy
CUBE Version:
The maximum outer secon is cm 27x27; the in-
side of the tunnel has cm 25x25 secon, and the
length is 35 cm.
The drawers measure cm 25x18 each.
The heang resistance absorbs 500 was and the
switching on is adjusted by a manual thermostat.
POSITIONING
THE DEHYDRATOR:
As for any electrical apparatus, the motor unit
must not come into direct contact with water or
vapour sources. The dehydrator must therefore
be placed at due distance from taps, sinks and
basins, pools and sheltered from rain or from pos-
sible water splashes.
During operaon the dehydrator releases mois-
ture which must not stagnate in the surrounding
environment so as not to slow down or prevent
the drying process. It is therefore recommended
to place it in a spacious room or, however, in a
room which is not sealed from the outside envi-
ronment.
Avoid moist environments such as laundries, cel-
lars etc.
Do not posion the hatch or motor unit toward
walls or obstrucons; leave at least 25 cm space
around these two components so as to allow prop-
er air and moisture sucon.
CLEANING
AND MAINTENANCE:
No parcular aenon is required. To clean the
dehydrator avoid using abrasive cloths or tools
that might impair the appearance; do not use sol-
vents on the plasc and painted parts.
It is recommended to use a cloth slightly damp-
ened with water and neutral detergent. Check on
regular basis the sucon grid and make sure is free
from any laments and u, which could compro-
mise the normal air circulaon. If clogged, remove
it using an air jet.
The drawers can be washed with hot water and
detergent, either by hand or in the dishwasher.
Important
- always unplug the power cable from the power
socket in view of any intervenon.
- perform a complete washing of the tunnel and
the drawers prior to the rst use;
- never remove the protecon of electrical parts
in the motor unit;
- do not use water directly on the appliance or
near it;
- do not immerse the motor unit in water;
HOW TO USE
THE APPLIANCE
CUBE Version:
ENTFERNEN DER
SICHERHEITSVORRICHTUNGEN
STRENGSTENS
VERBOTEN
N. 91.001.065
IM BRANDFALL
KEIN WASSER AUF
ELEKTROANLAGEN
DIE UNTER STROM STEHEN
N. 91.001.066
REINIGEN UND/ODER
SCHMIEREN BEI
MASCHINENBETRIEB
STRENGSTENS VERBOTEN
N. 91.001.068
Posion the master switch on (I) to fed power to
the dehydrator. The fan will start to rotate to its
maximum speed. At this point, by acng on the
adjusng knob (g.1) the operang temperature
can be varied from 30°C to 68°C. The adjusng
knob adjusts the temperature of the air ow by
operang directly on the thermostat. During ope-
raon a “click” is heard whenever the thermal
condions set by the thermostat is reached.
To dene the best drying degree, access the
drawers through the inspecon hatch located on
the appliance rear.
The operang cycle has to be stopped aer the
necessary drying degree has been reached.
Fig. 1

16 Made in Italy
English
WARNING
NEVER CUT OFF THE POWER TO THE DE-
HYDRATOR BY REMOVING THE PLUG.
REMOVE THE PLUG FROM THE SOCKET
ONLY AFTER THE MOTOR HAS SHUT
DOWN, WITH THE MASTER SWITCH PO-
SITIONED TO (O). BEFORE SHUTTING
DOWN THE MOTOR USING THE SWITCH
(I-O), IT IS RECOMMENDED TO HAVE
THE FAN ROTATE FOR SOME MINUTES
BY BRINGING THE ADJUSTING KNOB IN
0 POSITION.
PRO and PRO DELUXE Version:
Master switch:
Insert the plug and switch the master switch to
(I) to power the dehydrator prior to starng any
process. The dehydrator switches on and goes in
stand-by mode, the display indicates the applian-
ce is (On). Posioning the switch to (O) cuts the
power supply to the electronic board.
WARNING
NEVER CUT OFF THE POWER TO THE DE-
HYDRATOR BY REMOVING THE PLUG.
REMOVE THE PLUG FROM THE SOCKET
ONLY AFTER THE MOTOR HAS SHUT
DOWN, WITH THE MASTER SWITCH PO-
SITIONED TO (O).
Key :
In stand-by condion (the screen displays the
message “ON”), press repeatedly the key unl
the number of program (see table 1) to set up is
displayed (in this condion both LEDS will blink).
Key :
Starts and stops the drying cycle. To resume the
process aer being stopped (PAUSE), press again
the key . The program will restart from the point
in which it has been interrupted.
To reset the program while is running, press and
hold for 3 seconds unl the screen displays the
message (On). This operaon resets the drying
cycle previously set and causes the dehydrator to
go in stand-by condion.
WARNING
If the dehydrator is reset at an operang tempe-
rature greater than 40°C, the electronic board will
stop the cycle, but the fan will keep running at
maximum speed up to lower the temperature of
the motor and bring it to 40°C to prevent it goes
damaged. During this operaon both LEDS blink.
Display and indicator lights:
During the drying process, the display alternately
shows the operang temperature detected at the
moment (indicator light on), the me remaining
at the end of the drying program (indicator light
on) and the program currently in use (indica-
tor lights o). The remaining me is expressed in
hours up to the last hour; the countdown is ex-
pressed in minutes (this funcon can be idened
thanks to the lit point that follows the value).
ENTFERNEN DER
SICHERHEITSVORRICHTUNGEN
STRENGSTENS
VERBOTEN
N. 91.001.065
IM BRANDFALL
KEIN WASSER AUF
ELEKTROANLAGEN
DIE UNTER STROM STEHEN
N. 91.001.066
REINIGEN UND/ODER
SCHMIEREN BEI
MASCHINENBETRIEB
STRENGSTENS VERBOTEN
N. 91.001.068
ENTFERNEN DER
SICHERHEITSVORRICHTUNGEN
STRENGSTENS
VERBOTEN
N. 91.001.065
IM BRANDFALL
KEIN WASSER AUF
ELEKTROANLAGEN
DIE UNTER STROM STEHEN
N. 91.001.066
REINIGEN UND/ODER
SCHMIEREN BEI
MASCHINENBETRIEB
STRENGSTENS VERBOTEN
N. 91.001.068
ENTFERNEN DER
SICHERHEITSVORRICHTUNGEN
STRENGSTENS
VERBOTEN
N. 91.001.065
IM BRANDFALL
KEIN WASSER AUF
ELEKTROANLAGEN
DIE UNTER STROM STEHEN
N. 91.001.066
REINIGEN UND/ODER
SCHMIEREN BEI
MASCHINENBETRIEB
STRENGSTENS VERBOTEN
N. 91.001.068
Fig. 2

17
English
Made in Italy
Programs:
The dehydrator is equipped with an electronic
control system, which ensures a wide range of
simple and eecve programs suitable to all uses
and product types. The programs are designed by
taking into account all variables involved in the
drying process; they dier in temperature, dura-
on and air ow speed.
All automated programs described below display
the duraon in hours and envisage a nal phase
that allows preserving the products at best drying
level with minimum energy consumpon. Once
the drying process is completed, the appliance
preserves the product at the moisture level rea-
ched and prevents rehydraon unl the product
is withdrawn.
PROGRAM Display Hours T°C
EVO (customized) P1 1-72 20-68
AUTO A1 30 55
THIN A2 18 50
BIO A3 30 45
HOT A4 15 68
PASTA A5 20 40
ECO A6 30 45
DELAY H0 1-9 -
P1 – EVO
(customized sengs program):
allows seng up and control all parameters of the
drying process.
It is possible to set the drying me (1h - 72h), the
operang temperature (20°C - 68°C) and the fan
speed (i.e. the air ow) (levels 1 - 2 - 3 - 4).
ng the EVO program:
• Press the key to access the EVO program.
The display shows P1 (the LEDS are blinking).
• Press the key to access the wring box.
• The LED blinks and the display shows the
temperature (20°C). Press the key to display
all seable temperatures in sequence.
• Once the necessary value is found, conrm
using the key .
• The LED blinks and the display shows the
message (- -). Press the key to display all sea-
ble hours in sequence.
• Once the necessary value is found, conrm
using the key .
• The LEDS are o and the display shows the value
(L4). Press the key to display the 4 preset air
ow levels.
L4 - 2000 RPM
L3 - 1600 RPM
L2 - 1300 RPM
L1 - 900 RPM
• Once the necessary value is found, conrm
using the key .
• At this point both LEDS blink and the display
shows P1. The dehydrator is ready to start the
drying cycle as soon as entered.
• Pressing the key starts the drying cycle
according to the parameters set
The EVO program parameters set are not stored
on the electronic board. It is therefore recommen-
ded to write them down in the special notes sec-
on at the end of this manual.
A1- AUTO: designed to dry every product type, is
suitable both for rst drying experience and un-
certainty on which program to use. It has 30h du-
raon at an average temperature of 55°C.
A2- THIN: short program with average tempera-
ture values. Suitable for dry fruits and vegetables
cut into thin slices (max 5mm). The program is also
recommended to obtain the best dried mushro-
oms. It has 18h duraon at maximum temperature
value of 50°C.
A3- BIO: safeguards the organolepc properes
and nutrional values of dried products. Suitable
for bio and raw food or, more generally, for those
who do not want cooked foods. It has 30h dura-
on at maximum temperature value of 45°C.
A4- HOT: is the program that runs the dehydrator
at the highest temperature. Recommended when
the drying process has to be accelerated. It can
18 Made in Italy
English
• Select the number of delay hours of the cycle start
from H1 to H9 by repeatedly pressing the key.
• Press the key to conrm the selecon.
• The display shows the selected delay and the LED
blinks.
• Scroll using the key through the operaon
programs and select the desired one.
• Press the key to conrm the selected program.
• The dehydrator stays in stand-by condion
throughout the delay me set up to the start of
the selected cycle. During the delay me the led
stays lit and the display shows alternavely the
inial delay set, the countdown to the start and
the selected program to be started up.
Preservaon:
The PRESERVATION mode is enabled at the end of
each cycle (except for the EVO program).
The preservaon mode is automacally enabled
and stays acve unl the dehydrator is manual-
ly switched o, that is when ready to collect and
store the products. The preservaon cycle has a
maximum duraon of 6 hours and envisages a con-
nuous, slightly heated air ow that prevents the
food from geng re-hydrated.
During preservaon cycle the display shows 00
blinking.
To reset the cycle press and hold the key for 3
seconds unl the screen displays (On).
Error messages:
In case of errors or if the dehydrator undergoes da-
mages, the appliance stops completely and displays
one of the following values:
• E1
• E2
• E3
• E4
• E5
In this case the intervenons must be carried out exclusi-
vely by the manufacturer through his Technical Assistance
Service or by specialized personnel informed on the risks
arising from operaons on powered products. Use exclu-
sively original spare parts, accessories and power cables.
also be used for meat, meringues or biscuits ba-
king. Not recommended for thin or delicate pro-
ducts. It has 15h duraon at maximum temperatu-
re value of 68°C.
A5- PASTA: opmized program for drying fresh pa-
sta. Depending on the type of pasta, the required
drying me could vary; it is therefore recommen-
ded to periodically check the product and stop the
cycle when the result is achieved. It has 20h dura-
on at an average temperature of 40°C.
A6- ECO: minimizes energy consumpon due to a
maximum absorpon of 270W. The drying me is
slightly longer, in exchange of considerable energy
savings. Perfect as well for limited power availabi-
lity and for light products which don’t get moved
thanks to the low speed of the air ow. It has 30h
duraon at maximum temperature value of 45°C.
There are other variables that aect the process.
For instance, the permeability of a fruit determi-
nes substanally the drying ming. The thicker the
peel, the longer the product has to be dried. The
thickness of the slices and the climate surroun-
ding the machine is also very important: in a very
humid environment the dehydrator needs longer
me to dry one and the same product rather than
in a very dry environment.
It is recommended to perform a test drying cycle
to verify the actual drying degree the product rea-
ches at the end of the cycle. Each product has, in
fact, dierent reacons on the basis of the size,
moisture degree and working environment tem-
perature. Carry out tests on the products most
commonly handled so as to determine prepara-
on, program and perfect ming.
H0- DELAY: this program is t to delay the start
of any drying program. The delay allows exploing
the me bands during which the electric energy con-
sumpon is less expensive.
In case a delayed start is to be used, set rst this fun-
con and subsequently the drying program selected.
Seng the DELAY - DELAYED START funcon:
• Press the key and scroll through the programs
menu unl the display shows H0.
• Press the key to select it.
This manual suits for next models
1
Table of contents
Languages:
Other Tre Spade Kitchen Appliance manuals


Popular Kitchen Appliance manuals by other brands


FoodSaver
FoodSaver FFS015X-01 User instructions

Bestron
Bestron SWEET DREAMS ASW602 instruction manual

Gallet
Gallet CRO 612 instruction manual

Presenza
Presenza QKA051 Installation guide and user's manual

Sage
Sage the Tea Maker Compact quick guide

Küppersbusch
Küppersbusch EEH 6200.0 Instructions for use and installation instructions


