Trebs Comfortice User manual

Handleiding
Comfortice
IJs/ Milkshake machine

Beschrijving van onderdelen
1. Motor
2. Doorzichtige deksel
3. Mixer/ Roerspaan
4. Uitneembare binnenemmer
5. Gedeelte waar motor in bevestigd wordt
6. Display
7. Ventilatie
8. IJslepel
9. RVS binnenemmer
11. Aanduiding vriescompressor in werking
12. Timer
13. Aanduiding apparaat ingeschakeld op netspanning
14. Aan/ uit schakelaar én Inschakelen van de vriesfunctie
15. Instellen van mixtijd
16. Inschakelen van de roerspaan
Veiligheidswaarschuwing:
Houdt bij het gebruik van elektrische apparatuur, zoals deze schepijsmachine, altijd de volgende
veiligheidswaarschuwingen in acht:
1. Lees voor gebruik deze handleiding goed door.
2. Controleer of het voltage van het apparaat overeenkomt met het voltage dat in uw land wordt
gebruikt.
3. Plaats het apparaat, het netsnoer en het motorgedeelte van het apparaat nooit in de buurt van
water of andere vloeistoffen om elektrische schokken en schade aan het apparaat te voorkomen.
4. Houdt het apparaat buiten bereik van kinderen. Laat kinderen nooit alleen het apparaat gebruiken,
zorg altijd dat een volwassene in de buurt is.
5. Haal de stekker uit het stopcontact wanneer u het apparaat niet gebruikt, het schoonmaakt of een
van de onderdelen in of uit het apparaat haalt.
6. Schakel de hulp van een vakman in om beschadigingen aan het snoer/ apparaat te verhelpen.
7. Raak de onderdelen aan de binnenkant van het apparaat niet aan als het apparaat in werking is.
8. Gebruikt geen scherpe voorwerpen om beschadiging aan het product te voorkomen. Om het ijs uit
de machine te scheppen kan een rubberen spatel of houten lepel worden gebruikt.
9. Gebruik het apparaat niet wanneer het netsnoer of de stekker beschadigd is. Laat het apparaat en
het netsnoer alleen door een vakman repareren.
10. Verplaats het apparaat niet als de stekker in het stopcontact zit.
11. Haal bij het schoonmaken de stekker altijd uit het stopcontact.
12. Zet het apparaat niet in de regen of in de buurt van een warmte bron.
13. Gebruik geen chemische reinigingsmiddelen om het apparaat schoon te maken.
14. Plaats het apparaat nooit ondersteboven.
15. Plaats het apparaat op een plek met voldoende ventilatie (open ruimte van 20 cm aan alle kanten
van het apparaat).
16. Houdt het apparaat tijdens transport altijd horizontaal.
Het apparaat is alleen geschikt voor huishoudelijk gebruik. Wanneer het apparaat voor de eerste keer
wordt gebruikt, kan een “verbrande” lucht worden waargenomen. Dit wordt veroorzaakt door de hitte
1

2
van het isolatiemateriaal dat wordt gebruikt om de motor te beschermen en is normaal. Na het eerste
gebruik zal deze geur verdwijnen.
Gebruik van het apparaat:
LET OP:
Het is belangrijk dat u het apparaat voor gebruik minimaal 12 uur op een vlak oppervlakte laat
staan zodat de olie in de compressor weer is gezakt.
Voorbereiding:
1. Was voor gebruik alle onderdelen van het apparaat die in contact komen met het ijs goed af
(inclusief de uitneembare binnenemmer, de RVS binnenemmer, de roerspaan en de doorzichtige
deksel).
2. Schenk een kleine hoeveelheid (2 theelepels) ontsmettingsalcohol in de binnenemmer en plaatst
de uitneembare binnenemmer in de binnenemmer van het apparaat. Dit is belangrijk zodat de kou
vanuit de binnenemmer van het apparaat naar de uitneembare binnenemmer wordt geleid.
3. Plaats het apparaat op een vlakke ondergrond in de buurt van een stopcontact met voldoende
ventilatieruimte aan alle kanten van het apparaat.
4. Controleer of de spanning van uw lichtnet overeenkomt met de spanning, die op het typeplaatje
(aan de onderkant van het apparaat) staat aangegeven.
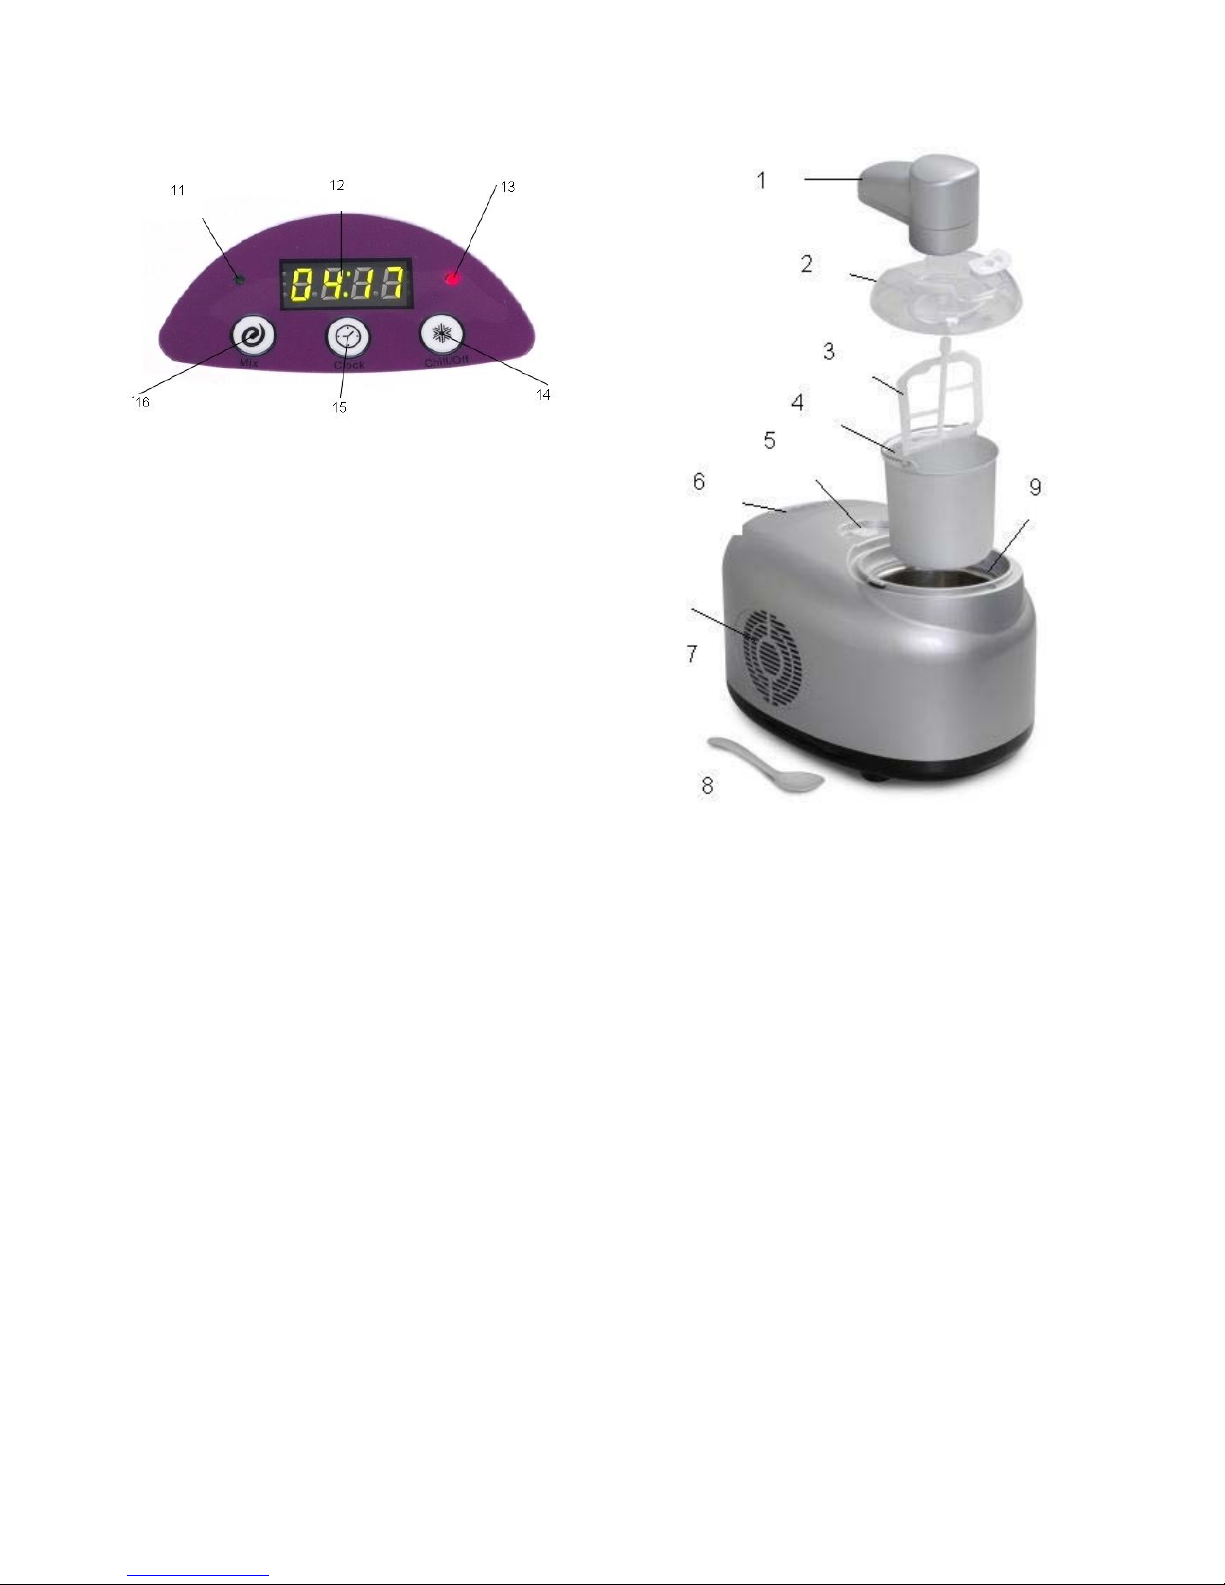
5. Bevestig de mixer, doorzichtige deksel en de motor in de machine. Zorg ervoor dat de
doorzichtige deksel goed in het apparaat is bevestigd anders zal de mixer niet goed werken.
6. Leg de roerspaan nooit in of op een warm oppervlakte zoals bijvoorbeeld een oven of magnetron.
Gebruik de roerspaan nooit als deze is beschadigd.
Uitleg van de display knoppen:
1. De knop aan de rechterkant van het apparaat is om de roerspaan (mixer) in of uit te schakelen.
Bevestig de roerspaan in het apparaat en druk op deze knop en het apparaat begint met mixen.
Wanneer de ingeschakelde mixtijd voorbij is, klinkt een zoemer en zal het apparaat automatisch
uitschakelen.
2. De knop in het midden van het apparaat is om de mixtijd in te stellen. De tijd kan worden
ingesteld op: 5 minuten, 15 minuten of 30 minuten. Nadat de ingestelde tijd voorbij is, klikt een
zoemer en zal het apparaat automatisch uitschakelen. Op het LED display verschijnt nu 0
(minuten) en zal automatisch overgaan op 50 (minuten).
3. De knop aan de linkerkant van het apparaat is de aan/uit knop én de knop waarmee de
vriescompressor wordt ingeschakeld. Nadat de ingrediënten voldoende zijn gemixt, kan het
vriesproces beginnen. Druk op de ON/OFF knop om het vriesproces in te schakelen. De vriestijd
is automatisch ingeschakeld op 50 minuten. Na ongeveer 2 tot 3 minuten hoort u de
vriescompressor aanslaan en gaat het groene indicatielampje op de display branden. Na 50
minuten klinkt een zoemer en na 70 minuten zal het apparaat automatisch uitschakelen.
4. Het rode indicatielampje brand wanneer de stekker van het apparaat in het stopcontact wordt
gestoken.
Maken van ijs door middel van kant en klare ijsmix:
1. Bereid de ijsmix zoals staat beschreven op de verpakking. Laat de ijsmix ca. 10 minuten staan
(rijpen).
2. Zet de uitneembare binnenemmer in de binnenemmer van het apparaat en schenk de ijsmix in de
uitneembare binnenemmer.
3. Bevestig de mixer, doorzichtige deksel en de motor in de machine. Zorg ervoor dat de
doorzichtige deksel goed in het apparaat is bevestigd anders zal de mixer niet goed werken.
4. Schakel de gewenste mixtijd in (5, 15 of 30 minuten) en zet de mixer aan. Nadat de ingestelde
mixtijd is verstreken zal de zoemer klinken en het apparaat automatisch uitschakelen.
5. Wanneer de ingrediënten voldoende zijn gemixt kan het vriesproces worden ingeschakeld. Druk
op de aan/uit knop om de vriescompressor in te schakelen. De vriestijd is afhankelijk van de
gewenste stevigheid van het ijs, het seizoen, de omgevingstemperatuur, de ingrediënten en de
hoeveelheid ijs in het apparaat.

3
Tijdsindicatieoverzicht
Tijd Hardheid van het ijs
25 minuten ijsmix is licht aangevroren
40 minuten “soft ijs”
50 minuten Vers schepijs
Geeft u de voorkeur aan iets steviger ijs, schep het ijs dan in een schone afsluitbare bak en
plaats deze enkele uren in de vriezer.
6. De ingrediënten welke u gebruikt om ijs te maken dienen koud te zijn, gebruik nooit warme
ingrediënten.
7. Vul de uitneembare binnenemmer nooit meer dan de helft. Gedurende de laatste minuten van het
vriesproces zal de ijsmix namelijk in volume toenemen.
8. Gedurende het vriesproces kunt u ingrediënten als chocolade snippers, rozijnen of noten toevoeg
door de opening van de doorzichtige deksel. Alcoholische drank dient pas in de laatste minuut te
worden toegevoegd, dit vertraagd namelijk het vriesproces.
9. Wanneer de ijsmix steviger wordt zal de roerspaan langzamer draaien, dit betekend dat het ijs
klaar is, maar zal de motor niet beschadigen. U kunt nu wel het beste de mixer uitschakelen.
10. Bewaar het ijs niet te lang in het apparaat, bewaar het ijs in de vriezer.
11. Haal na gebruik de stekker uit het stopcontact. Haal de uitneembare binnenemmer uit het
apparaat en schep het ijs uit de emmer. Gebruik hiervoor een plastic of houten lepel om
beschadiging van de binnenemmer te voorkomen.
Maken van Milkshake:
1. Pureer de ingrediënten welke u wilt gebruiken voor de milkshake.
2. Zet de uitneembare binnenemmer in de binnenemmer en schenk de milkshakemix in de
uitneembare binnenemmer.
3. Bevestig de mixer, doorzichtige deksel en de motor in de machine. Zorg ervoor dat de
doorzichtige deksel goed in het apparaat is bevestigd anders zal de mixer niet goed werken.
4. Schakel de gewenste mixtijd in (5, 15 of 30 minuten) en zet de mixer aan. Nadat de ingestelde
mixtijd is verstreken zal de zoemer klinken en het apparaat automatisch uitschakelen.
5. Afhankelijk van de gewenste dikte van de milkshake kunt u de vriescompressor enige tijd
inschakelen.
Bewaren van het ijs in de ijsmachine:
Als het ijs klaar is, kan het 10 tot 20 minuten in het apparaat bewaard worden als het apparaat is
uitgeschakeld.
U kunt het ijs in een afsluitbare bak enige tijd in de diepvries bewaren. Hoe langer het ijs wordt
bewaard, zal de smaak en kwaliteit achteruit gaan. Na één tot twee weken zal de structuur van het ijs
verslechteren en de smaak verloren gaan.
Vries ontdooit ijs nooit opnieuw in, er kan bacterievorming ontstaan. Maak de onderdelen van het
apparaat altijd goed schoon na gebruik.
Bewaartijd
Soort ijs Max. bewaartijd
IJs gemaakt van rauwe ingrediënten Een week in de vriezer
IJs gemaakt van sap Een tot twee weken in de vriezer
IJs gemaakt van halfbereide ingrediënten Twee weken in de vriezer
Schoonmaken van het apparaat
Zorg ervoor dat de stekker van het apparaat uit het stopcontact is voordat u begint met schoonmaken.
De uitneembare onderdelen van het apparaat kunnen met afwasmiddel in warm water worden
afgewassen. De vaste binnenemmer kan met water en een zachte doek worden gereinigd. Droog
deze vervolgens met een droge doek.
Plaats de onderdelen nooit in de vaatwasser. Het motorgedeelte kan met een schone doek worden
gereinigd. Houdt de motor nooit onder water.

4
Het oplossen van problemen
Onder normale omstandigheden is de bereidingstijd van het ijs 50 minuten. Wanneer de dit na 50
minuten nog steeds niet stevig is geworden, controleer dan de volgende punten voordat u terug gaat
naar de winkel:
1. De ingrediënten welke worden gebruikt voor het maken van het ijs moeten minimaal op
kamertemperatuur zijn, het liefst uit de koelkast komen. IJs kan niet worden gemaakt van warme
ingrediënten.
2. De uitneembare binnenemmer mag niet meer dan tot de helft zijn gevuld. Wanneer er teveel
ingrediënten in de binnenemmer zijn, zal de bereidingstijd toenemen.
3. De compressor is voorzien van een veiligheidsysteem. Wanneer de stroom uitvalt of het apparaat
wordt uitgeschakeld en direct weer wordt ingeschakeld, wordt het koelingproces onderbroken. Het
apparaat zal automatisch uitschakelen en na 2 tot 3 minuten weer aangaan. Echter, het apparaat
zal nu niet gaan koelen, ook niet als u op de aan/uit knop druk. Haal in dit geval de stekker uit het
stopcontact, wacht enkele seconden en steek de stekker weer in het stopcontact. Druk vervolgens
op de mix knop en op de aan/uit knop en het apparaat zal na 2 tot 3 minuten beginnen met
koelen.
Wij raden aan bovenstaande punten goed te controleren voordat u met het product terug gaat
naar de winkel.

5
Recepten:
Met deze ijsmachine kunt u verschillende lekkernijen maken zoals roomijs, sorbet, milkshake, sauzen
of “frozen” yoghurt. Onderstaand enkele recepten voor de bereiding van ijs met verse ingrediënten.
Deze recepten zijn slechts voorbeelden, vele variaties hierop zijn mogelijk.
LET OP: de onderdelen van het apparaat hoeven niet in de vriezer te worden geplaatst!
Bananenijs
Ingrediënten:
•2 rijpe bananen (hoe rijper de bananen zijn, hoe meer smaak)
•4 ½ theelepel verse citroensap
•¼ kopje en 2 theelepels siroop
•1 kopje melk
•½ kopje slagroom
Schil en pureer de bananen samen met het citroensap. Zorg ervoor dat bij de bereiding de bananen
niet bruin worden. U houdt ongeveer 1 beker bananenpuree over. Roer de siroop, melk en de
slagroom door de bananenpuree. Giet dit mengsel in de ijsmachine en zet het apparaat aan. Na
ongeveer 50 minuten heeft u 0.5 liter bananenijs.
Aardbeienijs
Ingrediënten:
•Ongeveer 1 liter aardbeien, gewassen en gesneden
•½ kopje en 2 theelepels poedersuiker
•8 theelepels verse citroensap
•1 kopje melk
•1 ½ kopje slagroom
Pureer de aardbeien en roer de overige ingrediënten door de aardbeienpuree. Giet dit mengsel in de
ijsmachine en zet het apparaat aan. Na ongeveer 50 minuten heeft u 0.5 liter aardbeienijs.
Honing- yoghurtijs
Ingrediënten:
•2 grote eieren
•1 kopje honing
•0.5 liter naturel yoghurt
Sla de eieren tot een schuimige massa. Roer langzaam de honing erdoor tot er een heldere massa
ontstaat. Roer deze massa door de yoghurt. Indien nodig kunt u nog een beker melk toevoegen. Giet
dit mengsel in de ijsmachine en zet het apparaat aan. Na ongeveer 50 minuten heeft u 0.8 liter ijs.
Vanille-ijs
Ingrediënten:
•1 ½ kopje afgeroomde melk
•¼ kopje suiker
•3 theelepels vetarme melkpoeder
•¾ theelepels vanille extract
Verwarm de melk, suiker en het melkpoeder in een kleine pan. Roer tot de suiker en het melkpoeder
zijn opgelost. Laat het geheel afkoelen en het vanille extract eronder. Giet dit mengsel in de
ijsmachine en zet het apparaat aan. Na ongeveer 50 minuten heeft u 0.8 liter vanille-ijs.
Ananas Sorbet
Ingrediënten:

6
•1 klein blikje ananasstukjes
•¾ kopje siroop
Laat de ananasstukjes goed uitlekken en pureer ze vervolgens. Dit is ongeveer 1 kopje. Roer de
siroop door de puree. Giet dit mengsel in de ijsmachine en zet het apparaat aan. Na ongeveer 25
minuten heeft u 1½ kopje ananas sorbet.

7
M
M
Mo
o
od
d
de
e
e
d
d
d'
'
'e
e
em
m
mp
p
pl
l
lo
o
oi
i
i
C
C
Co
o
om
m
mf
f
fo
o
or
r
rt
t
ti
i
ic
c
ce
e
e
Sorbetière
/
Appareil
à
milk-shakes
S
So
or
rb
be
et
ti
iè
èr
re
e/
/A
Ap
pp
pa
ar
re
ei
il
là
àm
mi
il
lk
k-
-s
sh
ha
ak
ke
es
s

Chers clients,
Vous venez d’acheter un produit qui a été conçu pour répondre à vos attentes en matière de
technologie, fiabilité et maniabilité.
Afin de profiter le plus longtemps possible de votre nouvel appareil, veuillez lire attentivement ce mode
d’emploi.
Caractéristiques techniques
•Capacité: 0,7 litre donne 1,4 litres de glace
•Tension: 230 V
•Consommation: 150 Watts
•Poids: 10,8 Kg
8
Descriptif
1. Transmission
2. Couvercle transparent
3. Centrifugeuse
4. Bol intérieur en inox amovible
5. Conteneur avec couvercle et moteur
6. Centre de commande avec écran
7. Ventilation
8. Cuillère à glace
9. Bol intérieur
11. LED verte- brille lorsque l’appareil est en marche
12. Temps restant
13. LED rouge- brille lorsque l’appereil
14. Touche Chill/ OFF, Interupteur
15. Touche Clock, Temps de préparation
16. Touche Mix, Démarre la centrifugeuse
Avant la première utilisation
Nettoyez toutes les pièces et séchez-les correctement.
Attention! La machine peut s'être retrouvée à l'envers pendant le transport et le stockage. Le liquide
de refroidissement a donc pu entrer dans les conduits. Veuillez donc laissez la machine pendant 12
heures posez à l'endroit avant de l'utiliser.
Préparation
•Posez la machine sur une surface plane et supportant son poids.
•Laissez un périmètre de sécurité d'au moins 20 centimètres autour de l'appareil.
•Branchez la machine sur une prise secteur.
•Mettez le récipient en aluminium dans le conteneur.
•Mettez ensuite le système de centrifugation dans le récipient et ajoutez le couvercle par-dessus.

9
•Sécurisez le couvercle en le tournant. La petite ouverture doit montrer vers l'extérieur.
•Insérez en dernier le bloc moteur sur l'appareil.
Remarques:
•Veuillez utiliser des ingrédients frais
•Les fruits doivent être frais et lavés
•Les ingrédients doivent être refroidis
•Ne mettez jamais d'ingrédients chauds dans l'appareil!
Mise en marche et préparation de la glace
•Allumez l'appareil en appuyant sur la touche Chill/OFF. L'écran indique un temps de 50 minutes et
comme à compter à rebours. Après 2 minutes (environ à 48:00 sur l'écran) le système de
refroidissement se met en route.
•Allumez la centrifugeuse en appuyant sur la touche „MIX“.
•Versez votre mélange par l'ouverture du couvercle.
Important: Ne versez pas votre mélange jusqu'au bord du couvercle. Gardez 3 cm d'écart avec le
bord.
•Choisissez le temps de préparation en appuyant sur la touche „CLOCK“. 3 temps sont disponibles:
15, 30 ou 50 minutes. Il est conseillé de choisir 50 minutes.
•Vérifiez de temps en temps la consistance de la glace. Eteignez pour cela la centrifugeuse en
appuyant la touche „MIX“. Vérifiez en passant une longue cuillère dans l'ouverture.
•La machine vous signale par un bip sonore que le temps est écoulé et la centrifugeuse s'éteint. Le
système de refroidissement continu à fonctionner.
•Vous pouvez continuer à faire tourner la centrifugeuse si la consistance n'est pas a votre goût (5
minutes de plus par exemple). Appuyez pour cela sur la touche „MIX“. Sur l'écran s'affiche 5
minutes. En appuyant sur la touche „CLOCK“ vous pouvez augmenter le temps en choisissant
entre 15, 30 ou 50 minutes.
•Une fois que vous avez la consistance souhaitée vous pouvez appuyer sur la touche „CHILL/OFF“.
Un signal sonore vous indique que la machine est éteinte.
•Pour récupérer la glace enlever le bloc moteur et le couvercle.
•Vous pouvez sortir le récipient. Retirez délicatement la centrifugeuse.
•La glace doit être servie de suite. Celle que vous ne mangez pas doit être mise dans un autre
récipient et congelée. Ne laissez pas de glace dans l'appareil car en le rallumant elle se gèle sur
les parois.
Temps de congélation:
Crème glacée avec des morceaux Environ 1 semaine
Sorbets 1-2 semaines
Crème glacée avec les ingrédients cuits 2 semaines environ
Conseils importants pour la préparation de la crème glacée
•Allumez d'abord l'appareil avant de mettre les ingrédients dans l'ouverture.
•Le système de refroidissement doit s'éteindre uniquement lorsque la glace est finie. Le système de
refroidissement ne se remet en route qu'au bout de 2 minutes si la machine est arrêtée avant ou
qu'il y a une coupure de courant. Cela est dû à un système de sécurité propre à l'appareil.
•N'utilisez pas d'objets pointus ou contendants pour retirez la glace. Vous risquez d'endommager le
récipient. Veuillez utiliser une cuillère en plastique par exemple.
•Lorsque la consistance est trop épaisse pour le moteur et la centrifugeuse, la centrifugeuse
commence à tourner dans l'autre sens. Veuillez éteindre la machine dans ce cas là.
Après la préparation
Eteignez l'appareil et débranchez-le. N'oubliez pas de le nettoyer entièrement ensuite.

Nettoyage et entretien
•Nettoyez l'appareil uniquement lorsqu'il est débranché.
•Retirez le couvercle en le tournant.
•Retirez la centrifugeuse et le récipient.
•Nettoyez toutes les pièces et séchez-les correctement.
•Nettoyez l'appareil en lui même avec un chiffon humide et séchez-le correctement. N'utilisez pas
de produits nettoyants chimiques!
Conseils de sécurité
•Ce mode d'emploi vous sert à vous servir correctement du produit. Gardez le précieusement afin
de pouvoir le consulter à tout moment.
•N'utilisez l'appareil que comme indiqué dans la notice. Aucune garantie ne pourra être appliquée
en cas de mauvaise utilisation du produit.
•N'ouvrez pas l'appareil, sous peine de perdre toute garantie.
•N'essayez pas de réparer l'appareil vous même.
•Faites attention lorsque vous manipulez votre produit. Une chute ou un coup peuvent l'abîmer.
•Ne l'exposez pas à l'humidité et à la chaleur.
•Ne plongez pas l'appareil dans l'eau ou dans d'autres liquides.
•Branchez l'appareil uniquement sur du 230 Volts / 50Hz.
•La machine à glace n'est pas un jouet! Les enfants ont le droit d'utiliser l'appareil uniquement sous
la surveillance d'un adulte.
•Ne stockez pas l'appareil à l'envers.
•N'utilisez pas la machine à l'extérieur!
•Ne mettez rien dans la centrifugeuse pendant son utilisation.
•Vérifiez régulièrement si aucune pièce n'est défectueuse. Sinon arrêtez d'utiliser l'appareil.
•Ne portez pas l'appareil par le câble d'alimentation. Ne le passez pas sur des objets tranchants.
Ne le pliez et ne l'enroulez pas.
•Cet appareil est uniquement prévu pour un usage domestique et non commercial.
ATTENTION:
N'utilisez l'appareil que comme indiqué dans la notice. Aucune garantie ne pourra être appliquée en
cas de mauvaise utilisation du produit
Nous ne sommes pas responsable des conséquences inhérentes à un dommage.
10

11
Recettes
Cette machine permet de préparer de succulents plats glacés comme par exemple de la crème
glacée, des sorbets, des boissons glacées, des sauces et des yaourts glacés. Essayez différents
types combinaisons avec d'autres ingrédients sur la base des recettes ci-dessous.
Glace à la banane
•2 Bananes mûres
•4 ½ cuillères à café de jus de citron
•¼ de tasse et 2 cuillères à café de sirop
•½ tasse le crème fouettée
•1 tasse de lait
La préparation doit être faite rapidement pour que les bananes ne brunissent pas. Mixez les bananes
avec le jus de citron. Vous devez obtenir une tasse de purée de banane. Ajoutez la crème, le sirop et
le lait.
Mettez le tout dans la machine et laissez la tourner 25-30 minutes. Vous obtenez environ 0,5 litre.
Crème glacée Miel-Yaourt
•2 œufs
•1 tasse de miel
•0,5 litre de yaourt nature
Battez les oeufs. Mélangez le miel aux œufs battus jusqu'a qu'elle soit claire et transparente. Ajoutez
ensuite la crème.
Mettez le tout dans la machine et laissez la tourner 25-30 minutes. Vous obtenez environ 0,8 litre.
Glace à la vanille
•1 ½ tasse de lait écrémé
•¼ tasse de sucre
•3 cuillères à café de poudre de lait demi écrémé
•¾ cuillères à café d'extrait de vanille
Réchauffez le lait, le sucre et la poudre de lait dans une petite casserole. Mélangez jusqu'à ce que le
sucre et la poudre de lait soient dissolus. Laissez tout refroidir correctement. Ajoutez la vanille.
Mettez le tout dans la machine et laissez la tourner 25-30 minutes. Vous obtenez environ 0,8 litre.
Sorbet à l'ananas
•1 petite conserve de morceaux d'ananas
•¾ tasse de sirop de sucre
Egouttez les morceaux d'ananas. Mixez les morceaux d'ananas. La purée doit remplir une tasse.
Ajoutez le sirop.
Mettez le tout dans la machine et laissez la tourner 25 minutes. Vous obtenez environ 1 ½ tasses de
sorbet.

OPERATION
INSTRUCTIONS
Comfortice
12
Ice
cream
/
Milkshake
machine
I
Ic
ce c
e cr
re
ea
am / M
m / Miillk
ks
sh
ha
ak
ke m
e ma
ac
ch
hiin
ne
e

CATALOGUE
NAME
1. Dasher motor
2. Transparent Cover
3. Dasher
4. Removable cylinder
5. Socket of Dasher motor
6. Display
7. Ventilation
8. Ice cream spoon
9. Stainless steel inner reservoir
11. Working indicator of the freezer
12. Timer
13. Power indicator
14. Chilling switch
15. The option of time
16. ON/OFF switch of Dasher motor
IMPORTANT SAFEGUARDS:
When using electrical ice cream makers, basic safety precautions should always be followed, including
the followings:
1. Read all instructions carefully before installing and using the ice cream maker.
2. Check to be use the voltage indicated on the nameplate agrees with your home’s voltage.
3. To protect against risk of electric shock, do not put cord, plug or ice cream maker body or electric
motor assembly of ice cream maker in water or any other liquid. This may cause personal injury or
damage to the product.
4. Close supervision is necessary when any ice cream maker is used by or near children .The ice
cream maker must be installed out of the reach of children.
5. Unplug from outlet when not in use , before installing or removing parts, and before cleaning.
6. The electrical cord must not be replaced by the user, as this requires the use of special tools .If
the electrical cord is damaged, contact an authorized service center.
7. Avoid contact with moving parts. Keep hands and utensils out of cylinder bowl while in use to
reduce the risk of injury to persons or the ice cream maker itself.
8. Do not use sharp objects or utensils inside the removable cylinder, otherwise it will damage the
inside of the cylinder. A Rubber spatula of wooden spoon may be used when the ice cream make
is in the OFF position.
9. Do not operate any ice cream maker with a damaged cord or plug, or after the ice cream maker
malfunctions, or is dropped or damaged in any manner. Return ice cream maker to the nearest
authorized service center for examination repair or electrical or mechanical adjustment. The used
of attachments not recommended sold by the ice cream maker manufacturer may cause fire ,
electric shock or injury.
13

14
DO NOT USE OUTDOORS
Do not let the cord hang over the edge of a table or counter, or touch hot surfaces. The ice cream
maker must never be laid on its side or turned upside down. Use the ice cream maker away from heat
sources keep it at a distance of at least 10cm from walls or other objects that could obstruct free air
circulation.
All maintenance other than normal cleaning must be performed by a service center authorized by the
manufacturer.
The ice cream maker must be connected to an efficiently grounded socket with a minimum rating of 5A
.The manufacturer declines all liability for damage caused by the lack of efficient grounding . If in
doubt, contact a qualified electrician.
Materials and articles in contact with food products conform to the Ec Directives 89/109.This ice cream
maker conforms to the provision of the low voltage Directive no.72/23 with subsequent amendment
93/68 and the Directive on Electromagnetic compatibility no.89/336.
The mixer icm23-1JBQ(the dasher motor) just can be fit on the icm23-1(the machine except the mixer)
specified only which can’t be suitable for any others.
This unit is for household use only. When your Ice cream maker is first used, you may experience an
odor and possibly a slight wisp of smoke from your Ice cream maker’s body. This is caused by the
heat caring of the insulation which protects the motor and is normal. After the first few uses, this will no
longer occur.
WORNING:
If you don’t want to make ice cream or before assembling the ice cream maker make sure the ON/OFF
switch of the Dasher motor is in the OFF position and the electric power cord is unplugged.
IMPORTANT: Place the ice cream maker upright on a flat surface for at least 12 hours before using it
for the time, to allow the oil contained in the compressor to set down.
1. The ice cream maker must be placed in upright position for whatever reason. It must never be laid
on its side or turned upside down, and never be moved especially when in use. This is very
important.
2. Before use, thoroughly wash all parts that will come into contact with the ice cream (including the
fixed stainless steel cylinder ,removable cylinder ,dasher and transparent cover).
3. Pour a measure (2tbs) of surgical alcohol into the fixed stainless steel cylinder and place the
removable cylinder inside the fixed stainless steel cylinder .It is essential to perform this operation
in order for the cold be transmitted from the fixed cylinder to the removable cylinder and thus
guarantee the success of the ice cream.
4. Install the dasher, transparent cover ,and the dasher motor. Insert the dasher to dasher motor until
the dasher snap into position, otherwise the Ice cream maker will not give you the proper mixing
action.
5. Removable cylinder should never be used in a conventional oven, microwave oven on top of the
range of on any other heated surface. If the removable cylinder is scratched of chipped,
removable cylinder should not be used to blend any liquids.
USING THE ELECTRONIC TIMER
The electric timer allow you to control the ON/OFF switch of the mixing motor power.
1. The protection will prolong 2~3 minutes when start the chilling motor. After start the chilling motor,
the indicator light on the left will be bright and, the one on the right will be bright when put the plug
in the socket.
2. The button on the left is the mixing power switch. Press the button after stalling the dasher then
press the switch on the mixing assembly, the mixing motor will start working. When the setting
time finish, the buzzer will work, it indicates that the process is finished and the power will be OFF

15
automatically.
3. The power on the mixer there are three time option: 5 minutes, 15 minutes, 30 minutes. The
power will be OFF automatically and alarming after every process is finished. Then the indicating
No. is 0 (tacitly approve to 50 minutes),the chilling motor will stop automatically after working for
70 minutes.
Operating Instruction
1. Position the ice cream maker near an outlet on a flat stable surface, allowing adequate space
around it ,without obstructing the air circulation at the sides.
2. Check that the voltage indicated on the rating plate corresponds to the outlet’s voltage. Plug the
power cord into the outlet.
3. Turn on the chilling switch .The indicator light shows that the chilling system is started, the air
circulating through the air port of the machine.
4. Put 10g surgical alcohol in the fixed stainless steel cylinder, then put the fixed cylinder in the
removable cylinder. After 5 minutes put the ice cream in the removable cylinder and place the
dasher in it, cover the transparent cover, install the dasher motor (insert the hole correctly), start
the electric fan switch and put the plug in the socket, then press the button ON start.
5. Chose different making time according to different season ,different temperature ,different
ingredient and the volume of the ice cream
P.S.: Chose 15minutes when the temperature is 1℃~3℃
Chose 30 minutes when the temperature is 13℃~30℃
Chose 40 minutes when the temperature is 27℃~35℃
6. The ingredient should be at refrigerator temperature best, never use hot ingredients.
7. Never fill the cylinder more than half full. During the last minutes of the preparation, the ice cream
expands in volume until it fills the cylinder.
8. During preparation, you can add chocolate chips, raisins, sesame, almond powder and other
ingredients through the opening in the cover. Alcoholic beverages should not be added until the
end of preparation, otherwise they will delay the chilling.
9. When the ice cream has reach a good consistency, the dasher rotation reverses direction,
indicating that the ice cream is ready, while this will not damage the motor or dasher. It is
nevertheless good practice to stop the dasher.
10.Do not keep the ice cream in the ice cream maker for too long, store the ice cream in a seal
freezer container .
11.When finish making, unplug the power cord and remove the removable cylinder. Then remove the
ice cream from the removable cylinder using the plastic scoop or wooden spoon, to avoid
damaging the walls and bottom of the removable cylinder.
12.A few minutes after removing the ice cream, when the removable cylinder reaches room
temperature, wipe away ice cream residue with a damp cloth and dry thoroughly.
STORING ICE CREAM IN THE ICE CREAM MAKER
When the ice cream is ready , it can be kept in the ice cream maker for 10~20 minutes with the dasher
motor off. Before serving rework it for several minutes until it reaches the desired consistency and
degree of whipping.
You can store the ice cream frozen in a seal container for a limited period, however keeping it for too
long reduces its flavor and quality . After one or two weeks ,the structure of the ice cream deteriorates
and the fresh taste is lost.
Store the ice cream in a minimum temperature of 12℉.Mark the date of preparation and type of ice
cream on the container. Ice cream is susceptible to bacteria. The ice cream maker and tools must be
kept scrupulously clean and dry. Never refreeze unfrozen or semi-frozen ice cream.
Remove the ice cream from the freezer about 20minutes before serving and place it in the refrigerator
for 10minutes. It can also be left for 10~15 minutes at room temperature to reach a suitable
temperature for consumption.

16
OPTIMAL STORGAE
Ice cream made from raw ingredients one week in freezer
Ice cream made from juice one to two weeks in the freezer
Ice cream made from semi-cooked ingredients two weeks in the freezer
CLEANING THE ICE CREAM MAKER
Before cleaning the ice cream maker ,make sure the ice cream maker is unplugged. The assembles
and tools (including removable cylinder ,dasher and transparent cover) can be washed in warm water
with dishwashing liquid.
The fixed cylinder must be washed with water and a soft cloth .Then rinse and dry with a cloth.
Do not wash any of the components in a dishwasher.
The motor assembly can be cleaned with a damp cloth.
Never immerse the motor in water or other liquid. Do not rinse the motor under the tap otherwise it will
cause damage.
Important : After the removable cylinder is used ,it is essential to thoroughly clean all parts in contact
with the salt solution to prevent corrosion.
HELPFUL HINTS:
Certain recipes involve cooking, prepare them at least a day ahead to ensure that they chill completely
and expand. It is always advisable to chill the basic mixture.
For cold mixtures , the best results are obtained by beating the eggs and sugar with an electric whisk.
This helps increase the volume.
The majority of recipes consist of cream, milk eggs and sugar. You may use whatever cream you
wish.
The flavor and texture will vary greatly according to the quality of the cream chosen, the higher the
percentage of fat , the richer the ice cream .For example heavy cream contains a minimum of 36%fat,
heavy cream 30%, light cream 18% half and half 10%. Always maintain the same overall quantity of
liquid. For example ,the lightest ice cream can be made by using more milk than cream, or by
eliminating the cream altogether. You may also use skimmed milk, but the texture or the ice cream will
be very different.
The ice cream mixer can be kept in the refrigerator for several days .Stir it well before pouring it into
the cylinder.
The flavor of sorbets depends largely on the degree of ripeness and sweetness of the fruit and juice
used. Taste the fruit before adding it to the recipe. If it is too acidic add sugar, if it is very ripe, add less
sugar or no sugar. Remember that cold reduces sweetness.
Artificial sweeteners can be used in place of sugar . Add the sweetener to the mixture and mix until
completely dissolved.
Cooked mixtures must not be poured into the cylinder until they are completely cold.
To sweeten the mixture during preparation, do not add sugar directly into the cylinder (it does no
dissolve) .Instead, dissolve the sugar in a little water or skimmed milk and pour the resulting
syrup(cooled)into the cylinder.
The fruit used in the recipes must always be washed and dried before use, frit must always be peeled
and seeded, then process to mud and form mixture with the electronic food processor .When using
raw eggs, make sure they are fresh.
TROUBLESHOOTING:
Under normal conditions ,ice cream preparation requires less than 30~40 minutes. If the ice cream is
still not formed after check the following points before contacting an authorized service center.
1. The ingredients must be poured into the ice cream maker at room temperature or, preferably, at
refrigerator temperature, Ice cream can not be made from hot ingredients.
2. The removable cylinder must not be more than half filled. If the quantity of ingredients is
excessive, the time required to form the ice cream increases considerably and the result may not
be satisfactory.
3. The compressor is fitted with a safety device. In the event of power failure, or if the ice cream
maker is turned off and on again for any reason, operation of the chilling system is interrupted

17
.The ice cream maker will automatically shut down for 2~3 minutes before turning on again,
operation will not commence, even if the chilling button is in.
4. We strongly recommend checking all the above points before contacting the authorized service
center. If the service center does not find a fault , the user will be required to pay the costs of the
testing.
RECIPE:
Chocolate Ice cream
An incredibly rich chocolate ice cream , this recipe can be the base for many version of your own. At
the end of the freezing process, stir in a handful of toasted nuts, such as almonds and hazelnuts or
bits of chocolate or crystallized ginger.
3 cups half-and-half
6 oz. bittersweet chocolate
100g sugar
3 egg yolks
20g heavy cream
5g vanilla extract
The volume of the removable cylinder is 5 quart
The ingredient filled in the cylinder is only 0.7quart, makes about 1 quart.
Classic vanilla ice cream
The best vanilla ice cream is made with vanilla beans that have been steeped in custard to release
their maximum flavor. If vanilla beans are unavailable, simply omit the stepping and add 10g vanilla
extract to chilled custard before freezing.
3 cup half-and-half
10g vanilla extract
100g sugar
3 egg yolks
Making process: Pour the powder into the removable cylinder(make sure the temperature of the
ingredient is 16℃) add 400g pure water and dash the ingredient, then you can make
wonderful ice cream.

18
B
B
Be
e
ed
d
di
i
ie
e
en
n
nu
u
un
n
ng
g
gs
s
sa
a
an
n
nl
l
le
e
ei
i
it
t
tu
u
un
n
ng
g
g
Comfortice
E
E
Ei
i
is
s
s-
-
-/
/
/
M
M
Mi
i
il
l
lk
k
ks
s
sh
h
ha
a
ak
k
ke
e
em
m
ma
a
as
s
sc
c
ch
h
hi
i
in
n
ne
e
e

Wir danken Ihnen für den Kauf dieses Produktes. Sie haben ein Produkt erworben, das entwickelt
wurde, um den höchsten Ansprüchen gerecht zu werden, sowohl technisch als auch im Hinblick auf
Zuverlässigkeit, Ausstattung und Bedienkomfort.
Damit Sie lange Freude an Ihrer neuen Eismaschine haben, lesen Sie bitte diese
Bedienungsanleitung aufmerksam durch und befolgen Sie die nun folgenden Hinweise und Tipps.
Technische Daten
•Füllmenge: 0,7 Liter ergibt 1,4 Liter Speiseeis
•Spannung: 230 V
•Verbrauch: 150 Watt
•Gewicht: 10,8 Kg
Produktbeschreibung
1. Kontaktbrücke
2. Deckel
3. Rührwerk
4. Eisbehälter
5. Ansluss für Motor
6. Display
7. Lüftungsöffnung
8. Eislöffel
9. Herausnehmbarem Edelstahlkübel
11. Grüne LED-leuchtet, wennn die Eismaschine in Betrieb ist
12. Anzeige für die Restlaufzeit
13. Rote LED- leuchtet, wenn die Eismaschine
an Netzstrom angeschlossen ist
14. Taste „Chill/ Off“, zum Ein- und Ausschalten der Eismaschine
15. Taste „Clock“ zur wahl der Zubereitungszeit
16. Taste „Mix“ zum Starten des Rührwerks
19
Other manuals for Comfortice
1
Table of contents
Languages:
Other Trebs Ice Cream Maker manuals