TrekStor SURFBOOK E11B-CO User manual

PRIMEBOOK P13
SURFBOOK E11B
EN OPERATING INSTRUCTIONS

1. Welcome 4
2. Intended use 4
3. Explanation of Safety Symbols and Keywords 5
4. General Safety Information 6
5. Technical speciications 11
Technical speciications of the power adapter 12
6. Content 12
7. Controls and ports 13
9. Starting up the Surbook for the irst time 16
Charging the Surbook 16
Switching on the Surbook 16
Unlocking the display 17
10. Switch out of Windows 10 Home in S mode (optional) 17
11. Important elements on the start screen 18
12. Using the keyboard 18
Special keys and function buttons on the keyboard 18
13. Touchpad 19
14. Info Center 20
15. Accessing and using the Start menu 20
Accessing the Start menu 20
Layout of the Start menu 20
Navigating/Selecting an item in the Start menu 21
Pinning, organising and removing apps 21
16. Accessing the settings 23
17. Connecting the Surbook to the Internet 23
Connecting to a stationary wireless network (WiFi) 23
18. Launching the Internet browser/Entering an Internet address 24
19. Downloading applications from the Windows Store 24
CONTENT

20. Changing the display language 25
21. Using the camera 26
22. Transferring iles between the Surbook and other devices 27
Transferring iles via Bluetooth 27
Transferring iles between the Surbook and
an external storage device 28
23. Connecting the Surbook to a television 28
Connecting to a television via HDMI cable 28
Connecting to a television via Miracast 29
24. Reset 30
25. Switching off/Restarting the Surbook 30
26. Useful tips on saving energy 30
27. Troubleshooting/FAQ 31
28. Glossary 32
29. Notes on copyright and trademarks 34
30. Notes on disposal and recycling 35
Disposal considerations 35
Notes on recycling 35
31. Notes on the warranty 35
32. Support information 36

4
1. Welcome
We hope you enjoy your new Surbook E11B.
The online operating instructions, the enclosed Quick Guide and the additional
brochure "Product Safety and Legal Information" are direct components of the
product.
Please read all three documents carefully before you turn on your device. They
contain important information about device safety, usage and disposal.
Please keep these documents in a safe place and pass them on in full to the new
owner if the device changes hands.
In order to be able to work with maximum eficiency and safely, as well as to protect
the device from possible dangers, please familiarize yourself with all operating and
safety instructions.
These operating instruction describes the basic functions of your Surbook. For
information on the operation of individual apps, please refer to the instructions
of the individual apps.
For more interesting and useful tips about Windows 10 visit:
www.microsoft.com/en-gb/windows/emulator
2. Intended use
The Surbook is a Windows laptop that can be used for suring the Internet, running
a number of apps (including the Microsoft Ofice Suite), gaming, and streaming and
viewing music, images, and videos.1
Never use the device for anything other than its intended purpose. Malfunctions
may otherwise occur. Intended use includes observing all instructions contained
in the technical documentation. The manufacturer is not liable for damages
resulting from improper use or modiication of the device.
Furthermore, the manufacturer shall not be held liable for damage or for loss of
data or any subsequent damage caused as a result.
The manufacturer shall reserve the right to constantly further develop the
product. Changes may be made without any direct reference to them in the
user’s manual. As a result, the information contained in the user’s manual does
not need to relect the current technical design.
Unauthorized modiications to the device (particularly installing external
irmware not approved by the manufacturer or modiications to the device
hardware) will invalidate the warranty.
Not all of the applications you will need are pre-installed at the factory. You can download those
apps from the Microsoft Store. Some apps must be purchased.

5
3. Explanation of Safety Symbols and Keywords
This booklet uses the following safety symbols and keywords:
WARNING
Indicates possible danger to life and/or danger of severe, irreversible injuries
CAUTION
Follow instructions to avoid injuries and material damage
NOTICE
Follow instructions to avoid material damage
iADVICE
Additional information about using the device

6
4. General Safety Information
WARNING
Risk of multiple injuries due to reduced physical, sensory, or mental
capabilities and/or lack of knowledge or practical experience
■Children and vulnerable individuals may only use the device under direct
supervision.
Risk of suffocation and severe injuries from accessories and packaging
materials
■Keep accessories and packaging materials out of reach of babies, young
children, and pets.
■Do not insert accessories and/or parts of the device into oriices such as
your mouth, ears, or eyes.
Risk of electric shock or electrocution from live components
■Do not insert objects into the device’s ventilation slots.
■Do not open the power adapter.
■Do not touch the power adapter if your hands are wet.
■Do not short out the device and/or charger.
Risk of electric shock or electrocution and/or fire hazard from unsafe
connections
■Make sure the power cord is not bent, crimped, or damaged in any other way.
■Never use the power cord or plug if they are damaged.
■Only use the included power adapter and only connect it to a suitable
and professionally installed power outlet. Please read and observe the
speciications on the power adapter’s label.
■Do not use power outlets if they are loose.
■If the power adapter is defective, contact customer service.
Fire hazard and/or risk of burns from damaged or leaking batteries
■Do not use or charge the device if the battery is damaged or leaking.
■Avoid skin contact with the device and/or battery if the battery is leaking.
Wear protective gloves if it is not possible to avoid touching the device/
battery in such cases.
■Immediately wash your hands thoroughly in the event of skin contact with
the battery substrate.
■If the battery substrate comes into contact with your eyes, rinse them out
with plenty of water and consult a physician immediately.

7
Risk of hearing loss through the use of headsets, earbuds, or headphones
The device can generate high sound levels when using headsets, earbuds, or
headphones. This may result in hearing loss if your ears are exposed to high sound
levels over an extended period of time. The higher you set the volume, the more
quickly your hearing can be damaged. Hearing loss may occur slowly over time.
■Do not listen to music or other audio iles for an extended period of time at
high volumes.
■Lower the volume before connecting your headset, earbuds, or headphones.
■When using headsets, earbuds, or headphones, make sure the acoustic
emissions do not exceed an A-weighted sound level of 80 dB.
■Always set the volume at the lowest level where you can still clearly hear the
audio track being played without causing discomfort.
■Do not increase the volume once you have become accustomed to that
sound level.
■Adjusting the default settings for the equalizer can boost the device’s
volume levels.
■Changing the settings of pre-installed software (for example, the operating
system, irmware, drivers) can also increase volume levels.
Risk of multiple injuries due to reduced attentiveness
■Safety is the top priority while driving. For this reason, it is prohibited to
use the device while operating a motor vehicle.
■Always be aware of your immediate surroundings to avoid putting yourself
or others at risk.
■When using a headset, earbuds, or headphones in public, adjust the
volume so that you can still hear noises or sounds in your surroundings.
Distractions or being cut off from your surroundings may lead to
accidents. It is illegal to use headsets, earbuds, or headphones while
operating a motor vehicle in some regions.
Risk of interference with other electronic devices that transmit high-frequency
signals
■Switch off the device in safety or security zones where the use of mobile
devices is prohibited (e.g., when the plane is taking off or landing, in hospitals,
or near medical equipment). Obey the corresponding signs and warnings and
strictly observe the instructions contained on them.
■You are allowed to use the device in airplane mode with the permission of the
light crew once the aircraft has taken off. Please note that use of the device may
interfere with the plane’s electronic navigation systems.
■Refrain from using the device near other electronic devices.

8
Risk of multiple injuries and fire/explosion hazard in potentially explosive
atmospheres
■Operating the device in potentially explosive atmospheres, such as at illing
stations, on construction sites, or in chemical plants, is prohibited.
■Switch off the device if you are in areas that contain potentially explosive
materials (e. g., gas, fuel, chemicals, particulate matter, grain, dust, or metal
powders). Sparks could cause an explosion or ire.
■Obey the corresponding signs and warnings in these areas and strictly observe
all instructions contained on them.
CAUTION
Risk of fire or explosion when using non-approved chargers and power
adapters
■Only use the included power adapter or an equivalent power adapter to
charge the battery.
■If the power adapter is defective, only exchange it for an equivalent power
adapter. Please note the information in the technical speciications of the
power adapter in the online user’s manual or contact customer service.
Risk of multiple injuries from slipping, tripping, or falling
■Do not expose the device and/or power adapter to vibrations and/or any form
of impact.
■Do not drop the device and/or power adapter. Do not use the device/power
adapter if it has been dropped and/or is damaged. Have a qualiied service
technician check the device/power adapter before restarting it.
■Always ensure that the power cord is installed securely.
■Do not allow the power cord to knot or kink.
Risk of adverse effects to health in the case of a known predisposition to
photosensitivity
■If members of your family have been known to exhibit manifestations of
photosensitivity (e.g., seizures when using similar devices), it is advisable to
consult a physician before operating the device.
■Watching videos and/or playing video games with rapid frame rates over
an extended period of time may trigger a seizure or lead to fainting. Cease
all use of the device if you are feeling unwell and wait an appropriate
amount of time before starting to use it again.
■If you are experiencing muscle cramps or feeling disoriented while using
the device, cease all use of the device immediately and consult a physician.

9
■To avoid tiring or straining your eyes, please note the following:
■Only use the device indoors under suitable lighting conditions and avoid
harsh light.
■Hold the device at an appropriate distance from yourself.
■Ensure that the display is clean.
■Adjust the screen’s brightness and/or contrast settings to a level that is
comfortable for a crisp, clear display.
■Take regular breaks when using the device.
Risk of impairment to the musculoskeletal system and supporting tissue
from use over longer periods of time
■Repetitive movements (e.g., use of keyboard/touch screen or playing
games for an extended period of time) may result in pain in the hands,
arms, shoulders, neck and shoulder region, and in other parts of the body.
To avoid tiring or straining your musculoskeletal system and supporting
tissue, please note the following:
■Always assume a relaxed posture when using the device.
■Change your position regularly and take frequent breaks to move
around.
■Press lightly when typing.
■Take regular breaks.
■If you are experiencing discomfort similar to that indicated above while using the
device, cease all use of the device immediately and consult a physician.
■Do not rest the device on your lap or other parts of your body when in use. The
device may heat up, resulting in discomfort or injury (e. g., minor burns).
NOTICE
To avoid potential malfunctions and/or damage to the device caused by
environmental factors, please note the following:
■The recommended humidity for operating, charging, and storing the device
is between 30 and 70 percent.
■The recommended ambient temperature for operating, charging, and
storing the device is between 5° C and 30° C. Temperatures above or
below this may adversely affect the charging capacity and service life of
the device and battery and cause damage to the device.
■Protect the device from rapid temperature luctuations. Condensation from
humidity can damage the device and may result in danger to the user.
■Shield the device from direct sunlight (e. g., in the car) and do not store it near
a heat source to prevent the display and device from malfunctioning and avoid
the risk of the battery exploding.

10
■Keep the device away from open lames such as candles, ireplaces, and
campires to avoid the risk of the battery exploding.
■Do not expose your device to rain or to dripping or splashing water.
■Do not use the device outdoors during a storm.
■Should the device become wet, turn it off immediately. Ensure that the device
and/or the power adapter are checked by a qualiied person before using it
again.
■Use the device in a dust-free environment.
■Magnetic ields may cause the device to malfunction and/or the battery to
discharge.
To prevent possible damage to your device:
■Do not charge your device on standard USB ports such as those found on
desktop or laptop computers.
■Take care to wind the cord loosely.
■Moisture, dense smoke, and fumes may lead to malfunctions and/or
damage the device’s housing.
iADVICE
The storage capacity indicated on the packaging and in the technical
specifications refers to the total storage capacity of your device. The storage
capacity of your device as indicated by the operating system may differ from the
specified storage capacity, as a portion of the total storage is also used by the
operating system and system applications.

11
5. Technical specifications
Processor (CPU): Intel® Celeron N4000 processor*
(up to 2.6 GHz, 2MB Intel® Smart-Cache),
dual core;
Intel® Pentium® Silver N5000 processor*
(up to 2.7 GHz, 2MB Intel® Smart-Cache),
quad core
Operating system: Windows 10 Home in S mode
RAM: 4 GB
Storage capacity: 64 GB
Graphics processing unit (GPU): Intel® UHD Graphics 600*,
Intel® UHD Graphics 605*
Display size: 11.6" (29.5 cm)
Display type: Full-HD-IPS-Display
Screen resolution: 1920 x 1080 pixel
Aspect ratio: 16 : 9
Camera: Front: 0.3 MP
Speaker: stereo
Microphone: dual microphone
Interfaces: M.2 SSD extension, 1 x USB 3.1 Gen 1,
1 x USB 2.0, memory card reader,
audio out/mic in (3.5mm), Mini-HDMI®
Network: WiFi, Bluetooth 4.2, Miracast™
Frequencies: WiFi 802.11 ac/b/g/n: 2.4 GHz/5 GHz
Memory extension: microSD(HC/XC) up to 256 GB,
M.2 SSD (42 mm - B key)
Dimensions (B x H x T): ca. 289 x 203 x 22.4 mm
Weight: ca. 1095 g
Material/Colour: Plastic/Black
MPEG-4.2 SP/ASP (z. B. Xvid bis simple@L3)
Video container formats: AVI, MKV, MOV
Gaming: 3D-Games, G-Sensor Games,
Classic Games
Supported picture formats: JPEG, PNG, GIF, BMP
Playable audio formats: MP3, WAV, OGG, FLAC, AAC

12
Battery: Li-Polymer
Battery capacity: 7.6 V/4600 mAh/34.96 Wh
Charge by: DC IN
Power supply: Power adapter (100 V – 240 V)
More: Hall-Sensor
Languages: German, English, Italian, Spanish, French,
Dutch; additional languages available via
Windows Download
Preinstalled Software: Ofice 365 Personal (one-year-license)**
Temperatures: 5° C to 30° C
Relative humidity: 30 % to 70 %
* depending on the model
** activation required. Ofice 365 Personal for 12 months included, software is already pre-installed.
Ofice activation is required within 6 months of Windows activation date. After expiration, the
license must be renewed for a fee.
Technical specifications of the power adapter
Model: EE-202000E
Input voltage: 100 - 240 V ~ , 50/60 Hz
Input current: 0,5 A max.
Output: DC 12 V/2000 mA
Standby power consumption: < 0,30 W
Manufacturer: Shenzhen Engine Power Co., Ltd.
6. Content
■TREKSTOR SURFBOOK E11B
■Power adapter (100 V - 240 V)
■Cleaning cloth
■Quick start guide
■Product safety and legal information
13
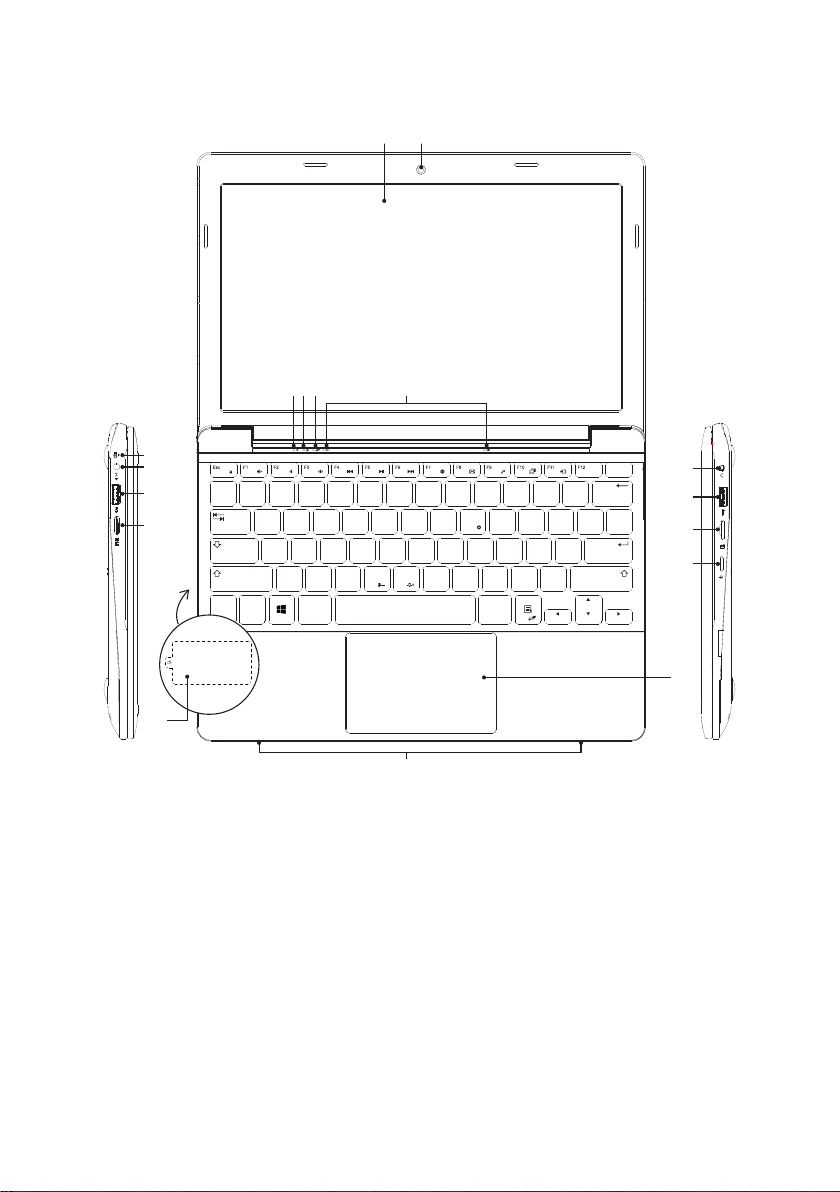
7. Controls and ports
Strg Alt Alt Gr
Fn
!
1
§
3³
"
2²
$
4
%
5
&
6
`
´
^ß \
?
°
Bild ▲
€
/
7{
(
8[
)
9]0
=
}
~+
*
#
'
@
Q
A S D F G H J K L Ö Ä
W E R T Z U I O P Ü
.
:
-
_
,
;
|<>
V B NY X MC
µ
Bild ▼Ende
Pos1
Entf
EinfgDruck
BA
C
D
E
F
P
L
M
N
O
KI J
Q
H
G
M.2 SSD extension
A) Display J) Status LED touchpad
B) Camera (front) K) Dual microphone
C) Charging LED L) Audio port
D) DC IN M) USB socket 2.0
E) USB socket 3.1 Gen 1 N) Memory card slot
F) Mini-HDMI® socket O) On/Off switch
G) M.2 SSD extension P) Touchpad
(bottom) Q) Stereo speaker
H) Status LED on/off (bottom)
I) Status LED Caps Lock
14
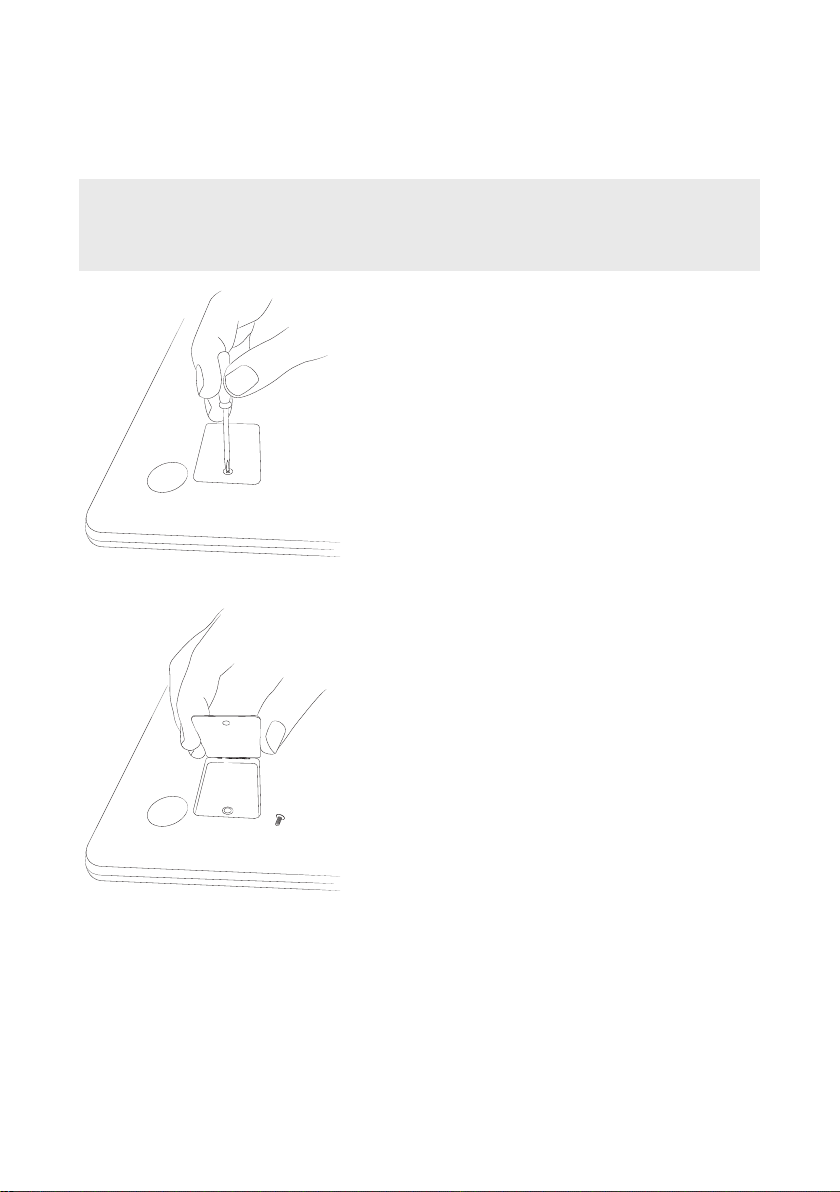
8. Insert M.2 SSD MODULE (optional)
Follow the step-by-step instructions shown to insert the SSD into the SSD extension
slot. Make sure that the computer is switched off before inserting the SSD.
iADVICE
The Surfbook E11B is only compatible with an SSD module with form factor
M.2 2242 in version B & M key and B key.
Step 1: Unscrew SSD extension slot
Use a screwdriver to loosen the screw in the cover
of the SSD extension slot. Remove and retain the
screw.
Step 2: Open SSD extension slot
Open the cover of the SSD extension slot by
inserting a small lever into the screw opening and
lifting the cover. Never use sharp or sharp-edged
tools. Then use your ingers to remove the cover.
A second screw base becomes visible once you
open the SSD extension slot. Loosen the screw in
the screw base; remove and retain it.

15
Step 3: Insert SSD
Align the SSD before inserting it into the
extension slot. The semicircular recess of
the SSD points towards the screw base and
the gold-coloured contacts of the SSD point
towards the contacts in the SSD extension slot.
Insert the SSD slightly diagonally into the SSD
extension slot.
iADVICE
The SSD can only be inserted in one direction. Depending on the connection type
that your device features, the SSD may have to be rotated along its longitudinal
axis to it correctly.
You know the SSD has been inserted correctly if the semicircular recess is
secured irmly to the screw base. Use the screw removed in step 2 to tighten the
SSD in the deeper-lying screw base.
Step 4: Seal SSD extension slot
Use the cover to seal the SSD extension slot. Then use the screw removed in
step 1 to screw together the SSD extension slot.
Start your computer. The control panel will now display the SSD as a new
storage medium. The SSD is now ready for use.

16
9. Starting up the Surfbook for the first time
First unpack your Surbook. Remove all components from the packaging and
completely remove the packaging material, including the protective ilm. Check
to ensure that the delivery is complete (see Section 6). If you ind that there are
missing or damaged components, contact customer service immediately.
Charging the Surfbook
Please fully charge your Surbook before you use it for the irst time.
Connect the DC plug of the included power supply to the socket (DC IN) of the
Surbook. Then plug the power supply into an electrical outlet.
iADVICE
Only leave the power adapter connected to the power socket until the Surfbook is
fully charged. Disconnect the power adapter from the socket first and then remove
the charging cable from your Surfbook.
iADVICE
The maximum battery life is reached after approximately charging cycles.
iADVICE
We recommend charging the Surfbook while it is switched off. This allows you
to get the maximum charging speed.
Switching on the Surfbook
Press the On/off switch for about 2-3 seconds to switch on the Surbook. The
charging LED lights up and the device starts up. A coniguration assistant
appears directly after the tablet has booted up. Follow the coniguration
assistant instructions to set up your Surbook.
iADVICE
During the setup process, the configuration assistant will prompt you to sign in
with your Microsoft account. If you do not yet have a Microsoft account, please
set one up at this point.

17
Unlocking the display
As soon as the device has been set up (and every time it is subsequently
switched on and booted up), the lock screen appears. Press any key on the
keyboard to unlock the screen.
iADVICE
If your Surfbook is password-protected, you must then enter the password.
iADVICE
Alternatively, you can also log into your Surfbook via Windows Hello. To activate
and set up this feature, select "Settings" → "Accounts" → "Sign-in options"
→ "Windows Hello".
10. Switch out of Windows 10 Home in S mode (optional)
iADVICE
Turning off the S mode is a one-time process. If you make the switch, you will
not be able to return to S mode from Windows 10 Home.
a) Open the Microsoft Store (see section 19).
b) Enter "Switch out of S Mode" in the search bar.
c) A window will appear "Switch out s mode".
d) Click on "More information".
e) Click on "Install".
f) If necessary, log in with your Microsoft account (see section 19).
g) Conirm that you have saved all your iles.
iADVICE
If you have not saved your files, they can be lost.
h) Windows 10 Home will now run without S mode.
18
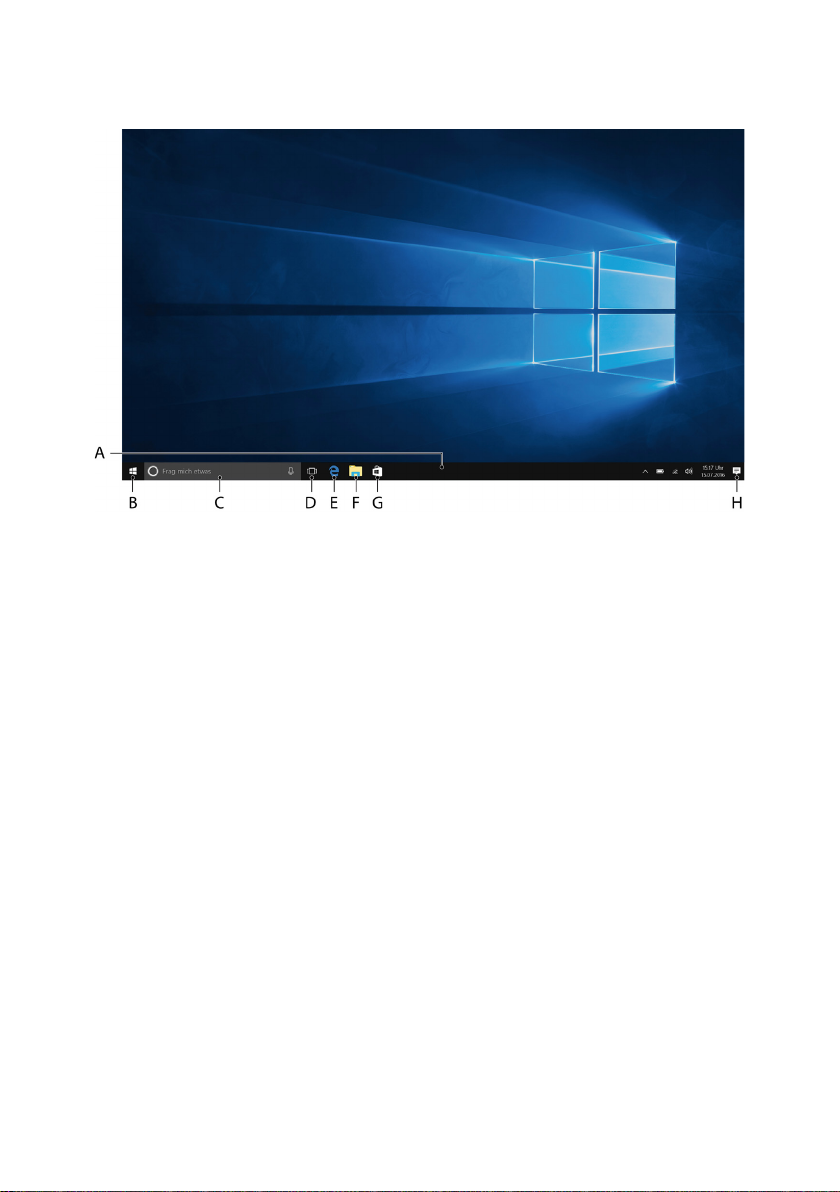
11. Important elements on the start screen
A) Task bar
B) Windows icon: Opens the Start menu
C) Cortana: Your digital assistant reminds you of pending tasks and
appointments and gives hints and tips
D) Task View: Enables the Task View and shows all open programs including
the "+ New Desktop" button for creating virtual desktops
E) "e" – Microsoft Edge: Opens the Internet browser
F) Folder symbol: Opens the ile browser
G) Windows Store: Opens the Windows Store
H) Memo symbol: Opens the Action Center
12. Using the keyboard
Special keys and function buttons on the keyboard
To simplify operation, the keyboard has numerous special keys and function
buttons for controlling the Surbook.
Fn key (blue)
The blue Fn key is used to enable or operate the additional function buttons
(blue symbols) on the keyboard.

19
These additional function keys include the F1 to F12 function keys, the "settings"
(cogwheel symbol) , "deactivate touchpad", "|", "<" and ">" keys as well as
the keys for controlling display brightness (sun symbol and "+" or "-"). It also
includes "Page (high)", "Page (down)", "Home" and "End" for faster navigation.
To enable and use these functions, keep the Fn key pressed as you press the key with
the required blue symbol.
Function buttons in the top row of buttons
Lock screen
Mute
E-Mail
Search
Project
Devices
Prt Scr (= Print Screen)
Ins (= Insert)
Volume -
Volume +
Previous track
Play/Pause
Next track
Open browser
Windows button
Press this button to enter the Start menu. In conjuction with other keys, e. g.
Windows + E (display My Computer), other control demands can be given.
13. Touchpad
The touchpad performs the functions of a mouse. Move the cursor on the touch
surface by swiping your inger across the surface in the desired direction.
The keys (invisibly integrated in the lower part of the touchpad) perform the
same functions as mouse keys:
You use the left key to select functions, programs and iles, position objects and
conirm commands. The right mouse key calls up the context menu.
You can change the size of some displays (images, Web pages, and so on). Move
two ingers apart on the touchpad to enlarge the display.
In reverse, move two ingers towards each other on the touchpad to reduce the
display again.
Similarly, you can move the screen contents either up or down by placing two
ingers on the touchpad in parallel and swiping either up or down.

20
14. Info Center
The Info Center is a bar with quick links to some important Surbook functions,
which you can either display or hide. To access the Info Center, click the memo
symbol on the bottom right of the display.
iADVICE
Among other things, the Info Center includes a quick link to what is known as
T ". If you tap this function, the Start menu is enlarged in the display.
15. Accessing and using the Start menu
The Start menu acts as the starting point for all of the important content of
your Surbook. Below you can read some useful information about the Start
menu’s basic functions.
Accessing the Start menu
There are two ways to display the Start menu:
■Click the Windows symbol on the bottom left in the task bar.
■Press the Windows button on the keyboard.
Tapping/Pressing a second time will hide the Start menu.
Layout of the Start menu
In addition to the straightforward navigation list (A) found in the "classic" Start
menu of older Windows versions, the Start menu of your Surbook has a useful
app area (B) to the right of the navigation list.
This manual suits for next models
1
Table of contents
Other TrekStor Laptop manuals

TrekStor
TrekStor YOURBOOK C11B User manual

TrekStor
TrekStor PRIMETAB T13B User manual

TrekStor
TrekStor SurfBook W2 User manual

TrekStor
TrekStor PRIMEBOOK P14 User manual

TrekStor
TrekStor PRIMETAB T13B User manual

TrekStor
TrekStor PRIMEBOOK P14B User manual

TrekStor
TrekStor PRIMEBOOK U13B User manual

TrekStor
TrekStor PRIMEBOOK C13B User manual

TrekStor
TrekStor SurfBook A13B User manual

TrekStor
TrekStor PRIMEBOOK C11 User manual


