Trelawny TCG 250 User manual
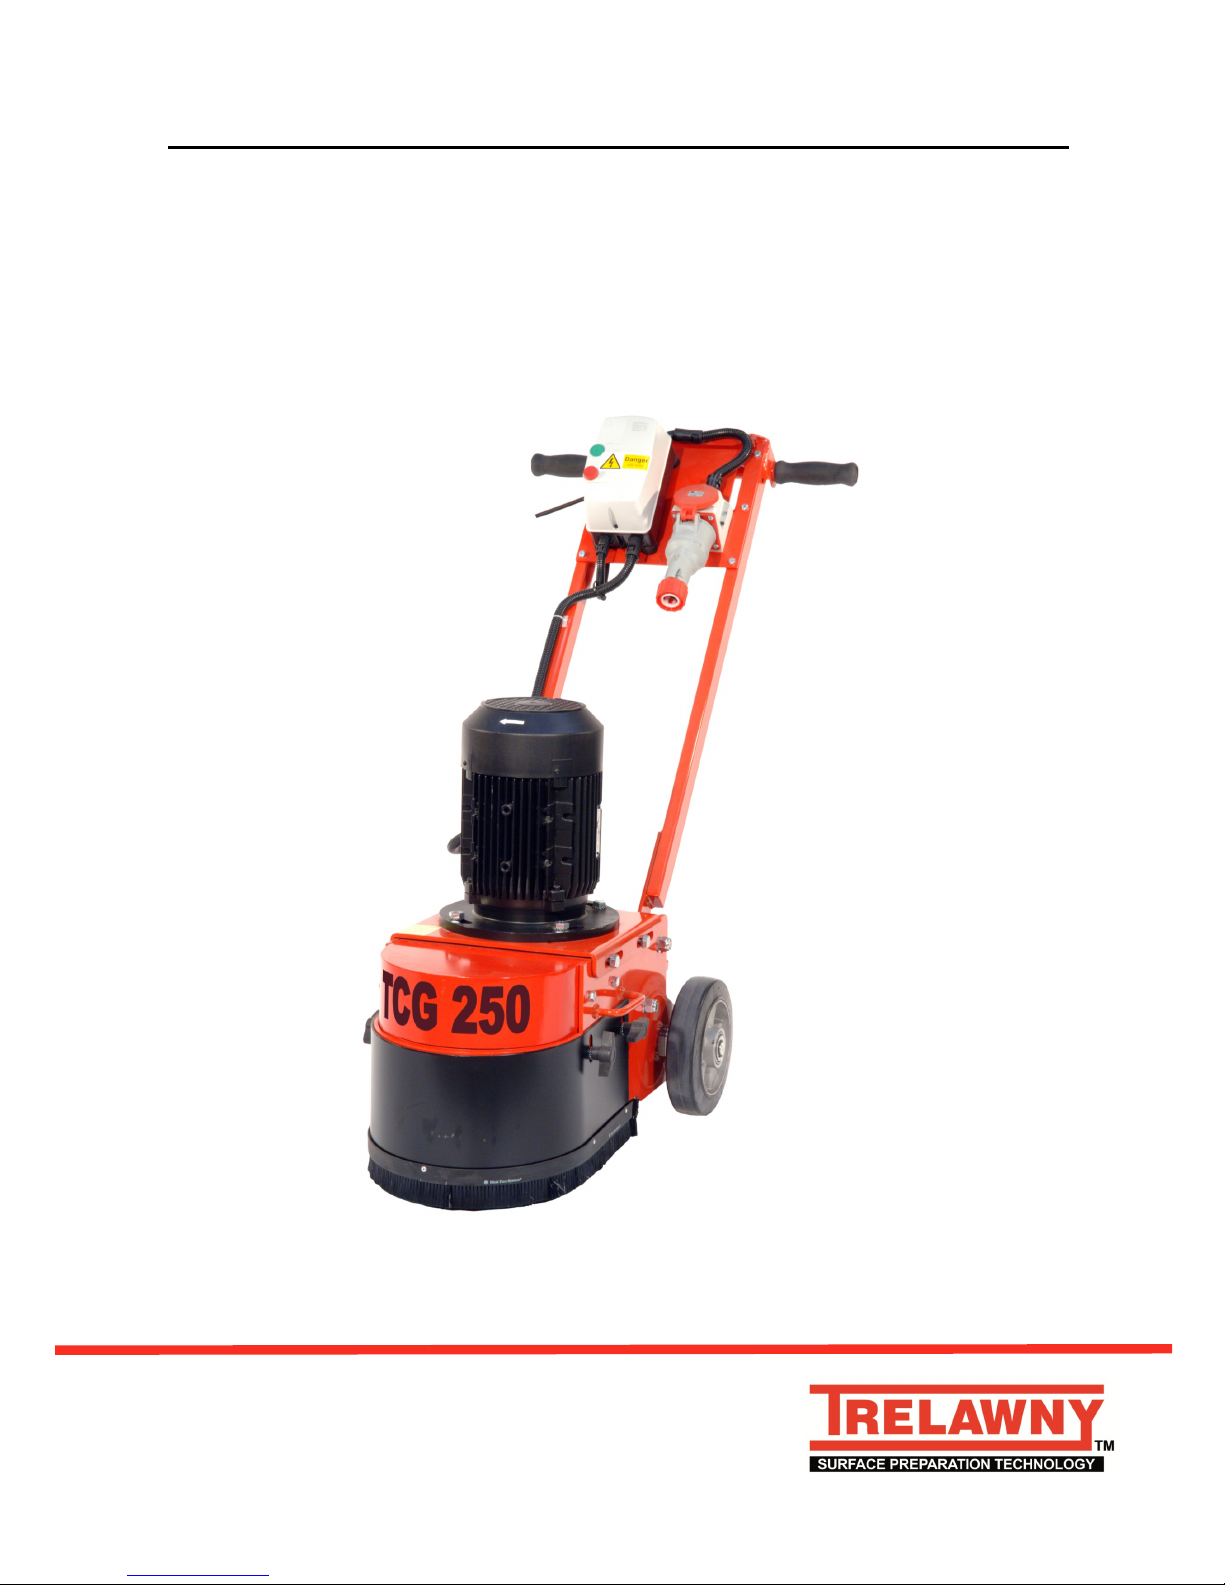
TCG 250 Floor Grinder
Operation and Maintenance Manual
www.trelawnyspt.co.uk

OPERATION
Foreword
Thank you for your purchase of the
TRELAWNY TCG250 Floor Grinder.
This manual contains the necessary
maintenance information for you to
ensure proper operation and care for
this machine.
See also the manual that is
s up p l ie d b y t h e e n g i n e
manufacturer.
It is essential for you to read
t h r o u g h t h e s e m a n u a l s
thoroughly.
In the unlikely event that you
experience problems with your
TCG250, please do not hesitate to
contact your local Trelawny dealer or
a ge nt . W e a lwa ys w el co m e
feedback and comments from our
valued customers.
General Information
Before op erating, perform ing
maintenance or repairing the
TCG250 FLOOR GRINDER this
m a nu a l m u s t be r e ad a n d
understood by the operator, if in any
doubt, ask your supervisor before
using this equipment.
Local safety regulations must be
followed at all times. Failure to follow
these instructions could result in
damage to the TCG250 and/or
personal injury.
Trelawny SPT Limited disclaims all
responsibility for damage to persons
or objects arising as a consequence
of incorrect handling of the machine,
failure to inspect the machine for
damage or other faults that may
influence the operation prior to
starting work, or failure to follow the
safety regulations listed or applicable
to the job site.
This machine is primarily designed
for the smoothing of concrete,
marble and terrazzo surfaces. It can
be used both indoors and out.
Electric models are more suitable for
indoor use because of the toxic
exhaust gases that are produced by
petrol engines.
Safety
WEAR SAFETY BOOTS, FACE
MASK, SHATTERPROOF
GLASSES, HELMET, GLOVES and
any other personal protective
equipment required for the working
conditions. Avoid loose clothing; this
may become trapped in moving
parts and cause serious injury.
TO AVOID NUISANCE DUST,
connect an industrial vacuum
cleaner (minimum 3000watts or
equivalent) to the 50mm (2”) vacuum
port situated at the rear of the
machine.
ENSURE THAT THE WORK PLACE
IS WELL VENTILATED. Avoid
operating engine-powered machines
in an enclosed area, since engine
exhaust gases are poisonous.
BE VERY CAREFUL WITH HOT
COMPONENTS. The exhaust and
other parts of the engine are hot
during operation and can remain hot
for some time after shutdown.
DO NOT REFUEL THE ENGINE
WHILE THE ENGINE IS HOT OR
RUNNING, there is a very real
danger from explosion –always
refuel when the engine is cold, and
in the open air.
During transportation fasten fuel cap
tightly and close fuel tap.
DO NOT OPERATE ELECTRIC
VERSIONS IN WET CONDITIONS.
CAUTION THIS MACHINE IS
HEAVY. I t we ighs b etween
(92kg/202lbs) and (144kg /317 lbs)
dependent on power unit.
Do not lift this machine manually.
Risk of Hand-arm
Vibration injury
These tools may cause Hand-arm
Vibration Syndrome injury if their use
is not adequately managed.
We advise you to carry out a risk
assessment and to implement
measures such as; limiting exposure
time [i.e. actual trigger time, not total
time at work], job rotation, ensuring
the tools are used correctly, ensuring
the tools are maintained according to
our recommendations, and ensuring
that the operators wear personal
p r o t e c t i v e e q u i p m e n t [ P P E ]
particularly gloves and clothing to
keep them warm and dry.
Employers should consider setting
up a programme of health
s u r ve i l l an c e t o e s t a b l is h a
benchmark for each operator and to
detect early symptoms of vibration
injury.
We are not aware of any PPE that
provides protection against vibration
injury by attenuating vibration
emissions.
See „Specifications‟ section for
vibration emission data.
Further advice is available from our
Technical Department.
We strongly advise you to visit the
Health & Safety Executive website
http://www.hse.gov.uk/vibration This
site provides excellent advice and
information on HAV and currently,
includes a Hand-arm Vibration
Exposure Calculator that is easy to
use to work out the daily vibration
exposure for each of your operators.
Media Types &
Applications
Grinding Blocks
All can be used wet or dry
Coarse grinding blocks
These are fitted as standard on
machines fitted with the grinding
block option. These are designed for
the rapid removal of material. They
produce a surface finish suitable for
directly laying floor coverings or for
two part epoxy paint coatings and for
the first grind of terrazzo floor
surfaces.
Medium grinding blocks
These are less aggressive than the
coarse blocks, they should provide a
surface finish suitable for painting or
used as the next stage to the coarse
grinding blocks, when achieving a
polished surface on terrazzo tiles or
other marble type surfaces.
Fine grinding blocks
These are the least aggressive of all
the grinding media. These are
generally only used for final finishing
to provide a surface suitable for final
polishing.

OPERATION
In addition, scarifying blocks and
wire brushes are available which can
be fitted in place of the grinding
blocks.
Diamond Disc machine
The machine is fitted with a 20
segment diamond disc for medium
concrete as standard (see below for
specification). There are also 10
segment discs for very aggressive
grinding and 16 segment discs for
aggressive grinding available. The
20 segment disc are the most
economical and least aggressive.
All discs can be used wet or dry.
Grinding disc 20 segment (Blue)
(Soft bonded diamond)
Premium disc.
For medium to hard material,
granite, cured concrete or terrazzo.
Grinding disc 20 segment (Black)
(Medium bonded diamond)
Premium disc.
For medium or general abrasive
materials - medium strength
concrete or adhesives.
Grinding disc 20 segment (Red)
(Hard bonded diamond)
Premium disc.
For softer or abrasive materials -
green (less than 48hrs old) or
medium strength concrete, or
adhesives.
Pre-Start Check
ALL VERSIONS
Check all bolts and screws for
tightness. Ensure that all fittings are
secure.
Check the drive belts for correct
tightness. There should normally be
approximately 13mm (1/2") of free
play when the belt is depressed in
the middle position between the two
pulleys.
To check and set the belt tension,
refer to the Belt installation &
Adjustment section.
The TCG250 is supplied with a
specially commissioned electric
motors and starter switch assembly.
Each unit is fully tested and the
overload relays have been calibrated
a n d s e t a c c o r d i n g t o t h e
manufactures specifications.
In the event of malfunction on a new
machine, the owner should first
check that the power supply on site
is suitable and adequate.
All cables should be fully uncoiled
and never left wrapped around cable
reels or tied in loops.
The starter box is fitted with a safety
feature to protect the motor and
relays from damage. Should an
overload condition occur which
triggers the thermal overload within
the starter, depress the red stop
button to reset.
Note that the circuitry may have to
cool down for a period before the
overload switch can reset itself upon
depressing the stop button.
The starter boxes are preset and
under no circumstances should they
be tampered with, stripped down or
adjusted, otherwise it will invalidate
the warranty.
.
110v Motor
The motor requires the minimum of a
32amp, 110v power supply.
Always use the shortest possible
length of extension cable. To avoid
voltage drop the cable must be a
minimum core wire size of 2.5mm2
but preferably 4.0mm2cross-section.
The maximum length of cable can
then be 15 metres and 30 meters
respectively.
Use a centre tap transformer with a
continuous rated output of at least
3.0KVA. In practice this means that
a 5.0KVA transformer must be used.
Manufacturers have different
methods of rating their equipment.
All transformers and cables should
be fitted with 32amp plugs and
sockets.
The 230v supply to the 110v
transformers ideally should be rated
to at least 20amp if supply problems
are to be avoided.
230v and 415v Motors
Take particular care when using
230v or 415v Machines, ensure that
the electrical supply is earthed and
that breakers and fuses are correct
for the loading.
The 230v motor requires the
minimum of a 13amp, 220v power
supply.
The 415v motor requires the
minimum of a 10amp, 380v power
supply. Always use the shortest
possible length of extension cable.
To avoid voltage drop the cable must
have a minimum core wire size of
2.5mm2cross-section area.
Maximum length of cable 30 meters.
Starting
Machines fitted with petrol
engines
The disc must be raised off the floor
surface before starting the engine
from cold.
The machine is fitted with a pedal
operated stand to allow the disc to
be raised off the ground when
starting the engine.
Tilt the machine back by it‟s handle
bar whilst depressing the pedal,
keeping the pedal depressed, lower
the machine back to the floor. The
weight of the machine keeps the
stand engaged and the head off the
floor.
The engine may now be started.
When starting from cold the throttle
lever must be in the fast position to
allow the automatic choke to
operate. Subsequent starting may
be carried out with the lever in the
idle/slow position.
Once the engine is at operating
temperature you may begin work.
To retract the stand simply tilt the
machine back.
See next section for detailed engine
starting procedure.
ENGINE VERSIONS
CAUTION
Beware of POISONOUS FUMES.
Start and operate only in well-
ventilated areas.
Be careful with
HOT COMPONENTS.
The exhaust and other engine parts are
hot during and for some time after
operation. Do not touch them.

OPERATION
Petrol engine starting procedure
Check that there is sufficient fuel in
the fuel tank. (See manufactures
hand book for type)
Check that the engine oil level is
correct. (See pre-start check)
Ensure that the machine is started
on a level surface.
Open the engine fuel tap.
For cold engine starting, the 5.5hp
engines have an automatic choke,
apply full throttle to operate.
Set the start switch to the "on"
position on Honda supplied engines.
Check that the machine has been
raised on its stand.
Pull the „hold to run‟ lever against the
handle bar.
Pull the recoil starter cord handle.
After the engine starts, move the
throttle lever towards the idle/tick-
over position until the engine runs
smoothly.
After a minute or two reduce to a
quarter open throttle setting and
warm up the engine for a further 2~3
minutes before setting to tick over.
The warm up procedure is
particularly important during cold
weather.
Machines fitted with an
electric motor
IMPORTANT:
Pull back on the handle bars to
retract the machines stand, pull the
„hold to run‟ lever against the handle
bar and press the green start button
on the switch box, then gently lower
the disc onto the surface being
worked.
IMPORTANT
Do not pull the recoil starter cord
to the end of its travel as it may
cause damage to the engine or
injury to the operator.
When the engine starts, recoil the
cord slowly.
Do not allow the cord to snap back
to its start position.
: EMERGENCY SHUTDOWN :
Release the “Hold to run lever” on
the handle bar and/or switch off
the ignition switch on Honda
engine versions.
Machine Operation
(Please refer to manual handling
recommendations when lifting.)
Connect a suitable commercial
vacuum which has been designed
for the collection of concrete dust
and possibly toxic paint particles, or
for use in the pharmaceutical or food
industries, Trelawny can supply
special HEPA filtered vacuums
which are suitable for these
applications.
Or if suitable for the area being
worked, connect a water hose to the
supplied connection at the rear of
the machine.
Shut Down
On electric powered machines,
simply release the “hold to run”
lever.
On engine powered machines, move
the engine‟s throttle lever to the slow
speed position. (This avoids the
engine becoming washed internally
by neat fuel if switched off from high
engine revolutions.)
Release the „hold to run‟ lever and
on Honda engines, switch off the
engine's start switch.
Important:
Close the engine fuel tap.
On both electric and engine powered
machines, use the stand to raise the
disc off the ground to prevent any
built up heat deforming the rubber
coupling if it is left under load whilst
hot and stationary. The machine
can be stored whilst on it‟s stand.
After the engine or motor has
completely cooled, clean off any
concrete dust from external
components and remove any heavy
build up of concrete dust from inside
the front dust skirt, (See start of
“Grinding Block Replacement”
section for safe method of gaining
access to inside of front dust skirt).
Take care when using hoses or
pressure washers and clean within
the dust skirt area only.
Do not to allow water to be directed
at or splashed onto the engine,
electric motor or any electrical
components. Once clean and dry,
cover the machine to protect it and
store the grinder in a dry place.
Machine Storage
Long period storage: over
3months
Clean outside of machine, inspect
the grinding blocks for wear; replace
any worn parts as required.
Remove any build up of material
from inside of grinding disc area
following step in start of “Grinding
Block Replacement” Section .
Cover the machine to protect it.
Store the machine in a dry place.
Be sure to check security of wooden
wedges after any lay up period.
On engine-powered machines,
once the engine has reached
operating temperature and you are
ready to start work, set the throttle
lever to the full throttle position, pull
back on the handle bars to retract
the machines stand and slowly lower
the disc to the surface.
The machine may oscillate slightly
during use, which is normal. Move
the machine slowly backwards and
forwards, slightly swinging the
grinding head right and left; this will
ensure that a uniform finish is
achieved.
Complete a small area noting the
performance; on engine versions
reduce the throttle to tick over and
release the „hold to run‟ lever.
Then on both engine and electric
motor versions release the „hold to
run‟ lever to stop the machine,
inspect the finish produced.
If necessary change the grade of
grinding blocks or diamond discs
and recheck performance and
surface finish.

MAINTENANCE
Belt Installation &
Adjustment
Removal
Remove t he top cover b y
unscrewing the two 8mm bolts either
side of the chassis.
Loosen the engine/motor mounting
plate bolts and slide the engine/
motor forward. Slide the belt off the
drive pulley and then remove it from
the engine/motor pulley.
Installation
Slide the new belt onto the engine/
motor pulley first, locating the belt in
the pulleys teeth. Then slide onto
into the teeth of the drive pulley.
Slide the engine/motor backwards
until the slack in the belt is taken up,
gently nip the four bolts and ensure
the slack in the belt is correct (see
note below). If the tension needs
adjusting move the motor mounting
plate in the desired direction until the
correct tension is achieved.
Tighten all engine/motor mounting
plate bolts fully, refit the top cover
and tighten the 8mm bolts.
IMPORTANT
Normal slack should be
approximately 13mm (1/2") when
the belts are depressed in the
middle position between the
engine pulley and driveshaft
pulley.
Drive system maintenance
The drive system on the TCG250 is
virtually maintenance free and will
give a long service life without
attention providing the belt tension is
set correctly.
The belt may need changing
occasionally, the bearings (29) will
require greasing after any lay up
period and/or every 6 months or
occasionally during heavy use.
Grinding Block
Replacement
Switch off the engine powered
versions and allow the engine to
cool completely, disconnect electric
motor powered versions from its
power supply.
Place the machine on a flat and level
surface.
Raise the front skirt by loosening the
four 10mm guard retaining bolts on
either side of the machine and slide
the guard up to the top of the slots,
tighten the bolts temporarily.
Tilt the machine backwards to rest
on its handle bar.
Place a heavy object (10kg sand
bag, etc.) across the upper part of
the handle bar or tie down for
additional security.
Take note how the grinding blocks
and wedges have been assembled,
using a suitable wooden drift, knock
out the grinding block, not the
wooden wedge.
Dispose of the used grinding blocks
according to local legislation.
Fit each new grinding block squarely
into the grinding plate location corner
at the outer flat face of the grinding
disc.
Secure with a new wooden wedge,
between the block and the inner face
of the grinding block, knock the
wedge into position using a suitable
drift.
Note:
Do not use a mix of old and new
grinding blocks, this will cause rapid
wear of the new blocks and could
cause the machine to become
uncontrollable, unstab le a nd
dangerous in use.
Re-adjust the lower guard and
tighten the bolts.
Diamond Disc/Q.R.
Plate Replacement
Switch off the engine powered
versions and allow the engine to
cool completely, disconnect electric
motor powered versions from its
power supply.
Place the machine on a flat and level
surface.
Raise the front skirt by loosening the
four 10mm guard retaining bolts on
either side of the machine and slide
the guard up to the top of the slots,
tighten the bolts temporarily.
Tilt the machine backwards to rest
on its handle bar.
Place a heavy object (10kg sand
bag, etc.) across the upper part of
the handle bar or rope down for
additional security.
Remove the four countersunk M12
screws from the disc, ensuring that
the disc is supported as the last two
are removed. The disc now will
come away from the drive plate.
Dispose of the used item according
to local legislation.
Offer the new disc up to the drive
plate and align the holes. Loosely fit
the four bolts and then tighten in a
diagonal sequence to 40lb/ft.
Re-adjust the lower guard and
tighten the bolts
Brush Seal
Replacement
The machine is fitted with a flexible
brush seal which will need
replacement from time to time to
maintain the efficiency of the dust
control system. Follow the first five
steps from the above procedure for
changing discs. Drill out rivets and to
remove the brush simply grasp one
end and pull, the brush will come off
the guard.
To fit the new brush, align one end
of the brush with the end of the
guard and use a suitable drift to
knock the brush onto the metal
guard, working along until it is
securely fitted.

TROUBLESHOOTING
FAULT CAUSE ACTION
Engine stops suddenly
or does not run correctly
No fuel in the fuel tank. Refuel fuel tank. (See safety section.)
Spark plug faulty. Replace spark plug.
Fuel blockage. Check fuel line and strainer.
Air filter partially blocked. Replace air cleaner element.
Motor stops suddenly or
does not run correctly
Loose wiring, incorrect voltage, or blown
fuse.
Check connections and power supply or
replace fuse.
Engine/motor runs but
the grinding heads do
not move.
Drive Belts slack or failed. Replace Belt or adjust tension.
Sheared drive key/ loose taperlock bush Replace key and re-torque taperlock bush.
Grinder is slow or erratic No grinding blocks fitted Check grinding discs for any damage, replace
if necessary. Fit new grinding blocks.
Loose or a failed drive belts. Adjust drive belt, or replace.
Surface too rough. Use Trelawny TFP200/250 surface Planer to
produce a smoother surface or to remove bulk
of material prior to grinding. Change grinding
blocks to a coarser grade.
Engine will not start No fuel in the fuel tank Refuel fuel tank, see safety precautions.
Water in fuel Drain fuel tank, float chamber, and refuel.
Incorrect fuel in tank, i.e. diesel in petrol
tank
Clean out fuel tank, all fuel lines and
carburettor float chamber. Refuel with correct
fuel.
Spark plug faulty Replace spark plug.
Motor will not start Power supply is not switched on, blown
fuse, voltage incorrect, loose wiring, or
faulty motor.
Confirm that the power supply is switched on.
Rectify loose wiring, replace blown fuse or
replace motor.
Use above information in conjunction with the Honda / Briggs and Stratton Operation and Maintenance Manual.
If problem has not been cured by any of the above actions, contact your local Trelawny SPT dealership for assistance.

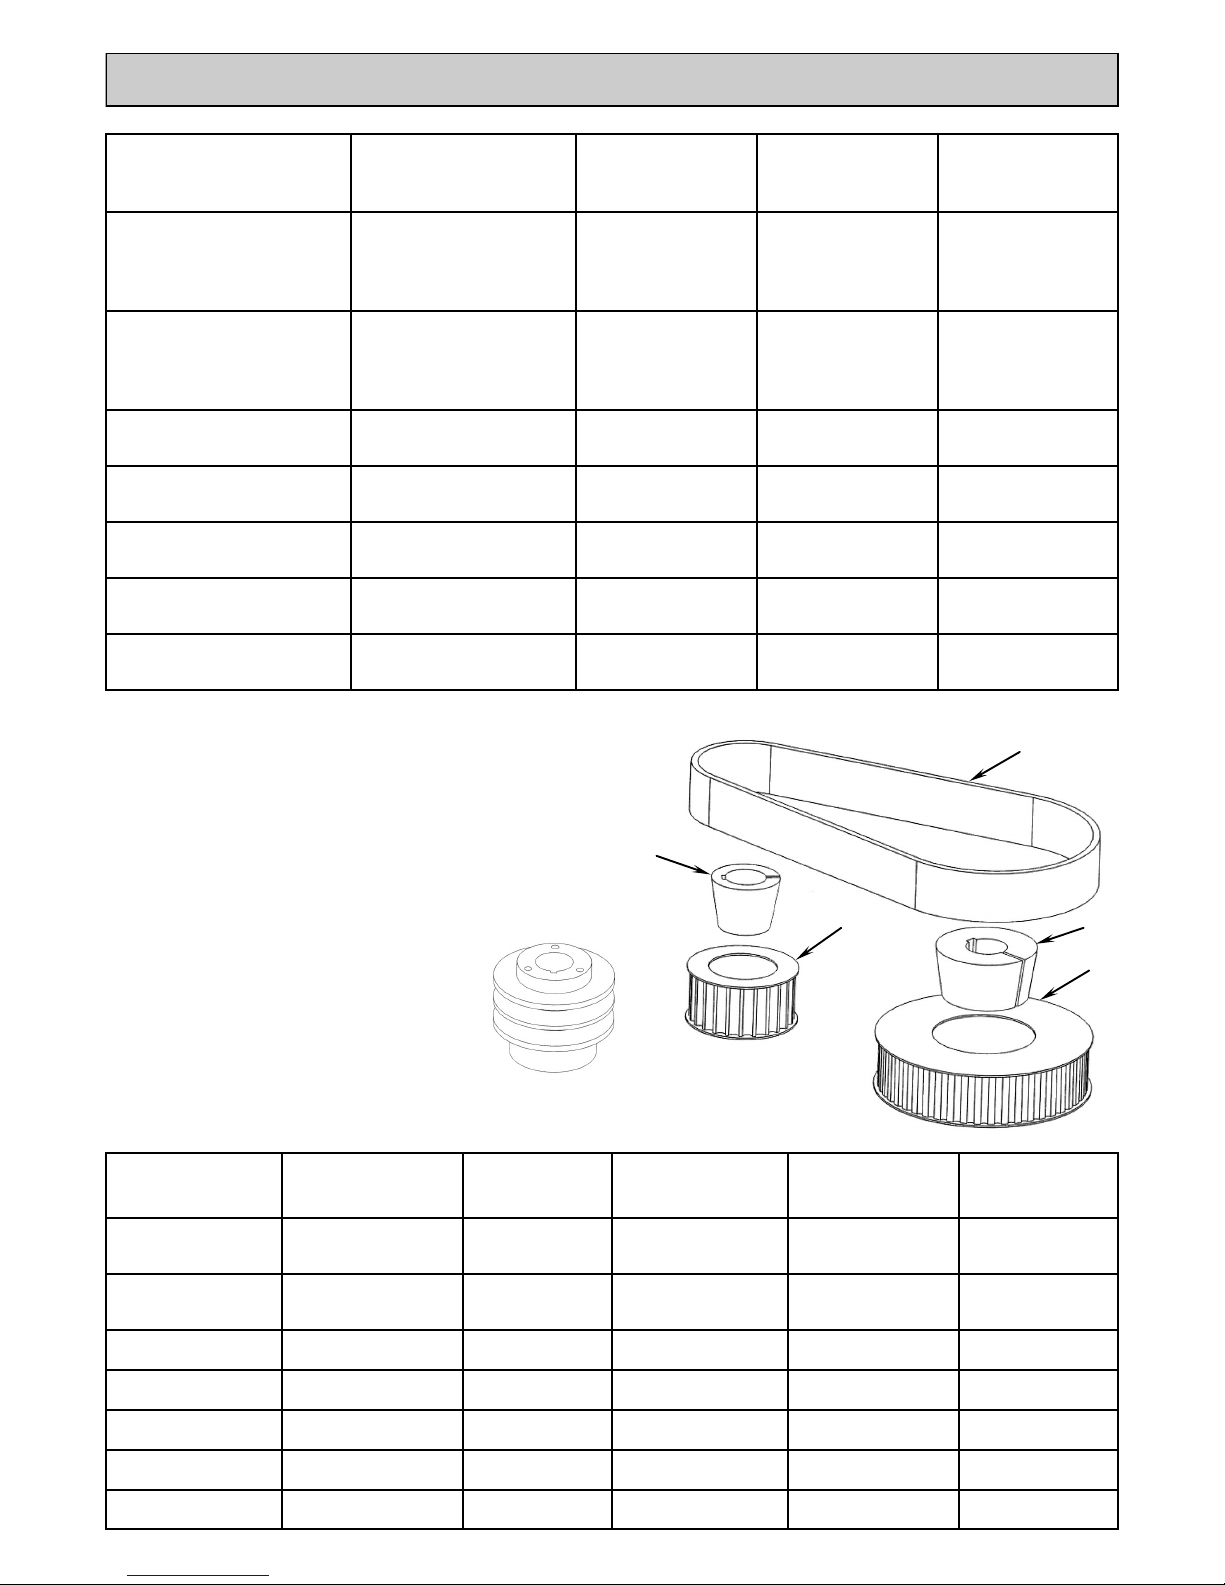
EXPLODED VIEW
Notes
Any items not numerically identified are duplicates of identified
items.
Parts 23-28 are variable dependant on model.
(See additional table on page 12)
Part 42 may be a „Grinding Block Holding Plate‟ (350.00CDR)
dependant on your model, if this is the case your machine will
not have Part 41.
Horse shoe weight, part 47 is an optional extra.
Model specific items are shown in a separate table on page 11.
Not shown:
Motor/engine and associated fasteners, starter box/throttle
lever assembly and safety switch, stand return spring, water
hose and brush seals. (See table for part numbers and details)

PARTS LIST
Item Part No. Description Item Part No. Description
1 822.2000 Rubber grip (x2) 44 831.0820 M8 x 20 hex bolt
2 345.9220 Vacuum takeoff tube 45 811.1008 M8 shake proof washer
3 828.0138/
826.0183/
819.0385
3/8” ball valve/
bulkhead connector/
hose tail
46 345.9223 Belt guard
4 350.9121 Wheel (x2) 47 345.2012 Weight
5 812.1001 20mm plain washer (x2) 48 345.2011 Removable section
6 814.1020 External circlip (x2) 49 345.9221 Dust skirt
7 345.9241 Stub axle (x2) 50 345.2010 Chassis
8 812.1016 M16 washer (x2) 51 350.00CDR R/H Grinding Block Mounting Plate
9 824.1600 M16 Nyloc nut (x2) 52 350.5509 Abrasive Block (Coarse)
10 345.9222 Rear dust skirt 350.5505 Abrasive Block (Fine)
350.5507 Abrasive Block (Medium)
11 831.0620 M6 x 20 hex bolt 350.5519 Wire brush
12 811.1006 M6 shake proof washer 350.5525 Scarifying Block
13 843.0808 Water hose grommet 53 350.5502 Wedge
14 831.0820/
811.1008
M8 x 20 hex bolt
M8 shake proof washer
54 350.5660 6 Segment Quick Fit Plate
15 345.9232 Starter box/throttle mounting plate 55 See Page
13/14
Quick Fit Plate Tooling
16 345.9230 Complete handle assembly 56 350.9180
350.9186
Throttle lever (petrol only)
Ball
17 834.0500 1/2” UNF nyloc nut (x8)
18 812.0500 1/2” plain washer (x4) Items not shown on exploded view
19 830.2000 Rubber mount 1/2” UNF See page 13 Motor/engine
20 345.9231 Handle clamping plate 345.9560A 230v Motor extension
21 831.1030/
811.1010
M10 x 30 hex bolt
M10 shake proof washer (x12)
320.7110 110v starter assembly
22 350.9150 Drive key 8 x 7 x 25 320.7112 230v starter assembly
23 See page 13 Motor pulley 320.7114 415v starter assembly
350.9175 Throttle cable (petrol only)
24 See page 13 Taper lock bush (motor) 719.3000 Water hose (request 0.4M)
25 See page 13 Drive belt 345.9828 Deadmans complete switch assembly
26 See page 13 Drive shaft pulley 345.9826 Deadmans upper switch inc lever
27 See page 13 Taper lock bush (drive shaft) 345.9800 Deadmans switch box (No lever)
28 345.9224
345.9225
Motor mounting plate for all other models
Motor mounting plate for 345.2000, 345.2000D
and 345.2004D
731.3154 Front brush seal
29 350.9116 25mm bearing assembly (x2) 731.3155 Rear brush seal
30 824.1000
824.1200
M10 nyloc nut (x6)
M12 nyloc nut (x6) (for 345.2000D)
713.5060 Stand return spring
31 806.1060
806.1260
M10x60 cap head bolt (x6)
M12x60 cap head bolt (x6) (for 345.2000D)
350.9141 M12 x 25 c/sunk socket screw x4
32 345.9235 Drive shaft
(for 345.2000D)
320.9126D Honda engine pulley for woodruff key type
shaft (N1)
33 345.9207A Pedal operated stand assembly 320.9126E Honda pulley extension for N1 type shaft
34 345.9208 Shaft bush (x2)
35 345.9204 Connecting rod
36 813.0420 4mm roll pin
37 345.9201 Pedal
38 345.9203 Pivot pin
39 345.9202 Pedal bracket
40 350.9146 Rubber coupling
(for 345.2000D)
41 350.9143A Diamond plate adapter
41a 809.3005 O-ring
42 350.5620G 20 Segment diamond disc
43 320.9234
811.1010
M10 x 20 hex bolt
M10 shake proof washer

ITEM Part Number DESCRIPTION ITEM Part Number DESCRIPTION
OTHER PARTS NOT SHOWN IN EXPLODED VIEW 230v Lovato Starter Box Components
320.7110 110v starter assembly 841.2616 Contactor (Lovato) 230v
320.7112 230v starter assembly 841.2625 Overload Relay 230v/415v 4-6.5amp
320.7114 415v starter assembly 841.2621 Start Contact (Lovato) all versions
841.2104 230v Panel Mounting Plug (Blue)
841.2102 110v 32amp Lead Plug (Yellow)
841.2104 240v 16amp Lead Plug (Blue) 415v Lovato Starter Box Components
841.2106 415v Lead Plug (Red) 841.2617 Contactor (Lovato) 415v
841.2625 Overload Relay 230v/415v 4-6.5amp
841.2621 Start Contact (Lovato) all versions
110v WEG Starter Box Components 841.2106 415v Panel Mounting Plug (Red)
841.2640 110v Starter Box & Lid inc Buttons
320.7130 110v Panel Mounting Plug (Yellow)
230v WEG Starter Box Components
841.2642 230v/415v Starter Box & Lid inc Buttons
841.2640A Overload Relay 230v only (RW27D17) Lafert Motor Components (see exploded view page 15)
841.2640B Contactor (CWM18.10 230v only) 14 841.2650 Icar or Ducati start capacitor (Black)
320.7132 230v Panel Mounting Plug (Blue) 14 841.2660 Facon or Ducati run capacitor (White)
5 841.2670 SE01 Electronic starter switch
24 841.2680 Fan
415v WEG Starter Box Components 22 841.2690 Fan Cover
841.2642 230v/415v Starter Box & Lid inc Buttons 9/11 841.2694 Terminal box and lid
841.2106 415v Panel Mounting Plug (Red)
Others not show in exploded view
345.9828 Deadmans complete switch assembly
110v Lovato Starter Box Components 345.9826 Deadmans upper switch inc lever
841.2615 Contactor (Lovato) 110v 345.9800 Deadmans switch box (No lever)
841.2620 Start Contactor (Lovato) 110v 320.9300 M5 x 50 Screws for Deadmans Handle x 2
required
841.2624 230/415v Overload Relay 4/6.5amp 320.9305 M5 Nyloc Nuts for Deadmans Handle x 2
required
841.2621 Start Contact (Lovato) all versions 320.9310 M5 Plain Washer x 4 required
841.2102 110v Panel Mounting Plug (Yellow) 320.9150 Spacer Plate (Electric) x 2 required
PARTS LIST model specific
Model variant by part
number
(D=Diamond Disc)
Motor/engine/starter
N4 shaft prior to 2014
Motor bolts Motor nuts Motor washers
345.2000
5.5HP petrol
350.9500 Honda N4
shaft
345.9500 Honda N1
shaft
806.5610 (x2) 824.0810 (x2) 811.1008 (x8)
345.2000D
5.5HP petrol
350.9500 Honda N4
shaft
345.9500 Honda N1
shaft
806.5610 (x2) 824.0810 (x2) 811.1008 (x8)
345.2002
110V 1ph 1.8Kw
345.9550 motor
320.9143 starter 831.1240 (x4) 824.1200 (x4) 811.1012 (x8)
345.2002D
110V 1ph 1.8Kw
345.9550 motor
320.9143 starter 831.1240 (x4) 824.1200 (x4) 811.1012 (x8)
345.2004
230V 1ph 2.2kW
345.9565 motor
320.9147 starter 831.1240 (x4) 824.1200 (x4) 811.1012 (x8)
345.2004D
230V 1ph 2.2Kw
350.9560 motor
320.9147 starter 831.1040 (x4) 824.1000 (x4) 811.1010 (x8)
345.2006D
415V 3ph 5.5kW
350.9575 motor
325.9186 starter 831.1240 (x4) 824.1200 (x4) 811.1012 (x8)
Model variant by part
number
(23) PULLEY (MOTOR) (24) TAPER LOCK
BUSH (MOTOR)
(25) BELT (26) PULLEY
(DRIVESHAFT)
(27) TAPER LOCK
BUSH
(DRIVESHAFT)
345.2000 345.9130 Honda N4
345.9126A Honda N1
345.9129A N4
See (23) N1
345.9136 Honda N4
345.9126V Honda N1
345.9134 Honda N4
345.9126D Honda N1 345.9126M Honda
345.2000D 345.9130 Honda N4
345.9126A Honda N1
345.9129A N4
See (23) N1
345.9136 Honda N4
345.9126V Honda N1
345.9134 Honda N4
345.9126D Honda N1 345.9126M Honda
345.2002 345.9130 345.9129A 345.9136 345.9134 345.9126
345.2002D 345.9130 345.9127A 345.9135 345.9123 345.9125
345.2004 345.9133 345.9129B 345.9137 345.9134 345.9126
345.2004D 345.9127A 345.9127A 345.9135 345.9124 345.9124A
345.2006D 345.9127 345.9128 345.9136 345.9124 345.9124B
Taper Lock bushes include new grub
screws (Not illustrated) for fitting
Also supplied with data sheet with torque
setting and method.
Drive components by model 25
24
27
26
23
The TCG250 is available in a range of
configurations.
The appropriate drive components for each
variant are listed in the table below.
Note:
Honda N1 type shaft has a v-belt pulley
arrangement and is not a taper lock pulley,
this item has to be purchased as an
assembly. HONDA N1 PULLEY
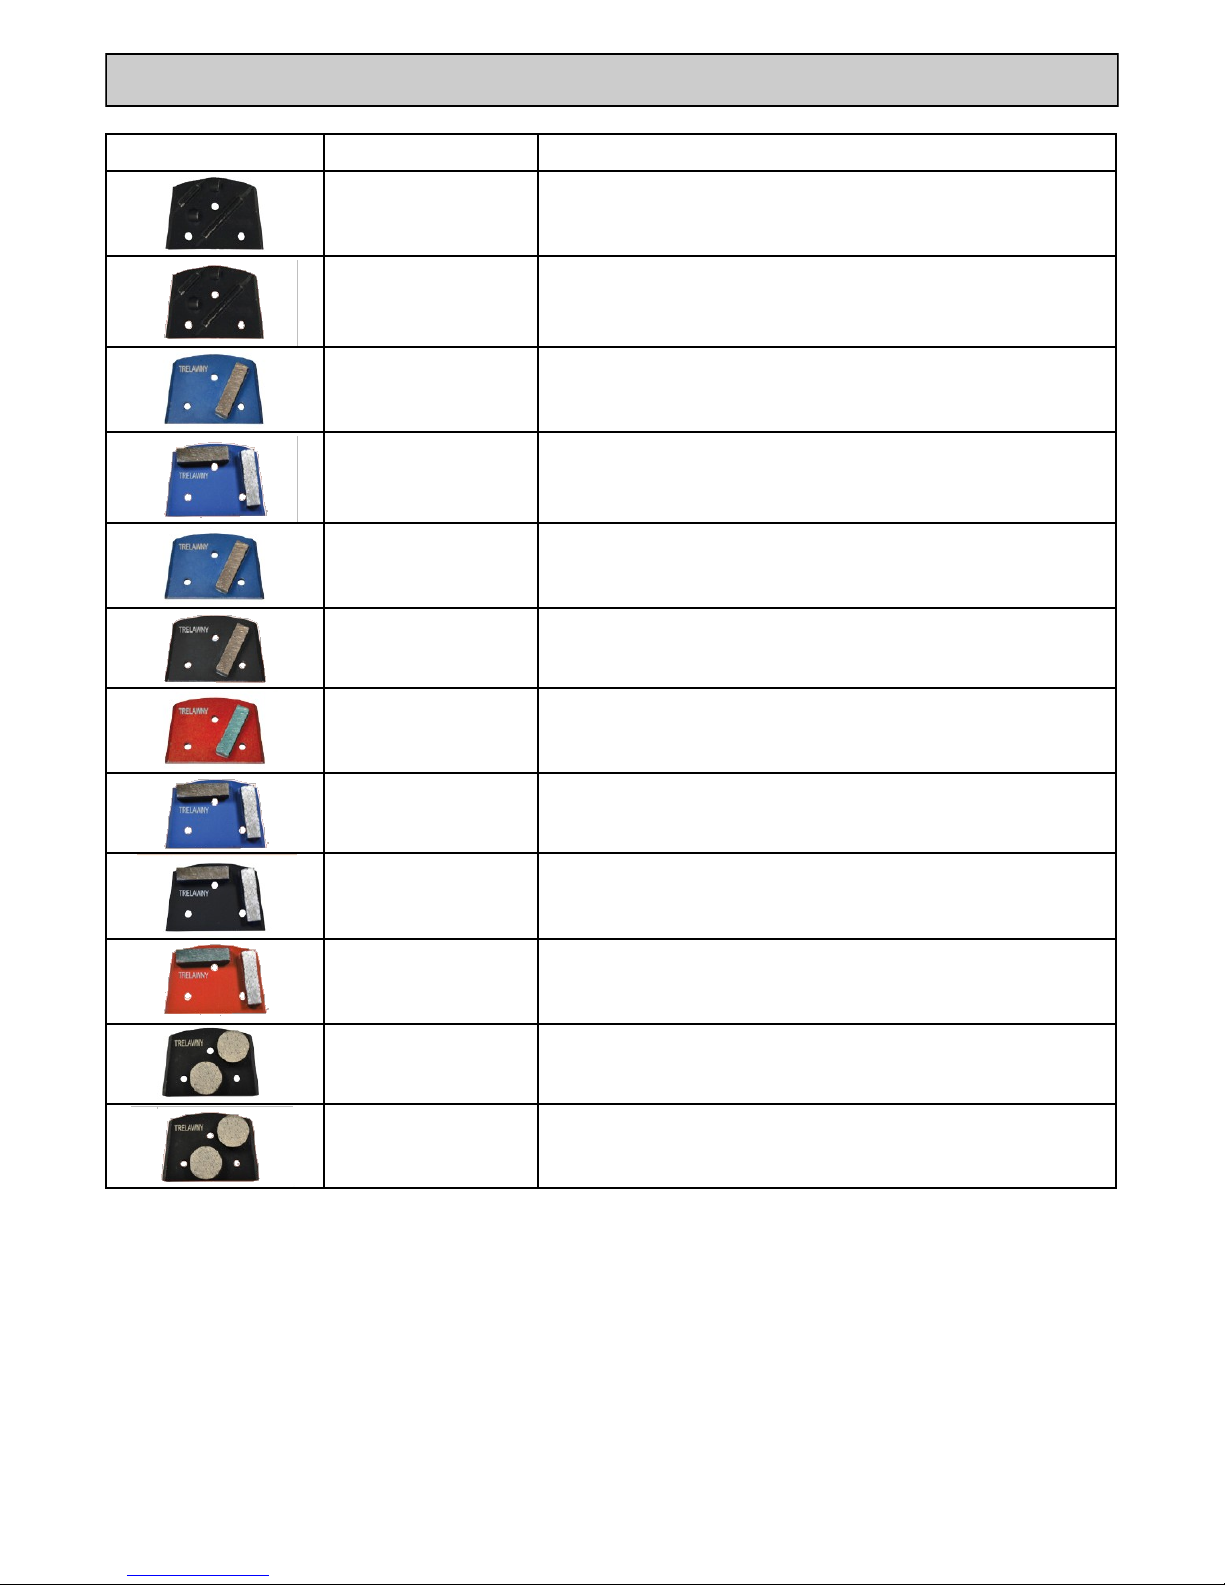
Image Part Number Tool Description
365.5495L
PCD Removal Diamond Anti Clock Wise
For removal of coatings, adhesives & toppings
365.5495R
PCD Removal Diamond Clock Wise
For removal of coatings, adhesives & toppings
365.5500
16 Grit Single (Quick Release) Soft Bond
For very course grinding and thin coating removal
365.5500/2
16 Grit Double (Quick Release) Soft Bond
For very course grinding and thin coating removal
365.5501
30 Grit Single (Quick Release) Soft Bond
For Hard Concrete
365.5502 30 Grit Single (Quick Release) Medium Bond
For Medium Hardness concrete
365.5503 30 Grit Single (Quick Release) Hard Bond
For Soft Concrete or for very rough concrete
365.5501/2 30 Grit Double (Quick Release) Soft Bond
For Hard Concrete
365.5502/2 30 Grit Double (Quick Release) Medium Bond
For Medium Hardness concrete
365.5503/2 30 Grit Double (Quick Release) Hard Bond
For Soft Concrete or for very rough concrete
365.5504/2 70 Grit Double (Quick Release) Medium Bond
For Light Grinding and Scratch Removal
365.5506/2 120 Grit Double (Quick Release) Medium Bond
For Light Grinding and Scratch Removal
Media Types - Metal Bond Tools

Image Part Number Tool Description
365.5605
50 Grit Hybrid
365.5610
100 Grit Hybrid
365.5620
200 Grit Hybrid
365.5602A
200 Grit Resin Bond
365.5604A
400 Grit Resin Bond
365.5608A
800 Grit Resin Bond
365.5618A
1500 Grit Resin Bond
365.5635A
3000 Grit Resin Bond
350.5666 Polishing Adapter Plate
Used to attach the “Polishing Tools” to the quick release plate
Media Types - Resin Bond Tools
AmTec 230v 4 pole motor wiring diagram (For use with blocks)
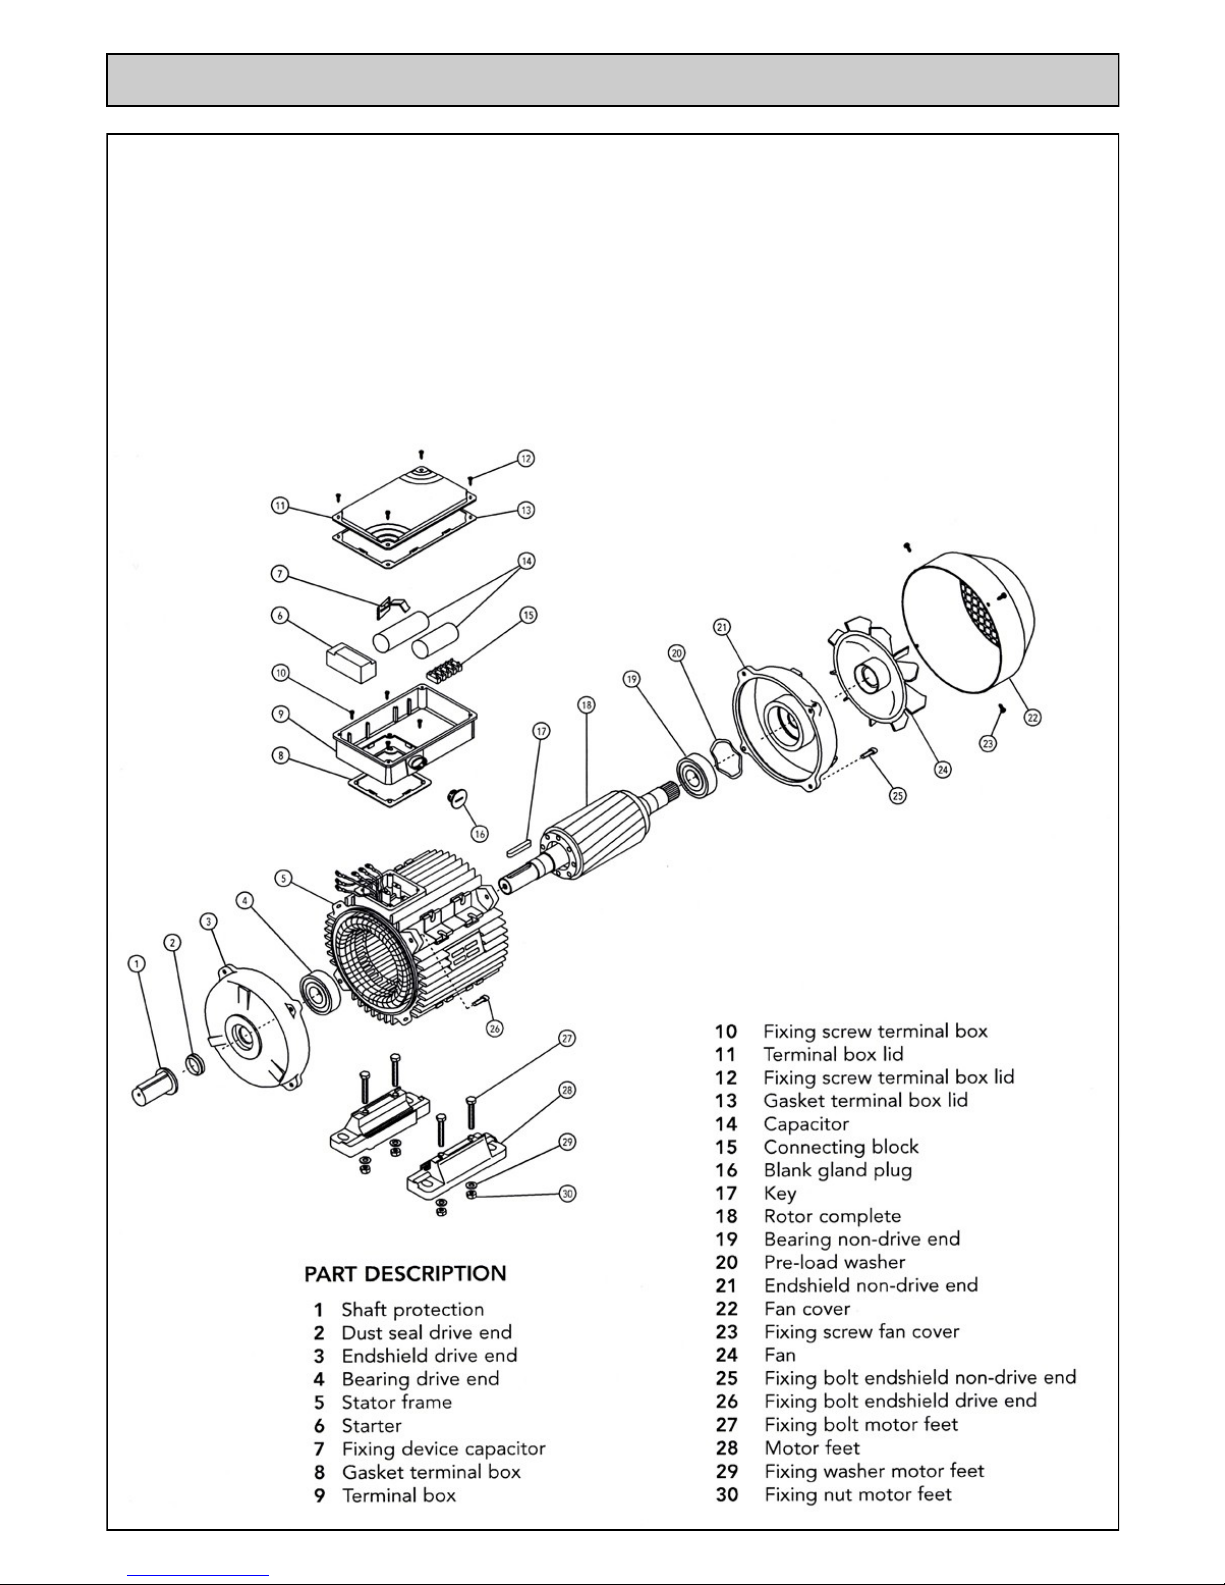
LAFERT ELECTRIC MOTOR EXPLODED VIEW
110v & 230v Motors
Only the most commonly used motor components are carried in stock at
Trelawny SPT Ltd.
These items are listed under the Lafert Motor heading in the parts list on
the previous page.
Note:
Endsheild Drive End Flange not shown in item 3.
Items 27,28,29 & 30 are not used on the Grinder.
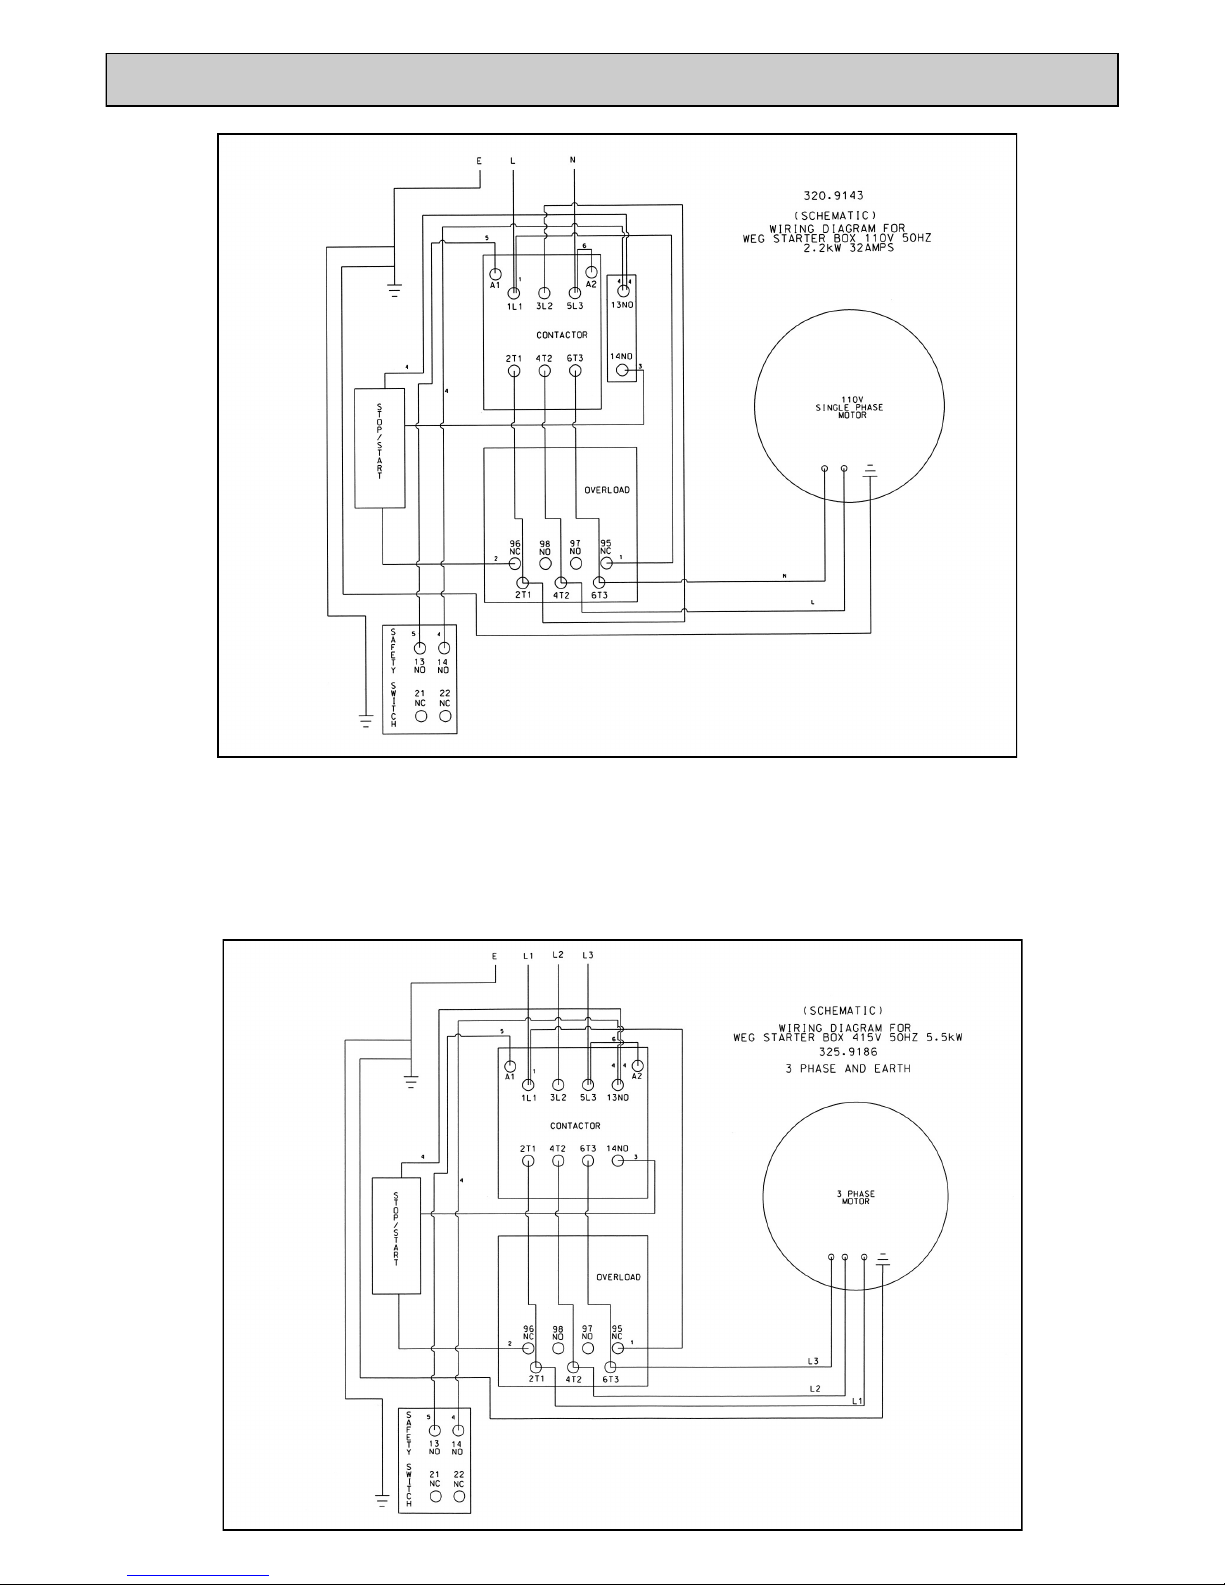
WIRING DIAGRAMS

WIRING DIAGRAMS

STARTER BOX WIRING DIAGRAMS (LOVATO)
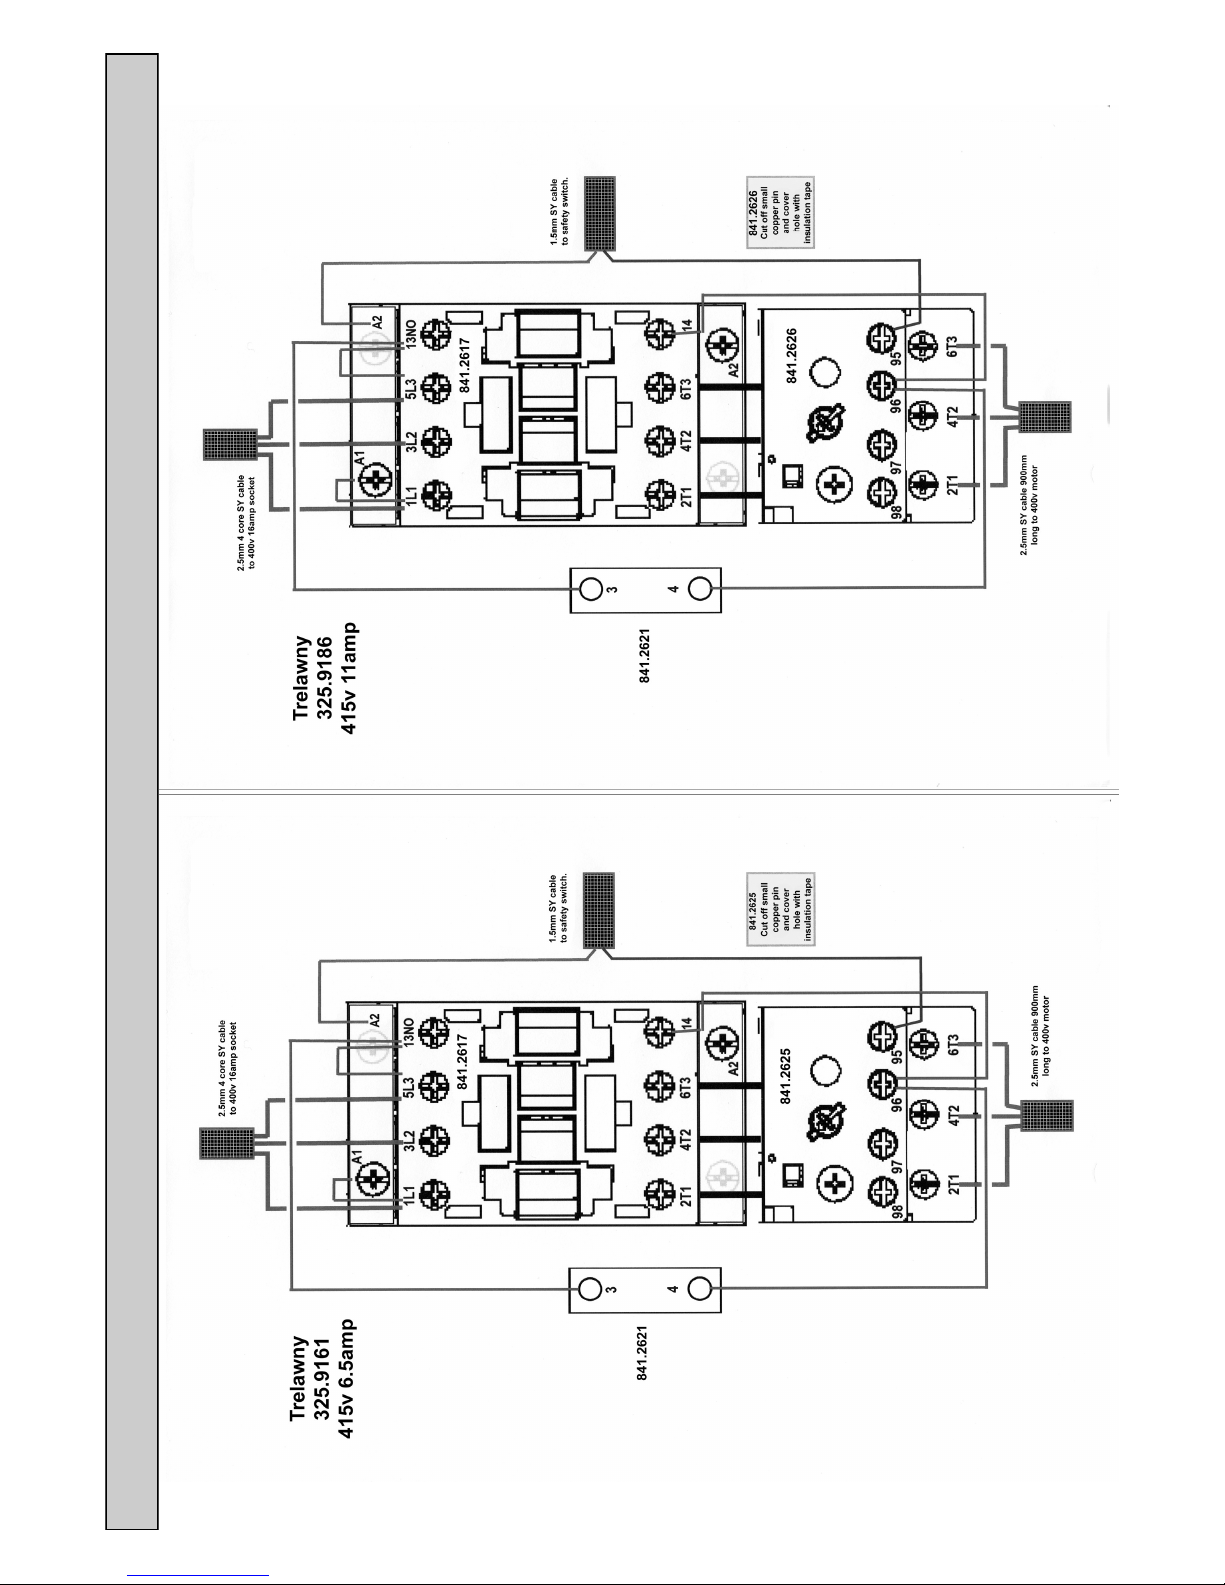
STARTER BOX WIRING DIAGRAMS (LOVATO)
TECHNICAL SPECIFICATIONS
Machinery Directive Information
This tool has been designed and produced in accordance with the following directives:
2006/42/EC Machinery Directive
If your company has any problem with our products or would like to discuss the possibility of an improvement being made to them, then please do not
hesitate to contact us. Your comments are both important and appreciated.
All rights reserved. Any unauthorised use or copying of the contents or part thereof is prohibited.
This applies to trademarks, model denominations, part numbers and drawings.
Use only genuine Trelawny spares.
The use of non-Trelawny spare parts invalidates the warranty.
Length x Width x Height (inc handle and wheels) 1100mm x 450mm x 980mm 43.3” x 17.7” x 38.6”
Cutting width 254mm 10 inch
Average depth of cut (dependent on concrete) 1 mm 0.040 inch
Electric motors 400v 230v 110v
Power 5.5kW (7.5hp) 2.2kW (3.0hp) 1.8kW
(2.4hp)
Voltage 400v (3ph) 230v (1ph) 110v (1ph)
Supply 11amp 16amp 32amp
Disc speed - rpm approximately 1600 1425 860
Petrol engines: Honda GXV160 Unleaded petrol - disc speed variable dependant on throttle
opening
Weight Electric motor 90kg (198lbs)
5.5hp Petrol engine 87kg (192lbs)
Working distance from wall 25mm side / 20mm front 1.0” side / 3/4” front
Electric motor Noise LwA SWL 86.04dB (A)
Honda Engine 5.5hp 91.5dB (A)
Declared Noise emissions in accordance with EN ISO 15744: 2008
Carborundum Blocks Diamond Disc
Vibration (AEQ) at the Handle Bar (110v Electric) Aeq = 2.36 m/s2 (k) Aeq = 1.25 m/s2 (k)
Vibration (AEQ) at the Handle Bar (230v Electric) Aeq = 1.17 m/s2 (k) Aeq = 0.913m/s2 (k)
Vibration (AEQ) at the Handle Bar (415v Electric) Aeq = 2.75 m/s2 (k) Aeq = 2.34 m/s2 (k)
Vibration (AEQ) at the Handle Bar (Petrol Models) Aeq = 5.61 m/s2 (k) Aeq = 6.35 m/s2 (k)
(K= +40% -0%)
Noise level measured in accordance with EN ISO 15744: 2008
Vibration measured in accordance with EN ISO 28927:2012 & EN ISO 20643:2005

NOTES

NOTES
Other manuals for TCG 250
1
Table of contents
Other Trelawny Floor Machine manuals


Popular Floor Machine manuals by other brands


Duplex
Duplex 280i AC instruction manual

HAKO
HAKO Scrubmaster B 310 R/WZB 960 instruction manual

Tennant
Tennant 96GR Operator's manual

Nilfisk-Advance
Nilfisk-Advance BR755C Instructions for use

Tornado
Tornado PS Series 98220 Operation & maintenance manual

Nilfisk-Advance
Nilfisk-Advance SC4000 Instructions for use