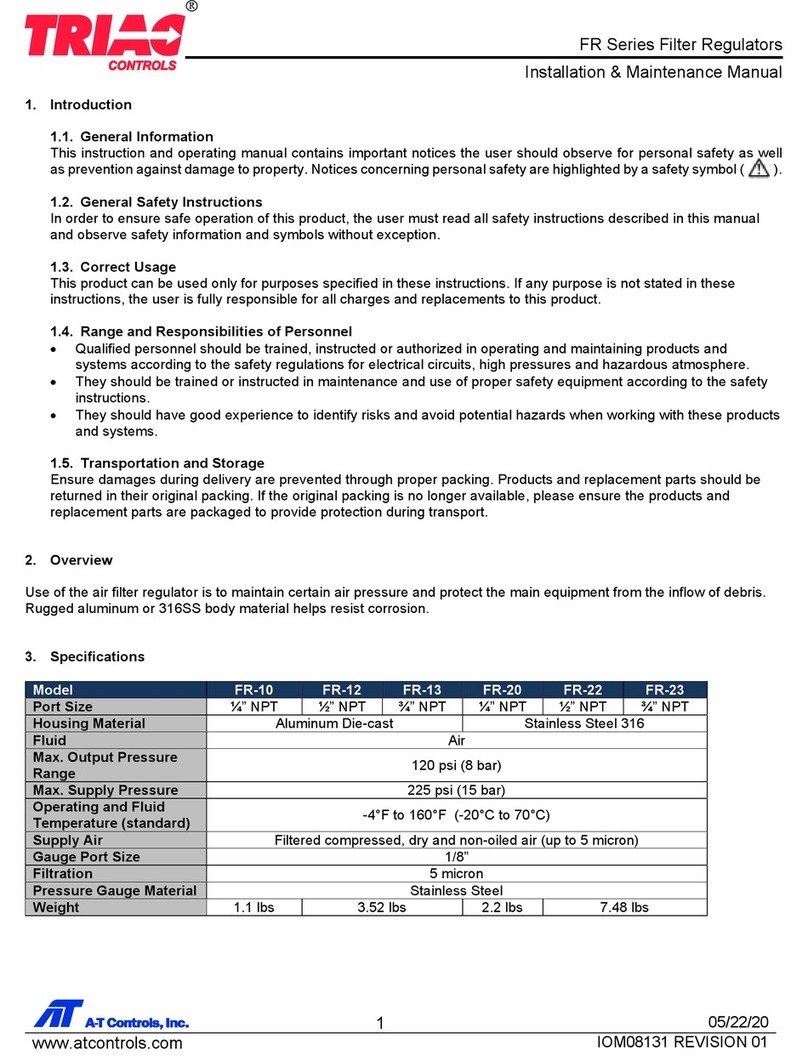
TRIAC 2R Series Instruction Manual

RACK & PINION ACTUATORS
2R40 to 2R1750 Series
Installation & Maintenance Manual
1 October 24, 2013
www.atcontrols.com
Engineering\documents\products\IOM\IOM1003.docx
TRIAC
2R Series Actuators:
Attention: Instructional videos on some of the information provided below can be found on our website
www.atcontrols.com (http://www.a-tcontrols.com/videos/).
1. Installation of Actuator:
Triac actuators are mounted directly to valves or adapted
to the valve by means of an intermediate bracket and
coupler. The coupler adapts the output of the actuator to
the valve shaft. Standard mounting kits provide mounting
of the actuator in the direction of the pipe. Pipelines can
be horizontal, vertical, or other positions. When mounting
the actuator to a valve using a mounting kit, the pinion
drive, coupling device and valve stem should be centered
and concentric to prevent any side loading to the bottom
pinion radial bearing and valve stem seal area.
After mounting, it may be necessary to adjust the end of
travel stop for proper open or closed valve position.
Pneumatically stroke the actuator several times to assure
proper operation with no binding of the coupler.
2. Air
Supply:
Pneumatic piping to the actuator and associated accessories should follow the best practices for instrument
pneumatic piping systems, ie line free of water, oil, pipe sealant or other contaminants. The operating medium
is to be filtered dry air or inert gas which is filtered to 50 micron particles size or less. It is extremely important
that the actuator be powered with the proper air pressure and air volume. Maximum working pressure is 150
PSI.
The spring housing on spring return actuators, if not piped, will breathe through the right hand port. It’s
important that it not be exposed to a corrosive atmosphere. Please contact Triac Controls for possible
solutions if this condition exists.
3. Lubrication:
Triac actuators are factory lubricated for life and additional lubrication is not normally required. However, for
actuators performing 100,000 cycles or more, an oil mist lubricator is recommended. Oil mist lubrication
requires a mineral oil type ISO VG32 Class 1 for usage in temperature range 15 to 158 Deg. F. Oil mist
lubricator must be set to the lowest setting. Once begun, the oil mist lubrication cannot be discontinued.
Caution: If the actuator is equipped with a pneumatic positioner or pneumatic controller, oil mist lubricated air
cannot be used unless the instrument manufacturer indicates that the instrument is compatible with lubricated
air.
Description Section
Installation of Actuator 1
Air Supply 2
Lubrication 3
Travel Adjustment 4
Spare Parts 5
Operation – Double Acting 6
Operation – Spring Return FCW 7
Disassembly Procedures 8
Assembly Instructions 9
Actuator Testing 10
Cycling of infrequently used
actuator 11
Bill of Materials 12
Service 13

RACK & PINION ACTUATORS
2R40 to 2R1750 Series
Installation & Maintenance Manual
2 October 24, 2013
www.atcontrols.com Engineering\documents\products\IOM\IOM1003.docx
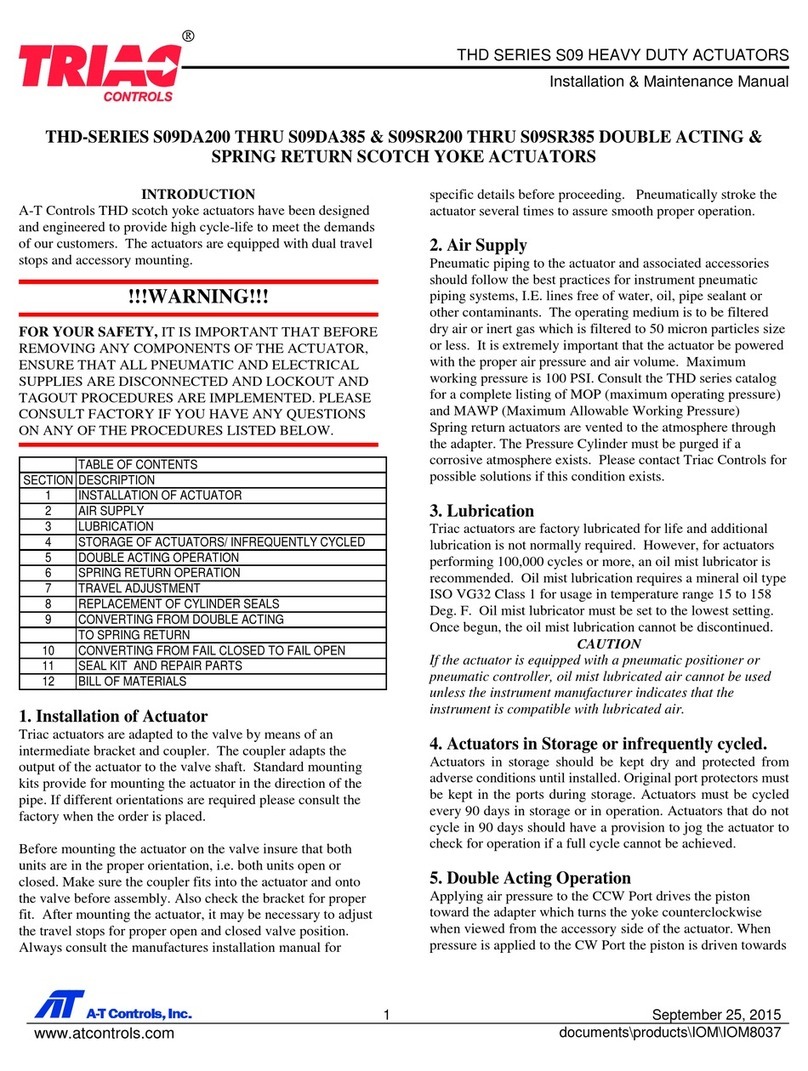
4. Travel Adjustment:
The Triac 2nd generation rack & pinion actuators have travel
stop adjustments in both the clockwise and counterclockwise
directions. The 5 degrees overtravel feature provides
adjustments from -5 degrees to +5 degrees at the 0 degree
clockwise position and from 85 degrees to 95 degrees at the
90 degree counterclockwise position.
All actuated valves require accurate travel-stop adjustments at
both ends of the stroke to obtain optimum performance and
valve seat life. The accumulation of tolerances in the adaption
of actuators to valves is such that there must be a range of
adjustment for both ends of the stroke to achieve the expected
performance. See the valve manufacture’s IOM on how the travel should be adjusted.
Ball & Plug Valves require precise adjustment at the open and closed position. This is to protect the
seat from the flow media and to assure absolute shut-off in the closed position.
Butterfly Valves require precise adjustment at the open and closed position. This is to assure full shut-
off, to prevent disc overtravel which can damage the seat in the closed position, and to assure
maximum flow in the open position.
Tee Assemblies, where two valves are operated in tandem through a single operator, (3-way
configuration) require precise adjustment at both ends of the stroke. This is to assure the seating of
both valves.
5. Spare Parts:
Actuator
Size
Buna
Repair Kit
-20°F to
175°F
Viton
Repair Kit
0°F to
300°F
Low Temp
Repair Kit
-45°F to
175°F
Spring
Cartridges
(each)
2R40 2RKB0040 2RKV0040 2RKLT0040 SP20040
2R80 2RKB0080 2RKV0080 2RKLT0080 SP20080
2R130 2RKB0130 2RKV0130 2RKLT0130 SP20130
2R200 2RKB0200 2RKV0200 2RKLT0200 SP20200
2R300 2RKB0300 2RKV0300 2RKLT0300 SP20300
2R500 2RKB0500 2RKV0500 2RKLT0500 SP20500
2R850 2RKB0850 2RKV0850 2RKLT0850 SP20850
2R1200 2RKB1200 2RKV1200 2RKLT1200 SP21200
2R1750 2RKB1750 2RKV1750 2RKLT1750 SP21750
*Seal Kits also available, but Complete Repair Kits are recommended
Distributed by Relevant Solutions | 1.888.858.3647 | relevantsolutions.com

RACK & PINION ACTUATORS
2R40 to 2R1750 Series
Installation & Maintenance Manual
3 October 24, 2013
www.atcontrols.com Engineering\documents\products\IOM\IOM1003.docx
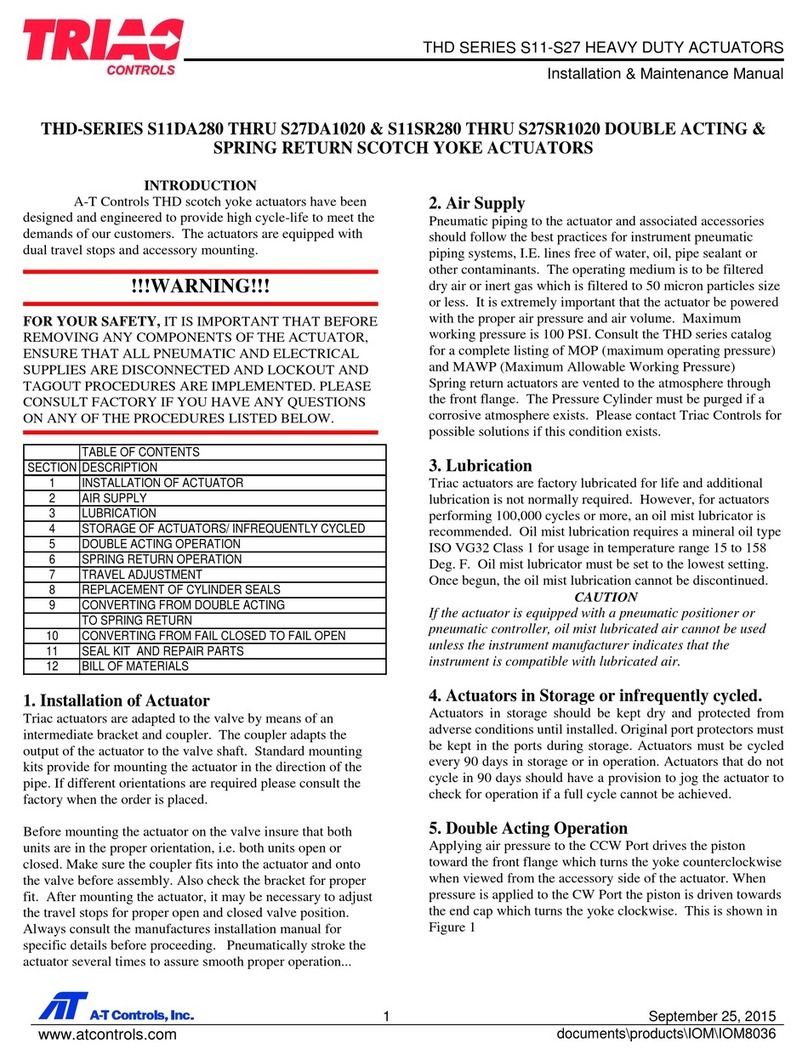
6. Operation – Double Acting:
CCW:
Air is supplied to Port A forcing the pistons away
from each other (toward ends) which rotates the
drive pinion counterclockwise and exhausts the air
out of
Port B.
CW:
Air is supplied to Port B forcing the pistons toward
each other (toward center) which rotates the drive
pinion clockwise and exhausts the air out of Port A.
7. Operation – Spring Return (Fail CW):
CCW:
Air is supplied to Port A forcing the pistons away
from each other (toward ends), which rotates the
drive pinion counterclockwise, compresses the
springs and exhausts air out of Port B.
FAIL CW:
Air failure (loss of pressure) allows the compressed
springs to force pistons toward each other (toward
center), which rotates the drive pinion clockwise
and exhausts air out of Port A.
*(Unit is capable of failure in counterclockwise direction by reversing pistons inside of housing.)
Distributed by Relevant Solutions | 1.888.858.3647 | relevantsolutions.com

RACK & PINION ACTUATORS
2R40 to 2R1750 Series
Installation & Maintenance Manual
4 October 24, 2013
www.atcontrols.com
Engineering\documents\products\IOM\IOM1003.docx
8. Disassembly Procedures:
8.1 Removal of Travel Stops:
Disconnect air supply and electric to de-pressure the actuator. Release the lock nuts and unscrew
both travel stops and seals, which are located at the top of the actuator body on the side. In the case
of spring return valves make sure that the actuator is in the failed position before removing the
actuator
8.2 Removal of End Caps:
Spring Return Units:
Loosen all end cap bolts evenly, to allow the springs to push the end caps out from the body. The
springs are contained on spools and the tension will be relaxed when the end cap is removed.
Always use caution when removing springs.
Double Acting Units:
Loosen and remove the end cap bolts evenly on both end caps. Using a rubber mallet rotate the end
cap slightly, gaining access to the edges of the end cap. Use the rubber mallet to remove the end cap
evenly.
8.3 Removal of Pistons:
Rotate the pinion using a wrench to drive the pistons apart until they are free of the actuator body.
8.4 Removal of Pinion:
Remove the snap ring, thrust washer and thrust bearing from the top of the pinion. Carefully remove
the pinion from the cylinder body through the bottom. The travel stop cam will not fit through the
bottom bore. It will slip off the pinion prior to the pinion removal. Take care to ensure the pinion does
not damage the body.
9. Assembly Instructions
9.1 Inspection:
Check that all components are clean and have not been damaged. Triac recommends that all O-
rings, Bearings, Washers, etc are replaced using only Triac replacement parts.
CAUTION
Before removing any components of the actuator, ensure that
all pneumatic and electrical power supplies are disconnected.
Distributed by Relevant Solutions | 1.888.858.3647 | relevantsolutions.com

RACK & PINION ACTUATORS
2R40 to 2R1750 Series
Installation & Maintenance Manual
5 October 24, 2013
www.atcontrols.com Engineering\documents\products\IOM\IOM1003.docx
9.2 Installing the Pinion:
Lightly grease the pinion, o-ring grooves and guide bushing groove of the pinion and pinion o-rings
with multi-purpose grease. Install the top bearing into the actuator body bearing bore. Fit the top o-
ring into the top pinion groove. Fit the bottom guide bushing into the bottom pinion groove. Slip the
bottom o-ring into the bottom pinion groove. Carefully insert the pinion into the body until the top of
the Pinion is inside the body cylinder. Fit the travel stop cam over the top of the pinion and slide it
down until it is engaged with the pinion. (Note: The travel stop cam will engage with the pinion in only
one position.)
Gently push the pinion up through the body making sure the bottom guide bushing, bottom o-ring &
top o-ring stay in their grooves. With the pinion in this position install the thrust bearing washer, the
thrust washer and lastly the snap ring. Make sure the snap ring fits properly in the groove.
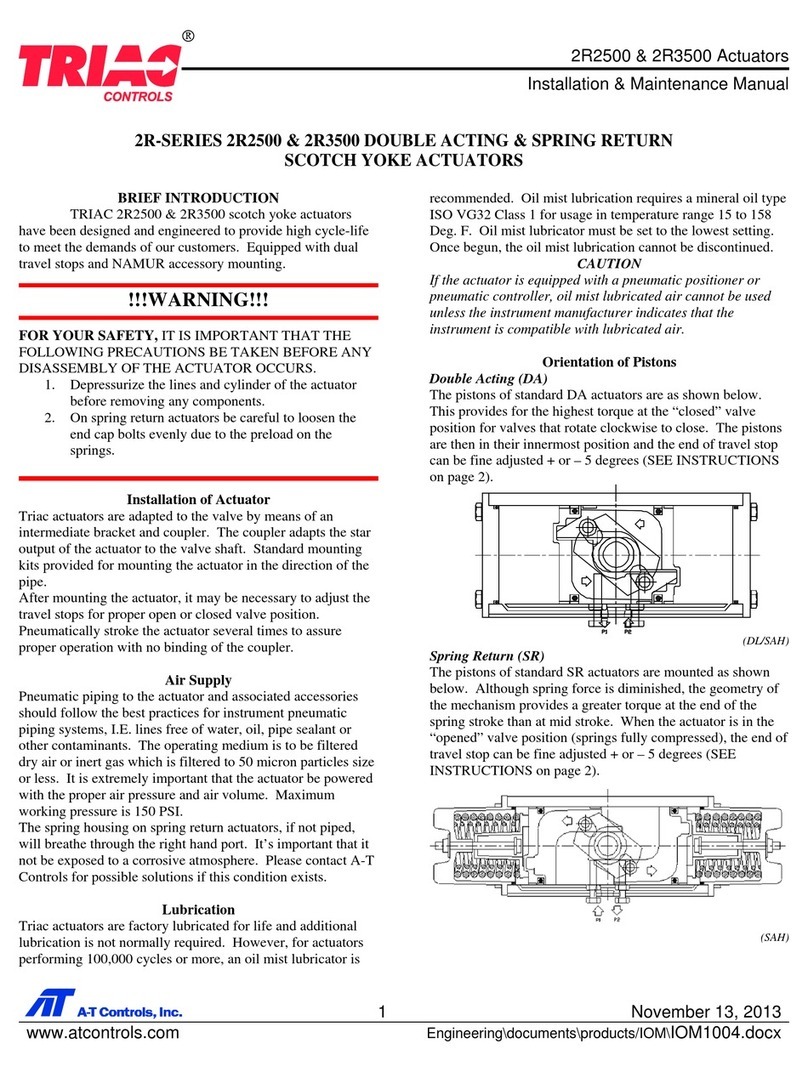
9.3 Alignment of Pinion for Correct Piston Installation:
Rotate the pinion to the position shown in Fig. 5 (When
viewed from the slot at the top of the pinion) ensuring
that the machined stop flats are in the correct
orientation.
9.4 Installing the Pistons:
Lightly grease the piston o-rings, piston backup ring &
guide plate with multi-purpose grease & fit the o-rings,
backup ring & guide plate into their respective grooves
on the piston. Liberally grease the actuator body bore
and the piston rack. Insert the pistons into the bore, one
piston in each end with the teeth facing each other (see
Figures 2, 3 & 4). (Note: The position of the Piston
determines the fail rotation of the actuator).
Push both pistons together until they are both in contact
with the pinion, so that when the pinion is rotated
(Clockwise for FCW, Counter Clockwise for FCCW) the
pistons are drawn together. When the pistons are together and the racks are correctly engaged with
the pinion, the top pinion drive flats should be several degrees past perpendicular to the body for
FCW, parallel to the body for FCCW.
9.5 Installing the Travel Stops:
With the pistons together, screw in the corresponding travel stop assembly complete with nut, washer
and seal until it comes into contact with the pinion. Rotate the pinion 90 degrees to drive the pistons
apart and screw in the other travel stop until it comes into contact with the pinion. After the end caps
are installed (see below) final adjustment is easily made when the actuator has been mounted to its
valve, damper or other device, depending on individual requirements. Ensure the nuts are tightened
against washer and seal.
Distributed by Relevant Solutions | 1.888.858.3647 | relevantsolutions.com

RACK & PINION ACTUATORS
2R40 to 2R1750 Series
Installation & Maintenance Manual
6 October 24, 2013
www.atcontrols.com Engineering\documents\products\IOM\IOM1003.docx
9.6 End Cap Installation:
With the pistons together, lightly grease the end cap o-rings with multi-purpose grease. Grease the
ends of the body bore and the end caps. Install the o-rings into the groove in the end caps.
Spring Return Unit
Install the correct number of springs for the desired torque output. Place the springs into the pockets
of the piston and end cap. Balance the springs across the Pistons.
10. Testing:
Using compressed air at 80psi-100psi, check the seal areas with soapy water and ensure no bubbles are
produced and that the pinion rotates smoothly over its full travel.
11. Cycling of infrequently used or stored actuators:
Actuators that are not in current use for at least a 3 month period, should be cycled a minimum of ten times.
The seal manufacturers recommend this procedure to prevent pre-set of the seals.
Distributed by Relevant Solutions | 1.888.858.3647 | relevantsolutions.com

RACK & PINION ACTUATORS
2R40 to 2R1750 Series
Installation & Maintenance Manual
7 October 24, 2013
www.atcontrols.com
Engineering\documents\products\IOM\IOM1003.docx
12. Bill of Materials:
Description Qty Material Remarks
1 Cylinder Body 1 Aluminum Hard Anodized
2 Drive shaft/Pinion 1 Steel Electroless Nickel Plated
3 Bottom Pinion Bushing*** 1 Nylon
4 Bottom Pinion O-Ring*** 1 Nitrile Buna
5 Travel Stop Cam 1 SCM21 Phosphate Coated
6 Travel Stop Washer 1 PTFE
7 Top Pinion Bushing*** 1 Nylon
8 Top Pinion O-Ring***# 1 Nitrile Buna
9 Pinion Teflon Washer*** 1 RTFE
10 Pinion SST Washer*** 1 304 SST
11 Snap Ring*** 1 Steel Electroless Nickel Plated
12 Piston 2 Die Cast Aluminum Dichromate Dipped
13 Guide Plate*** 2 Nylon
14 Piston O-Ring***# 2 Nitrile Buna
15 Piston Guide Band*** 2 PTFE
16 End Cap O-Ring***# 2 Nitrile Buna
17 Hole Sealant 2 Nitrile Buna
18 End Cap 2 Die Cast Aluminum Epoxy Coated
19 End Cap Bolts 8 304 SST
20 Travel Stop Bolt 2 304 SST
21 Travel Stop Nut 2 304 SST
22 Travel Stop Washer 2 304 SST
23 Travel Stop O-Ring***# 2 Nitrile Buna
24 Spring Cartridge Varies Spring Steel Epoxy Coated
25 Dust Plug 2 Polyethylene
26 Position Indicator 1 Polyethylene
*** Parts included in Repair Kit (Recommended)
# Parts included in Seal Kit
Note: Spring Cartridges are for
s
p
rin
g
return actuator onl
y
Distributed by Relevant Solutions | 1.888.858.3647 | relevantsolutions.com

RACK & PINION ACTUATORS
2R40 to 2R1750 Series
Installation & Maintenance Manual
8 October 24, 2013
www.atcontrols.com Engineering\documents\products\IOM\IOM1003.docx
13. Service:
It is the policy of Triac to give the best possible service to our customers. We are happy to assist you in any
way we can. If you have any questions about Triac Actuators or other Triac products please contact A-T
Controls or your local Triac Distributor.
A-T Controls, Inc. • 9955 International Boulevard, Cincinnati, OH 45246 • Phone: (513) 530-5175 • Fax: (513) 247-5462 • www.a-tcontrols.com
A-T Controls product, when properly selected, is designed to perform its intended function safely during its useful life. However, the purchaser or user of
A-T Controls products should be aware that A-T Controls products might be used in numerous applications under a wide variety of industrial service
conditions. Although A-T Controls can provide general guidelines, it cannot provide specific data and warnings for all possible applications. The
purchaser / user must therefore assume the ultimate responsibility for the proper sizing and selection, installation, operation, and maintenance of A-T
Controls products. The user should read and understand the installation operation maintenance (IOM) instructions included with the product, and train
its employees and contractors in the safe use of A-T Controls products in connection with the specific application.
While the information and specifications contained in this literature are believed to be accurate, they are supplied for informative purposes only. Because
A-T Controls is continually improving and upgrading its product design, the specifications, dimensions and information contained in this literature are
subject to change without notice. Should any question arise concerning these specifications, the purchaser/user should contact A-T Controls.
For product specifications go to http://download.a-tcontrols.com/
Distributed by:
Relevant Solutions | 888-858-3647 | relevantsolutions.com
This manual suits for next models
9
Table of contents
Other TRIAC Controllers manuals
Popular Controllers manuals by other brands

Viking
Viking C--250 Technical practice

Federal Signal Corporation
Federal Signal Corporation SignalMaster 331105 SMC5 instructions

Power Electronics
Power Electronics VS65 Series Programming and Software Manual
YASKAWA
YASKAWA SI-P3V installation manual

AMCOL
AMCOL 6000-ETC Operator's manual

Colorlight
Colorlight X16 user manual
National Instruments
National Instruments IC-3171 Getting started guide
BENDIX
BENDIX EC-30 ABS-ATC CONTROLLER Troubleshooting

TECH
TECH EU-RP-3 user manual

Copley Controls Corp.
Copley Controls Corp. ServoTube 38 installation guide
Masibus
Masibus LC5296-XP user manual

Omron
Omron SYSMAC CV Series Operation manual
