manuals.online logo
Brands
  1. Home
  2. •
  3. Brands
  4. •
  5. Tricity Bendix
  6. •
  7. Toaster
  8. •
  9. Tricity Bendix T4TS9 User manual

Tricity Bendix T4TS9 User manual

Instruction Manual
T4T59
4 Slice Electric Toaster
Please follow all the precautions listed below for safety and to reduce
the risk of re, injury or electrical shock.
Read all the instructions.
Do not touch the body of the toaster when it is hot.
Disconnect the appliance at the mains supply when lling or emptying the toaster, before
cleaning, adjusting or removing any components, and when it is not in use.
As a safety feature, the carriage lever will not stay down when the appliance is disconnected
from the mains.
Do not immerse the appliance, connecting cord or plug in water or liquids.
Do nor cover the appliance when it is in use, or has recently been used.
Do not place this appliance on or near a hot gas or electric burner, or in a heated oven.
Do not insert oversize items, foil packages or metal implements in the toaster wells.
The use of accessory attachments not recommended by the appliance manufacturer may
cause injury.
Do not let the connecting cord overhang the edge of the work surface or allow it to touch hot
surfaces or sources of heat or ame.
Do not attempt to change the appliance connecting cord. Refer this to qualied service per-
sonnel as specialist tools are necessary.
If any part of this appliance is visibly damaged or malfunctions in any way, or the connecting
cord or mains plug is broken do not continue to use it.Take it to a qualied service centre for
service and repair.
Do not use the toaster without the crumb tray in place.
Do not use this appliance for other than the intended use.
This appliance is for indoor domestic use only. Do not use it outdoors.
Bread may burn, therefore toasters must not be used near or below curtains and other com-
bustible materials.They must be watched.
This appliance is not intended for use by persons (including children) with reduced physical,
sensory or mental capabilities, or lack of experience and knowledge, unless they have been
given supervision or instruction concerning use of the appliances by a person responsible for
their safety
Children should be supervised to ensure that they do not play with the appliance.
THE TOASTER SHOULD NOT BE UNATTENDED WHILE IN USE
Unpacking Your Toaster
Unpack your toaster carefully. Retain the packaging so that you can transport the appliance
safely at a later date.
Before using your toaster check that the voltage marked on the rating plate under the toaster
and the base matches your mains voltage:
Please read all the instructions in this User Guide with particular reference to the safety
notes.
Before Using Your Toaster
Place the toaster on a stable, level surface. If the connecting cord is too long, carefully invert
the toaster and wind the excess cable round the cleats at the bottom of the unit.To lead the
cable from the toaster, press the cable into the recess at the centre rear of the appliance.
Important Safety Instructions
Retain these Instructions For Future Use
1
2
3
44 55 66
7 7 Using Your Toaster
Your toaster can be used to toast a wide variety of bread. Fresh and wholemeal breads
take longer to toast, so these items will need to be set at a higher setting than lighter
types of bread. As personal preference plays a great part, we suggest that you try
dierent settings.Try the lower settings rst, gradually increasing the timer setting until
you nd the right one for your circumstances.
Ensure that the mains socket is switched o at the wall and connect the appliance cord
to the wall socket. Now switch on the power.
There are two independently adjustable sets of controls which can be used to toast dier-
ent types of bread or to set dierent browning levels. Set each timer control to the desired
setting. Press each carriage down gently until it latches.The toasting cycle will commence.
If the mains power to the appliance is o, the carriage levers will not stay down.
Place the bread into the toaster bread wells. Set the timer control to the desired setting.
Press the carriage down gently until it latches.The power indicator will light and the
toasting cycle will commence. If the mains power to the appliance is o, the carriage
lever will not stay down.
When the bread has toasted, the carriage will‘pop up’and the toaster will switch o. The
toast can now be safely removed from the toaster.
If you have toasted small slices, you can remove these items more easily by manually
raising the carriage to its higher position.
At any time the toasting cycle can be stopped by pressing the CANCEL button.The toast
will pop up and the toaster will switch o.
Note: If you interrupt the toasting cycle, always use the CANCEL button. Do NOT force the
carriage lever up or you may damage the appliance.
Never attempt to remove bread while it is toasting. Press CANCEL rst.
KEY
1 Twin Toasting Wells
2 Carriage Levers
3 Toast Timer Controls
4 Reheat Button
5 Cancel Button/Power Indicator
6 Frozen Button
7 Crumb Trays (at rear of toaster)
Features and Controls Operation
Getting Started
Te sco Stores Ltd, Delamare Road,
Cheshunt, Herts, EN8 9SL
UK: Waste electrical products should not be disposed of with household
waste. Separate disposal facilities exist, for your nearest facilities. See
www.recycle-more.co.uk or in-store for details.
ROI: Produced after 13th August 2005.Waste electrical products should
not be disposed of with household waste. Please recycle where facilities
exist. Check with your Local Authority or retailer for recycling advice.
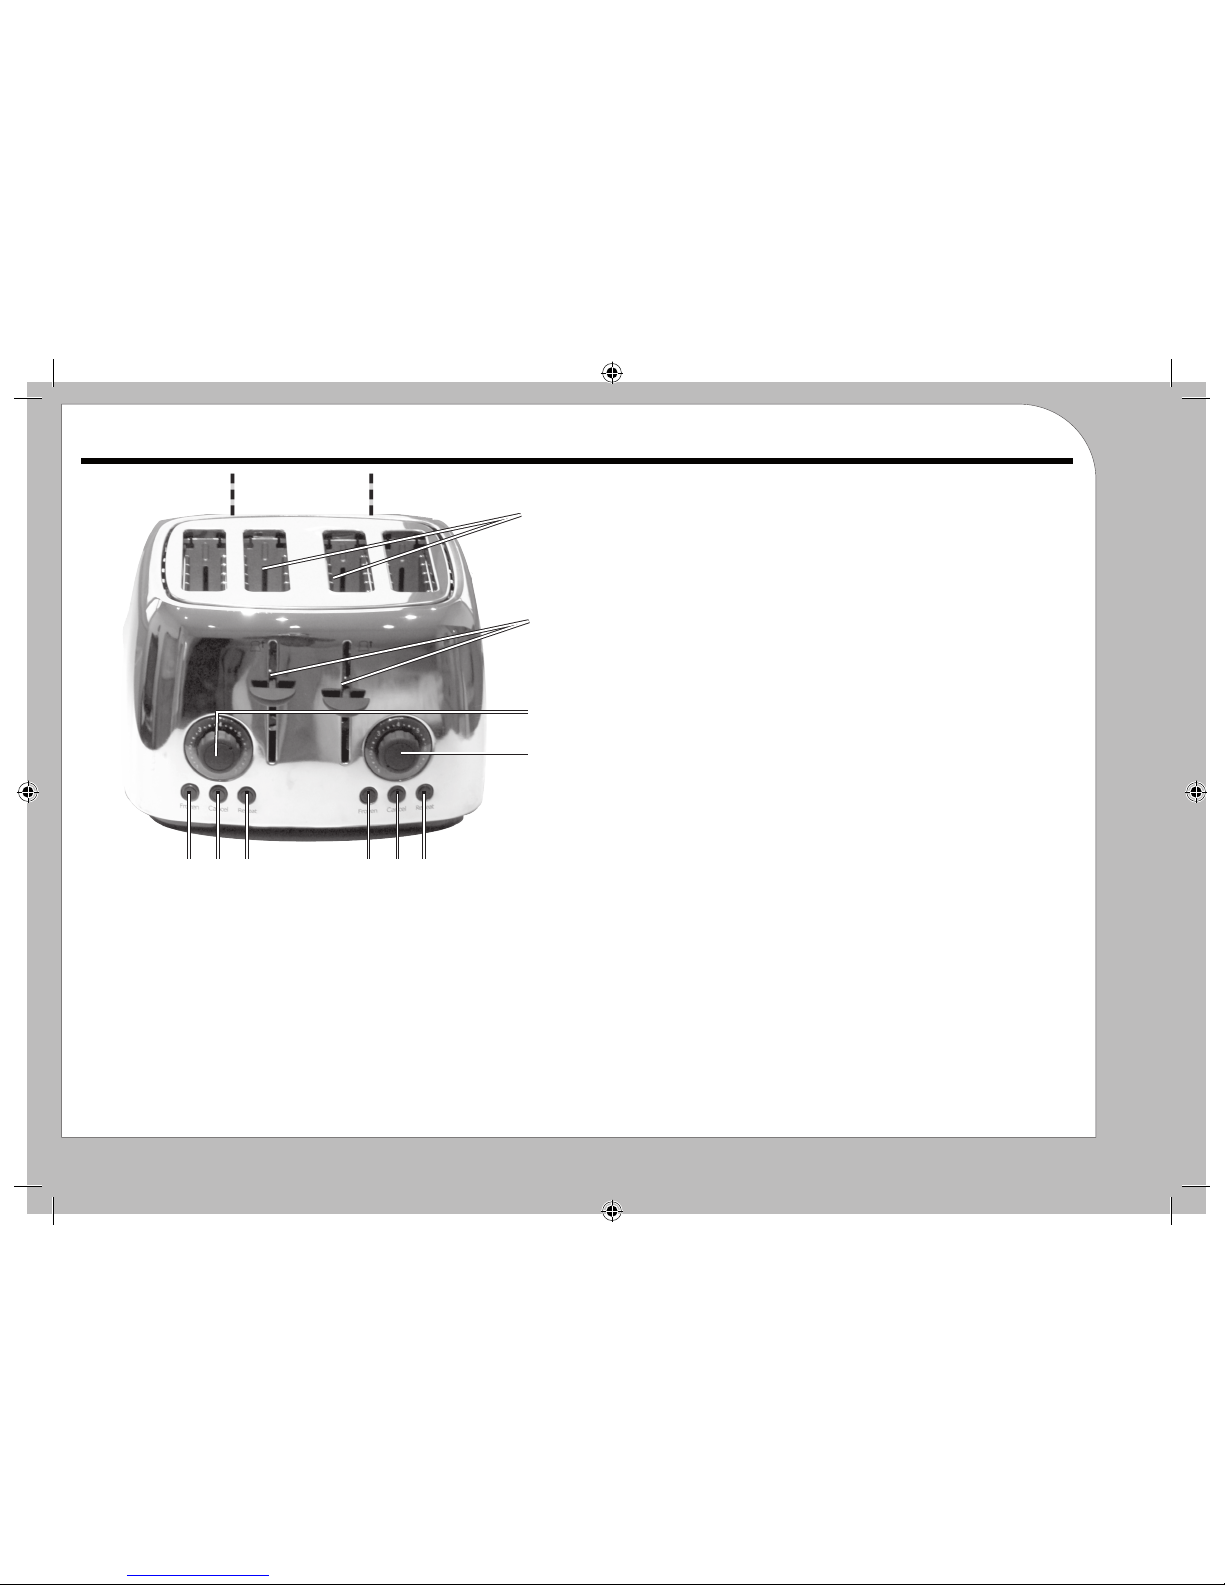
Operating Features Of Your Toaster
Dual Controls: The toaster has two separate sets of controls
which can be used for dierent breads or dierent degrees
of browning.
Timer Control: Turn this control clockwise (higher setting)
to increase toasting time and anti-clockwise to decrease the
time (lower setting).
Frozen: Frozen sliced bread may be defrosted and toasted
in one operation. Adjust the control to the preferred setting,
press the FROZEN button and then press the carriage lever
to switch on the toaster. The Frozen indicator will glow and
the bread will toast as normal. During this cycle extra time is
added to compensate for the frozen bread.
Reheat: Use the REHEAT button to reheat toasted bread that
has cooled. Press the REHEAT button and then press the car-
riage lever to switch on the toaster.The Reheat indicator will
glow and the bread will be briey reheated.The toaster will
then switch o.
Crumb Removal
Empty each crumb tray at least once a week. This will mini-
mise the build up of toast crumbs and other debris.
To remove the crumb tray: Switch the toaster o at the mains
supply and allow it to cool. The crumb tray is located at the
left side of the toaster. Grip the handle and slide out the
crumb tray.
Empty the crumbs and wipe the crumb tray clean. After
emptying, replace the tray.
Cleaning
Unplug the toaster from the mains socket. If the toaster is
hot allow it to cool fully.Wipe the outside with a soft cloth. If
necessary, the body of the toaster may be wiped clean with
a slightly damp (not wet) cloth.
Do not immerse any part of this appliance in water or other
liquid when cleaning and never use any abrasive cleaners or
scourers.
Storage
When not in use ensure that the appliance is switched o
at the mains
Warranty
Your appliance is covered by a warranty for 12 months from
the date of purchase. If a fault develops during this period,
please return the unit to your nearestTesco store together with
the original receipt as proof of purchase. This warranty in no
way aects your consumer rights.
Specications
Voltage Rating: 220 - 240VAC, 50Hz
Power Consumption: 1260-1500W
Weight: 2.30 Kg.
THIS APPLIANCE MUST BE EARTHED

Other Tricity Bendix Toaster manuals

Tricity Bendix T2T49 User manual

Tricity Bendix

Tricity Bendix T2T49 User manual

Tricity Bendix T2TSS11B User manual

Tricity Bendix

Tricity Bendix T2TSS11B User manual

Popular Toaster manuals by other brands

Teesa TSA3302 owner's manual

Teesa

Teesa TSA3302 owner's manual

APW Wyott AT Express Installation and operating instructions

APW Wyott

APW Wyott AT Express Installation and operating instructions

Kenwood ttm610 series instructions

Kenwood

Kenwood ttm610 series instructions

Kenwood TTM020 Series manual

Kenwood

Kenwood TTM020 Series manual

CASO DESIGN INOX4 2779 Original operating manual

CASO DESIGN

CASO DESIGN INOX4 2779 Original operating manual

Imetec N6701 Instructions for use

Imetec

Imetec N6701 Instructions for use

Sunbeam 6225 Service manual

Sunbeam

Sunbeam 6225 Service manual

Grunkel TS-140 H user manual

Grunkel

Grunkel TS-140 H user manual

Morris S1308TS instruction manual

Morris

Morris S1308TS instruction manual

Cafe C9TMA2S3PD3 owner's manual

Cafe

Cafe C9TMA2S3PD3 owner's manual

Philips HD2686 manual

Philips

Philips HD2686 manual

Breville BTA420 instructions

Breville

Breville BTA420 instructions

Clas Ohlson T367SS-UK manual

Clas Ohlson

Clas Ohlson T367SS-UK manual

Coline 134801-UK instruction manual

Coline

Coline 134801-UK instruction manual

inventum Toastwich SG421 instruction manual

inventum

inventum Toastwich SG421 instruction manual

MIA Vario 4 in 1 manual

MIA

MIA Vario 4 in 1 manual

Perfect Sence PSCVT01 instruction manual

Perfect Sence

Perfect Sence PSCVT01 instruction manual

Dualit DCTT 1 Instructions and guarantee

Dualit

Dualit DCTT 1 Instructions and guarantee

manuals.online logo
manuals.online logoBrands
  • About & Mission
  • Contact us
  • Privacy Policy
  • Terms and Conditions

Copyright 2025 Manuals.Online. All Rights Reserved.