Triton advanced Vuoksa 2 advanced User manual

Assembly Instruction - Triton Vuoksa 2 advanced
Touring kayak
QR-Code assembly video:

2
You can find many assembling videos to our boats on
our YouTube channel:
https://www.youtube.com/c/faltbootde
Assembly Instructions Triton Vuoksa 2 advanced
Dear Customer,
At first: please do not be alarmed by the extent of these instructions!
The assembling instructions are very detailed and almost every step is illustrated. You will notice that it
will help you at one point or another. After a few times and with a little practice you won’t need the
manual anymore.
You have purchased a Triton Vouksa 2 advanced - a powerful touring kayak with extremely high
stability and stiffness, which has been one of the best-selling folding kayaks in Europe in recent years.
The body stiffness results from the high structural performance of the frame; on the other hand the hull
is designed to fit the frame perfectly. This is why the first few setups are power intensive, since frame
and skin have to adapt to another (the hull expands a bit while/after assembling the first couple of
times). The assembling gets then easier each time.
Please take your time for the first assembling to learn about the special features. It is strongly
recommended following the single steps in the instructions carefully! Otherwise, it will be
unnecessarily difficult. After some practice you will build it up without much hassle in about 20-30
minutes. Always keep in mind that no one is born a master, and the individual assembling has to be
learned for each folding boat. As a "reward" of the assembling you get a fast, stiff and stable touring
kayak, which is characterized by excellent handling and a strong hull!
Please check the assembly videos in our YouTube channel: https://www.youtube.com/faltbootde
If you have any questions, your dealer will be happy to assist you. Otherwise, you can also contact us
Please also consider the instructions of “Care and Accessories” at the end of this manual. Especially if
you are planning extensive tours in salt water, which requires special care!
We hope you will enjoy your new kayak!
Brief overview of assembling:
1. Assembling bow: Attach 4x stringer elements without lock, 4x stringer elements with
lock and install cross rib #1
2. Assembling stern: Attach 4x stringer elements without lock, Attach 4x stringer elements
with lock and install cross rib #4
3. Insert bow and stern into the hull and tension the keel
(Therefore take the stringer elements out of the skin!)
4. Close the stringer
5. Insert and close the coaming
6. Install cross ribs #3 and #4
7. Insert seats (and if necessary the rudder system)
8. Inflate sponsons
This short description should provide a general overview of the basic structure of assembling.
For the first few times please consider the following detailed assembly instructions and read
them carefully before you get going:

3
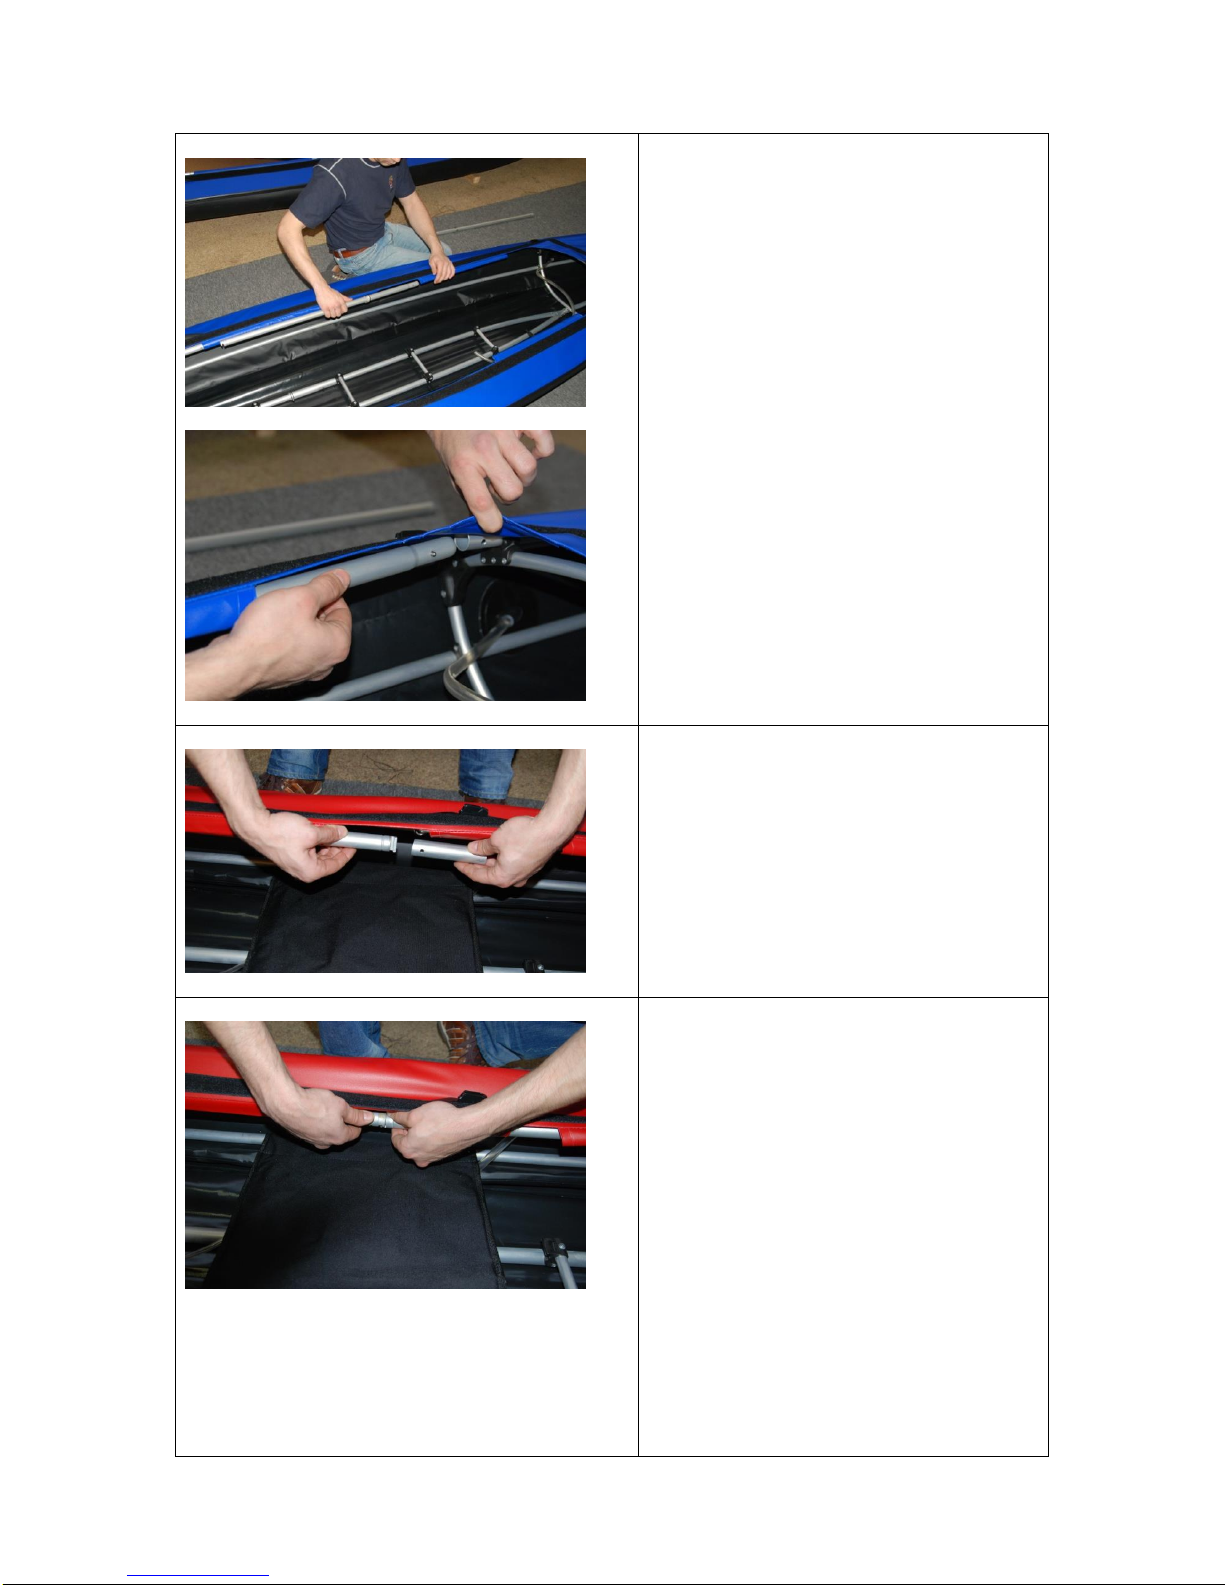
1) Overview parts
Please first get all parts out the pack and spread them out. It is best to sort the parts
according to the content list.
1) 8x Stringer element with lock:
2) 8x Stringer element without lock
3) 4x Sleeves, small
4) 2x Sleeves, big
5) 2x Bent coaming rod (wider
diameter)
6) 4x Coaming rod (wider diameter)
7) Keel ladder with riveted half tube
8) Keel ladder with hemispherical
ends
9) 2x Keel fork (identical)
10)Bow segment (with two pickups)
11)Stern segment
12)Cross rib #1 - #4
13)Hull
14)2 Seats
15)Deck
16)Rudder system
17)Repair kit
18)Backpack and waist belt (no pic)
14)
1)
2)
3)
4)
5)
6)
7)
8)
9)
10)
11)
12)
# 1
# 2
# 3
# 4
13)
14)
15)
16)
17)

4
2) Assembling Bow
You need:
1x Bow element with a long fixed rod with
two flexible pickups (encircled on the left)
1x Keel fork (both identical)
4x Stringer element without lock
4x Stringer element with lock
1x Cross rib #1 with steel hooks on top
First mount the keel fork on the keel rod of
the bow element. The plug-in connections
all have all so-called snap buttons, which
snap into place when plugging on.
The clips of the keel have to show upwards.
Attach a stringer element without lock to
each of the 4 pickups of the bow element.
Then attach one stringer element with lock
to each of them.
Install cross rib #1. Therefore, insert the two
steel hooks diagonally from underneath into
the pickup on the ridge bar. Then bring the
cross rib in an upright position.
Then insert the bottom of the cross rib into
the pickup on the keel rod. (NOTE: This has
to be the SECOND step AFTER having
connected it to the ridge bar!)
Insert the small pin into the receiver and
then slide it backwards into the opening
towards the center of the boat (as shown on
the left).
Then clip the stringer elements into the C-
clips of the cross rib.

5
Ensure, that all snap buttons face inside
the kayak:
The bow element is fully assembled and
should result in the image on the left.
3) Assembling stern
You need:
1x Stern element with two long fixed rods
1x Keel fork (both identical)
4x Stringer element without lock
4x Stringer element with lock
1x Cross rib #4 with two clips on top
Proceed likewise as with the bow element:
Attach a stringer element without lock to
each of the 4 pickups of the bow element.
Then attach one stringer element with lock
to each of them.
Mount the keel fork on the keel rod of the
stern element. Again, make sure, the clips
of the keel show upwards.
Insert cross rib #4 into the receiver on the
keel and clip all the stringer into the C-
clips. The two fixed rods of the stern
element have to be clipped into the to
clips on top of the cross rib. Make sure,
that they overlap equally (as shown on
the left).
snap button

6
Again, make sure, all snap buttons face
inside the kayak:
The stern element is fully assembled and
should result in the image on the left.
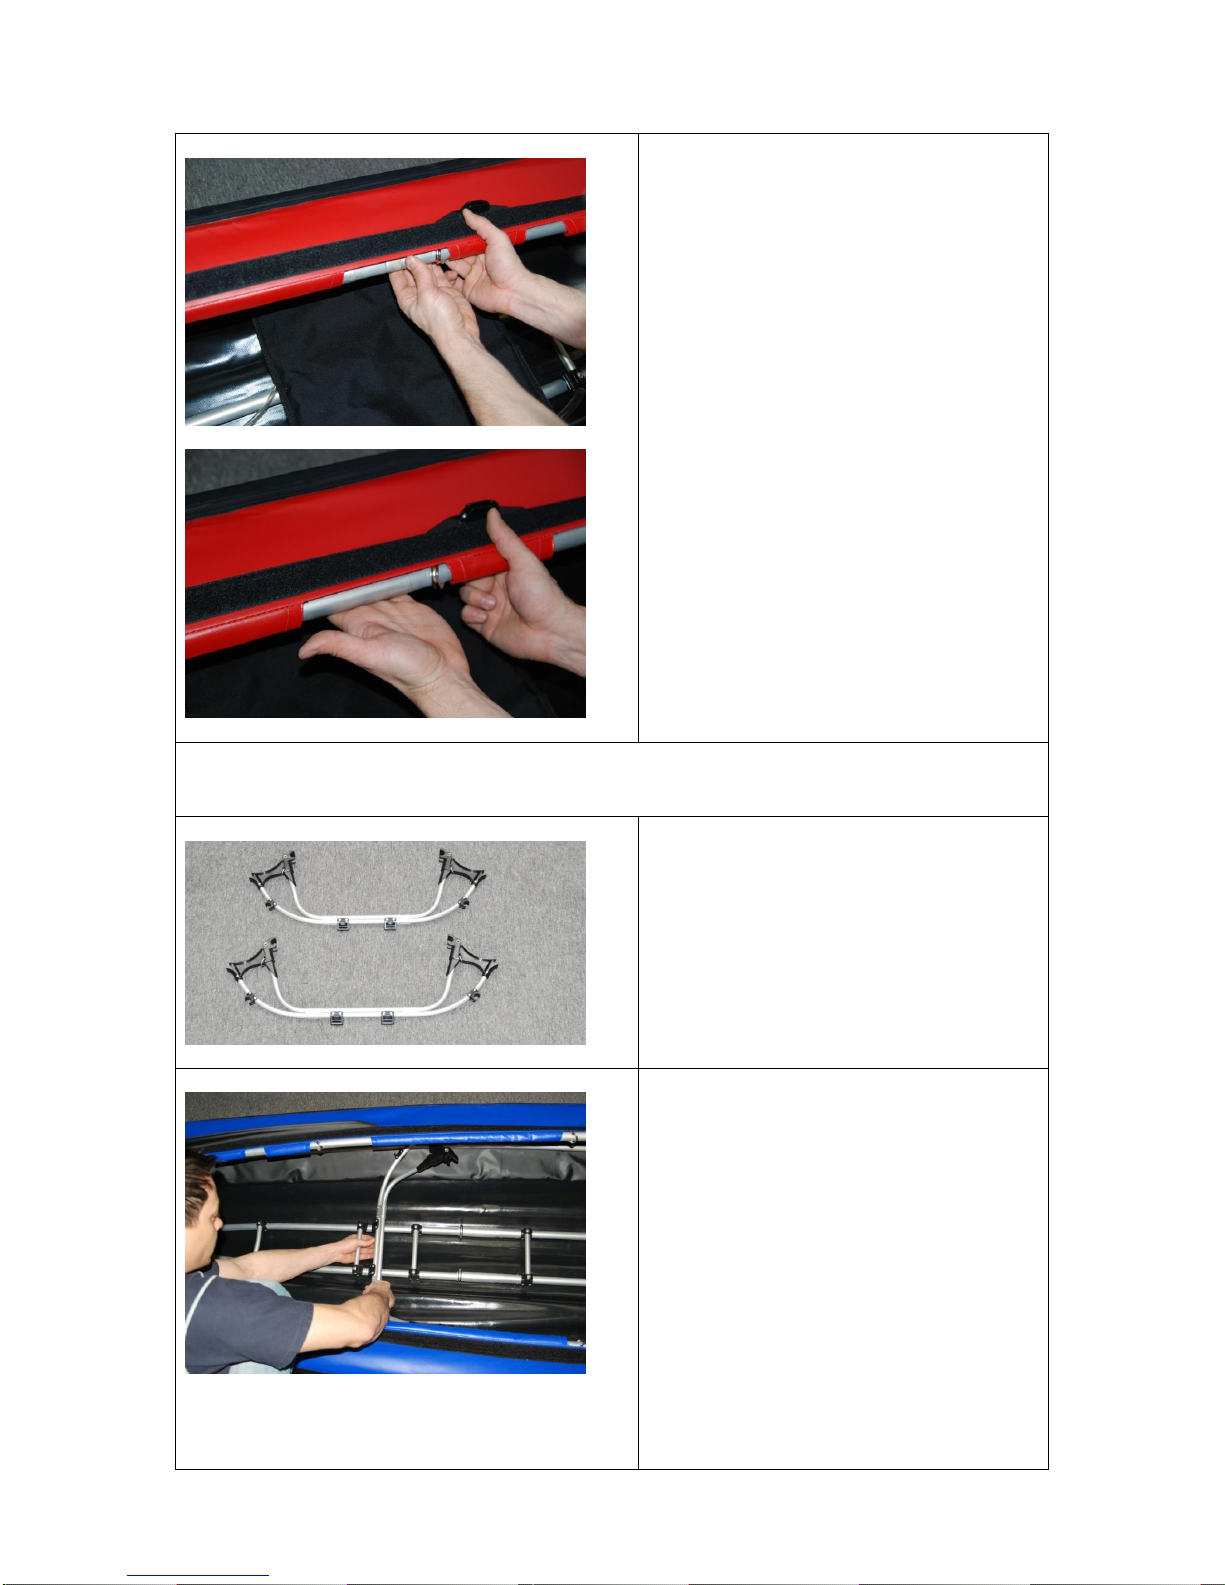
4) Inserting bow and stern element / tensioning the hull
Spread out the hull.
Then insert the bow element into the hull.
Make sure to place the frame centered
Now push the frame flatly into the bow.
It is best to kneel inside the boat and
take the frame at the back ends of the
stringer elements.
Try to orientate at the ridge bar and the
reinforcement strip on the deck to insert
the frame centrally.
Push the frame firmly into the bow as far
as you can.

7
Make sure, the two pickup elements at the
ridge bar are pointing towards the center
of the kayak (this is where the coaming is
inserted later on).
Proceed likewise with the stern.
Push the frame flat into the bow and as
far as you can.
Make sure to take the filling tubes for the
sponsons between the stringer elements.
Again, make sure to insert the stern
element centrally. Orientate at the two
ridge bars on top of the cross rib. They
should have the same distance to the
sides.
Now attach the two keel ladders to the
keel forks. (It doesn't matter, where to
attach which part.)

8
Now bow and stern are getting connected
and tensioned. In order to do this, remove
the split pins on keel ladder.
And then proceed exactly as described.
Please read through the following
section before going to work:
The keel ladder part with the
hemispherical ends is placed "UNDER"
the ladder with the riveted half tubes.
IMPORTANT:
Prior to this operation take the stringer
elements out the skin. This will relieve
the keel and will avoid any blockage.
You can pull up bow and stern without any
problem. The skin can flex and the frame
won’t jam.
(You see this very clearly on the pictures
on the left).
If the stringer elements are not removed
from the skin, an unfortunate pressure on
the keel rods is created, which may
damage them.
Slowly press the aligned keel ladders
down.
Put the stringer elements back into the
hull (see the left picture).
Especially the first time a high tension
occurs. This is normal and will decrease
with further assembling.
Then insert the split pins back through the
holes and wrap the rubber around it.

9
5) Connecting stringer
The connecting of the stringer elements is
a process that you have to learn.
Especially the precise alignment of the
"locks" to another is crucial to prevent
jamming. This connection technology
adds a lot to the overall stiffness of the
boat.
For one, you "press" the excess length,
the two stringer element with lock of bow
and stern have, "into the boat length" and
on the other hand, this connection is
stable, both on pressure and on tension.
A huge advantage on the water!
Note: You can connect the stringer
elements both by pushing them into the
boat, or by pulling them into the boat from
the opposite side.
Give it a try, what suits you better.
Work your way from the bottom up. Start
with the lower stringer elements.
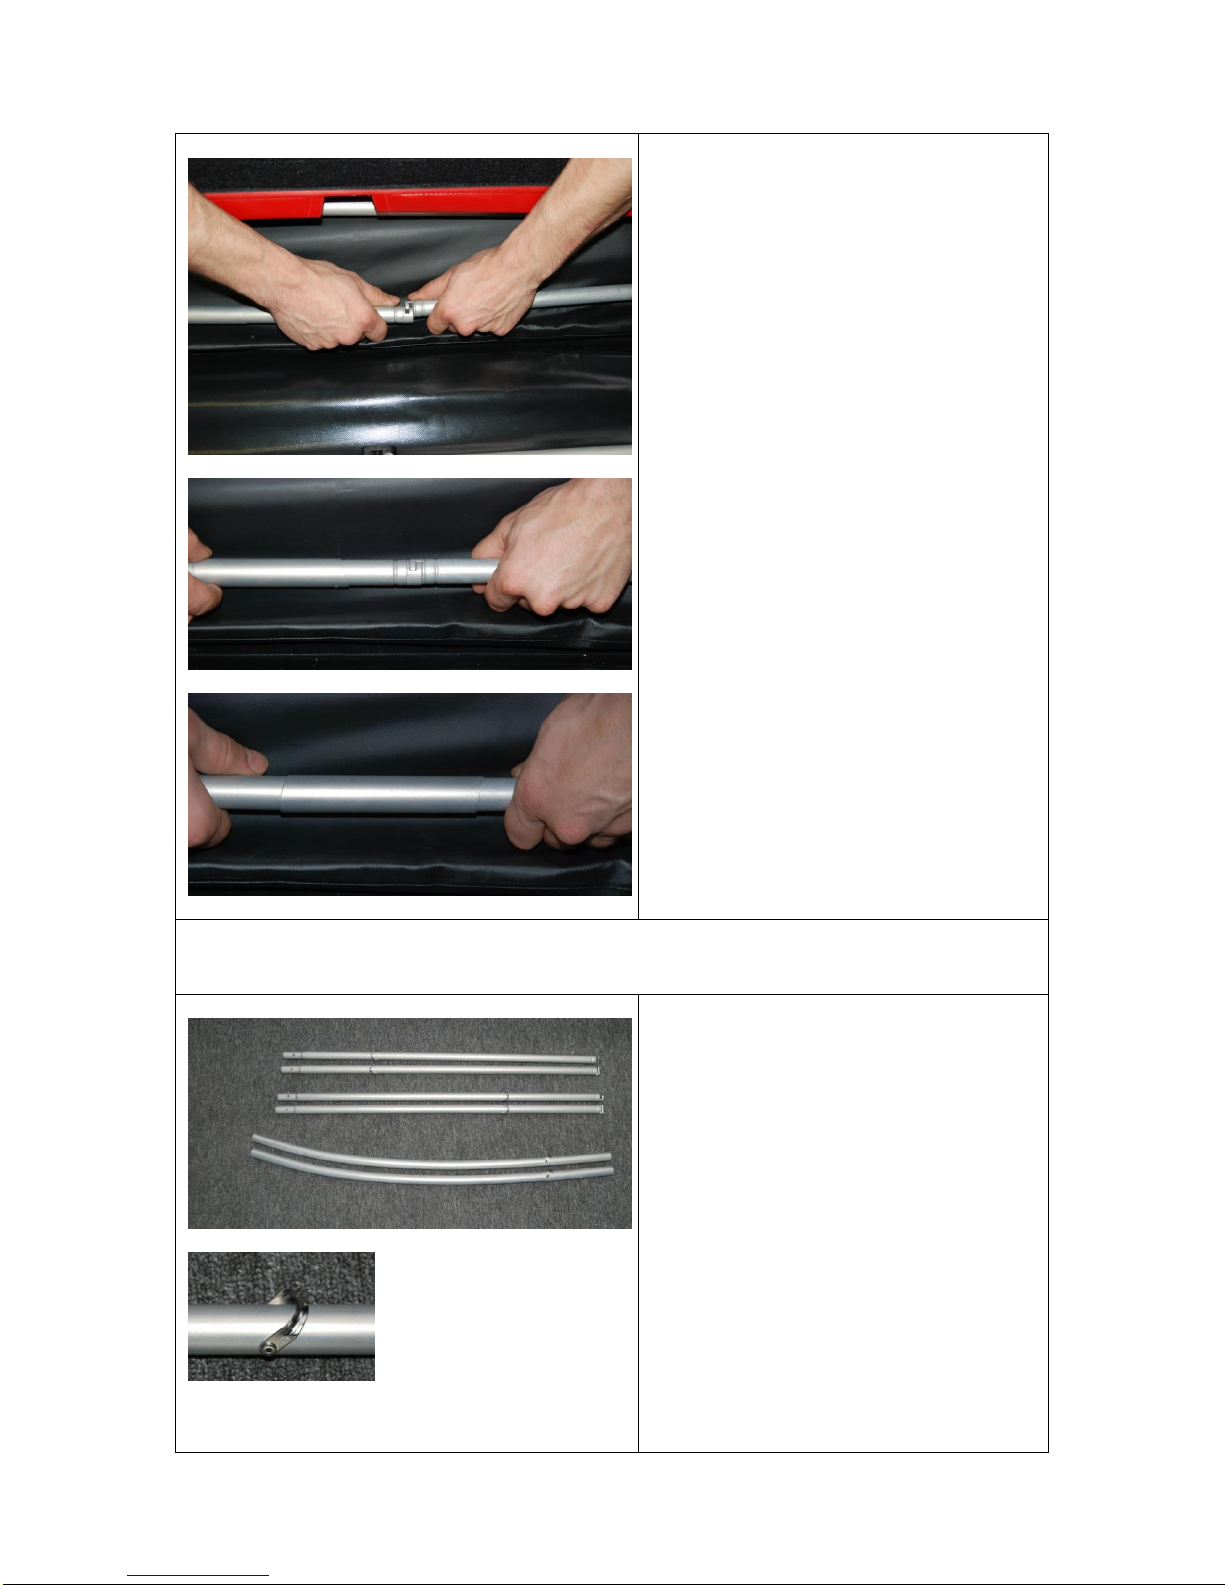
First take one of the four small sleeves
and slide it onto one of the stringer
element (see top picture).
Then take the stringer element (as in the
second picture) and align the locks
exactly to another.
The mouths have to "look at each other".
This is crucial, otherwise it will be
unnecessarily difficult.
Push both stringer elements towards the
boat's center. This requires some strength
(especially for the first few times). The
process can also be done - as mentioned
earlier - from the other side, by pulling the
stringer elements to yourself.
Then connect the two locks. You must
align the locks exactly to another, in
order to prevent jamming.
Do the whole process - especially the first
few times - as slowly as possible and
without hassle.
10
Let the stringer then slowly come back
and make sure that the two elements
form a straight line.
This is very important, too. Once there is
no straight line, the stringer elements will
jam.
If they form a straight line, you still can
adjust some little imprecision, by pressing
with your thumb.
Then slide the sleeve over the connection.
Repeat the process with the remaining 3
stringer elements, from bottom to top.
Especially at the beginning you have to
practice a bit until you find the right way.
But then it is surprisingly easy. The
gratitude is an extremely stiff and strong
connection that contributes a lot to the
performance of your folding kayak.
6) Installation of the coaming
For the coaming you need:
2x bent coaming rod with open ends
4x straight coaming rod with lock
Connect the one straight rod (with the D-
rings for the back rest) to each of the two
bent coaming rods.

11
Insert these with the bent part ahead into
the coaming channel. And that into the
part with the largest gap in the rear third
(see the left picture).
Then slide this first half of the coaming
through the channel to the front.
Especially at the first assembly you have
to make sure, that the rod runs through
the channel.
It is much easier to push the coaming rod
“from the inside of the boat”, rather than
“from above”. This creates a “straight line”
and prevents jamming inside the channel.
Thus, the rods are much easier to push
into the channel!
Then connect the coaming rod with the
pickup element in the bow by sliding it
onto it. Just pull the flexible part a bit
toward you, so that there is also a straight
line. Thus, the connection of coaming rod
is much easier.
Proceed likewise on the other side.
NOTE:
You can also insert the coaming rods
separately (before you connect them).
First the bent rod, then the straight one
and connect them inside the channel.
Proceed how it suits you best!
12
Then insert the two remaining coaming
rods without D-rings in the channel
towards the stern.
Connect them with the pickup element in
the stern.
Take one of the two bigger sleeves and
put it onto the coaming rod.
The connection of the coaming rods is
done similarly to the connection of the
stringer.
(NOTE: On the pictures you see the same
procedure done on a Ladoga 2 advanced,
where the seat cloths are already installed)
Align both locks exactly on another. Then
press the rods slightly downward or
upward - depending on how the
connection works better.
Snap the locks and return rods. Then slide
the sleeve over it.
Important:
Again, it is crucial to form a straight line
and then slide the sleeve over the locks.
You can also pull the two rods towards
you, if you want to do it from the other
side.
13
NOTE:
Some customers proceed in reverse
order, connecting stringer and coaming.
That is, they connect bow and stern,
THEN connect the stringer elements first
and insert the coaming afterwards and
connect it.
Try that variation, if you want and proceed
how it suits you best!
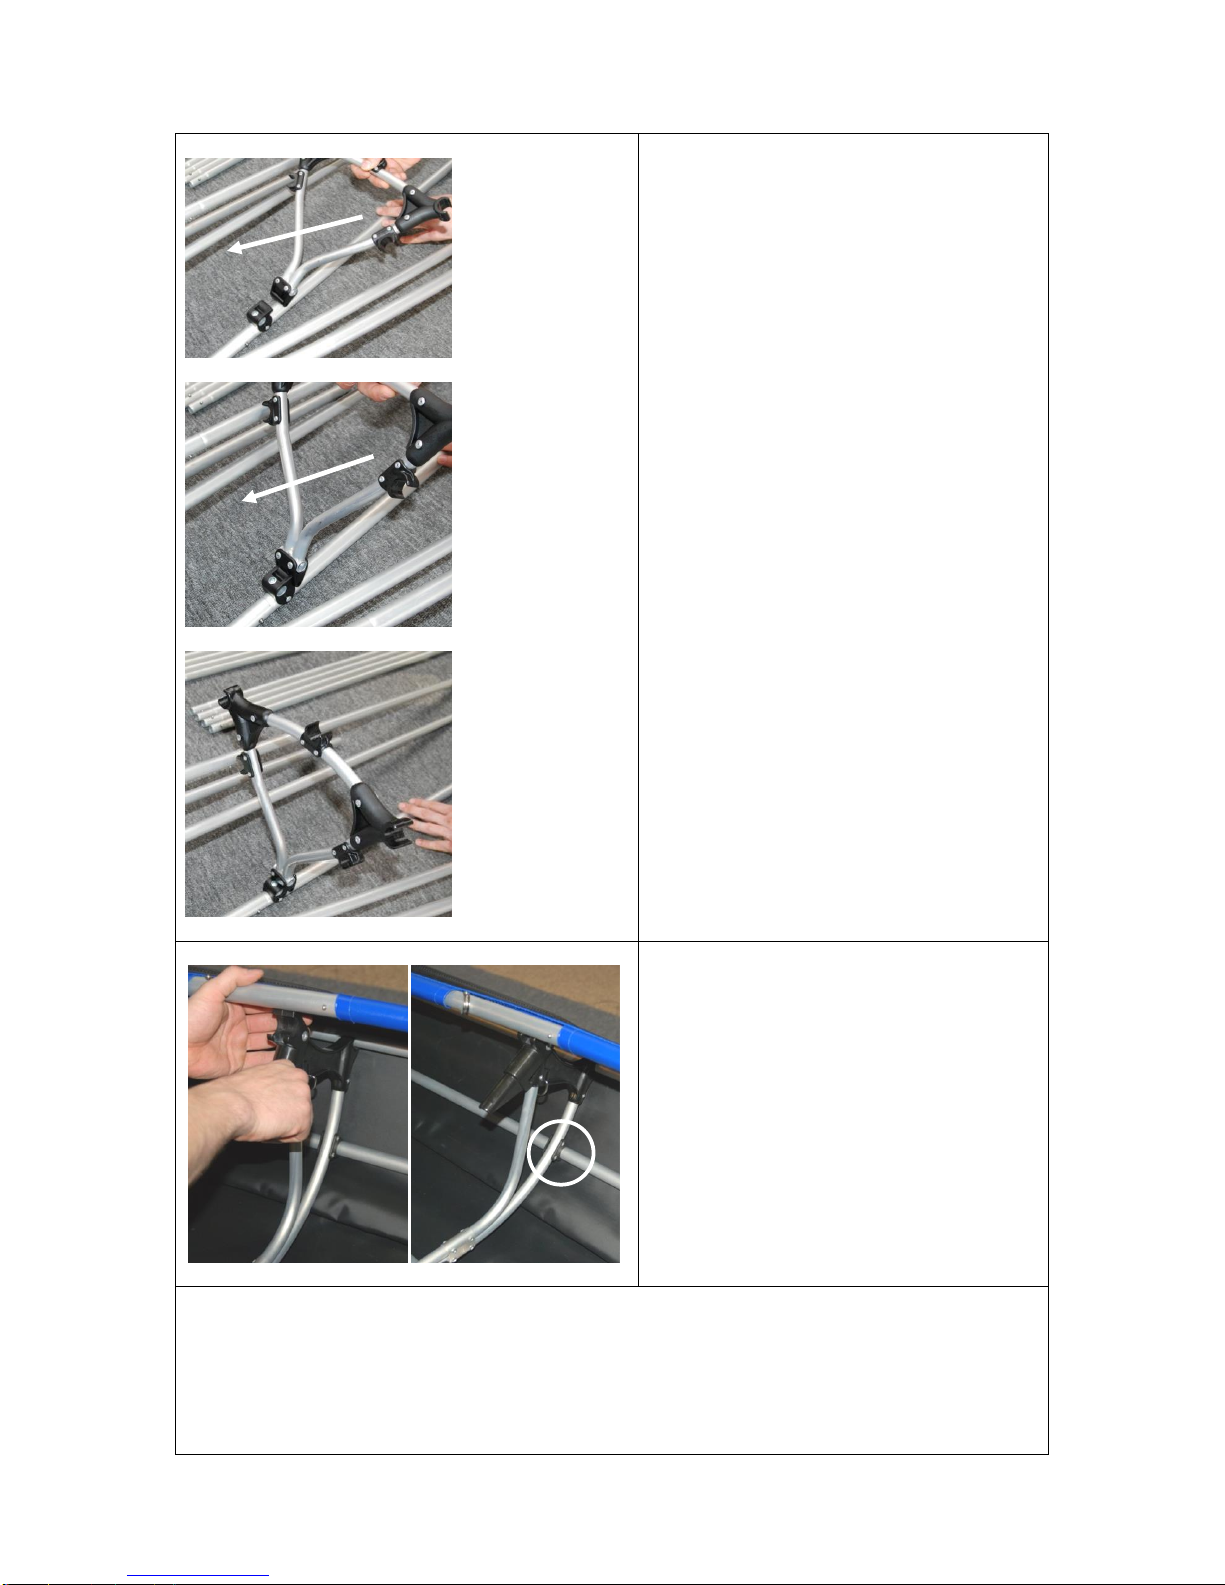
7) Installation of the cockpit cross ribs and installation of the seats
Now you will need the two remaining
cross ribs.
Cross rib #2 (narrower, the upper one in
the picture on the left)
Cross rib #3 (wider, the lower one in the
picture on the left)
Cross rib #2 is positioned in the front area
of the cockpit.
Join it diagonally to the clips on the keel
ladder and raise it slowly.
Please make sure, not to snag the cross
rib on the coaming channel
14
(On the left you see it done in detail at the
installation on a Triton Ladoga 1
advanced.)
Now open the closure on the cross ribs.
Therefore, push the little security ring
upwards, otherwise the lock won't open.
Push it upwards and let it stay open.
Then clip the stringer elements into the C-
clips on the cross rib.
Install cross rib #4 in the same way.

15
Only now insert the coaming into the
upper closure and close it by pushing the
handle downwards.
Make sure, the small security ring falls
back down into position to secure the
closure.
Installing the seats
Take the Velcros…
…and fasten the split end to cross rib #1
(to cross rib #4 in the stern).

16
The closed end is fastened around the
cross bar of the keel ladder.
(see pictures on the left)
Now place the seat onto the Velcro and
lead the upper strap through the D-ring on
the coaming, then lead it back through the
clip.
Set the desired position.
The elastic straps are fixed on the cross
rib behind the seat.
Now inflate the sponsons by using the
filling tubes. These are then connected
with the connecting pipe. By connecting
the tubes you will provide a pressure
equalization, which guarantees an ever
symmetrical underwater hull.
It is best to inflate the sponsons with the
mouth. When you notice, that it gets
harder to inflate, it is usually the right
pressure.

17
8) Deck
Now attach the deck onto the Velcros on the coaming. (You can paddle also paddle your
Triton Vouksa 2 advanced "open" in good conditions)
Your boat is now fully assembled. Have fun on the water!
Instructions for disassembling:
- For the disassembling proceed in the same way as for assembling but in reverse order.
- At first: Deflate the sponsons!
9) Folding the hull
Before folding the skin, spread it out flatly and fold it lengthwise.
Then fold the bow to the middle (app. one length of the packing bag):
Fold from the stern again to the middle (app. one length of the packing bag)…

18
…and finally fold the hull again from the bow on the folded side of the stern:
Done!
10) Care, Safety, Storage and further Information:
Salt water:
If you want to use your boat in the brackish water / salt water,
the treatment of the rod with "CorroFilm" is absolutely
recommended. Ask your local Dealer for it!
CorroFilm can be sprayed onto (and if necessary also in) the rods
and generates a transparent, dry protective film which protects the
aluminum perfectly against the "attack" of salt water. Ask your
dealer about CorroFilm. Clean the rods and boat skin after exposing
it to salt water (e.g. after the tour) with sufficient fresh water.
Important: If the boat is to be stored for a longer time, take the air
out of the sponsons! A folding boat should be built up and removed
several times a year.
Ensure that the boat skin and rods are dry when packed and stored.
The boat skin is resistant to salt water. Nevertheless, it should also
be cleaned with fresh water after the return from a tour in brackish
or salt water. Especially when sand or small stones can cause high
abrasion.
Please make sure to carry the boat not only by the handles, but also support it from the
bottom, in order to relieve the handles from tension.
Always wear a life jacket when you are using your boat on the
Waters! Beware of rapid weather changes!

19
Repairing and reinforcements
The PVC / PU skin can easily be repaired in case of abrasion, a small crack or hole with the
included repair kit.
- Cut a strip of PVC / PU material from the supplied repair kit.
Make sure that it extends generously over the damaged area.
- Round the corners of the strip with scissors or similar.
- Clean the strip and the area to be patched. Both must be free of grease.
- It is best to roughen the spot with a fine sandpaper (but in a pinch it will also work without it)
- Apply a thin layer of glue on both surfaces
- Wait for the glue to dry slightly, then press the patch firmly onto the area to be repaired.
If you can make the repairing at home: Let the glue dry for an hour, place the patch on the
spot, and gently warm both with a hot air dryer. Then push the patch firmly onto the hull.
On tour: The canoe can be reused shortly after repair. However, the adhesive and protective
effect still improves within 12 hours when the adhesive is completely dried. The sponson can
be repaired in the same procedure as described above. Please pay attention to a clean,
grease-free surface.
Your kayak is equipped with a keel strip. However, you can apply additional reinforcements
at much stressed points. Depending on the type of use, other keel strips or partial
reinforcements of the skin are recommended. If necessary, ask for it in specialized dealers.
More useful accessories for your boat:
Hatch cover, Sprayskirts, Sails

20
For more information about your and other products, sources of supply and downloads at
any time:
Other Triton advanced Boat manuals

Popular Boat manuals by other brands

Outcast Sporting Gear
Outcast Sporting Gear Prowler Assembly instructions and owner's manual

grabner
grabner XR TREKKING owner's manual

Malibu Boats
Malibu Boats 2000 owner's manual

Blue Sky Boatworks
Blue Sky Boatworks 360 Degrees Escape owner's manual

Bavaria Yachts
Bavaria Yachts BAVARIA 44 - 3 cabins Manual for owners and skippers

Wehncke
Wehncke Sport 190 operating instructions


SARDINE MARINE
SARDINE MARINE SM-12X Owner's and operator's manual

ANDIAMO
ANDIAMO 2007 Moorings Beneteau 32.2 Operation manual

MINN KOTA
MINN KOTA Talon 12' owner's manual

CORRECT CRAFT
CORRECT CRAFT Ski Nautique 1996 owner's manual

Boston Whaler
Boston Whaler 190 Montauk owner's manual

Meridian
Meridian 341 sedan owner's manual