Trivel Maya User manual

User Manual
Version 1.0.0
Copyright 2017
T15 - T20 - T25 - T30 - T250 - T350
Maya - Zoulou - Inca - Azteca

Table of content
Acknowledgments
Trivel Tricycle
Contact us
Important information
Maintenance
Safety tips
Before we begin
General warning
Note to users
Note to qualified facilities and technicians
Symbols
Warning
Safety
Minimizing accident risks
Load limit
Required tools
Tricycle adjustment
Full heel support pedals
Pedals with foot straps
Parking brakes
Parking brakes for
T15, T20, T25 & T30 models
Belt
Harness
Speed gear
Free-fixed gear
Handle bars
Seat horizontal adjustment
Seat vertical adjustment
Quick release
T250 & T350 seat and backrest
Limited guarantee
1
1
1
1
2
2
3
3
3
3
3
4
4
4
4
4
5
5
5
6
6
7
7
7
8
9-10
11
12
12
13
14

Acknowledgments
To learn more about our
products, parts, accessories and
services, please visit
www.trivel.com
Trivel Tricycle
Thank you for purchasing a Trivel
product. Do not hesitate to send
us your comments or questions
about this manual, our tricycles,
their reliability, safety or use or
about repair or maintenance
services offered by Trivel’s
authorized retailers.
Our products are made in
Canada and parts are made in
Canada or imported.
Contact us
Trivel
297 Notre-Dame
Repentigny, Quebec
J6A 2R9 Canada
Tel : (450) 581-6670
Fax : (450) 581-7568
information@trivel.com
www.trivel.com
www.facebook.com/
Trivel-474851199347834/
Information importante
If you have any questions regar-
ding safety, adjustments, acces-
sories, use or maintenance,
contact your Trivel authorized
retailer.
Please enter the information
below for future reference:
Date of purchase or possession :
__________________________
Invoice number :
__________________________
Retailer :
___________________________
___________________________
Address :
__________________________
__________________________
Phone number :
__________________________
1

Maintenance
Please follow these key maintenance instructions:
• Maintain tire pressure as recommended by manufacturer. You’ll find
this information on the tire’s sidewall.
• Ensure gearing systems are well lubricated.
• Make sure all nuts and bolts are tightened.
• Clean tricycle after riding in calcium or salt to prevent corrosion.
• Protect tricycle from rain and snow.
• Check brakes regularly to ensure safe braking.
Safety tips
• If the user is a child, make sure an adult always accompanies him or
her.
• Always place user’s feet safely on pedals.
• Properly tighten belt and straps on user for safety.
• Make sure the user’s toes do not touch the ground.
• The user must always wear a protection helmet, at a minimum.
2

Before we begin
General warning
Our tricycles are manufactured
according to the latest steel-re-
lated technologies and are there-
fore subject to specific caveats :
• DO NOT MODIFY THE FRAME
IN ANY WAY. DRILLING AND
GRINDING CAN CAUSE SEVERE
STRUCTURE DAMAGES AND
WILL AUTOMATICALLY CANCEL
THE GUARANTEE.
• DO NOT USE ANY LOCKING
RINGS OTHER THAN THOSE
DESIGNED AND APPROVED BY
TRIVEL.
Note to users
Please read this entire manual
carefully before using or
maintaining your Trivel product.
If you have any questions or if
instructions are not clear, contact
your Trivel qualified technician or
Trivel
(see contact information above).
Note to qualified retai-
lers and technicians
Please read this entire manual
carefully before any mainte-
nance, repair or adjustment of
the product.
If you have any questions or if
instructions are not clear, contact
us at Trivel by email or phone
(see contact information above).
Symbols
The following symbols have been
used throughout this manual.
Please make sure to check what
they mean.
Useful information for
users
Important information to
prevent injuries or
damages
3

Warning
A qualified Trivel techni-
cian must ensure the initial
adjustment of your Trivel
product.
Do not tighten screws
with air or electric tools;
the final tightening must
be manual.
Regular maintenance will
extend your Trivel pro-
duct’s life cycle.
The latest version of this
manual is available on our
website: trivel.com/en
Safety
See Maintenance section.
Minimizing accidents
risks
Trivel is not responsible for acci-
dents caused by the use or hand-
ling when tricycle is towed by an
adult’s regular bike, or by its
capsizing when the child gets off
his or her tricycle or when he or
she activates the brakes.
Do not use for downhill.
Trivel is not responsible for acci-
dents caused by the use of
towing equipment.
Load limit
There is no limit for the towing
bar. Follow the bike manufactu-
rer’s indications.
To learn more, contact your Trivel
representative.
Required tools
11mm wrench (7/16)
3mm Allen wrench
4mm Allen wrench
5mm Allen wrench
6mm Allen wrench
11mm Allen wrench
Models
T15 - T20 - Maya
T25 - T30
Zoulou - Inca
T250 - T350
Azteca
Max weight
100 lb
200 lb
250 lb
350 lb
4
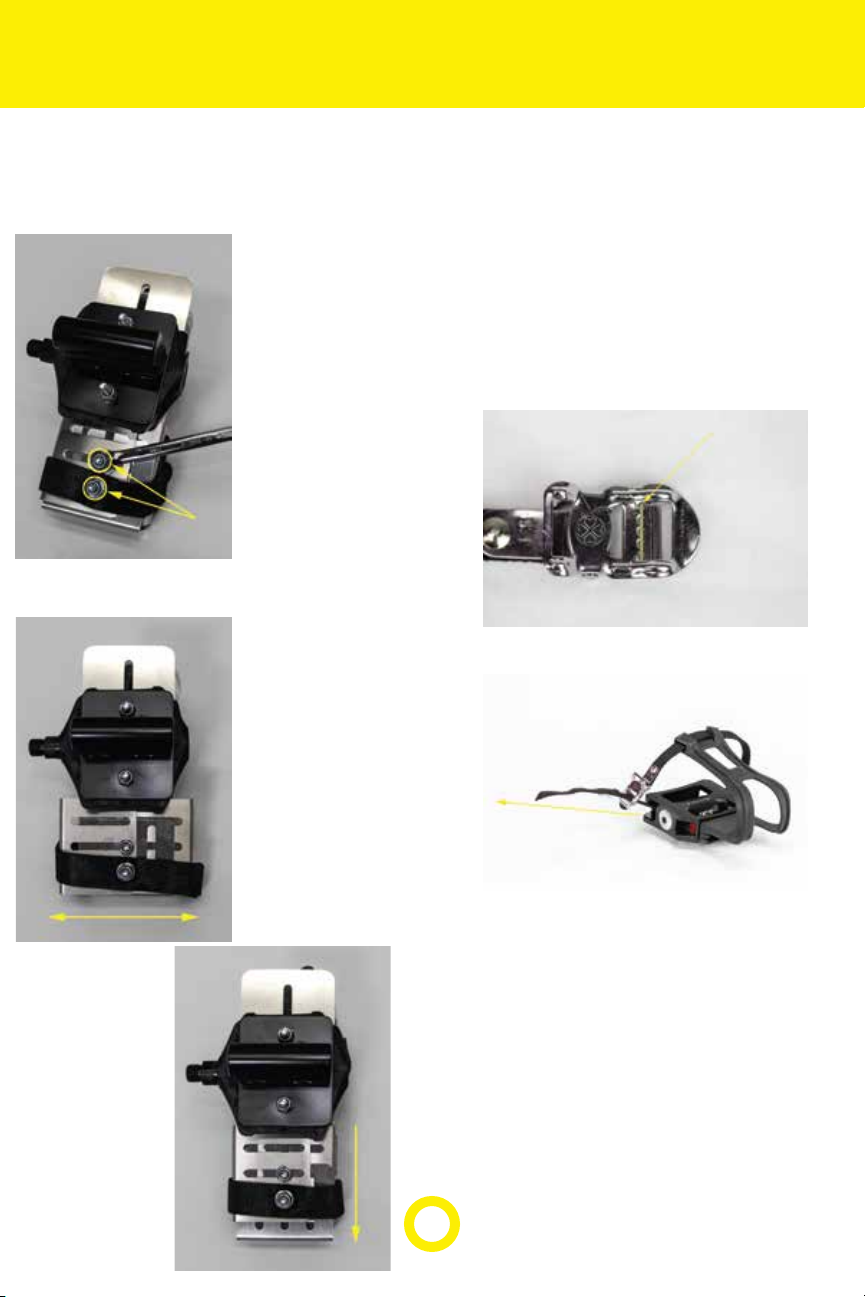
Tricycle adjustment
Full heel support pedals
You can
adjust the
width and
length of the
full heel sup-
port pedals.
To do this,
you’ll need an
11 mm
wrench.
1- Unscrew
both nuts at
the heel.
2 -Pull edges
on desired
side.
3- Tighten
nuts and
make sure
the plates
are well
secured.
Pedals with foot straps
No tool is required to adjust foot
strap pedals.
All you need to do is insert your
foot and pull the strap.
5
Parking brakes
If your tricycle is equipped with a
parking brake handle, you’ll just
need to activate it to immobilize
the tricycle when the user gets
on or off it.
Follow these steps to engage the
lock.
1- Push the brake lever
2- Press on the knob
simultaneously
3- Release the brake lever while
still pressing on the button.
To disengage the lock, push the
lever until the knob lifts back up.
Parking brakes for T15,
T20, T25 & T30 models
If your tricycle is equipped with
parking brakes on its front wheel,
follow the steps below to acti-
vate it.
1- Pull the lever away from the
frame, as illustrated on the pic-
ture below.
2- To disengage the brakes, push
the lever back in its initial posi-
tion.
6

Belt
To adjust your belt :
1- Align male part (A) with
female part (B) and push them
together until you hear a click
(C)
2- Adjust strap (D) until the belt
is comfortably tightened
Harness
To adjust
your
harness, you
need to pull
the straps in
the direction
illustrated by
the arrows in
the picture
on the right.
Speed gear
Always make sure to
pedal when changing
gears. Do not try to
change gears while the
tricycle is stationary; you
may damage it.
Twist shifter
To change gears with a twist
shifter, twist the handle.
Ez-Fire shifter
To change gears with an EZ-Fire
shifter, press with you thumb or
index the small levers as illus-
trated on the picture below.
7

Free-fixed gear
The free-fixed gear system allows
you to switch between free and
fixed gears in an instant. You
need this system if you’ll use a
towing bar.
DO NOT USE ANY
TOWING BAR OTHER
THAN THE ONE PROVI-
DED BY THE
MANUFACTURER
Dual gearing system
Fixed gear: allows tricycle to
move forwards and backwards.
Wheels will turn as long as the
user pedals and will stop as soon
as the user stop pedaling.
Free wheel: this works just as a
regular bike, i.e. the user will
propel the tricycle by pedaling,
which will keep moving forward
even when user stops pedaling.
How to engage and disengage
the free-fixed gearing system
To disengage the free-fixed gea-
ring system, slide tab to the left
(see picture)
Watch out for your fingers
while handling.
It is highly recommended
to disengage the
free-fixed gearing system
if no one is sitting on the
tricycle.
To activate
this system,
align rails
and hole and
insert tab in
hole.
To make this
alignment
easier, press
on the tab
where the hole is situated and,
using your hand, backward pedal
slowly until both components are
aligned.
8

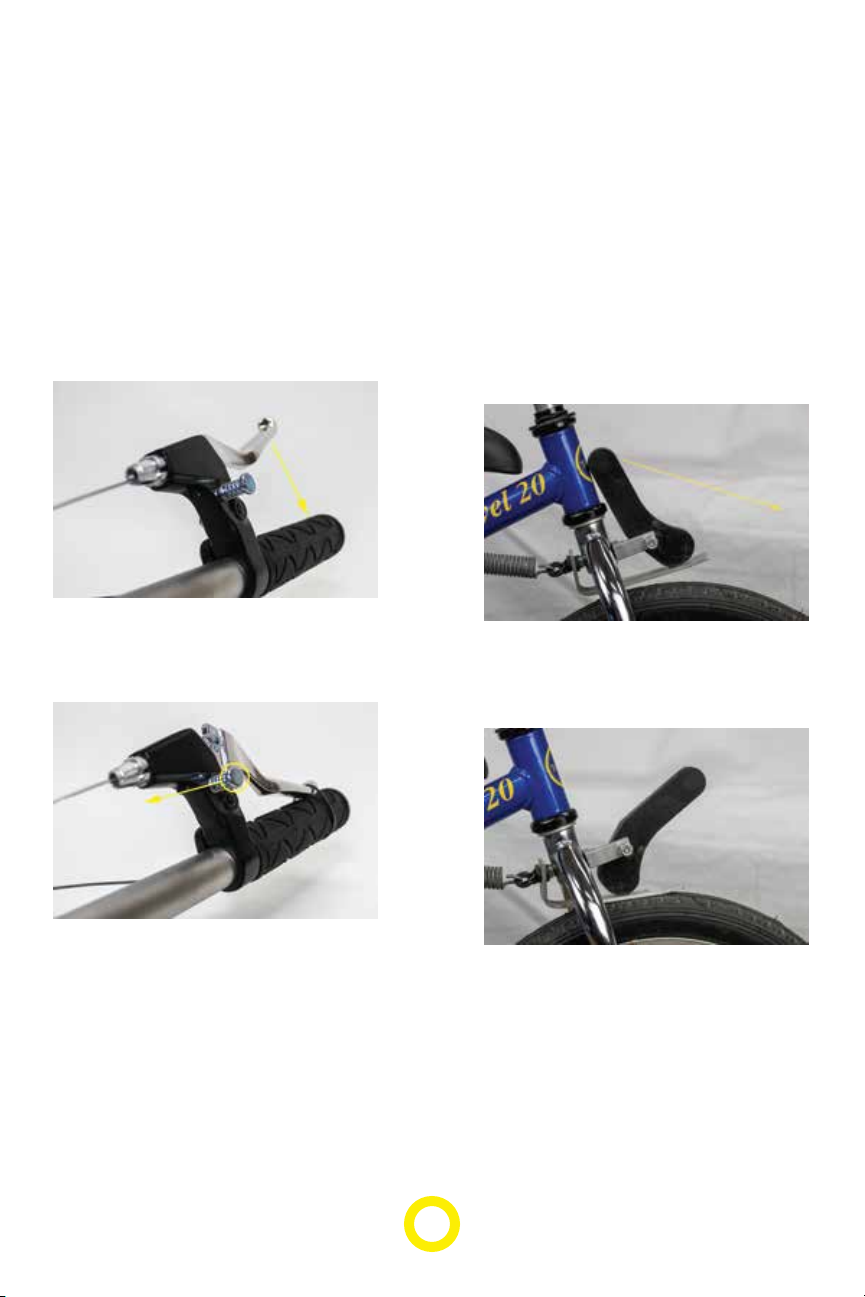
Handle bars
Tool-adjustable stem for T15,
T20, T25, T30 models
To adjust the stem, you’ll need a
5 or 6mm Allen wrench.
To adjust the stem’s angle,
untighten the screw as illustrated
in the picture below.
Adjust angle. Tighten the screw
at the desired angle.
To adjust the handlebars’ angle,
untighten both screws on the
upper part of the stem with your
5mm Allen wrench. Adjust angle
and tighten screws with the
wrench.
9

Tool-free adjustable stem for
T250 & T350 models
This stem allows a better clea-
rance when user is getting on
and off the tricycle. A simple
knob makes it easy to change
the handlebars’ position (see
picture below).
To adjust position, push the
button upwards, then lift small
lever completely. Adjust angle of
stem and handlebars as required.
Handlebars for Maya, Zoulou,
Inca, Azteca models
You can adjust these handlebars
vertically. To do so, you’ll need
either a 5mm or 6mm Allen
wrench.
Untighten the screw. Adjust to
desired height, and tighten the
screw back.
Do not over tighten the
screw, you could damage
the locking ring.
10
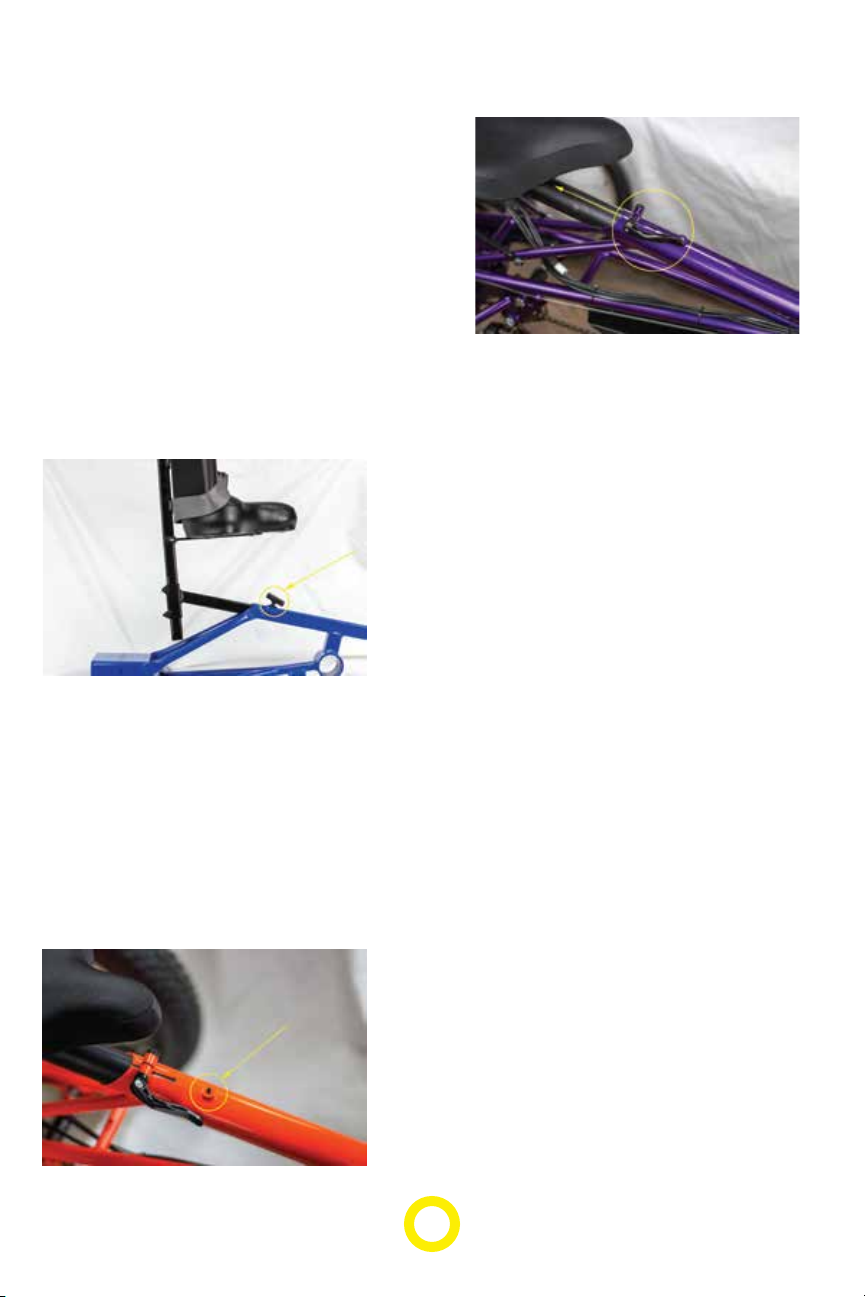
Horizontal seat adjust-
ment
For Maya, Zoulou, Inca & Azteca
models
To horizontally adjust the seat on
the Maya model, untighten the
screw with a 4mm Allen wrench.
Please note that some tricycles
are manually adjustable, in which
case no tools are required.
To adjust the seat’s horizontal
position on Zoulou, Inca &
Azteca models, follow the steps
below:
1- With a 3mm Allen wrench,
lightly untighten the safety
screw.
Open the quick release (see
Quick release section below)
3- Pull on the seat stem and
adjust distance as desired.
4- Close the quick release and
make sure it is tightened enough.
5- Tighten the safety screw.
6- Check if seat is secured.
11

Vertical seat adjustment
For Maya & Zoulou models
To vertically adjust the seat,
follow the steps below:
1- To lift seat, untighten both
screws (see picture below) with
4mm Allen wrench
2- Pull the seat up to the desired
height
3- Firmly tighten both screws
4- Check if seat is secured
Quick release
Opened
Closed
12

Seat and backrest for
T250 & T350 models
These models have a unique
seating horizontal adjustment.
Since you do not require any
tool, you can easily adjust it.
Depending on the version of
your tricycle, the horizontal
adjustment system may include
between 2 and 4 small knobs.
1- Untighten screws manually
2- Adjust the seat to desired
horizontal position
3- Firmly tighten screws
4- Check if seat is secured
For the backrest, the hydraulic
system will allow you to adjust
the angle with a simple button
(see picture below).
Complete tilting system
(OPTIONAL)
If your tricycle is equipped with
our complete tilting system, you
can tilt your backrest at 4 diffe-
rent angles.
To do so, you’ll need two 11mm
wrenches.
1- Untighten screws with
wrenches
2- Tilt backrest to desired angle
3- Tighten screws with wrenches
4- Check if backrest is secured
13

Limited guarantee
Guarantee
The Trivel product and parts
mentioned in this manual are
guaranteed for 90days from the
date of purchase.
Limits and exclusions
In case of a repair or replace-
ment under the guarantee, the
client is responsible to pay any
transport fees to replace or
repair the covered component.
Our responsibility
Trivel’s responsibility is limited, at
our discretion, to the repair or
replacement of the product’s
components that are covered by
the guarantee.
14
This manual suits for next models
9
Table of contents
Other Trivel Bicycle manuals


Popular Bicycle manuals by other brands


Pedego
Pedego COMFORT CRUISER Assembly instructions and owner's manual

Wisper
Wisper 705se owner's manual

SSR Motorsports
SSR Motorsports Sprinter 12 owner's manual

Yeti Cycles
Yeti Cycles 575 2011 owner's manual

Sun Bicycles
Sun Bicycles Traditional 24 Supplemental owner's manual

STONBIKE
STONBIKE LAN2620 user manual


