Trivel T-120 User manual

1
1. Grip
2. Shifter
3. Brake lever
4. Cable housings
5. Stem
6. Steerer column
7. Headset
8. Fender
9. Saddle
10. Frame
11. Front brake
12. Tire
13. Rim
14. Spoke
15. Fork
16. Front hub
17. Quick release binder
18. Seat post
19. Quick release clamp
20. Rear brake
21. Gear Hub
22. Rear wheel nut
23. Chain
24. Chainwheel
25. Crankarm
26. Pedal

2
Contents
Welcome word....................................................................... 3
About us................................................................................. 3
Before your first ride.............................................................. 3
A Word on safety ................................................................... 4
Condition of use .........................................................4
Safety recommendations ...........................................5
Safety checklist...........................................................6
Ergonomic recommendations................................................ 7
Handlebar height........................................................7
Saddle height..............................................................7
Foot position on the pedal.........................................7
Knee angle..................................................................8
Knee over pedal rule ..................................................8
Leg reach ....................................................................8
Ergonomic adjustments ......................................................... 9
Adjusting the saddle height........................................9
Adjusting the handlebar height................................10
Riding your bike ....................................................................11
Technical adjustments..........................................................13
Brake adjustment.....................................................13
Adjusting the chain tension......................................13
Adjusting the gear hub.............................................13
Repairing a flat tire ...............................................................14
Maintenance.........................................................................14
Required tools..........................................................14
Chain lubrification....................................................15
Tire pressure ............................................................15
Internal gear hub maintenance................................15
Lifespan and normal wear ....................................................16
Cleaning your bike ................................................................17
Storing your bike...................................................................18
Warranty terms and limitations ...........................................18

3
Welcome word
Congratulations on your purchase! We
are confident that you will enjoy riding
your new Trivel T-120 bike as we spent a
great deal of time designing it with you in
mind!
This manual will get you through the
necessary information about safety,
usage, and maintenance of your new bike
so you can experience the most of it, for
many years.
Please read this manual thoroughly
before your first ride and keep in handy
for future reference.
If some instructions remain unclear to
you, please do not hesitate to contact us
or your retailer for further explanation.
This sign indicates important
information to be noted and
caution about the proper
use of the equipment
This sign indicates a serious
warning about a potential
risk of injury, death or other
safety information
About us
For over 25 years, the passionate,
dedicated Trivel team has been designing
and manufacturing quality products for
reduced mobility children and adults, thus
providing them with hours of fun and
pleasure.
To learn more about our products, parts,
accessories and services, please visit
www.trivel.com
Before your first ride
To ensure your first ride goes smoothly,
please make sure to follow these simple
instructions:
1. Read and understand this user
manual.
2. Adjust the bike to the recommended
settings for your size.
3. Proceed to a first safety check on your
bike.
You’re good to go! Put your helmet on and
enjoy the ride!
Note that the initial assembly,
adjustments and the following regular
maintenance of your new bike must be
done by a qualified technician for the
equipment to be safe to use and to be covered by
our limited warranty.
It is strongly recommended that you
choose a private or closed-circuit road
without obstacles, major inclines or
vehicles to get used to your new bike
handling and to practice safe braking before going
for a a longer ride with other riders or on public
roads.

4
A Word on safety
Your new Trivel T-120 bike is a very
reliable and safe product. Our design
team and factory workers spent a great
amount of time ensuring that it met the
level of quality, performance and safety
that is the norm of the industry.
However, riding a bike, like other sporting
activities, involves some risks. People who
engage in cycling must be aware of the
risks involved and personally assume
them.
The majority of crashes and injuries are
caused by human factors such as bad
judgment over a hazardous situation,
improper handling or neglecting the
equipment’s mechanical maintenance.
Many serious injuries can be prevented by
wearing adequate protective equipment
such as a homologated helmet.
Respecting the local road laws and getting
to know how to properly use and maintain
your bike with the help of this manual will
also significantly help reducing the risks of
injuries.
It is the rider’s responsibility to fully
understand how to safely use and
maintain the bike.
In the case of a child riding the bike, it is
the supervising adult’s responsibility to
educate on local public road laws,
encourage safe riding activity and ensure
the proper fit, adjustment and good
mechanical condition of the equipment.
This document is not a complete service
manual. We recommend that you seek
advice from your retailer if anything is
unclear or if you need more information.
Although it is unfortunately impossible to
avoid every risks or hazardous situations
that can occur, there are several safety
advices listed in the following chapter that
can help reduce the risk of a crash or
accident.
When it comes to safety, always use good
sense, ride intelligently and be careful
about your own safety and that of the
others.
Condition of use
Your new Trivel bike was designed to used
under the Condition 2 type of riding based
on the standardized bicycle classification
usage.
This bike is designed to
be ridden on paved road
but can also be ridden
on smooth gravel roads
and light trails with small
obstacles like potholes
or small roots. Controlled drops of
maximum 6 ‘’ (15 cm) at slow speed such
as a sidewalk curb are permitted but they
should not be jumped. This bike is not
designed for racing, aggressive riding or
mountain biking.
Recommended weight limit: 200 lbs (91
kg) total weight including the rider, all the
equipment, accessories and luggage.
This bike was not designed to be fitted
with a child carrying seat.
If using feet securing device such as
toe-clips or clipless pedals, be aware of
a possible interference with front
wheel when turning sharply.

5
Safety recommendations
Check and make sure that all component
connections and accessories are safely
attached before every ride. Do not ride
your bike with loose components or
accessories. Take the bike to your retailer
if necessary.
Always wear a homologated helmet; it
could save your life. Make sure it is
properly attached and positioned.
Wear bright, visible clothes. Preferably
closely fitted to your body to avoid
entanglement into components. Lace
your shoes.
Keep control of your speed at all time and
always ride within your capacity and
limits.
On public roads, always ensure you are
visible to other road users. Make sure
your bike has all the reflectors or lights
that are required by the local laws.
Know and respect the local laws regarding
bicycle use and required safety
equipment on public roads.
Never ride under the influence of alcohol
or illicit substances. This could seriously
impair your judgment, reflexes or balance
and may lead to prosecutions, serious
injuries or even death.
Never carry a second passenger on the
bike.
Do not carry anything on the handlebars
or between your legs as this could
seriously impact your balance or get
caught in the wheels and may cause
serious injury or death.
Make sure the bike is properly sized for
you and that you are fully able to control
it.
Adapt your riding style and behaviour to
each type of terrain, situation, and
weather condition.
This product and its components were not
designed to be used for extreme
conditions or stunts. Do not engage in
aggressive riding or jumps.
Avoid riding on wet or icy ground if
possible. Wet and icy ground greatly
increase risk of a loss of control.
Avoid riding at night if possible. If you
must, make sure you are easily seen from
other road users. Install adequate lights to
your bike.
Stay away from potential hazardous
situations such as stairs, steep descents,
curbs, heavy car traffic, etc.
Avoid getting your bike in direct contact
with sea water as it can be quickly
damaging to the ferrous parts. Wipe off
any sea spray particles or sand whenever
possible.
Take note of your bike’s serial number and
store it somewhere secured. This unique
identification number can be required by
Trivel customer service for warranty
purpose. It could also help you retrieve
your bike it was stolen.
For California resident: This product may
contain chemicals known to the state of
California to cause cancer and birth defects or
other reproductive harm, including paint,
lubricants, and various metals. Wash hands
thoroughly after handling this product.
(California Prop 65)

6
Safety checklist
Before each ride, you should refer to this
safety check list to make sure your bike is
safe to ride.
Check for cracks or any damage on the
frame and fork. If you think you have
found damage, do not ride your bike. It is
recommended to bring it to your local
bike dealer and ask for advice.
Check tire pressure with a pressure gauge.
Recommended pressure specific to each
tire is written on its sides. Riding your bike
with low pressure greatly increase risks of
puncture.
Check brake function and brake pad wear.
Squeeze both brake levers and push the
bike back and forth to see if brakes are
functioning. If needed, proceed to brake
adjustment section.
Check both wheels attachment and
alignment. Raise the front end of the bike
and let it fall to the ground to make sure it
is securely attached. Look at eye level to
make sure both wheels are centered in
the frame and fork. Spin both wheels to
make sure they are straight.
Check fork, stem and handlebar
attachment and alignment. Stand in front
of your bike while holding the front wheel
steady between your legs and firmly try to
rotate the handlebars. None of these
components (fork, stem, handlebar or
front wheel) should be moving. If any of
these components are moving, align stem
with the wheel and tighten again.
Check the chain for smooth operation and
proper lubrication. Apply oil if needed.
Check the chain tension on single speed
models.
Check both pedals and crank arm
attachments. Pedals should be properly
tightened to the crank arm. If needed,
tighten them again. Rock both crank arms
from side to side to find any play. There
should be none. If needed, tighten crank
arm again or have the bottom bracket
adjusted.
Check all quick release levers that may be
in an open position. Make sure they all are
properly tightened and in their closed
position.
Check saddle attachment and seat post
insertion limit. Saddle should be firmly
tightened, and the seat post minimal
insertion mark respected.
Check both grip attachments and grip end
presence. Firmly try to rotate grips on
handlebar. They should not move.
Check for correct attachment of all
accessories if any. Make sure that there
are no loose components or parts that
could interfere with any moving parts on
bike when riding.
Check for the presence of reflectors and
their proper orientation. No accessories
should obstruct the reflectors.
Check for any cracks or damage to your
helmet. A cracked helmet should not be
used. Attachment straps should also be
well adjusted to your head.
7
Ergonomic recommendations
Keep in mind that these
recommendations should only be used
as a reference. The theories of the bike
fitting science vary even between
experienced specialists. No one has the same body
proportion, flexibility or injury history. Ideally, you
should be comfortable while riding your bike.
Achieving the right position can require some
experimentation and counselling from a fitting
specialist.
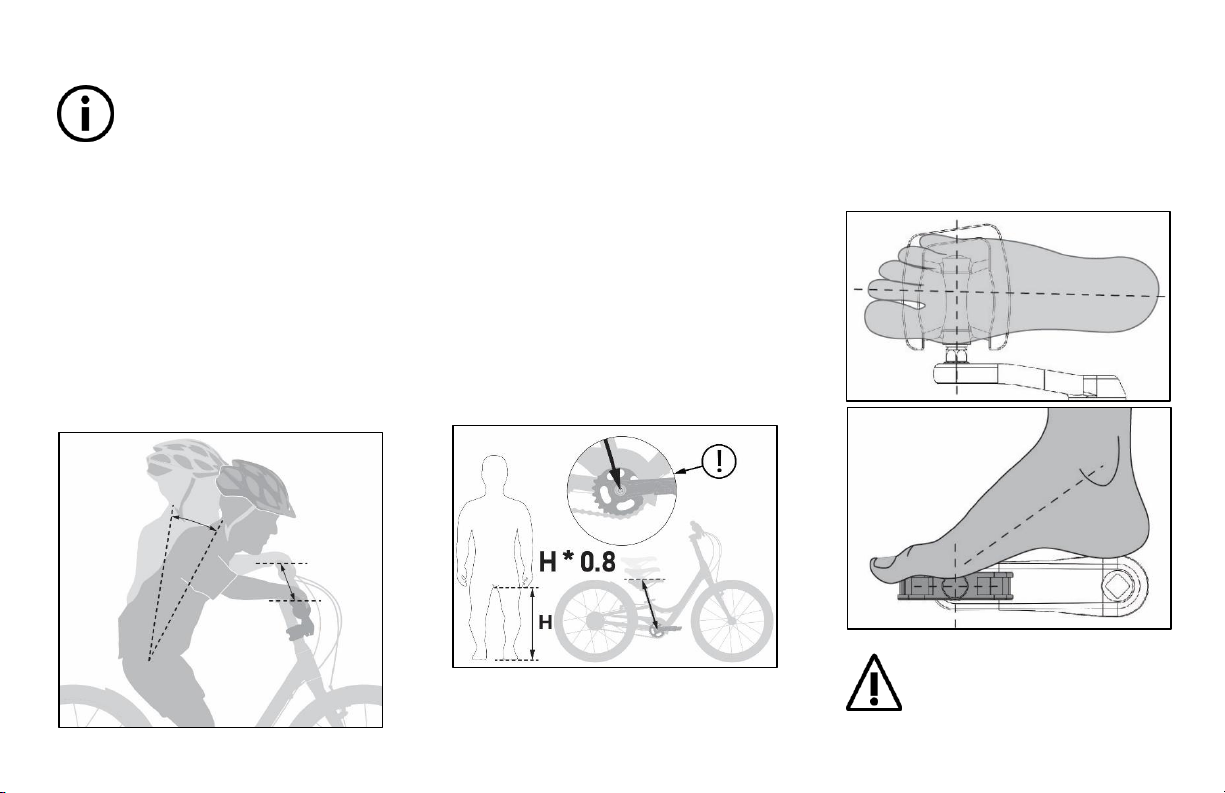
Handlebar height
The handlebar can be fitted on a wide
range of position changing significantly
the torso angle. Set the handlebar high for
a more comfortable position or low for a
more performant position.
Saddle height
A properly adjusted saddle height allows
for a better leg deployment while
pedaling. It will prevent joint injuries over
longer rides and improve your muscular
efficiency.
A simple and common way to determine a
rider’s recommended saddle height is to
measure the distance from the groin to
the ground while standing against a wall
(a measure generally called ‘inseam’) then
multiply that number by a factor of 0.8
The resulting value can then be used to
set the saddle’s height from the
chainwheel center as illustrated next.
Foot position on the pedal
The first condition for an efficient
pedalling motion is to position the foot
straight and with the ball of the foot inline
with the pedal axle as per illustration
below.
Illustrations above showing a bare
foot for bone alignment reference
only. Do not ride your bike without
shoes.

8
Knee angle
The way the knee bends when pedaling is
an important factor for muscular
efficiency and to avoid joint injury over
longer rides.
A good saddle height should result in a
knee angle of about 35 degrees when the
rider’s leg is fully extended (with the pedal
at the farthest distance from the saddle).
Knee over pedal rule
This simple technique helps position the
rider’s hip along the seat tube axis to
prevent unwanted hip movement and
improve weight distribution over the bike.
Ideally, the rider’s kneecap should be
vertically aligned with the pedal axle
when the chainwheel arm is on the
forward horizontal position.
Leg reach
Ideally the rider should be able to reach
the ground with at least the tip of the foot
to keep balance without getting off the
saddle when coming to a complete stop.
9
Ergonomic adjustments
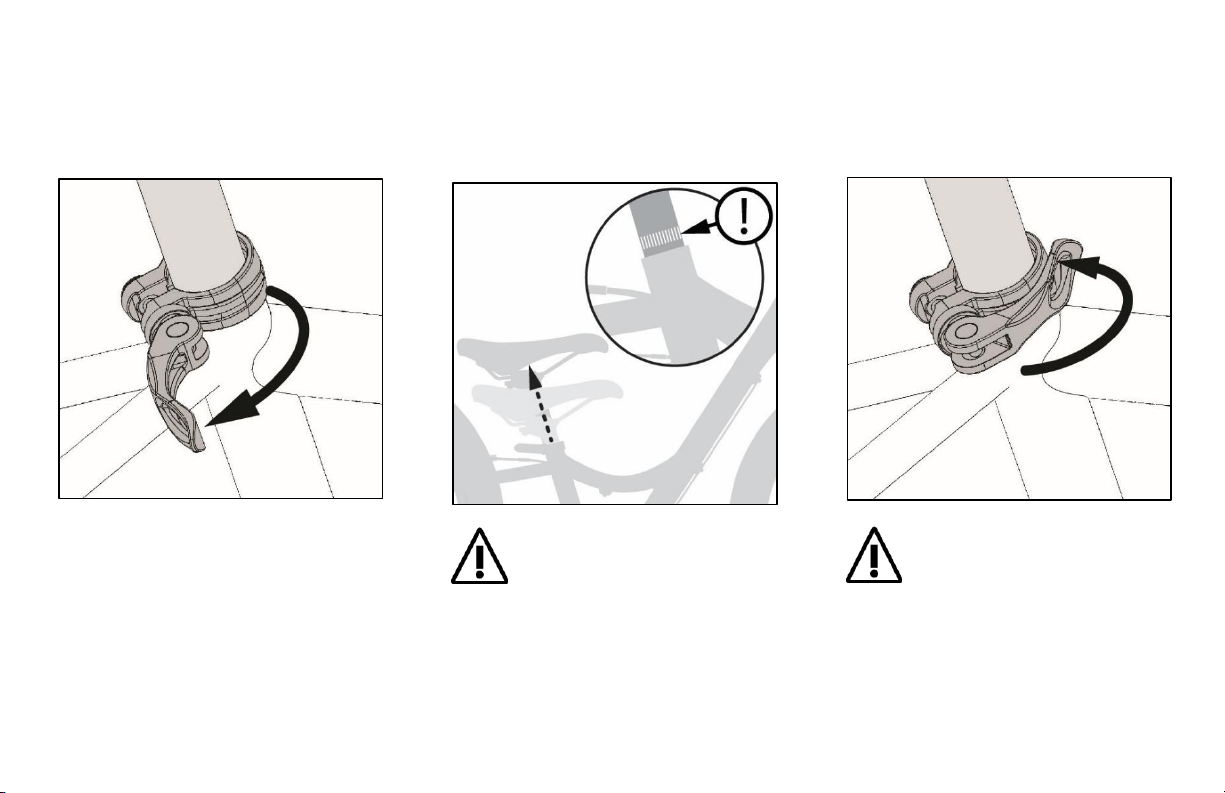
Adjusting the saddle height
1. Pull the seat tube quick release clamp
lever into ‘open’ position
2. Lift the saddle to the required height
Do not raise the saddle past the seat
post’s minimum insertion engraved
mark.
3. Push the seat tube quick release
clamp lever back to ‘closed’ position
Check for correct saddle alignment
before tightening the clamp.
10
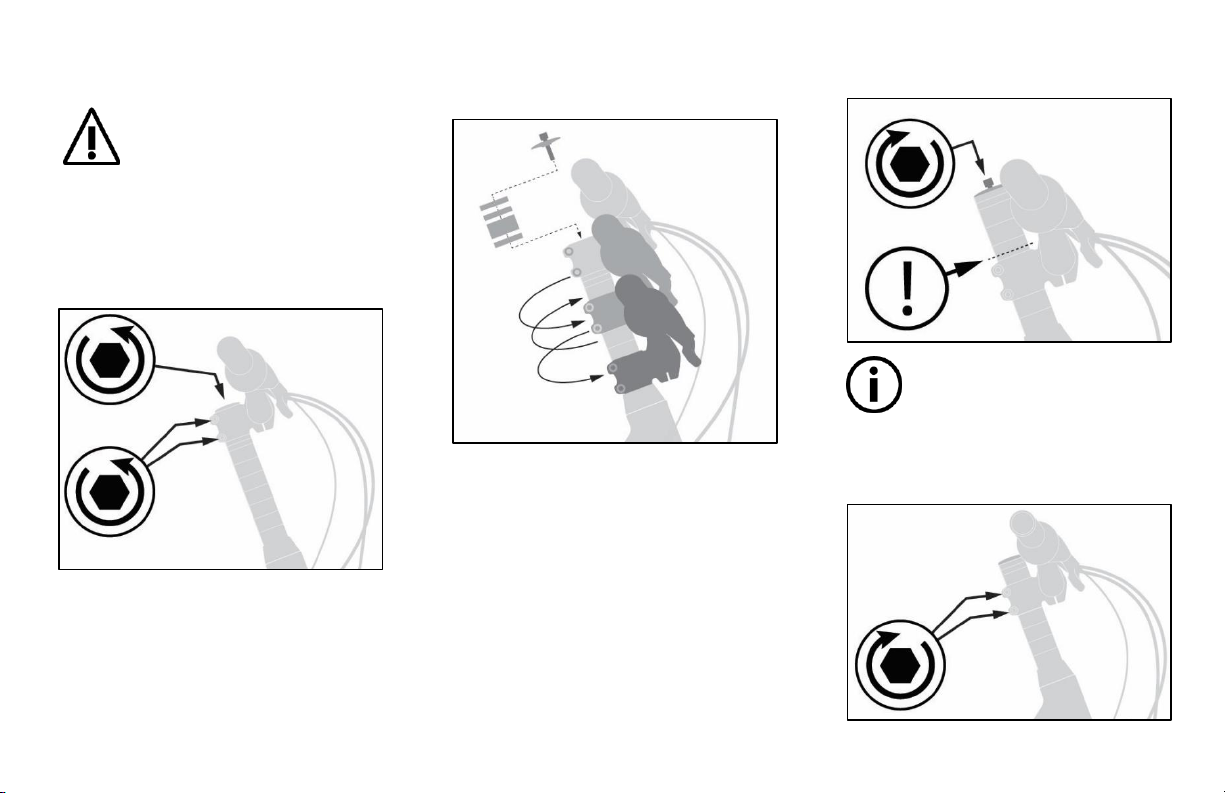
Adjusting the handlebar height
It is recommended to have this
adjustment made by a qualified
technician as it will require to adjust
the headset bearings. An improper
adjustment of the headset can result in permanent
damage to the component or frame and may lead
to a loss of control, resulting in serious injury or
even death.
1. Loosen the stem clamp and remove
the headset top cap
2. Rearrange the spacers stack above or
below the stem to reach the required
handlebar height
3. Adjust the headset bearing
compression with the top cap bolt
If the handlebar must be fitted on the
lower part of the steering tube, It is
recommended to cut some of the
exceeding length above the stem. Only
a qualified technician with the necessary tooling
and hardware should proceed to this.
4. Tighten the stem clamp

11
Riding your bike
Riding uphill
Shift to a lower gear before going uphill.
Avoid shifting when the chain is under
high tension while climbing a hill to
prevent damage to the components.
On the steepest inclines, shift your body
weight to the front of the bike to
reposition your center of gravity. This will
prevent the front end of the bike from
lifting.
Riding downhill
Assesses the risks and evaluate your riding
capacity before attempting to ride down
an incline. Hold the handlebar firmly and
keep your fingers on both brakes at all
time when going downhill. Be attentive to
your braking force to avoid locking any
wheel.
On the steepest inclines, shift your body
weight to the rear of the bike to reposition
your center of gravity. This will prevent
the rear end from lifting while braking.
You may move your body backwards over
the saddle while extending your arms as
the hill gets steeper.
Riding off road
Only ride off road trails with a purposely
designed bike.
Riding off the paved roads is more
hazardous and requires a different set of
skills and good balance ability. You must
be aware of the risks involved and fully
assume the responsibility.
Respect your own limits and experience
level.
Equip yourself with the adequate
protective gears. Sudden loss of control
can happen when riding off road. Learn
how to dismount off the bike before
falling.
Respect private property and the other
users on the trails and slow down when
you cross. It is recommended to bring a
basic tool set. Be prepared for emergency
fixes on your bike. Do not throw away
garbage on the trails.
Riding in wet weather
Avoid riding in wet weather if possible as
this seriously increases the risk of losing
control and falling.
Tire contact with the ground and braking
efficiency is greatly reduced on wet
conditions. Slow down, start braking
earlier than usual and more gently, take
extra caution when turning.
Riding at night
If you must ride at night or during lower
daylight time, make sure you are visible to
the others and that you can also see them
well.
Reflectors included with your bike are a
minimal safety device and it is
recommended (often mandatory too)
that you use a proper set of lights when
riding at night.
Wear bright colored clothes and
accessories. Always double check and
confirm that others see you before
crossing an intersection or attempting a
manoeuvre. Always ride defensively and
assume that people did not see you at
first.
Riding on public roads
Avoid riding in heavy traffic if possible. It
is your responsibility to know and follow
the local laws regarding the use of a bike
on public roads.

12
Braking
An efficient braking technique will
improve your riding experience and keep
you safe. Understand your brakes
function and how they react under
different conditions is essential for your
safety. Very importantly too, remember
which lever controls the front brake and
which one controls the rear brake.
▪Left hand side brake lever pulls the front
brake
▪Right hand side brake lever pulls the
rear brake
Always use both brakes at the same time
and practice modulating the braking force
you apply between front and rear brakes
to avoid locking the wheels. The braking
force is at its peak just before the wheel
locks.
Applying too much force on a brake
lever will cause the wheel to lock and
can result in a loss of control, serious
injury or even death.
Shifting gears
Frequent and efficient shifting increases
the chain and gears durability and can
reduces muscular fatigue.
Make a habit of starting off on a low gear
and work your way toward a higher gear
as you are accelerating, thus maintaining
a comfortable pedaling cadence.
Avoid shifting under high chain tension
such as when climbing a steep incline.
For a smooth gear shifting, briefly stop
pedaling or reduce the force being applied
to the pedals when shifting the gears.
▪Twist the shifter away from you to shift
to a higher gear ( +)
▪Twist the shifter towards you to shift to
a lower gear ( -)
Be sure to shift the shifting lever one
gear at a time. During shifting, reduce
the force being applied to the pedals.
If you try to force operation of the
shifting lever or perform multi-shifting while the
pedals are being turned strongly, your feet may
come off the pedals and the bicycle may topple
over, which could result in serious injury.
The gears can be shifted while lightly
pedaling, but on rare occasions the
pawls and ratchet inside the hub may
produce some noise afterwards as
part of normal gear shifting operation.
Using the quick release binders
Your bike is equipped with quick release
binders. These attachment mechanisms
are use on components that often require
to be removed and reattached or adjusted
such as the seat post clamp and the front
wheel.

13
Technical adjustments
Brake adjustment
When the brakes wear down with normal
use, the distance between the brake pads
and the rim surface increases. The cable
tension then needs to be adjusted to get
the brake pads closer to the rim and
preserve proper braking force.
To increase cable tension:
1. Turn the barrel adjuster counter
clockwise to pull cable
2. Lock the adjustment by turning the
locknut clockwise
Adjusting the chain tension
Chain tension must be adjusted so it does
not allow the chain to drop from the
sprocket.
Correct chain tension is met when there is
a movement of about 6 to 12mm vertically
when pushing the chain up.
▪Loosen the rear wheel nuts
▪Pull the wheel to put the chain under
tension
▪Tighten the rear wheel nuts temporarily
▪Check and measure the chain tension
▪Pull or push the rear wheel further into
the frame if needed until the
recommended tension is met
▪Check that the rear wheel is centered
within the frame center axis
▪Firmly tighten the rear wheel nuts
▪Check the brake pads position on the
rim and adjust if needed
Adjusting the gear hub
Your gear hub transmission must be
precisely synchronised to function
properly. The cable tension controls the
gear synchronism.
Correct cable tension is achieved when
the two adjustment witness lines on the
hub are aligned while the shifter is set on
the 4th gear.
▪Put the shifter in the 4th gear.
▪Turn the barrel adjuster on the shifter to
increase or reduce the cable tension
until both adjustment witness lines on
the hub are aligned.

14
Repairing a flat tire
1. Take the punctured wheel off the
bike
2. Detach the tire from the rim using
tire levers if needed
3. Remove the inner tube and locate the
puncture
4. Find the corresponding location of
the puncture outside and inside the
tire
5. Check if any sharp objects remain
stuck in the tire
6. Fix the punctured inner tube with a
puncture repair kit or get a new one
7. Pre-inflate the new or repaired inner
tube to a low pressure just enough so
it keeps its shape
8. Insert the inner tube inside the tire
9. Put the tire back on the rim making
sure the tire thread is facing forward
10. Inflate tire to recommended pressure
while checking for an even position of
the tire on the rim
11. Put the wheel back on the bike
Maintenance
Regular maintenance is essential to keep
your new bike riding for many years, for
your own safety and to preserve your
bike’s limited warranty.
It is recommended to take your bike to a
qualified technician once a year for
inspection and to take a tune up
appointment if necessary.
Additionally, there are a few simple basic
maintenance interventions that you can
proceed to, by your own at home.
Required tools
The following list of tools is a minimum
requirement to proceed to basic
maintenance and simple adjustments of
your bike.
▪Allen keys set
(Metric sizes 2mm to 8mm)
▪Open end wrench keys set
(Metric sizes 8mm to 15mm)
▪Screwdrivers
(Medium size Phillips head and flat head)
▪Bio chain lubricant
▪Bio degreaser for metal parts
▪Protective gloves
▪Protective glasses
▪Clean cloth
▪Air pump with a pressure gauge
Bike components and accessories uses
international metric system sizes bolts
and nuts. Do not use imperial system
tools, bolts or nuts to avoid damaging
the components.
The maintenance of your bike requires
to handling of chemical products that
can be hazardous to your health. Make
sure to follow each product’s safety
notice and wear the adequate
protective gear at all time when doing
maintenance.

15
Chain lubrification
Clean and lubricate the chain and
sprockets regularly. There is no official
schedule as it depends greatly on where
and how the bike is ridden. However, it is
generally recommended to do it after
your bike has been ridden in wet or
muddy conditions, after being washed or
at least each month in normal condition.
The chain should be lubricated with a bike
chain specific lubricant. Do not use
grease. Ideally, the chain should be
cleaned with a bio degreaser prior to
lubrication.
Apply only a small amount of lubricant
over the full length of the chain by gently
pouring fluid over the chain, into each
link.
Let the lubricant penetrate for a minute
and remove the excess fluid with a clean
cloth. This will keep the chain clean and
running smoothly.
Be careful not to spill lubricant over
the rim as this could greatly affect its
braking performance. If you accidently
do, immediately clean the rim with a
bio degreaser.
Tire pressure
Keeping your tires inflated inside the
recommended pressure range will
guarantee their performance and
durability. Avoid riding your bike with the
tires underinflated to prevent premature
wear, rim damage and puncture.
Read the markings on the tire to know the
recommended pressure.
On the example above, any pressure
between 60 and 80 PSI is acceptable.
Generally, a lower pressure will provide
more comfort by reducing road chatter
and absorbing impacts while a higher
pressure will provide slightly less rolling
resistance but transmit more impacts.
To inflate the tires, remove the valve caps,
identify the type of valve and fit a
compatible pump head or use with an
adapter.
Types of valve:
A. Presta (French)
B. Schraeder (American)
C. Presta to Schraeder adapter
Internal gear hub maintenance
In order to maintain proper performance,
it is recommended to grease the internal
hub about once every two years starting
from the first time of use (or once about
every 5,000 km if the bicycle is used very
frequently).
It is recommended to use only Shimano
internal hub grease or lubrication kit
when carrying out maintenance. If the
special grease or lubrication kit is not
used, problems may occur such as the
gear shifting not working correctly.

16
Lifespan and normal wear
A bike’s frame, fork and every component
that makes a complete bike are subject to
material fatigue and wear.
Normal use of your bike will eventually
wear components such as the chain, the
brake pads, the tires, the rims, bearings,
etc.
Intensive use, harsh conditions and lack of
maintenance will cause these parts to
wear off faster.
Most of the parts on your bike are
replaceable and they should be when they
are worn out. Here’s how to find out
when some of the components of your
bike need to be replaced:
Brake pads
The brake pads get in contact with the
rim’s braking track and a small quantity of
material wears off every time you apply
the brakes.
Replace the brake pads once the material
has been worn off down to the engraved
limit line.
In order to maintain strong braking
power and to prevent premature wear
of your brake pads and rim, inspect the
brake pads contact surface from time
to time. Remove any metal shrapnel present and
lightly sand down the material to remove the thin
glazed portion of its surface if necessary.
Rim
A quality rim can last for many years when
used under normal conditions and with
timely brake pads replacement. However,
it is not eternal and the rim’s braking
surface slowly wears out every time you
apply the brakes.
A rim should be replaced when the
braking track material has been worn off
down to the engraved limit groove line.
From time to time, of after a hard
impact, inspect your rims to spot any
deformation in the material. Check
every spoke to make sure none of
them is broken. If the rim has a deformation, or if
a spoke is broken, do not ride your bike. Have the
damage assessed by a qualified technician and
have the parts fixed if possible.

17
Tires
The tires on your bike will wear out
gradually with use. Generally speaking,
they will need to be replaced before or
when the thread pattern on their outside
surface cannot be seen anymore.
Many factors will influence the lifespan of
your tires such as the type of terrain you
ride on, your braking habits, or if the air
pressure is frequently kept too low for
long periods of time.
Tires can be damaged when you hit
obstacles such as potholes hard. Visually
inspect your tires if you suspect they are
damaged or need to be replaced.
Chain
Your bike being equipped with an internal
gear hub and a specially coated chain, you
can expect your chain and gears to last for
a few seasons without needing
replacement provided that you maintain a
proper chain tension, frequent lubrication
and manage your gear shifting efficiently.
Your chain will ‘stretch’ over time and
generally needs to be replaced when it
reach an elongation of about 1%.
Speciality tools for chain stretch
measurement are available at your local
bike shop.
Cleaning your bike
Keeping your bike clean is an easy and
simple way to help extend its
performance and look.
Fill a bucket with warm water and mix a
biodegradable dishwashing liquid or other
soft soap.
Clean transmission components such as
the chain, sprocket, and chainring first
with degreaser using specially designed
brushes or a dedicated cloth.
Thoroughly wash the frame and
components from top to bottom with
soapy water using a soft brush.
Rinse with water at low pressure (Do not
use a pressure washer as it can damage
sealed components).
Dry the chain with a clean cloth and apply
lubricant before letting to it to air dry.
The internal hub is not completely
waterproof. Avoid using the hub in
places where water might get inside
and do not use high-pressure water to
clean the hub, otherwise the internal
mechanism may rust.

18
Storing your bike
It is recommended to store your bike in a
tempered dry place, preferably indoor or
inside a locked shed.
Make sure the chain has been lubricated
before storing your bike for a prolonged
period.
Check that there is enough air pressure in
the tires from time to time, so they don’t
get damaged.
If you plan to leave your bike outside, we
recommend that you lock it and cover it
with a tarp to protect from water but
allow circulation of air.
Warranty terms and limitations
By the present, Trivel gives notice to the
original owner of a Trivel bike of the
provisions of the limited warranty that Trivel
offers the owner following the purchase of
the equipment from an authorized Trivel
retailer.
Warranty against hidden defects
Trivel warrants to the owner that its
equipment, when new, is exempt from
hidden defects. Should the owner discover
what he believes is a hidden defect, he must
notify Trivel in writing within three (3) days
from the moment when he or she first
becomes aware of said defect in order to
give Trivel the opportunity to correct said
defect if possible, at the sole discretion of
Trivel and provided Trivel can establish said
hidden defect is present before the
expiration of the warranty.
Warranty against apparent anomaly
The owner must verify the apparent
condition, the quantity and the contents of
the equipment following the purchase and,
on the same day, must immediately proceed
with a complete inspection of it with the
help from the owner’s manual. If there is
damage, if a part is missing or is damaged, if
the equipment is broken, or if there are
other problems of the same kind (hereafter
known as: ‘Apparent anomaly’), the owner
must contact the retailer immediately and
notify Trivel within three (3) days from the
date of purchase from the retailer by
registered letter, a receipt for which must be
kept for reference. Should the owner not
advise of the Apparent anomaly within the
prescribed time period, Trivel shall not be
responsible for any prejudice suffered by the
owner due to the Apparent anomaly and the
equipment shall be deemed free of any
Apparent anomaly when purchased and the
owner deemed satisfied with the purchase.
Frame
Trivel warrants to the owner that the bike
frame when new, is free from defects in
materials and workmanship. This warranty
shall expire thirty-six (36) months following
the purchase date of the equipment from
the retailer. The frame excludes the paint
and finish, the front fork, the wheels, the
tires, the drive train, the brakes, the saddle

19
post, the handlebar and stem and any
suspension component or part.
Useful life warranty
As for any other consumer good, a Trivel
bike has a useful life cycle. The length of the
useful life cycle can vary depending on the
criteria chosen for workmanship and
materials of the equipment as well as the
kind of use and frequency to which the bike
has been subjected. However, Trivel advises
the owner that the maintenance and upkeep
performed on the equipment during its
useful life cycle are very important as a
means of prolonging the useful life cycle of
the product. Consequently, Trivel advises
the owner that the equipment must be
checked periodically by the retailer as
general maintenance of the product and as
a means of detecting stress and/or potential
failures including, but without limiting the
generality of the preceding, cracks,
deformations, corrosion, paint chipping,
dents and any other indications of potential
problems, improper use or abuse. These
regular verifications are important safety
checks and they are essential in helping to
prevent accidents, bodily injury and
premature reduction of the useful product
life cycle of the equipment.
Merchandise return policy during warranty
period
If a defect occurs during the warranty
period, the parts will have to be shipped to
Trivel directly from an authorized Trivel
retailer and, following repairs, Trivel shall
ship the parts back without charge to the
retailer exclusively. If the shipping address is
different than the nearest Trivel retailer’s
the customer shall have to pay shipping
costs both to and from said different
address.
Validity of the limited warranty
The Trivel limited warranty is conditional to
the equipment having been handled and
maintained adequately by the owner in
accordance with the notices to the owner
and the instructions printed in the owner’s
manual and on the equipment having been
stored in appropriate conditions. To be able
to benefit from the terms and conditions of
the limited warranty offered by Trivel, the
owner must fill a Trivel limited warranty
form (which can be found at an authorized
Trivel retailer and on Trivel website) and
return it to the retailer with a copy of the
invoice obtained at the time of purchase to
Trivel within thirty (30) days of the purchase
date.
Without limiting the generality of the
preceding, the Trivel limited warranty
excludes components of the vehicle that are
damaged by an error or negligence in the
maintenance of the equipment and its
components or resulting from a use that
does not conform to the notice to the owner
and to the Trivel owner’s manual by the
owner.
DURING THE WARRANTY PERIOD, SHOULD
THERE BE A PROBLEM WITH YOUR
PRODUCT, YOU SHOULD HAVE REPAIRS
MADE BY AN AUTHORIZED TRIVEL RETAILER
IN ORDER TO CONSERVE YOUR RIGHTS
UNDER THE WARRANTY.
THE WARRANTY IS NON-TRANSFERRABLE
Please visit Trivel website for the latest
version of this limited warranty
Table of contents
Other Trivel Bicycle manuals


