Trivel Azteca User manual

USER MANUAL

2 | Trivel.com
WELCOME WORD
Congratulations on your purchase! We are confident that you will enjoy riding your
new Trivel tricycle as we spent a great deal of time designing it with you in mind!
This manual will get you through the necessary information about safety, usage, and
maintenance of your new tricycle so you can experience the most of it, for many years.
Please read this manual thoroughly before you go for your first ride and keep in handy
for future reference.
If some instructions remain unclear to you, please do not hesitate to contact us or
your dealer for further explanation.
ABOUT US
For over 25 years, the passionate,
dedicated Trivel team has been
designing and manufacturing
tricycles for reduced mobility
children and adults, thus providing
them with hours of fun and
pleasure. We can install a wide
range of custom components onto
your tricycle, so it is fully adapted to
the user’s specific needs.
To learn more about our products,
parts, accessories and services,
please visit www.trivel.com

Trivel.com | 3
Welcome word ..............................................
About us..........................................................
Table of Contents..........................................
A word on safety ...........................................
Before your first ride ....................................
Before each ride ............................................
Setting your position on your Trivel .....................................
Setting the seat position and angle.....................................
Setting the backrest height and angle...............................
Setting the handlebar position ..............................................
Riding basics ..................................................
Turning................................................................................................
Going uphill......................................................................................
Braking................................................................................................
Using gears.......................................................................................
Riding in wet condition..............................................................
Riding at night.................................................................................
Riding with feet securing devices...........................................
Using the Power assistance system..........
Safety warnings................................................................................
Notice to the user............................................................................
Description of the components...............................................
Getting started..................................................................................
Using the LCD Panel functions.................................................
Turning the power assist system on......................................
Choosing an assistance mode..................................................
Operating range and battery usage optimisation............
Removing or inserting the battery.........................................
Charging the battery of your electric
power assist system........................................................................
Storing the battery..........................................................................
Minimum battery maintenance schedule..........................
Troubleshooting (Electric assistance system)....................
Error codes ..........................................................................................
Maintenance and adjustments..................
Tools, products and protective gear needed.....................
Preventive maintenance..............................................................
Tire pressure adjustment.............................................................
Changing a punctured inner tube..........................................
Brake adjustments...........................................................................
Derailleurs adjustments................................................................
Quick release binder system adjustment............................
Folding the stem..............................................................................
Lubricating the chain.....................................................................
Washing your Trivel.........................................................................
Storing your Trivel............................................................................
Normal wear.......................................................................................
Troubleshooting.............................................
Warranty terms...............................................
2
2
3
4
7
7
9
10
12
13
14
15
16
17
17
23
24
24
25
25
26
29
32
35
38
38
41
42
44
45
46
47
47
48
49
50
50
52
54
59
64
67
68
69
70
71
72
76
TABLE OF CONTENTS

4 | Trivel.com
A WORD ON SAFETY
Trivel puts a great effort in developing
the safest product possible. Riding
a tricycle, like most other sporting
activities, involves some risks. People who
engage in this activity must be aware of
those risks and fully assume them.
A Trivel is a very safe and stable vehicle
thanks to its three-wheel triangular
platform design. Although it is propelled
in a similar way than a regular two-wheel
bicycle, its handling characteristics are
significantly different. Make sure to read
and understand the Riding Basics section
of this manual to learn about important
advices on how to operate such a vehicle
before your first ride.
Most of the accidents are caused by
human factors such as bad judgment
of a hazardous situation, improper
handling or neglecting the equipment’s
mechanical maintenance.
Many serious injuries can be prevented
only by wearing adequate protective
equipment such as a homologated
helmet.
Respecting the local road laws and
getting to know how to properly use and
maintain your tricycle with the help of
this manual will also help significantly to
reduce the risks of injuries.
It is the rider’s responsibility to fully
understand the usage of the equipment
he or she is operating.
In the case of a child operating the
tricycle, it is the responsible adult’s duty
to educate on local public road laws,
supervise safe riding activity and ensure
the proper fit, adjustment and good
mechanical condition of the equipment.
The following signs will be used
throughout the manual. They represent
Warnings and Cautions about important
or hazardous situations that must be fully
understood to avoid damage to your
equipment, personal injuries or even
death.
This sign indicates a serious
warning about a potential
risk of injury or death or
other safety information
This sign indicates cautions
about the proper use of the
equipment or other
important information
For everything related to the
use, maintenance and
storage of a Power assisted
system, please refer to the
section Power assistance
system instructions

Trivel.com | 5
Check all component connections
and accessories attachment before
every ride. Do not ride your tricycle
with loose components or
accessories. Take the tricycle to your
dealer if necessary.
Always wear a homologated
helmet, it could save your life. Make
sure it is properly attached and
positioned on your head.
Always place user’s feet safely on
pedals. Use adequate pedal
attachment system if needed.
If using a backrest, harness or any
other support system, make sure to
properly tighten the belts and
straps on user.
Make sure the user’s toes are not
allowed to touch the ground at any
time.
Choose bright, visible clothing.
Preferably closely tted to your body
to avoid entanglement into
components.
Lace shoes properly.
Trivel is not responsible for
accidents caused by the use or
handling when tricycle is towed by
an adult’s regular bike, or by its
capsizing when the child gets o
his or her tricycle or when he or she
activates the brakes.
When riding on public roads,
always ensure you are visible to
other road users. Make sure your
tricycle has all the reectors or
lights that are required by the local
laws. A safety pennant ag is also
recommended for extra visibility.
Never ride under the inuence of
alcohol or illicit substances. This
could seriously impair your
judgment, reexes or balance and
may lead to prosecutions, serious
injuries or even death.
Never carry a second passenger on
your tricycle unless that is with an
approved accessory equipment.
Do not carry anything on the
handlebars or between your legs as
this could seriously impact your
balance or get caught in the wheels
and may cause serious injury or
death. Use the provided cargo
compartment is your tricycle is
equipped
with such.
Make sure your tricycle is properly
tted to you and that you are fully
able to control it.
Adapt your riding style and
behaviour to each type of terrain,
situation, and weather condition.

6 | Trivel.com
This product and its components
were not designed to be used for
extreme conditions or stunts. Do
not engage in aggressive riding or
jumps.
Do not use for downhill.
Trivel is not responsible for
accidents caused by the use of
towing equipment.
Avoid riding on wet or icy ground if
possible. Wet and icy ground
seriously reduces traction between
tires and road surface. If you must,
take extra caution as the risk of
slipping and falling is much higher
especially when turning and
braking.
Avoid riding at night if possible.
Your vision is seriously reduced in
the dark and you may not see
obstacles coming at you in time to
avoid them. Other road vehicles
might also not be able to see you
and this can cause very dangerous
situations potentially leading to
serious injuries or even death.
When riding with children, always
keep a close eye on them and try to
stay away from potential
hazardous situations such as stairs,
steep descents, curbs, trac, etc.
Show a good example by following
all safety recommendations.
Avoid direct contact with sea water
and your equipment. Wipe o any
sea spray particles or sand
whenever possible. Calcium can
quickly damage important
component of your tricycle.
Always lock your tricycle to an
immovable object with a high-
quality bicycle lock when left
unattended. It is also recommended
to lock any component with a quick
release attachment device.
Take note of your product serial
number and store it somewhere
secured. This unique identication
number can be required by Trivel
customer service for warranty
purpose. It can also help proving
your ownership of the equipment to
your insurance company or local
police service in case it is stolen.
This product may contain
chemicals known to the state of
California to cause cancer and birth
defects or other reproductive harm,
including paint, lubricants, and
various metals. Wash hands
thoroughly after handling this
product. (California Prop 65).

Trivel.com | 7
BEFORE YOUR FIRST RIDE
Congratulations, you are about to experience a great feeling;
riding a Trivel! To ensure you have a pleasant first ride, please
make sure to follow these simple instructions:
1. Read or have someone read to you this manual’s Safety Warnings
and Riding Basics sections. Only until these sections have been fully
understood is it recommended to go for your first ride.
2. Adjust the seat, backrest, and handlebars to the recommended
position for you. See Adjusting your Trivel section to learn how.
3. Proceed to a safety check on the equipment. See Equipment Safety
check on the following chapter.
4. You’re good to go! Put your helmet on and enjoy the ride!
It is strongly recommended that you choose a private or
closed-circuit road without major inclines or heavy vehicles
get to know how your Trivel handles and how control
components such as the brakes and derailleurs feel.
BEFORE EACH RIDE
EQUIPMENT SAFETY CHECK
Proceed to the following Equipment safety check before going
for a ride.
1. Check components attachment
a. Check front wheel attachment by lifting the front end of your
Trivel and firmly hitting down on the top of the wheel. There
should be no movement of the wheel. Tighten the nuts or
quick-release binding system if the wheel moves or gets off
the fork. See the quick-release binder adjustment section for
instructions.
b. Check handlebars, seat, backrest and all other attachment
systems for unwanted movement. Tighten loose components
if needed.
See the Setting your position on your Trivel section
forinstructions.

8 | Trivel.com
2. Check brakes function
a. Pull the brake levers with full strength
and make sure the brakes are stopping
the wheels from spinning efficiently.
b. Brake pads should reach the rim
around the first third of the brake lever
stroke.
c. The brake lever should not get in
contact with the grip.
d. The wheel should be able to spin freely
when the brake lever is released.
If these conditions are not met, an
adjustment of your brakes is required. See
brake adjustment section for instructions.
3. Check tire pressure
a. Use a pressure gage or connect a
pump with a pressure gage to each
tire’s valve to get a pressure reading.
Make sure the pressure is within the
tire’s recommended pressure value.
This information is engraved on each
tire’s sidewall. Adjust pressure with a
pump if it is below the recommended
minimum pressure.It is normal for
a tire to lose a bit of its air pressure
after a while. However, if your tire is
completely flat (out of air pressure),
it is likely that its inner tube has been
punctured. You will need to repair
or replace the inner tube before you
can go for a ride. See tire pressure
adjustment and puncture repair
section for instructions.
4. Check the chain’s lubrication
a. Spin the chainwheel backwards and
visually inspect the chain for proper
lubrication. A squeaking sound when
the chainwheel is spinning is also an
easy symptom to spot that tells you
that your chain needs to be lubricated.
In doubt, add some lubricant. See
the Lubricating the chain section for
instructions.
If possible, always ride with
someone else. This way, in the case
of an accident, one can call for
assistance and wait along with the
injured rider.
If you are going by yourself, tell
someone you know about your
itinerary and expected return time.
Bring a cellular phone if possible.
If using a power assist system, think
about the planned distance of your
ride and battery autonomy. Adapt
your power assist level accordingly.
See Optimizing your battery life
section in Getting Started chapter
for more details on how to increase
your range.

Trivel.com | 9
SETTING YOUR POSITION ON YOUR TRIVEL
Comfort is key to a pleasant ride. Your Trivel is offering many ergonomic adjustments to ensure your position is optimal.
Werecommend the following key points for a proper positioning.
4
1
2
3
1. Adjust handlebar height so the forearms are parallel to the ground when the user is sitting.
2. Set the seat position so that there is a slight bend of the knee when the pedal is at the farthest point.
3. The user must be able to reach the ground with the foot while sitting in case of emergency.
4. Adjust the saddle and backrest height and angle so that the user’s torso angle is close to be vertical (depending on riding style and preference).

10 | Trivel.com
A
B
C
A
B
C
A. Anti rotation screw
B. Quick release binder lever
C. Seat beam
Set seat position by moving the Seat
Beam (C) forward or backward along the
frame.
1. Loosen the seat beam anti rotation set
screw (A) using an Allen key
2. Pull the quick release binder lever (B) to its
open position to free the seat beam (C)
3. Adjust seat position to the desired distance
from the chainwheel
4. Push the quick release binder lever (B) back
to its closed position to lock the seat beam
(C) into the new position
5. Tighten the seat beam anti rotation set
screw (A) with the Allen key
SETTING THE SEAT POSITION AND ANGLE
The seat position is the principal setting
that can be adjusted to modify the user’s
position.
Moving it back or forth will change the
torso angle and leg extension when
pedalling so an optimal control and
pedalling efficiency can be obtained.
For a more active position, we
recommend that the seat be adjusted so
that the user has a slightly bent forward
torso angle as well as an approximate
knee angle of 25 degrees when the pedal
is at its farthest point when pedalling.
For a more relaxed position, the seat can
be moved forward, thus allowing less leg
extension and an upright or laid-back
torso angle.

Trivel.com | 11
1. Loosen the seat carrier clamp (B) using
a wrench until the saddle (A) can rotate
freely
2. Rotate the saddle (A) upward of downward
to the desired angle
3. Re-center the saddle (A) along the seat
beam (C) if it is unaligned
4. Tighten the seat carrier clamp (B) using a
wrench until the saddle (A) is locked tightly
into its new position.
The seat angle can be adjusted to your
personal preference whether you wish
for a straight, upright position or a more
relaxed, laid back seating position. You
should also consider adjusting the
backrest height and angle accordingly.
Set the seat angle by rotating the seat (A)
upward or downward along the seat
carrier clamp (B).
A
BC
A
B
C
A. Seat
B. Seat carrier clamp
C. Seat beam

12 | Trivel.com
SETTING THE BACKREST HEIGHT AND ANGLE
The backrest height and angle are
adjusted at the same time using just one
tool from the back of the backrest.
The backrest height can be adjusted to
reach your lower back precisely where it
needs the most support. The angle should
be adjusted along with the saddle for an
upright or a more laid-back position.
A
B
A
B
A
B
A
B
A. Backrest carrier clamp bolt
B. Backrest
1. Loosen the backrest carrier clamp (A) using
an Allen key until the backrest (B) can
move freely
2. Move the backrest to the desired height
and angle
3. Tighten the backrest in the new position
using the Allen key

Trivel.com | 13
SETTING THE HANDLEBAR POSITION
Make sure to fully understand how
to use and adjust a quick release
lever before setting the handlebar
position. Failure to properly use this
mechanism can result into the
dismantling of the stem assembly
and lead to a loss of control and
serious injuries. Instructions on how
to use a quick release lever can be
found in the Maintenance and
adjustment section.
Never lift the stem above the
minimum insertion mark engraved
on the lower part of the stem.
Lifting the stem above this mark
can result into the dismantling of
the stem assembly and lead to a
loss of control and serious injuries.
You can easily move the stem (B) up or
down using only the quick-release lever
(A). The stem should be positioned so
that the user has his forearms parallel
to the ground when he holds the
handlebars.
A
B
A
B
A. Quick release binder lever
B. Stem
1. Pull the quick release binder lever (A) to its
open position to free the stem (B)
2. Adjust the stem position to the height
required to meet the recommended
arm position
3. Check alignment of the handlebars
with the front wheel. Realign if
not perpendicular.
4. Push the quick release binder lever (A)
back to its closed position to lock the stem
(B) into the new position

14 | Trivel.com
RIDING BASICS
Congratulations on choosing to ride
differently! Compared to a regular
bicycle, riding a Trivel, with its reclined
position offers several benefits.
RIDE MORE COMFORTABLY
A reclined position relieves pressure
on your wrists, preventing pain and
numbness due to the compression on
the hand’s nerves. This position also
allows for greater support of the lower
back, thus helping reduce spine related
pain often experienced by riders with less
flexibility on a regular bicycle. At last, an
upright torso angle virtually eliminates
the cervical spine pain due to the stress
on the neck that often felt with the
traditional bicycle positioning.
RIDE MORE EASILY
A Trivel is an excellent option for people
who are new to cycling, those who have
a bit less balance or riders who wants
to experience a new type of riding. Our
distinctive three wheeled platform puts
the user in a lower and more centered
position along the wheelbase, allowing
for fun, easy, free coasting and amazing
cornering capabilities.
RIDE LONGER
With less pain you will get higher
endurance and will be able to go for
longer rides. Breathe more easily with the
upright position and enjoy the sceneries
with the excellent peripherical view that
this position provides.

Trivel.com | 15
TURNING
Practice safe turning first by controlling
your speed at all time and especially
before going into a curve. It is of the
upmost importance that the user gets
to know how a Trivel vehicle handles
curves at different speeds and on
different surfaces. As it was previously
recommended in this notice, the user
should ride his or her Trivel on a closed-
circuit road several times before going on
a ride involving the use of public roads.
A three wheeled vehicle is not able
to lean like a two-wheeled vehicle
can when turning. You should
always allow more time for braking
when approaching a curve. Taking
a curve at a high speed can lead to
a loss of control and braking
capacity that can result in serious
injuries.
If the speed is too high while taking
a curve, there is a risk of tipping
sideways. It is the responsibility of
the user to be in control of his speed
and to brake suciently before
taking a curve. The user must avoid
tipping at all time.
In a situation where going into a
curve at high speed can’t be
avoided, it is recommended that the
rider leans his or her body weight
slightly inside the direction of the
curve to help prevent tipping.
16 | Trivel.com
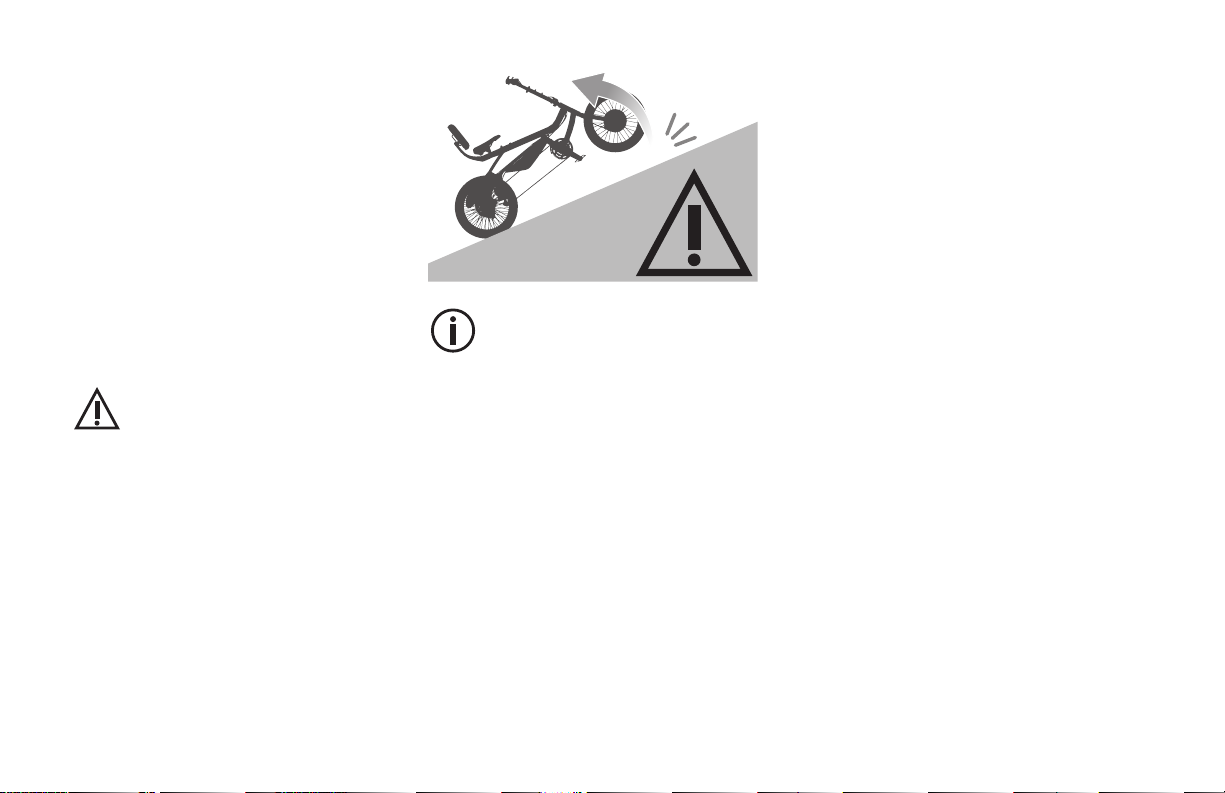
GOING UPHILL
Your Trivel has been designed with a
wheelbase length that allows a rider to
safely take on most inclines. However, it
is recommended to avoid inclines over
8 % (roughly 5 degrees angle). Before
going for a ride that may include big
inclines, get to know your itinerary and if
needed, look for an alternative route with
a gentler incline.
If the incline is too steep, there is a
risk of tipping backwards, which
can lead to the loss of the front
brake function and/or a risk of
serious injuries. It is the
responsibility of the user to know
his or her itinerary beforehand and
plan a safe route. The user must
avoid tipping at all time.
In a situation where a rider is
attempting an incline over the
vehicle tipping point limit, it is
recommended that the rider leans
his or her body weight slightly
forward to help prevent tipping.

Trivel.com | 17
BRAKING
Efficient braking will improve your riding
and make you safer. Before your first ride,
you should get to know how the brakes
work, how powerful and responsive they
are, and which side is front, which side is
rear.
Keep in mind that the braking
distance needed to come to a
complete stop is likely to be longer
when riding a Trivel compared with
a traditional bicycle.
How to brake efficiently
1. Use both front and rear brakes
simultaneously
2. Apply force progressively on the brake
levers(modulate the braking force in
between front and rear brake)
3. Understand that the front brake is
responsible for most of the braking duty
4. Avoid putting so much force on the brake
levers as to lock the wheel and skid
5. Understand that the braking power is at its
peak at the point where the wheel is about
to lock but is reduced drastically when
itdoes
6. Anticipate braking time according to your
speed, weather condition and the riding
track surface
7. Avoid braking while taking a curve. Instead,
brake before taking a curve and release
brake while turning
USING GEARS
Knowing how and when to shift gears
will make your riding experience better.
Shifting gears frequently to adapt your
pedalling cadence to your speed can
help prevent muscular fatigue, joint
injuries, and extend the drivetrain use life.
Your Trivel is equipped with an efficient
and reliable gear transmission system.
To make the best out of it, you should
understand how it works and how to use
it properly.

18 | Trivel.com
What’s what ?
Shifters(Trigger type) components terminology
B
A
F
E
C
D
A. Front derailleur down shift lever
B. Front derailleur up shift lever
C. Front derailleur cable tension
adjustment barrel
D. Rear derailleur cable tension
adjustment barrel
E. Rear derailleur down shift lever
F. Rear derailleur up shift lever

Trivel.com | 19
Gear transmission components terminology
A
CF
G
D
E
B
A. Rear derailleur cable housing
B. Rear derailleur
C. Cassette
D. Chain
E. Rear derailleur cable
F. Chainwheel
G. Front derailleur

20 | Trivel.com
How it works
The shifter levers either pull or release
cable, causing the front or rear derailleur
to move sideways pushing the chain
from a sprocket to another thus
operating a change of gear.
A gear change can’t be made when the
rider is not pedalling.
T
here are several types of
transmission systems and many
possible combinations. If the system
tted on your Trivel is not sucient
for your level of tness, preferred
route, or personal preference, ask a
qualied technician for possible
upgrades.
Highest gear combination(Largest front chainwheel/Smallest rear sprocket)
High speed – Requires more effort – Good to go fast
Lowest gear combination (Smallest front chainwheel/Largest rear sprocket)
Low speed – Requires less effort – Good for riding uphill
Table of contents
Other Trivel Bicycle manuals


