Troyer's Birds' Paradise Bed and Breakfast User manual
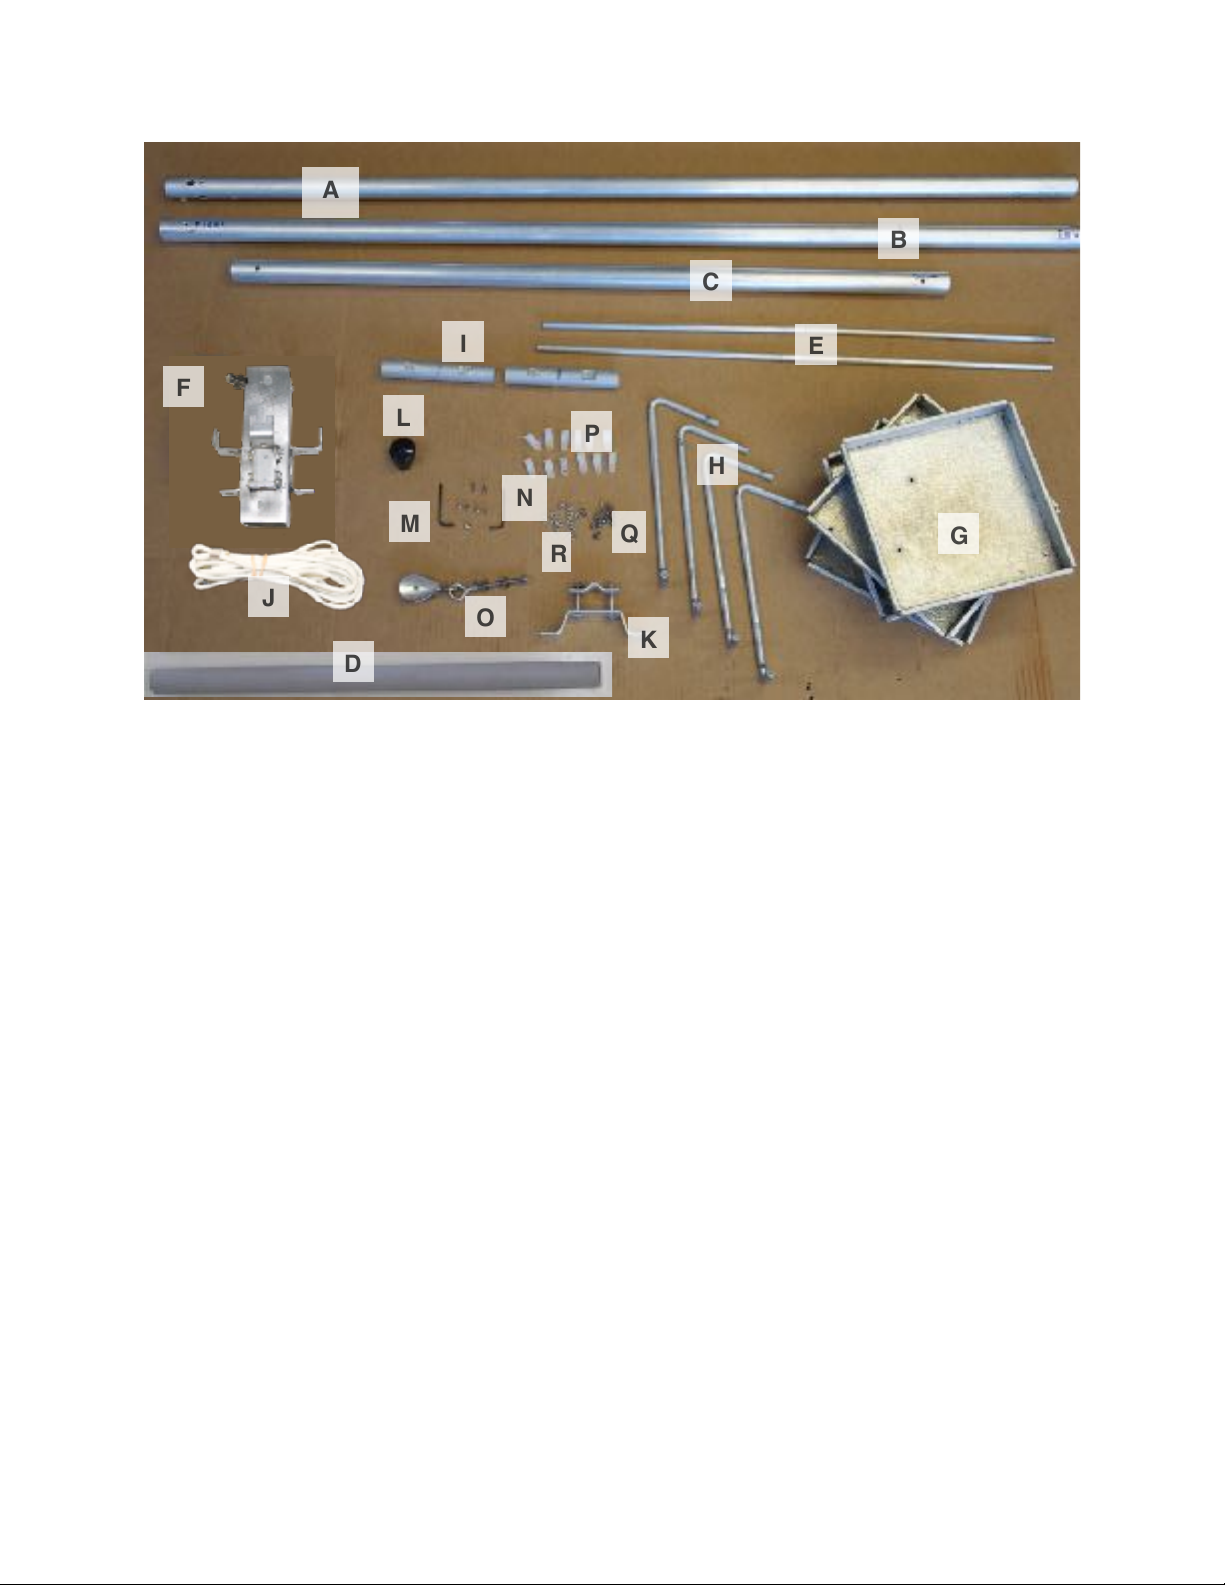
Bed and Breakfast Instructions
A) Top of pole with many larger holes
B) Middle section of pole with a tapped hole at
each end
C) Bottom of pole t
D) PVC Ground Socket (Has one machine screw
inserted into the sleeve. A piece of plastic tape
holds the screw in place and the tape should be
removed before installation)
E) Top Perch Rods
F) Hub with brackets and rope attached bolt with
hardware
G) Trays
H) Tray Arms
I) Splice pieces
J) Rope with Crimp
(K) Rope winder with assembled hardware
(L) Top Cap
(M) (4) 1/4 - 20 x 1/4” stainless steel set screws
with a 1/8” allen wrench
(N) (2) 10 - 24 x 1/2” stainless steel set screws
with 3/32” allen wrench
(O) Eye bolt with assembled hardware
(P) (12) ⅜plastic clips
(Q) (12) #8 x ⅜” machine screw
R) (12) # 8 nut
Troyer’s Birds’ Paradise 20785 Morris Rd Conneautville, PA 16406 814-587-2756 Page 1
A
B
C
E
G
H
I
D
F
J
L
M
O
K
P
Q
R
N
HARDWARE BAG
Bed and Breakfast Instructions
Location of a bed and breakfast should be
within 10 feet of martin housing.
Step 1) Install ground stake (D). Dig a hole
24 inches deep by 6 inches in diameter.
Measure and mark 2” from the top of the
sleeve (the top is the end which has drilled
and tapped hole in it) Place a piece of pack-
aging tape or like over the top of the sleeve.
Place 2” of gravel in the bottom of hole.
Place the pvc ground sleeve (D) into the hole.
Mix one 80 pound bag of your favorite pre-
mixed concrete. Follow the directions on the
bag. Fill the hole with cement and pull up on
the sleeve so that your 2” mark is at concrete
level. Make sure the sleeve is plumb.
Step 2) Assemble the pole. Each B&B has a
3 section pole. The top piece (A) which has a
bunch of larger holes, a middle section (B)
with a drilled and tapped hole at each end
and the bottom section (C). We will begin by
installing the splice pieces into the middle
section (B). You will need the 2 aluminum
bar splice sections (I) as well as 2 of the
¼”-20 x ¼” set screws (M) and the ⅛” allen
wrench. Notice on the aluminum bar splice
piece a flat sectioned has been milled into
each end. Measure the splice piece and find
the center and mark it with the flat milled
section facing up. Thread one of the ¼-20 x
¼” set screws into the tapped hole on the
middle section. Do only enough so the set
screw will stay in place. Insert the splice flat
section up into the end of the middle section
and stop when you meet your center mark.
Using the ⅛” allen wrench tighten the set
screw. The set screw should be tightened
and be just below flush on your pole. Flip
the middle section around and repeat this
step at the other end. Set aside the middle
section and get your top section of the pole
(A).
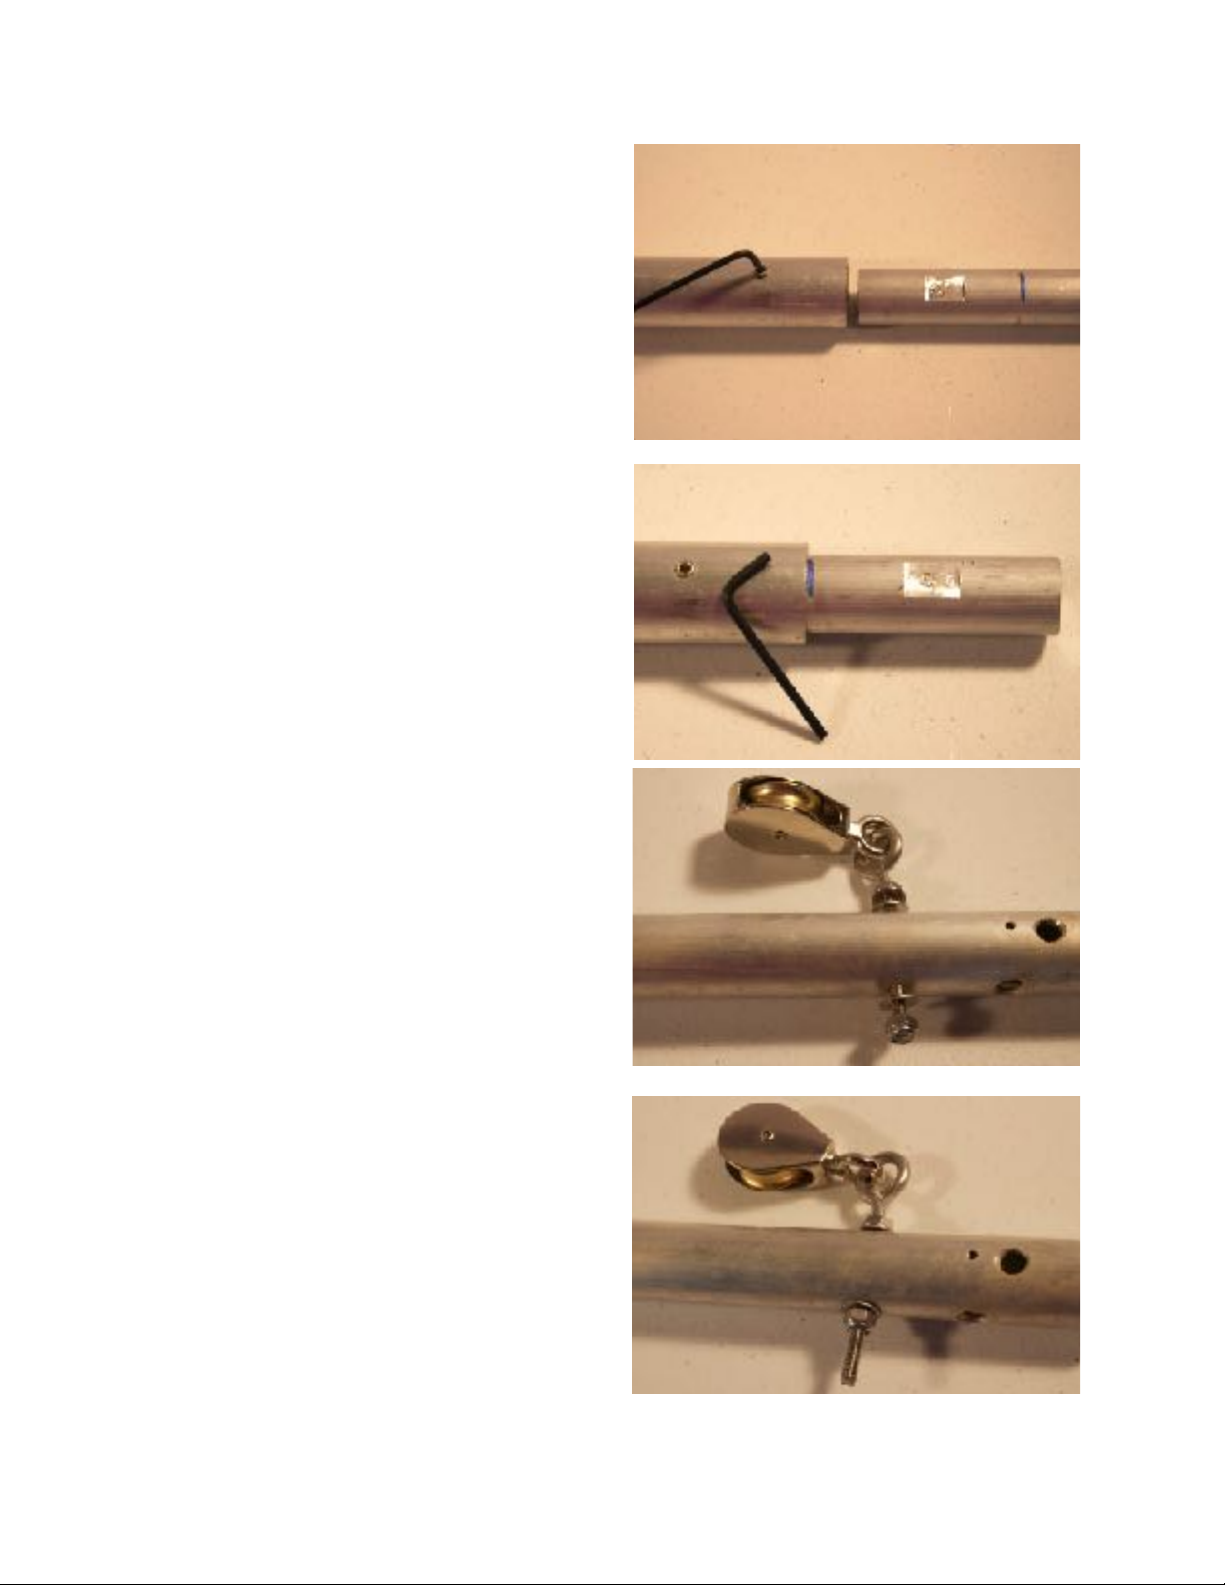
Step 3) We will begin by installing the pulley
with attached eyebolt (O). Your eyebolt has
various pieces of hardware installed for you.
You need to remove the lock nut from the
end and one of the 2 washers. Insert the
eyebolt thru the lower hole on the pole, then
add the washer and then the lock nut. Using
a 7/16” wrench tighten the lock nut all the
way till it meets the pole. See photo 3A
Next we will install the top perch rods ((E)
into the larger holes above the pulley. Locate
Troyer’s Birds’ Paradise 20785 Morris Rd Conneautville, PA 16406 814-587-2756 Page 2
Step 2
Step 2
Step 3
Step 3A
Eyebolt
Whiz nut
Washer
Washer
Lock Nut
Pulley
Bed and Breakfast Instructions
the 2 tapped holes. Thread into the holes
your ½-20 x ½” set screws using your 3/32
allen wrench. Measure and mark the center
of the top perch rods. Insert the rod into the
hole doing the uppermost rod first. Tighten
the set screws See photos 3B and 3C.
Next place the black cap over the top of the
pole. See step 3C.
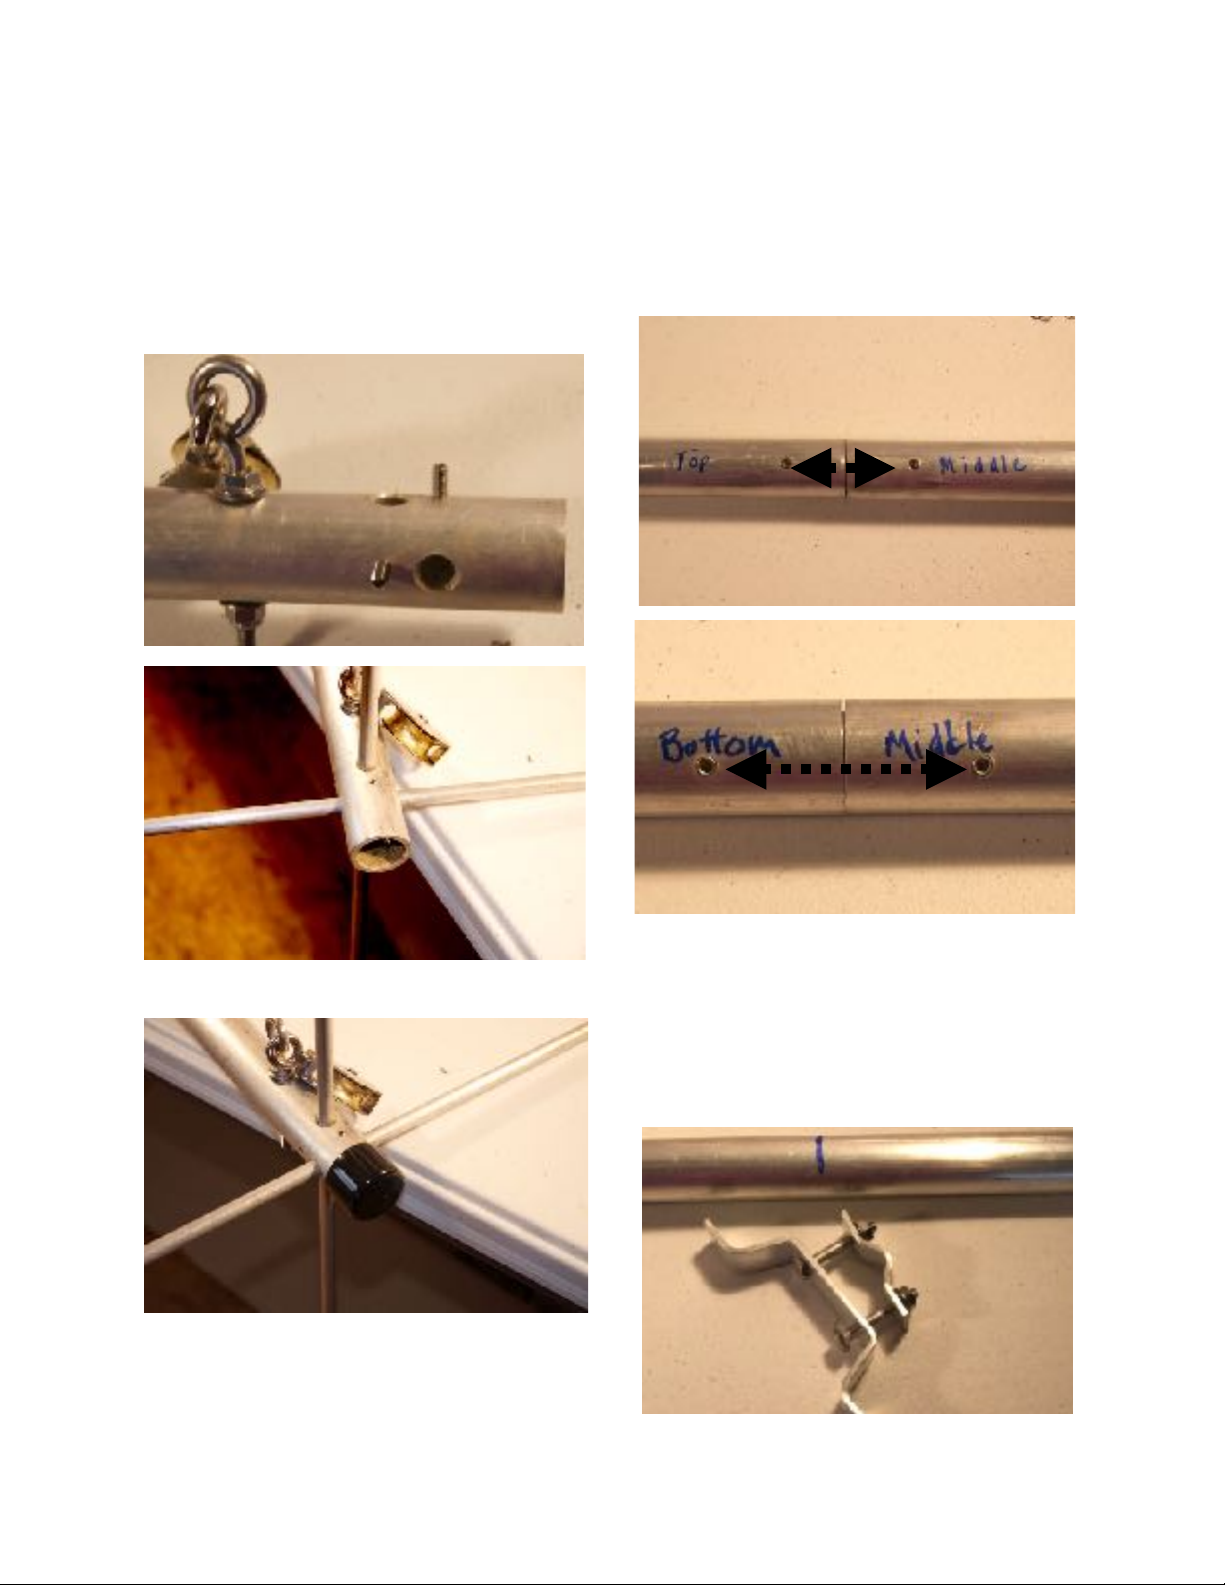
Step 4) Next we will attach the 3 sections of
the pole together. Take your top pole sec-
tion and middle section. Align the middle
section so that the drilled and tapped hole on
the top section aligns with the set screw that
holds the splice into place. Insert the splice,
thread the ¼”-20 x ¼” (M) set screw into the
tapped hole. Align the set screw and tighten.
Next add the bottom section. Its the same
way. Align the set screw holes, insert the
screw and tighten.
Step 5) Slip the hub onto the pole bottom
and slide it up the pole.
Step 6) Rope Winder (K). The rope winder
needs to be oriented under the pulley. Easi-
est way is to lay the assembled pole on the
ground pulley facing up towards the sky.
Measure from the bottom up to around 50”.
Your rope winder has been assembled for
you. Loosen and remove one of the whiz
Troyer’s Birds’ Paradise 20785 Morris Rd Conneautville, PA 16406 814-587-2756 Page 3
Step 3B
Step 3C
Step 3C
Step 4
Step 4
Step 6
Step 3C
Bed and Breakfast Instructions
nuts. Slip the back piece of the rope winder
around the pole. Replace the bolt into the
back plate, thread the nut back on and tight-
en using a 7/16” wrench. Set the pole aside.
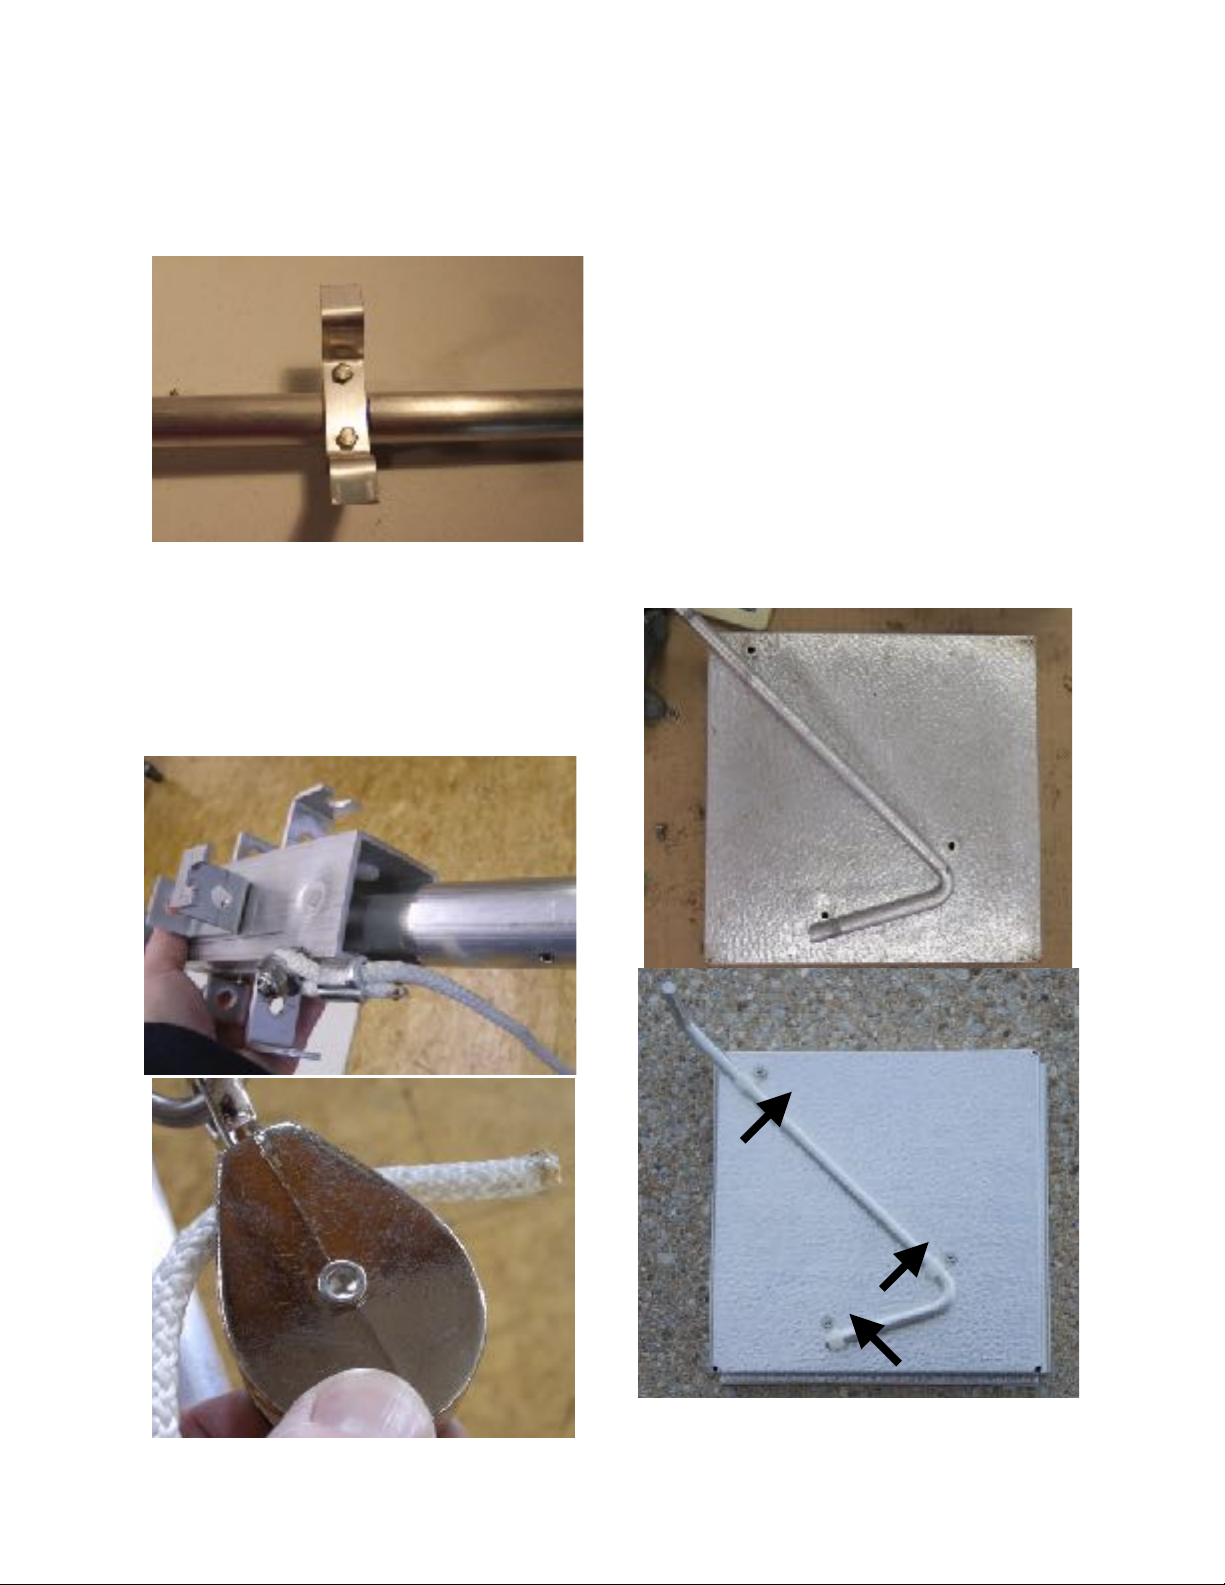
Step 7) Add the rope (J) to the hub (F). Un-
furl your rope and get the end that has a
loop with crimp. Remove the lock nut and
one washer from the bolt on the hub. Slip
the loop of the rope onto the bolt. Replace
the washer and lock nut. Holding your rope
upwards, tighten the lock nut till the rope
feels secure. Take the end of the rope and
insert the rope thru the back of the pulley
and pull the rope over and thru the pulley so
that the rope falls forward of the hub and
pole See step 7 photos.
Pull the rope down and loosely tie it on to
your rope winder.
Step 8) Assemble the trays. The arms are
attached to the underside of the feeding
trays. Each tray will need 3 ⅜clips (P) , 3 #8
x ⅜” screws (Q) and 3 # 8 nuts (R). Lay the
tray (G) on a flat surface bottom side up. Lay
the arm over the tray so that the arm lays flat
with the sharp bend of the arm facing the
corner between 2 holes in the tray, see photo
Troyer’s Birds’ Paradise 20785 Morris Rd Conneautville, PA 16406 814-587-2756 Page 4
Step 7
Step 8
Step 8
Step 6
Step 7
Take note the
direction of the
plastic clips
Bed and Breakfast Instructions
It can get a bit tricky holding all the parts,
but take your time and you will see its not
too bad. Take the ⅜” plastic clips (P) and slip
them onto the ⅜” tray arm (H) exactly as seen
in the photo. The holes in the clips will align
with the holes on the trays. Now you need to
slip a #8 x ⅜” screw (Q) from inside the tray
out. (The screw goes thru the hole from in-
side the tray, thru the hole in the clip and
held in place with a nut.) Thread on a # 8
nut (R), continue to the next hole then the
third. Once all 3 nuts are in place, go ahead
and tighten them up. Repeat for the other 3
trays and set aside.
After waiting a day for the concrete to harden
remove the packaging tape from the top of
the ground sleeve. Your complete pole (with
out trays) will now slip inside the ground
sleeve. Tighten the screw that is in the
sleeve to the pole. This will keep the pole
from spinning inside the sleeve.
The rope winder may need to be adjusted to
a comfortable height. Simply loosen the nuts
and slide the rope winder to comfortable
height. One person can do it by raising the
hub and standing on the rope. Tie the ex-
cess rope o%on to your rope winder. Now
its time to place the trays into the hub’s C-
brackets. You are now ready to teach your
martins to eat from your feeding station.
Tips on how to teach your martins to use the
feeder are found on the last page.
Trays lift out of the hub for easy cleaning.
You can leave your pole up year round, but
you should bring your trays in.
Troyer’s Birds’ Paradise 20785 Morris Rd Conneautville, PA 16406 814-587-2756 Page 5
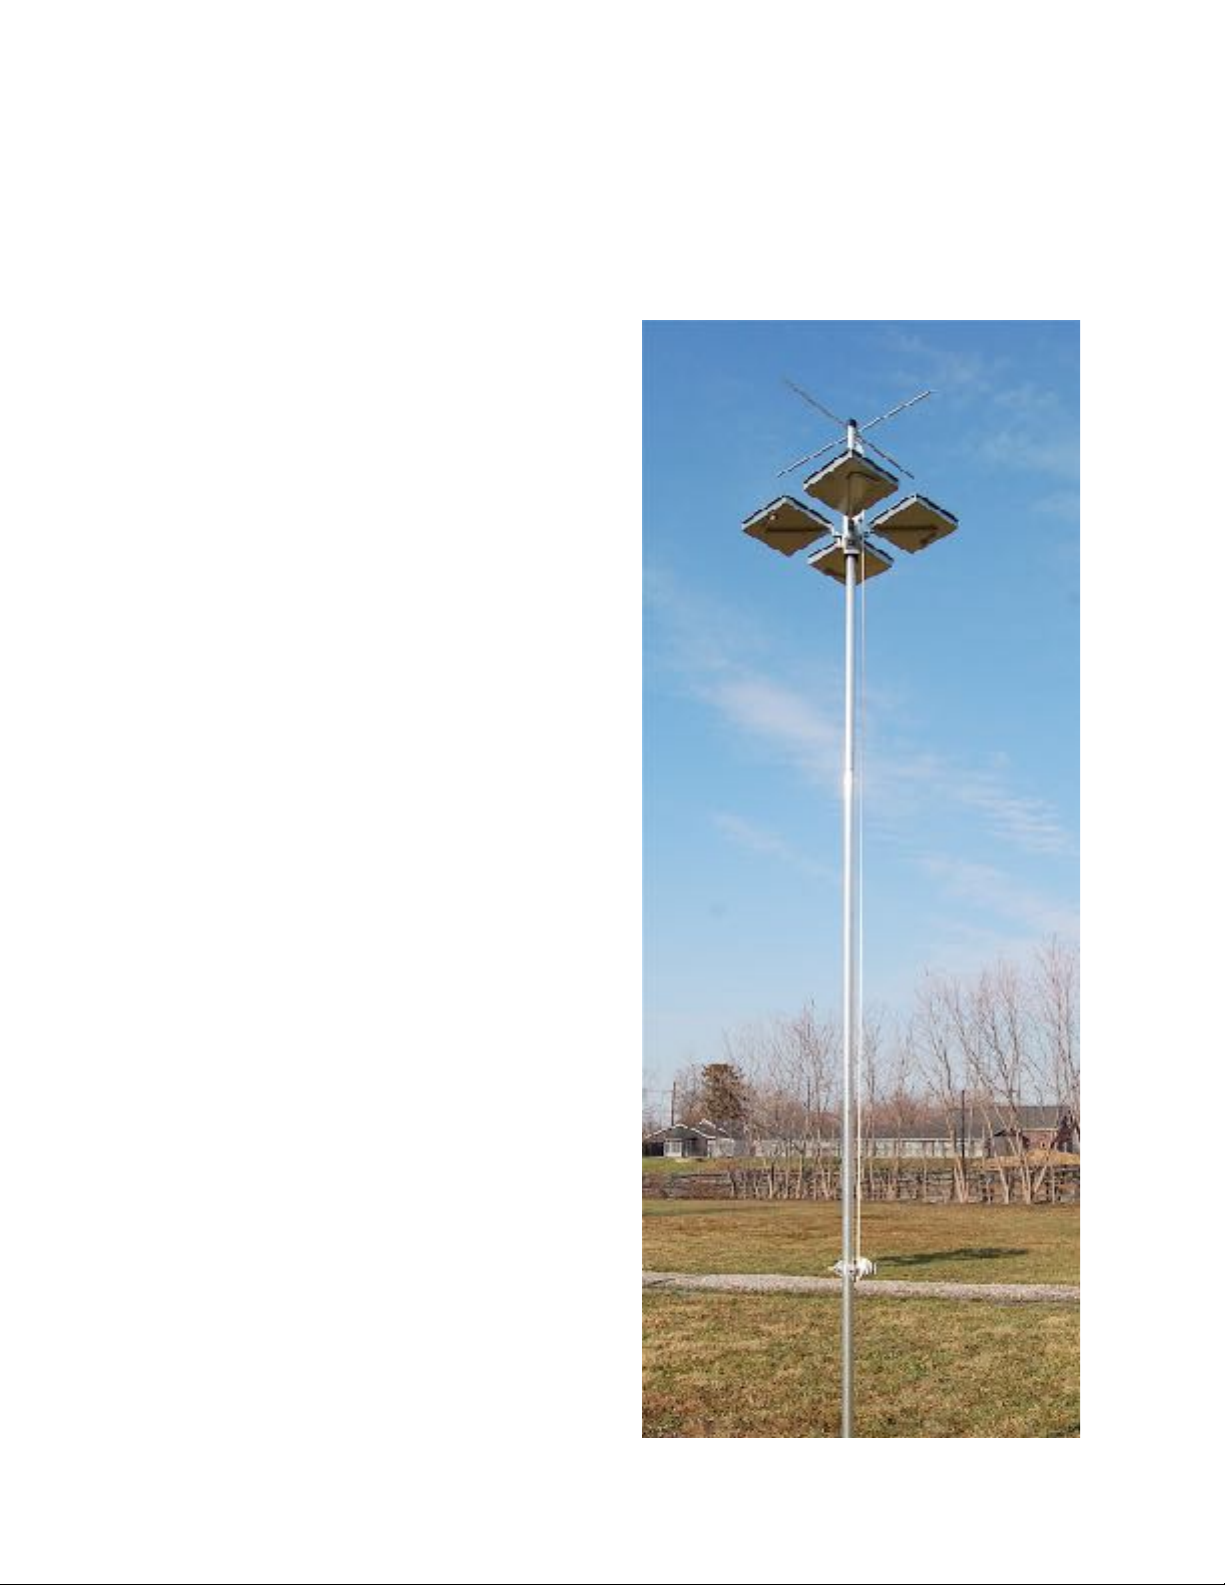
A Bed & Breakfast
ready and waiting
for the returning martins.

Bed and Breakfast Instructions
Troyer’s Birds’ Paradise 20785 Morris Rd Conneautville, PA 16406 814-587-2756 Page 6
Supplemental feeding is frustrating at the beginning but the rewards of saving
your colony out number this discomfort of a sore finger or getting wet. Here is
how we taught our martins to eat. First don’t try to teach your Martins to eat
scrambled egg, just wont happen in my opinion. Break down and buy some
crickets. Depending on your colony size you will want at least 1000 pre wing size
(1") crickets. Place your order for crickets before your Martins return. When your
crickets arrive place them in your freezer, box and all. I leave my frozen crickets
in the box, till I need them, but you could place frozen crickets into storage bags
if that suits you better.
When your weather turns (and it always does) retrieve some of your frozen crick-
ets and place them on a paper plate or paper towel. You can defrost them using
a microwave or leave out to till the crickets have reached room temperature.
Never feed a frozen cricket. Now the martins need to be hungry, so on the first
day of inclement weather, your martins may look at you comically as you fling
crickets, but still, stand near your racks and using a plastic spoon launch the
cricket air borne, (place cricket on spoon head, hold handle in one hand, and
gently pull back on the spoon head till the plastic spoon is flexed, and let go, the
cricket will be airborne) over the martins head, but never flick crickets directly at
the martins. It takes only one martin to get the frenzy started. Once your mar-
tins accept your flinging crickets your half way there. Now comes the easy part.
Do you have a bed and breakfast or did you build your own feeding platform?
Lets face it, humans are generally lazy, why fling crickets if we can teach the Mar-
tins to eat at one place, and we don’t need to get wet? Well, how can we accom-
plish this? Start by placing a few crickets in your B&B or on your platform. If your
feeding station raises, like our B&B, raise up the trays with crickets on it. Stand
under or near the feeding station. Begin to launch your crickets using your
spoon. Try to get the martins near the feeding platform. Feed less crickets than
you may normally, getting the matins near the feeding station to see the provided
crickets. Walk away. Again it takes only 1 martin to land on the feeding platform.
Once this happens you can place more and more crickets into the feeding station.
During long cold wet spells, your martins can eat you out of house and home.
That’s when egg comes into play. You have trained your martins to eat crickets
from the feeding platform, now its time to add scrambled eggs. We make our
scrambled eggs by placing 6 eggs into a microwave safe bowl, and whisk. Mi-
crowave till cooked and then chop into small pieces. Place your scrambled eggs
into your feeding trays, spread it around, add a few crickets, and watch your mar-
tins. During long cold spells you will need to fill your feeding station as often as
possible. It’s such a thrill to see them eat your o%erings. Knowing that your mar-
tins will survive this cold snap brings you great joy. You will notice that your
Martins will even come to greet you as they await your food. It’s such a thrill!
And fear not, your Martins will return to catching their own food as soon as the
temperatures raise and insects are flying. It is also my opinion that there are now
so many of us landlords who supplemental feed that more and more martins are
catching on faster every year.

Bed and Breakfast Instructions
Troyer’s Birds’ Paradise 20785 Morris Rd Conneautville, PA 16406 814-587-2756 Page 7


