True 956657 User manual

INSTALLATION GUIDE
DUAL ZONE
WINE CABINET
956657

Thank you for purchasing your new True Professional Series unit. For over
65 years, True® has been a leader in commercial refrigeration. No other
refrigeration company has the reputation for being the industry’s best when
it comes to superior quality and service. And while our reputation for quality
reaches across the globe, all of our products are proudly made in the USA.
Respected by the culinary world,True’s unmatched performance is proven
—our products are carried in some of the most prestigious restaurants
and hotels around the world.
And now, we are pleased to bring this performance to you —crafting products
for your home of the same quality that the world’s
best chefs demand in their kitchens.
This guide will answer most of your questions about the installation of yourTrue
Professional unit. If you have questions that are not answered here, contact
True customer service at 800-325-6152 or info@true-residential.com.
Or you may also visit our website at true-residential.com.
Thank You
For
Your Purchase

Ownership 1
Safety Precautions 1
Disposal of Old Refrigerator 1
CFC Disposal 1
Uncrating 2
Electrical Specications 3
Leveling Refrigerator 4
Installing Anti-Tip Brackets 5
Installing the Door Stop 6
Installation Specications for Dual Zone Wine Cabinet 8-11
Installation Specications - Dual Zone with Overlay Panel 12-17
Home Alarm System 18
Dual Zone Wine Cabinet Components 19
True Precision Control Operation 20
Shelving Adjustment 21-22
General Maintenance, Replacement Parts, Installation Checklist
& FAQs 23-26
INDEXInstallation Guide
TM

True Professional Dual Zone Wine Cabinet Installation Guide
1
OWNERSHIP
SAFETY PRECAUTIONS
DANGER!
RISK OF CHILDREN
ENTRAPMENT
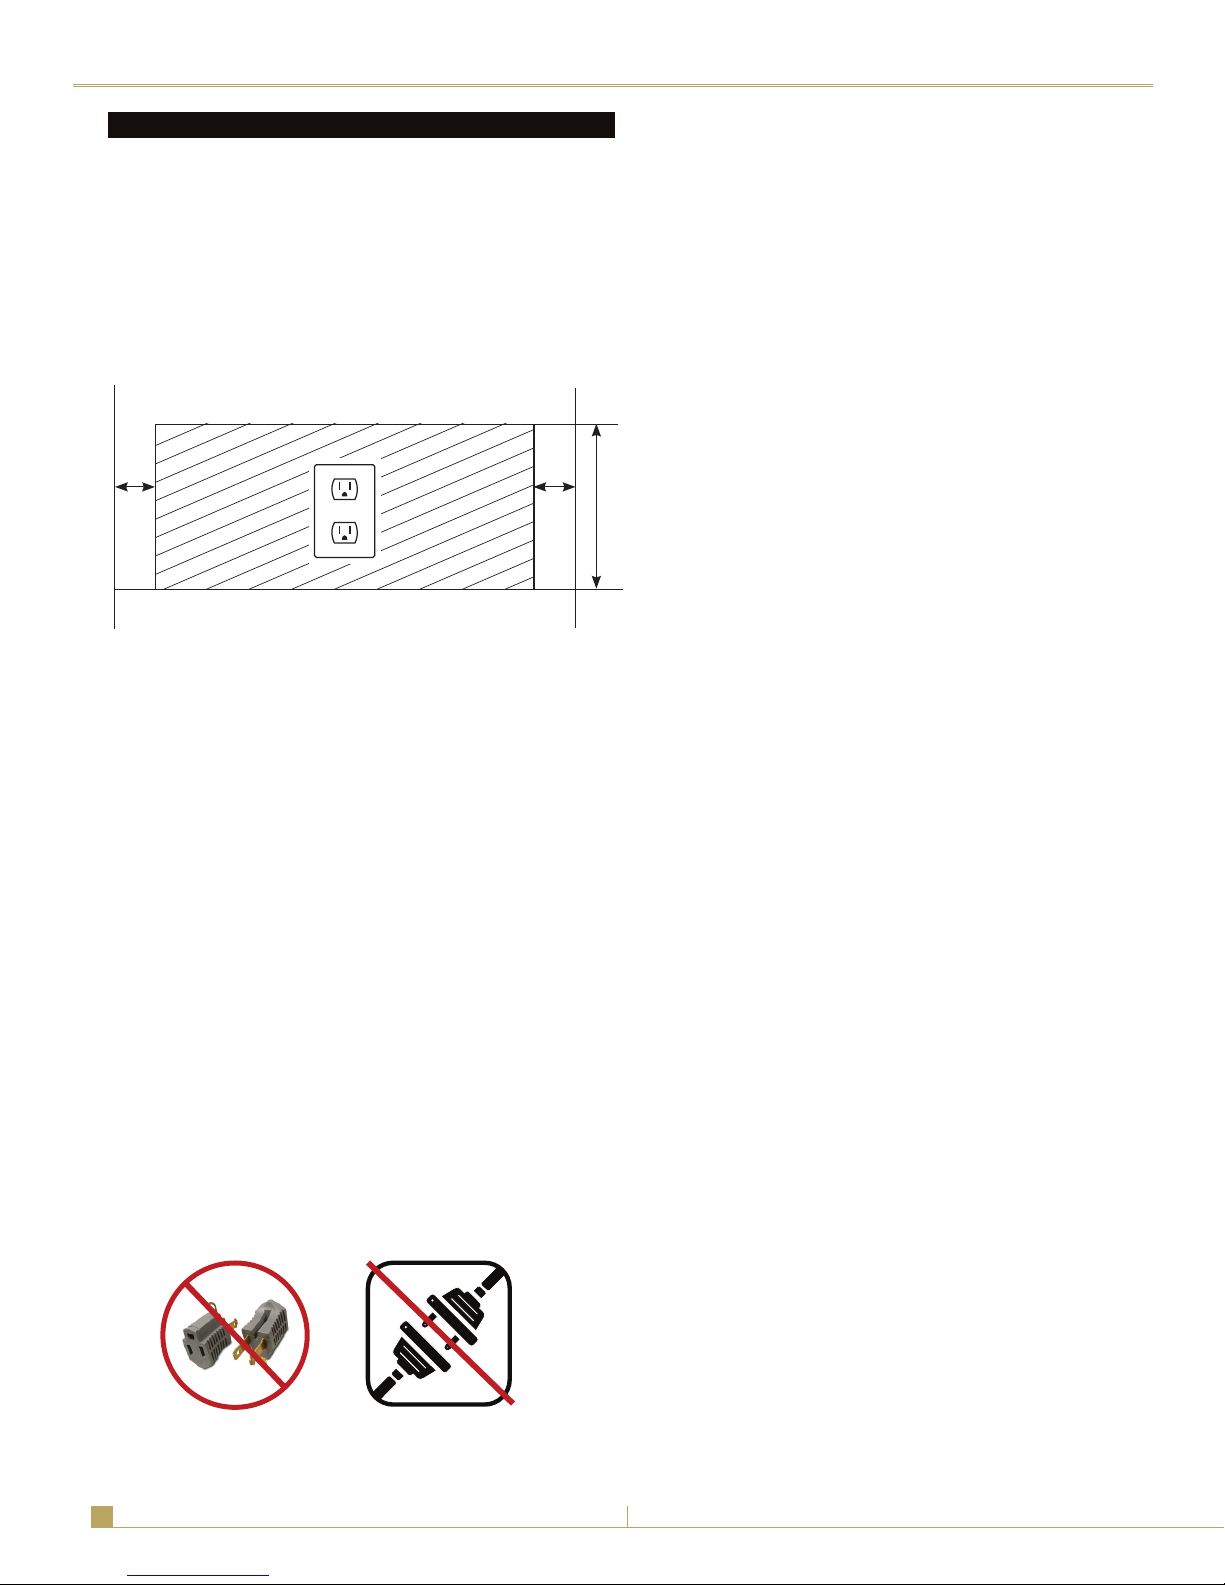
To insure that your unit works properly from the
rst day, it must be installed properly. (We highly
recommend a trained refrigeration mechanic and
electrician install your True Professional Cabinet.) The
cost of a professional installation is money well spent.
Before you start to install yourTrue Professional
Cabinet, carefully inspect it for freight damage. If
damage is discovered, immediately le a claim with
the delivery freight carrier. True is not responsible for
damage incurred during shipment.
Any questions about the installation please contact
yourTrue dealer or True Technical Service Department
at 1-800-325-6152 (Please have your model and
serial numbers available when you call our Service
Department).
• This refrigerator must be properly installed
and located in accordance with the installation
instructions before it is used.
• Do not allow children to climb, stand or hang on
the shelves in the refrigerator. They could damage
the refrigerator and seriously injure themselves.
• Do not store or use gasoline or other ammable
vapors and liquids in the vicinity of this or any
other appliance.
• Keep hands away from the “pinch point” areas
(gaps between the doors and between the doors
and cabinet) small areas are not necessarily safe.
• Unplug the refrigerator before cleaning and
making repairs.
NOTE: We strongly recommend that any
servicing be performed by a qualied individual.
• Setting temperature control to OFF only removes
power from the refrigeration system, it does not
remove power from other circuits. For example,
temperature control and lights.
NOTE: WE STRONGLY RECOMMEND THAT ANY
SERVICING BE PERFORMED BY A QUALIFIED
INDIVIDUAL
PROPER DISPOSAL OF THE OLD
REFRIGERATOR
Child entrapment and suffocation are not problems
of the past. Junked or abandoned refrigerators are
still dangerous... even if they will sit for “just a few
days”. If you are getting rid of your old refrigerator,
please follow the instructions below to help prevent
accidents.
Before You Throw Away Your Old Refrigerator or
Freezer:
• Take off the doors.
• Leave the shelves in place so that children may not
easily climb inside.
CFC DISPOSAL
Your old refrigerator may have a cooling system that
used CFC’s (chlorouorocarbons). CFCs are believed
to harm stratospheric ozone. If you are throwing away
your old refrigerator, make sure the CFC refrigerant is
removed for proper disposal by a qualied service. If
you intentionally release this CFC refrigerant you can
be subject to nes and imprisonment under provisions
of the environment legislation.

True Professional Dual Zone Wine Cabinet Installation Guide 2
A
C
D
Tools Required:
• Cutting utensil (utility knife)
• Hammer
• Crowbar
• Phillips head screwdriver
The following procedure is recommended for
uncrating the unit:
MOVE YOUR UNIT AS CLOSE TO THE FINAL
LOCATION AS POSSIBLE BEFORE REMOVING
THE WOODEN SKID.
A. Remove nails securing cardboard box to the
wooden skid.Then discard any outer packaging
(cardboard, clear plastic).
Inspect for concealed damage. Again, immediately le
a claim with the freight carrier if there is damage.
B. IMPORTANT: Remove wooden block with Phillips
head screw driver before removing refrigerator
from pallet.
C. Remove skid by carefully lifting the refrigerator off
and place skid aside. Remove clear plastic
coating from cabinet.
D. Open the unit and remove any packing material.
Styrofoam, tape, and any other material used
for shipping purposes.
NOTE: KEYS FOR UNIT ARE PROVIDED WITH
THIS PACKET
UNCRATING
B

True Professional Dual Zone Wine Cabinet Installation Guide
3
Do not, under any circumstances, cut or remove the
third (ground) prong from the power cord. For personal
safety, this appliance must be properly grounded.
To minimize the depth of the cutout opening, the
electrical outlet must be positioned as shown below.
Outlet must be ush with wall.
Before your new unit is connected to a power supply,
check the incoming voltage with a volt meter. If anything
less than 100% of the rated voltage for operation is
noted, correct immediately.
The power cord of this appliance is equipped with a
3-prong (grounding) plug which mates with a standard
3-prong (grounding) wall outlet to minimize the
possibility of electric shock hazard from this appliance.
A 115V AC, 60 Hz, 15 amp circuit breaker and electrical
supply are required.
Have the wall outlet and circuit checked by a qualied
electrician to make sure the outlet is properly grounded.
If the outlet is a standard 2-prong outlet, it is your
personal responsibility and obligation to have it replaced
with the properly grounded 3 prong wall outlet.
Do not use an extension cord or two prong adaptor.
Electrical ground is required on this appliance.
2” 2” 8”
Rear wall of cut out
ELECTRICAL SPECIFICATIONS
The unit should always be plugged into its own
individual electrical outlet, which has a voltage rating
that matches the rating plate. This provides the best
performance and also prevents overloading house
wiring circuits which could cause a re hazard from
overheated wires. Never unplug your refrigerator by
pulling on the power cord. Always grip plug rmly
and pull straight out from the outlet.
Repair or replace immediately all power cords that
have become frayed or otherwise damaged. Do not
use a cord that shows cracks or abrasion damage
along its length or at either end. When moving the
refrigerator away from the wall, be careful not to roll
over or damage the power cord.

True Professional Dual Zone Wine Cabinet Installation Guide 4
1. Set unit in its nal location. Be sure there is adequate ventilation in
your room.
2. Proper leveling of your True unit is critical to operating success
(for non-mobile models). Effective condensate removal and door
operation will be effected by leveling. Adjust leg levelers on the front
and back of the cabinet if it needs to be lowered or raised.
3. The unit should be leveled from the interior of the unit front to back
and side to side with a level. If the refrigerator is not level adjust the
stainless steel leg levelers. The leg levelers can be adjusted by turning
to reach the desired leveling height as shown in the illustration below.
4. Free plug and cord from back of cooler (do not plug in).
5. The unit should be placed close enough to the electrical supply so
that extension cords are never used.
WARNING: COMPRESSOR WARRANTIES ARE VOID IF
THE UNIT IS MORE THAN 7 FT. (2.1M) FROM PLUG-IN
CONNECTION OR IF AN EXTENSION CORD IS USED.
LEVELING REFRIGERATOR

True Professional Dual Zone Wine Cabinet Installation Guide
5
BC
To prevent this the anti-tip brackets need to be installed.
Reconnect the anti-tip bracket if the product is moved.
Failure to follow these instructions can result in property
or bodily harm.
Read all installation instructions rst. Install the anti-tip
brackets to hold both rear legs of the unit. Follow these
steps to secure the brackets to the oor before moving
the unit into nal operating position.
Contact a qualied oor covering installer for the best
procedure of drilling mounting holes through your type
of oor covering.
BEFORE MOVING UNIT TAKE PRECAUTIONS TO
PROTECT THE FLOOR COVERING.
AANTI-TIP BRACKET LOCATOR - TOP VIEW
INSTALLING ANTI-TIP BRACKETS
ALL FREE STANDING, DRAWER OR STACKED UNITS MUST HAVE
THE ANTI-TIP BRACKETS INSTALLED.
TIP OVER HAZARD: A CHILD OR ADULT CAN TIP THE REFRIGERATOR
AND MAY CAUSE PROPERTY OR BODILY HARM.
A. Determine the location of the unit. From the front
of the determined location of the lower louver grill
measure back 201/2”. From the determined side of
the unit measure over 27/32”. This is where the back
and outer side of the bracket should sit. Using the
bracket as a template mark the holes for drilling.
B. To mount the anti-tip bracket to wood oor, drill
pilot holes for each of the bracket holes. To mount
the anti-tip bracket to concrete or ceramic oor
use a masonry bit to drill pilot holes. Align anti-tip
bracket holes with the holes in the oor. Fasten anti-
tip bracket with screws provided using the brass
colored screw for wood, or blue colored masonry
screw for concrete.
C. Move unit into nal position making sure rear leveling
legs slide into the anti-tip brackets.
Back of the unit
Cabinet Front
27/32” 27/32”
223/16”
2225/32”201/2”
Overlay Panel
221/32”

True Professional Dual Zone Wine Cabinet Installation Guide 6
INSTALLING THE DOOR STOP
All units are provided with an optional door stop. When installed, the door stop will restrict the door from
opening past approximately 120º to prevent damage to surrounding cabinets.To install the door stop, use the
2 screws provided and secure the bracket to the bottom of the door on the same side as the hinge.
Cabinet door
Hinge
Door stop
Door stop
installed
Cabinet grill

True Professional Dual Zone Wine Cabinet Installation Guide
7
NOTES

True Professional Dual Zone Wine Cabinet Installation Guide 8
Installation Specifications
for
True Professional Dual Zone
Wine Cabinet
TWC-24DZ-R-SG-A
TWC-24DZ-L-SG-A
Installation Guide

True Professional Dual Zone Wine Cabinet Installation Guide
9
INSTALLATION SPECIFICATIONS - DUAL ZONE WINE CABINET
Dimensions may vary by ± 1/8”
23
7/8"
29
3/4"
4
1/8"
FRONT
VIEW 46
7/8"
25
1/4"
1
7/8"
TOP
VIEW
SIDE
VIEW
23
7/8"
34
1/4"
3
3/4"

True Professional Dual Zone Wine Cabinet Installation Guide 10
23
7/8"
29
3/4"
4
1/8"
True’s Dual Zone Wine Cabinets are designed to be inserted into a cabinet
opening or free standing. Below are recommended dimensions for rough opening.
INSTALLATION SPECIFICATIONS - DUAL ZONE WINE CABINET
ROUGH
OPENING
HEIGHT
341/2”
Front view
of unit
between
cabinets
ROUGH
OPENING
DEPTH
24”
ROUGH
OPENING
WIDTH
24”

True Professional Dual Zone Wine Cabinet Installation Guide
11
True’s stainless steel cabinets are UL rated for use in outdoor settings.
In outdoor locations where the ambient temperature regularly exceeds 95˚F, it is recommended
to vent the rear of the cut out opening in the area shown below for optimum performance. The
recommended cut out size is 4” x 10”.
8”
8”
ROUGH
OPENING
HEIGHT
341/2”
ROUGH
OPENING
DEPTH
241/4”
ROUGH
OPENING
WIDTH
24”
INSTALLATION SPECIFICATIONS - OUTDOOR

True Professional Dual Zone Wine Cabinet Installation Guide 12
Installation Specifications
for
True Professional Dual Zone
Wine Cabinet
with
OVERLAY PANEL
TWC-24DZ-R/L-OG-A
TWC-24DZ-R/L-OP-A
Installation Guide

True Professional Dual Zone Wine Cabinet Installation Guide
13
INSTALLATION SPECIFICATIONS - DUAL ZONE MODEL WITH OVERLAY PANEL
NOTE:These units
are shown with
optional panel/handle
provided by others
* Including 3/4” thick panel (provided by others)
Overlay Panel (OP)
TWC-24DZ-R-OP-A
Overlay Panel Glass (OG)
TWC-24DZ-R-OG-A
23 7/8"
34 1/4"
25 1/4"
46 7/8"
34 1/4"
23 7/8"
3 3/4"
4 1/8"
23 1/8"
3/4"
23 7/8"
34 1/4"
25 1/4"
46 7/8"
34 1/4"
23 7/8"
3 3/4"
4 1/8"
23 1/8"
3/4"
*
*

True Professional Dual Zone Wine Cabinet Installation Guide 14
.840”
.965”
(3 sides)
3/4”
6”
2313/16”
1713/16”
291/2”
6”
143/4”
231/2”
.840”
.965”
(3 sides)
3/4”
6”
2313/16”
1713/16”
291/2”
6”
143/4”
231/2”
INSTALLATION SPECIFICATIONS - DUAL ZONE MODEL WITH OVERLAY PANEL...Continuation
CUSTOM PANEL INSTALLATION
NOTE: dual zone models maximum weight 10 lb
Back of Overlay Panel
(OG)
Back of Overlay Panel
(OP)
Solid Door Glass Door
3/4”
237/8”
231/8”
Solid Door Panel Dimensions
Door Panel Width 2313/16”
Door Panel Height 291/2”
Door Panel Depth 3/4” max
Door Panel Weight 10 lb. max
MODELS
Solid Door Glass Door
TWC-24DZ-R/L-OP-A TWC-24DZ-R/L-OG-A
Cut Out Dimensions (WxDxH)
24 x 24 x 34.5 24 x 24 x 34.5
Glass Door Panel Dimensions
Door Panel Width 2313/16”
Door Panel Height 291/2”
Door Panel Depth 3/4” max
Door Panel Weight 10 lb. max
Rail/Style Dimension 2” min

True Professional Dual Zone Wine Cabinet Installation Guide
15
ROUGH
OPENING
HEIGHT
341/2”
Front view of
unit
between
cabinets
ROUGH
OPENING
DEPTH
24”
ROUGH
OPENING
WIDTH
24”
True’s Dual Zone Wine Cabinet Overlay Models are designed to be
inserted into a cabinet opening.
INSTALLATION SPECIFICATIONS - DUAL ZONE MODEL WITH OVERLAY PANEL...Continuation

True Professional Dual Zone Wine Cabinet Installation Guide 16
Tools Needed:
• Phillips Screwdriver
• 3/8” Wrench
• 1/8” Drill Bit
• Ten (10) Screws #6
SEE PAGE 14 FOR OVERLAY PANEL DIMENSIONS
BEFORE INSTALLING.
FOR EASY OVERLAY INSTALLATION REFRIGERATOR
DOOR REMOVAL IS REQUIRED.
NOTE: DO NOT INSTALL A SOLID PANEL ON A
GLASS DOOR. THIS MAY CAUSE MOISTURE TO FORM
BEHIND THE PANEL RESULTING IN DAMAGE.
1. Open front door and pull grill forward to remove.
2. To remove door back out two bottom hinge screws
with a 3/8” wrench. Secure door while removing
screws. Remove two Phillips screws from the top
hinge. Save all these screws for later reinstall.
3. Lay door on a safe solid surface. If retrotting glass
door model be careful not to damage glass. Lay
cardboard or other safe material down before working
on the door.
4. Remove door gasket from the inside of the door
frame. Place gasket to the side for later reinstall.
5. There are pre marked areas on the front of the door.
Drill these pre marked holes with 1/8” drill bit. Make
sure to go all the way through the door.
NOTE: IF HANDLE IS BEING USED ON OVERLAY
INSTALL IT BEFORE STEP 8 (See Image A). FOR BEST
INSTALLATION, SCREWS ATTACHING HANDLE
SHOULD BE RECESSED.
6. It is recommended to clamp the door front on top
of the overlay before drilling pilot holes and installing
anchor screws. The clamp ensures the overlay panel
and door stay aligned with each other while installing.
Once panel is clamped in place, pilot holes may be
drilled into the panel from the rear side of the door.
INSTALLING OVERLAY PANELS FOR DUAL ZONE MODELS
1
43
2Remove
screws from
top and
bottom hinge
5

True Professional Dual Zone Wine Cabinet Installation Guide
17
7. Once all holes are pre drilled use the appropriate
specied screws to secure the overlay panel onto the
front of the refrigerator door.
8. Reinstall all components in reverse order. Door
gasket snaps back into place. Overlay panel and door
stay aligned with each other while installing.
INSTALLING OVERLAY PANELS FOR DUAL ZONE MODELS...Continuation
8
Door Layers - GeneralView
Gasket Door
Handle
Overlay Panel
7
6
Image A
Reinstall
screws on top
and bottom
hinge
Table of contents
Other True Wine Cooler manuals