Trufrost IC-200 User manual

USER MANUAL
Ice Machine: IC-200, IC-300
IC-455, IC-900
Flake Ice Machines: IF-200, IF-500
IF-1000

2/ 11
Content
I. The Installation of Ice Machine
1.Unpacking Note
2.Environmental Requirements
3.Water supply installation
4.Power Supply Requirements
II. The Use of Ice Machine
1.Checking before Operation
2.Familiarize with the Operation Panel
3.Operating process
4.Other Special Stop Conditions
III. Maintenance and Common Faults
1.Maintenance
2.Common Faults and Removal
3.Conditions Not Covered By Warranty
IV. Attachment
1.List of Attachments
V. Annex
1.Error Codes
2.Circuit Diagrams
Note: We reserve the rights to amend any part of the content in this manual without prior notifications.
Ice Machine Installation and Maintenance Instructions
3
3
3
3
4
4
5
6
7
7
8
8
9
9
8

3/ 11
Modular Type Ice Machine Installation and
Maintenance Instructions
I. Ice Machine Installation
1.Unpacking Note
Check the machine model before unpacking.
Check whether the outer package is intact before unpacking.
Check whether the machine is in good condition, or whether the accessories are
complete after unpacking.
2.Environmental Requirements
Indoor use only. Running the machine below freezing point is strictly prohibited.
Environment temperature: Maximum temperature < 43°C,
minimum temperature > 3°C.
Peripheral spacing: Proper spacing must be observed.(spacing can be reduced
accordingly with water cooling machine).Please refer to the table below:
Machine level placement:Level the machine in place. (It can be adjusted through the
adjustable foot at the bottom of the machine.)
3.Water Supply Installation
The water used for the ice making must be in accordance with the standards of local
drinking water.
The water used for the ice making may be connected to a filtration device first.
(Depending on the local water quality)
It is forbidden to connect the ice machine with hot water.
Please refer to the water inlet and drain pipe layout as following:
Machine
Spacing in cm
Side
15
Back
20
Front
30
Water
Temperature
(°C )
Ice Making
Water
Pressure
(Mpa)
Cooling
Water
Pressure
(Mpa)
Inlet Pipe
Diameter
(mm)
Drain Pipe Diameter (mm)
>0.6
>0.13
>0.59
>9.5(3/8”)
>15.8(5/8”)
<32
<0.55
<1.17
Drop per meter>3cm
Ice Machine Installation and Maintenance Instructions
The installation of drain pipe must observe the following principles
(Please refer to the diagram below):
1. Any point in the middle of drain pipe shall not be higher than the outfall.
2. Any point in the middle of drain pipe shall not be higher than outlet.

4/ 11
Installation Diagram (for reference only):
Air-Cooling Machine
Water-Cooling Machine
Note:
(a)The inlet and outlet of cooling water are only
applicable to the water cooling machine.
(b) The outer filter is optional.
External Power Supply
External Water Supply
Filter
Discharge into sewer
Cooling Water Inlet
Cooling Water Outlet
Ice Machine Installation and Maintenance Instructions
External Power Supply
External Water Supply
Discharge into sewer
Note:
(a) The outer filter is optional.
Drain Pipe Installation Attention
The drain pipe
mustn't be like this.
Drain Pipe Installation Attention
The drain pipe
mustn't be like this.
Drain Pipe Installation Attention

5/ 11
4.PowerSupplyRequirements
The voltage, frequency and capacity of power supply provided is consistent with
that marked on the machine nameplate.
The earth terminal of the power supply, socket or plug must be connected to
the external grounding steadily!
The power supply wire provided etc. shall all be in accordance with the standards of
the local country or region.
The power supply voltage fluctuation shall not exceed ±10% of the rated voltage.
II. The Use of Ice Machine
1. Checking Before Operation
Whether all the temporary fixed tapes in the ice machine has been removed!
Whether all the accessories or other items in the ice machine has been taken out!
Whether the ice machine is appropriately leveled!
Whether all the water pipes are correctly connected!
Whether the plug is connected to the power supply steadily!
Whether the machine grounding is connected to external grounding steadily!
To confirm that the power supply's voltage frequency and others are consistent with
the machine nameplate!
To confirm that the environment temperature and water temperature is with the
scope mentioned!

6/ 11
2. Familiarize with the Operation Panel
With voice panel:
Without voice panel:
Ice Machine Installation and Maintenance Instructions
7/ 11
3. Operating Process
Start up: Clicking the button (switch) on the panel after connected to the power
and water supply correctly, the machine will on. During the whole operating
process, it will work automatically.(Note: Please turn off the power supply in case
of thunderstorm or long time not in use.)
Pre-cooling: After power on, the water inlet valve will turn on automatically, the
evaporator pre-cools for 30 seconds before the water pump starts up, meanwhile the
compressor starts, the water pump stops running, the water inlet valve continues to
take in water till the specified level (that is to say water floating ball switch stops
water inlet).
Ice making: After pre-cooling for 30 seconds, the water pump starts up, continuous
water flows smoothly and ice comes into being gradually in ice try of the
evaporator.
Ice falling: After reaching the stipulated ice making time, the water pump shuts
down, the defrost valve powers on and open, and hot air enters into the evaporator,
at the same time the drain valve closes after 30 seconds. The water inlet valve open,
the whole sheet of ice will slide from the evaporator into the storage refrigerator
after defrosting for 1~2minutes. During the process of ice falling, hands should
be away from the storage refrigerator to avoid being hit by it !
Shutdown: When the machine runs, clicking the button(switch) on the panel and
the machine stops working.
Automatic Stop When Ice is Full: In the running, with the accumulation of ice in
the ice bin, it will reach to a certain height and block other ice fall down .Eventually
the full of ice result in sliding board cannot be rebounded and reset. After machine
detected it for a few time (30 seconds or so) and confirmed ice bin is full of ice , the
machine will stop working automatically. Until removed full of ice ,the sliding
board will be rebounded and reset again ,then machine will work automatically
again.
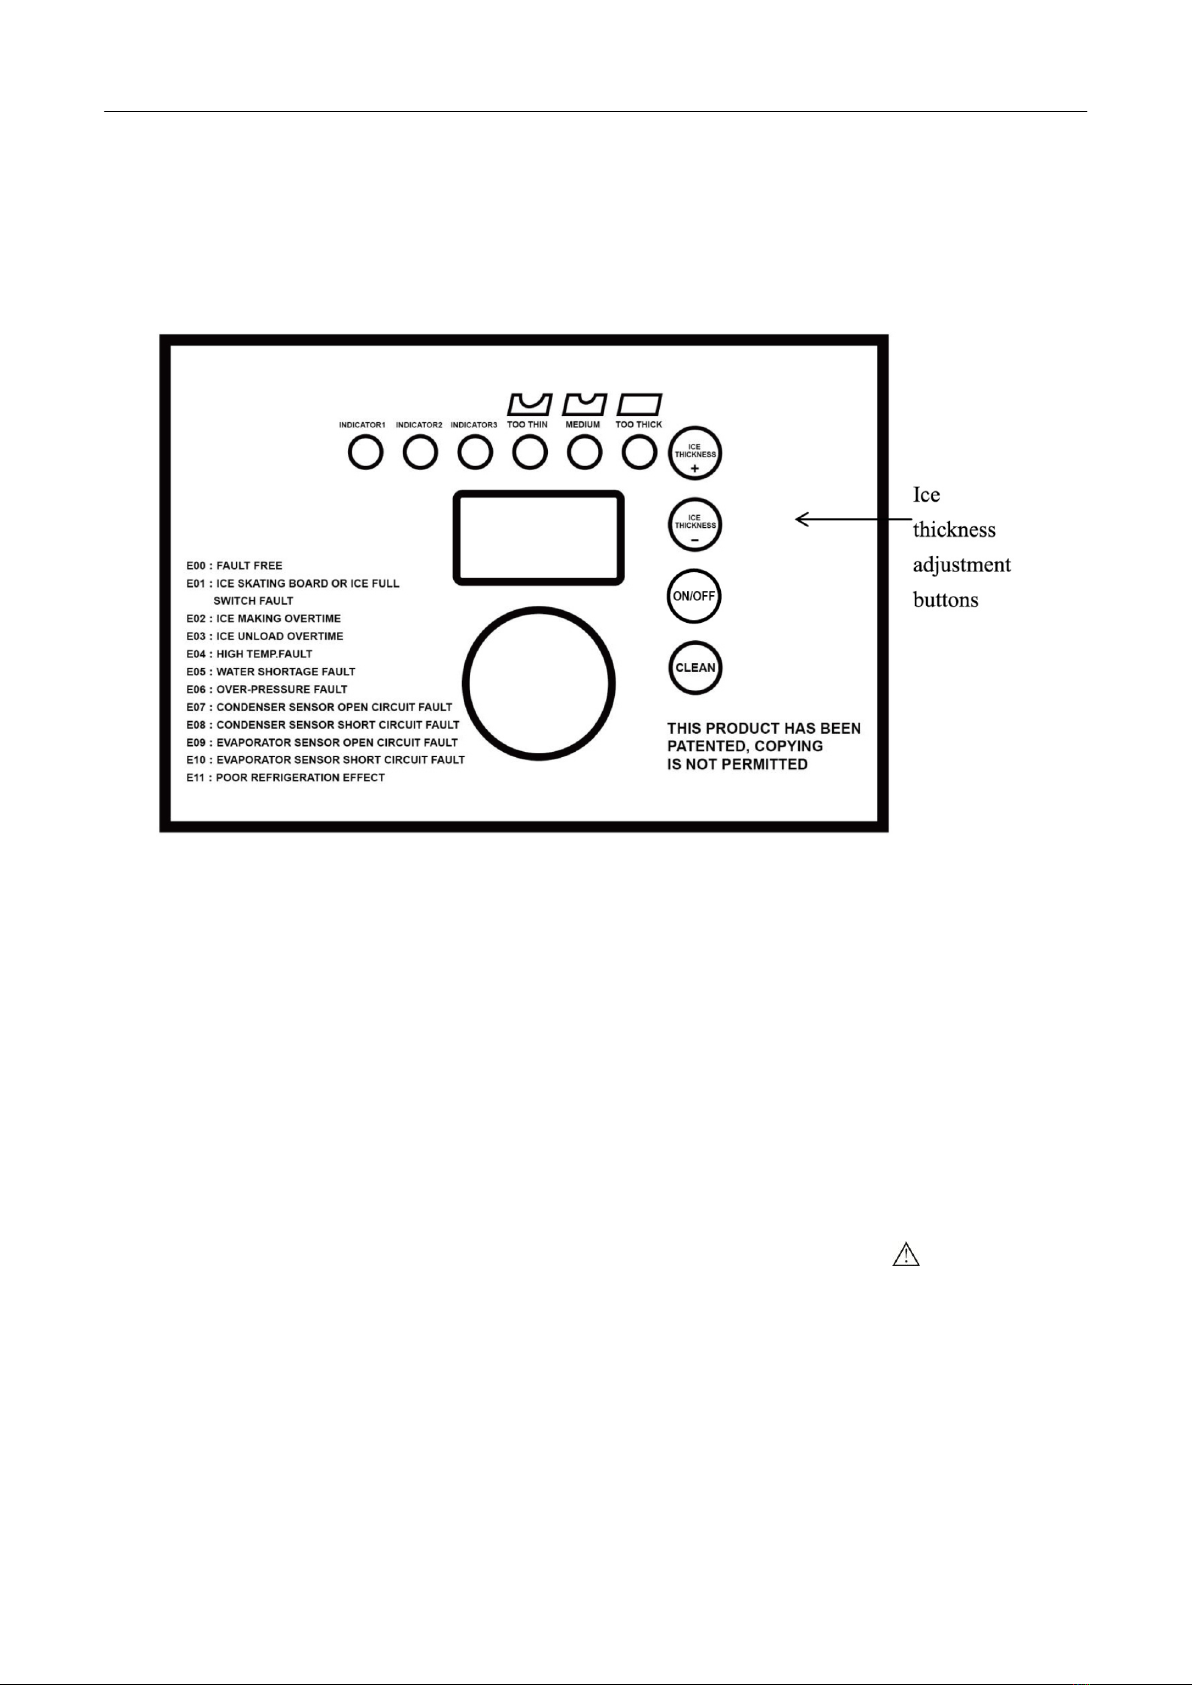
Ice thickness adjustment: There are two methods to adjust the ice thickness.
Please choose one according to the machine.
Method I, In the process of ice making,
the adjusting screw on the ice thickness
detector can be rotated left or right according to
the actual condition and the attached adjustment
instruction labeling if the ice thickness isn't
satisfactory, and tightens the screw after the
adjustment is completed.
Note: The adjustment shall be limited to
a circle each time.
Ice Machine Installation and Maintenance Instructions
Ice Thickness Adjusting Screw
8/ 11
Method II, In ice making process, if you are not satisfied with ice thickness please
adjust it through clicking the button on the touch panel (increase ice thickness + , reduce
ice thickness -)
Note: ice making time will extend or shorten one minute for every click.
4. Other Special Stop Conditions
There is no ice falling in three times consecutive cycles, this series of
machine stops automatically.
Environmental temperatures exceeds the prescribed temperature, this series of
machine stops automatically.
No condensed water in water cooling machine, this series of machine stops
automatically.
III. Maintenance and Common Faults
1. Maintenance:
Before maintenance and repair, the power must be cut off!
Maintenance and repair shall be handled by qualified professionals only.
Please read this manual in detail before maintenance and repair.
The manufacturer isn't responsible for the consequences of poor water quality
and wrong operation.
Clear the dust on the surface of machine regularly.
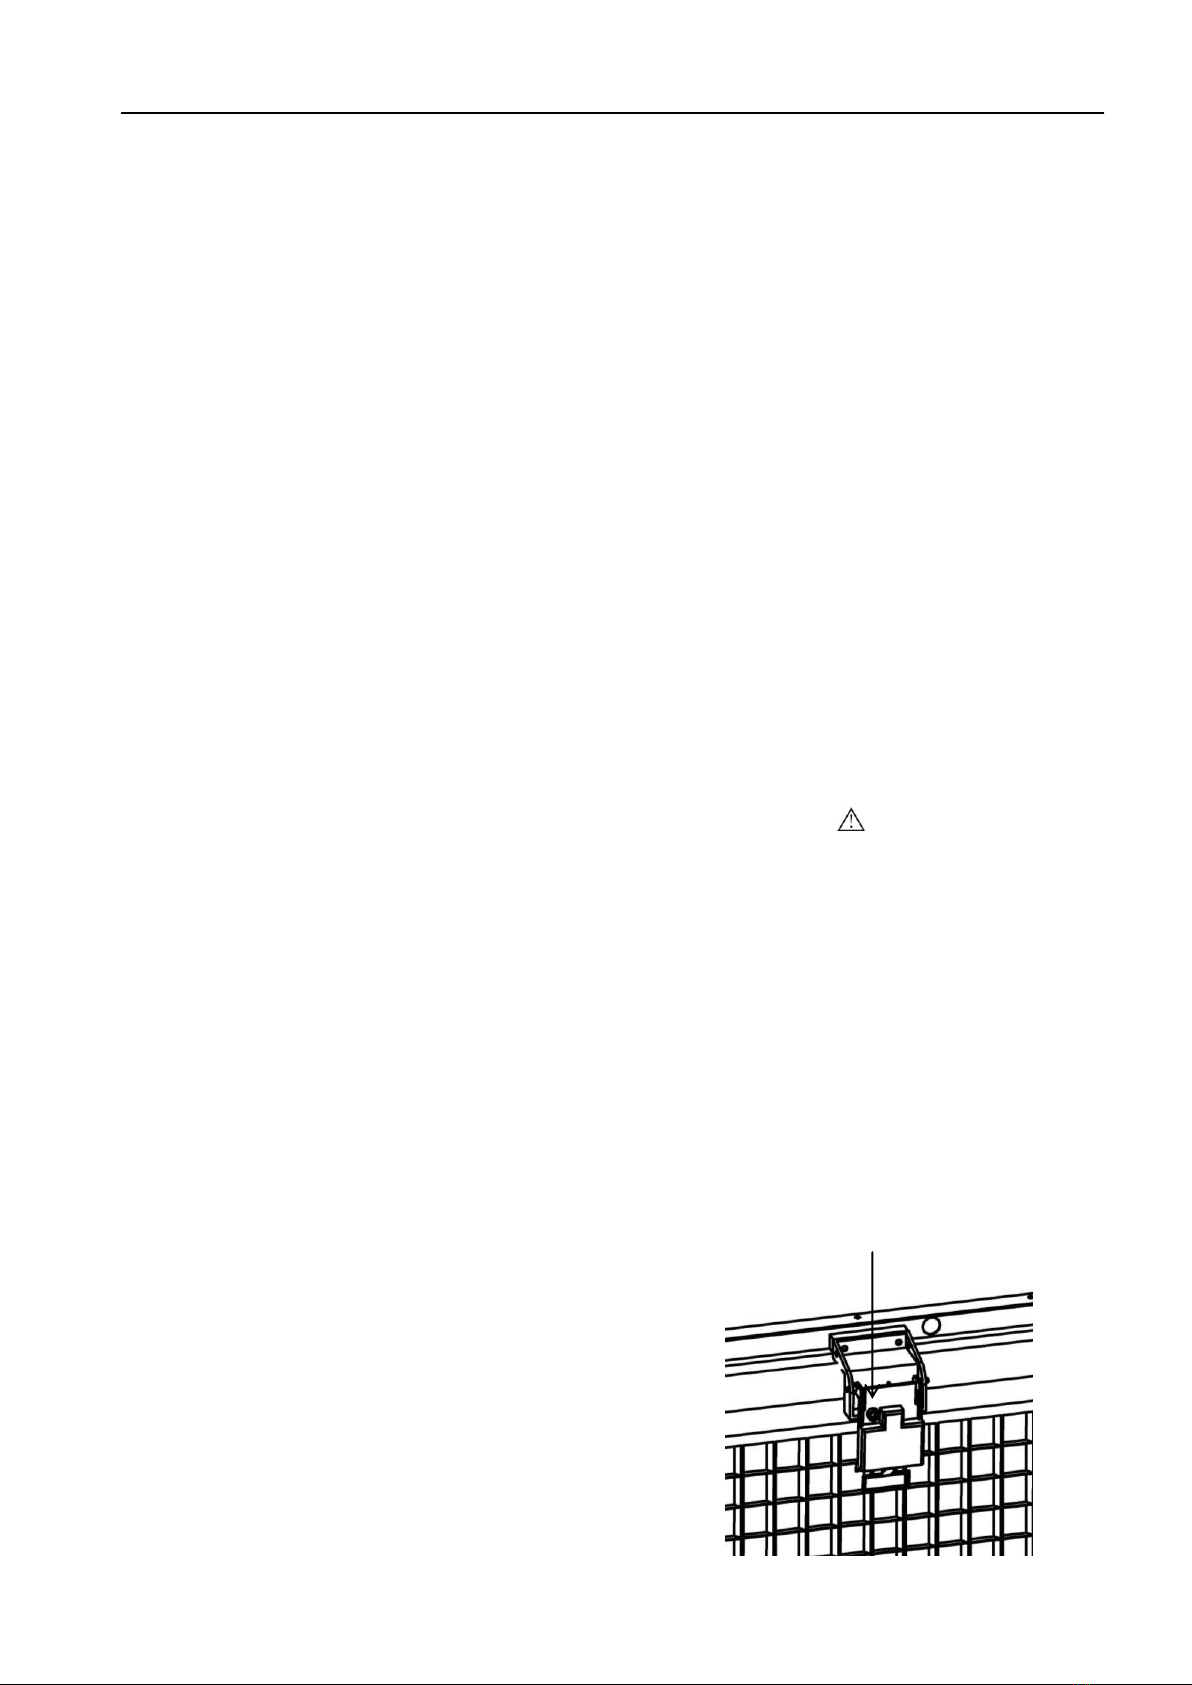
Clean the filter net (only applicable to air cooling machine)regularly, As
shown by picture:
Ice Machine Installation and Maintenance Instructions

9/ 11
Clean the cooling fin regularly at least at every 6 months. Please use the soft
brush to work in up-and-down lightly. Don’t swipe left-and-right for fear of
damaging the cooling fin and influencing the heat dissipation effect.
2.Common Faults and Removal:
3.Conditions Not Covered By Warranty:
The following conditions are not with the scope of ice machine warranty:
A. Normal maintenance, adjustment and cleaning.
B. Modify ice machine without authorization or use the non-original parts without prior
written permission from manufacturer.
C. Damage incurred due to improper installation, power supply, water supply and drainage,
etc.
Fault Phenomenon
The possible causes of
troubleshooting
Check and eliminate
Ice Machine not
starting up
No power supply
Power switch, power wire
Automatic stop after
starting the ice machine
for 3 minutes
High pressure protection
High ambient temperature,
dirty condenser , high voltage
switch, air cooled motor
Ice machine can only
make ice once
whenever it starts
Ice full
Ice sliding board
Ice cannot fall
Ice machine is dirty, the
ambient temperature is low
Clean, ambient temperature up
to requirement.
Ice is too thin or
incomplete
Tank water level is too low,
inlet valve doesn’t work,
water pressure is not
enough 、waterway is not
smooth
Check water level, water inlet
valve, water pressure and
pipeline
Ice making is too slow
Condenser is dirty, high
ambient temperature and poor
ventilation
Clean the filter and condenser,
keep specific spacing around the
machine
Ice Machine Installation and Maintenance Instructions
Take out all the filter nets along the
direction of arrow on both sides, and put
back the net into the ventilation window
after dusting by soft brush.
10 / 11
D. Additional labor fee due to holidays, overtime, etc., travel expenses during the travel
and reimbursement, etc. The extra expenses caused by inconvenience of maintenance.
E. Damage parts caused by misuse, abuse or negligence.
F. Damage or malfunction incurred caused by failure to follow the installation cleaning or
maintenance of the ice machine in the manual.
G. Other external damages not mentioned above.
IV. Attachment
Please refer to the attached list in detail.
V. Annex
1. Error Codes:
Code
Annotation
Machine Action
E00
No fault
Operating
E01
Ice sliding board fault
Protection
Shutdown
E02
Overtime ice making fault
Protection
Shutdown
E03
Overtime ice-shedding fault
Protection
shutdown
E04
High temperature fault (voice announcement
pressure beyond limit)
Protection
shutdown
E05
Water shortage fault
Protection
shutdown
E06
Excess of pressure limit fault
Protection
shutdown
E07
Condensation sensor open circuit fault, display
once every 5 seconds
Non stop
E08
Condensation sensor short circuit fault, display
once every 5 seconds
Non stop
2.Circuit Diagrams
Please refer to the machine body in detail.
Ice Machine Installation and Maintenance Instructions


TRUFROST COOLING PRIVATE LIMITED
509, 5th Floor, Emaar Palm Springs Plaza, Golf Course Road,
Sector 54, Gurugram- 122011, India
T. +91-124-2570524 info@trufrost.com
www.trufrost.com
This manual suits for next models
6
Table of contents
Other Trufrost Ice Maker manuals


