TRUlink 89030 User manual

1
USER GUIDE
TRULINK™2-PORT DVI SPLITTER/EXTENDER
BENUTZERHANDBUCH
TRULINK™DVI-SPLITTER/EXTENDER MIT 2ANSCHLÜSSEN
GUIDE D’UTILISATION
REPARTITEUR/ANTENNE 2PORTS DVI TRULINK™
MANUALE DELL’UTENTE
SPLITTER/EXTENDER DVI A 2PORTE TRULINK™
HANDLEIDING
TRULINK™2-POORTS DVI-SPLITTER/VERLENGER
GUÍA DEL USUARIO
DIVISOR/ALARGADOR DVI-D DE 2PUERTOS TRULINK™
Model: 89030
™

1
TABLE OF CONTENTS
TABLE OF CONTENTS
Introduction.............................................................. 2
Features .................................................................. 3
System Requirements.............................................. 4
Package Contents.................................................... 5
Device Overview...................................................... 6
Device Installation.................................................... 7
Technical Specifications........................................... 9
Cables To Go One Year Warranty.......................... 10
Important Safety Information.................................. 11
TABLE DES MATIERES
Introduction.............................................................. 2
Fonctions................................................................. 3
Configuration du système ........................................ 4
Contenu du pack...................................................... 5
Vue générale du périphérique.................................. 6
Installation du périphérique...................................... 7
Caractéristiques techniques..................................... 9
Garantie d'un an Cables To Go.............................. 10
Informations de sécurité importantes...................... 11
INHOUDSOPGAVE
Inleiding ...................................................................2
Onderdelen..............................................................3
Systeemvereisten.....................................................4
Inhoud verpakking....................................................5
Overzicht apparaat...................................................6
Installatie apparaat...................................................7
Technische specificaties ..........................................9
Cables To Go 1 jaar garantie..................................10
Belangrijke veiligheidsinformatie.............................11
INHALTSVERZEICHNIS
Einführung ................................................................2
Merkmale..................................................................3
Systemanforderungen...............................................4
Packungsinhalt..........................................................5
Geräteübersicht ........................................................6
Geräteinstallation......................................................7
Technische Daten .....................................................9
Einjährige Garantie von Cables To Go ....................10
Wichtige Sicherheitshinweise ..................................11
INDICE
Introduzione............................................................. 2
Caratteristiche ......................................................... 3
Requisiti di Sistema ................................................. 4
Contenuto della confezione...................................... 5
Panoramica del dispositivo....................................... 6
Installazione del dispositivo...................................... 7
Specifiche tecniche.................................................. 9
Cables To Go One un anno di garanzia ................. 10
Importanti informazioni sulla sicurezza................... 11
INDICE
Introducción............................................................. 2
Características......................................................... 3
Requisitos del sistema............................................. 4
Contenido del paquete............................................. 5
Descripción general del dispositivo .......................... 6
Instalación del dispositivo ........................................ 7
Especificaciones técnicas ........................................ 9
Un año de garantía Cables to Go........................... 10
Información de seguridad importante ..................... 11

2
INTRODUCTION
Thank you for purchasing the TruLink™DVI-D Monitor Splitter/Extender. The TruLink™DVI-D Monitor Splitter/Extender enables you to simultaneously distribute a DVI-D signal to two video
displays, while boosting the signal up to 10 m (32.8 feet). The device is powerful yet easy to use, with no software or complicated interface cards to install. Simply connect monitor cables and
power it on. The TruLink™Splitter/Extender is useful in many settings, from monitor testing and multimedia presentations to trade show exhibits and classroom use. Splitters are also popular
in small digital signage applications to display news headlines, stock prices, airline flights, train schedules and more. We recommend that you read this manual thoroughly and retain for
future reference.
EINFÜHRUNG
Vielen Dank, dass Sie den Trulink™DVI-D Monitor-Splitter/Extender gekauft haben. Der TruLink™DVI-D Monitor-Splitter/Extender ermöglicht es Ihnen, ein DVI-D-Signal gleichzeitig zu zwei
Videoanzeigegeräten zu verteilen, und er verstärkt gleichzeitig das Signal auf bis zu 10 m. Das Gerät ist leistungsfähig und doch einfach zu verwenden, und es müssen keine Software
installiert und keine komplizierten Schnittstellenkarten eingebaut werden. Schließen Sie einfach die Monitorkabel an und schalten Sie es ein. Der TruLink™Splitter/Extender ist in vielen
Umgebungen nützlich, vom Testen von Monitoren und Multimedia-Präsentationen bis hin zu Messeausstellungen und der Verwendung im Klassenzimmer. Splitter sind auch beliebt bei
kleineren digitalen Beschilderungsanwendungen, um die neuesten Schlagzeilen, Aktienkurse, Flüge, Zugfahrpläne und mehr anzuzeigen. Bitte lesen Sie dieses Handbuch sorgfältig
durch und bewahren Sie es zum zukünftigen Nachschlagen auf.
INTRODUCTION
Merci d’avoir acheté le répartiteur d’écran/extension DVI-D TruLink™. Il permet de distribuer simultanément un signal DVI-D à deux écrans, tout en augmentant le signal jusqu’à 10 m. Ce
périphérique est puissant et facile à utiliser, sans aucun logiciel ou interface compliquée à installer. Brancher simplement les câbles du moniteur et le mettre sous tension. Le
répartiteur/extension TruLink™est utile dans de nombreux contextes, allant du test de moniteur aux présentations multimédias pour les salons commerciaux et les utilisations scolaires. Les
répartiteurs sont aussi très appréciés dans les petites applications de signalisation numérique, pour afficher les titres des nouvelles, les cours boursiers, les horaires des trains, des vols, et
bien plus. Nous recommandons de lire attentivement ce manuel et de le conserver pour toute référence ultérieure.
INTRODUZIONE
Grazie per aver acquistato lo Splitter/Extender monitor DVI-D TruLink™. Lo Splitter/Extender monitor DVI-D TruLink™consente di distribuire contemporaneamente un segnale DVI-D a due
display video, amplificando il segnale fino a 10 m. Il dispositivo è potente e non facile di usare. Non è necessario installare alcun software o complicate schede di interfaccia. È sufficiente
collegare i cavi del monitor e accenderlo. Lo Splitter/Extender TruLink™è utile in molte impostazioni, dal test dei monitor e dalle presentazioni multimediali a fiere e utilizzo in aula. Gli Splitter
sono inoltre popolari nelle applicazioni di segnali digitali, per visualizzare nuovi titoli, prezzi di titoli, voli aerei, orari di treni e tanto altro ancora. Si consiglia di leggere il presente manuale
attentamente e di conservarlo per riferimento futuro.
INLEIDING
Hartelijk dank voor uw aanschaf van de TruLink™DVI-D monitor splitter/verlenger. De TruLink™DVI-D monitor splitter/verlenger stelt u in staat om tegelijkertijd een DVI-D siggnaal naar twee
videoschermen te versturen, terwijl het signaal tot 10 m wordt versterkt. Het apparaat is krachtig maar gemakkelijk in het gebruik, zonder dat u software of ingewikkelde interfacekaarten hoeft
te installeren. Sluit gewoon de monitorkabels aan en schakel de stroom in. De TruLink™splitter/verlenger is handig bij vele instellingen, van het testen van de monitor en
multimediapresentaties tot handelspresentaties op een beurs en het gebruik in een klaslokaal. Splitters zijn ook populair bij kleine digitale bewegwijzeringstoepassingen om nieuwskoppen,
aandelenkoersen, vluchten, treintijden enz. te tonen. We raden u aan deze handleiding goed door te lezen en te bewaren voor gebruik in de toekomst.
INTRODUCCIÓN
Le agradecemos que haya adquirido el divisor/alargador para monitor DVI-D TruLink™. El divisor/alargador para monitor DVI-D TruLink™permite distribuir simultáneamente una señal DVI-D a
dos pantallas de vídeo al tiempo que potencia la señal hasta 10 m. Se trata de un dispositivo potente pero que no por ello deja de ser fácil de usar, ya que no hay que instalar ningún
software ni complicadas tarjetas de interconexión. No tiene más que conectarle los cables del monitor y encenderlo. El divisor/alargador TruLink™es útil para muchas aplicaciones, desde
testeo de monitores y presentaciones multimedia hasta exposiciones en ferias comerciales y apoyo de las explicaciones en el aula. El uso de divisores está también muy extendido en la
señalización digital para mostrar en pantallas titulares periodísticos, el precio de las acciones en la bolsa, los vuelos de las aerolíneas, los horarios de los trenes y mucho más. Es
recomendable que lea atentamente este manual y que lo guarde para poder consultarlo en el futuro.
INTRODUCTION

3
FEATURES
FEATURES
Connectors – DVI-D Female Input (1), DVI-D Female
Outputs (2)
Durable All-Metal Housing
Power-Saving Mode
No Software Required
Transmission distance of up to10 m (32.8 feet)
Suitable for WUXGA, UXGA, SXGA, SVGA, and VGA
monitors
Daisy-Chain multiple units together to support additional
displays
Supports EDID and HDCP
1920 x 1080 Maximum Resolution
Please note: The term "extender" refers to the ability of the
product to extend the distance of your cable runs to 10 m
(32.8 feet). It does not mean the product provides "extended
desktop" functionality, or the ability to view different
information on each of your monitors.
FONCTIONS
Connecteurs – entrée DVI-D femelle (1), sorties DVI-D
femelles (2)
Boîtier durable entièrement métallique
Mode économie d’énergie
Aucun logiciel requis
Transmission sur une distance de plus de 10 m
Convient pour des moniteurs WUXGA, UXGA, SXGA,
SVGA, et VGA
Mettre des unités multiples en série pour prendre en
charge des écrans supplémentaires
Prend en charge les spécifications EDID et HDCP
Résolution maximale 1920 x 1080
Remarque : le terme « extension » renvoie à la capacité du
produit à prolonger la distance de votre câble à 10 mètres.
Cela ne signifie pas que le produit fournit une fonction
«extension de bureau », ou la possibilité de visualiser des
informations différentes sur chacun de vos moniteurs.
FUNZIONI
Connettori – Ingresso femmina DVI-D (1), uscita femmina
DVI-D (2)
Alloggiamento resistente in metallo
Modalità di risparmio energia
Nessun software necessario
Distanza di trasmissione fino a 10 m
Adatto per monitor WUXGA, UXGA, SXGA, SVGA e VGA.
Unità multiple Daisy-Chain per supportare display
aggiuntivi.
Supporta EDID e HDCP
Risoluzione massima 1920 x 1080
Nota: il termine “extender” si riferisce alla capacità del
prodotto di estendere la distanza del cavo fino a 10 m. Non
significa che il prodotto fornisca funzionalità di "desktop
esteso", oppure la possibilità di visualizzare diverse
informazioni su ognuno dei monitor.
KENMERKEN
Connectoren - DVD-D vrouwtje ingang (1), DVI-D vrouwtje
uitgangen (2)
Duurzame, geheel metalen behuizing
Stroombesparende modus
Geen software nodig
Overdrachtafstand tot maximaal 10 m
Geschikt voor WUXGA, UXGA, SXGA, SVGA en VGA
monitoren
Daisy-chain meerdere units tezamen om aanvullende
displays te ondersteunen
Ondersteunt EDID en HDCP
1920 x 1080 maximale resolutie
Let op: De term “verlenger” heeft betrekking op het vermogen
van het product om de afstand van de kabel te verlengen tot
10 meter. Dit betekent niet dat het product een verlenging of
uitbreiding van de desktop levert, of dat op elk van de
monitoren andere informatie kan worden weergegeven.
CARACTERÍSTICAS
Conectores: 1 entrada DVI-D hembra, 2 salidas DVI-D
hembra
Carcasa totalmente de metal, duradera
Modo de ahorro de energía
No es necesario ningún software
Distancia de transmisión hasta 10 m
Apto para monitores WUXGA, UXGA, SXGA, SVGA y
VGA
Las unidades se conectan en cadena de margarita para
que así se puedan usar con más dispositivos de
visualización
Compatible con EDID y HDCP
Resolución máxima 1920 x 1080
Atención: El término “alargador” se refiere a la capacidad
del producto de alargar la distancia de extensión de los
cables hasta 10 m. No implica que el producto sirva para
“alargar el escritorio” o para que se pueda ver información
diferente en cada uno de los monitores.
MERKMALE
Anschlüsse – DVI-D-Buchseneingang (1), DVI-D-
Buchsenausgang (2)
Haltbares Ganzmetallgehäuse
Energiesparmodus
Keine Software erforderlich
Übertragungsstrecke bis 10 m
Geeignet für WUXGA-, UXGA-, SXGA-, SVGA- und
VGAc-Monitore.
Reihenschaltung mehrerer Geräte zur Unterstützung
zusätzlicher Anzeigegeräte
Unterstützt EDID und HDCP
Maximale Auflösung 1920 x 1080
Bitte beachten: Der Begriff „Extender“ bezieht sich auf die
Fähigkeit des Produkts, die Strecke des Kabelverlaufs auf 10
Meter zu erweitern. Er bedeutet nicht, dass das Produkt
„erweiterte Desktop“-Funktionalität oder die Möglichkeit bietet,
verschiedene Informationen auf jedem Monitor anzuzeigen.

4
SYSTEM REQUIREMENTS
SYSTEM REQUIREMENTS
A system with a DVI-D capable video card
One Male to Male DVI-D cable to connect the
computer to the splitter
Two Male to Male DVI-D cables to connect the
monitors to the splitter
REQUISITOS DEL SISTEMA
Sistema con tarjeta de vídeo que admita DVI-D
Un cable DVI-D macho a macho para conectar el
ordenador al divisor
Dos cables DVI-D macho a macho para conectar
los monitores al divisor
SYSTEEMVEREISTEN
Een systeem met een voor DVI-D geschikte
videokaart
Eén mannetje/mannetje DVI-D kabel om de
computer op de splitter aan te sluiten
Eén mannetje/mannetje DVI-D kabel om de
computer op de splitter aan te sluiten
REQUISITI DI SISTEMA
Un sistema con una scheda video DVI-D
Un cavo da maschio a maschio DVI-D per
collegare il computer allo splitter
Due cavi da maschio a maschio DVI-D per
collegare i monitor allo splitter
SYSTEMANFORDERUNGEN
Alle Systeme mit einer DVI-D-fähigen Grafikkarte
Ein DVI-D-Kabel mit zwei Steckern zum
Anschließen des Computers an den Splitter
Zwei DVI-D-Kabel mit zwei Steckern zum
Anschließen der Monitore an den Splitter
CONFIGURATION DU SYSTÈME
Un système avec une carte vidéo DVI-D
Un câble DVI-D mâle/mâle pour brancher
l’ordinateur au répartiteur
Deux câbles DVI-D mâle/mâle pour brancher
les moniteurs au répartiteur

5
PACKAGE CONTENTS
PACKAGE CONTENTS
2-Port DVI-D Splitter/Extender
Universal (UK-EU)Power Adapter
User Manual
Set of foot pads for the bottom of the unit
PACKUNGSINHALT
DVI-D Splitter/Extender mit 2 Anschlüssen
Universal-Netzadapter (UK-EU)
Benutzerhandbuch
Satz Fußpads für die Unterseite des Geräts.
CONTENIDO DEL PAQUETE
Divisor/alargador DVI-D de 2 puertos
Adaptador de corriente universal (Reino Unido-
UE)
Guía del usuario
Juego de almohadillas para patas de aparatos,
para la parte inferior de la unidad
INHOUD VERPAKKING
2-poorts DVI-D splitter/verlenger
Universele (GB-EU) Stroomadapter
Gebruiksaanwijzing
Set voetsteunen voor de onderzijde van de unit
CONTENUTO DELLA CONFEZIONE
Splitter/Extender DVI-D a 2 porte
Adattatore di alimentazione universale (UK-UE)
Manuale per l’utente
Insieme di piedini per la base dell’unità
CONTENU DU PACK
Répartiteur/antenne 2 ports DVI TruLink®
Adaptateur universel (RU-UE)
Manuel d'utilisation
Jeu de tampons pour les pieds de l'appareil

6
DEVICE OVERVIEW /GERÄTEÜBERSICHT /VUE GÉNÉRALE DE L’APPAREIL /PANORAMICA DISPOSITVO
OVERZICHT APPARAAT /DESCRIPCIÓN GENERAL DEL DISPOSITIVO /

7
DEVICE INSTALLATION
Hinweis:
Schalten Sie vor dem Anschließen an den
Splitter den Computer und beide Anzeigegeräte aus.
Schritt 1: Schließen Sie das DVI-D-Kabel mit zwei
Steckern an den DVI-D-Ausgang des Computers und an
den Eingang am Splitter an.
Schritt 2: Schließen Sie ein DVI-D-Kabel mit zwei
Steckern an jeden Ausgang des Splitters und an den DVI-
D-Eingang an beiden Monitoren an.
Schritt 3: Schließen Sie den mitgelieferten Netzadapter
an die Splitter/Extender-Einheit an. Schließen Sie den
Netzadapter an eine freie Steckdose an.
Schritt 4: Schalten Sie schließlich den Splitter/Extender
und beide Monitore ein.
Die ACTIVE-LED leuchtet, wenn ein Videosignal am
Eingangsanschluss empfangen wird. Die POWER-LED
leuchten, wenn der Videosplitter vom 9-V-Netzadapter
eingeschaltet wird. Wenn beide Lämpchen leuchten, sollten
Sie ein Videosignal an den angeschlossenen Monitoren
empfangen.
Note:
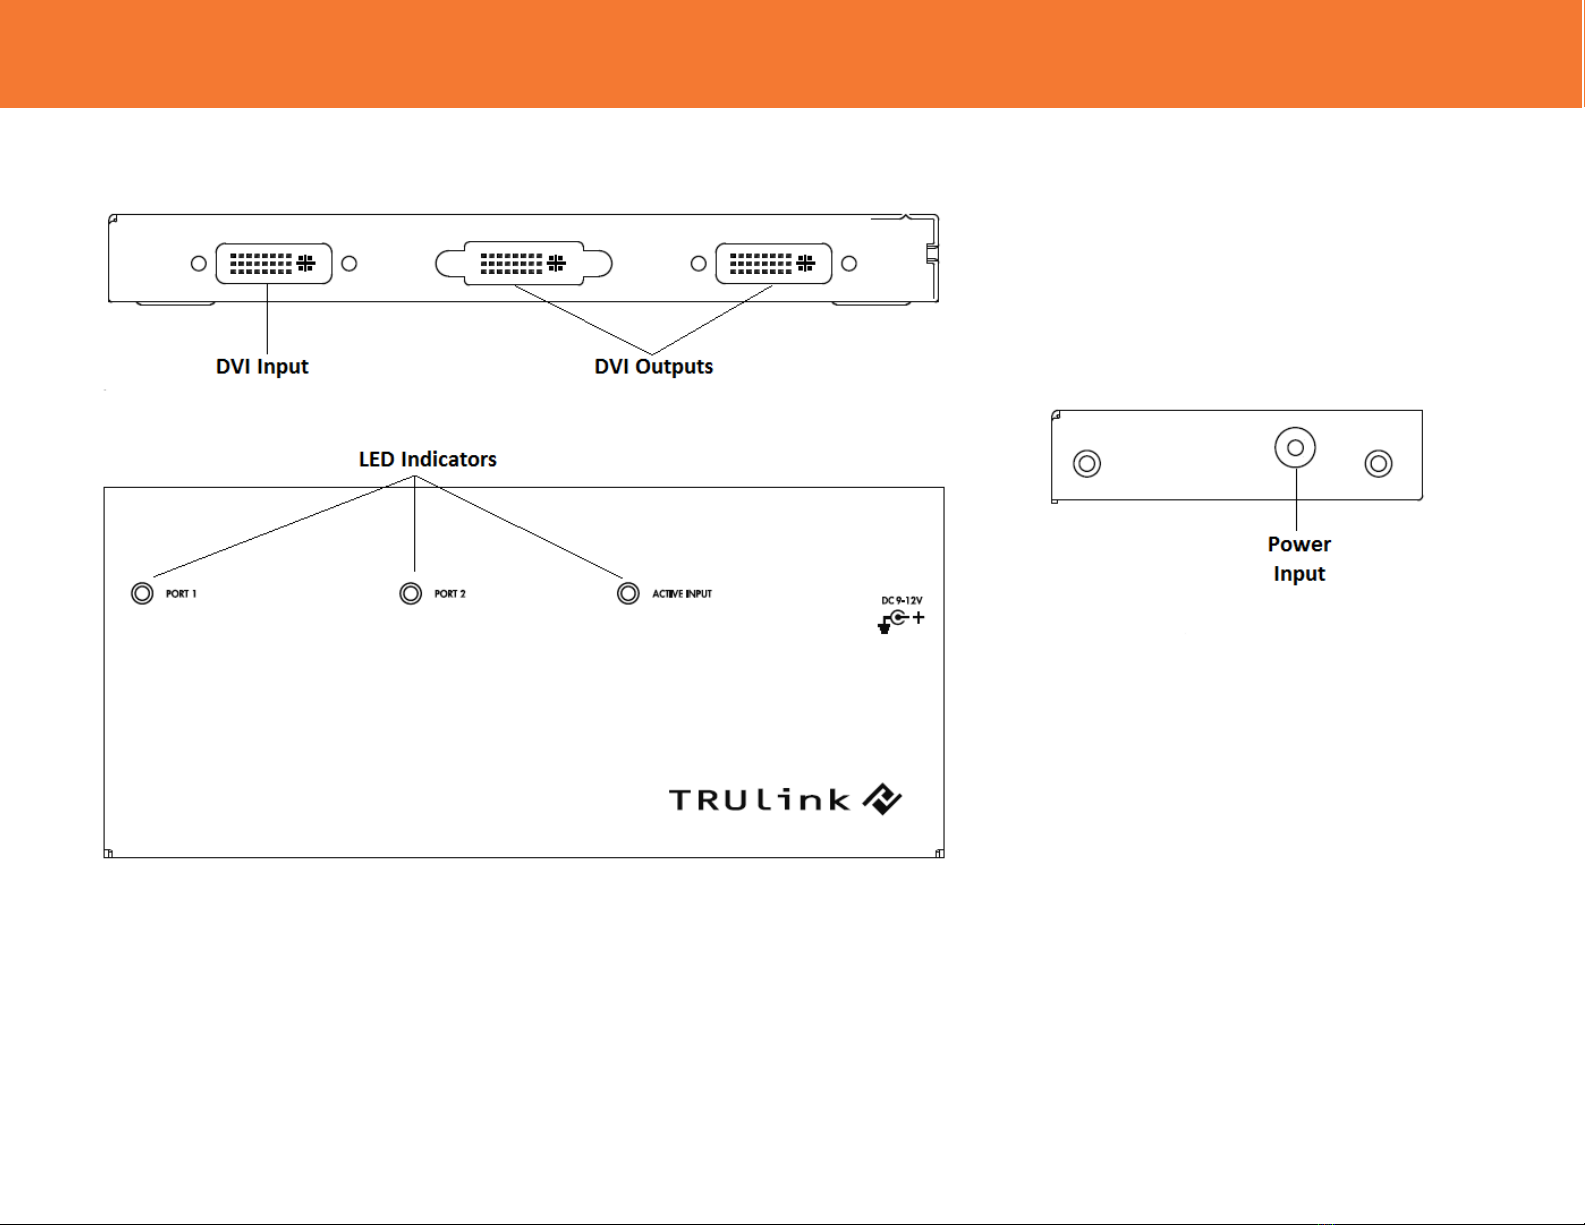
Be sure that you first power off the computer and
both monitors before making the connections to the
splitter.
Step 1: Connect your male to male DVI-D cable from the
DVI-D output of the computer to the input on the splitter
Step 2: Connect a male to male DVI-D cable from each
output of the splitter to the DVI-D input on both monitors.
Step 3: Connect included AC/DC power adapter to the
splitter extender unit. Connect AC/DC adapter to available
power outlet.
Step 4: Finally power on the splitter extender and both
monitors.
The ACTIVE LED illuminates when there is a video signal at
the Input port. The POWER LED illuminates when the Video
Splitter is powered up by the DC 9V power adapter. If both
lights are illuminated, then you should be receiving a video
signal on the connected monitors.
Nota:
assicurarsi di scollegare prima l’alimentazione al
computer e a entrambi i monitor prima di collegare lo
splitter.
Fase 1: Collegare il cavo DVI-D maschio-maschio
dall’uscita DVI-D del computer all’ingresso sullo splitter
Fase 2: Collegare un cavo maschio-maschio DVI-D da
ogni uscita dello splitter all’ingresso DVI-D su ogni
monitor.
Fase 3: Collegare l’adattatore di alimentazione CA/CC
incluso all'unità dello splitter/extender. Collegare
l’adattatore CA/CC all’uscita di alimentazione disponibile.
Fase 4: Infine, accendere lo splitter/extender ed entrambi
i monitor.
Il LED ATTIVO si illumina quando è presente un segnale
video alla porta di ingresso. Il LED di alimentazione si illumina
quando lo splitter video è alimentato dall’adattatore di
alimentazione 9 V CC. Se entrambe le spie sono illuminate, si
dovrebbe ricevere un segnale video sui monitor collegati.
Opmerki
ng:
Zorg ervoor dat u eerst de computer en
beide monitoren uitschakelt voordat u de verbindingen
met de splitter gaat maken.
Stap 1: Sluit uw mannetje/mannetje DVI-D kabel vanuit
de DVI-D uitgang van de computer aan op de ingang op
de splitter
Stap 2: Sluit een mannetje/mannetje DVI-D kabel vanuit
iedere uitgang van de splitter aan op de DVI-D ingang op
beide monitoren.
Stap 3: Sluit de meegeleverde AC/DC-stroomadapter aan
op de splitter/verlenger-unit. Sluit de AC/DC-adapter aan
op de stroomvoorziening.
Stap 4: Sluit tenslotte de splitter/verlenger en beide
monitoren aan op de stroom.
De LED ‘ACTIVE’ gaat branden als er een videosignaal op de
ingangspoort is. De LED ‘POWER’ gaat branden als de
videosplitter door de DV 9V van stroom wordt voorzien. Als
beide lampjes verlicht zijn, dient u een videosignaal van de
aangesloten monitoren te ontvangen.
Nota:
Acuérdese de apagar primero el ordenador y los
dos monitores antes de efectuar las conexiones al divisor.
Paso 1: Conecte el cable DVI-D macho a macho de la
salida DVI-D del ordenador a la entrada del divisor.
Paso 2: Conecte un cable DVI-D macho a macho de cada
salida del divisor a la entrada DVI-D de ambos monitores.
Paso 3: Conecte el adaptador de CA/CC del kit al
alargador/divisor. Conecte el adaptador de CA/CC a una
toma de corriente libre.
Paso 4: Por último encienda el divisor/alargador y ambos
monitores.
El ACTIVE LED se ilumina cuando hay una señal de vídeo en
el puerto de entrada. El POWER LED se ilumina cuando el
divisor de vídeo recibe corriente del adaptador de CC de 9 V.
Si se iluminan los dos LED, tiene que recibir una señal de
vídeo en los monitores conectados.
Remarque :
s’assurer d'éteindre l’ordinateur et les deux
moniteurs avent d’effectuer le branchement au répartiteur.
Étape 1 : brancher le câble DVI-D mâle/mâle de la sortie DVI-
D de l’ordinateur, à l'entrée du répartiteur
Étape 2 : brancher le câble DVI-D mâle/mâle de chaque sortie
du répartiteur à l’entrée DVI-D de chacun des deux moniteurs.
Étape 3 : brancher l’adaptateur universel CA/CC fourni au
répartiteur/antenne. Brancher l’adaptateur CA/CC à une prise
secteur.
Étape 4 : enfin, mettre sous tension le répartiteur/antenne et
les deux moniteurs.
La DEL ACTIVE s’allume lorsqu’il existe un signal vidéo au
port d’entrée La DEL de mise en marche (POWER) s’allume
lorsque le répartiteur vidéo est sous tension grâce à
l'adaptateur CC 9 V. Si les deux témoins sont allumés, les
moniteurs branchés doivent recevoir un signal vidéo.

8
DEVICE INSTALLATION APPLICATION DIAGRAMS

9
Part Number 89030
Maximum Supported Resolution 1920 x 1080 (1080p)
Signal type WUXGA, UXGA, SXGA, SVGA, and VGA
LED Power (Green) x 1
Active (Blue) x 1
Maximum Cable Length Supported 10 m (32.8 ft)
Connector – Input DVI-D Female x 1
Connectors - Output DVI-D Female x 2
Power Consumption DC 12V, 150 mA Normal Operation
10 mA, power-save mode
Enclosure Metal
Weight 0.45 kg
Dimensions 2 x 18 x 8.5 cm
TECHNICAL SPECIFICATIONS /TECHNISCHE DATEN /CARACTERISTIQUES TECHNIQUES /SPECIFICHE TECNICHE /
T
ECHNISHCE
S
PECIFICATIES
/
E
SPECIFICACIONES TÉCN
ICAS

10
At Cables To Go, we want you to be totally confident in your purchase. That is why we offer a one year warranty on this device.
If you experience problems due to workmanship or material defect for the duration of this warranty, we will repair or replace this
device. To request a Return Merchandise Authorisation (RMA) number, contact customer service at 0800 328 2916 or
www.cablestogo.co.uk
Wir bei Cables To Go möchten, dass Sie mit Ihrem Kauf vollständig zufrieden sind. Deshalb bieten wir eine einjährige Garantie
auf dieses Gerät. Wenn während dieser Garantie Probleme aufgrund eines Fertigungs- oder Materialfehlers auftreten,
reparieren oder ersetzen wir dieses Gerät. Wenden Sie sich zum Anfordern einer Return Merchandise Authorization (RMA)-
Nummer an unseren Kundenservice unter 0800 328 2916 oder www.cablestogo.co.uk.
Chez Cables To Go, nous voulons que vous soyez complètement satisfait de votre achat. C'est pourquoi vous bénéficiez d'un
an de garantie sur cet appareil. Si vous rencontrez des problèmes liés à des défauts matériels ou de fabrication pendant la
durée de cette garantie, nous réparerons ou remplacerons cet appareil. Pour demander un numéro d'autorisation de retour de
marchandise (ARM), contactez le service client au 0800.328.2916 ou www.cablestogo.co.uk.
Alla Cables To Go, vogliamo che i nostri clienti abbiano totale fiducia nei loro acquisti. Ecco perché, su questo dispositivo
offriamo una garanzia di un anno. Qualora nel corso del periodo coperto da garanzia dovessero verificarsi problemi legati alla
manodopera o ai materiali utilizzati, sarà nostra cura occuparci della riparazione o della sostituzione del dispositivo. Per
richiedere un numero RMA (Return Merchandise Authorization / autorizzazione alla restituzione della merce), contattare il
Servizio Clienti al numero 0800 328 2916 o visitare il sito www.cablestogo.co.uk.
Bij Cables To Go willen we dat u volledig op uw aankoop kunt vertrouwen. Daarom bieden we een garantie van een jaar op dit
apparaat. Als u problemen ondervindt door slecht vakmanschap of een materieel defect tijdens de garantieperiode, zullen we
het apparaat repareren of vervangen. Als u een RMA-nummer (Return Merchandise Authorization - Toestemming voor retour
van consumentenproducten) wilt, kunt u contact opnemen met klantenservice op 0800 328 2916 of via www.cablestogo.co.uk.
En Cables To Go queremos que confíe completamente en su compra. Esa es la razón por la que ofrecemos un año de
garantía en este dispositivo. Si experimenta problemas debidos a mano de obra o defectos de material durante el periodo de
validez de esta garantía, repararemos o sustituiremos este dispositivo. Para solicitar un número de autorización de devolución
de mercancía, contacte con el servicio de atención al cliente en el número de teléfono 0800 328 2916 o visite
www.cablestogo.co.uk
CABLES TO GO®ONE YEAR WARRANTY /EINJÄHRIGE GARANTIE VON CABLES TO GO®/GARANTIE D'UN AN DE
CABLES TO GO®/GARANZIA DI UN ANNO CABLES TO GO®/CABLES TO GO®EÉNJAARSGARANTIE /UN AÑO DE
GARANTÍA CABLES TO GO®

11
Cables To Go
3555 Kettering Blvd.
Moraine, OH 45439
1-800-506-9607
www.cablestogo.com
!Do not plug the unit in any outlet that does not have enough current to allow the device to function. Refer to the
specifications in this manual for power level of the unit.
I
MPORTANT
S
AFETY
I
NFORMATION
Do not plug the unit in any outlet that does not have enough
current to allow the device to function. Refer to the specifications
in this manual for power level of the unit.
Liquid: If this unit or its corresponding power adapter has had
liquid spilled on or in it, do not attempt to use the unit. Do not
attempt to use this product in an outdoor environment as
elements such as rain, snow, hail, etc. can damage the product.
In case of a storm, it is recommended that you unplug this device
from the outlet.
Avoid placing this product next to objects that produce heat such
as portable heaters, space heaters, or heating ducts.
THERE ARE NO USER SERVICEABLE PARTS. Do not attempt
to open this product and expose the internal circuitry. If you feel
that the product is defective, unplug the unit and refer to the
warranty information section of this manual.
W
ICHTIGE
S
ICHERHEITSHINWEISE
Schließen Sie das Gerät nicht an eine Steckdose an, die nicht
genug Strom für das Gerät liefert. Die entsprechenden Daten für
das Gerät finden Sie in diesem Handbuch.
Flüssigkeit: Wenn auf dieses Gerät oder den dazugehörigen
Netzadapter Flüssigkeiten geschüttet wurden, darf es/er nicht
verwendet werden. Verwenden Sie dieses Produkt nicht im
Freien, da Regen, Schnee, Hagel usw. das Produkt beschädigen
können. Ziehen Sie bei einem Gewitter den Netzstecker des
Geräts.
Stellen Sie dieses Produkt nicht in der Nähe von Gegenständen
auf, die Hitze erzeugen, zum Beispiel tragbare Heizgeräte,
Heizöfen oder Heizungsleitungen.
ES BEFINDEN SICH KEINE VOM BENUTZER
REPARIERBAREN TEILE IM GERÄT. Versuchen Sie nicht, das
Produkt zu öffnen und den internen Schaltkreis freizulegen. Wenn
das Produkt defekt ist, ziehen Sie den Netzstecker und sehen Sie
im Abschnitt mit den Garantieinformationen in diesem Handbuch
nach.
I
NFORMATIONS DE SECUR
ITE IMPORTANTES
Pour permettre à l'appareil de fonctionner, ne branchez pas l'unité sur
une prise ne délivrant pas assez de courant. Reportez-vous aux
spécifications de ce manuel pour connaître le niveau d'alimentation de
l'unité.
Liquide : Si du liquide s'est répandu sur ou à l'intérieur de cette unité
ou son adaptateur d'alimentation correspondant, n'essayez pas
d'utiliser cette unité. N'essayez pas d'utiliser ce produit dans un
environnement extérieur car des éléments tels que la pluie, la neige,
la grêle, etc. peuvent endommager ce produit.
En cas de tempête, il est recommandé de débrancher cet appareil de
la source de courant.
Évitez de placer ce produit près d'objets produisant de la chaleur
comme les appareils de chauffage portables ou non et les conduits de
chauffage
AUCUNE PIÈCE NE NÉCESSITE D'ÊTRE ENTRETENUE PAR
L'UTILISATEUR. N'essayez pas d'ouvrir ce produit et d'exposer sa
circuiterie interne. Si vous pensez que ce produit présente des
défauts, débranchez l'unité et reportez-vous à la section de ce guide
comportant des informations de garantie.
I
NFORMAZIONI DI SICUR
EZZA IMPORTANTI
Non collegare l'unità a prese che non dispongono di un quantitativo di
corrente sufficiente a garantire il corretto funzionamento del
dispositivo. Consultare le specifiche tecniche presenti in questo
manuale per maggiori informazioni relative al livello energetico del
dispositivo.
Liquidi: Se l'unità o il relativo alimentatore entrano in contatto con dei
liquidi, non cercare di utilizzare il dispositivo. Non cercare di utilizzare
il prodotto in presenza di pioggia, neve, grandine, ecc. Il dispositivo si
potrebbe danneggiare.
In caso di temporale si consiglia di scollegare il dispositivo dalla presa
di corrente.
Evitare di posizionare il dispositivo nelle vicinanze di oggetti che
producono calore come ad esempio stufette portatili, convettori termici
o condotti di riscaldamento.
IL DISPOSITIVO NON CONTIENE PARTI CHE POSSONO ESSERE
RIPARATE DALL’UTENTE. Non cercare di aprire il prodotto fino a
scoprire i circuiti interni. Se si ritiene che il prodotto sia difettoso,
scollegare l'unità e consultare la sezione informativa sulla garanzia
all'interno del presente manuale.
B
ELANGRIJKE VEILIG
HEIDSINFORMATIE
Sluit de unit niet aan op een stopcontact dat niet genoeg spanning
levert om het apparaat te laten functioneren. Raadpleeg de
specificaties in deze handleiding voor het spanningsniveau van de
unit.
Vloeistof:Als op of in deze unit of de bijbehorende stroomadapter
vloeistof is gemorst, moet de unit niet gebruiken.
Gebruik dit product niet buitenshuis aangezien regen, sneeuw, hagel
enz. schade aan het product kunnen toebrengen.
Bij onweer is het aan te bevelen dit product van de stroom af te halen.
Plaats dit product niet bij voorwerpen die hitte afgeven zoals
radiatoren, verwarmingselementen of verwarmingsbuizen.
ER ZIJN GEEN ONDERDELEN DIE DE GEBRUIKER ZELF KAN
HERSTELLEN. Dit product niet te openen en het interne circuit niet
blootstellen. Als u meent dat het product defect is, koppel de unit dan
af en raadpleeg het gedeelte in deze handleiding over de garantie-
informatie.
I
NFORMACIÓN DE SEGURI
DAD IMPORTANTE
No conecte la unidad en una salida que no disponga de suficiente
corriente como para permitir que el dispositivo funcione. Consulte en
este manual las especificaciones sobre nivel de potencia de la
unidad.
Líquidos: Si se han derramado líquidos sobre la unidad, en la unidad
o en su correspondiente adaptador de potencia, no intente utilizar la
unidad. No intente utilizar este producto en el exterior, ya que
elementos como la lluvia, la nieve, el granizo, etc. pueden dañar el
producto.
En caso de tormenta, se recomienda que desconecte este dispositivo
del enchufe.
Evite situar este producto cerca de objetos que produzcan calor,
como calefacciones portátiles, calefactores o conductos de
calefacción.
NO HAY PIEZAS QUE PUEDA REPARAR EL PROPIO USUARIO.
No intente abrir este producto y exponer la circuitería interna. Si cree
que el producto presenta algún defecto, desconecte la unidad y
consulte la sección de garantía de este manual.
IMPORTANT SAFETY INFORMATION

12
For more information on this product or to check for updated drivers,
manuals or frequently asked questions please visit our website.
Weitere Informationen über dieses Produkt und aktualisierte Treiber,
Handbücher und häufig gestellte Fragen finden Sie auf unserer Website.
Pour plus d'informations concernant ce produit ou pour rechercher des pilotes actualisés,
des manuels ou des questions souvent posées, veuillez visiter notre site web.
Per ulteriori informazioni su questo prodotto oppure per verificare la presenza di aggiornamenti di driver
e manuali o per consultare le domande frequenti, visitare il nostro sito web.
Ga voor meer informatie over dit product of over bijgewerkte stuurprogramma’s,
handleidingen of veel gestelde vragen naar onze website.
Para obtener más información sobre este producto o para comprobar controladores actualizados,
manuales o preguntas frecuentes, visite nuestro sitio web.
www.cablestogo.co.uk
VER.2.1.07.06.10
Table of contents
Other TRUlink Media Converter manuals
Popular Media Converter manuals by other brands

Johansson
Johansson 9640 KIT instruction manual

CTS
CTS HES-3112-CL-DR SERIES user manual

ZyXEL Communications
ZyXEL Communications Ethernet-to-Fiber Media Converter... user guide

Analog Devices
Analog Devices AD9266 Quick start user guide

StarTech.com
StarTech.com PATA2SATA3 instruction manual

Kramer
Kramer KDS-EN7 user manual