Truper CARBA-140 User manual

Cuando el cargador de batería esté en conectado y el interruptor esté
en la posición de encendido, tenga cuidado de que las pinzas no se
toquen.
Nunca cargue una batería en la posición de encendido, ni cargue una
batería de 6 V en la posición de 12 V
OPERACIÓN
Verifique que el área alrededor de la batería esté bien ventilada durante
la carga. Puede esparcir el gas del área soplándolo con una hoja de
cartón u otro material no metálico usándolo como abanico.
INSTRUCCIONES DE OPERACIÓN PARA EL CARGADOR Y LA
BATERÍA
Para asegurar el uso correcto del cargador y de la batería, y que la
máquina no se dañe, se debe seguir las siguientes instrucciones:
1. Instrucciones de operación para la batería a cargar.
2. Cuando la batería tiene baja la carga, generalmente la tensión de
la terminal es normal. El fenómeno físico de la poca energía es el
cambio de la gravedad en la solución en la batería. Normalmente
es de 1,28 kg/L si es menor que 1,16 kg/L significa que debe cargar
la batería
3. La tensión de la batería deja el valor normal cuando se carga o está
descargada. Es más alto cuando se carga y es más bajo cuando se
descarga. Si la tensión no regresa a su valor normal después de
media hora, significa que la batería no esta bien.
4. Este es un cargador manual y no está provisto de un indicador de
carga total, el amperímetro indica la corriente que el cargador
suministra a la batería y la intensidad dependerá del estado de
carga de ésta.
No se recomienda utilizar la lectura del amperímetro para
determinar si la batería ha sido cargada completamente.
Para determinar el nivel de carga de la batería, se debe medir de
manera frecuente la tensión en sus terminales con un voltímetro,
cuando la tensión medida se encuentre en el nivel nominal, la batería
estará cargada.
METODO DE ARRANQUE:
El uso de la función del arranque debe cumplir con el
ciclo de trabajo del producto.
1. Lea con cuidado el instructivo del motor.
2. Cargue la batería durante 10 a 15 minutos.
• Conecte cualquier electrodo del cargador a la terminal de la batería,
que no conecte al chasis, y el otro a la terminal que conecte con el
chasis.
• Revise nuevamente la conexión: Si no existe ningún problema,
coloque el interruptor del cargador en la posición de arranque y
encienda el cargador de baterías.
El ciclo de trabajo para arranque del motor
es de 3 segundos encendido y 360 segundos apagado.
(CARBA-140)
El ciclo de trabajo para arranque del motor es de 3 segundos encendido
y 240 segundos apagado. (CARBA-200)
NOTA: Si excede el lapso de 3 segundos de arranque, el cargador
sufrirá daños.
MANTENIMIENTO
• El cargador de baterías debe recibir mantenimiento y revisiones
de manera regular para poder funcionar bien y con seguridad
• No abra jamás la carcasa del cargador de batería, ni trate de
desarmarla. Solamente un Centro de Servicio Autorizado Truper,
la puede reparar.
• El periodo de garantía del cargador de batería es de 1 año. Haga
INSTRUCCIONES DE SEGURIDAD
1. Mantenga el área de trabajo en orden. Las áreas y bancos
desordenados propician accidentes
2. Observe las condiciones del área de trabajo. No utilice
máquinas o equipos eléctricos en áreas mojadas o húmedas.
No exponga su equipo a la lluvia. Mantenga el área de trabajo
bien iluminada. No utilice equipos eléctricos en presencia de
gases o líquidos inflamables.
3. Prevéngase contra los choques eléctricos. Prevenga a
tierra tales como tuberías, radiadores y refrigeradores.
4. Mantenga a los niños alejados. Los niños nunca deben estar cerca
del área de trabajo. No permita que ellos sostengan máquinas,
equipos o cables de extensión. No permita que otras personas
toquen el equipo, manténgalas alejadas de su campo de trabajo.
5. Mantenga guardado el equipo mientras no esté en uso. Cuando
no esté en uso, el equipo debe guardarse en un lugar seco y libre
de polvo. Siempre guarde su equipo bajo llave para que no esté al
alcance de los niños.
6. No fuerce el equipo. Esta hará mejor su trabajo y será más segura
dentro del rango para la cual fue diseñada. No utilice aditamentos
inapropiados para intentar exceder la capacidad del equipo.
7. Utilice el equipo eléctrico adecuado. No utilice equipos demasiados
débiles para ejecutar trabajos pesados. No utilice equipos eléctricos
para trabajos pesados para los cuales no ha sido diseñada.
8. Utilice la indumentaria apropiada. No utilice ropa suelta, guantes,
corbatas o joyería que pueda ser atrapada en las partes móviles.
No utilice calzado resbaloso. Utilice algún protector de cabello para
retener el cabello largo.
9. Utilice protección para ojos. Siempre utilice accesorios de
seguridad apropiados por la Norma Oficial Mexicana (NOM),
como es el caso de goggles, caretas y mascarillas contra polvo,
cuando trabaje con materiales que despidan partes metálicas,
virutas o polvos químicos.
10. No use el cable de alimentación para fines para los cuales no está
dispuesto. No lleve la herramienta colgada del cable y no tire de
éste para desconectar la clavija de la base de enchufe. Proteja el
cable contra el calor, el aceite y las esquinas afiladas.
11. Afiance la pieza de trabajo. Utilice un dispositivo de fijación o una
mordaza para mantener firme la pieza de trabajo. Esto es más
seguro que usando una sola mano y le permite tener ambas manos
libres. Mantenga el balance adecuado todo el tiempo sobre sus pies.
No trate de alcanzar algo sobre la máquina o se cruce cuando esté
en funcionamiento.
12. No extienda su radio de acción. Evite toda postura que cause
cansancio. Cuide de que su posición sea segura y de que conserve
el equilibrio.
13. Mantenga el equipo en las mejores condiciones. Mantenga el equipo
limpio para tener la mejor ejecución y seguridad. Siga las
instrucciones para la lubricación y cambio de accesorios. Verifique
los cables de la herramienta periódicamente y si se encuentran
dañados, llévelos a reparar a un Centro de Servicio Autorizado
Truper®. Los mangos o manijas deben siempre permanecer limpios,
secos y libres de aceite y grasas.
14. Desconecte el equipo cuando no esté en uso, antes de proceder
al mantenimiento.
15. Reduzca el riesgo de arranques accidentales. No lleve
ninguna herramienta con el dedo puesto sobre el interruptor
mientras esté conectado a la red eléctrica. Asegúrese de que
el interruptor esté en la posición “apagado” (OFF) antes de
conectar el cable de alimentación.
16. Extensiones para exterior. En el exterior, utilice solamente
cables de extensión homologados y convenientemente
marcados.
17. Manténgase alerta. Fíjese en lo que está haciendo, utilice su sentido
común. No opere ninguna herramienta cuando esté cansado.
18. Revise las partes dañadas. Antes de continuar utilizando la
máquina, los protectores u otras partes móviles que pudieran estar
dañadas deben ser cuidadosamente revisadas, para asegurarse que
operan apropiadamente y trabajarán como debe ser. Verifique
también la alineación de las partes móviles, si están atascadas, o
si hay alguna probable ruptura de las partes, verifique también el
montaje, así como cualquier otra condición que pueda afectar la
operación de la herramienta. Todos los componentes deben estar
montados adecuadamente y cumplir los requisitos para garantizar
el correcto funcionamiento del aparato. Un protector u otra parte
que estén dañadas deberán ser apropiadamente reparadas o
cambiadas. Todo interruptor de mando deteriorado, deberá ser
reemplazado por un Centro de Servicio Autorizado Truper®. No
utilice ninguna herramienta eléctrica en la cual el interruptor no
tenga contacto.
19. Reemplazo de partes y accesorios. Cuando necesite remplazar las
piezas, utilice solamente refacciones originales Truper®, destinados
para usarse con está herramienta.
20. Para su seguridad personal utilice
únicamente los accesorios o aparatos adicionales indicados
en las instrucciones de manejo o recomendados por el
fabricante de la herramienta. La utilización de accesorios
diferentes a los indicados en las instrucciones de manejo,
puede ocasionar riesgo personal.
21. Protección para oídos. Utilice protectores auriculares,
cuando ejecute servicios que hagan ruidos
superiores a 85 dB
REGLAS DE SEGURIDAD ADICIONALES PARA EL CARGADOR DE
BATERÍAS
SEGURIDAD GENERAL DE BATERÍAS
Los cargadores de baterías se pueden utilizar para recargar baterías
de plomo ácido de ciclo profundo. También se pueden utilizar como
auxiliar en el arranque.
Estos cargadores tienen protección contra sobrecalentamiento y
protección contra picos de corriente. Son seguros y confiables al usarse.
La función del cargador de baterías incluye selección de corriente de
carga. Este control se encuentra integrado en el panel frontal del
cargador y es de fácil uso.
Tiene instalado un cinturón para mover el cargador.
Cuando se utiliza el cargador de baterías se deben observar las
siguientes reglas de seguridad, con el fin de proteger la seguridad de
las personas y de sus propiedades.
1. No exponga el cargador a la lluvia o nieve.
2. El uso de algún accesorio que no haya sido recomendado o vendido
por el fabricante de la batería puede ser causa de incendio, descarga
eléctrica o lesiones a las personas.
3. Cuando desconecte el cargador, debe hacerlo por la clavija y no por
el cable. No hacerlo puede dañar tanto al cable como a la clavija.
4. A menos que sea estrictamente necesario, no se debe utilizar cables
de extensión. El uso de cables de extensión incorrectos puede
ocasionar incendio y descarga eléctrica.
En caso de que sea necesario el uso de un cable de extensión, se debe
asegurar que:
a) Las espigas de la clavija en el cable de alimentación sean del mismo
número, medida y forma que los de la clavija del cargador;
b) El cable de extensión tenga el alambrado adecuado y que esté en
buenas condiciones eléctricas;
c) El calibre del cable sea lo suficientemente grande para el arco de
amperes de carga como se especifica en la tabla siguiente:
Calibre mínimo para cables de extensión (AWG)
(Cuando se usan 127 V~ solamente)
(1) Se permite utilizarlo siempre y cuando las extensiones mismas
cuenten con un artefacto de protección contra sobrecorriente.
(2) Uno de los conductores debe ser conductor para puesta a tierra.
Todos los conductores son de la misma designación (calibre)
incluyendo el de puesta a tierra. Referencia: NMX-J-195-ANCE
5. No opere el cargador si tiene el cable o clavija dañados. Llévelo a un
Centro de Servicio Autorizado Truper®
6. No utilice el cargador si ha recibido un golpe fuerte, si se cayó o si
está dañado de cualquier forma. Llévelo a un Centro de Servicio
Autorizado Truper®
7. No desarme el cargador. Cuando se requiera darle servicio o hacer
alguna reparación debe llevarlo a un Centro de Servicio Autorizado
Truper®. El armado posterior puede ser causa de fuego o descarga
eléctrica.
8. Para reducir el riesgo de descarga eléctrica, desconecte el cargador
del tomacorriente antes de llevar a cabo cualquier tarea de
mantenimiento o de limpieza. Apagar los controles no reduce estos
riesgos.
9. RIESGO DE GASES EXPLOSIVOS
A) TRABAJAR CERCA DE UNA BATERÍA DE PLOMO ÁCIDO ES
PELIGROSO. LAS BATERÍAS GENERAN GASES EXPLOSIVOS
DURANTE LA OPERACIÓN NORMAL DE LA BATERÍA. DEBIDO
A ESTO ES MUY IMPORTANTE QUE CADA VEZ, ANTES DE
UTILIZAR EL CARGADOR, LEA ESTE INSTRUCTIVO Y SIGA
LAS INSTRUCCIONES AL PIE DE LA LETRA.
b) Para reducir el riesgo de que la batería explote, siga estas
instrucciones y las instrucciones del fabricante del equipo que vaya
a utilizar cerca de la batería. Revise las medidas precautorias en
este producto y en el motor.
10. Precaución personal:
a) Debe haber una persona cerca de usted, para que le ayude cuando
trabaje con una batería de plomo ácido
b) Tenga suficiente agua fresca y jabón cerca, en caso de que el ácido
de la batería entre en contacto con su piel, ropa u ojos.
c) Use protección para ojos completa y ropa protectora. Evite tocarse
los ojos cuando trabaje cerca de la batería.
d) En caso de que el ácido de la batería entre en contacto con su piel
o ropa, lave de inmediato con gua y jabón. En caso de que entre
ácido en sus ojos, lave con mucha agua fría, por lo menos durante
10 minutos y busque atención médica de inmediato.
e) NUNCA fume o permita que haya chispas o flama cerca de la batería
o del motor.
f) Tenga mucho cuidado de no dejar caer una herramienta de metal
sobre la batería. Esto puede provocar una chispa o un corto circuito
en la batería o en alguna otra parte eléctrica y provocar una
explosión.
g) Retire todos los artículos de metal, tales como anillos, pulseras y
relojes cuando trabaje con una batería de plomo ácido. Una batería
de plomo ácido puede producir un cortocircuito con una corriente
tan alta que es suficiente para soldar un anillo o cualquier artículo
de metal, ocasionando quemaduras severas.
h) Use el cargador solamente para recargar baterías de PLOMO ÁCIDO.
No está diseñada para el suministro de electricidad a sistemas de
baja tensión diferentes a la aplicación de arranque de motor. No
utilice el cargador de baterías para recargar pilas secas que se
utilizan comúnmente con aparatos electrodomésticos. Este tipo de
baterías pueden explotar y ocasionar lesiones a las personas y dañar
sus propiedades.
i) NUNCA recargue una batería congelada.
PREPARACIÓN PARA CARGAR
a) En caso de necesitar sacar la batería del vehículo hacia el cargador,
retire siempre primero la terminal aterrizada de la batería. Verifique
que todos los accesorios del vehículo estén apagados para no
provocar un arco.
b) Verifique que el área alrededor de la batería esté bien ventilada
cuando se carga la batería. Puede esparcir el gas del área soplándolo
con una hoja de cartón y otro material no metálico usándolo como
abanico.
c) Limpie las terminales de la batería. Tenga cuidado que la corrosión
no entre en contacto con sus ojos.
d) Añada agua destilada en cada celda hasta que el ácido de la batería
llegue al nivel especificado indicado por el fabricante de la batería.
Esto ayuda a purgar el gas excesivo de las celdas. No llene demasiado.
Para las baterías que no tiene tapas en celdas, siga con cuidado las
instrucciones de recarga indicadas por el fabricante.
e) Estudie todas las medidas preventivas que indica el fabricante de
la batería, tales como, quitar o no quitar las tapas de las celdas
cuando se hace la recarga y las tasas de carga recomendadas.
f) Determine la tensión de la batería revisando el manual del automóvil.
En caso de que el cargador tenga velocidad de carga ajustable,
cargue la batería primero a la velocidad más baja.
UBICACIÓN DEL CARGADOR
a) Sitúe el cargador tan lejos como lo permitan los cables de corriente
continua de la batería.
b) Nunca coloque el cargador directamente sobre la batería que se
esté cargando. Los gases de la batería pueden corroer y dañar el
cargador.
c) No permita que el ácido de la batería gotee sobre el cargador cuando
revise la gravedad o cuando la rellene.
d) No haga funcionar el cargador en un área cerrada, ni impida la
ventilación de ninguna manera.
e) No coloque la batería sobre el cargador. El dispositivo produce calor
en la máquina mientras está funcionando. Para permitir que el calor
salga, no cubra con ningún objeto la ventila.
MEDIDAS DE PRECAUCIÓN
a) La conexión y desconexión de las pinzas de salida de corriente
directa solo se debe hacer con los interruptores del cargador en
la posición APAGADO y con el cable de corriente alterna
desconectado de la fuente de electricidad o tomacorriente. Nunca
permita que las pinzas se toquen entre sí.
b) Coloque las pinzas en la bataría y el chasis como se indica en 1(e),
1(f), 1(b) y 1(d).
1. SIGA ESTOS PASOS CUANDO LA BATERÍA ESTÉ INSTALADA EN EL
VEHÍCULO. UNA CHISPA CERCA DE LA BATERÍA PUEDE PROVOCAR
QUE EXPLOTE. PARA REDUCIR EL RIESGO DE CHISPAS CERCA DE LA
BATERÍA:
a) Para reducir el riesgo de daños, coloque los cables de corriente en
el cofre, la puerta o alguna parte del motor.
b) Manténganse alejado de las aspas del ventilador, bandas, poleas y
otras partes que podría ocasionar lesiones a las personas.
c) Revise la polaridad de los postes de la batería. El poste de la batería
POSITIVO (POS, P, +) generalmente tiene un diámetro mayor que el
poste NEGATIVO (NEG, N, -)
d) Determine cuál de los postes de la batería está aterrizado (conectado)
al chasis. En caso de que el poste negativo esté aterrizado al chasis
(como sucede en la mayoría de los vehículos), vea el inciso (e).
En caso de que el poste positivo esté aterrizado al chasis, vea el
inciso (f).
e) En los vehículos aterrizados con el negativo, conecte la pinza POSITIVA
(ROJA) del cargador de batería al poste sin aterrizar POSITIVO (POS,
P, +) de la batería. No conecte la pinza en el carburador, las líneas
de combustible o las láminas de metal de la carrocería. Conecte a
una parte metálica de calibre grueso del marco o del block del motor.
f) En los vehículos aterrizados con el positivo, conecte la pinza NEGATIVA
(NEGRA) del cargador de batería al poste sin aterrizar NEGATIVO
(NEG, N, -) de la batería. Conecte la pinza POSITIVA (ROJA) al chasis
del vehículo o al block del motor alejado de la batería. No conecte
la pinza al carburador, las líneas de combustible o partes de hoja
metálica de la carrocería. Conecte a una parte metálica de calibre
grueso del marco o del block del motor.
g) Cuando desconecte el cargador, desconecte el cable de alimentación,
retire la pinza del chasis del vehículo y después retire la pinza de la
terminal de la batería.
2. SIGA ESTOS PASOS CUANDO LA BATERÍA ESTÉ FUERA DEL VEHÍCULO.
UNA CHISPA CERCA DE LA BATERÍA PUEDE OCASIONAR UNA
EXPLOSIÓN. PARA REDUCIR EL RIESGO QUE SE GENERE UNA CHISPA
CERCA DE LA BATERÍA:
a) Revise la polaridad de los postes de la batería. El poste POSITIVO
(POS, P, +) DE LA BATERÍA GENERALMENTE TIENE UN DIÁMETRO MAYOR
QUE EL POSTE negativo (NEG, N, -).
b) Coloque un cable de batería aislado de 24 pulgadas de largo, de por
lo menos calibre 6 (AWG), el poste NEGATIVO (NEG, N, -) de la batería.
c) Conecte la pinza POSITIVA (ROJA) del cargador al poste POSITIVO
(POS, P, +) de la batería.
d) Coloque su cuerpo y el extremo libre del cable tan lejos como sea
posible de la batería. Entonces conecte la pinza del cargador
NEGATIVO (NEGRA) al extremo libre del cable.
e) No se ponga frente a la batería cuando haga la conexión final.
f) Cuando desconecte el cargador, hágalo en secuencia inversa al
procedimiento de conexión y desconecte la primera conexión
situándose tan lejos como sea posible.
g) La batería de un bote marino se debe retirar y cargarse en tierra.
Para hacer carga a bordo se requiere equipo especialmente diseñado
para uso marino.
INSTRUCCIONES PARA ATERRIZAR Y CONECTAR UN CABLE DE
CORRIENTE ALTERNA.
Para reducir el riesgo de descarga eléctrica, el cargador debe estar
aterrizado. El cargador viene equipado con un cable eléctrico con un
conductor aterrizado y una clavija aterrizada. Se debe conectar la clavija
en un tomacorriente debidamente instalado y aterrizado, que cumpla
con lo códigos y ordenamientos locales.
NUNCA altere el cable o clavija de
corriente alterna que viene con el equipo. Si no se puede
introducir en el tomacorrientes, haga que un electricista
calificado conecte el tomacorriente adecuado. Una conexión
no adecuada puede ocasionar una descarga eléctrica.
Este cargador de baterías está hecho para usarse en un circuito de
tensión nominal de 127 V~ y tiene una clavija aterrizada que se ve como
lo indica la figura A. Se puede utilizar un adaptador temporal similar al
adaptador ilustrado en las figuras B y C, en caso de que no esté
disponible un tomacorrientes adecuado, se puede conectar el adaptador
a un tomacorrientes de dos polos mostrado en la figura B. Este adaptador
temporal debe utilizarse solamente hasta que un electricista calificado
instale un tomacorrientes aterrizado adecuadamente.
Antes de utilizar el adaptador como se
ilustra, asegúrese que el tornillo del centro de la placa (si
existe) del tomacorrientes esté aterrizada. El anillo rígido o
lengüeta de conexión de color verde que sale del adaptador se debe
conectar a un tomacorriente aterrizado. En caso de que sea necesario,
reemplace el tornillo de la placa con un tornillo más largo que pueda
sujetar el anillo rígido o lengüeta y que haga una conexión aterrizada
al tomacorriente aterrizado.
reparar el cargador con el proveedor o en el Centro de Servicio
Autorizado Truper, mostrando su factura de compra.
• Antes de llevar a cabo cualquier tipo de mantenimiento, debe cortar
primero el suministro eléctrico.
• Limpie con regularidad el cargador usando un trapo suave. Después
de hacer una recarga, limpie las pinzas para eliminar la corrosión.
Debe proteger su piel cotra quemaduras.
• Almacene el cargador de baterías en un sitio seco, limpio y lejos de
corrientes de aire.
• En caso de falla, consulte a un Centro de Servicio Autorizado Truper.
DIAGRAMA ELÉCTRICO
Lea este Instructivo por completo
antes de usar la herramienta.
ATENCIÓN
Instructivo
Cargador de batería con ARRANCADOR
ESPAÑOL
ENGLISH
Códigos: 13028
13029
Modelos: CARBA-140
CARBA-200

CONSERVE ESTE INSTRUCTIVO
Usted necesitará el instructivo para consultar las reglas de seguridad
y precaución, instrucciones de ensamble, procedimientos de
mantenimiento y operación, lista y diagrama de partes.
Mantenga su factura junto con este instructivo. Escriba el número de
factura en la parte interna de la cubierta frontal. Guarde el
instructivo y la factura en un lugar seco y seguro para futuras
referencias.
ESPECIFICACIONES TÉCNICAS
CARBA-140
Entrada
Tensión:
Frecuencia:
Corriente:
Salida
Tensión:
Corriente:
Arranque de motor:
Ciclo de trabajo:
CARBA-200
Entrada
Tensión:
Frecuencia:
Corriente:
Salida
Tensión:
Corriente:
Arranque de motor:
Ciclo de trabajo:
Clase de aislamiento del transformador: Clase “H”
El cable de aislamiento tiene sujeta-cables tipo: “Y”
Todos los conductores son: 8 AWG x 3C con temperatura de
aislamiento de 105 ºC
NOTA IMPORTANTE: Si el cable de alimentación se daña, éste debe
ser reemplazado por el fabricante o Centro de Servicio Autorizado
Truper®, con el fin de evitar algún riesgo de descarga o accidente
considerable.
El tipo de sujeta-cables empleado para este producto es tipo “Y”.
La construcción de este producto está diseñada de manera que su
aislamiento eléctrico es alterado por salpicaduras o derramamiento
de líquidos durante su operación.
Antes de obtener acceso a las
terminales, todos los circuitos de alimentación deben ser
desconectados
127 V~
60 Hz
0.9 A / 3.4 A / 11 A / 26 A
12 V
2 A / 20 A continuos / 55 A / 140 A intermitentes
12 V / 55 A intermitentes:
30 s máximo encendido / 600 s mínimo apagado
12 V / 140 A intermitentes:
3 s máximo encendido / 360 s mínimo apagado
55 A intermitentes:
30 s máximo encendido / 600 s mínimo apagado
140 A intermitentes:
3 s máximo encendido / 360 s mínimo apagado
127 V~
60 Hz
1.2 A / 3.8 A / 6.4 A / 32 A
12 V
2 A / 20 A / 35 A continuos / 200 A intermitentes
12 V / 200 A intermitentes:
3 s máximo encendido / 240 s mínimo apagado
200 A intermitentes:
3 s máximo encendido / 240 s mínimo apagado
Cuando el cargador de batería esté en conectado y el interruptor esté
en la posición de encendido, tenga cuidado de que las pinzas no se
toquen.
Nunca cargue una batería en la posición de encendido, ni cargue una
batería de 6 V en la posición de 12 V
OPERACIÓN
Verifique que el área alrededor de la batería esté bien ventilada durante
la carga. Puede esparcir el gas del área soplándolo con una hoja de
cartón u otro material no metálico usándolo como abanico.
INSTRUCCIONES DE OPERACIÓN PARA EL CARGADOR Y LA
BATERÍA
Para asegurar el uso correcto del cargador y de la batería, y que la
máquina no se dañe, se debe seguir las siguientes instrucciones:
1. Instrucciones de operación para la batería a cargar.
2. Cuando la batería tiene baja la carga, generalmente la tensión de
la terminal es normal. El fenómeno físico de la poca energía es el
cambio de la gravedad en la solución en la batería. Normalmente
es de 1,28 kg/L si es menor que 1,16 kg/L significa que debe cargar
la batería
3. La tensión de la batería deja el valor normal cuando se carga o está
descargada. Es más alto cuando se carga y es más bajo cuando se
descarga. Si la tensión no regresa a su valor normal después de
media hora, significa que la batería no esta bien.
4. Este es un cargador manual y no está provisto de un indicador de
carga total, el amperímetro indica la corriente que el cargador
suministra a la batería y la intensidad dependerá del estado de
carga de ésta.
No se recomienda utilizar la lectura del amperímetro para
determinar si la batería ha sido cargada completamente.
Para determinar el nivel de carga de la batería, se debe medir de
manera frecuente la tensión en sus terminales con un voltímetro,
cuando la tensión medida se encuentre en el nivel nominal, la batería
estará cargada.
METODO DE ARRANQUE:
El uso de la función del arranque debe cumplir con el
ciclo de trabajo del producto.
1. Lea con cuidado el instructivo del motor.
2. Cargue la batería durante 10 a 15 minutos.
• Conecte cualquier electrodo del cargador a la terminal de la batería,
que no conecte al chasis, y el otro a la terminal que conecte con el
chasis.
• Revise nuevamente la conexión: Si no existe ningún problema,
coloque el interruptor del cargador en la posición de arranque y
encienda el cargador de baterías.
El ciclo de trabajo para arranque del motor
es de 3 segundos encendido y 360 segundos apagado.
(CARBA-140)
El ciclo de trabajo para arranque del motor es de 3 segundos encendido
y 240 segundos apagado. (CARBA-200)
NOTA: Si excede el lapso de 3 segundos de arranque, el cargador
sufrirá daños.
MANTENIMIENTO
• El cargador de baterías debe recibir mantenimiento y revisiones
de manera regular para poder funcionar bien y con seguridad
• No abra jamás la carcasa del cargador de batería, ni trate de
desarmarla. Solamente un Centro de Servicio Autorizado Truper,
la puede reparar.
• El periodo de garantía del cargador de batería es de 1 año. Haga
2
ADVERTENCIA
INSTRUCCIONES DE SEGURIDAD
1. Mantenga el área de trabajo en orden. Las áreas y bancos
desordenados propician accidentes
2. Observe las condiciones del área de trabajo. No utilice
máquinas o equipos eléctricos en áreas mojadas o húmedas.
No exponga su equipo a la lluvia. Mantenga el área de trabajo
bien iluminada. No utilice equipos eléctricos en presencia de
gases o líquidos inflamables.
3. Prevéngase contra los choques eléctricos. Prevenga a
tierra tales como tuberías, radiadores y refrigeradores.
4. Mantenga a los niños alejados. Los niños nunca deben estar cerca
del área de trabajo. No permita que ellos sostengan máquinas,
equipos o cables de extensión. No permita que otras personas
toquen el equipo, manténgalas alejadas de su campo de trabajo.
5. Mantenga guardado el equipo mientras no esté en uso. Cuando
no esté en uso, el equipo debe guardarse en un lugar seco y libre
de polvo. Siempre guarde su equipo bajo llave para que no esté al
alcance de los niños.
6. No fuerce el equipo. Esta hará mejor su trabajo y será más segura
dentro del rango para la cual fue diseñada. No utilice aditamentos
inapropiados para intentar exceder la capacidad del equipo.
7. Utilice el equipo eléctrico adecuado. No utilice equipos demasiados
débiles para ejecutar trabajos pesados. No utilice equipos eléctricos
para trabajos pesados para los cuales no ha sido diseñada.
8. Utilice la indumentaria apropiada. No utilice ropa suelta, guantes,
corbatas o joyería que pueda ser atrapada en las partes móviles.
No utilice calzado resbaloso. Utilice algún protector de cabello para
retener el cabello largo.
9. Utilice protección para ojos. Siempre utilice accesorios de
seguridad apropiados por la Norma Oficial Mexicana (NOM),
como es el caso de goggles, caretas y mascarillas contra polvo,
cuando trabaje con materiales que despidan partes metálicas,
virutas o polvos químicos.
10. No use el cable de alimentación para fines para los cuales no está
dispuesto. No lleve la herramienta colgada del cable y no tire de
éste para desconectar la clavija de la base de enchufe. Proteja el
cable contra el calor, el aceite y las esquinas afiladas.
11. Afiance la pieza de trabajo. Utilice un dispositivo de fijación o una
mordaza para mantener firme la pieza de trabajo. Esto es más
seguro que usando una sola mano y le permite tener ambas manos
libres. Mantenga el balance adecuado todo el tiempo sobre sus pies.
No trate de alcanzar algo sobre la máquina o se cruce cuando esté
en funcionamiento.
12. No extienda su radio de acción. Evite toda postura que cause
cansancio. Cuide de que su posición sea segura y de que conserve
el equilibrio.
13. Mantenga el equipo en las mejores condiciones. Mantenga el equipo
limpio para tener la mejor ejecución y seguridad. Siga las
instrucciones para la lubricación y cambio de accesorios. Verifique
los cables de la herramienta periódicamente y si se encuentran
dañados, llévelos a reparar a un Centro de Servicio Autorizado
Truper®. Los mangos o manijas deben siempre permanecer limpios,
secos y libres de aceite y grasas.
14. Desconecte el equipo cuando no esté en uso, antes de proceder
al mantenimiento.
15. Reduzca el riesgo de arranques accidentales. No lleve
ninguna herramienta con el dedo puesto sobre el interruptor
mientras esté conectado a la red eléctrica. Asegúrese de que
el interruptor esté en la posición “apagado” (OFF) antes de
conectar el cable de alimentación.
16. Extensiones para exterior. En el exterior, utilice solamente
cables de extensión homologados y convenientemente
marcados.
17. Manténgase alerta. Fíjese en lo que está haciendo, utilice su sentido
común. No opere ninguna herramienta cuando esté cansado.
18. Revise las partes dañadas. Antes de continuar utilizando la
máquina, los protectores u otras partes móviles que pudieran estar
dañadas deben ser cuidadosamente revisadas, para asegurarse que
operan apropiadamente y trabajarán como debe ser. Verifique
también la alineación de las partes móviles, si están atascadas, o
si hay alguna probable ruptura de las partes, verifique también el
montaje, así como cualquier otra condición que pueda afectar la
operación de la herramienta. Todos los componentes deben estar
montados adecuadamente y cumplir los requisitos para garantizar
el correcto funcionamiento del aparato. Un protector u otra parte
que estén dañadas deberán ser apropiadamente reparadas o
cambiadas. Todo interruptor de mando deteriorado, deberá ser
reemplazado por un Centro de Servicio Autorizado Truper®. No
utilice ninguna herramienta eléctrica en la cual el interruptor no
tenga contacto.
19. Reemplazo de partes y accesorios. Cuando necesite remplazar las
piezas, utilice solamente refacciones originales Truper®, destinados
para usarse con está herramienta.
20. Para su seguridad personal utilice
únicamente los accesorios o aparatos adicionales indicados
en las instrucciones de manejo o recomendados por el
fabricante de la herramienta. La utilización de accesorios
diferentes a los indicados en las instrucciones de manejo,
puede ocasionar riesgo personal.
21. Protección para oídos. Utilice protectores auriculares,
cuando ejecute servicios que hagan ruidos
superiores a 85 dB
REGLAS DE SEGURIDAD ADICIONALES PARA EL CARGADOR DE
BATERÍAS
SEGURIDAD GENERAL DE BATERÍAS
Los cargadores de baterías se pueden utilizar para recargar baterías
de plomo ácido de ciclo profundo. También se pueden utilizar como
auxiliar en el arranque.
Estos cargadores tienen protección contra sobrecalentamiento y
protección contra picos de corriente. Son seguros y confiables al usarse.
La función del cargador de baterías incluye selección de corriente de
carga. Este control se encuentra integrado en el panel frontal del
cargador y es de fácil uso.
Tiene instalado un cinturón para mover el cargador.
Cuando se utiliza el cargador de baterías se deben observar las
siguientes reglas de seguridad, con el fin de proteger la seguridad de
las personas y de sus propiedades.
1. No exponga el cargador a la lluvia o nieve.
2. El uso de algún accesorio que no haya sido recomendado o vendido
por el fabricante de la batería puede ser causa de incendio, descarga
eléctrica o lesiones a las personas.
3. Cuando desconecte el cargador, debe hacerlo por la clavija y no por
el cable. No hacerlo puede dañar tanto al cable como a la clavija.
4. A menos que sea estrictamente necesario, no se debe utilizar cables
de extensión. El uso de cables de extensión incorrectos puede
ocasionar incendio y descarga eléctrica.
En caso de que sea necesario el uso de un cable de extensión, se debe
asegurar que:
a) Las espigas de la clavija en el cable de alimentación sean del mismo
número, medida y forma que los de la clavija del cargador;
b) El cable de extensión tenga el alambrado adecuado y que esté en
buenas condiciones eléctricas;
c) El calibre del cable sea lo suficientemente grande para el arco de
amperes de carga como se especifica en la tabla siguiente:
Calibre mínimo para cables de extensión (AWG)
(Cuando se usan 127 V~ solamente)
(1) Se permite utilizarlo siempre y cuando las extensiones mismas
cuenten con un artefacto de protección contra sobrecorriente.
(2) Uno de los conductores debe ser conductor para puesta a tierra.
Todos los conductores son de la misma designación (calibre)
incluyendo el de puesta a tierra. Referencia: NMX-J-195-ANCE
5. No opere el cargador si tiene el cable o clavija dañados. Llévelo a un
Centro de Servicio Autorizado Truper®
6. No utilice el cargador si ha recibido un golpe fuerte, si se cayó o si
está dañado de cualquier forma. Llévelo a un Centro de Servicio
Autorizado Truper®
7. No desarme el cargador. Cuando se requiera darle servicio o hacer
alguna reparación debe llevarlo a un Centro de Servicio Autorizado
Truper®. El armado posterior puede ser causa de fuego o descarga
eléctrica.
8. Para reducir el riesgo de descarga eléctrica, desconecte el cargador
del tomacorriente antes de llevar a cabo cualquier tarea de
mantenimiento o de limpieza. Apagar los controles no reduce estos
riesgos.
9. RIESGO DE GASES EXPLOSIVOS
A) TRABAJAR CERCA DE UNA BATERÍA DE PLOMO ÁCIDO ES
PELIGROSO. LAS BATERÍAS GENERAN GASES EXPLOSIVOS
DURANTE LA OPERACIÓN NORMAL DE LA BATERÍA. DEBIDO
A ESTO ES MUY IMPORTANTE QUE CADA VEZ, ANTES DE
UTILIZAR EL CARGADOR, LEA ESTE INSTRUCTIVO Y SIGA
LAS INSTRUCCIONES AL PIE DE LA LETRA.
b) Para reducir el riesgo de que la batería explote, siga estas
instrucciones y las instrucciones del fabricante del equipo que vaya
a utilizar cerca de la batería. Revise las medidas precautorias en
este producto y en el motor.
10. Precaución personal:
a) Debe haber una persona cerca de usted, para que le ayude cuando
trabaje con una batería de plomo ácido
b) Tenga suficiente agua fresca y jabón cerca, en caso de que el ácido
de la batería entre en contacto con su piel, ropa u ojos.
c) Use protección para ojos completa y ropa protectora. Evite tocarse
los ojos cuando trabaje cerca de la batería.
d) En caso de que el ácido de la batería entre en contacto con su piel
o ropa, lave de inmediato con gua y jabón. En caso de que entre
ácido en sus ojos, lave con mucha agua fría, por lo menos durante
10 minutos y busque atención médica de inmediato.
e) NUNCA fume o permita que haya chispas o flama cerca de la batería
o del motor.
f) Tenga mucho cuidado de no dejar caer una herramienta de metal
sobre la batería. Esto puede provocar una chispa o un corto circuito
en la batería o en alguna otra parte eléctrica y provocar una
explosión.
g) Retire todos los artículos de metal, tales como anillos, pulseras y
relojes cuando trabaje con una batería de plomo ácido. Una batería
de plomo ácido puede producir un cortocircuito con una corriente
tan alta que es suficiente para soldar un anillo o cualquier artículo
de metal, ocasionando quemaduras severas.
h) Use el cargador solamente para recargar baterías de PLOMO ÁCIDO.
No está diseñada para el suministro de electricidad a sistemas de
baja tensión diferentes a la aplicación de arranque de motor. No
utilice el cargador de baterías para recargar pilas secas que se
utilizan comúnmente con aparatos electrodomésticos. Este tipo de
baterías pueden explotar y ocasionar lesiones a las personas y dañar
sus propiedades.
i) NUNCA recargue una batería congelada.
PREPARACIÓN PARA CARGAR
a) En caso de necesitar sacar la batería del vehículo hacia el cargador,
retire siempre primero la terminal aterrizada de la batería. Verifique
que todos los accesorios del vehículo estén apagados para no
provocar un arco.
b) Verifique que el área alrededor de la batería esté bien ventilada
cuando se carga la batería. Puede esparcir el gas del área soplándolo
con una hoja de cartón y otro material no metálico usándolo como
abanico.
c) Limpie las terminales de la batería. Tenga cuidado que la corrosión
no entre en contacto con sus ojos.
d) Añada agua destilada en cada celda hasta que el ácido de la batería
llegue al nivel especificado indicado por el fabricante de la batería.
Esto ayuda a purgar el gas excesivo de las celdas. No llene demasiado.
Para las baterías que no tiene tapas en celdas, siga con cuidado las
instrucciones de recarga indicadas por el fabricante.
e) Estudie todas las medidas preventivas que indica el fabricante de
la batería, tales como, quitar o no quitar las tapas de las celdas
cuando se hace la recarga y las tasas de carga recomendadas.
f) Determine la tensión de la batería revisando el manual del automóvil.
En caso de que el cargador tenga velocidad de carga ajustable,
cargue la batería primero a la velocidad más baja.
UBICACIÓN DEL CARGADOR
a) Sitúe el cargador tan lejos como lo permitan los cables de corriente
continua de la batería.
b) Nunca coloque el cargador directamente sobre la batería que se
esté cargando. Los gases de la batería pueden corroer y dañar el
cargador.
c) No permita que el ácido de la batería gotee sobre el cargador cuando
revise la gravedad o cuando la rellene.
d) No haga funcionar el cargador en un área cerrada, ni impida la
ventilación de ninguna manera.
e) No coloque la batería sobre el cargador. El dispositivo produce calor
en la máquina mientras está funcionando. Para permitir que el calor
salga, no cubra con ningún objeto la ventila.
MEDIDAS DE PRECAUCIÓN
a) La conexión y desconexión de las pinzas de salida de corriente
directa solo se debe hacer con los interruptores del cargador en
la posición APAGADO y con el cable de corriente alterna
desconectado de la fuente de electricidad o tomacorriente. Nunca
permita que las pinzas se toquen entre sí.
b) Coloque las pinzas en la bataría y el chasis como se indica en 1(e),
1(f), 1(b) y 1(d).
1. SIGA ESTOS PASOS CUANDO LA BATERÍA ESTÉ INSTALADA EN EL
VEHÍCULO. UNA CHISPA CERCA DE LA BATERÍA PUEDE PROVOCAR
QUE EXPLOTE. PARA REDUCIR EL RIESGO DE CHISPAS CERCA DE LA
BATERÍA:
a) Para reducir el riesgo de daños, coloque los cables de corriente en
el cofre, la puerta o alguna parte del motor.
b) Manténganse alejado de las aspas del ventilador, bandas, poleas y
otras partes que podría ocasionar lesiones a las personas.
c) Revise la polaridad de los postes de la batería. El poste de la batería
POSITIVO (POS, P, +) generalmente tiene un diámetro mayor que el
poste NEGATIVO (NEG, N, -)
d) Determine cuál de los postes de la batería está aterrizado (conectado)
al chasis. En caso de que el poste negativo esté aterrizado al chasis
(como sucede en la mayoría de los vehículos), vea el inciso (e).
En caso de que el poste positivo esté aterrizado al chasis, vea el
inciso (f).
e) En los vehículos aterrizados con el negativo, conecte la pinza POSITIVA
(ROJA) del cargador de batería al poste sin aterrizar POSITIVO (POS,
P, +) de la batería. No conecte la pinza en el carburador, las líneas
de combustible o las láminas de metal de la carrocería. Conecte a
una parte metálica de calibre grueso del marco o del block del motor.
f) En los vehículos aterrizados con el positivo, conecte la pinza NEGATIVA
(NEGRA) del cargador de batería al poste sin aterrizar NEGATIVO
(NEG, N, -) de la batería. Conecte la pinza POSITIVA (ROJA) al chasis
del vehículo o al block del motor alejado de la batería. No conecte
la pinza al carburador, las líneas de combustible o partes de hoja
metálica de la carrocería. Conecte a una parte metálica de calibre
grueso del marco o del block del motor.
g) Cuando desconecte el cargador, desconecte el cable de alimentación,
retire la pinza del chasis del vehículo y después retire la pinza de la
terminal de la batería.
2. SIGA ESTOS PASOS CUANDO LA BATERÍA ESTÉ FUERA DEL VEHÍCULO.
UNA CHISPA CERCA DE LA BATERÍA PUEDE OCASIONAR UNA
EXPLOSIÓN. PARA REDUCIR EL RIESGO QUE SE GENERE UNA CHISPA
CERCA DE LA BATERÍA:
a) Revise la polaridad de los postes de la batería. El poste POSITIVO
(POS, P, +) DE LA BATERÍA GENERALMENTE TIENE UN DIÁMETRO MAYOR
QUE EL POSTE negativo (NEG, N, -).
b) Coloque un cable de batería aislado de 24 pulgadas de largo, de por
lo menos calibre 6 (AWG), el poste NEGATIVO (NEG, N, -) de la batería.
c) Conecte la pinza POSITIVA (ROJA) del cargador al poste POSITIVO
(POS, P, +) de la batería.
d) Coloque su cuerpo y el extremo libre del cable tan lejos como sea
posible de la batería. Entonces conecte la pinza del cargador
NEGATIVO (NEGRA) al extremo libre del cable.
e) No se ponga frente a la batería cuando haga la conexión final.
f) Cuando desconecte el cargador, hágalo en secuencia inversa al
procedimiento de conexión y desconecte la primera conexión
situándose tan lejos como sea posible.
g) La batería de un bote marino se debe retirar y cargarse en tierra.
Para hacer carga a bordo se requiere equipo especialmente diseñado
para uso marino.
INSTRUCCIONES PARA ATERRIZAR Y CONECTAR UN CABLE DE
CORRIENTE ALTERNA.
Para reducir el riesgo de descarga eléctrica, el cargador debe estar
aterrizado. El cargador viene equipado con un cable eléctrico con un
conductor aterrizado y una clavija aterrizada. Se debe conectar la clavija
en un tomacorriente debidamente instalado y aterrizado, que cumpla
con lo códigos y ordenamientos locales.
NUNCA altere el cable o clavija de
corriente alterna que viene con el equipo. Si no se puede
introducir en el tomacorrientes, haga que un electricista
calificado conecte el tomacorriente adecuado. Una conexión
no adecuada puede ocasionar una descarga eléctrica.
Este cargador de baterías está hecho para usarse en un circuito de
tensión nominal de 127 V~ y tiene una clavija aterrizada que se ve como
lo indica la figura A. Se puede utilizar un adaptador temporal similar al
adaptador ilustrado en las figuras B y C, en caso de que no esté
disponible un tomacorrientes adecuado, se puede conectar el adaptador
a un tomacorrientes de dos polos mostrado en la figura B. Este adaptador
temporal debe utilizarse solamente hasta que un electricista calificado
instale un tomacorrientes aterrizado adecuadamente.
Antes de utilizar el adaptador como se
ilustra, asegúrese que el tornillo del centro de la placa (si
existe) del tomacorrientes esté aterrizada. El anillo rígido o
lengüeta de conexión de color verde que sale del adaptador se debe
conectar a un tomacorriente aterrizado. En caso de que sea necesario,
reemplace el tornillo de la placa con un tornillo más largo que pueda
sujetar el anillo rígido o lengüeta y que haga una conexión aterrizada
al tomacorriente aterrizado.
reparar el cargador con el proveedor o en el Centro de Servicio
Autorizado Truper, mostrando su factura de compra.
• Antes de llevar a cabo cualquier tipo de mantenimiento, debe cortar
primero el suministro eléctrico.
• Limpie con regularidad el cargador usando un trapo suave. Después
de hacer una recarga, limpie las pinzas para eliminar la corrosión.
Debe proteger su piel cotra quemaduras.
• Almacene el cargador de baterías en un sitio seco, limpio y lejos de
corrientes de aire.
• En caso de falla, consulte a un Centro de Servicio Autorizado Truper.
DIAGRAMA ELÉCTRICO
Cuando el cargador de batería esté en conectado y el interruptor esté
en la posición de encendido, tenga cuidado de que las pinzas no se
toquen.
Nunca cargue una batería en la posición de encendido, ni cargue una
batería de 6 V en la posición de 12 V
OPERACIÓN
Verifique que el área alrededor de la batería esté bien ventilada durante
la carga. Puede esparcir el gas del área soplándolo con una hoja de
cartón u otro material no metálico usándolo como abanico.
INSTRUCCIONES DE OPERACIÓN PARA EL CARGADOR Y LA
BATERÍA
Para asegurar el uso correcto del cargador y de la batería, y que la
máquina no se dañe, se debe seguir las siguientes instrucciones:
1. Instrucciones de operación para la batería a cargar.
2. Cuando la batería tiene baja la carga, generalmente la tensión de
la terminal es normal. El fenómeno físico de la poca energía es el
cambio de la gravedad en la solución en la batería. Normalmente
es de 1,28 kg/L si es menor que 1,16 kg/L significa que debe cargar
la batería
3. La tensión de la batería deja el valor normal cuando se carga o está
descargada. Es más alto cuando se carga y es más bajo cuando se
descarga. Si la tensión no regresa a su valor normal después de
media hora, significa que la batería no esta bien.
4. Este es un cargador manual y no está provisto de un indicador de
carga total, el amperímetro indica la corriente que el cargador
suministra a la batería y la intensidad dependerá del estado de
carga de ésta.
No se recomienda utilizar la lectura del amperímetro para
determinar si la batería ha sido cargada completamente.
Para determinar el nivel de carga de la batería, se debe medir de
manera frecuente la tensión en sus terminales con un voltímetro,
cuando la tensión medida se encuentre en el nivel nominal, la batería
estará cargada.
METODO DE ARRANQUE:
El uso de la función del arranque debe cumplir con el
ciclo de trabajo del producto.
1. Lea con cuidado el instructivo del motor.
2. Cargue la batería durante 10 a 15 minutos.
• Conecte cualquier electrodo del cargador a la terminal de la batería,
que no conecte al chasis, y el otro a la terminal que conecte con el
chasis.
• Revise nuevamente la conexión: Si no existe ningún problema,
coloque el interruptor del cargador en la posición de arranque y
encienda el cargador de baterías.
El ciclo de trabajo para arranque del motor
es de 3 segundos encendido y 360 segundos apagado.
(CARBA-140)
El ciclo de trabajo para arranque del motor es de 3 segundos encendido
y 240 segundos apagado. (CARBA-200)
NOTA: Si excede el lapso de 3 segundos de arranque, el cargador
sufrirá daños.
MANTENIMIENTO
• El cargador de baterías debe recibir mantenimiento y revisiones
de manera regular para poder funcionar bien y con seguridad
• No abra jamás la carcasa del cargador de batería, ni trate de
desarmarla. Solamente un Centro de Servicio Autorizado Truper,
la puede reparar.
• El periodo de garantía del cargador de batería es de 1 año. Haga
3
INSTRUCCIONES DE SEGURIDAD
1. Mantenga el área de trabajo en orden. Las áreas y bancos
desordenados propician accidentes
2. Observe las condiciones del área de trabajo. No utilice
máquinas o equipos eléctricos en áreas mojadas o húmedas.
No exponga su equipo a la lluvia. Mantenga el área de trabajo
bien iluminada. No utilice equipos eléctricos en presencia de
gases o líquidos inflamables.
3. Prevéngase contra los choques eléctricos. Prevenga a
tierra tales como tuberías, radiadores y refrigeradores.
4. Mantenga a los niños alejados. Los niños nunca deben estar cerca
del área de trabajo. No permita que ellos sostengan máquinas,
equipos o cables de extensión. No permita que otras personas
toquen el equipo, manténgalas alejadas de su campo de trabajo.
5. Mantenga guardado el equipo mientras no esté en uso. Cuando
no esté en uso, el equipo debe guardarse en un lugar seco y libre
de polvo. Siempre guarde su equipo bajo llave para que no esté al
alcance de los niños.
6. No fuerce el equipo. Esta hará mejor su trabajo y será más segura
dentro del rango para la cual fue diseñada. No utilice aditamentos
inapropiados para intentar exceder la capacidad del equipo.
7. Utilice el equipo eléctrico adecuado. No utilice equipos demasiados
débiles para ejecutar trabajos pesados. No utilice equipos eléctricos
para trabajos pesados para los cuales no ha sido diseñada.
8. Utilice la indumentaria apropiada. No utilice ropa suelta, guantes,
corbatas o joyería que pueda ser atrapada en las partes móviles.
No utilice calzado resbaloso. Utilice algún protector de cabello para
retener el cabello largo.
9. Utilice protección para ojos. Siempre utilice accesorios de
seguridad apropiados por la Norma Oficial Mexicana (NOM),
como es el caso de goggles, caretas y mascarillas contra polvo,
cuando trabaje con materiales que despidan partes metálicas,
virutas o polvos químicos.
10. No use el cable de alimentación para fines para los cuales no está
dispuesto. No lleve la herramienta colgada del cable y no tire de
éste para desconectar la clavija de la base de enchufe. Proteja el
cable contra el calor, el aceite y las esquinas afiladas.
11. Afiance la pieza de trabajo. Utilice un dispositivo de fijación o una
mordaza para mantener firme la pieza de trabajo. Esto es más
seguro que usando una sola mano y le permite tener ambas manos
libres. Mantenga el balance adecuado todo el tiempo sobre sus pies.
No trate de alcanzar algo sobre la máquina o se cruce cuando esté
en funcionamiento.
12. No extienda su radio de acción. Evite toda postura que cause
cansancio. Cuide de que su posición sea segura y de que conserve
el equilibrio.
13. Mantenga el equipo en las mejores condiciones. Mantenga el equipo
limpio para tener la mejor ejecución y seguridad. Siga las
instrucciones para la lubricación y cambio de accesorios. Verifique
los cables de la herramienta periódicamente y si se encuentran
dañados, llévelos a reparar a un Centro de Servicio Autorizado
Truper®. Los mangos o manijas deben siempre permanecer limpios,
secos y libres de aceite y grasas.
14. Desconecte el equipo cuando no esté en uso, antes de proceder
al mantenimiento.
15. Reduzca el riesgo de arranques accidentales. No lleve
ninguna herramienta con el dedo puesto sobre el interruptor
mientras esté conectado a la red eléctrica. Asegúrese de que
el interruptor esté en la posición “apagado” (OFF) antes de
conectar el cable de alimentación.
16. Extensiones para exterior. En el exterior, utilice solamente
cables de extensión homologados y convenientemente
marcados.
17. Manténgase alerta. Fíjese en lo que está haciendo, utilice su sentido
común. No opere ninguna herramienta cuando esté cansado.
18. Revise las partes dañadas. Antes de continuar utilizando la
máquina, los protectores u otras partes móviles que pudieran estar
dañadas deben ser cuidadosamente revisadas, para asegurarse que
operan apropiadamente y trabajarán como debe ser. Verifique
también la alineación de las partes móviles, si están atascadas, o
si hay alguna probable ruptura de las partes, verifique también el
montaje, así como cualquier otra condición que pueda afectar la
operación de la herramienta. Todos los componentes deben estar
montados adecuadamente y cumplir los requisitos para garantizar
el correcto funcionamiento del aparato. Un protector u otra parte
que estén dañadas deberán ser apropiadamente reparadas o
cambiadas. Todo interruptor de mando deteriorado, deberá ser
reemplazado por un Centro de Servicio Autorizado Truper®. No
utilice ninguna herramienta eléctrica en la cual el interruptor no
tenga contacto.
19. Reemplazo de partes y accesorios. Cuando necesite remplazar las
piezas, utilice solamente refacciones originales Truper®, destinados
para usarse con está herramienta.
20. Para su seguridad personal utilice
únicamente los accesorios o aparatos adicionales indicados
en las instrucciones de manejo o recomendados por el
fabricante de la herramienta. La utilización de accesorios
diferentes a los indicados en las instrucciones de manejo,
puede ocasionar riesgo personal.
21. Protección para oídos. Utilice protectores auriculares,
cuando ejecute servicios que hagan ruidos
superiores a 85 dB
REGLAS DE SEGURIDAD ADICIONALES PARA EL CARGADOR DE
BATERÍAS
SEGURIDAD GENERAL DE BATERÍAS
Los cargadores de baterías se pueden utilizar para recargar baterías
de plomo ácido de ciclo profundo. También se pueden utilizar como
auxiliar en el arranque.
Estos cargadores tienen protección contra sobrecalentamiento y
protección contra picos de corriente. Son seguros y confiables al usarse.
La función del cargador de baterías incluye selección de corriente de
carga. Este control se encuentra integrado en el panel frontal del
cargador y es de fácil uso.
Tiene instalado un cinturón para mover el cargador.
Cuando se utiliza el cargador de baterías se deben observar las
siguientes reglas de seguridad, con el fin de proteger la seguridad de
las personas y de sus propiedades.
1. No exponga el cargador a la lluvia o nieve.
2. El uso de algún accesorio que no haya sido recomendado o vendido
por el fabricante de la batería puede ser causa de incendio, descarga
eléctrica o lesiones a las personas.
3. Cuando desconecte el cargador, debe hacerlo por la clavija y no por
el cable. No hacerlo puede dañar tanto al cable como a la clavija.
4. A menos que sea estrictamente necesario, no se debe utilizar cables
de extensión. El uso de cables de extensión incorrectos puede
ocasionar incendio y descarga eléctrica.
En caso de que sea necesario el uso de un cable de extensión, se debe
asegurar que:
a) Las espigas de la clavija en el cable de alimentación sean del mismo
número, medida y forma que los de la clavija del cargador;
b) El cable de extensión tenga el alambrado adecuado y que esté en
buenas condiciones eléctricas;
c) El calibre del cable sea lo suficientemente grande para el arco de
amperes de carga como se especifica en la tabla siguiente:
Calibre mínimo para cables de extensión (AWG)
(Cuando se usan 127 V~ solamente)
(1) Se permite utilizarlo siempre y cuando las extensiones mismas
cuenten con un artefacto de protección contra sobrecorriente.
(2) Uno de los conductores debe ser conductor para puesta a tierra.
Todos los conductores son de la misma designación (calibre)
incluyendo el de puesta a tierra. Referencia: NMX-J-195-ANCE
Capacidad de Amperes (2) Calibre de extensión
Mayor de
0 A
10 A
13 A
15 A
10 A
13 A
15 A
20 A
18 AWG (1)
16 AWG
14 AWG
8 AWG
16 AWG
14 AWG
12 AWG
6 AWG
3
3
3
3
Mayor 15 mNo. de
conductores
De 1.8 m
hasta 15 m
Hasta
5. No opere el cargador si tiene el cable o clavija dañados. Llévelo a un
Centro de Servicio Autorizado Truper®
6. No utilice el cargador si ha recibido un golpe fuerte, si se cayó o si
está dañado de cualquier forma. Llévelo a un Centro de Servicio
Autorizado Truper®
7. No desarme el cargador. Cuando se requiera darle servicio o hacer
alguna reparación debe llevarlo a un Centro de Servicio Autorizado
Truper®. El armado posterior puede ser causa de fuego o descarga
eléctrica.
8. Para reducir el riesgo de descarga eléctrica, desconecte el cargador
del tomacorriente antes de llevar a cabo cualquier tarea de
mantenimiento o de limpieza. Apagar los controles no reduce estos
riesgos.
9. RIESGO DE GASES EXPLOSIVOS
A) TRABAJAR CERCA DE UNA BATERÍA DE PLOMO ÁCIDO ES
PELIGROSO. LAS BATERÍAS GENERAN GASES EXPLOSIVOS
DURANTE LA OPERACIÓN NORMAL DE LA BATERÍA. DEBIDO
A ESTO ES MUY IMPORTANTE QUE CADA VEZ, ANTES DE
UTILIZAR EL CARGADOR, LEA ESTE INSTRUCTIVO Y SIGA
LAS INSTRUCCIONES AL PIE DE LA LETRA.
b) Para reducir el riesgo de que la batería explote, siga estas
instrucciones y las instrucciones del fabricante del equipo que vaya
a utilizar cerca de la batería. Revise las medidas precautorias en
este producto y en el motor.
10. Precaución personal:
a) Debe haber una persona cerca de usted, para que le ayude cuando
trabaje con una batería de plomo ácido
b) Tenga suficiente agua fresca y jabón cerca, en caso de que el ácido
de la batería entre en contacto con su piel, ropa u ojos.
c) Use protección para ojos completa y ropa protectora. Evite tocarse
los ojos cuando trabaje cerca de la batería.
d) En caso de que el ácido de la batería entre en contacto con su piel
o ropa, lave de inmediato con gua y jabón. En caso de que entre
ácido en sus ojos, lave con mucha agua fría, por lo menos durante
10 minutos y busque atención médica de inmediato.
e) NUNCA fume o permita que haya chispas o flama cerca de la batería
o del motor.
f) Tenga mucho cuidado de no dejar caer una herramienta de metal
sobre la batería. Esto puede provocar una chispa o un corto circuito
en la batería o en alguna otra parte eléctrica y provocar una
explosión.
g) Retire todos los artículos de metal, tales como anillos, pulseras y
relojes cuando trabaje con una batería de plomo ácido. Una batería
de plomo ácido puede producir un cortocircuito con una corriente
tan alta que es suficiente para soldar un anillo o cualquier artículo
de metal, ocasionando quemaduras severas.
h) Use el cargador solamente para recargar baterías de PLOMO ÁCIDO.
No está diseñada para el suministro de electricidad a sistemas de
baja tensión diferentes a la aplicación de arranque de motor. No
utilice el cargador de baterías para recargar pilas secas que se
utilizan comúnmente con aparatos electrodomésticos. Este tipo de
baterías pueden explotar y ocasionar lesiones a las personas y dañar
sus propiedades.
i) NUNCA recargue una batería congelada.
PREPARACIÓN PARA CARGAR
a) En caso de necesitar sacar la batería del vehículo hacia el cargador,
retire siempre primero la terminal aterrizada de la batería. Verifique
que todos los accesorios del vehículo estén apagados para no
provocar un arco.
b) Verifique que el área alrededor de la batería esté bien ventilada
cuando se carga la batería. Puede esparcir el gas del área soplándolo
con una hoja de cartón y otro material no metálico usándolo como
abanico.
c) Limpie las terminales de la batería. Tenga cuidado que la corrosión
no entre en contacto con sus ojos.
d) Añada agua destilada en cada celda hasta que el ácido de la batería
llegue al nivel especificado indicado por el fabricante de la batería.
ADVERTENCIA
Esto ayuda a purgar el gas excesivo de las celdas. No llene demasiado.
Para las baterías que no tiene tapas en celdas, siga con cuidado las
instrucciones de recarga indicadas por el fabricante.
e) Estudie todas las medidas preventivas que indica el fabricante de
la batería, tales como, quitar o no quitar las tapas de las celdas
cuando se hace la recarga y las tasas de carga recomendadas.
f) Determine la tensión de la batería revisando el manual del automóvil.
En caso de que el cargador tenga velocidad de carga ajustable,
cargue la batería primero a la velocidad más baja.
UBICACIÓN DEL CARGADOR
a) Sitúe el cargador tan lejos como lo permitan los cables de corriente
continua de la batería.
b) Nunca coloque el cargador directamente sobre la batería que se
esté cargando. Los gases de la batería pueden corroer y dañar el
cargador.
c) No permita que el ácido de la batería gotee sobre el cargador cuando
revise la gravedad o cuando la rellene.
d) No haga funcionar el cargador en un área cerrada, ni impida la
ventilación de ninguna manera.
e) No coloque la batería sobre el cargador. El dispositivo produce calor
en la máquina mientras está funcionando. Para permitir que el calor
salga, no cubra con ningún objeto la ventila.
MEDIDAS DE PRECAUCIÓN
a) La conexión y desconexión de las pinzas de salida de corriente
directa solo se debe hacer con los interruptores del cargador en
la posición APAGADO y con el cable de corriente alterna
desconectado de la fuente de electricidad o tomacorriente. Nunca
permita que las pinzas se toquen entre sí.
b) Coloque las pinzas en la bataría y el chasis como se indica en 1(e),
1(f), 1(b) y 1(d).
1. SIGA ESTOS PASOS CUANDO LA BATERÍA ESTÉ INSTALADA EN EL
VEHÍCULO. UNA CHISPA CERCA DE LA BATERÍA PUEDE PROVOCAR
QUE EXPLOTE. PARA REDUCIR EL RIESGO DE CHISPAS CERCA DE LA
BATERÍA:
a) Para reducir el riesgo de daños, coloque los cables de corriente en
el cofre, la puerta o alguna parte del motor.
b) Manténganse alejado de las aspas del ventilador, bandas, poleas y
otras partes que podría ocasionar lesiones a las personas.
c) Revise la polaridad de los postes de la batería. El poste de la batería
POSITIVO (POS, P, +) generalmente tiene un diámetro mayor que el
poste NEGATIVO (NEG, N, -)
d) Determine cuál de los postes de la batería está aterrizado (conectado)
al chasis. En caso de que el poste negativo esté aterrizado al chasis
(como sucede en la mayoría de los vehículos), vea el inciso (e).
En caso de que el poste positivo esté aterrizado al chasis, vea el
inciso (f).
e) En los vehículos aterrizados con el negativo, conecte la pinza POSITIVA
(ROJA) del cargador de batería al poste sin aterrizar POSITIVO (POS,
P, +) de la batería. No conecte la pinza en el carburador, las líneas
de combustible o las láminas de metal de la carrocería. Conecte a
una parte metálica de calibre grueso del marco o del block del motor.
f) En los vehículos aterrizados con el positivo, conecte la pinza NEGATIVA
(NEGRA) del cargador de batería al poste sin aterrizar NEGATIVO
(NEG, N, -) de la batería. Conecte la pinza POSITIVA (ROJA) al chasis
del vehículo o al block del motor alejado de la batería. No conecte
la pinza al carburador, las líneas de combustible o partes de hoja
metálica de la carrocería. Conecte a una parte metálica de calibre
grueso del marco o del block del motor.
g) Cuando desconecte el cargador, desconecte el cable de alimentación,
retire la pinza del chasis del vehículo y después retire la pinza de la
terminal de la batería.
2. SIGA ESTOS PASOS CUANDO LA BATERÍA ESTÉ FUERA DEL VEHÍCULO.
UNA CHISPA CERCA DE LA BATERÍA PUEDE OCASIONAR UNA
EXPLOSIÓN. PARA REDUCIR EL RIESGO QUE SE GENERE UNA CHISPA
CERCA DE LA BATERÍA:
a) Revise la polaridad de los postes de la batería. El poste POSITIVO
(POS, P, +) DE LA BATERÍA GENERALMENTE TIENE UN DIÁMETRO MAYOR
QUE EL POSTE negativo (NEG, N, -).
b) Coloque un cable de batería aislado de 24 pulgadas de largo, de por
lo menos calibre 6 (AWG), el poste NEGATIVO (NEG, N, -) de la batería.
c) Conecte la pinza POSITIVA (ROJA) del cargador al poste POSITIVO
(POS, P, +) de la batería.
d) Coloque su cuerpo y el extremo libre del cable tan lejos como sea
posible de la batería. Entonces conecte la pinza del cargador
NEGATIVO (NEGRA) al extremo libre del cable.
e) No se ponga frente a la batería cuando haga la conexión final.
f) Cuando desconecte el cargador, hágalo en secuencia inversa al
procedimiento de conexión y desconecte la primera conexión
situándose tan lejos como sea posible.
g) La batería de un bote marino se debe retirar y cargarse en tierra.
Para hacer carga a bordo se requiere equipo especialmente diseñado
para uso marino.
INSTRUCCIONES PARA ATERRIZAR Y CONECTAR UN CABLE DE
CORRIENTE ALTERNA.
Para reducir el riesgo de descarga eléctrica, el cargador debe estar
aterrizado. El cargador viene equipado con un cable eléctrico con un
conductor aterrizado y una clavija aterrizada. Se debe conectar la clavija
en un tomacorriente debidamente instalado y aterrizado, que cumpla
con lo códigos y ordenamientos locales.
NUNCA altere el cable o clavija de
corriente alterna que viene con el equipo. Si no se puede
introducir en el tomacorrientes, haga que un electricista
calificado conecte el tomacorriente adecuado. Una conexión
no adecuada puede ocasionar una descarga eléctrica.
Este cargador de baterías está hecho para usarse en un circuito de
tensión nominal de 127 V~ y tiene una clavija aterrizada que se ve como
lo indica la figura A. Se puede utilizar un adaptador temporal similar al
adaptador ilustrado en las figuras B y C, en caso de que no esté
disponible un tomacorrientes adecuado, se puede conectar el adaptador
a un tomacorrientes de dos polos mostrado en la figura B. Este adaptador
temporal debe utilizarse solamente hasta que un electricista calificado
instale un tomacorrientes aterrizado adecuadamente.
Antes de utilizar el adaptador como se
ilustra, asegúrese que el tornillo del centro de la placa (si
existe) del tomacorrientes esté aterrizada. El anillo rígido o
lengüeta de conexión de color verde que sale del adaptador se debe
conectar a un tomacorriente aterrizado. En caso de que sea necesario,
reemplace el tornillo de la placa con un tornillo más largo que pueda
sujetar el anillo rígido o lengüeta y que haga una conexión aterrizada
al tomacorriente aterrizado.
ATENCIÓN
reparar el cargador con el proveedor o en el Centro de Servicio
Autorizado Truper, mostrando su factura de compra.
• Antes de llevar a cabo cualquier tipo de mantenimiento, debe cortar
primero el suministro eléctrico.
• Limpie con regularidad el cargador usando un trapo suave. Después
de hacer una recarga, limpie las pinzas para eliminar la corrosión.
Debe proteger su piel cotra quemaduras.
• Almacene el cargador de baterías en un sitio seco, limpio y lejos de
corrientes de aire.
• En caso de falla, consulte a un Centro de Servicio Autorizado Truper.
DIAGRAMA ELÉCTRICO

Cuando el cargador de batería esté en conectado y el interruptor esté
en la posición de encendido, tenga cuidado de que las pinzas no se
toquen.
Nunca cargue una batería en la posición de encendido, ni cargue una
batería de 6 V en la posición de 12 V
OPERACIÓN
Verifique que el área alrededor de la batería esté bien ventilada durante
la carga. Puede esparcir el gas del área soplándolo con una hoja de
cartón u otro material no metálico usándolo como abanico.
INSTRUCCIONES DE OPERACIÓN PARA EL CARGADOR Y LA
BATERÍA
Para asegurar el uso correcto del cargador y de la batería, y que la
máquina no se dañe, se debe seguir las siguientes instrucciones:
1. Instrucciones de operación para la batería a cargar.
2. Cuando la batería tiene baja la carga, generalmente la tensión de
la terminal es normal. El fenómeno físico de la poca energía es el
cambio de la gravedad en la solución en la batería. Normalmente
es de 1,28 kg/L si es menor que 1,16 kg/L significa que debe cargar
la batería
3. La tensión de la batería deja el valor normal cuando se carga o está
descargada. Es más alto cuando se carga y es más bajo cuando se
descarga. Si la tensión no regresa a su valor normal después de
media hora, significa que la batería no esta bien.
4. Este es un cargador manual y no está provisto de un indicador de
carga total, el amperímetro indica la corriente que el cargador
suministra a la batería y la intensidad dependerá del estado de
carga de ésta.
No se recomienda utilizar la lectura del amperímetro para
determinar si la batería ha sido cargada completamente.
Para determinar el nivel de carga de la batería, se debe medir de
manera frecuente la tensión en sus terminales con un voltímetro,
cuando la tensión medida se encuentre en el nivel nominal, la batería
estará cargada.
METODO DE ARRANQUE:
El uso de la función del arranque debe cumplir con el
ciclo de trabajo del producto.
1. Lea con cuidado el instructivo del motor.
2. Cargue la batería durante 10 a 15 minutos.
• Conecte cualquier electrodo del cargador a la terminal de la batería,
que no conecte al chasis, y el otro a la terminal que conecte con el
chasis.
• Revise nuevamente la conexión: Si no existe ningún problema,
coloque el interruptor del cargador en la posición de arranque y
encienda el cargador de baterías.
El ciclo de trabajo para arranque del motor
es de 3 segundos encendido y 360 segundos apagado.
(CARBA-140)
El ciclo de trabajo para arranque del motor es de 3 segundos encendido
y 240 segundos apagado. (CARBA-200)
NOTA: Si excede el lapso de 3 segundos de arranque, el cargador
sufrirá daños.
MANTENIMIENTO
• El cargador de baterías debe recibir mantenimiento y revisiones
de manera regular para poder funcionar bien y con seguridad
• No abra jamás la carcasa del cargador de batería, ni trate de
desarmarla. Solamente un Centro de Servicio Autorizado Truper,
la puede reparar.
• El periodo de garantía del cargador de batería es de 1 año. Haga
4
INSTRUCCIONES DE SEGURIDAD
1. Mantenga el área de trabajo en orden. Las áreas y bancos
desordenados propician accidentes
2. Observe las condiciones del área de trabajo. No utilice
máquinas o equipos eléctricos en áreas mojadas o húmedas.
No exponga su equipo a la lluvia. Mantenga el área de trabajo
bien iluminada. No utilice equipos eléctricos en presencia de
gases o líquidos inflamables.
3. Prevéngase contra los choques eléctricos. Prevenga a
tierra tales como tuberías, radiadores y refrigeradores.
4. Mantenga a los niños alejados. Los niños nunca deben estar cerca
del área de trabajo. No permita que ellos sostengan máquinas,
equipos o cables de extensión. No permita que otras personas
toquen el equipo, manténgalas alejadas de su campo de trabajo.
5. Mantenga guardado el equipo mientras no esté en uso. Cuando
no esté en uso, el equipo debe guardarse en un lugar seco y libre
de polvo. Siempre guarde su equipo bajo llave para que no esté al
alcance de los niños.
6. No fuerce el equipo. Esta hará mejor su trabajo y será más segura
dentro del rango para la cual fue diseñada. No utilice aditamentos
inapropiados para intentar exceder la capacidad del equipo.
7. Utilice el equipo eléctrico adecuado. No utilice equipos demasiados
débiles para ejecutar trabajos pesados. No utilice equipos eléctricos
para trabajos pesados para los cuales no ha sido diseñada.
8. Utilice la indumentaria apropiada. No utilice ropa suelta, guantes,
corbatas o joyería que pueda ser atrapada en las partes móviles.
No utilice calzado resbaloso. Utilice algún protector de cabello para
retener el cabello largo.
9. Utilice protección para ojos. Siempre utilice accesorios de
seguridad apropiados por la Norma Oficial Mexicana (NOM),
como es el caso de goggles, caretas y mascarillas contra polvo,
cuando trabaje con materiales que despidan partes metálicas,
virutas o polvos químicos.
10. No use el cable de alimentación para fines para los cuales no está
dispuesto. No lleve la herramienta colgada del cable y no tire de
éste para desconectar la clavija de la base de enchufe. Proteja el
cable contra el calor, el aceite y las esquinas afiladas.
11. Afiance la pieza de trabajo. Utilice un dispositivo de fijación o una
mordaza para mantener firme la pieza de trabajo. Esto es más
seguro que usando una sola mano y le permite tener ambas manos
libres. Mantenga el balance adecuado todo el tiempo sobre sus pies.
No trate de alcanzar algo sobre la máquina o se cruce cuando esté
en funcionamiento.
12. No extienda su radio de acción. Evite toda postura que cause
cansancio. Cuide de que su posición sea segura y de que conserve
el equilibrio.
13. Mantenga el equipo en las mejores condiciones. Mantenga el equipo
limpio para tener la mejor ejecución y seguridad. Siga las
instrucciones para la lubricación y cambio de accesorios. Verifique
los cables de la herramienta periódicamente y si se encuentran
dañados, llévelos a reparar a un Centro de Servicio Autorizado
Truper®. Los mangos o manijas deben siempre permanecer limpios,
secos y libres de aceite y grasas.
14. Desconecte el equipo cuando no esté en uso, antes de proceder
al mantenimiento.
15. Reduzca el riesgo de arranques accidentales. No lleve
ninguna herramienta con el dedo puesto sobre el interruptor
mientras esté conectado a la red eléctrica. Asegúrese de que
el interruptor esté en la posición “apagado” (OFF) antes de
conectar el cable de alimentación.
16. Extensiones para exterior. En el exterior, utilice solamente
cables de extensión homologados y convenientemente
marcados.
17. Manténgase alerta. Fíjese en lo que está haciendo, utilice su sentido
común. No opere ninguna herramienta cuando esté cansado.
18. Revise las partes dañadas. Antes de continuar utilizando la
máquina, los protectores u otras partes móviles que pudieran estar
dañadas deben ser cuidadosamente revisadas, para asegurarse que
operan apropiadamente y trabajarán como debe ser. Verifique
también la alineación de las partes móviles, si están atascadas, o
si hay alguna probable ruptura de las partes, verifique también el
montaje, así como cualquier otra condición que pueda afectar la
operación de la herramienta. Todos los componentes deben estar
montados adecuadamente y cumplir los requisitos para garantizar
el correcto funcionamiento del aparato. Un protector u otra parte
que estén dañadas deberán ser apropiadamente reparadas o
cambiadas. Todo interruptor de mando deteriorado, deberá ser
reemplazado por un Centro de Servicio Autorizado Truper®. No
utilice ninguna herramienta eléctrica en la cual el interruptor no
tenga contacto.
19. Reemplazo de partes y accesorios. Cuando necesite remplazar las
piezas, utilice solamente refacciones originales Truper®, destinados
para usarse con está herramienta.
20. Para su seguridad personal utilice
únicamente los accesorios o aparatos adicionales indicados
en las instrucciones de manejo o recomendados por el
fabricante de la herramienta. La utilización de accesorios
diferentes a los indicados en las instrucciones de manejo,
puede ocasionar riesgo personal.
21. Protección para oídos. Utilice protectores auriculares,
cuando ejecute servicios que hagan ruidos
superiores a 85 dB
REGLAS DE SEGURIDAD ADICIONALES PARA EL CARGADOR DE
BATERÍAS
SEGURIDAD GENERAL DE BATERÍAS
Los cargadores de baterías se pueden utilizar para recargar baterías
de plomo ácido de ciclo profundo. También se pueden utilizar como
auxiliar en el arranque.
Estos cargadores tienen protección contra sobrecalentamiento y
protección contra picos de corriente. Son seguros y confiables al usarse.
La función del cargador de baterías incluye selección de corriente de
carga. Este control se encuentra integrado en el panel frontal del
cargador y es de fácil uso.
Tiene instalado un cinturón para mover el cargador.
Cuando se utiliza el cargador de baterías se deben observar las
siguientes reglas de seguridad, con el fin de proteger la seguridad de
las personas y de sus propiedades.
1. No exponga el cargador a la lluvia o nieve.
2. El uso de algún accesorio que no haya sido recomendado o vendido
por el fabricante de la batería puede ser causa de incendio, descarga
eléctrica o lesiones a las personas.
3. Cuando desconecte el cargador, debe hacerlo por la clavija y no por
el cable. No hacerlo puede dañar tanto al cable como a la clavija.
4. A menos que sea estrictamente necesario, no se debe utilizar cables
de extensión. El uso de cables de extensión incorrectos puede
ocasionar incendio y descarga eléctrica.
En caso de que sea necesario el uso de un cable de extensión, se debe
asegurar que:
a) Las espigas de la clavija en el cable de alimentación sean del mismo
número, medida y forma que los de la clavija del cargador;
b) El cable de extensión tenga el alambrado adecuado y que esté en
buenas condiciones eléctricas;
c) El calibre del cable sea lo suficientemente grande para el arco de
amperes de carga como se especifica en la tabla siguiente:
Calibre mínimo para cables de extensión (AWG)
(Cuando se usan 127 V~ solamente)
(1) Se permite utilizarlo siempre y cuando las extensiones mismas
cuenten con un artefacto de protección contra sobrecorriente.
(2) Uno de los conductores debe ser conductor para puesta a tierra.
Todos los conductores son de la misma designación (calibre)
incluyendo el de puesta a tierra. Referencia: NMX-J-195-ANCE
5. No opere el cargador si tiene el cable o clavija dañados. Llévelo a un
Centro de Servicio Autorizado Truper®
6. No utilice el cargador si ha recibido un golpe fuerte, si se cayó o si
está dañado de cualquier forma. Llévelo a un Centro de Servicio
Autorizado Truper®
7. No desarme el cargador. Cuando se requiera darle servicio o hacer
alguna reparación debe llevarlo a un Centro de Servicio Autorizado
Truper®. El armado posterior puede ser causa de fuego o descarga
eléctrica.
8. Para reducir el riesgo de descarga eléctrica, desconecte el cargador
del tomacorriente antes de llevar a cabo cualquier tarea de
mantenimiento o de limpieza. Apagar los controles no reduce estos
riesgos.
9. RIESGO DE GASES EXPLOSIVOS
A) TRABAJAR CERCA DE UNA BATERÍA DE PLOMO ÁCIDO ES
PELIGROSO. LAS BATERÍAS GENERAN GASES EXPLOSIVOS
DURANTE LA OPERACIÓN NORMAL DE LA BATERÍA. DEBIDO
A ESTO ES MUY IMPORTANTE QUE CADA VEZ, ANTES DE
UTILIZAR EL CARGADOR, LEA ESTE INSTRUCTIVO Y SIGA
LAS INSTRUCCIONES AL PIE DE LA LETRA.
b) Para reducir el riesgo de que la batería explote, siga estas
instrucciones y las instrucciones del fabricante del equipo que vaya
a utilizar cerca de la batería. Revise las medidas precautorias en
este producto y en el motor.
10. Precaución personal:
a) Debe haber una persona cerca de usted, para que le ayude cuando
trabaje con una batería de plomo ácido
b) Tenga suficiente agua fresca y jabón cerca, en caso de que el ácido
de la batería entre en contacto con su piel, ropa u ojos.
c) Use protección para ojos completa y ropa protectora. Evite tocarse
los ojos cuando trabaje cerca de la batería.
d) En caso de que el ácido de la batería entre en contacto con su piel
o ropa, lave de inmediato con gua y jabón. En caso de que entre
ácido en sus ojos, lave con mucha agua fría, por lo menos durante
10 minutos y busque atención médica de inmediato.
e) NUNCA fume o permita que haya chispas o flama cerca de la batería
o del motor.
f) Tenga mucho cuidado de no dejar caer una herramienta de metal
sobre la batería. Esto puede provocar una chispa o un corto circuito
en la batería o en alguna otra parte eléctrica y provocar una
explosión.
g) Retire todos los artículos de metal, tales como anillos, pulseras y
relojes cuando trabaje con una batería de plomo ácido. Una batería
de plomo ácido puede producir un cortocircuito con una corriente
tan alta que es suficiente para soldar un anillo o cualquier artículo
de metal, ocasionando quemaduras severas.
h) Use el cargador solamente para recargar baterías de PLOMO ÁCIDO.
No está diseñada para el suministro de electricidad a sistemas de
baja tensión diferentes a la aplicación de arranque de motor. No
utilice el cargador de baterías para recargar pilas secas que se
utilizan comúnmente con aparatos electrodomésticos. Este tipo de
baterías pueden explotar y ocasionar lesiones a las personas y dañar
sus propiedades.
i) NUNCA recargue una batería congelada.
PREPARACIÓN PARA CARGAR
a) En caso de necesitar sacar la batería del vehículo hacia el cargador,
retire siempre primero la terminal aterrizada de la batería. Verifique
que todos los accesorios del vehículo estén apagados para no
provocar un arco.
b) Verifique que el área alrededor de la batería esté bien ventilada
cuando se carga la batería. Puede esparcir el gas del área soplándolo
con una hoja de cartón y otro material no metálico usándolo como
abanico.
c) Limpie las terminales de la batería. Tenga cuidado que la corrosión
no entre en contacto con sus ojos.
d) Añada agua destilada en cada celda hasta que el ácido de la batería
llegue al nivel especificado indicado por el fabricante de la batería.
Esto ayuda a purgar el gas excesivo de las celdas. No llene demasiado.
Para las baterías que no tiene tapas en celdas, siga con cuidado las
instrucciones de recarga indicadas por el fabricante.
e) Estudie todas las medidas preventivas que indica el fabricante de
la batería, tales como, quitar o no quitar las tapas de las celdas
cuando se hace la recarga y las tasas de carga recomendadas.
f) Determine la tensión de la batería revisando el manual del automóvil.
En caso de que el cargador tenga velocidad de carga ajustable,
cargue la batería primero a la velocidad más baja.
UBICACIÓN DEL CARGADOR
a) Sitúe el cargador tan lejos como lo permitan los cables de corriente
continua de la batería.
b) Nunca coloque el cargador directamente sobre la batería que se
esté cargando. Los gases de la batería pueden corroer y dañar el
cargador.
c) No permita que el ácido de la batería gotee sobre el cargador cuando
revise la gravedad o cuando la rellene.
d) No haga funcionar el cargador en un área cerrada, ni impida la
ventilación de ninguna manera.
e) No coloque la batería sobre el cargador. El dispositivo produce calor
en la máquina mientras está funcionando. Para permitir que el calor
salga, no cubra con ningún objeto la ventila.
MEDIDAS DE PRECAUCIÓN
a) La conexión y desconexión de las pinzas de salida de corriente
directa solo se debe hacer con los interruptores del cargador en
la posición APAGADO y con el cable de corriente alterna
desconectado de la fuente de electricidad o tomacorriente. Nunca
permita que las pinzas se toquen entre sí.
b) Coloque las pinzas en la bataría y el chasis como se indica en 1(e),
1(f), 1(b) y 1(d).
1. SIGA ESTOS PASOS CUANDO LA BATERÍA ESTÉ INSTALADA EN EL
VEHÍCULO. UNA CHISPA CERCA DE LA BATERÍA PUEDE PROVOCAR
QUE EXPLOTE. PARA REDUCIR EL RIESGO DE CHISPAS CERCA DE LA
BATERÍA:
a) Para reducir el riesgo de daños, coloque los cables de corriente en
el cofre, la puerta o alguna parte del motor.
b) Manténganse alejado de las aspas del ventilador, bandas, poleas y
otras partes que podría ocasionar lesiones a las personas.
c) Revise la polaridad de los postes de la batería. El poste de la batería
POSITIVO (POS, P, +) generalmente tiene un diámetro mayor que el
poste NEGATIVO (NEG, N, -)
d) Determine cuál de los postes de la batería está aterrizado (conectado)
al chasis. En caso de que el poste negativo esté aterrizado al chasis
(como sucede en la mayoría de los vehículos), vea el inciso (e).
En caso de que el poste positivo esté aterrizado al chasis, vea el
inciso (f).
e) En los vehículos aterrizados con el negativo, conecte la pinza POSITIVA
(ROJA) del cargador de batería al poste sin aterrizar POSITIVO (POS,
P, +) de la batería. No conecte la pinza en el carburador, las líneas
de combustible o las láminas de metal de la carrocería. Conecte a
una parte metálica de calibre grueso del marco o del block del motor.
f) En los vehículos aterrizados con el positivo, conecte la pinza NEGATIVA
(NEGRA) del cargador de batería al poste sin aterrizar NEGATIVO
(NEG, N, -) de la batería. Conecte la pinza POSITIVA (ROJA) al chasis
del vehículo o al block del motor alejado de la batería. No conecte
la pinza al carburador, las líneas de combustible o partes de hoja
metálica de la carrocería. Conecte a una parte metálica de calibre
grueso del marco o del block del motor.
g) Cuando desconecte el cargador, desconecte el cable de alimentación,
retire la pinza del chasis del vehículo y después retire la pinza de la
terminal de la batería.
2. SIGA ESTOS PASOS CUANDO LA BATERÍA ESTÉ FUERA DEL VEHÍCULO.
UNA CHISPA CERCA DE LA BATERÍA PUEDE OCASIONAR UNA
EXPLOSIÓN. PARA REDUCIR EL RIESGO QUE SE GENERE UNA CHISPA
CERCA DE LA BATERÍA:
a) Revise la polaridad de los postes de la batería. El poste POSITIVO
(POS, P, +) DE LA BATERÍA GENERALMENTE TIENE UN DIÁMETRO MAYOR
QUE EL POSTE negativo (NEG, N, -).
b) Coloque un cable de batería aislado de 24 pulgadas de largo, de por
lo menos calibre 6 (AWG), el poste NEGATIVO (NEG, N, -) de la batería.
c) Conecte la pinza POSITIVA (ROJA) del cargador al poste POSITIVO
(POS, P, +) de la batería.
d) Coloque su cuerpo y el extremo libre del cable tan lejos como sea
posible de la batería. Entonces conecte la pinza del cargador
NEGATIVO (NEGRA) al extremo libre del cable.
e) No se ponga frente a la batería cuando haga la conexión final.
f) Cuando desconecte el cargador, hágalo en secuencia inversa al
procedimiento de conexión y desconecte la primera conexión
situándose tan lejos como sea posible.
g) La batería de un bote marino se debe retirar y cargarse en tierra.
Para hacer carga a bordo se requiere equipo especialmente diseñado
para uso marino.
INSTRUCCIONES PARA ATERRIZAR Y CONECTAR UN CABLE DE
CORRIENTE ALTERNA.
Para reducir el riesgo de descarga eléctrica, el cargador debe estar
aterrizado. El cargador viene equipado con un cable eléctrico con un
conductor aterrizado y una clavija aterrizada. Se debe conectar la clavija
en un tomacorriente debidamente instalado y aterrizado, que cumpla
con lo códigos y ordenamientos locales.
NUNCA altere el cable o clavija de
corriente alterna que viene con el equipo. Si no se puede
introducir en el tomacorrientes, haga que un electricista
calificado conecte el tomacorriente adecuado. Una conexión
no adecuada puede ocasionar una descarga eléctrica.
Este cargador de baterías está hecho para usarse en un circuito de
tensión nominal de 127 V~ y tiene una clavija aterrizada que se ve como
lo indica la figura A. Se puede utilizar un adaptador temporal similar al
adaptador ilustrado en las figuras B y C, en caso de que no esté
disponible un tomacorrientes adecuado, se puede conectar el adaptador
a un tomacorrientes de dos polos mostrado en la figura B. Este adaptador
temporal debe utilizarse solamente hasta que un electricista calificado
instale un tomacorrientes aterrizado adecuadamente.
Antes de utilizar el adaptador como se
ilustra, asegúrese que el tornillo del centro de la placa (si
existe) del tomacorrientes esté aterrizada. El anillo rígido o
lengüeta de conexión de color verde que sale del adaptador se debe
conectar a un tomacorriente aterrizado. En caso de que sea necesario,
reemplace el tornillo de la placa con un tornillo más largo que pueda
sujetar el anillo rígido o lengüeta y que haga una conexión aterrizada
al tomacorriente aterrizado.
ADVERTENCIA
ADVERTENCIA
TORNILLO DE METAL
CUBIERTA DE LA
CAJA DEL
TOMACORRIENTE
ATERRIZADO
PIN DE TIERRA
ADAPTADOR
MEDIO
ATERRIZADO PIN
DE TIERRA
reparar el cargador con el proveedor o en el Centro de Servicio
Autorizado Truper, mostrando su factura de compra.
• Antes de llevar a cabo cualquier tipo de mantenimiento, debe cortar
primero el suministro eléctrico.
• Limpie con regularidad el cargador usando un trapo suave. Después
de hacer una recarga, limpie las pinzas para eliminar la corrosión.
Debe proteger su piel cotra quemaduras.
• Almacene el cargador de baterías en un sitio seco, limpio y lejos de
corrientes de aire.
• En caso de falla, consulte a un Centro de Servicio Autorizado Truper.
DIAGRAMA ELÉCTRICO

Cuando el cargador de batería esté en conectado y el interruptor esté
en la posición de encendido, tenga cuidado de que las pinzas no se
toquen.
Nunca cargue una batería en la posición de encendido, ni cargue una
batería de 6 V en la posición de 12 V
OPERACIÓN
Verifique que el área alrededor de la batería esté bien ventilada durante
la carga. Puede esparcir el gas del área soplándolo con una hoja de
cartón u otro material no metálico usándolo como abanico.
INSTRUCCIONES DE OPERACIÓN PARA EL CARGADOR Y LA
BATERÍA
Para asegurar el uso correcto del cargador y de la batería, y que la
máquina no se dañe, se debe seguir las siguientes instrucciones:
1. Instrucciones de operación para la batería a cargar.
2. Cuando la batería tiene baja la carga, generalmente la tensión de
la terminal es normal. El fenómeno físico de la poca energía es el
cambio de la gravedad en la solución en la batería. Normalmente
es de 1,28 kg/L si es menor que 1,16 kg/L significa que debe cargar
la batería
3. La tensión de la batería deja el valor normal cuando se carga o está
descargada. Es más alto cuando se carga y es más bajo cuando se
descarga. Si la tensión no regresa a su valor normal después de
media hora, significa que la batería no esta bien.
4. Este es un cargador manual y no está provisto de un indicador de
carga total, el amperímetro indica la corriente que el cargador
suministra a la batería y la intensidad dependerá del estado de
carga de ésta.
No se recomienda utilizar la lectura del amperímetro para
determinar si la batería ha sido cargada completamente.
Para determinar el nivel de carga de la batería, se debe medir de
manera frecuente la tensión en sus terminales con un voltímetro,
cuando la tensión medida se encuentre en el nivel nominal, la batería
estará cargada.
METODO DE ARRANQUE:
El uso de la función del arranque debe cumplir con el
ciclo de trabajo del producto.
1. Lea con cuidado el instructivo del motor.
2. Cargue la batería durante 10 a 15 minutos.
• Conecte cualquier electrodo del cargador a la terminal de la batería,
que no conecte al chasis, y el otro a la terminal que conecte con el
chasis.
• Revise nuevamente la conexión: Si no existe ningún problema,
coloque el interruptor del cargador en la posición de arranque y
encienda el cargador de baterías.
El ciclo de trabajo para arranque del motor
es de 3 segundos encendido y 360 segundos apagado.
(CARBA-140)
El ciclo de trabajo para arranque del motor es de 3 segundos encendido
y 240 segundos apagado. (CARBA-200)
NOTA: Si excede el lapso de 3 segundos de arranque, el cargador
sufrirá daños.
MANTENIMIENTO
• El cargador de baterías debe recibir mantenimiento y revisiones
de manera regular para poder funcionar bien y con seguridad
• No abra jamás la carcasa del cargador de batería, ni trate de
desarmarla. Solamente un Centro de Servicio Autorizado Truper,
la puede reparar.
• El periodo de garantía del cargador de batería es de 1 año. Haga
5
INSTRUCCIONES DE SEGURIDAD
1. Mantenga el área de trabajo en orden. Las áreas y bancos
desordenados propician accidentes
2. Observe las condiciones del área de trabajo. No utilice
máquinas o equipos eléctricos en áreas mojadas o húmedas.
No exponga su equipo a la lluvia. Mantenga el área de trabajo
bien iluminada. No utilice equipos eléctricos en presencia de
gases o líquidos inflamables.
3. Prevéngase contra los choques eléctricos. Prevenga a
tierra tales como tuberías, radiadores y refrigeradores.
4. Mantenga a los niños alejados. Los niños nunca deben estar cerca
del área de trabajo. No permita que ellos sostengan máquinas,
equipos o cables de extensión. No permita que otras personas
toquen el equipo, manténgalas alejadas de su campo de trabajo.
5. Mantenga guardado el equipo mientras no esté en uso. Cuando
no esté en uso, el equipo debe guardarse en un lugar seco y libre
de polvo. Siempre guarde su equipo bajo llave para que no esté al
alcance de los niños.
6. No fuerce el equipo. Esta hará mejor su trabajo y será más segura
dentro del rango para la cual fue diseñada. No utilice aditamentos
inapropiados para intentar exceder la capacidad del equipo.
7. Utilice el equipo eléctrico adecuado. No utilice equipos demasiados
débiles para ejecutar trabajos pesados. No utilice equipos eléctricos
para trabajos pesados para los cuales no ha sido diseñada.
8. Utilice la indumentaria apropiada. No utilice ropa suelta, guantes,
corbatas o joyería que pueda ser atrapada en las partes móviles.
No utilice calzado resbaloso. Utilice algún protector de cabello para
retener el cabello largo.
9. Utilice protección para ojos. Siempre utilice accesorios de
seguridad apropiados por la Norma Oficial Mexicana (NOM),
como es el caso de goggles, caretas y mascarillas contra polvo,
cuando trabaje con materiales que despidan partes metálicas,
virutas o polvos químicos.
10. No use el cable de alimentación para fines para los cuales no está
dispuesto. No lleve la herramienta colgada del cable y no tire de
éste para desconectar la clavija de la base de enchufe. Proteja el
cable contra el calor, el aceite y las esquinas afiladas.
11. Afiance la pieza de trabajo. Utilice un dispositivo de fijación o una
mordaza para mantener firme la pieza de trabajo. Esto es más
seguro que usando una sola mano y le permite tener ambas manos
libres. Mantenga el balance adecuado todo el tiempo sobre sus pies.
No trate de alcanzar algo sobre la máquina o se cruce cuando esté
en funcionamiento.
12. No extienda su radio de acción. Evite toda postura que cause
cansancio. Cuide de que su posición sea segura y de que conserve
el equilibrio.
13. Mantenga el equipo en las mejores condiciones. Mantenga el equipo
limpio para tener la mejor ejecución y seguridad. Siga las
instrucciones para la lubricación y cambio de accesorios. Verifique
los cables de la herramienta periódicamente y si se encuentran
dañados, llévelos a reparar a un Centro de Servicio Autorizado
Truper®. Los mangos o manijas deben siempre permanecer limpios,
secos y libres de aceite y grasas.
14. Desconecte el equipo cuando no esté en uso, antes de proceder
al mantenimiento.
15. Reduzca el riesgo de arranques accidentales. No lleve
ninguna herramienta con el dedo puesto sobre el interruptor
mientras esté conectado a la red eléctrica. Asegúrese de que
el interruptor esté en la posición “apagado” (OFF) antes de
conectar el cable de alimentación.
16. Extensiones para exterior. En el exterior, utilice solamente
cables de extensión homologados y convenientemente
marcados.
17. Manténgase alerta. Fíjese en lo que está haciendo, utilice su sentido
común. No opere ninguna herramienta cuando esté cansado.
18. Revise las partes dañadas. Antes de continuar utilizando la
máquina, los protectores u otras partes móviles que pudieran estar
dañadas deben ser cuidadosamente revisadas, para asegurarse que
operan apropiadamente y trabajarán como debe ser. Verifique
también la alineación de las partes móviles, si están atascadas, o
si hay alguna probable ruptura de las partes, verifique también el
montaje, así como cualquier otra condición que pueda afectar la
operación de la herramienta. Todos los componentes deben estar
montados adecuadamente y cumplir los requisitos para garantizar
el correcto funcionamiento del aparato. Un protector u otra parte
que estén dañadas deberán ser apropiadamente reparadas o
cambiadas. Todo interruptor de mando deteriorado, deberá ser
reemplazado por un Centro de Servicio Autorizado Truper®. No
utilice ninguna herramienta eléctrica en la cual el interruptor no
tenga contacto.
19. Reemplazo de partes y accesorios. Cuando necesite remplazar las
piezas, utilice solamente refacciones originales Truper®, destinados
para usarse con está herramienta.
20. Para su seguridad personal utilice
únicamente los accesorios o aparatos adicionales indicados
en las instrucciones de manejo o recomendados por el
fabricante de la herramienta. La utilización de accesorios
diferentes a los indicados en las instrucciones de manejo,
puede ocasionar riesgo personal.
21. Protección para oídos. Utilice protectores auriculares,
cuando ejecute servicios que hagan ruidos
superiores a 85 dB
REGLAS DE SEGURIDAD ADICIONALES PARA EL CARGADOR DE
BATERÍAS
SEGURIDAD GENERAL DE BATERÍAS
Los cargadores de baterías se pueden utilizar para recargar baterías
de plomo ácido de ciclo profundo. También se pueden utilizar como
auxiliar en el arranque.
Estos cargadores tienen protección contra sobrecalentamiento y
protección contra picos de corriente. Son seguros y confiables al usarse.
La función del cargador de baterías incluye selección de corriente de
carga. Este control se encuentra integrado en el panel frontal del
cargador y es de fácil uso.
Tiene instalado un cinturón para mover el cargador.
Cuando se utiliza el cargador de baterías se deben observar las
siguientes reglas de seguridad, con el fin de proteger la seguridad de
las personas y de sus propiedades.
1. No exponga el cargador a la lluvia o nieve.
2. El uso de algún accesorio que no haya sido recomendado o vendido
por el fabricante de la batería puede ser causa de incendio, descarga
eléctrica o lesiones a las personas.
3. Cuando desconecte el cargador, debe hacerlo por la clavija y no por
el cable. No hacerlo puede dañar tanto al cable como a la clavija.
4. A menos que sea estrictamente necesario, no se debe utilizar cables
de extensión. El uso de cables de extensión incorrectos puede
ocasionar incendio y descarga eléctrica.
En caso de que sea necesario el uso de un cable de extensión, se debe
asegurar que:
a) Las espigas de la clavija en el cable de alimentación sean del mismo
número, medida y forma que los de la clavija del cargador;
b) El cable de extensión tenga el alambrado adecuado y que esté en
buenas condiciones eléctricas;
c) El calibre del cable sea lo suficientemente grande para el arco de
amperes de carga como se especifica en la tabla siguiente:
Calibre mínimo para cables de extensión (AWG)
(Cuando se usan 127 V~ solamente)
(1) Se permite utilizarlo siempre y cuando las extensiones mismas
cuenten con un artefacto de protección contra sobrecorriente.
(2) Uno de los conductores debe ser conductor para puesta a tierra.
Todos los conductores son de la misma designación (calibre)
incluyendo el de puesta a tierra. Referencia: NMX-J-195-ANCE
5. No opere el cargador si tiene el cable o clavija dañados. Llévelo a un
Centro de Servicio Autorizado Truper®
6. No utilice el cargador si ha recibido un golpe fuerte, si se cayó o si
está dañado de cualquier forma. Llévelo a un Centro de Servicio
Autorizado Truper®
7. No desarme el cargador. Cuando se requiera darle servicio o hacer
alguna reparación debe llevarlo a un Centro de Servicio Autorizado
Truper®. El armado posterior puede ser causa de fuego o descarga
eléctrica.
8. Para reducir el riesgo de descarga eléctrica, desconecte el cargador
del tomacorriente antes de llevar a cabo cualquier tarea de
mantenimiento o de limpieza. Apagar los controles no reduce estos
riesgos.
9. RIESGO DE GASES EXPLOSIVOS
A) TRABAJAR CERCA DE UNA BATERÍA DE PLOMO ÁCIDO ES
PELIGROSO. LAS BATERÍAS GENERAN GASES EXPLOSIVOS
DURANTE LA OPERACIÓN NORMAL DE LA BATERÍA. DEBIDO
A ESTO ES MUY IMPORTANTE QUE CADA VEZ, ANTES DE
UTILIZAR EL CARGADOR, LEA ESTE INSTRUCTIVO Y SIGA
LAS INSTRUCCIONES AL PIE DE LA LETRA.
b) Para reducir el riesgo de que la batería explote, siga estas
instrucciones y las instrucciones del fabricante del equipo que vaya
a utilizar cerca de la batería. Revise las medidas precautorias en
este producto y en el motor.
10. Precaución personal:
a) Debe haber una persona cerca de usted, para que le ayude cuando
trabaje con una batería de plomo ácido
b) Tenga suficiente agua fresca y jabón cerca, en caso de que el ácido
de la batería entre en contacto con su piel, ropa u ojos.
c) Use protección para ojos completa y ropa protectora. Evite tocarse
los ojos cuando trabaje cerca de la batería.
d) En caso de que el ácido de la batería entre en contacto con su piel
o ropa, lave de inmediato con gua y jabón. En caso de que entre
ácido en sus ojos, lave con mucha agua fría, por lo menos durante
10 minutos y busque atención médica de inmediato.
e) NUNCA fume o permita que haya chispas o flama cerca de la batería
o del motor.
f) Tenga mucho cuidado de no dejar caer una herramienta de metal
sobre la batería. Esto puede provocar una chispa o un corto circuito
en la batería o en alguna otra parte eléctrica y provocar una
explosión.
g) Retire todos los artículos de metal, tales como anillos, pulseras y
relojes cuando trabaje con una batería de plomo ácido. Una batería
de plomo ácido puede producir un cortocircuito con una corriente
tan alta que es suficiente para soldar un anillo o cualquier artículo
de metal, ocasionando quemaduras severas.
h) Use el cargador solamente para recargar baterías de PLOMO ÁCIDO.
No está diseñada para el suministro de electricidad a sistemas de
baja tensión diferentes a la aplicación de arranque de motor. No
utilice el cargador de baterías para recargar pilas secas que se
utilizan comúnmente con aparatos electrodomésticos. Este tipo de
baterías pueden explotar y ocasionar lesiones a las personas y dañar
sus propiedades.
i) NUNCA recargue una batería congelada.
PREPARACIÓN PARA CARGAR
a) En caso de necesitar sacar la batería del vehículo hacia el cargador,
retire siempre primero la terminal aterrizada de la batería. Verifique
que todos los accesorios del vehículo estén apagados para no
provocar un arco.
b) Verifique que el área alrededor de la batería esté bien ventilada
cuando se carga la batería. Puede esparcir el gas del área soplándolo
con una hoja de cartón y otro material no metálico usándolo como
abanico.
c) Limpie las terminales de la batería. Tenga cuidado que la corrosión
no entre en contacto con sus ojos.
d) Añada agua destilada en cada celda hasta que el ácido de la batería
llegue al nivel especificado indicado por el fabricante de la batería.
Esto ayuda a purgar el gas excesivo de las celdas. No llene demasiado.
Para las baterías que no tiene tapas en celdas, siga con cuidado las
instrucciones de recarga indicadas por el fabricante.
e) Estudie todas las medidas preventivas que indica el fabricante de
la batería, tales como, quitar o no quitar las tapas de las celdas
cuando se hace la recarga y las tasas de carga recomendadas.
f) Determine la tensión de la batería revisando el manual del automóvil.
En caso de que el cargador tenga velocidad de carga ajustable,
cargue la batería primero a la velocidad más baja.
UBICACIÓN DEL CARGADOR
a) Sitúe el cargador tan lejos como lo permitan los cables de corriente
continua de la batería.
b) Nunca coloque el cargador directamente sobre la batería que se
esté cargando. Los gases de la batería pueden corroer y dañar el
cargador.
c) No permita que el ácido de la batería gotee sobre el cargador cuando
revise la gravedad o cuando la rellene.
d) No haga funcionar el cargador en un área cerrada, ni impida la
ventilación de ninguna manera.
e) No coloque la batería sobre el cargador. El dispositivo produce calor
en la máquina mientras está funcionando. Para permitir que el calor
salga, no cubra con ningún objeto la ventila.
MEDIDAS DE PRECAUCIÓN
a) La conexión y desconexión de las pinzas de salida de corriente
directa solo se debe hacer con los interruptores del cargador en
la posición APAGADO y con el cable de corriente alterna
desconectado de la fuente de electricidad o tomacorriente. Nunca
permita que las pinzas se toquen entre sí.
b) Coloque las pinzas en la bataría y el chasis como se indica en 1(e),
1(f), 1(b) y 1(d).
1. SIGA ESTOS PASOS CUANDO LA BATERÍA ESTÉ INSTALADA EN EL
VEHÍCULO. UNA CHISPA CERCA DE LA BATERÍA PUEDE PROVOCAR
QUE EXPLOTE. PARA REDUCIR EL RIESGO DE CHISPAS CERCA DE LA
BATERÍA:
a) Para reducir el riesgo de daños, coloque los cables de corriente en
el cofre, la puerta o alguna parte del motor.
b) Manténganse alejado de las aspas del ventilador, bandas, poleas y
otras partes que podría ocasionar lesiones a las personas.
c) Revise la polaridad de los postes de la batería. El poste de la batería
POSITIVO (POS, P, +) generalmente tiene un diámetro mayor que el
poste NEGATIVO (NEG, N, -)
d) Determine cuál de los postes de la batería está aterrizado (conectado)
al chasis. En caso de que el poste negativo esté aterrizado al chasis
(como sucede en la mayoría de los vehículos), vea el inciso (e).
En caso de que el poste positivo esté aterrizado al chasis, vea el
inciso (f).
e) En los vehículos aterrizados con el negativo, conecte la pinza POSITIVA
(ROJA) del cargador de batería al poste sin aterrizar POSITIVO (POS,
P, +) de la batería. No conecte la pinza en el carburador, las líneas
de combustible o las láminas de metal de la carrocería. Conecte a
una parte metálica de calibre grueso del marco o del block del motor.
f) En los vehículos aterrizados con el positivo, conecte la pinza NEGATIVA
(NEGRA) del cargador de batería al poste sin aterrizar NEGATIVO
(NEG, N, -) de la batería. Conecte la pinza POSITIVA (ROJA) al chasis
del vehículo o al block del motor alejado de la batería. No conecte
la pinza al carburador, las líneas de combustible o partes de hoja
metálica de la carrocería. Conecte a una parte metálica de calibre
grueso del marco o del block del motor.
g) Cuando desconecte el cargador, desconecte el cable de alimentación,
retire la pinza del chasis del vehículo y después retire la pinza de la
terminal de la batería.
2. SIGA ESTOS PASOS CUANDO LA BATERÍA ESTÉ FUERA DEL VEHÍCULO.
UNA CHISPA CERCA DE LA BATERÍA PUEDE OCASIONAR UNA
EXPLOSIÓN. PARA REDUCIR EL RIESGO QUE SE GENERE UNA CHISPA
CERCA DE LA BATERÍA:
a) Revise la polaridad de los postes de la batería. El poste POSITIVO
(POS, P, +) DE LA BATERÍA GENERALMENTE TIENE UN DIÁMETRO MAYOR
QUE EL POSTE negativo (NEG, N, -).
b) Coloque un cable de batería aislado de 24 pulgadas de largo, de por
lo menos calibre 6 (AWG), el poste NEGATIVO (NEG, N, -) de la batería.
c) Conecte la pinza POSITIVA (ROJA) del cargador al poste POSITIVO
(POS, P, +) de la batería.
d) Coloque su cuerpo y el extremo libre del cable tan lejos como sea
posible de la batería. Entonces conecte la pinza del cargador
NEGATIVO (NEGRA) al extremo libre del cable.
e) No se ponga frente a la batería cuando haga la conexión final.
f) Cuando desconecte el cargador, hágalo en secuencia inversa al
procedimiento de conexión y desconecte la primera conexión
situándose tan lejos como sea posible.
g) La batería de un bote marino se debe retirar y cargarse en tierra.
Para hacer carga a bordo se requiere equipo especialmente diseñado
para uso marino.
INSTRUCCIONES PARA ATERRIZAR Y CONECTAR UN CABLE DE
CORRIENTE ALTERNA.
Para reducir el riesgo de descarga eléctrica, el cargador debe estar
aterrizado. El cargador viene equipado con un cable eléctrico con un
conductor aterrizado y una clavija aterrizada. Se debe conectar la clavija
en un tomacorriente debidamente instalado y aterrizado, que cumpla
con lo códigos y ordenamientos locales.
NUNCA altere el cable o clavija de
corriente alterna que viene con el equipo. Si no se puede
introducir en el tomacorrientes, haga que un electricista
calificado conecte el tomacorriente adecuado. Una conexión
no adecuada puede ocasionar una descarga eléctrica.
Este cargador de baterías está hecho para usarse en un circuito de
tensión nominal de 127 V~ y tiene una clavija aterrizada que se ve como
lo indica la figura A. Se puede utilizar un adaptador temporal similar al
adaptador ilustrado en las figuras B y C, en caso de que no esté
disponible un tomacorrientes adecuado, se puede conectar el adaptador
a un tomacorrientes de dos polos mostrado en la figura B. Este adaptador
temporal debe utilizarse solamente hasta que un electricista calificado
instale un tomacorrientes aterrizado adecuadamente.
Antes de utilizar el adaptador como se
ilustra, asegúrese que el tornillo del centro de la placa (si
existe) del tomacorrientes esté aterrizada. El anillo rígido o
lengüeta de conexión de color verde que sale del adaptador se debe
conectar a un tomacorriente aterrizado. En caso de que sea necesario,
reemplace el tornillo de la placa con un tornillo más largo que pueda
sujetar el anillo rígido o lengüeta y que haga una conexión aterrizada
al tomacorriente aterrizado.
ADVERTENCIA
ATENCIÓN
ATENCIÓN
ADVERTENCIA
reparar el cargador con el proveedor o en el Centro de Servicio
Autorizado Truper, mostrando su factura de compra.
• Antes de llevar a cabo cualquier tipo de mantenimiento, debe cortar
primero el suministro eléctrico.
• Limpie con regularidad el cargador usando un trapo suave. Después
de hacer una recarga, limpie las pinzas para eliminar la corrosión.
Debe proteger su piel cotra quemaduras.
• Almacene el cargador de baterías en un sitio seco, limpio y lejos de
corrientes de aire.
• En caso de falla, consulte a un Centro de Servicio Autorizado Truper.
DIAGRAMA ELÉCTRICO
CARBA-200
CARBA-140

Cuando el cargador de batería esté en conectado y el interruptor esté
en la posición de encendido, tenga cuidado de que las pinzas no se
toquen.
Nunca cargue una batería en la posición de encendido, ni cargue una
batería de 6 V en la posición de 12 V
OPERACIÓN
Verifique que el área alrededor de la batería esté bien ventilada durante
la carga. Puede esparcir el gas del área soplándolo con una hoja de
cartón u otro material no metálico usándolo como abanico.
INSTRUCCIONES DE OPERACIÓN PARA EL CARGADOR Y LA
BATERÍA
Para asegurar el uso correcto del cargador y de la batería, y que la
máquina no se dañe, se debe seguir las siguientes instrucciones:
1. Instrucciones de operación para la batería a cargar.
2. Cuando la batería tiene baja la carga, generalmente la tensión de
la terminal es normal. El fenómeno físico de la poca energía es el
cambio de la gravedad en la solución en la batería. Normalmente
es de 1,28 kg/L si es menor que 1,16 kg/L significa que debe cargar
la batería
3. La tensión de la batería deja el valor normal cuando se carga o está
descargada. Es más alto cuando se carga y es más bajo cuando se
descarga. Si la tensión no regresa a su valor normal después de
media hora, significa que la batería no esta bien.
4. Este es un cargador manual y no está provisto de un indicador de
carga total, el amperímetro indica la corriente que el cargador
suministra a la batería y la intensidad dependerá del estado de
carga de ésta.
No se recomienda utilizar la lectura del amperímetro para
determinar si la batería ha sido cargada completamente.
Para determinar el nivel de carga de la batería, se debe medir de
manera frecuente la tensión en sus terminales con un voltímetro,
cuando la tensión medida se encuentre en el nivel nominal, la batería
estará cargada.
METODO DE ARRANQUE:
El uso de la función del arranque debe cumplir con el
ciclo de trabajo del producto.
1. Lea con cuidado el instructivo del motor.
2. Cargue la batería durante 10 a 15 minutos.
• Conecte cualquier electrodo del cargador a la terminal de la batería,
que no conecte al chasis, y el otro a la terminal que conecte con el
chasis.
• Revise nuevamente la conexión: Si no existe ningún problema,
coloque el interruptor del cargador en la posición de arranque y
encienda el cargador de baterías.
El ciclo de trabajo para arranque del motor
es de 3 segundos encendido y 360 segundos apagado.
(CARBA-140)
El ciclo de trabajo para arranque del motor es de 3 segundos encendido
y 240 segundos apagado. (CARBA-200)
NOTA: Si excede el lapso de 3 segundos de arranque, el cargador
sufrirá daños.
MANTENIMIENTO
• El cargador de baterías debe recibir mantenimiento y revisiones
de manera regular para poder funcionar bien y con seguridad
• No abra jamás la carcasa del cargador de batería, ni trate de
desarmarla. Solamente un Centro de Servicio Autorizado Truper,
la puede reparar.
• El periodo de garantía del cargador de batería es de 1 año. Haga
INSTRUCCIONES DE SEGURIDAD
1. Mantenga el área de trabajo en orden. Las áreas y bancos
desordenados propician accidentes
2. Observe las condiciones del área de trabajo. No utilice
máquinas o equipos eléctricos en áreas mojadas o húmedas.
No exponga su equipo a la lluvia. Mantenga el área de trabajo
bien iluminada. No utilice equipos eléctricos en presencia de
gases o líquidos inflamables.
3. Prevéngase contra los choques eléctricos. Prevenga a
tierra tales como tuberías, radiadores y refrigeradores.
4. Mantenga a los niños alejados. Los niños nunca deben estar cerca
del área de trabajo. No permita que ellos sostengan máquinas,
equipos o cables de extensión. No permita que otras personas
toquen el equipo, manténgalas alejadas de su campo de trabajo.
5. Mantenga guardado el equipo mientras no esté en uso. Cuando
no esté en uso, el equipo debe guardarse en un lugar seco y libre
de polvo. Siempre guarde su equipo bajo llave para que no esté al
alcance de los niños.
6. No fuerce el equipo. Esta hará mejor su trabajo y será más segura
dentro del rango para la cual fue diseñada. No utilice aditamentos
inapropiados para intentar exceder la capacidad del equipo.
7. Utilice el equipo eléctrico adecuado. No utilice equipos demasiados
débiles para ejecutar trabajos pesados. No utilice equipos eléctricos
para trabajos pesados para los cuales no ha sido diseñada.
8. Utilice la indumentaria apropiada. No utilice ropa suelta, guantes,
corbatas o joyería que pueda ser atrapada en las partes móviles.
No utilice calzado resbaloso. Utilice algún protector de cabello para
retener el cabello largo.
9. Utilice protección para ojos. Siempre utilice accesorios de
seguridad apropiados por la Norma Oficial Mexicana (NOM),
como es el caso de goggles, caretas y mascarillas contra polvo,
cuando trabaje con materiales que despidan partes metálicas,
virutas o polvos químicos.
10. No use el cable de alimentación para fines para los cuales no está
dispuesto. No lleve la herramienta colgada del cable y no tire de
éste para desconectar la clavija de la base de enchufe. Proteja el
cable contra el calor, el aceite y las esquinas afiladas.
11. Afiance la pieza de trabajo. Utilice un dispositivo de fijación o una
mordaza para mantener firme la pieza de trabajo. Esto es más
seguro que usando una sola mano y le permite tener ambas manos
libres. Mantenga el balance adecuado todo el tiempo sobre sus pies.
No trate de alcanzar algo sobre la máquina o se cruce cuando esté
en funcionamiento.
12. No extienda su radio de acción. Evite toda postura que cause
cansancio. Cuide de que su posición sea segura y de que conserve
el equilibrio.
13. Mantenga el equipo en las mejores condiciones. Mantenga el equipo
limpio para tener la mejor ejecución y seguridad. Siga las
instrucciones para la lubricación y cambio de accesorios. Verifique
los cables de la herramienta periódicamente y si se encuentran
dañados, llévelos a reparar a un Centro de Servicio Autorizado
Truper®. Los mangos o manijas deben siempre permanecer limpios,
secos y libres de aceite y grasas.
14. Desconecte el equipo cuando no esté en uso, antes de proceder
al mantenimiento.
15. Reduzca el riesgo de arranques accidentales. No lleve
ninguna herramienta con el dedo puesto sobre el interruptor
mientras esté conectado a la red eléctrica. Asegúrese de que
el interruptor esté en la posición “apagado” (OFF) antes de
conectar el cable de alimentación.
16. Extensiones para exterior. En el exterior, utilice solamente
cables de extensión homologados y convenientemente
marcados.
17. Manténgase alerta. Fíjese en lo que está haciendo, utilice su sentido
común. No opere ninguna herramienta cuando esté cansado.
18. Revise las partes dañadas. Antes de continuar utilizando la
máquina, los protectores u otras partes móviles que pudieran estar
dañadas deben ser cuidadosamente revisadas, para asegurarse que
operan apropiadamente y trabajarán como debe ser. Verifique
también la alineación de las partes móviles, si están atascadas, o
si hay alguna probable ruptura de las partes, verifique también el
montaje, así como cualquier otra condición que pueda afectar la
operación de la herramienta. Todos los componentes deben estar
montados adecuadamente y cumplir los requisitos para garantizar
el correcto funcionamiento del aparato. Un protector u otra parte
que estén dañadas deberán ser apropiadamente reparadas o
cambiadas. Todo interruptor de mando deteriorado, deberá ser
reemplazado por un Centro de Servicio Autorizado Truper®. No
utilice ninguna herramienta eléctrica en la cual el interruptor no
tenga contacto.
19. Reemplazo de partes y accesorios. Cuando necesite remplazar las
piezas, utilice solamente refacciones originales Truper®, destinados
para usarse con está herramienta.
20. Para su seguridad personal utilice
únicamente los accesorios o aparatos adicionales indicados
en las instrucciones de manejo o recomendados por el
fabricante de la herramienta. La utilización de accesorios
diferentes a los indicados en las instrucciones de manejo,
puede ocasionar riesgo personal.
21. Protección para oídos. Utilice protectores auriculares,
cuando ejecute servicios que hagan ruidos
superiores a 85 dB
REGLAS DE SEGURIDAD ADICIONALES PARA EL CARGADOR DE
BATERÍAS
SEGURIDAD GENERAL DE BATERÍAS
Los cargadores de baterías se pueden utilizar para recargar baterías
de plomo ácido de ciclo profundo. También se pueden utilizar como
auxiliar en el arranque.
Estos cargadores tienen protección contra sobrecalentamiento y
protección contra picos de corriente. Son seguros y confiables al usarse.
La función del cargador de baterías incluye selección de corriente de
carga. Este control se encuentra integrado en el panel frontal del
cargador y es de fácil uso.
Tiene instalado un cinturón para mover el cargador.
Cuando se utiliza el cargador de baterías se deben observar las
siguientes reglas de seguridad, con el fin de proteger la seguridad de
las personas y de sus propiedades.
1. No exponga el cargador a la lluvia o nieve.
2. El uso de algún accesorio que no haya sido recomendado o vendido
por el fabricante de la batería puede ser causa de incendio, descarga
eléctrica o lesiones a las personas.
3. Cuando desconecte el cargador, debe hacerlo por la clavija y no por
el cable. No hacerlo puede dañar tanto al cable como a la clavija.
4. A menos que sea estrictamente necesario, no se debe utilizar cables
de extensión. El uso de cables de extensión incorrectos puede
ocasionar incendio y descarga eléctrica.
En caso de que sea necesario el uso de un cable de extensión, se debe
asegurar que:
a) Las espigas de la clavija en el cable de alimentación sean del mismo
número, medida y forma que los de la clavija del cargador;
b) El cable de extensión tenga el alambrado adecuado y que esté en
buenas condiciones eléctricas;
c) El calibre del cable sea lo suficientemente grande para el arco de
amperes de carga como se especifica en la tabla siguiente:
Calibre mínimo para cables de extensión (AWG)
(Cuando se usan 127 V~ solamente)
(1) Se permite utilizarlo siempre y cuando las extensiones mismas
cuenten con un artefacto de protección contra sobrecorriente.
(2) Uno de los conductores debe ser conductor para puesta a tierra.
Todos los conductores son de la misma designación (calibre)
incluyendo el de puesta a tierra. Referencia: NMX-J-195-ANCE
5. No opere el cargador si tiene el cable o clavija dañados. Llévelo a un
Centro de Servicio Autorizado Truper®
6. No utilice el cargador si ha recibido un golpe fuerte, si se cayó o si
está dañado de cualquier forma. Llévelo a un Centro de Servicio
Autorizado Truper®
7. No desarme el cargador. Cuando se requiera darle servicio o hacer
alguna reparación debe llevarlo a un Centro de Servicio Autorizado
Truper®. El armado posterior puede ser causa de fuego o descarga
eléctrica.
8. Para reducir el riesgo de descarga eléctrica, desconecte el cargador
del tomacorriente antes de llevar a cabo cualquier tarea de
mantenimiento o de limpieza. Apagar los controles no reduce estos
riesgos.
9. RIESGO DE GASES EXPLOSIVOS
A) TRABAJAR CERCA DE UNA BATERÍA DE PLOMO ÁCIDO ES
PELIGROSO. LAS BATERÍAS GENERAN GASES EXPLOSIVOS
DURANTE LA OPERACIÓN NORMAL DE LA BATERÍA. DEBIDO
A ESTO ES MUY IMPORTANTE QUE CADA VEZ, ANTES DE
UTILIZAR EL CARGADOR, LEA ESTE INSTRUCTIVO Y SIGA
LAS INSTRUCCIONES AL PIE DE LA LETRA.
b) Para reducir el riesgo de que la batería explote, siga estas
instrucciones y las instrucciones del fabricante del equipo que vaya
a utilizar cerca de la batería. Revise las medidas precautorias en
este producto y en el motor.
10. Precaución personal:
a) Debe haber una persona cerca de usted, para que le ayude cuando
trabaje con una batería de plomo ácido
b) Tenga suficiente agua fresca y jabón cerca, en caso de que el ácido
de la batería entre en contacto con su piel, ropa u ojos.
c) Use protección para ojos completa y ropa protectora. Evite tocarse
los ojos cuando trabaje cerca de la batería.
d) En caso de que el ácido de la batería entre en contacto con su piel
o ropa, lave de inmediato con gua y jabón. En caso de que entre
ácido en sus ojos, lave con mucha agua fría, por lo menos durante
10 minutos y busque atención médica de inmediato.
e) NUNCA fume o permita que haya chispas o flama cerca de la batería
o del motor.
f) Tenga mucho cuidado de no dejar caer una herramienta de metal
sobre la batería. Esto puede provocar una chispa o un corto circuito
en la batería o en alguna otra parte eléctrica y provocar una
explosión.
g) Retire todos los artículos de metal, tales como anillos, pulseras y
relojes cuando trabaje con una batería de plomo ácido. Una batería
de plomo ácido puede producir un cortocircuito con una corriente
tan alta que es suficiente para soldar un anillo o cualquier artículo
de metal, ocasionando quemaduras severas.
h) Use el cargador solamente para recargar baterías de PLOMO ÁCIDO.
No está diseñada para el suministro de electricidad a sistemas de
baja tensión diferentes a la aplicación de arranque de motor. No
utilice el cargador de baterías para recargar pilas secas que se
utilizan comúnmente con aparatos electrodomésticos. Este tipo de
baterías pueden explotar y ocasionar lesiones a las personas y dañar
sus propiedades.
i) NUNCA recargue una batería congelada.
PREPARACIÓN PARA CARGAR
a) En caso de necesitar sacar la batería del vehículo hacia el cargador,
retire siempre primero la terminal aterrizada de la batería. Verifique
que todos los accesorios del vehículo estén apagados para no
provocar un arco.
b) Verifique que el área alrededor de la batería esté bien ventilada
cuando se carga la batería. Puede esparcir el gas del área soplándolo
con una hoja de cartón y otro material no metálico usándolo como
abanico.
c) Limpie las terminales de la batería. Tenga cuidado que la corrosión
no entre en contacto con sus ojos.
d) Añada agua destilada en cada celda hasta que el ácido de la batería
llegue al nivel especificado indicado por el fabricante de la batería.
Esto ayuda a purgar el gas excesivo de las celdas. No llene demasiado.
Para las baterías que no tiene tapas en celdas, siga con cuidado las
instrucciones de recarga indicadas por el fabricante.
e) Estudie todas las medidas preventivas que indica el fabricante de
la batería, tales como, quitar o no quitar las tapas de las celdas
cuando se hace la recarga y las tasas de carga recomendadas.
f) Determine la tensión de la batería revisando el manual del automóvil.
En caso de que el cargador tenga velocidad de carga ajustable,
cargue la batería primero a la velocidad más baja.
UBICACIÓN DEL CARGADOR
a) Sitúe el cargador tan lejos como lo permitan los cables de corriente
continua de la batería.
b) Nunca coloque el cargador directamente sobre la batería que se
esté cargando. Los gases de la batería pueden corroer y dañar el
cargador.
c) No permita que el ácido de la batería gotee sobre el cargador cuando
revise la gravedad o cuando la rellene.
d) No haga funcionar el cargador en un área cerrada, ni impida la
ventilación de ninguna manera.
e) No coloque la batería sobre el cargador. El dispositivo produce calor
en la máquina mientras está funcionando. Para permitir que el calor
salga, no cubra con ningún objeto la ventila.
MEDIDAS DE PRECAUCIÓN
a) La conexión y desconexión de las pinzas de salida de corriente
directa solo se debe hacer con los interruptores del cargador en
la posición APAGADO y con el cable de corriente alterna
desconectado de la fuente de electricidad o tomacorriente. Nunca
permita que las pinzas se toquen entre sí.
b) Coloque las pinzas en la bataría y el chasis como se indica en 1(e),
1(f), 1(b) y 1(d).
1. SIGA ESTOS PASOS CUANDO LA BATERÍA ESTÉ INSTALADA EN EL
VEHÍCULO. UNA CHISPA CERCA DE LA BATERÍA PUEDE PROVOCAR
QUE EXPLOTE. PARA REDUCIR EL RIESGO DE CHISPAS CERCA DE LA
BATERÍA:
a) Para reducir el riesgo de daños, coloque los cables de corriente en
el cofre, la puerta o alguna parte del motor.
b) Manténganse alejado de las aspas del ventilador, bandas, poleas y
otras partes que podría ocasionar lesiones a las personas.
c) Revise la polaridad de los postes de la batería. El poste de la batería
POSITIVO (POS, P, +) generalmente tiene un diámetro mayor que el
poste NEGATIVO (NEG, N, -)
d) Determine cuál de los postes de la batería está aterrizado (conectado)
al chasis. En caso de que el poste negativo esté aterrizado al chasis
(como sucede en la mayoría de los vehículos), vea el inciso (e).
En caso de que el poste positivo esté aterrizado al chasis, vea el
inciso (f).
e) En los vehículos aterrizados con el negativo, conecte la pinza POSITIVA
(ROJA) del cargador de batería al poste sin aterrizar POSITIVO (POS,
P, +) de la batería. No conecte la pinza en el carburador, las líneas
de combustible o las láminas de metal de la carrocería. Conecte a
una parte metálica de calibre grueso del marco o del block del motor.
f) En los vehículos aterrizados con el positivo, conecte la pinza NEGATIVA
(NEGRA) del cargador de batería al poste sin aterrizar NEGATIVO
(NEG, N, -) de la batería. Conecte la pinza POSITIVA (ROJA) al chasis
del vehículo o al block del motor alejado de la batería. No conecte
la pinza al carburador, las líneas de combustible o partes de hoja
metálica de la carrocería. Conecte a una parte metálica de calibre
grueso del marco o del block del motor.
g) Cuando desconecte el cargador, desconecte el cable de alimentación,
retire la pinza del chasis del vehículo y después retire la pinza de la
terminal de la batería.
2. SIGA ESTOS PASOS CUANDO LA BATERÍA ESTÉ FUERA DEL VEHÍCULO.
UNA CHISPA CERCA DE LA BATERÍA PUEDE OCASIONAR UNA
EXPLOSIÓN. PARA REDUCIR EL RIESGO QUE SE GENERE UNA CHISPA
CERCA DE LA BATERÍA:
a) Revise la polaridad de los postes de la batería. El poste POSITIVO
(POS, P, +) DE LA BATERÍA GENERALMENTE TIENE UN DIÁMETRO MAYOR
QUE EL POSTE negativo (NEG, N, -).
b) Coloque un cable de batería aislado de 24 pulgadas de largo, de por
lo menos calibre 6 (AWG), el poste NEGATIVO (NEG, N, -) de la batería.
c) Conecte la pinza POSITIVA (ROJA) del cargador al poste POSITIVO
(POS, P, +) de la batería.
d) Coloque su cuerpo y el extremo libre del cable tan lejos como sea
posible de la batería. Entonces conecte la pinza del cargador
NEGATIVO (NEGRA) al extremo libre del cable.
e) No se ponga frente a la batería cuando haga la conexión final.
f) Cuando desconecte el cargador, hágalo en secuencia inversa al
procedimiento de conexión y desconecte la primera conexión
situándose tan lejos como sea posible.
g) La batería de un bote marino se debe retirar y cargarse en tierra.
Para hacer carga a bordo se requiere equipo especialmente diseñado
para uso marino.
INSTRUCCIONES PARA ATERRIZAR Y CONECTAR UN CABLE DE
CORRIENTE ALTERNA.
Para reducir el riesgo de descarga eléctrica, el cargador debe estar
aterrizado. El cargador viene equipado con un cable eléctrico con un
conductor aterrizado y una clavija aterrizada. Se debe conectar la clavija
en un tomacorriente debidamente instalado y aterrizado, que cumpla
con lo códigos y ordenamientos locales.
NUNCA altere el cable o clavija de
corriente alterna que viene con el equipo. Si no se puede
introducir en el tomacorrientes, haga que un electricista
calificado conecte el tomacorriente adecuado. Una conexión
no adecuada puede ocasionar una descarga eléctrica.
Este cargador de baterías está hecho para usarse en un circuito de
tensión nominal de 127 V~ y tiene una clavija aterrizada que se ve como
lo indica la figura A. Se puede utilizar un adaptador temporal similar al
adaptador ilustrado en las figuras B y C, en caso de que no esté
disponible un tomacorrientes adecuado, se puede conectar el adaptador
a un tomacorrientes de dos polos mostrado en la figura B. Este adaptador
temporal debe utilizarse solamente hasta que un electricista calificado
instale un tomacorrientes aterrizado adecuadamente.
Antes de utilizar el adaptador como se
ilustra, asegúrese que el tornillo del centro de la placa (si
existe) del tomacorrientes esté aterrizada. El anillo rígido o
lengüeta de conexión de color verde que sale del adaptador se debe
conectar a un tomacorriente aterrizado. En caso de que sea necesario,
reemplace el tornillo de la placa con un tornillo más largo que pueda
sujetar el anillo rígido o lengüeta y que haga una conexión aterrizada
al tomacorriente aterrizado.
6
NOTAS
reparar el cargador con el proveedor o en el Centro de Servicio
Autorizado Truper, mostrando su factura de compra.
• Antes de llevar a cabo cualquier tipo de mantenimiento, debe cortar
primero el suministro eléctrico.
• Limpie con regularidad el cargador usando un trapo suave. Después
de hacer una recarga, limpie las pinzas para eliminar la corrosión.
Debe proteger su piel cotra quemaduras.
• Almacene el cargador de baterías en un sitio seco, limpio y lejos de
corrientes de aire.
• En caso de falla, consulte a un Centro de Servicio Autorizado Truper.
DIAGRAMA ELÉCTRICO

Cuando el cargador de batería esté en conectado y el interruptor esté
en la posición de encendido, tenga cuidado de que las pinzas no se
toquen.
Nunca cargue una batería en la posición de encendido, ni cargue una
batería de 6 V en la posición de 12 V
OPERACIÓN
Verifique que el área alrededor de la batería esté bien ventilada durante
la carga. Puede esparcir el gas del área soplándolo con una hoja de
cartón u otro material no metálico usándolo como abanico.
INSTRUCCIONES DE OPERACIÓN PARA EL CARGADOR Y LA
BATERÍA
Para asegurar el uso correcto del cargador y de la batería, y que la
máquina no se dañe, se debe seguir las siguientes instrucciones:
1. Instrucciones de operación para la batería a cargar.
2. Cuando la batería tiene baja la carga, generalmente la tensión de
la terminal es normal. El fenómeno físico de la poca energía es el
cambio de la gravedad en la solución en la batería. Normalmente
es de 1,28 kg/L si es menor que 1,16 kg/L significa que debe cargar
la batería
3. La tensión de la batería deja el valor normal cuando se carga o está
descargada. Es más alto cuando se carga y es más bajo cuando se
descarga. Si la tensión no regresa a su valor normal después de
media hora, significa que la batería no esta bien.
4. Este es un cargador manual y no está provisto de un indicador de
carga total, el amperímetro indica la corriente que el cargador
suministra a la batería y la intensidad dependerá del estado de
carga de ésta.
No se recomienda utilizar la lectura del amperímetro para
determinar si la batería ha sido cargada completamente.
Para determinar el nivel de carga de la batería, se debe medir de
manera frecuente la tensión en sus terminales con un voltímetro,
cuando la tensión medida se encuentre en el nivel nominal, la batería
estará cargada.
METODO DE ARRANQUE:
El uso de la función del arranque debe cumplir con el
ciclo de trabajo del producto.
1. Lea con cuidado el instructivo del motor.
2. Cargue la batería durante 10 a 15 minutos.
• Conecte cualquier electrodo del cargador a la terminal de la batería,
que no conecte al chasis, y el otro a la terminal que conecte con el
chasis.
• Revise nuevamente la conexión: Si no existe ningún problema,
coloque el interruptor del cargador en la posición de arranque y
encienda el cargador de baterías.
El ciclo de trabajo para arranque del motor
es de 3 segundos encendido y 360 segundos apagado.
(CARBA-140)
El ciclo de trabajo para arranque del motor es de 3 segundos encendido
y 240 segundos apagado. (CARBA-200)
NOTA: Si excede el lapso de 3 segundos de arranque, el cargador
sufrirá daños.
MANTENIMIENTO
• El cargador de baterías debe recibir mantenimiento y revisiones
de manera regular para poder funcionar bien y con seguridad
• No abra jamás la carcasa del cargador de batería, ni trate de
desarmarla. Solamente un Centro de Servicio Autorizado Truper,
la puede reparar.
• El periodo de garantía del cargador de batería es de 1 año. Haga
INSTRUCCIONES DE SEGURIDAD
1. Mantenga el área de trabajo en orden. Las áreas y bancos
desordenados propician accidentes
2. Observe las condiciones del área de trabajo. No utilice
máquinas o equipos eléctricos en áreas mojadas o húmedas.
No exponga su equipo a la lluvia. Mantenga el área de trabajo
bien iluminada. No utilice equipos eléctricos en presencia de
gases o líquidos inflamables.
3. Prevéngase contra los choques eléctricos. Prevenga a
tierra tales como tuberías, radiadores y refrigeradores.
4. Mantenga a los niños alejados. Los niños nunca deben estar cerca
del área de trabajo. No permita que ellos sostengan máquinas,
equipos o cables de extensión. No permita que otras personas
toquen el equipo, manténgalas alejadas de su campo de trabajo.
5. Mantenga guardado el equipo mientras no esté en uso. Cuando
no esté en uso, el equipo debe guardarse en un lugar seco y libre
de polvo. Siempre guarde su equipo bajo llave para que no esté al
alcance de los niños.
6. No fuerce el equipo. Esta hará mejor su trabajo y será más segura
dentro del rango para la cual fue diseñada. No utilice aditamentos
inapropiados para intentar exceder la capacidad del equipo.
7. Utilice el equipo eléctrico adecuado. No utilice equipos demasiados
débiles para ejecutar trabajos pesados. No utilice equipos eléctricos
para trabajos pesados para los cuales no ha sido diseñada.
8. Utilice la indumentaria apropiada. No utilice ropa suelta, guantes,
corbatas o joyería que pueda ser atrapada en las partes móviles.
No utilice calzado resbaloso. Utilice algún protector de cabello para
retener el cabello largo.
9. Utilice protección para ojos. Siempre utilice accesorios de
seguridad apropiados por la Norma Oficial Mexicana (NOM),
como es el caso de goggles, caretas y mascarillas contra polvo,
cuando trabaje con materiales que despidan partes metálicas,
virutas o polvos químicos.
10. No use el cable de alimentación para fines para los cuales no está
dispuesto. No lleve la herramienta colgada del cable y no tire de
éste para desconectar la clavija de la base de enchufe. Proteja el
cable contra el calor, el aceite y las esquinas afiladas.
11. Afiance la pieza de trabajo. Utilice un dispositivo de fijación o una
mordaza para mantener firme la pieza de trabajo. Esto es más
seguro que usando una sola mano y le permite tener ambas manos
libres. Mantenga el balance adecuado todo el tiempo sobre sus pies.
No trate de alcanzar algo sobre la máquina o se cruce cuando esté
en funcionamiento.
12. No extienda su radio de acción. Evite toda postura que cause
cansancio. Cuide de que su posición sea segura y de que conserve
el equilibrio.
13. Mantenga el equipo en las mejores condiciones. Mantenga el equipo
limpio para tener la mejor ejecución y seguridad. Siga las
instrucciones para la lubricación y cambio de accesorios. Verifique
los cables de la herramienta periódicamente y si se encuentran
dañados, llévelos a reparar a un Centro de Servicio Autorizado
Truper®. Los mangos o manijas deben siempre permanecer limpios,
secos y libres de aceite y grasas.
14. Desconecte el equipo cuando no esté en uso, antes de proceder
al mantenimiento.
15. Reduzca el riesgo de arranques accidentales. No lleve
ninguna herramienta con el dedo puesto sobre el interruptor
mientras esté conectado a la red eléctrica. Asegúrese de que
el interruptor esté en la posición “apagado” (OFF) antes de
conectar el cable de alimentación.
16. Extensiones para exterior. En el exterior, utilice solamente
cables de extensión homologados y convenientemente
marcados.
17. Manténgase alerta. Fíjese en lo que está haciendo, utilice su sentido
común. No opere ninguna herramienta cuando esté cansado.
18. Revise las partes dañadas. Antes de continuar utilizando la
máquina, los protectores u otras partes móviles que pudieran estar
dañadas deben ser cuidadosamente revisadas, para asegurarse que
operan apropiadamente y trabajarán como debe ser. Verifique
también la alineación de las partes móviles, si están atascadas, o
si hay alguna probable ruptura de las partes, verifique también el
montaje, así como cualquier otra condición que pueda afectar la
operación de la herramienta. Todos los componentes deben estar
montados adecuadamente y cumplir los requisitos para garantizar
el correcto funcionamiento del aparato. Un protector u otra parte
que estén dañadas deberán ser apropiadamente reparadas o
cambiadas. Todo interruptor de mando deteriorado, deberá ser
reemplazado por un Centro de Servicio Autorizado Truper®. No
utilice ninguna herramienta eléctrica en la cual el interruptor no
tenga contacto.
19. Reemplazo de partes y accesorios. Cuando necesite remplazar las
piezas, utilice solamente refacciones originales Truper®, destinados
para usarse con está herramienta.
20. Para su seguridad personal utilice
únicamente los accesorios o aparatos adicionales indicados
en las instrucciones de manejo o recomendados por el
fabricante de la herramienta. La utilización de accesorios
diferentes a los indicados en las instrucciones de manejo,
puede ocasionar riesgo personal.
21. Protección para oídos. Utilice protectores auriculares,
cuando ejecute servicios que hagan ruidos
superiores a 85 dB
REGLAS DE SEGURIDAD ADICIONALES PARA EL CARGADOR DE
BATERÍAS
SEGURIDAD GENERAL DE BATERÍAS
Los cargadores de baterías se pueden utilizar para recargar baterías
de plomo ácido de ciclo profundo. También se pueden utilizar como
auxiliar en el arranque.
Estos cargadores tienen protección contra sobrecalentamiento y
protección contra picos de corriente. Son seguros y confiables al usarse.
La función del cargador de baterías incluye selección de corriente de
carga. Este control se encuentra integrado en el panel frontal del
cargador y es de fácil uso.
Tiene instalado un cinturón para mover el cargador.
Cuando se utiliza el cargador de baterías se deben observar las
siguientes reglas de seguridad, con el fin de proteger la seguridad de
las personas y de sus propiedades.
1. No exponga el cargador a la lluvia o nieve.
2. El uso de algún accesorio que no haya sido recomendado o vendido
por el fabricante de la batería puede ser causa de incendio, descarga
eléctrica o lesiones a las personas.
3. Cuando desconecte el cargador, debe hacerlo por la clavija y no por
el cable. No hacerlo puede dañar tanto al cable como a la clavija.
4. A menos que sea estrictamente necesario, no se debe utilizar cables
de extensión. El uso de cables de extensión incorrectos puede
ocasionar incendio y descarga eléctrica.
En caso de que sea necesario el uso de un cable de extensión, se debe
asegurar que:
a) Las espigas de la clavija en el cable de alimentación sean del mismo
número, medida y forma que los de la clavija del cargador;
b) El cable de extensión tenga el alambrado adecuado y que esté en
buenas condiciones eléctricas;
c) El calibre del cable sea lo suficientemente grande para el arco de
amperes de carga como se especifica en la tabla siguiente:
Calibre mínimo para cables de extensión (AWG)
(Cuando se usan 127 V~ solamente)
(1) Se permite utilizarlo siempre y cuando las extensiones mismas
cuenten con un artefacto de protección contra sobrecorriente.
(2) Uno de los conductores debe ser conductor para puesta a tierra.
Todos los conductores son de la misma designación (calibre)
incluyendo el de puesta a tierra. Referencia: NMX-J-195-ANCE
5. No opere el cargador si tiene el cable o clavija dañados. Llévelo a un
Centro de Servicio Autorizado Truper®
6. No utilice el cargador si ha recibido un golpe fuerte, si se cayó o si
está dañado de cualquier forma. Llévelo a un Centro de Servicio
Autorizado Truper®
7. No desarme el cargador. Cuando se requiera darle servicio o hacer
alguna reparación debe llevarlo a un Centro de Servicio Autorizado
Truper®. El armado posterior puede ser causa de fuego o descarga
eléctrica.
8. Para reducir el riesgo de descarga eléctrica, desconecte el cargador
del tomacorriente antes de llevar a cabo cualquier tarea de
mantenimiento o de limpieza. Apagar los controles no reduce estos
riesgos.
9. RIESGO DE GASES EXPLOSIVOS
A) TRABAJAR CERCA DE UNA BATERÍA DE PLOMO ÁCIDO ES
PELIGROSO. LAS BATERÍAS GENERAN GASES EXPLOSIVOS
DURANTE LA OPERACIÓN NORMAL DE LA BATERÍA. DEBIDO
A ESTO ES MUY IMPORTANTE QUE CADA VEZ, ANTES DE
UTILIZAR EL CARGADOR, LEA ESTE INSTRUCTIVO Y SIGA
LAS INSTRUCCIONES AL PIE DE LA LETRA.
b) Para reducir el riesgo de que la batería explote, siga estas
instrucciones y las instrucciones del fabricante del equipo que vaya
a utilizar cerca de la batería. Revise las medidas precautorias en
este producto y en el motor.
10. Precaución personal:
a) Debe haber una persona cerca de usted, para que le ayude cuando
trabaje con una batería de plomo ácido
b) Tenga suficiente agua fresca y jabón cerca, en caso de que el ácido
de la batería entre en contacto con su piel, ropa u ojos.
c) Use protección para ojos completa y ropa protectora. Evite tocarse
los ojos cuando trabaje cerca de la batería.
d) En caso de que el ácido de la batería entre en contacto con su piel
o ropa, lave de inmediato con gua y jabón. En caso de que entre
ácido en sus ojos, lave con mucha agua fría, por lo menos durante
10 minutos y busque atención médica de inmediato.
e) NUNCA fume o permita que haya chispas o flama cerca de la batería
o del motor.
f) Tenga mucho cuidado de no dejar caer una herramienta de metal
sobre la batería. Esto puede provocar una chispa o un corto circuito
en la batería o en alguna otra parte eléctrica y provocar una
explosión.
g) Retire todos los artículos de metal, tales como anillos, pulseras y
relojes cuando trabaje con una batería de plomo ácido. Una batería
de plomo ácido puede producir un cortocircuito con una corriente
tan alta que es suficiente para soldar un anillo o cualquier artículo
de metal, ocasionando quemaduras severas.
h) Use el cargador solamente para recargar baterías de PLOMO ÁCIDO.
No está diseñada para el suministro de electricidad a sistemas de
baja tensión diferentes a la aplicación de arranque de motor. No
utilice el cargador de baterías para recargar pilas secas que se
utilizan comúnmente con aparatos electrodomésticos. Este tipo de
baterías pueden explotar y ocasionar lesiones a las personas y dañar
sus propiedades.
i) NUNCA recargue una batería congelada.
PREPARACIÓN PARA CARGAR
a) En caso de necesitar sacar la batería del vehículo hacia el cargador,
retire siempre primero la terminal aterrizada de la batería. Verifique
que todos los accesorios del vehículo estén apagados para no
provocar un arco.
b) Verifique que el área alrededor de la batería esté bien ventilada
cuando se carga la batería. Puede esparcir el gas del área soplándolo
con una hoja de cartón y otro material no metálico usándolo como
abanico.
c) Limpie las terminales de la batería. Tenga cuidado que la corrosión
no entre en contacto con sus ojos.
d) Añada agua destilada en cada celda hasta que el ácido de la batería
llegue al nivel especificado indicado por el fabricante de la batería.
Esto ayuda a purgar el gas excesivo de las celdas. No llene demasiado.
Para las baterías que no tiene tapas en celdas, siga con cuidado las
instrucciones de recarga indicadas por el fabricante.
e) Estudie todas las medidas preventivas que indica el fabricante de
la batería, tales como, quitar o no quitar las tapas de las celdas
cuando se hace la recarga y las tasas de carga recomendadas.
f) Determine la tensión de la batería revisando el manual del automóvil.
En caso de que el cargador tenga velocidad de carga ajustable,
cargue la batería primero a la velocidad más baja.
UBICACIÓN DEL CARGADOR
a) Sitúe el cargador tan lejos como lo permitan los cables de corriente
continua de la batería.
b) Nunca coloque el cargador directamente sobre la batería que se
esté cargando. Los gases de la batería pueden corroer y dañar el
cargador.
c) No permita que el ácido de la batería gotee sobre el cargador cuando
revise la gravedad o cuando la rellene.
d) No haga funcionar el cargador en un área cerrada, ni impida la
ventilación de ninguna manera.
e) No coloque la batería sobre el cargador. El dispositivo produce calor
en la máquina mientras está funcionando. Para permitir que el calor
salga, no cubra con ningún objeto la ventila.
MEDIDAS DE PRECAUCIÓN
a) La conexión y desconexión de las pinzas de salida de corriente
directa solo se debe hacer con los interruptores del cargador en
la posición APAGADO y con el cable de corriente alterna
desconectado de la fuente de electricidad o tomacorriente. Nunca
permita que las pinzas se toquen entre sí.
b) Coloque las pinzas en la bataría y el chasis como se indica en 1(e),
1(f), 1(b) y 1(d).
1. SIGA ESTOS PASOS CUANDO LA BATERÍA ESTÉ INSTALADA EN EL
VEHÍCULO. UNA CHISPA CERCA DE LA BATERÍA PUEDE PROVOCAR
QUE EXPLOTE. PARA REDUCIR EL RIESGO DE CHISPAS CERCA DE LA
BATERÍA:
a) Para reducir el riesgo de daños, coloque los cables de corriente en
el cofre, la puerta o alguna parte del motor.
b) Manténganse alejado de las aspas del ventilador, bandas, poleas y
otras partes que podría ocasionar lesiones a las personas.
c) Revise la polaridad de los postes de la batería. El poste de la batería
POSITIVO (POS, P, +) generalmente tiene un diámetro mayor que el
poste NEGATIVO (NEG, N, -)
d) Determine cuál de los postes de la batería está aterrizado (conectado)
al chasis. En caso de que el poste negativo esté aterrizado al chasis
(como sucede en la mayoría de los vehículos), vea el inciso (e).
En caso de que el poste positivo esté aterrizado al chasis, vea el
inciso (f).
e) En los vehículos aterrizados con el negativo, conecte la pinza POSITIVA
(ROJA) del cargador de batería al poste sin aterrizar POSITIVO (POS,
P, +) de la batería. No conecte la pinza en el carburador, las líneas
de combustible o las láminas de metal de la carrocería. Conecte a
una parte metálica de calibre grueso del marco o del block del motor.
f) En los vehículos aterrizados con el positivo, conecte la pinza NEGATIVA
(NEGRA) del cargador de batería al poste sin aterrizar NEGATIVO
(NEG, N, -) de la batería. Conecte la pinza POSITIVA (ROJA) al chasis
del vehículo o al block del motor alejado de la batería. No conecte
la pinza al carburador, las líneas de combustible o partes de hoja
metálica de la carrocería. Conecte a una parte metálica de calibre
grueso del marco o del block del motor.
g) Cuando desconecte el cargador, desconecte el cable de alimentación,
retire la pinza del chasis del vehículo y después retire la pinza de la
terminal de la batería.
2. SIGA ESTOS PASOS CUANDO LA BATERÍA ESTÉ FUERA DEL VEHÍCULO.
UNA CHISPA CERCA DE LA BATERÍA PUEDE OCASIONAR UNA
EXPLOSIÓN. PARA REDUCIR EL RIESGO QUE SE GENERE UNA CHISPA
CERCA DE LA BATERÍA:
a) Revise la polaridad de los postes de la batería. El poste POSITIVO
(POS, P, +) DE LA BATERÍA GENERALMENTE TIENE UN DIÁMETRO MAYOR
QUE EL POSTE negativo (NEG, N, -).
b) Coloque un cable de batería aislado de 24 pulgadas de largo, de por
lo menos calibre 6 (AWG), el poste NEGATIVO (NEG, N, -) de la batería.
c) Conecte la pinza POSITIVA (ROJA) del cargador al poste POSITIVO
(POS, P, +) de la batería.
d) Coloque su cuerpo y el extremo libre del cable tan lejos como sea
posible de la batería. Entonces conecte la pinza del cargador
NEGATIVO (NEGRA) al extremo libre del cable.
e) No se ponga frente a la batería cuando haga la conexión final.
f) Cuando desconecte el cargador, hágalo en secuencia inversa al
procedimiento de conexión y desconecte la primera conexión
situándose tan lejos como sea posible.
g) La batería de un bote marino se debe retirar y cargarse en tierra.
Para hacer carga a bordo se requiere equipo especialmente diseñado
para uso marino.
INSTRUCCIONES PARA ATERRIZAR Y CONECTAR UN CABLE DE
CORRIENTE ALTERNA.
Para reducir el riesgo de descarga eléctrica, el cargador debe estar
aterrizado. El cargador viene equipado con un cable eléctrico con un
conductor aterrizado y una clavija aterrizada. Se debe conectar la clavija
en un tomacorriente debidamente instalado y aterrizado, que cumpla
con lo códigos y ordenamientos locales.
NUNCA altere el cable o clavija de
corriente alterna que viene con el equipo. Si no se puede
introducir en el tomacorrientes, haga que un electricista
calificado conecte el tomacorriente adecuado. Una conexión
no adecuada puede ocasionar una descarga eléctrica.
Este cargador de baterías está hecho para usarse en un circuito de
tensión nominal de 127 V~ y tiene una clavija aterrizada que se ve como
lo indica la figura A. Se puede utilizar un adaptador temporal similar al
adaptador ilustrado en las figuras B y C, en caso de que no esté
disponible un tomacorrientes adecuado, se puede conectar el adaptador
a un tomacorrientes de dos polos mostrado en la figura B. Este adaptador
temporal debe utilizarse solamente hasta que un electricista calificado
instale un tomacorrientes aterrizado adecuadamente.
Antes de utilizar el adaptador como se
ilustra, asegúrese que el tornillo del centro de la placa (si
existe) del tomacorrientes esté aterrizada. El anillo rígido o
lengüeta de conexión de color verde que sale del adaptador se debe
conectar a un tomacorriente aterrizado. En caso de que sea necesario,
reemplace el tornillo de la placa con un tornillo más largo que pueda
sujetar el anillo rígido o lengüeta y que haga una conexión aterrizada
al tomacorriente aterrizado.
reparar el cargador con el proveedor o en el Centro de Servicio
Autorizado Truper, mostrando su factura de compra.
• Antes de llevar a cabo cualquier tipo de mantenimiento, debe cortar
primero el suministro eléctrico.
• Limpie con regularidad el cargador usando un trapo suave. Después
de hacer una recarga, limpie las pinzas para eliminar la corrosión.
Debe proteger su piel cotra quemaduras.
• Almacene el cargador de baterías en un sitio seco, limpio y lejos de
corrientes de aire.
• En caso de falla, consulte a un Centro de Servicio Autorizado Truper.
DIAGRAMA ELÉCTRICO
CENTROS DE SERVICIO AUTORIZADOS TRUPER®
Venta de partes, componentes, consumibles y accesorios.
En caso de tener algún problema para contactar un Centro de Servicio Autorizado Truper
®
consulte nuestra página
www.truper.com donde obtendrá un listado actualizado, o llame al: 800 690-6990 ó800 0187-8737 donde le
informarán cuál es el Centro de Servicio más cercano.
AGUASCALIENTES
BAJA
CALIFORNIA
BAJA
CALIFORNIA SUR
CAMPECHE
CHIAPAS
CHIHUAHUA
CIUDAD DE
MÉXICO
COAHUILA
COLIMA
DURANGO
ESTADO DE
MÉXICO
GUANAJUATO
GUERRERO
HIDALGO
JALISCO
MICHOACÁN
MORELOS
NAYARIT
NUEVO LEÓN
OAXACA
PUEBLA
QUERÉTARO
QUINTANA ROO
SAN LUIS
POTOSÍ
SINALOA
SONORA
TABASCO
TAMAULIPAS
TLAXCALA
VERACRUZ
YUCATÁN
DE TODO PARA LA CONSTRUCCIÓN
GRAL. BARRAGÁN #1201, COL. GREMIAL, C.P. 20030,
AGUASCALIENTES, AGS. TEL.: 449 994 0537
SUCURSAL TIJUANA
AV. LA ENCANTADA, LOTE #5, PARQUE INDUSTRIAL EL
FLORIDO II, C.P 22244, TIJUANA, B.C.
TEL.: 664 969 5100
FIX FERRETERÍAS
FELIPE ÁNGELES ESQ. RUIZ CORTÍNEZ S/N, COL. PUEBLO
NUEVO, C.P. 23670, CD. CONSTITUCIÓN, B.C.S.
TEL.: 613 132 1115
TORNILLERÍA Y FERRETERÍA AAA
AV. ÁLVARO OBREGÓN #324, COL. ESPERANZA
C.P. 24080 CAMPECHE, CAMP. TEL.: 981 815 2808
FIX FERRETERÍAS
AV. CENTRAL SUR #27, COL. CENTRO, C.P. 30700,
TAPACHULA, CHIS. TEL.: 962 118 4083
SUCURSAL CHIHUAHUA
AV. SILVESTRE TERRAZAS #128-11, PARQUE INDUSTRIAL
BAFAR, CARRETERA MÉXICO CUAUHTÉMOC, C.P. 31415,
CHIHUAHUA, CHIH. TEL. 614 434 0052
FIX FERRETERÍAS
EL MONSTRUO DE CORREGIDORA, CORREGIDORA # 22,
COL. CENTRO, C.P. 06060, CUAUHTÉMOC, CDMX.
TEL: 55 5522 5031 / 5522 4861
SUCURSAL TORREÓN
CALLE METAL MECÁNICA #280, PARQUE INDUSTRIAL
ORIENTE, C.P. 27278, TORREÓN, COAH.
TEL.: 871 209 68 23
BOMBAS Y MOTORES BYMTESA DE MANZANILLO
BLVD. MIGUEL DE LA MADRID #190, COL. 16 DE
SEPTIEMBRE, C.P. 28239, MANZANILLO, COL.
TEL.: 314 332 1986 / 332 8013
TORNILLOS ÁGUILA, S.A. DE C.V.
MAZURIO #200, COL. LUIS ECHEVERRÍA, DURANGO,
DGO.TEL.: 618 817 1946 / 618 818 2844
SUCURSAL CENTRO JILOTEPEC
AV. PARQUE INDUSTRIAL #1-A, C.P. 54240, JILOTEPEC,
EDO. DE MÉX. TEL: 761 782 9101 EXT. 5728 Y 5102
CÍA. FERRETERA NUEVO MUNDO S.A. DE C.V.
AV. MÉXICO - JAPÓN #225, CD. INDUSTRIAL, C.P. 38010,
CELAYA, GTO. TEL.: 461 617 7578 / 79 / 80 / 88
CENTRO DE SERVICIO ECLIPSE
CALLE PRINCIPAL MZ.1 LT. 1, COL. SANTA FE, C.P. 39010,
CHILPANCINGO, GRO. TEL.: 747 478 5793
FERREPRECIOS S.A. DE C.V.
LIBERTAD ORIENTE #304 LOCAL 30, INTERIOR DE PASAJE
ROBLEDO, COL. CENTRO, C.P. 43600, TULANCINGO,
HGO. TEL.: 775 753 6615 / 775 753 6616
SUCURSAL GUADALAJARA
AV. ADOLFO B. HORN # 6800, COL: SANTA CRUZ DEL
VALLE, C.P.: 45655, TLAJOMULCO DE ZUÑIGA, JAL.
TEL.: 33 3606 5285 AL 90
FIX FERRETERÍAS
AV. PASEO DE LA REPÚBLICA #3140-A, COL.
EX-HACIENDA DE LA HUERTA, C.P. 58050, MORELIA,
MICH. TEL.: 443 334 6858
FIX FERRETERÍAS
CAPITÁN ANZURES #95, ESQ. JOSÉ PERDIZ, COL.
CENTRO, C.P. 62740, CUAUTLA, MOR.
TEL.: 735 352 8931
HERRAMIENTAS DE TEPIC
MAZATLAN #117, COL. CENTRO, C.P. 63000, TEPIC, NAY.
TEL.: 311 258 0540
SUCURSAL MONTERREY
CARRETERA LAREDO #300, 1B MONTERREY PARKS,
COLONIA PUERTA DE ANÁHUAC, C.P. 66052, ESCOBEDO,
NUEVO LEÓN, TEL.: 81 8352 8791 / 81 8352 8790
FIX FERRETERÍAS
AV. 20 DE NOVIEMBRE #910, COL. CENTRO, C.P. 68300,
TUXTEPEC, OAX. TEL.: 287 106 3092
SUCURSAL PUEBLA
AV PERIFÉRICO #2-A, SAN LORENZO ALMECATLA,
C.P. 72710, CUAUTLACINGO, PUE.
TEL.: 222 282 8282 / 84 / 85 / 86
ARU HERRAMIENTAS S.A DE C.V.
AV. PUERTO DE VERACRUZ #110, COL. RANCHO DE
ENMEDIO, C.P. 76842, SAN JUAN DEL RÍO, QRO.
TEL.: 427 268 4544
FIX FERRETERÍAS
CARRETERA FEDERAL MZ. 46 LT. 3 LOCAL 2, COL EJIDAL,
C.P. 77710 PLAYA DEL CARMEN, Q.R.
TEL.: 984 267 3140
FIX FERRETERÍAS
AV. UNIVERSIDAD #1850, COL. EL PASEO, C.P. 78320,
SAN LUIS POTOSÍ, S.L.P. TEL.: 444 822 4341
SUCURSAL CULIACÁN
AV. JESÚS KUMATE SUR #4301, COL. HACIENDA DE LA
MORA, C.P. 80143, CULIACÁN, SIN.
TEL.: 667 173 9139 / 173 8400
FIX FERRETERÍAS
CALLE 5 DE FEBRERO #517, SUR LT. 25 MZ. 10, COL.
CENTRO, C.P. 85000, CD. OBREGÓN, SON.
TEL.: 644 413 2392
SUCURSAL VILLAHERMOSA
CALLE HELIO LOTES 1, 2 Y 3 MZ. #1, COL. INDUSTRIAL,
2A ETAPA, C.P. 86010, VILLAHERMOSA, TAB.
TEL.: 993 353 7244
VM ORINGS Y REFACCIONES
CALLE ROSITA #527 ENTRE 20 DE NOVIEMBRE Y GRAL.
RODRÍGUEZ, FRACC. REYNOSA, C.P. 88780, REYNOSA,
TAMS. TEL.: 899 926 7552
SERVICIOS Y HERRAMIENTAS INDUSTRIALES
PABLO SIDAR #132, COL . BARRIO DE SAN BARTOLOMÉ,
C.P. 90970, SAN PABLO DEL MONTE, TLAX.
TEL.: 222 271 7502
LA CASA DISTRIBUIDORA TRUPER
BLVD. PRIMAVERA. ESQ. HORTENSIA S/N, COL.
PRIMAVERA C.P. 93308, POZA RICA, VER.
TEL.: 782 823 8100 / 826 8484
SUCURSAL MÉRIDA
CALLE 33 #600 Y 602, LOCALIDAD ITZINCAB Y MULSAY,
MPIO. UMÁN, C.P. 97390, MÉRIDA, YUC.
TEL.: 999 912 2451

Cuando el cargador de batería esté en conectado y el interruptor esté
en la posición de encendido, tenga cuidado de que las pinzas no se
toquen.
Nunca cargue una batería en la posición de encendido, ni cargue una
batería de 6 V en la posición de 12 V
OPERACIÓN
Verifique que el área alrededor de la batería esté bien ventilada durante
la carga. Puede esparcir el gas del área soplándolo con una hoja de
cartón u otro material no metálico usándolo como abanico.
INSTRUCCIONES DE OPERACIÓN PARA EL CARGADOR Y LA
BATERÍA
Para asegurar el uso correcto del cargador y de la batería, y que la
máquina no se dañe, se debe seguir las siguientes instrucciones:
1. Instrucciones de operación para la batería a cargar.
2. Cuando la batería tiene baja la carga, generalmente la tensión de
la terminal es normal. El fenómeno físico de la poca energía es el
cambio de la gravedad en la solución en la batería. Normalmente
es de 1,28 kg/L si es menor que 1,16 kg/L significa que debe cargar
la batería
3. La tensión de la batería deja el valor normal cuando se carga o está
descargada. Es más alto cuando se carga y es más bajo cuando se
descarga. Si la tensión no regresa a su valor normal después de
media hora, significa que la batería no esta bien.
4. Este es un cargador manual y no está provisto de un indicador de
carga total, el amperímetro indica la corriente que el cargador
suministra a la batería y la intensidad dependerá del estado de
carga de ésta.
No se recomienda utilizar la lectura del amperímetro para
determinar si la batería ha sido cargada completamente.
Para determinar el nivel de carga de la batería, se debe medir de
manera frecuente la tensión en sus terminales con un voltímetro,
cuando la tensión medida se encuentre en el nivel nominal, la batería
estará cargada.
METODO DE ARRANQUE:
El uso de la función del arranque debe cumplir con el
ciclo de trabajo del producto.
1. Lea con cuidado el instructivo del motor.
2. Cargue la batería durante 10 a 15 minutos.
• Conecte cualquier electrodo del cargador a la terminal de la batería,
que no conecte al chasis, y el otro a la terminal que conecte con el
chasis.
• Revise nuevamente la conexión: Si no existe ningún problema,
coloque el interruptor del cargador en la posición de arranque y
encienda el cargador de baterías.
El ciclo de trabajo para arranque del motor
es de 3 segundos encendido y 360 segundos apagado.
(CARBA-140)
El ciclo de trabajo para arranque del motor es de 3 segundos encendido
y 240 segundos apagado. (CARBA-200)
NOTA: Si excede el lapso de 3 segundos de arranque, el cargador
sufrirá daños.
MANTENIMIENTO
• El cargador de baterías debe recibir mantenimiento y revisiones
de manera regular para poder funcionar bien y con seguridad
• No abra jamás la carcasa del cargador de batería, ni trate de
desarmarla. Solamente un Centro de Servicio Autorizado Truper,
la puede reparar.
• El periodo de garantía del cargador de batería es de 1 año. Haga
INSTRUCCIONES DE SEGURIDAD
1. Mantenga el área de trabajo en orden. Las áreas y bancos
desordenados propician accidentes
2. Observe las condiciones del área de trabajo. No utilice
máquinas o equipos eléctricos en áreas mojadas o húmedas.
No exponga su equipo a la lluvia. Mantenga el área de trabajo
bien iluminada. No utilice equipos eléctricos en presencia de
gases o líquidos inflamables.
3. Prevéngase contra los choques eléctricos. Prevenga a
tierra tales como tuberías, radiadores y refrigeradores.
4. Mantenga a los niños alejados. Los niños nunca deben estar cerca
del área de trabajo. No permita que ellos sostengan máquinas,
equipos o cables de extensión. No permita que otras personas
toquen el equipo, manténgalas alejadas de su campo de trabajo.
5. Mantenga guardado el equipo mientras no esté en uso. Cuando
no esté en uso, el equipo debe guardarse en un lugar seco y libre
de polvo. Siempre guarde su equipo bajo llave para que no esté al
alcance de los niños.
6. No fuerce el equipo. Esta hará mejor su trabajo y será más segura
dentro del rango para la cual fue diseñada. No utilice aditamentos
inapropiados para intentar exceder la capacidad del equipo.
7. Utilice el equipo eléctrico adecuado. No utilice equipos demasiados
débiles para ejecutar trabajos pesados. No utilice equipos eléctricos
para trabajos pesados para los cuales no ha sido diseñada.
8. Utilice la indumentaria apropiada. No utilice ropa suelta, guantes,
corbatas o joyería que pueda ser atrapada en las partes móviles.
No utilice calzado resbaloso. Utilice algún protector de cabello para
retener el cabello largo.
9. Utilice protección para ojos. Siempre utilice accesorios de
seguridad apropiados por la Norma Oficial Mexicana (NOM),
como es el caso de goggles, caretas y mascarillas contra polvo,
cuando trabaje con materiales que despidan partes metálicas,
virutas o polvos químicos.
10. No use el cable de alimentación para fines para los cuales no está
dispuesto. No lleve la herramienta colgada del cable y no tire de
éste para desconectar la clavija de la base de enchufe. Proteja el
cable contra el calor, el aceite y las esquinas afiladas.
11. Afiance la pieza de trabajo. Utilice un dispositivo de fijación o una
mordaza para mantener firme la pieza de trabajo. Esto es más
seguro que usando una sola mano y le permite tener ambas manos
libres. Mantenga el balance adecuado todo el tiempo sobre sus pies.
No trate de alcanzar algo sobre la máquina o se cruce cuando esté
en funcionamiento.
12. No extienda su radio de acción. Evite toda postura que cause
cansancio. Cuide de que su posición sea segura y de que conserve
el equilibrio.
13. Mantenga el equipo en las mejores condiciones. Mantenga el equipo
limpio para tener la mejor ejecución y seguridad. Siga las
instrucciones para la lubricación y cambio de accesorios. Verifique
los cables de la herramienta periódicamente y si se encuentran
dañados, llévelos a reparar a un Centro de Servicio Autorizado
Truper®. Los mangos o manijas deben siempre permanecer limpios,
secos y libres de aceite y grasas.
14. Desconecte el equipo cuando no esté en uso, antes de proceder
al mantenimiento.
15. Reduzca el riesgo de arranques accidentales. No lleve
ninguna herramienta con el dedo puesto sobre el interruptor
mientras esté conectado a la red eléctrica. Asegúrese de que
el interruptor esté en la posición “apagado” (OFF) antes de
conectar el cable de alimentación.
16. Extensiones para exterior. En el exterior, utilice solamente
cables de extensión homologados y convenientemente
marcados.
17. Manténgase alerta. Fíjese en lo que está haciendo, utilice su sentido
común. No opere ninguna herramienta cuando esté cansado.
18. Revise las partes dañadas. Antes de continuar utilizando la
máquina, los protectores u otras partes móviles que pudieran estar
dañadas deben ser cuidadosamente revisadas, para asegurarse que
operan apropiadamente y trabajarán como debe ser. Verifique
también la alineación de las partes móviles, si están atascadas, o
si hay alguna probable ruptura de las partes, verifique también el
montaje, así como cualquier otra condición que pueda afectar la
operación de la herramienta. Todos los componentes deben estar
montados adecuadamente y cumplir los requisitos para garantizar
el correcto funcionamiento del aparato. Un protector u otra parte
que estén dañadas deberán ser apropiadamente reparadas o
cambiadas. Todo interruptor de mando deteriorado, deberá ser
reemplazado por un Centro de Servicio Autorizado Truper®. No
utilice ninguna herramienta eléctrica en la cual el interruptor no
tenga contacto.
19. Reemplazo de partes y accesorios. Cuando necesite remplazar las
piezas, utilice solamente refacciones originales Truper®, destinados
para usarse con está herramienta.
20. Para su seguridad personal utilice
únicamente los accesorios o aparatos adicionales indicados
en las instrucciones de manejo o recomendados por el
fabricante de la herramienta. La utilización de accesorios
diferentes a los indicados en las instrucciones de manejo,
puede ocasionar riesgo personal.
21. Protección para oídos. Utilice protectores auriculares,
cuando ejecute servicios que hagan ruidos
superiores a 85 dB
REGLAS DE SEGURIDAD ADICIONALES PARA EL CARGADOR DE
BATERÍAS
SEGURIDAD GENERAL DE BATERÍAS
Los cargadores de baterías se pueden utilizar para recargar baterías
de plomo ácido de ciclo profundo. También se pueden utilizar como
auxiliar en el arranque.
Estos cargadores tienen protección contra sobrecalentamiento y
protección contra picos de corriente. Son seguros y confiables al usarse.
La función del cargador de baterías incluye selección de corriente de
carga. Este control se encuentra integrado en el panel frontal del
cargador y es de fácil uso.
Tiene instalado un cinturón para mover el cargador.
Cuando se utiliza el cargador de baterías se deben observar las
siguientes reglas de seguridad, con el fin de proteger la seguridad de
las personas y de sus propiedades.
1. No exponga el cargador a la lluvia o nieve.
2. El uso de algún accesorio que no haya sido recomendado o vendido
por el fabricante de la batería puede ser causa de incendio, descarga
eléctrica o lesiones a las personas.
3. Cuando desconecte el cargador, debe hacerlo por la clavija y no por
el cable. No hacerlo puede dañar tanto al cable como a la clavija.
4. A menos que sea estrictamente necesario, no se debe utilizar cables
de extensión. El uso de cables de extensión incorrectos puede
ocasionar incendio y descarga eléctrica.
En caso de que sea necesario el uso de un cable de extensión, se debe
asegurar que:
a) Las espigas de la clavija en el cable de alimentación sean del mismo
número, medida y forma que los de la clavija del cargador;
b) El cable de extensión tenga el alambrado adecuado y que esté en
buenas condiciones eléctricas;
c) El calibre del cable sea lo suficientemente grande para el arco de
amperes de carga como se especifica en la tabla siguiente:
Calibre mínimo para cables de extensión (AWG)
(Cuando se usan 127 V~ solamente)
(1) Se permite utilizarlo siempre y cuando las extensiones mismas
cuenten con un artefacto de protección contra sobrecorriente.
(2) Uno de los conductores debe ser conductor para puesta a tierra.
Todos los conductores son de la misma designación (calibre)
incluyendo el de puesta a tierra. Referencia: NMX-J-195-ANCE
5. No opere el cargador si tiene el cable o clavija dañados. Llévelo a un
Centro de Servicio Autorizado Truper®
6. No utilice el cargador si ha recibido un golpe fuerte, si se cayó o si
está dañado de cualquier forma. Llévelo a un Centro de Servicio
Autorizado Truper®
7. No desarme el cargador. Cuando se requiera darle servicio o hacer
alguna reparación debe llevarlo a un Centro de Servicio Autorizado
Truper®. El armado posterior puede ser causa de fuego o descarga
eléctrica.
8. Para reducir el riesgo de descarga eléctrica, desconecte el cargador
del tomacorriente antes de llevar a cabo cualquier tarea de
mantenimiento o de limpieza. Apagar los controles no reduce estos
riesgos.
9. RIESGO DE GASES EXPLOSIVOS
A) TRABAJAR CERCA DE UNA BATERÍA DE PLOMO ÁCIDO ES
PELIGROSO. LAS BATERÍAS GENERAN GASES EXPLOSIVOS
DURANTE LA OPERACIÓN NORMAL DE LA BATERÍA. DEBIDO
A ESTO ES MUY IMPORTANTE QUE CADA VEZ, ANTES DE
UTILIZAR EL CARGADOR, LEA ESTE INSTRUCTIVO Y SIGA
LAS INSTRUCCIONES AL PIE DE LA LETRA.
b) Para reducir el riesgo de que la batería explote, siga estas
instrucciones y las instrucciones del fabricante del equipo que vaya
a utilizar cerca de la batería. Revise las medidas precautorias en
este producto y en el motor.
10. Precaución personal:
a) Debe haber una persona cerca de usted, para que le ayude cuando
trabaje con una batería de plomo ácido
b) Tenga suficiente agua fresca y jabón cerca, en caso de que el ácido
de la batería entre en contacto con su piel, ropa u ojos.
c) Use protección para ojos completa y ropa protectora. Evite tocarse
los ojos cuando trabaje cerca de la batería.
d) En caso de que el ácido de la batería entre en contacto con su piel
o ropa, lave de inmediato con gua y jabón. En caso de que entre
ácido en sus ojos, lave con mucha agua fría, por lo menos durante
10 minutos y busque atención médica de inmediato.
e) NUNCA fume o permita que haya chispas o flama cerca de la batería
o del motor.
f) Tenga mucho cuidado de no dejar caer una herramienta de metal
sobre la batería. Esto puede provocar una chispa o un corto circuito
en la batería o en alguna otra parte eléctrica y provocar una
explosión.
g) Retire todos los artículos de metal, tales como anillos, pulseras y
relojes cuando trabaje con una batería de plomo ácido. Una batería
de plomo ácido puede producir un cortocircuito con una corriente
tan alta que es suficiente para soldar un anillo o cualquier artículo
de metal, ocasionando quemaduras severas.
h) Use el cargador solamente para recargar baterías de PLOMO ÁCIDO.
No está diseñada para el suministro de electricidad a sistemas de
baja tensión diferentes a la aplicación de arranque de motor. No
utilice el cargador de baterías para recargar pilas secas que se
utilizan comúnmente con aparatos electrodomésticos. Este tipo de
baterías pueden explotar y ocasionar lesiones a las personas y dañar
sus propiedades.
i) NUNCA recargue una batería congelada.
PREPARACIÓN PARA CARGAR
a) En caso de necesitar sacar la batería del vehículo hacia el cargador,
retire siempre primero la terminal aterrizada de la batería. Verifique
que todos los accesorios del vehículo estén apagados para no
provocar un arco.
b) Verifique que el área alrededor de la batería esté bien ventilada
cuando se carga la batería. Puede esparcir el gas del área soplándolo
con una hoja de cartón y otro material no metálico usándolo como
abanico.
c) Limpie las terminales de la batería. Tenga cuidado que la corrosión
no entre en contacto con sus ojos.
d) Añada agua destilada en cada celda hasta que el ácido de la batería
llegue al nivel especificado indicado por el fabricante de la batería.
Esto ayuda a purgar el gas excesivo de las celdas. No llene demasiado.
Para las baterías que no tiene tapas en celdas, siga con cuidado las
instrucciones de recarga indicadas por el fabricante.
e) Estudie todas las medidas preventivas que indica el fabricante de
la batería, tales como, quitar o no quitar las tapas de las celdas
cuando se hace la recarga y las tasas de carga recomendadas.
f) Determine la tensión de la batería revisando el manual del automóvil.
En caso de que el cargador tenga velocidad de carga ajustable,
cargue la batería primero a la velocidad más baja.
UBICACIÓN DEL CARGADOR
a) Sitúe el cargador tan lejos como lo permitan los cables de corriente
continua de la batería.
b) Nunca coloque el cargador directamente sobre la batería que se
esté cargando. Los gases de la batería pueden corroer y dañar el
cargador.
c) No permita que el ácido de la batería gotee sobre el cargador cuando
revise la gravedad o cuando la rellene.
d) No haga funcionar el cargador en un área cerrada, ni impida la
ventilación de ninguna manera.
e) No coloque la batería sobre el cargador. El dispositivo produce calor
en la máquina mientras está funcionando. Para permitir que el calor
salga, no cubra con ningún objeto la ventila.
MEDIDAS DE PRECAUCIÓN
a) La conexión y desconexión de las pinzas de salida de corriente
directa solo se debe hacer con los interruptores del cargador en
la posición APAGADO y con el cable de corriente alterna
desconectado de la fuente de electricidad o tomacorriente. Nunca
permita que las pinzas se toquen entre sí.
b) Coloque las pinzas en la bataría y el chasis como se indica en 1(e),
1(f), 1(b) y 1(d).
1. SIGA ESTOS PASOS CUANDO LA BATERÍA ESTÉ INSTALADA EN EL
VEHÍCULO. UNA CHISPA CERCA DE LA BATERÍA PUEDE PROVOCAR
QUE EXPLOTE. PARA REDUCIR EL RIESGO DE CHISPAS CERCA DE LA
BATERÍA:
a) Para reducir el riesgo de daños, coloque los cables de corriente en
el cofre, la puerta o alguna parte del motor.
b) Manténganse alejado de las aspas del ventilador, bandas, poleas y
otras partes que podría ocasionar lesiones a las personas.
c) Revise la polaridad de los postes de la batería. El poste de la batería
POSITIVO (POS, P, +) generalmente tiene un diámetro mayor que el
poste NEGATIVO (NEG, N, -)
d) Determine cuál de los postes de la batería está aterrizado (conectado)
al chasis. En caso de que el poste negativo esté aterrizado al chasis
(como sucede en la mayoría de los vehículos), vea el inciso (e).
En caso de que el poste positivo esté aterrizado al chasis, vea el
inciso (f).
e) En los vehículos aterrizados con el negativo, conecte la pinza POSITIVA
(ROJA) del cargador de batería al poste sin aterrizar POSITIVO (POS,
P, +) de la batería. No conecte la pinza en el carburador, las líneas
de combustible o las láminas de metal de la carrocería. Conecte a
una parte metálica de calibre grueso del marco o del block del motor.
f) En los vehículos aterrizados con el positivo, conecte la pinza NEGATIVA
(NEGRA) del cargador de batería al poste sin aterrizar NEGATIVO
(NEG, N, -) de la batería. Conecte la pinza POSITIVA (ROJA) al chasis
del vehículo o al block del motor alejado de la batería. No conecte
la pinza al carburador, las líneas de combustible o partes de hoja
metálica de la carrocería. Conecte a una parte metálica de calibre
grueso del marco o del block del motor.
g) Cuando desconecte el cargador, desconecte el cable de alimentación,
retire la pinza del chasis del vehículo y después retire la pinza de la
terminal de la batería.
2. SIGA ESTOS PASOS CUANDO LA BATERÍA ESTÉ FUERA DEL VEHÍCULO.
UNA CHISPA CERCA DE LA BATERÍA PUEDE OCASIONAR UNA
EXPLOSIÓN. PARA REDUCIR EL RIESGO QUE SE GENERE UNA CHISPA
CERCA DE LA BATERÍA:
a) Revise la polaridad de los postes de la batería. El poste POSITIVO
(POS, P, +) DE LA BATERÍA GENERALMENTE TIENE UN DIÁMETRO MAYOR
QUE EL POSTE negativo (NEG, N, -).
b) Coloque un cable de batería aislado de 24 pulgadas de largo, de por
lo menos calibre 6 (AWG), el poste NEGATIVO (NEG, N, -) de la batería.
c) Conecte la pinza POSITIVA (ROJA) del cargador al poste POSITIVO
(POS, P, +) de la batería.
d) Coloque su cuerpo y el extremo libre del cable tan lejos como sea
posible de la batería. Entonces conecte la pinza del cargador
NEGATIVO (NEGRA) al extremo libre del cable.
e) No se ponga frente a la batería cuando haga la conexión final.
f) Cuando desconecte el cargador, hágalo en secuencia inversa al
procedimiento de conexión y desconecte la primera conexión
situándose tan lejos como sea posible.
g) La batería de un bote marino se debe retirar y cargarse en tierra.
Para hacer carga a bordo se requiere equipo especialmente diseñado
para uso marino.
INSTRUCCIONES PARA ATERRIZAR Y CONECTAR UN CABLE DE
CORRIENTE ALTERNA.
Para reducir el riesgo de descarga eléctrica, el cargador debe estar
aterrizado. El cargador viene equipado con un cable eléctrico con un
conductor aterrizado y una clavija aterrizada. Se debe conectar la clavija
en un tomacorriente debidamente instalado y aterrizado, que cumpla
con lo códigos y ordenamientos locales.
NUNCA altere el cable o clavija de
corriente alterna que viene con el equipo. Si no se puede
introducir en el tomacorrientes, haga que un electricista
calificado conecte el tomacorriente adecuado. Una conexión
no adecuada puede ocasionar una descarga eléctrica.
Este cargador de baterías está hecho para usarse en un circuito de
tensión nominal de 127 V~ y tiene una clavija aterrizada que se ve como
lo indica la figura A. Se puede utilizar un adaptador temporal similar al
adaptador ilustrado en las figuras B y C, en caso de que no esté
disponible un tomacorrientes adecuado, se puede conectar el adaptador
a un tomacorrientes de dos polos mostrado en la figura B. Este adaptador
temporal debe utilizarse solamente hasta que un electricista calificado
instale un tomacorrientes aterrizado adecuadamente.
Antes de utilizar el adaptador como se
ilustra, asegúrese que el tornillo del centro de la placa (si
existe) del tomacorrientes esté aterrizada. El anillo rígido o
lengüeta de conexión de color verde que sale del adaptador se debe
conectar a un tomacorriente aterrizado. En caso de que sea necesario,
reemplace el tornillo de la placa con un tornillo más largo que pueda
sujetar el anillo rígido o lengüeta y que haga una conexión aterrizada
al tomacorriente aterrizado.
reparar el cargador con el proveedor o en el Centro de Servicio
Autorizado Truper, mostrando su factura de compra.
• Antes de llevar a cabo cualquier tipo de mantenimiento, debe cortar
primero el suministro eléctrico.
• Limpie con regularidad el cargador usando un trapo suave. Después
de hacer una recarga, limpie las pinzas para eliminar la corrosión.
Debe proteger su piel cotra quemaduras.
• Almacene el cargador de baterías en un sitio seco, limpio y lejos de
corrientes de aire.
• En caso de falla, consulte a un Centro de Servicio Autorizado Truper.
DIAGRAMA ELÉCTRICO
Póliza de garantía
Modelos: CARBA-140
CARBA-200
13028
13029
Códigos:
Marca: TRUPER
Sello del establecimiento comercial.
Fecha de entrega:
Este producto está garantizado por 1 año. Para hacer válida la garantía o adquirir
piezas y componentes deberá presentar el producto en Corregidora 22, Col. Centro,
Alc. Cuauhtémoc, CDMX C.P. 06060 o en el establecimiento donde lo compró, o en
algún Centro de Servicio Truper® de los enlistados en el anexo de la póliza de
garantía y/o en www.truper.com . Los gastos de transportación que resulten para
su cumplimiento serán cubiertos por
Para dudas o comentarios, llame al 800-690-6990.
Hecho en China. Importado por Truper S.A. de C.V.
Parque Industrial 1, Jilotepec,
Edo. de Méx. C.P. 54240
09-2020
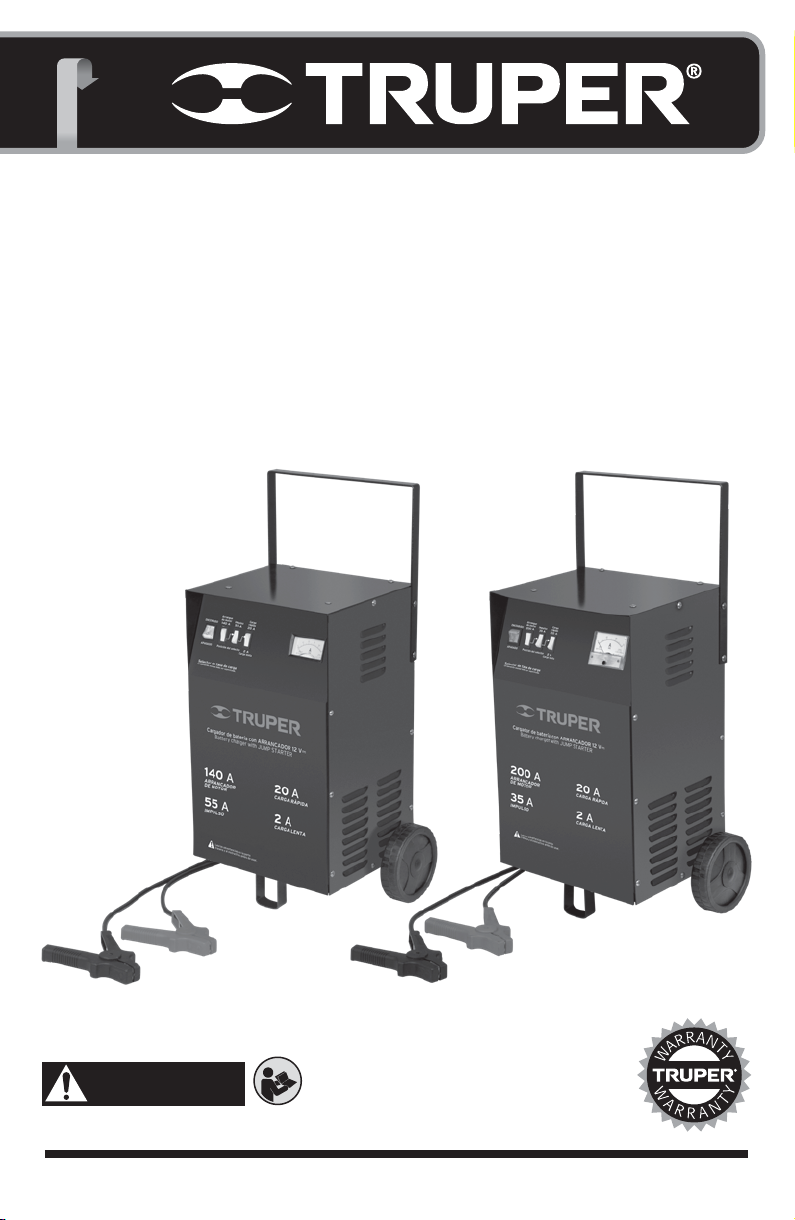
OPERATION
Verify the area around the battery is well ventilated when charging.
You can spread the gas away from the area, blowing it away using a
piece of carboard or any non-metallic material as a fan.
OPERATION INSTRUCTIONS FOR THE CHARGER AND THE BATTERY
To ensure correct use of the charger and battery, and that the machine
is not damaged, the following instructions should be followed:
1. Operation instructions for the battery to be charged.
2. When the battery has a low charge, the terminal voltage is usually
normal. The physical phenomenon of low energy is the change of
gravity in the solution in the battery. Normally it is 1.28 kg/L. If it is
less than 1.16 kg/L it means that you should charge the battery
3. The battery voltage changes from normal when it is recharged or
discharged. It is higher when charging and lower when discharging.
If the voltage does not return to its normal value after half an hour,
it means that the battery is malfunctioning.
4. This is a manual charger and does not have a full charge indicator.
The amperemeter indicates the current the charger supplies to the
battery and the current will depend on the battery's state of charge.
It is not recommended to use the amperemeter reading to determine
if the battery has been fully charged. To determine the battery charge
level, the voltage at the battery terminals should be measured
frequently with a voltmeter. When the measured voltage is at the
nominal level, the battery is charged.
START METHOD:
The use of the start function shall comply with the product work cycle.
1. Read carefully the motor instructions.
2. Charge the battery during 10 to 15 minutes.
• Connect any electrode of the charger to the battery terminal that is
not connected to the chassis and the other one to the terminal
connecting the chassis.
• Check the connection once again: If there is no problem, set the
charger switch in the start position and turn ON the battery charger.
The work cycle to start a motor is 3 seconds
ON and 360 seconds OFF. (CARBA – 140)
The work cycle to start a motor is 3 seconds ON and 240
seconds OFF. (CARBA – 200)
NOTE: If the 3 seconds start span is exceeded the charger will get
damaged.
MAINTENANCE
• The battery charger shall regularly be maintained and checked to
work correctly and safely.
• Never open the battery charger housing or try to disassemble it.
Only a Truper® Authorized Service Center can repair the battery.
• The Warranty period of the battery charger es 1 year. Repairs shall
be carried out with the supplier or in a Truper® Authorized Service
Center showing your invoice.
• Before carrying out any type of maintenance, first cut the power
supply.
• Clean regularly the charger using a soft cloth. After recharging,
clean the clamps to prevent corrosion.
Protect your skin against burns.
• Store the battery charger in a clean, dry place away from air drafts.
• In the event of any defect, call a Truper® Authorized Service Center
SAFETY INSTRUCTIONS
1. Keep the work area tidy. Cluttered areas and work benches favor
accidents
2. Pay attention to your work area conditions. Do not use
machinery or power devices in wet or damp areas. Do not
expose the equipment to rain. Keep your work area well lit.
Do not use power equipment in the presence of gas or
flammable liquids.
3. Prevent against electric shock. Prevent against electric
shock not touching grounded appliances such as pipes,
radiators and refrigerators.
4. Keep children away. Children shall never be near your work area.
Do not allow children to hold machinery, extension cables or
equipment. Do not allow other people to touch the equipment. Keep
them away from your work area.
5. Store the equipment while not in use. When not in use, the
equipment, shall be stored away in a dry and dust free place. Always
store the equipment locked away from children’s reach.
6. Do not force the equipment. It will perform better and safer when
used within its scope. do not use inadequate attachments to exceed
the capacity of the equipment.
7. Use the right power equipment. Do not use power equipment for
heavy-duty jobs. Do not use power equipment to carry out
heavy-duty jobs beyond the machine scope.
8. Wear adequate clothes. Do not use lose clothes, gloves, tie or jewelry
which could get caught in the mobile parts. Do not wear slippery
shoes. Wear hair protection to hold long hair.
9. Wear eye protection. Always wear adequate safety
accessories accepted in the Official Mexican Standard (NOM)
such as goggles, face mask and anti-dust face mask when
working with materials that shed metal parts, shavings, or
chemical dust.
10. Do not use the power cable for purposes different from its design.
Do not carry the tool by the cable. do not pull the cable to
disconnect the plug from the power outlet. Protect the cable against
heat, oil, and sharp edges.
11. Fasten the work piece. Use fixing devices or clamps to keep the
piece firm. It is safer than working one-handed and allows having
both hands free. keep adequate footing all time. do not try to
overreach over the machine or try go across when it is running
12. Do not overreach. Avoid tiresome positions. Your stance shall be
safe and balanced.
13. Keep the equipment in the best working conditions. Keep the
equipment clean to gain a better job and safety. Follow the
lubrication and accessories replacement instructions. Verify
regularly the tool power cables. If damaged, go to a Truper®
Authorized Service Center. The handles shall always stay clean and
free of oil and grease.
14. Disconnect the equipment when not in use and before carrying
out maintenance.
15. Reduce the risk of accidental start up. Never carry a
power tool still connected to the power supply with your
finger on the switch. Double check the switch is in the
OFF position before connecting the power cable.
16. Outdoor Extension Cables. When outdoors, use only
dedicated and duly marked extension cables.
17. Stay alert. Pay attention to the work. Use your common sense.
Do not operate power tools when tired.
18. Check for damaged parts. Before you continue using the machine,
the protectors and other mobile parts that could be damaged shall
be carefully checked to assure adequate performance. Verify mobile
parts. Look for alignment, probable break age of parts mounting
and any other condition that could affect the tool operation. All
the components shall be correctly mounted and comply with the
requirements to guarantee the tool is working correctly. A protector
or other damaged part shall be repaired or replaced. Any
deteriorated switch shall be replaced in a Truper® Authorized Service
Center. Never use a power tool if the switch is not making contact.
19. Parts and accessories replacement. When in need of replacement
parts, use only Truper® original replacement parts specially
manufactured for this tool.
20. For your person al safety use only
accessories or additional devices indicated in the handling
instructions or with the recommendation of the tool
manufacturer.
Using accessories different from those indicated in the
handling instructions may turn into a personal risk.
21. Hearing protection. Use hearing protection when carrying
out services producing noise above 85 dB.
ADDITIONAL SAFETY RULES FOR THE BATTERY CHARGER
GENERAL SAFETY FOR BATTERIES
The battery chargers can be used to charge deep cycle lead acid
batteries. They can also be used as an auxiliary in the startup of engines.
These chargers have an overheating protection and protection against
current peaks. They are safe and reliable when used.
The battery charger functions include current load selection. This control
is integrated in the charger front panel and is easy to use.
The charger is built with a belt to move the charger. To protect the
safety of people and their property, the following safety rules shall be
followed when using the battery charger:
1. Do not expose the charger to rain or snow.
2. Use of accessories not recommended or sold by the battery
manufacturer may cause fire, electric discharge or personal injuries.
3. When disconnecting the charger, hold and pull the plug, not the cable.
Failure to follow this instruction may damage both the cable and the
plug.
4. Unless strictly necessary, do not use extension cables. Using the
wrong extension cable may cause fire and electric shock.
If using an extension cable is necessary, make sure that:
a) The plug prongs in the extension cable are the same number, size
and shape than the charger plug;
b) The extension cable is wired correctly and in good electric condition;
c) The cable gauge is big enough for the load ampere arc as specified
in the following table:
Minimum gauge for extension cords (AWG)
(When using 127 V~ only)
(1) It is safe to use only if the extensions have an over current protection
device.
(2) One of the conductors should be grounded. All conductors are the
same gauge including the one that is grounded. Reference: NMX
–J-195-ANCE
5. Do not operate the charger if the cable or plug are damaged. Take
it to a Truper® Authorized Service Center.
6. Do not use the charger if it received a strong bump, it fell or is
damaged in any way. Take it to a Truper® Authorized Service Center.
7. Do not disassemble the charger. If you assemble it back it may cause
fire or electric shock. When needing to service or repair the device,
take it to a Truper® Authorized Service Center.
8. To reduce the risk of electric shock, disconnect the charger from
the power supply before carrying out maintenance or cleaning
service. Turning OFF the controls DOES NOT reduce those risks.
9. RISK OF EXPLOSIVE GAS
A) WORKING NEAR AN ACID LEAD BATTERY IS DANGEROUS.
BATTERIES GENERATE EXPLOSIVE GASSES DURING THE
BATTERY NORMAL OPERATION. THEREFORE, IT IS VERY
IMPORTANT THAT BEFORE USING THE CHARGER, YOU READ
AND FOLLOW THE INSTRUCTIONS TO THE VERY DETAIL.
b) To reduce the risk of the battery exploding, follow these instructions
and the instructions of the manufacturer of the equipment to be
used in the vicinity of the battery. Review the precautions on this
product and on the engine.
10. Personal precaution:
a) There shall be second person close to the user to help, when working
with an acid lead battery.
b) Have handy plenty of fresh water and soap in case battery acid make
contact with your skin, clothes or eyes.
c) Use full eye protection and protective clothing. Avoid touching your
eyes when working near the battery.
d) If battery acid comes in contact with your skin or clothes, wash
immediately with water and soap. If acid gets into your eyes, flush
with plenty of cold water for at least 10 minutes and seek medical
attention immediately.
e) NEVER smoke or allow sparks or flames near the battery or the
motor.
f) Be very careful not to drop a metal tool on the battery. This may
cause a spark or short circuit in the battery or other electrical part
and cause an explosion.
g) Remove all metal particles like rings, bracelets and watches when
working with an acid lead battery. An acid lead battery may cause
a short circuit with extremely high current capable or welding a ring
or any other metal article causing severe burns.
h) Use the charger only to recharge ACID LEAD batteries. It is not
designed to supply electricity to low tension systems different from
the motor starting application. Do not use the battery charger to
charge dry batteries used commonly with domestic appliances. These
types of batteries may explode and injure people and damage
property.
i) NEVER recharge a frozen battery.
PREPARING TO CHARGE
a) If you need to remove the battery from the vehicle toward the
charger, always remove first the battery ground terminal. Verify all
the vehicle accessories are OFF to prevent causing an arc.
b) Verify the area around the battery is well ventilated when charging
the battery. You can spread the gas from the area blowing it away
using a piece of carboard or any nonmetallic material as a fan.
c) Clean the battery terminals. Be careful the corrosion is not making
contact with your eyes.
d) Add distilled water into each cell until the battery acid is reaching
the specified level indicated by the battery manufacturer. This
operation is helpful to purge excessive gas in the cells. Do not overfill.
For batteries built without caps in the cells, follow carefully the
recharge instructions indicated by the manufacturer.
e) Study all the preventive measures indicated by the battery
manufacturer, such as to remove or no remove the cells caps when
recharging and the recommended rates.
f) Determine the battery tension checking the automobile manual. If
the charger has an adjustable loading speed, charge the battery first
in the lowest speed.
LOCATION OF THE CHARGER
a) Place the charger as far as the c.c. battery cables allow.
b) Never place the charger directly on the battery being charged. Gasses
from the battery can corrode and damage the charger.
c) Do not allow the battery acid to drip on the charger when checking
gravity or when filling up.
d) Do not operate the charger in an enclosed area. Do not block
ventilation in any way.
e) Do not place the battery on the charger. The device produces heat
in the machine while it is running. To allow heat to escape, do not
cover the ventilation slot with any object.
CAUTION MEASURES
a) Connection and disconnection of the direct current output clamps
can only be carried out having the charger switches in the OFF
position, and the power cable disconnected from the power supply.
Never let the clamps touch one to the other.
b) Set the clamps in the battery and chassis as indicated in 1 (e), 1 (f),
1 (b) and 1 (d).
1. FOLLOW THESE STEPS WHEN THE BATTERY IS INSTALLED IN THE
VEHICLE. A SPARK NEAR THE BATTERY MAY CAUSE AN EXPLOSION.
TO REDUCE THE RISK NEAR THE BATTERY:
a) To reduce the risk of damage, place the current cables on the hood,
door or any place in the motor.
b) Keep them away from the fan blades, bands, pulleys and other parts
that could injure people.
c) Check the polarity of the battery posts. The POSITIVE (POS, P +)
battery post, usually is of a larger diameter than the NEGATIVE
(NEG, N, -) post.
d) Determine which of the battery posts is grounded (connected) to
the chassis. If the negative post is grounded to the chassis (as it is
in most vehicles), see item (e). If the positive post is grounded to
the chassis, see item (f).
e) In vehicles grounded with the negative, connect the POSITIVE (RED)
of the charger to the post that is not grounded POSITIVE (POS, P +)
post of the battery. Do not connect the clamp in the carburetor,
fuel lines or body metal sheets. Connect into a metal part with tick
caliber or a block in the motor.
f) In vehicles grounded with the positive, connect the NEGATIVE (BLACK)
clamp of the battery charger to the post that is not grounded to the
NEGATIVE (NEG, N, -) post of the battery. Connect the POSITIVE (RED)
clamp to the vehicle chassis or to a block in the motor away from
the battery.
g) When disconnecting the charger, also disconnect the power cable.
Remove the clamp from the vehicle chassis and then, remove the
clamp from the battery terminal.
e) In vehicles grounded with the negative, connect the POSITIVE (RED)
clamp of the charger to the post that is not grounded POSITIVE (POS,
P +) of the battery. Do not connect the clamp in the carburetor, fuel
lines or body metal sheets. Connect into a metal part with tick caliber
or a block in the motor.
f) In vehicles grounded with the positive, connect the NEGATIVE (BLACK)
clamp to the post that is not grounded to the NEGATIVE (NEG, N, -)
post of the battery. Connect the POSITIVE (RED) clamp to the vehicle
chassis or to a block in the motor away from the battery.
g) When disconnecting the charger, also disconnect the power cable.
Remove the clamp from the vehicle chassis and thorn, remove the
clamp from the battery terminal.
2. FOLLOW THESE STEPS WHEN THE BATTERY IS OUTSIDE OF THE
VEHICLE A SPARK IN THE VICINITY OF THE BATTERY MAY CAUSE
AN EXPLOSION TO REDUCE THE RISK OF SPARKS GENERATING NEAR
THE BATTERY:
a) Check polarity in the battery post. The POSITIVE (POS, P +) battery
post OF THE BATTERY, USUALLY HAS A LARGER DIAMETER THAN THE
(NEG, N, -) post.
b) Attach a 24-inch long, insulated battery cable, at least 6-gauge (AWG),
to the NEGATIVE (NEG, N, -) pole of the battery.
c) Connect the POSITIVE (RED) clamp on the charger to the POSITIVE
(POS, P, +) post on the battery.
d) Place your body and the free end of the cable as far away from the
battery as possible. Then connect the NEGATIVE (BLACK) charger
clamp to the free end of the cable.
e) Do not stand in front of the battery when making the final connection.
f) When disconnecting the charger, do so in reverse sequence to the
connection procedure and disconnect the first connection by placing
yourselves as far away as possible.
g) The battery of a marine boat must be removed and charged on land.
Specially designed marine equipment is required to charge on board.
INSTRUCTIONS TO GROUND AND CONNECT AN ALTERNATE
CURRENT CABLE
To reduce the risk of electric shock, the charger shall be grounded. The
charger is equipped with an electric cable with a grounded conductor
and a grounded plug. The plug shall be connected into power supply
dully installed and grounded complying with the local codes and
ordinances.
NEVER modify the cable or the alternate
current plug installed in the equipment. If it cannot be
plugged in the power supply, call a certified electrician to
connect the suitable power supply. A connection if not
adequate may cause an electric shock.
This battery charger is manufactured to be used in a 127 V~ rated power
circuit and a grounded plug that looks like indicated in figure A.
A temporary adapter similar to the adapter shown in figures B and C
can be used if an adequate power supply is not available. The adapter
can be plugged into a two-pole power supply as shown in figure B. This
temporary adapter shall only be used until a certified electrician will
install a duly grounded power supply.
Before using the adapter as shown, double
check the screw in the center of the power supply plate (if
existing) is grounded. The rigid ring or green connection lug
coming out from the adapter shall be connected into a grounded
power supply.
If necessary, replace the plate screw with a longer screw to fasten
the rigid ring or lug and to make a grounded connection with the
grounded power supply.
When the battery charger is connected and the switch is in the ON
position, be careful not to touch together the connection grippers.
Never charge a battery in the ON position. Do not charge a 6 V battery
in the 12 V position.
ELECTRIC DIAGRAM
Manual
Battery charger with STARTER
ENGLISH
ESPAÑOL
Codes: 13028
13029
Models: CARBA-140
CARBA-200
CAUTION Read the user’s manual thoroughly
before operating this tool.
SAVE THIS INSTRUCTIONS MANUAL
You will need the instruction manual for safety and caution rules,
assembly instructions, maintenance and operating procedures, parts
list and diagram.
Keep your invoice with these instructions. Write the invoice number
on the inside of the front cover. Keep the instructions and invoice in
a dry, safe place for future reference.
TECHNICAL SPECIFICATIONS
CARBA-140
Input
Voltage:
Frequency:
Current:
Output
Voltage:
Current:
Engine start:
Work cycle:
CARBA-200
Input
Voltage:
Frequency:
Current:
Output
Voltage:
Current:
Engine start:
Work cycle:
TransformerI insulation : Class “H”
Insulation cord grips type: “Y”
All conductors are: 8 AWG x 3 C with 105ºC insulation temperature
IMPORTANT NOTE: Avoid the risk of electric shock or severe injury.
When the power cable gets damaged it should only be replaced by
the manufacturer or at a Truper® Authorized Service Center.
Power grips used in this product is type “Y”
The build quality of the electric insulation is altered if while in use
splashing or liquid get into the tool. Do not expose to rain, liquids
and / or dampness.
Before gaining access to the terminals all
power sources should be disconnected.
127 V~
60 Hz
0.9 A / 3.4 A / 11 A / 26 A
12 V
2 A / 20 A continuous / 55 A / 140 A intermittent
12 V / 55 A intermittent:
30 s maximum ON / 600 s minimum OFF
12 V / 140 A intermittent:
3 s maximum ON / 360 s minimum OFF
55 A intermittent:
30 s maximum ON / 600 s minimum OFF
140 A intermittent:
3 s maximum OFF / 360 s minimum OFF
127 V~
60 Hz
1.2 A / 3.8 A / 6.4 A / 32 A
12 V
2 A / 20 A / 35 A continuous / 200 A intermittent
12 V / 200 A intermittent:
3 s maximum ON / 240 s minimum OFF
200 A intermittent:
3 s maximum ON / 240 s minimum OFF
OPERATION
Verify the area around the battery is well ventilated when charging.
You can spread the gas away from the area, blowing it away using a
piece of carboard or any non-metallic material as a fan.
OPERATION INSTRUCTIONS FOR THE CHARGER AND THE BATTERY
To ensure correct use of the charger and battery, and that the machine
is not damaged, the following instructions should be followed:
1. Operation instructions for the battery to be charged.
2. When the battery has a low charge, the terminal voltage is usually
normal. The physical phenomenon of low energy is the change of
gravity in the solution in the battery. Normally it is 1.28 kg/L. If it is
less than 1.16 kg/L it means that you should charge the battery
3. The battery voltage changes from normal when it is recharged or
discharged. It is higher when charging and lower when discharging.
If the voltage does not return to its normal value after half an hour,
it means that the battery is malfunctioning.
4. This is a manual charger and does not have a full charge indicator.
The amperemeter indicates the current the charger supplies to the
battery and the current will depend on the battery's state of charge.
It is not recommended to use the amperemeter reading to determine
if the battery has been fully charged. To determine the battery charge
level, the voltage at the battery terminals should be measured
frequently with a voltmeter. When the measured voltage is at the
nominal level, the battery is charged.
START METHOD:
The use of the start function shall comply with the product work cycle.
1. Read carefully the motor instructions.
2. Charge the battery during 10 to 15 minutes.
• Connect any electrode of the charger to the battery terminal that is
not connected to the chassis and the other one to the terminal
connecting the chassis.
• Check the connection once again: If there is no problem, set the
charger switch in the start position and turn ON the battery charger.
The work cycle to start a motor is 3 seconds
ON and 360 seconds OFF. (CARBA – 140)
The work cycle to start a motor is 3 seconds ON and 240
seconds OFF. (CARBA – 200)
NOTE: If the 3 seconds start span is exceeded the charger will get
damaged.
MAINTENANCE
• The battery charger shall regularly be maintained and checked to
work correctly and safely.
• Never open the battery charger housing or try to disassemble it.
Only a Truper® Authorized Service Center can repair the battery.
• The Warranty period of the battery charger es 1 year. Repairs shall
be carried out with the supplier or in a Truper® Authorized Service
Center showing your invoice.
• Before carrying out any type of maintenance, first cut the power
supply.
• Clean regularly the charger using a soft cloth. After recharging,
clean the clamps to prevent corrosion.
Protect your skin against burns.
• Store the battery charger in a clean, dry place away from air drafts.
• In the event of any defect, call a Truper® Authorized Service Center
2
SAFETY INSTRUCTIONS
1. Keep the work area tidy. Cluttered areas and work benches favor
accidents
2. Pay attention to your work area conditions. Do not use
machinery or power devices in wet or damp areas. Do not
expose the equipment to rain. Keep your work area well lit.
Do not use power equipment in the presence of gas or
flammable liquids.
3. Prevent against electric shock. Prevent against electric
shock not touching grounded appliances such as pipes,
radiators and refrigerators.
4. Keep children away. Children shall never be near your work area.
Do not allow children to hold machinery, extension cables or
equipment. Do not allow other people to touch the equipment. Keep
them away from your work area.
5. Store the equipment while not in use. When not in use, the
equipment, shall be stored away in a dry and dust free place. Always
store the equipment locked away from children’s reach.
6. Do not force the equipment. It will perform better and safer when
used within its scope. do not use inadequate attachments to exceed
the capacity of the equipment.
7. Use the right power equipment. Do not use power equipment for
heavy-duty jobs. Do not use power equipment to carry out
heavy-duty jobs beyond the machine scope.
8. Wear adequate clothes. Do not use lose clothes, gloves, tie or jewelry
which could get caught in the mobile parts. Do not wear slippery
shoes. Wear hair protection to hold long hair.
9. Wear eye protection. Always wear adequate safety
accessories accepted in the Official Mexican Standard (NOM)
such as goggles, face mask and anti-dust face mask when
working with materials that shed metal parts, shavings, or
chemical dust.
10. Do not use the power cable for purposes different from its design.
Do not carry the tool by the cable. do not pull the cable to
disconnect the plug from the power outlet. Protect the cable against
heat, oil, and sharp edges.
11. Fasten the work piece. Use fixing devices or clamps to keep the
piece firm. It is safer than working one-handed and allows having
both hands free. keep adequate footing all time. do not try to
overreach over the machine or try go across when it is running
12. Do not overreach. Avoid tiresome positions. Your stance shall be
safe and balanced.
13. Keep the equipment in the best working conditions. Keep the
equipment clean to gain a better job and safety. Follow the
lubrication and accessories replacement instructions. Verify
regularly the tool power cables. If damaged, go to a Truper®
Authorized Service Center. The handles shall always stay clean and
free of oil and grease.
14. Disconnect the equipment when not in use and before carrying
out maintenance.
15. Reduce the risk of accidental start up. Never carry a
power tool still connected to the power supply with your
finger on the switch. Double check the switch is in the
OFF position before connecting the power cable.
16. Outdoor Extension Cables. When outdoors, use only
dedicated and duly marked extension cables.
17. Stay alert. Pay attention to the work. Use your common sense.
Do not operate power tools when tired.
18. Check for damaged parts. Before you continue using the machine,
the protectors and other mobile parts that could be damaged shall
be carefully checked to assure adequate performance. Verify mobile
parts. Look for alignment, probable break age of parts mounting
and any other condition that could affect the tool operation. All
the components shall be correctly mounted and comply with the
requirements to guarantee the tool is working correctly. A protector
or other damaged part shall be repaired or replaced. Any
deteriorated switch shall be replaced in a Truper® Authorized Service
Center. Never use a power tool if the switch is not making contact.
19. Parts and accessories replacement. When in need of replacement
parts, use only Truper® original replacement parts specially
manufactured for this tool.
20. For your person al safety use only
accessories or additional devices indicated in the handling
instructions or with the recommendation of the tool
manufacturer.
Using accessories different from those indicated in the
handling instructions may turn into a personal risk.
21. Hearing protection. Use hearing protection when carrying
out services producing noise above 85 dB.
ADDITIONAL SAFETY RULES FOR THE BATTERY CHARGER
GENERAL SAFETY FOR BATTERIES
The battery chargers can be used to charge deep cycle lead acid
batteries. They can also be used as an auxiliary in the startup of engines.
These chargers have an overheating protection and protection against
current peaks. They are safe and reliable when used.
The battery charger functions include current load selection. This control
is integrated in the charger front panel and is easy to use.
The charger is built with a belt to move the charger. To protect the
safety of people and their property, the following safety rules shall be
followed when using the battery charger:
1. Do not expose the charger to rain or snow.
2. Use of accessories not recommended or sold by the battery
manufacturer may cause fire, electric discharge or personal injuries.
3. When disconnecting the charger, hold and pull the plug, not the cable.
Failure to follow this instruction may damage both the cable and the
plug.
4. Unless strictly necessary, do not use extension cables. Using the
wrong extension cable may cause fire and electric shock.
If using an extension cable is necessary, make sure that:
a) The plug prongs in the extension cable are the same number, size
and shape than the charger plug;
b) The extension cable is wired correctly and in good electric condition;
c) The cable gauge is big enough for the load ampere arc as specified
in the following table:
Minimum gauge for extension cords (AWG)
(When using 127 V~ only)
(1) It is safe to use only if the extensions have an over current protection
device.
(2) One of the conductors should be grounded. All conductors are the
same gauge including the one that is grounded. Reference: NMX
–J-195-ANCE
5. Do not operate the charger if the cable or plug are damaged. Take
it to a Truper® Authorized Service Center.
6. Do not use the charger if it received a strong bump, it fell or is
damaged in any way. Take it to a Truper® Authorized Service Center.
7. Do not disassemble the charger. If you assemble it back it may cause
fire or electric shock. When needing to service or repair the device,
take it to a Truper® Authorized Service Center.
8. To reduce the risk of electric shock, disconnect the charger from
the power supply before carrying out maintenance or cleaning
service. Turning OFF the controls DOES NOT reduce those risks.
9. RISK OF EXPLOSIVE GAS
A) WORKING NEAR AN ACID LEAD BATTERY IS DANGEROUS.
BATTERIES GENERATE EXPLOSIVE GASSES DURING THE
BATTERY NORMAL OPERATION. THEREFORE, IT IS VERY
IMPORTANT THAT BEFORE USING THE CHARGER, YOU READ
AND FOLLOW THE INSTRUCTIONS TO THE VERY DETAIL.
b) To reduce the risk of the battery exploding, follow these instructions
and the instructions of the manufacturer of the equipment to be
used in the vicinity of the battery. Review the precautions on this
product and on the engine.
10. Personal precaution:
a) There shall be second person close to the user to help, when working
with an acid lead battery.
b) Have handy plenty of fresh water and soap in case battery acid make
contact with your skin, clothes or eyes.
c) Use full eye protection and protective clothing. Avoid touching your
eyes when working near the battery.
d) If battery acid comes in contact with your skin or clothes, wash
immediately with water and soap. If acid gets into your eyes, flush
with plenty of cold water for at least 10 minutes and seek medical
attention immediately.
e) NEVER smoke or allow sparks or flames near the battery or the
motor.
f) Be very careful not to drop a metal tool on the battery. This may
cause a spark or short circuit in the battery or other electrical part
and cause an explosion.
g) Remove all metal particles like rings, bracelets and watches when
working with an acid lead battery. An acid lead battery may cause
a short circuit with extremely high current capable or welding a ring
or any other metal article causing severe burns.
h) Use the charger only to recharge ACID LEAD batteries. It is not
designed to supply electricity to low tension systems different from
the motor starting application. Do not use the battery charger to
charge dry batteries used commonly with domestic appliances. These
types of batteries may explode and injure people and damage
property.
i) NEVER recharge a frozen battery.
PREPARING TO CHARGE
a) If you need to remove the battery from the vehicle toward the
charger, always remove first the battery ground terminal. Verify all
the vehicle accessories are OFF to prevent causing an arc.
b) Verify the area around the battery is well ventilated when charging
the battery. You can spread the gas from the area blowing it away
using a piece of carboard or any nonmetallic material as a fan.
c) Clean the battery terminals. Be careful the corrosion is not making
contact with your eyes.
d) Add distilled water into each cell until the battery acid is reaching
the specified level indicated by the battery manufacturer. This
operation is helpful to purge excessive gas in the cells. Do not overfill.
For batteries built without caps in the cells, follow carefully the
recharge instructions indicated by the manufacturer.
e) Study all the preventive measures indicated by the battery
manufacturer, such as to remove or no remove the cells caps when
recharging and the recommended rates.
f) Determine the battery tension checking the automobile manual. If
the charger has an adjustable loading speed, charge the battery first
in the lowest speed.
LOCATION OF THE CHARGER
a) Place the charger as far as the c.c. battery cables allow.
b) Never place the charger directly on the battery being charged. Gasses
from the battery can corrode and damage the charger.
c) Do not allow the battery acid to drip on the charger when checking
gravity or when filling up.
d) Do not operate the charger in an enclosed area. Do not block
ventilation in any way.
e) Do not place the battery on the charger. The device produces heat
in the machine while it is running. To allow heat to escape, do not
cover the ventilation slot with any object.
CAUTION MEASURES
a) Connection and disconnection of the direct current output clamps
can only be carried out having the charger switches in the OFF
position, and the power cable disconnected from the power supply.
Never let the clamps touch one to the other.
b) Set the clamps in the battery and chassis as indicated in 1 (e), 1 (f),
1 (b) and 1 (d).
1. FOLLOW THESE STEPS WHEN THE BATTERY IS INSTALLED IN THE
VEHICLE. A SPARK NEAR THE BATTERY MAY CAUSE AN EXPLOSION.
TO REDUCE THE RISK NEAR THE BATTERY:
a) To reduce the risk of damage, place the current cables on the hood,
door or any place in the motor.
b) Keep them away from the fan blades, bands, pulleys and other parts
that could injure people.
c) Check the polarity of the battery posts. The POSITIVE (POS, P +)
battery post, usually is of a larger diameter than the NEGATIVE
(NEG, N, -) post.
d) Determine which of the battery posts is grounded (connected) to
the chassis. If the negative post is grounded to the chassis (as it is
in most vehicles), see item (e). If the positive post is grounded to
the chassis, see item (f).
e) In vehicles grounded with the negative, connect the POSITIVE (RED)
of the charger to the post that is not grounded POSITIVE (POS, P +)
post of the battery. Do not connect the clamp in the carburetor,
fuel lines or body metal sheets. Connect into a metal part with tick
caliber or a block in the motor.
f) In vehicles grounded with the positive, connect the NEGATIVE (BLACK)
clamp of the battery charger to the post that is not grounded to the
NEGATIVE (NEG, N, -) post of the battery. Connect the POSITIVE (RED)
clamp to the vehicle chassis or to a block in the motor away from
the battery.
g) When disconnecting the charger, also disconnect the power cable.
Remove the clamp from the vehicle chassis and then, remove the
clamp from the battery terminal.
e) In vehicles grounded with the negative, connect the POSITIVE (RED)
clamp of the charger to the post that is not grounded POSITIVE (POS,
P +) of the battery. Do not connect the clamp in the carburetor, fuel
lines or body metal sheets. Connect into a metal part with tick caliber
or a block in the motor.
f) In vehicles grounded with the positive, connect the NEGATIVE (BLACK)
clamp to the post that is not grounded to the NEGATIVE (NEG, N, -)
post of the battery. Connect the POSITIVE (RED) clamp to the vehicle
chassis or to a block in the motor away from the battery.
g) When disconnecting the charger, also disconnect the power cable.
Remove the clamp from the vehicle chassis and thorn, remove the
clamp from the battery terminal.
2. FOLLOW THESE STEPS WHEN THE BATTERY IS OUTSIDE OF THE
VEHICLE A SPARK IN THE VICINITY OF THE BATTERY MAY CAUSE
AN EXPLOSION TO REDUCE THE RISK OF SPARKS GENERATING NEAR
THE BATTERY:
a) Check polarity in the battery post. The POSITIVE (POS, P +) battery
post OF THE BATTERY, USUALLY HAS A LARGER DIAMETER THAN THE
(NEG, N, -) post.
b) Attach a 24-inch long, insulated battery cable, at least 6-gauge (AWG),
to the NEGATIVE (NEG, N, -) pole of the battery.
c) Connect the POSITIVE (RED) clamp on the charger to the POSITIVE
(POS, P, +) post on the battery.
d) Place your body and the free end of the cable as far away from the
battery as possible. Then connect the NEGATIVE (BLACK) charger
clamp to the free end of the cable.
e) Do not stand in front of the battery when making the final connection.
f) When disconnecting the charger, do so in reverse sequence to the
connection procedure and disconnect the first connection by placing
yourselves as far away as possible.
g) The battery of a marine boat must be removed and charged on land.
Specially designed marine equipment is required to charge on board.
INSTRUCTIONS TO GROUND AND CONNECT AN ALTERNATE
CURRENT CABLE
To reduce the risk of electric shock, the charger shall be grounded. The
charger is equipped with an electric cable with a grounded conductor
and a grounded plug. The plug shall be connected into power supply
dully installed and grounded complying with the local codes and
ordinances.
NEVER modify the cable or the alternate
current plug installed in the equipment. If it cannot be
plugged in the power supply, call a certified electrician to
connect the suitable power supply. A connection if not
adequate may cause an electric shock.
This battery charger is manufactured to be used in a 127 V~ rated power
circuit and a grounded plug that looks like indicated in figure A.
A temporary adapter similar to the adapter shown in figures B and C
can be used if an adequate power supply is not available. The adapter
can be plugged into a two-pole power supply as shown in figure B. This
temporary adapter shall only be used until a certified electrician will
install a duly grounded power supply.
Before using the adapter as shown, double
check the screw in the center of the power supply plate (if
existing) is grounded. The rigid ring or green connection lug
coming out from the adapter shall be connected into a grounded
power supply.
If necessary, replace the plate screw with a longer screw to fasten
the rigid ring or lug and to make a grounded connection with the
grounded power supply.
When the battery charger is connected and the switch is in the ON
position, be careful not to touch together the connection grippers.
Never charge a battery in the ON position. Do not charge a 6 V battery
in the 12 V position.
ELECTRIC DIAGRAM
WARNING
CAUTION

OPERATION
Verify the area around the battery is well ventilated when charging.
You can spread the gas away from the area, blowing it away using a
piece of carboard or any non-metallic material as a fan.
OPERATION INSTRUCTIONS FOR THE CHARGER AND THE BATTERY
To ensure correct use of the charger and battery, and that the machine
is not damaged, the following instructions should be followed:
1. Operation instructions for the battery to be charged.
2. When the battery has a low charge, the terminal voltage is usually
normal. The physical phenomenon of low energy is the change of
gravity in the solution in the battery. Normally it is 1.28 kg/L. If it is
less than 1.16 kg/L it means that you should charge the battery
3. The battery voltage changes from normal when it is recharged or
discharged. It is higher when charging and lower when discharging.
If the voltage does not return to its normal value after half an hour,
it means that the battery is malfunctioning.
4. This is a manual charger and does not have a full charge indicator.
The amperemeter indicates the current the charger supplies to the
battery and the current will depend on the battery's state of charge.
It is not recommended to use the amperemeter reading to determine
if the battery has been fully charged. To determine the battery charge
level, the voltage at the battery terminals should be measured
frequently with a voltmeter. When the measured voltage is at the
nominal level, the battery is charged.
START METHOD:
The use of the start function shall comply with the product work cycle.
1. Read carefully the motor instructions.
2. Charge the battery during 10 to 15 minutes.
• Connect any electrode of the charger to the battery terminal that is
not connected to the chassis and the other one to the terminal
connecting the chassis.
• Check the connection once again: If there is no problem, set the
charger switch in the start position and turn ON the battery charger.
The work cycle to start a motor is 3 seconds
ON and 360 seconds OFF. (CARBA – 140)
The work cycle to start a motor is 3 seconds ON and 240
seconds OFF. (CARBA – 200)
NOTE: If the 3 seconds start span is exceeded the charger will get
damaged.
MAINTENANCE
• The battery charger shall regularly be maintained and checked to
work correctly and safely.
• Never open the battery charger housing or try to disassemble it.
Only a Truper® Authorized Service Center can repair the battery.
• The Warranty period of the battery charger es 1 year. Repairs shall
be carried out with the supplier or in a Truper® Authorized Service
Center showing your invoice.
• Before carrying out any type of maintenance, first cut the power
supply.
• Clean regularly the charger using a soft cloth. After recharging,
clean the clamps to prevent corrosion.
Protect your skin against burns.
• Store the battery charger in a clean, dry place away from air drafts.
• In the event of any defect, call a Truper® Authorized Service Center
3
SAFETY INSTRUCTIONS
1. Keep the work area tidy. Cluttered areas and work benches favor
accidents
2. Pay attention to your work area conditions. Do not use
machinery or power devices in wet or damp areas. Do not
expose the equipment to rain. Keep your work area well lit.
Do not use power equipment in the presence of gas or
flammable liquids.
3. Prevent against electric shock. Prevent against electric
shock not touching grounded appliances such as pipes,
radiators and refrigerators.
4. Keep children away. Children shall never be near your work area.
Do not allow children to hold machinery, extension cables or
equipment. Do not allow other people to touch the equipment. Keep
them away from your work area.
5. Store the equipment while not in use. When not in use, the
equipment, shall be stored away in a dry and dust free place. Always
store the equipment locked away from children’s reach.
6. Do not force the equipment. It will perform better and safer when
used within its scope. do not use inadequate attachments to exceed
the capacity of the equipment.
7. Use the right power equipment. Do not use power equipment for
heavy-duty jobs. Do not use power equipment to carry out
heavy-duty jobs beyond the machine scope.
8. Wear adequate clothes. Do not use lose clothes, gloves, tie or jewelry
which could get caught in the mobile parts. Do not wear slippery
shoes. Wear hair protection to hold long hair.
9. Wear eye protection. Always wear adequate safety
accessories accepted in the Official Mexican Standard (NOM)
such as goggles, face mask and anti-dust face mask when
working with materials that shed metal parts, shavings, or
chemical dust.
10. Do not use the power cable for purposes different from its design.
Do not carry the tool by the cable. do not pull the cable to
disconnect the plug from the power outlet. Protect the cable against
heat, oil, and sharp edges.
11. Fasten the work piece. Use fixing devices or clamps to keep the
piece firm. It is safer than working one-handed and allows having
both hands free. keep adequate footing all time. do not try to
overreach over the machine or try go across when it is running
12. Do not overreach. Avoid tiresome positions. Your stance shall be
safe and balanced.
13. Keep the equipment in the best working conditions. Keep the
equipment clean to gain a better job and safety. Follow the
lubrication and accessories replacement instructions. Verify
regularly the tool power cables. If damaged, go to a Truper®
Authorized Service Center. The handles shall always stay clean and
free of oil and grease.
14. Disconnect the equipment when not in use and before carrying
out maintenance.
15. Reduce the risk of accidental start up. Never carry a
power tool still connected to the power supply with your
finger on the switch. Double check the switch is in the
OFF position before connecting the power cable.
16. Outdoor Extension Cables. When outdoors, use only
dedicated and duly marked extension cables.
17. Stay alert. Pay attention to the work. Use your common sense.
Do not operate power tools when tired.
18. Check for damaged parts. Before you continue using the machine,
the protectors and other mobile parts that could be damaged shall
be carefully checked to assure adequate performance. Verify mobile
parts. Look for alignment, probable break age of parts mounting
and any other condition that could affect the tool operation. All
the components shall be correctly mounted and comply with the
requirements to guarantee the tool is working correctly. A protector
or other damaged part shall be repaired or replaced. Any
deteriorated switch shall be replaced in a Truper® Authorized Service
Center. Never use a power tool if the switch is not making contact.
19. Parts and accessories replacement. When in need of replacement
parts, use only Truper® original replacement parts specially
manufactured for this tool.
20. For your person al safety use only
accessories or additional devices indicated in the handling
instructions or with the recommendation of the tool
manufacturer.
Using accessories different from those indicated in the
handling instructions may turn into a personal risk.
21. Hearing protection. Use hearing protection when carrying
out services producing noise above 85 dB.
ADDITIONAL SAFETY RULES FOR THE BATTERY CHARGER
GENERAL SAFETY FOR BATTERIES
The battery chargers can be used to charge deep cycle lead acid
batteries. They can also be used as an auxiliary in the startup of engines.
These chargers have an overheating protection and protection against
current peaks. They are safe and reliable when used.
The battery charger functions include current load selection. This control
is integrated in the charger front panel and is easy to use.
The charger is built with a belt to move the charger. To protect the
safety of people and their property, the following safety rules shall be
followed when using the battery charger:
1. Do not expose the charger to rain or snow.
2. Use of accessories not recommended or sold by the battery
manufacturer may cause fire, electric discharge or personal injuries.
3. When disconnecting the charger, hold and pull the plug, not the cable.
Failure to follow this instruction may damage both the cable and the
plug.
4. Unless strictly necessary, do not use extension cables. Using the
wrong extension cable may cause fire and electric shock.
If using an extension cable is necessary, make sure that:
a) The plug prongs in the extension cable are the same number, size
and shape than the charger plug;
b) The extension cable is wired correctly and in good electric condition;
c) The cable gauge is big enough for the load ampere arc as specified
in the following table:
Minimum gauge for extension cords (AWG)
(When using 127 V~ only)
(1) It is safe to use only if the extensions have an over current protection
device.
(2) One of the conductors should be grounded. All conductors are the
same gauge including the one that is grounded. Reference: NMX
–J-195-ANCE
5. Do not operate the charger if the cable or plug are damaged. Take
it to a Truper® Authorized Service Center.
6. Do not use the charger if it received a strong bump, it fell or is
damaged in any way. Take it to a Truper® Authorized Service Center.
7. Do not disassemble the charger. If you assemble it back it may cause
fire or electric shock. When needing to service or repair the device,
take it to a Truper® Authorized Service Center.
8. To reduce the risk of electric shock, disconnect the charger from
the power supply before carrying out maintenance or cleaning
service. Turning OFF the controls DOES NOT reduce those risks.
9. RISK OF EXPLOSIVE GAS
A) WORKING NEAR AN ACID LEAD BATTERY IS DANGEROUS.
BATTERIES GENERATE EXPLOSIVE GASSES DURING THE
BATTERY NORMAL OPERATION. THEREFORE, IT IS VERY
IMPORTANT THAT BEFORE USING THE CHARGER, YOU READ
AND FOLLOW THE INSTRUCTIONS TO THE VERY DETAIL.
b) To reduce the risk of the battery exploding, follow these instructions
and the instructions of the manufacturer of the equipment to be
used in the vicinity of the battery. Review the precautions on this
Ampere Capacity (2) Extension Gauge
Higher
than
0 A
10 A
13 A
15 A
10 A
13 A
15 A
20 A
18 AWG (1)
16 AWG
14 AWG
8 AWG
16 AWG
14 AWG
12 AWG
6 AWG
3
3
3
3
Higher than
49.2 ft
Number of
Conductors
From 5.9 ft
to 49.2 ft
Up to
product and on the engine.
10. Personal precaution:
a) There shall be second person close to the user to help, when working
with an acid lead battery.
b) Have handy plenty of fresh water and soap in case battery acid make
contact with your skin, clothes or eyes.
c) Use full eye protection and protective clothing. Avoid touching your
eyes when working near the battery.
d) If battery acid comes in contact with your skin or clothes, wash
immediately with water and soap. If acid gets into your eyes, flush
with plenty of cold water for at least 10 minutes and seek medical
attention immediately.
e) NEVER smoke or allow sparks or flames near the battery or the
motor.
f) Be very careful not to drop a metal tool on the battery. This may
cause a spark or short circuit in the battery or other electrical part
and cause an explosion.
g) Remove all metal particles like rings, bracelets and watches when
working with an acid lead battery. An acid lead battery may cause
a short circuit with extremely high current capable or welding a ring
or any other metal article causing severe burns.
h) Use the charger only to recharge ACID LEAD batteries. It is not
designed to supply electricity to low tension systems different from
the motor starting application. Do not use the battery charger to
charge dry batteries used commonly with domestic appliances. These
types of batteries may explode and injure people and damage
property.
i) NEVER recharge a frozen battery.
PREPARING TO CHARGE
a) If you need to remove the battery from the vehicle toward the
charger, always remove first the battery ground terminal. Verify all
the vehicle accessories are OFF to prevent causing an arc.
b) Verify the area around the battery is well ventilated when charging
the battery. You can spread the gas from the area blowing it away
using a piece of carboard or any nonmetallic material as a fan.
c) Clean the battery terminals. Be careful the corrosion is not making
contact with your eyes.
d) Add distilled water into each cell until the battery acid is reaching
the specified level indicated by the battery manufacturer. This
operation is helpful to purge excessive gas in the cells. Do not overfill.
For batteries built without caps in the cells, follow carefully the
recharge instructions indicated by the manufacturer.
e) Study all the preventive measures indicated by the battery
manufacturer, such as to remove or no remove the cells caps when
recharging and the recommended rates.
f) Determine the battery tension checking the automobile manual. If
the charger has an adjustable loading speed, charge the battery first
in the lowest speed.
LOCATION OF THE CHARGER
a) Place the charger as far as the c.c. battery cables allow.
b) Never place the charger directly on the battery being charged. Gasses
from the battery can corrode and damage the charger.
c) Do not allow the battery acid to drip on the charger when checking
gravity or when filling up.
d) Do not operate the charger in an enclosed area. Do not block
ventilation in any way.
e) Do not place the battery on the charger. The device produces heat
in the machine while it is running. To allow heat to escape, do not
cover the ventilation slot with any object.
CAUTION MEASURES
a) Connection and disconnection of the direct current output clamps
can only be carried out having the charger switches in the OFF
position, and the power cable disconnected from the power supply.
Never let the clamps touch one to the other.
b) Set the clamps in the battery and chassis as indicated in 1 (e), 1 (f),
1 (b) and 1 (d).
1. FOLLOW THESE STEPS WHEN THE BATTERY IS INSTALLED IN THE
VEHICLE. A SPARK NEAR THE BATTERY MAY CAUSE AN EXPLOSION.
TO REDUCE THE RISK NEAR THE BATTERY:
a) To reduce the risk of damage, place the current cables on the hood,
door or any place in the motor.
b) Keep them away from the fan blades, bands, pulleys and other parts
that could injure people.
c) Check the polarity of the battery posts. The POSITIVE (POS, P +)
battery post, usually is of a larger diameter than the NEGATIVE
(NEG, N, -) post.
d) Determine which of the battery posts is grounded (connected) to
the chassis. If the negative post is grounded to the chassis (as it is
in most vehicles), see item (e). If the positive post is grounded to
the chassis, see item (f).
e) In vehicles grounded with the negative, connect the POSITIVE (RED)
of the charger to the post that is not grounded POSITIVE (POS, P +)
post of the battery. Do not connect the clamp in the carburetor,
fuel lines or body metal sheets. Connect into a metal part with tick
caliber or a block in the motor.
f) In vehicles grounded with the positive, connect the NEGATIVE (BLACK)
clamp of the battery charger to the post that is not grounded to the
NEGATIVE (NEG, N, -) post of the battery. Connect the POSITIVE (RED)
clamp to the vehicle chassis or to a block in the motor away from
the battery.
g) When disconnecting the charger, also disconnect the power cable.
Remove the clamp from the vehicle chassis and then, remove the
clamp from the battery terminal.
e) In vehicles grounded with the negative, connect the POSITIVE (RED)
clamp of the charger to the post that is not grounded POSITIVE (POS,
P +) of the battery. Do not connect the clamp in the carburetor, fuel
lines or body metal sheets. Connect into a metal part with tick caliber
or a block in the motor.
f) In vehicles grounded with the positive, connect the NEGATIVE (BLACK)
clamp to the post that is not grounded to the NEGATIVE (NEG, N, -)
post of the battery. Connect the POSITIVE (RED) clamp to the vehicle
chassis or to a block in the motor away from the battery.
g) When disconnecting the charger, also disconnect the power cable.
Remove the clamp from the vehicle chassis and thorn, remove the
clamp from the battery terminal.
2. FOLLOW THESE STEPS WHEN THE BATTERY IS OUTSIDE OF THE
VEHICLE A SPARK IN THE VICINITY OF THE BATTERY MAY CAUSE
AN EXPLOSION TO REDUCE THE RISK OF SPARKS GENERATING NEAR
THE BATTERY:
a) Check polarity in the battery post. The POSITIVE (POS, P +) battery
post OF THE BATTERY, USUALLY HAS A LARGER DIAMETER THAN THE
(NEG, N, -) post.
b) Attach a 24-inch long, insulated battery cable, at least 6-gauge (AWG),
to the NEGATIVE (NEG, N, -) pole of the battery.
c) Connect the POSITIVE (RED) clamp on the charger to the POSITIVE
(POS, P, +) post on the battery.
d) Place your body and the free end of the cable as far away from the
battery as possible. Then connect the NEGATIVE (BLACK) charger
clamp to the free end of the cable.
e) Do not stand in front of the battery when making the final connection.
f) When disconnecting the charger, do so in reverse sequence to the
connection procedure and disconnect the first connection by placing
yourselves as far away as possible.
g) The battery of a marine boat must be removed and charged on land.
Specially designed marine equipment is required to charge on board.
INSTRUCTIONS TO GROUND AND CONNECT AN ALTERNATE
CURRENT CABLE
To reduce the risk of electric shock, the charger shall be grounded. The
charger is equipped with an electric cable with a grounded conductor
and a grounded plug. The plug shall be connected into power supply
dully installed and grounded complying with the local codes and
ordinances.
NEVER modify the cable or the alternate
current plug installed in the equipment. If it cannot be
plugged in the power supply, call a certified electrician to
connect the suitable power supply. A connection if not
adequate may cause an electric shock.
This battery charger is manufactured to be used in a 127 V~ rated power
circuit and a grounded plug that looks like indicated in figure A.
A temporary adapter similar to the adapter shown in figures B and C
can be used if an adequate power supply is not available. The adapter
can be plugged into a two-pole power supply as shown in figure B. This
temporary adapter shall only be used until a certified electrician will
install a duly grounded power supply.
Before using the adapter as shown, double
check the screw in the center of the power supply plate (if
existing) is grounded. The rigid ring or green connection lug
coming out from the adapter shall be connected into a grounded
power supply.
If necessary, replace the plate screw with a longer screw to fasten
the rigid ring or lug and to make a grounded connection with the
grounded power supply.
When the battery charger is connected and the switch is in the ON
position, be careful not to touch together the connection grippers.
Never charge a battery in the ON position. Do not charge a 6 V battery
in the 12 V position.
ELECTRIC DIAGRAM
WARNING

OPERATION
Verify the area around the battery is well ventilated when charging.
You can spread the gas away from the area, blowing it away using a
piece of carboard or any non-metallic material as a fan.
OPERATION INSTRUCTIONS FOR THE CHARGER AND THE BATTERY
To ensure correct use of the charger and battery, and that the machine
is not damaged, the following instructions should be followed:
1. Operation instructions for the battery to be charged.
2. When the battery has a low charge, the terminal voltage is usually
normal. The physical phenomenon of low energy is the change of
gravity in the solution in the battery. Normally it is 1.28 kg/L. If it is
less than 1.16 kg/L it means that you should charge the battery
3. The battery voltage changes from normal when it is recharged or
discharged. It is higher when charging and lower when discharging.
If the voltage does not return to its normal value after half an hour,
it means that the battery is malfunctioning.
4. This is a manual charger and does not have a full charge indicator.
The amperemeter indicates the current the charger supplies to the
battery and the current will depend on the battery's state of charge.
It is not recommended to use the amperemeter reading to determine
if the battery has been fully charged. To determine the battery charge
level, the voltage at the battery terminals should be measured
frequently with a voltmeter. When the measured voltage is at the
nominal level, the battery is charged.
START METHOD:
The use of the start function shall comply with the product work cycle.
1. Read carefully the motor instructions.
2. Charge the battery during 10 to 15 minutes.
• Connect any electrode of the charger to the battery terminal that is
not connected to the chassis and the other one to the terminal
connecting the chassis.
• Check the connection once again: If there is no problem, set the
charger switch in the start position and turn ON the battery charger.
The work cycle to start a motor is 3 seconds
ON and 360 seconds OFF. (CARBA – 140)
The work cycle to start a motor is 3 seconds ON and 240
seconds OFF. (CARBA – 200)
NOTE: If the 3 seconds start span is exceeded the charger will get
damaged.
MAINTENANCE
• The battery charger shall regularly be maintained and checked to
work correctly and safely.
• Never open the battery charger housing or try to disassemble it.
Only a Truper® Authorized Service Center can repair the battery.
• The Warranty period of the battery charger es 1 year. Repairs shall
be carried out with the supplier or in a Truper® Authorized Service
Center showing your invoice.
• Before carrying out any type of maintenance, first cut the power
supply.
• Clean regularly the charger using a soft cloth. After recharging,
clean the clamps to prevent corrosion.
Protect your skin against burns.
• Store the battery charger in a clean, dry place away from air drafts.
• In the event of any defect, call a Truper® Authorized Service Center
4
SAFETY INSTRUCTIONS
1. Keep the work area tidy. Cluttered areas and work benches favor
accidents
2. Pay attention to your work area conditions. Do not use
machinery or power devices in wet or damp areas. Do not
expose the equipment to rain. Keep your work area well lit.
Do not use power equipment in the presence of gas or
flammable liquids.
3. Prevent against electric shock. Prevent against electric
shock not touching grounded appliances such as pipes,
radiators and refrigerators.
4. Keep children away. Children shall never be near your work area.
Do not allow children to hold machinery, extension cables or
equipment. Do not allow other people to touch the equipment. Keep
them away from your work area.
5. Store the equipment while not in use. When not in use, the
equipment, shall be stored away in a dry and dust free place. Always
store the equipment locked away from children’s reach.
6. Do not force the equipment. It will perform better and safer when
used within its scope. do not use inadequate attachments to exceed
the capacity of the equipment.
7. Use the right power equipment. Do not use power equipment for
heavy-duty jobs. Do not use power equipment to carry out
heavy-duty jobs beyond the machine scope.
8. Wear adequate clothes. Do not use lose clothes, gloves, tie or jewelry
which could get caught in the mobile parts. Do not wear slippery
shoes. Wear hair protection to hold long hair.
9. Wear eye protection. Always wear adequate safety
accessories accepted in the Official Mexican Standard (NOM)
such as goggles, face mask and anti-dust face mask when
working with materials that shed metal parts, shavings, or
chemical dust.
10. Do not use the power cable for purposes different from its design.
Do not carry the tool by the cable. do not pull the cable to
disconnect the plug from the power outlet. Protect the cable against
heat, oil, and sharp edges.
11. Fasten the work piece. Use fixing devices or clamps to keep the
piece firm. It is safer than working one-handed and allows having
both hands free. keep adequate footing all time. do not try to
overreach over the machine or try go across when it is running
12. Do not overreach. Avoid tiresome positions. Your stance shall be
safe and balanced.
13. Keep the equipment in the best working conditions. Keep the
equipment clean to gain a better job and safety. Follow the
lubrication and accessories replacement instructions. Verify
regularly the tool power cables. If damaged, go to a Truper®
Authorized Service Center. The handles shall always stay clean and
free of oil and grease.
14. Disconnect the equipment when not in use and before carrying
out maintenance.
15. Reduce the risk of accidental start up. Never carry a
power tool still connected to the power supply with your
finger on the switch. Double check the switch is in the
OFF position before connecting the power cable.
16. Outdoor Extension Cables. When outdoors, use only
dedicated and duly marked extension cables.
17. Stay alert. Pay attention to the work. Use your common sense.
Do not operate power tools when tired.
18. Check for damaged parts. Before you continue using the machine,
the protectors and other mobile parts that could be damaged shall
be carefully checked to assure adequate performance. Verify mobile
parts. Look for alignment, probable break age of parts mounting
and any other condition that could affect the tool operation. All
the components shall be correctly mounted and comply with the
requirements to guarantee the tool is working correctly. A protector
or other damaged part shall be repaired or replaced. Any
deteriorated switch shall be replaced in a Truper® Authorized Service
Center. Never use a power tool if the switch is not making contact.
19. Parts and accessories replacement. When in need of replacement
parts, use only Truper® original replacement parts specially
manufactured for this tool.
20. For your person al safety use only
accessories or additional devices indicated in the handling
instructions or with the recommendation of the tool
manufacturer.
Using accessories different from those indicated in the
handling instructions may turn into a personal risk.
21. Hearing protection. Use hearing protection when carrying
out services producing noise above 85 dB.
ADDITIONAL SAFETY RULES FOR THE BATTERY CHARGER
GENERAL SAFETY FOR BATTERIES
The battery chargers can be used to charge deep cycle lead acid
batteries. They can also be used as an auxiliary in the startup of engines.
These chargers have an overheating protection and protection against
current peaks. They are safe and reliable when used.
The battery charger functions include current load selection. This control
is integrated in the charger front panel and is easy to use.
The charger is built with a belt to move the charger. To protect the
safety of people and their property, the following safety rules shall be
followed when using the battery charger:
1. Do not expose the charger to rain or snow.
2. Use of accessories not recommended or sold by the battery
manufacturer may cause fire, electric discharge or personal injuries.
3. When disconnecting the charger, hold and pull the plug, not the cable.
Failure to follow this instruction may damage both the cable and the
plug.
4. Unless strictly necessary, do not use extension cables. Using the
wrong extension cable may cause fire and electric shock.
If using an extension cable is necessary, make sure that:
a) The plug prongs in the extension cable are the same number, size
and shape than the charger plug;
b) The extension cable is wired correctly and in good electric condition;
c) The cable gauge is big enough for the load ampere arc as specified
in the following table:
Minimum gauge for extension cords (AWG)
(When using 127 V~ only)
(1) It is safe to use only if the extensions have an over current protection
device.
(2) One of the conductors should be grounded. All conductors are the
same gauge including the one that is grounded. Reference: NMX
–J-195-ANCE
5. Do not operate the charger if the cable or plug are damaged. Take
it to a Truper® Authorized Service Center.
6. Do not use the charger if it received a strong bump, it fell or is
damaged in any way. Take it to a Truper® Authorized Service Center.
7. Do not disassemble the charger. If you assemble it back it may cause
fire or electric shock. When needing to service or repair the device,
take it to a Truper® Authorized Service Center.
8. To reduce the risk of electric shock, disconnect the charger from
the power supply before carrying out maintenance or cleaning
service. Turning OFF the controls DOES NOT reduce those risks.
9. RISK OF EXPLOSIVE GAS
A) WORKING NEAR AN ACID LEAD BATTERY IS DANGEROUS.
BATTERIES GENERATE EXPLOSIVE GASSES DURING THE
BATTERY NORMAL OPERATION. THEREFORE, IT IS VERY
IMPORTANT THAT BEFORE USING THE CHARGER, YOU READ
AND FOLLOW THE INSTRUCTIONS TO THE VERY DETAIL.
b) To reduce the risk of the battery exploding, follow these instructions
and the instructions of the manufacturer of the equipment to be
used in the vicinity of the battery. Review the precautions on this
product and on the engine.
10. Personal precaution:
a) There shall be second person close to the user to help, when working
with an acid lead battery.
b) Have handy plenty of fresh water and soap in case battery acid make
contact with your skin, clothes or eyes.
c) Use full eye protection and protective clothing. Avoid touching your
eyes when working near the battery.
d) If battery acid comes in contact with your skin or clothes, wash
immediately with water and soap. If acid gets into your eyes, flush
with plenty of cold water for at least 10 minutes and seek medical
attention immediately.
e) NEVER smoke or allow sparks or flames near the battery or the
motor.
f) Be very careful not to drop a metal tool on the battery. This may
cause a spark or short circuit in the battery or other electrical part
and cause an explosion.
g) Remove all metal particles like rings, bracelets and watches when
working with an acid lead battery. An acid lead battery may cause
a short circuit with extremely high current capable or welding a ring
or any other metal article causing severe burns.
h) Use the charger only to recharge ACID LEAD batteries. It is not
designed to supply electricity to low tension systems different from
the motor starting application. Do not use the battery charger to
charge dry batteries used commonly with domestic appliances. These
types of batteries may explode and injure people and damage
property.
i) NEVER recharge a frozen battery.
PREPARING TO CHARGE
a) If you need to remove the battery from the vehicle toward the
charger, always remove first the battery ground terminal. Verify all
the vehicle accessories are OFF to prevent causing an arc.
b) Verify the area around the battery is well ventilated when charging
the battery. You can spread the gas from the area blowing it away
using a piece of carboard or any nonmetallic material as a fan.
c) Clean the battery terminals. Be careful the corrosion is not making
contact with your eyes.
d) Add distilled water into each cell until the battery acid is reaching
the specified level indicated by the battery manufacturer. This
operation is helpful to purge excessive gas in the cells. Do not overfill.
For batteries built without caps in the cells, follow carefully the
recharge instructions indicated by the manufacturer.
e) Study all the preventive measures indicated by the battery
manufacturer, such as to remove or no remove the cells caps when
recharging and the recommended rates.
f) Determine the battery tension checking the automobile manual. If
the charger has an adjustable loading speed, charge the battery first
in the lowest speed.
LOCATION OF THE CHARGER
a) Place the charger as far as the c.c. battery cables allow.
b) Never place the charger directly on the battery being charged. Gasses
from the battery can corrode and damage the charger.
c) Do not allow the battery acid to drip on the charger when checking
gravity or when filling up.
d) Do not operate the charger in an enclosed area. Do not block
ventilation in any way.
e) Do not place the battery on the charger. The device produces heat
in the machine while it is running. To allow heat to escape, do not
cover the ventilation slot with any object.
CAUTION MEASURES
a) Connection and disconnection of the direct current output clamps
can only be carried out having the charger switches in the OFF
position, and the power cable disconnected from the power supply.
Never let the clamps touch one to the other.
b) Set the clamps in the battery and chassis as indicated in 1 (e), 1 (f),
1 (b) and 1 (d).
1. FOLLOW THESE STEPS WHEN THE BATTERY IS INSTALLED IN THE
VEHICLE. A SPARK NEAR THE BATTERY MAY CAUSE AN EXPLOSION.
TO REDUCE THE RISK NEAR THE BATTERY:
a) To reduce the risk of damage, place the current cables on the hood,
door or any place in the motor.
b) Keep them away from the fan blades, bands, pulleys and other parts
that could injure people.
c) Check the polarity of the battery posts. The POSITIVE (POS, P +)
battery post, usually is of a larger diameter than the NEGATIVE
(NEG, N, -) post.
d) Determine which of the battery posts is grounded (connected) to
the chassis. If the negative post is grounded to the chassis (as it is
in most vehicles), see item (e). If the positive post is grounded to
the chassis, see item (f).
e) In vehicles grounded with the negative, connect the POSITIVE (RED)
of the charger to the post that is not grounded POSITIVE (POS, P +)
post of the battery. Do not connect the clamp in the carburetor,
fuel lines or body metal sheets. Connect into a metal part with tick
caliber or a block in the motor.
f) In vehicles grounded with the positive, connect the NEGATIVE (BLACK)
clamp of the battery charger to the post that is not grounded to the
NEGATIVE (NEG, N, -) post of the battery. Connect the POSITIVE (RED)
clamp to the vehicle chassis or to a block in the motor away from
the battery.
g) When disconnecting the charger, also disconnect the power cable.
Remove the clamp from the vehicle chassis and then, remove the
clamp from the battery terminal.
e) In vehicles grounded with the negative, connect the POSITIVE (RED)
clamp of the charger to the post that is not grounded POSITIVE (POS,
P +) of the battery. Do not connect the clamp in the carburetor, fuel
lines or body metal sheets. Connect into a metal part with tick caliber
or a block in the motor.
f) In vehicles grounded with the positive, connect the NEGATIVE (BLACK)
clamp to the post that is not grounded to the NEGATIVE (NEG, N, -)
post of the battery. Connect the POSITIVE (RED) clamp to the vehicle
chassis or to a block in the motor away from the battery.
g) When disconnecting the charger, also disconnect the power cable.
Remove the clamp from the vehicle chassis and thorn, remove the
clamp from the battery terminal.
2. FOLLOW THESE STEPS WHEN THE BATTERY IS OUTSIDE OF THE
VEHICLE A SPARK IN THE VICINITY OF THE BATTERY MAY CAUSE
AN EXPLOSION TO REDUCE THE RISK OF SPARKS GENERATING NEAR
THE BATTERY:
a) Check polarity in the battery post. The POSITIVE (POS, P +) battery
post OF THE BATTERY, USUALLY HAS A LARGER DIAMETER THAN THE
(NEG, N, -) post.
b) Attach a 24-inch long, insulated battery cable, at least 6-gauge (AWG),
to the NEGATIVE (NEG, N, -) pole of the battery.
c) Connect the POSITIVE (RED) clamp on the charger to the POSITIVE
(POS, P, +) post on the battery.
d) Place your body and the free end of the cable as far away from the
battery as possible. Then connect the NEGATIVE (BLACK) charger
clamp to the free end of the cable.
e) Do not stand in front of the battery when making the final connection.
f) When disconnecting the charger, do so in reverse sequence to the
connection procedure and disconnect the first connection by placing
yourselves as far away as possible.
g) The battery of a marine boat must be removed and charged on land.
Specially designed marine equipment is required to charge on board.
INSTRUCTIONS TO GROUND AND CONNECT AN ALTERNATE
CURRENT CABLE
To reduce the risk of electric shock, the charger shall be grounded. The
charger is equipped with an electric cable with a grounded conductor
and a grounded plug. The plug shall be connected into power supply
dully installed and grounded complying with the local codes and
ordinances.
NEVER modify the cable or the alternate
current plug installed in the equipment. If it cannot be
plugged in the power supply, call a certified electrician to
connect the suitable power supply. A connection if not
adequate may cause an electric shock.
This battery charger is manufactured to be used in a 127 V~ rated power
circuit and a grounded plug that looks like indicated in figure A.
A temporary adapter similar to the adapter shown in figures B and C
can be used if an adequate power supply is not available. The adapter
can be plugged into a two-pole power supply as shown in figure B. This
temporary adapter shall only be used until a certified electrician will
install a duly grounded power supply.
Before using the adapter as shown, double
check the screw in the center of the power supply plate (if
existing) is grounded. The rigid ring or green connection lug
coming out from the adapter shall be connected into a grounded
power supply.
If necessary, replace the plate screw with a longer screw to fasten
the rigid ring or lug and to make a grounded connection with the
grounded power supply.
When the battery charger is connected and the switch is in the ON
position, be careful not to touch together the connection grippers.
Never charge a battery in the ON position. Do not charge a 6 V battery
in the 12 V position.
METAL SCREW
GROUNDED
POWER
SUPPLY BOX COVER
GROUND PRONG
ADAPTER
GROUNDED
ADAPTER GROUND
PRONG
ELECTRIC DIAGRAM
WARNING
WARNING
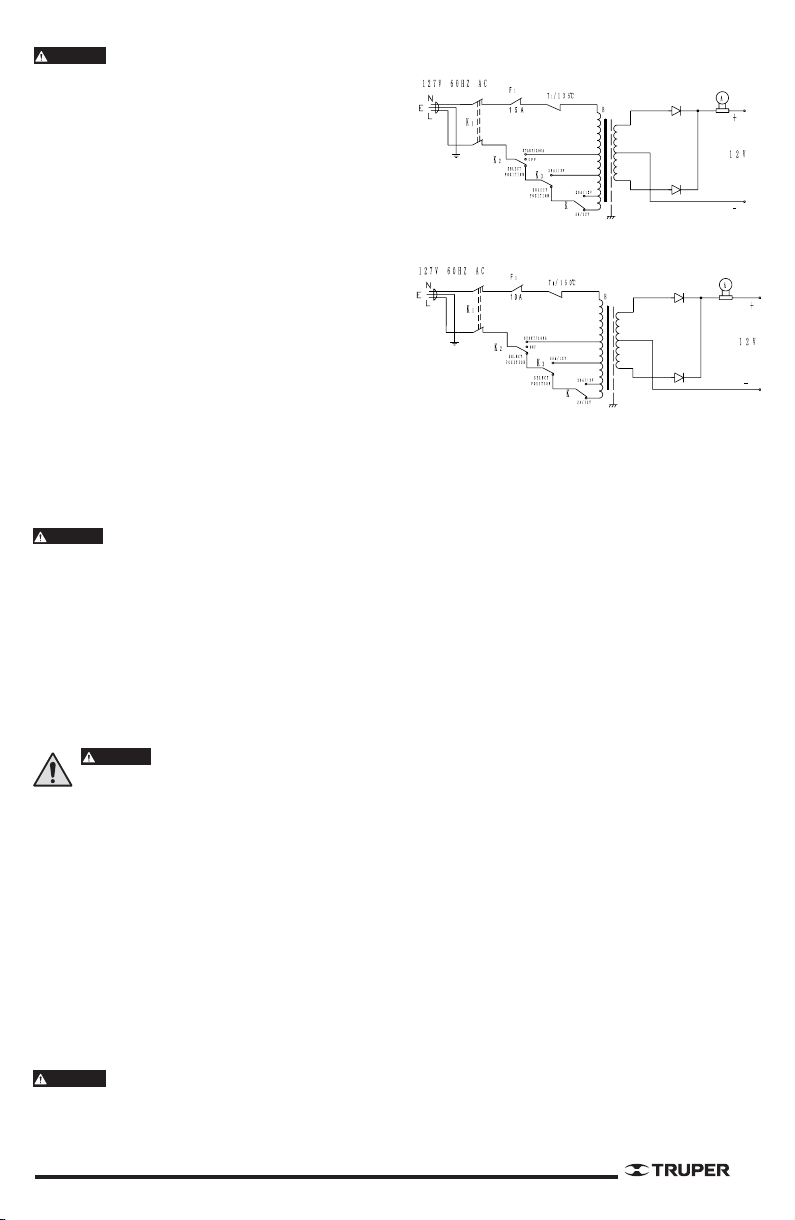
OPERATION
Verify the area around the battery is well ventilated when charging.
You can spread the gas away from the area, blowing it away using a
piece of carboard or any non-metallic material as a fan.
OPERATION INSTRUCTIONS FOR THE CHARGER AND THE BATTERY
To ensure correct use of the charger and battery, and that the machine
is not damaged, the following instructions should be followed:
1. Operation instructions for the battery to be charged.
2. When the battery has a low charge, the terminal voltage is usually
normal. The physical phenomenon of low energy is the change of
gravity in the solution in the battery. Normally it is 1.28 kg/L. If it is
less than 1.16 kg/L it means that you should charge the battery
3. The battery voltage changes from normal when it is recharged or
discharged. It is higher when charging and lower when discharging.
If the voltage does not return to its normal value after half an hour,
it means that the battery is malfunctioning.
4. This is a manual charger and does not have a full charge indicator.
The amperemeter indicates the current the charger supplies to the
battery and the current will depend on the battery's state of charge.
It is not recommended to use the amperemeter reading to determine
if the battery has been fully charged. To determine the battery charge
level, the voltage at the battery terminals should be measured
frequently with a voltmeter. When the measured voltage is at the
nominal level, the battery is charged.
START METHOD:
The use of the start function shall comply with the product work cycle.
1. Read carefully the motor instructions.
2. Charge the battery during 10 to 15 minutes.
• Connect any electrode of the charger to the battery terminal that is
not connected to the chassis and the other one to the terminal
connecting the chassis.
• Check the connection once again: If there is no problem, set the
charger switch in the start position and turn ON the battery charger.
The work cycle to start a motor is 3 seconds
ON and 360 seconds OFF. (CARBA – 140)
The work cycle to start a motor is 3 seconds ON and 240
seconds OFF. (CARBA – 200)
NOTE: If the 3 seconds start span is exceeded the charger will get
damaged.
MAINTENANCE
• The battery charger shall regularly be maintained and checked to
work correctly and safely.
• Never open the battery charger housing or try to disassemble it.
Only a Truper® Authorized Service Center can repair the battery.
• The Warranty period of the battery charger es 1 year. Repairs shall
be carried out with the supplier or in a Truper® Authorized Service
Center showing your invoice.
• Before carrying out any type of maintenance, first cut the power
supply.
• Clean regularly the charger using a soft cloth. After recharging,
clean the clamps to prevent corrosion.
Protect your skin against burns.
• Store the battery charger in a clean, dry place away from air drafts.
• In the event of any defect, call a Truper® Authorized Service Center
5
SAFETY INSTRUCTIONS
1. Keep the work area tidy. Cluttered areas and work benches favor
accidents
2. Pay attention to your work area conditions. Do not use
machinery or power devices in wet or damp areas. Do not
expose the equipment to rain. Keep your work area well lit.
Do not use power equipment in the presence of gas or
flammable liquids.
3. Prevent against electric shock. Prevent against electric
shock not touching grounded appliances such as pipes,
radiators and refrigerators.
4. Keep children away. Children shall never be near your work area.
Do not allow children to hold machinery, extension cables or
equipment. Do not allow other people to touch the equipment. Keep
them away from your work area.
5. Store the equipment while not in use. When not in use, the
equipment, shall be stored away in a dry and dust free place. Always
store the equipment locked away from children’s reach.
6. Do not force the equipment. It will perform better and safer when
used within its scope. do not use inadequate attachments to exceed
the capacity of the equipment.
7. Use the right power equipment. Do not use power equipment for
heavy-duty jobs. Do not use power equipment to carry out
heavy-duty jobs beyond the machine scope.
8. Wear adequate clothes. Do not use lose clothes, gloves, tie or jewelry
which could get caught in the mobile parts. Do not wear slippery
shoes. Wear hair protection to hold long hair.
9. Wear eye protection. Always wear adequate safety
accessories accepted in the Official Mexican Standard (NOM)
such as goggles, face mask and anti-dust face mask when
working with materials that shed metal parts, shavings, or
chemical dust.
10. Do not use the power cable for purposes different from its design.
Do not carry the tool by the cable. do not pull the cable to
disconnect the plug from the power outlet. Protect the cable against
heat, oil, and sharp edges.
11. Fasten the work piece. Use fixing devices or clamps to keep the
piece firm. It is safer than working one-handed and allows having
both hands free. keep adequate footing all time. do not try to
overreach over the machine or try go across when it is running
12. Do not overreach. Avoid tiresome positions. Your stance shall be
safe and balanced.
13. Keep the equipment in the best working conditions. Keep the
equipment clean to gain a better job and safety. Follow the
lubrication and accessories replacement instructions. Verify
regularly the tool power cables. If damaged, go to a Truper®
Authorized Service Center. The handles shall always stay clean and
free of oil and grease.
14. Disconnect the equipment when not in use and before carrying
out maintenance.
15. Reduce the risk of accidental start up. Never carry a
power tool still connected to the power supply with your
finger on the switch. Double check the switch is in the
OFF position before connecting the power cable.
16. Outdoor Extension Cables. When outdoors, use only
dedicated and duly marked extension cables.
17. Stay alert. Pay attention to the work. Use your common sense.
Do not operate power tools when tired.
18. Check for damaged parts. Before you continue using the machine,
the protectors and other mobile parts that could be damaged shall
be carefully checked to assure adequate performance. Verify mobile
parts. Look for alignment, probable break age of parts mounting
and any other condition that could affect the tool operation. All
the components shall be correctly mounted and comply with the
requirements to guarantee the tool is working correctly. A protector
or other damaged part shall be repaired or replaced. Any
deteriorated switch shall be replaced in a Truper® Authorized Service
Center. Never use a power tool if the switch is not making contact.
19. Parts and accessories replacement. When in need of replacement
parts, use only Truper® original replacement parts specially
manufactured for this tool.
20. For your person al safety use only
accessories or additional devices indicated in the handling
instructions or with the recommendation of the tool
manufacturer.
Using accessories different from those indicated in the
handling instructions may turn into a personal risk.
21. Hearing protection. Use hearing protection when carrying
out services producing noise above 85 dB.
ADDITIONAL SAFETY RULES FOR THE BATTERY CHARGER
GENERAL SAFETY FOR BATTERIES
The battery chargers can be used to charge deep cycle lead acid
batteries. They can also be used as an auxiliary in the startup of engines.
These chargers have an overheating protection and protection against
current peaks. They are safe and reliable when used.
The battery charger functions include current load selection. This control
is integrated in the charger front panel and is easy to use.
The charger is built with a belt to move the charger. To protect the
safety of people and their property, the following safety rules shall be
followed when using the battery charger:
1. Do not expose the charger to rain or snow.
2. Use of accessories not recommended or sold by the battery
manufacturer may cause fire, electric discharge or personal injuries.
3. When disconnecting the charger, hold and pull the plug, not the cable.
Failure to follow this instruction may damage both the cable and the
plug.
4. Unless strictly necessary, do not use extension cables. Using the
wrong extension cable may cause fire and electric shock.
If using an extension cable is necessary, make sure that:
a) The plug prongs in the extension cable are the same number, size
and shape than the charger plug;
b) The extension cable is wired correctly and in good electric condition;
c) The cable gauge is big enough for the load ampere arc as specified
in the following table:
Minimum gauge for extension cords (AWG)
(When using 127 V~ only)
(1) It is safe to use only if the extensions have an over current protection
device.
(2) One of the conductors should be grounded. All conductors are the
same gauge including the one that is grounded. Reference: NMX
–J-195-ANCE
5. Do not operate the charger if the cable or plug are damaged. Take
it to a Truper® Authorized Service Center.
6. Do not use the charger if it received a strong bump, it fell or is
damaged in any way. Take it to a Truper® Authorized Service Center.
7. Do not disassemble the charger. If you assemble it back it may cause
fire or electric shock. When needing to service or repair the device,
take it to a Truper® Authorized Service Center.
8. To reduce the risk of electric shock, disconnect the charger from
the power supply before carrying out maintenance or cleaning
service. Turning OFF the controls DOES NOT reduce those risks.
9. RISK OF EXPLOSIVE GAS
A) WORKING NEAR AN ACID LEAD BATTERY IS DANGEROUS.
BATTERIES GENERATE EXPLOSIVE GASSES DURING THE
BATTERY NORMAL OPERATION. THEREFORE, IT IS VERY
IMPORTANT THAT BEFORE USING THE CHARGER, YOU READ
AND FOLLOW THE INSTRUCTIONS TO THE VERY DETAIL.
b) To reduce the risk of the battery exploding, follow these instructions
and the instructions of the manufacturer of the equipment to be
used in the vicinity of the battery. Review the precautions on this
product and on the engine.
10. Personal precaution:
a) There shall be second person close to the user to help, when working
with an acid lead battery.
b) Have handy plenty of fresh water and soap in case battery acid make
contact with your skin, clothes or eyes.
c) Use full eye protection and protective clothing. Avoid touching your
eyes when working near the battery.
d) If battery acid comes in contact with your skin or clothes, wash
immediately with water and soap. If acid gets into your eyes, flush
with plenty of cold water for at least 10 minutes and seek medical
attention immediately.
e) NEVER smoke or allow sparks or flames near the battery or the
motor.
f) Be very careful not to drop a metal tool on the battery. This may
cause a spark or short circuit in the battery or other electrical part
and cause an explosion.
g) Remove all metal particles like rings, bracelets and watches when
working with an acid lead battery. An acid lead battery may cause
a short circuit with extremely high current capable or welding a ring
or any other metal article causing severe burns.
h) Use the charger only to recharge ACID LEAD batteries. It is not
designed to supply electricity to low tension systems different from
the motor starting application. Do not use the battery charger to
charge dry batteries used commonly with domestic appliances. These
types of batteries may explode and injure people and damage
property.
i) NEVER recharge a frozen battery.
PREPARING TO CHARGE
a) If you need to remove the battery from the vehicle toward the
charger, always remove first the battery ground terminal. Verify all
the vehicle accessories are OFF to prevent causing an arc.
b) Verify the area around the battery is well ventilated when charging
the battery. You can spread the gas from the area blowing it away
using a piece of carboard or any nonmetallic material as a fan.
c) Clean the battery terminals. Be careful the corrosion is not making
contact with your eyes.
d) Add distilled water into each cell until the battery acid is reaching
the specified level indicated by the battery manufacturer. This
operation is helpful to purge excessive gas in the cells. Do not overfill.
For batteries built without caps in the cells, follow carefully the
recharge instructions indicated by the manufacturer.
e) Study all the preventive measures indicated by the battery
manufacturer, such as to remove or no remove the cells caps when
recharging and the recommended rates.
f) Determine the battery tension checking the automobile manual. If
the charger has an adjustable loading speed, charge the battery first
in the lowest speed.
LOCATION OF THE CHARGER
a) Place the charger as far as the c.c. battery cables allow.
b) Never place the charger directly on the battery being charged. Gasses
from the battery can corrode and damage the charger.
c) Do not allow the battery acid to drip on the charger when checking
gravity or when filling up.
d) Do not operate the charger in an enclosed area. Do not block
ventilation in any way.
e) Do not place the battery on the charger. The device produces heat
in the machine while it is running. To allow heat to escape, do not
cover the ventilation slot with any object.
CAUTION MEASURES
a) Connection and disconnection of the direct current output clamps
can only be carried out having the charger switches in the OFF
position, and the power cable disconnected from the power supply.
Never let the clamps touch one to the other.
b) Set the clamps in the battery and chassis as indicated in 1 (e), 1 (f),
1 (b) and 1 (d).
1. FOLLOW THESE STEPS WHEN THE BATTERY IS INSTALLED IN THE
VEHICLE. A SPARK NEAR THE BATTERY MAY CAUSE AN EXPLOSION.
TO REDUCE THE RISK NEAR THE BATTERY:
a) To reduce the risk of damage, place the current cables on the hood,
door or any place in the motor.
b) Keep them away from the fan blades, bands, pulleys and other parts
that could injure people.
c) Check the polarity of the battery posts. The POSITIVE (POS, P +)
battery post, usually is of a larger diameter than the NEGATIVE
(NEG, N, -) post.
d) Determine which of the battery posts is grounded (connected) to
the chassis. If the negative post is grounded to the chassis (as it is
in most vehicles), see item (e). If the positive post is grounded to
the chassis, see item (f).
e) In vehicles grounded with the negative, connect the POSITIVE (RED)
of the charger to the post that is not grounded POSITIVE (POS, P +)
post of the battery. Do not connect the clamp in the carburetor,
fuel lines or body metal sheets. Connect into a metal part with tick
caliber or a block in the motor.
f) In vehicles grounded with the positive, connect the NEGATIVE (BLACK)
clamp of the battery charger to the post that is not grounded to the
NEGATIVE (NEG, N, -) post of the battery. Connect the POSITIVE (RED)
clamp to the vehicle chassis or to a block in the motor away from
the battery.
g) When disconnecting the charger, also disconnect the power cable.
Remove the clamp from the vehicle chassis and then, remove the
clamp from the battery terminal.
e) In vehicles grounded with the negative, connect the POSITIVE (RED)
clamp of the charger to the post that is not grounded POSITIVE (POS,
P +) of the battery. Do not connect the clamp in the carburetor, fuel
lines or body metal sheets. Connect into a metal part with tick caliber
or a block in the motor.
f) In vehicles grounded with the positive, connect the NEGATIVE (BLACK)
clamp to the post that is not grounded to the NEGATIVE (NEG, N, -)
post of the battery. Connect the POSITIVE (RED) clamp to the vehicle
chassis or to a block in the motor away from the battery.
g) When disconnecting the charger, also disconnect the power cable.
Remove the clamp from the vehicle chassis and thorn, remove the
clamp from the battery terminal.
2. FOLLOW THESE STEPS WHEN THE BATTERY IS OUTSIDE OF THE
VEHICLE A SPARK IN THE VICINITY OF THE BATTERY MAY CAUSE
AN EXPLOSION TO REDUCE THE RISK OF SPARKS GENERATING NEAR
THE BATTERY:
a) Check polarity in the battery post. The POSITIVE (POS, P +) battery
post OF THE BATTERY, USUALLY HAS A LARGER DIAMETER THAN THE
(NEG, N, -) post.
b) Attach a 24-inch long, insulated battery cable, at least 6-gauge (AWG),
to the NEGATIVE (NEG, N, -) pole of the battery.
c) Connect the POSITIVE (RED) clamp on the charger to the POSITIVE
(POS, P, +) post on the battery.
d) Place your body and the free end of the cable as far away from the
battery as possible. Then connect the NEGATIVE (BLACK) charger
clamp to the free end of the cable.
e) Do not stand in front of the battery when making the final connection.
f) When disconnecting the charger, do so in reverse sequence to the
connection procedure and disconnect the first connection by placing
yourselves as far away as possible.
g) The battery of a marine boat must be removed and charged on land.
Specially designed marine equipment is required to charge on board.
INSTRUCTIONS TO GROUND AND CONNECT AN ALTERNATE
CURRENT CABLE
To reduce the risk of electric shock, the charger shall be grounded. The
charger is equipped with an electric cable with a grounded conductor
and a grounded plug. The plug shall be connected into power supply
dully installed and grounded complying with the local codes and
ordinances.
NEVER modify the cable or the alternate
current plug installed in the equipment. If it cannot be
plugged in the power supply, call a certified electrician to
connect the suitable power supply. A connection if not
adequate may cause an electric shock.
This battery charger is manufactured to be used in a 127 V~ rated power
circuit and a grounded plug that looks like indicated in figure A.
A temporary adapter similar to the adapter shown in figures B and C
can be used if an adequate power supply is not available. The adapter
can be plugged into a two-pole power supply as shown in figure B. This
temporary adapter shall only be used until a certified electrician will
install a duly grounded power supply.
Before using the adapter as shown, double
check the screw in the center of the power supply plate (if
existing) is grounded. The rigid ring or green connection lug
coming out from the adapter shall be connected into a grounded
power supply.
If necessary, replace the plate screw with a longer screw to fasten
the rigid ring or lug and to make a grounded connection with the
grounded power supply.
When the battery charger is connected and the switch is in the ON
position, be careful not to touch together the connection grippers.
Never charge a battery in the ON position. Do not charge a 6 V battery
in the 12 V position.
ELECTRIC DIAGRAM
WARNING
CARBA-200
CARBA-140
WARNING
CAUTION
CAUTION

6
NOTES
OPERATION
Verify the area around the battery is well ventilated when charging.
You can spread the gas away from the area, blowing it away using a
piece of carboard or any non-metallic material as a fan.
OPERATION INSTRUCTIONS FOR THE CHARGER AND THE BATTERY
To ensure correct use of the charger and battery, and that the machine
is not damaged, the following instructions should be followed:
1. Operation instructions for the battery to be charged.
2. When the battery has a low charge, the terminal voltage is usually
normal. The physical phenomenon of low energy is the change of
gravity in the solution in the battery. Normally it is 1.28 kg/L. If it is
less than 1.16 kg/L it means that you should charge the battery
3. The battery voltage changes from normal when it is recharged or
discharged. It is higher when charging and lower when discharging.
If the voltage does not return to its normal value after half an hour,
it means that the battery is malfunctioning.
4. This is a manual charger and does not have a full charge indicator.
The amperemeter indicates the current the charger supplies to the
battery and the current will depend on the battery's state of charge.
It is not recommended to use the amperemeter reading to determine
if the battery has been fully charged. To determine the battery charge
level, the voltage at the battery terminals should be measured
frequently with a voltmeter. When the measured voltage is at the
nominal level, the battery is charged.
START METHOD:
The use of the start function shall comply with the product work cycle.
1. Read carefully the motor instructions.
2. Charge the battery during 10 to 15 minutes.
• Connect any electrode of the charger to the battery terminal that is
not connected to the chassis and the other one to the terminal
connecting the chassis.
• Check the connection once again: If there is no problem, set the
charger switch in the start position and turn ON the battery charger.
The work cycle to start a motor is 3 seconds
ON and 360 seconds OFF. (CARBA – 140)
The work cycle to start a motor is 3 seconds ON and 240
seconds OFF. (CARBA – 200)
NOTE: If the 3 seconds start span is exceeded the charger will get
damaged.
MAINTENANCE
• The battery charger shall regularly be maintained and checked to
work correctly and safely.
• Never open the battery charger housing or try to disassemble it.
Only a Truper® Authorized Service Center can repair the battery.
• The Warranty period of the battery charger es 1 year. Repairs shall
be carried out with the supplier or in a Truper® Authorized Service
Center showing your invoice.
• Before carrying out any type of maintenance, first cut the power
supply.
• Clean regularly the charger using a soft cloth. After recharging,
clean the clamps to prevent corrosion.
Protect your skin against burns.
• Store the battery charger in a clean, dry place away from air drafts.
• In the event of any defect, call a Truper® Authorized Service Center
SAFETY INSTRUCTIONS
1. Keep the work area tidy. Cluttered areas and work benches favor
accidents
2. Pay attention to your work area conditions. Do not use
machinery or power devices in wet or damp areas. Do not
expose the equipment to rain. Keep your work area well lit.
Do not use power equipment in the presence of gas or
flammable liquids.
3. Prevent against electric shock. Prevent against electric
shock not touching grounded appliances such as pipes,
radiators and refrigerators.
4. Keep children away. Children shall never be near your work area.
Do not allow children to hold machinery, extension cables or
equipment. Do not allow other people to touch the equipment. Keep
them away from your work area.
5. Store the equipment while not in use. When not in use, the
equipment, shall be stored away in a dry and dust free place. Always
store the equipment locked away from children’s reach.
6. Do not force the equipment. It will perform better and safer when
used within its scope. do not use inadequate attachments to exceed
the capacity of the equipment.
7. Use the right power equipment. Do not use power equipment for
heavy-duty jobs. Do not use power equipment to carry out
heavy-duty jobs beyond the machine scope.
8. Wear adequate clothes. Do not use lose clothes, gloves, tie or jewelry
which could get caught in the mobile parts. Do not wear slippery
shoes. Wear hair protection to hold long hair.
9. Wear eye protection. Always wear adequate safety
accessories accepted in the Official Mexican Standard (NOM)
such as goggles, face mask and anti-dust face mask when
working with materials that shed metal parts, shavings, or
chemical dust.
10. Do not use the power cable for purposes different from its design.
Do not carry the tool by the cable. do not pull the cable to
disconnect the plug from the power outlet. Protect the cable against
heat, oil, and sharp edges.
11. Fasten the work piece. Use fixing devices or clamps to keep the
piece firm. It is safer than working one-handed and allows having
both hands free. keep adequate footing all time. do not try to
overreach over the machine or try go across when it is running
12. Do not overreach. Avoid tiresome positions. Your stance shall be
safe and balanced.
13. Keep the equipment in the best working conditions. Keep the
equipment clean to gain a better job and safety. Follow the
lubrication and accessories replacement instructions. Verify
regularly the tool power cables. If damaged, go to a Truper®
Authorized Service Center. The handles shall always stay clean and
free of oil and grease.
14. Disconnect the equipment when not in use and before carrying
out maintenance.
15. Reduce the risk of accidental start up. Never carry a
power tool still connected to the power supply with your
finger on the switch. Double check the switch is in the
OFF position before connecting the power cable.
16. Outdoor Extension Cables. When outdoors, use only
dedicated and duly marked extension cables.
17. Stay alert. Pay attention to the work. Use your common sense.
Do not operate power tools when tired.
18. Check for damaged parts. Before you continue using the machine,
the protectors and other mobile parts that could be damaged shall
be carefully checked to assure adequate performance. Verify mobile
parts. Look for alignment, probable break age of parts mounting
and any other condition that could affect the tool operation. All
the components shall be correctly mounted and comply with the
requirements to guarantee the tool is working correctly. A protector
or other damaged part shall be repaired or replaced. Any
deteriorated switch shall be replaced in a Truper® Authorized Service
Center. Never use a power tool if the switch is not making contact.
19. Parts and accessories replacement. When in need of replacement
parts, use only Truper® original replacement parts specially
manufactured for this tool.
20. For your person al safety use only
accessories or additional devices indicated in the handling
instructions or with the recommendation of the tool
manufacturer.
Using accessories different from those indicated in the
handling instructions may turn into a personal risk.
21. Hearing protection. Use hearing protection when carrying
out services producing noise above 85 dB.
ADDITIONAL SAFETY RULES FOR THE BATTERY CHARGER
GENERAL SAFETY FOR BATTERIES
The battery chargers can be used to charge deep cycle lead acid
batteries. They can also be used as an auxiliary in the startup of engines.
These chargers have an overheating protection and protection against
current peaks. They are safe and reliable when used.
The battery charger functions include current load selection. This control
is integrated in the charger front panel and is easy to use.
The charger is built with a belt to move the charger. To protect the
safety of people and their property, the following safety rules shall be
followed when using the battery charger:
1. Do not expose the charger to rain or snow.
2. Use of accessories not recommended or sold by the battery
manufacturer may cause fire, electric discharge or personal injuries.
3. When disconnecting the charger, hold and pull the plug, not the cable.
Failure to follow this instruction may damage both the cable and the
plug.
4. Unless strictly necessary, do not use extension cables. Using the
wrong extension cable may cause fire and electric shock.
If using an extension cable is necessary, make sure that:
a) The plug prongs in the extension cable are the same number, size
and shape than the charger plug;
b) The extension cable is wired correctly and in good electric condition;
c) The cable gauge is big enough for the load ampere arc as specified
in the following table:
Minimum gauge for extension cords (AWG)
(When using 127 V~ only)
(1) It is safe to use only if the extensions have an over current protection
device.
(2) One of the conductors should be grounded. All conductors are the
same gauge including the one that is grounded. Reference: NMX
–J-195-ANCE
5. Do not operate the charger if the cable or plug are damaged. Take
it to a Truper® Authorized Service Center.
6. Do not use the charger if it received a strong bump, it fell or is
damaged in any way. Take it to a Truper® Authorized Service Center.
7. Do not disassemble the charger. If you assemble it back it may cause
fire or electric shock. When needing to service or repair the device,
take it to a Truper® Authorized Service Center.
8. To reduce the risk of electric shock, disconnect the charger from
the power supply before carrying out maintenance or cleaning
service. Turning OFF the controls DOES NOT reduce those risks.
9. RISK OF EXPLOSIVE GAS
A) WORKING NEAR AN ACID LEAD BATTERY IS DANGEROUS.
BATTERIES GENERATE EXPLOSIVE GASSES DURING THE
BATTERY NORMAL OPERATION. THEREFORE, IT IS VERY
IMPORTANT THAT BEFORE USING THE CHARGER, YOU READ
AND FOLLOW THE INSTRUCTIONS TO THE VERY DETAIL.
b) To reduce the risk of the battery exploding, follow these instructions
and the instructions of the manufacturer of the equipment to be
used in the vicinity of the battery. Review the precautions on this
product and on the engine.
10. Personal precaution:
a) There shall be second person close to the user to help, when working
with an acid lead battery.
b) Have handy plenty of fresh water and soap in case battery acid make
contact with your skin, clothes or eyes.
c) Use full eye protection and protective clothing. Avoid touching your
eyes when working near the battery.
d) If battery acid comes in contact with your skin or clothes, wash
immediately with water and soap. If acid gets into your eyes, flush
with plenty of cold water for at least 10 minutes and seek medical
attention immediately.
e) NEVER smoke or allow sparks or flames near the battery or the
motor.
f) Be very careful not to drop a metal tool on the battery. This may
cause a spark or short circuit in the battery or other electrical part
and cause an explosion.
g) Remove all metal particles like rings, bracelets and watches when
working with an acid lead battery. An acid lead battery may cause
a short circuit with extremely high current capable or welding a ring
or any other metal article causing severe burns.
h) Use the charger only to recharge ACID LEAD batteries. It is not
designed to supply electricity to low tension systems different from
the motor starting application. Do not use the battery charger to
charge dry batteries used commonly with domestic appliances. These
types of batteries may explode and injure people and damage
property.
i) NEVER recharge a frozen battery.
PREPARING TO CHARGE
a) If you need to remove the battery from the vehicle toward the
charger, always remove first the battery ground terminal. Verify all
the vehicle accessories are OFF to prevent causing an arc.
b) Verify the area around the battery is well ventilated when charging
the battery. You can spread the gas from the area blowing it away
using a piece of carboard or any nonmetallic material as a fan.
c) Clean the battery terminals. Be careful the corrosion is not making
contact with your eyes.
d) Add distilled water into each cell until the battery acid is reaching
the specified level indicated by the battery manufacturer. This
operation is helpful to purge excessive gas in the cells. Do not overfill.
For batteries built without caps in the cells, follow carefully the
recharge instructions indicated by the manufacturer.
e) Study all the preventive measures indicated by the battery
manufacturer, such as to remove or no remove the cells caps when
recharging and the recommended rates.
f) Determine the battery tension checking the automobile manual. If
the charger has an adjustable loading speed, charge the battery first
in the lowest speed.
LOCATION OF THE CHARGER
a) Place the charger as far as the c.c. battery cables allow.
b) Never place the charger directly on the battery being charged. Gasses
from the battery can corrode and damage the charger.
c) Do not allow the battery acid to drip on the charger when checking
gravity or when filling up.
d) Do not operate the charger in an enclosed area. Do not block
ventilation in any way.
e) Do not place the battery on the charger. The device produces heat
in the machine while it is running. To allow heat to escape, do not
cover the ventilation slot with any object.
CAUTION MEASURES
a) Connection and disconnection of the direct current output clamps
can only be carried out having the charger switches in the OFF
position, and the power cable disconnected from the power supply.
Never let the clamps touch one to the other.
b) Set the clamps in the battery and chassis as indicated in 1 (e), 1 (f),
1 (b) and 1 (d).
1. FOLLOW THESE STEPS WHEN THE BATTERY IS INSTALLED IN THE
VEHICLE. A SPARK NEAR THE BATTERY MAY CAUSE AN EXPLOSION.
TO REDUCE THE RISK NEAR THE BATTERY:
a) To reduce the risk of damage, place the current cables on the hood,
door or any place in the motor.
b) Keep them away from the fan blades, bands, pulleys and other parts
that could injure people.
c) Check the polarity of the battery posts. The POSITIVE (POS, P +)
battery post, usually is of a larger diameter than the NEGATIVE
(NEG, N, -) post.
d) Determine which of the battery posts is grounded (connected) to
the chassis. If the negative post is grounded to the chassis (as it is
in most vehicles), see item (e). If the positive post is grounded to
the chassis, see item (f).
e) In vehicles grounded with the negative, connect the POSITIVE (RED)
of the charger to the post that is not grounded POSITIVE (POS, P +)
post of the battery. Do not connect the clamp in the carburetor,
fuel lines or body metal sheets. Connect into a metal part with tick
caliber or a block in the motor.
f) In vehicles grounded with the positive, connect the NEGATIVE (BLACK)
clamp of the battery charger to the post that is not grounded to the
NEGATIVE (NEG, N, -) post of the battery. Connect the POSITIVE (RED)
clamp to the vehicle chassis or to a block in the motor away from
the battery.
g) When disconnecting the charger, also disconnect the power cable.
Remove the clamp from the vehicle chassis and then, remove the
clamp from the battery terminal.
e) In vehicles grounded with the negative, connect the POSITIVE (RED)
clamp of the charger to the post that is not grounded POSITIVE (POS,
P +) of the battery. Do not connect the clamp in the carburetor, fuel
lines or body metal sheets. Connect into a metal part with tick caliber
or a block in the motor.
f) In vehicles grounded with the positive, connect the NEGATIVE (BLACK)
clamp to the post that is not grounded to the NEGATIVE (NEG, N, -)
post of the battery. Connect the POSITIVE (RED) clamp to the vehicle
chassis or to a block in the motor away from the battery.
g) When disconnecting the charger, also disconnect the power cable.
Remove the clamp from the vehicle chassis and thorn, remove the
clamp from the battery terminal.
2. FOLLOW THESE STEPS WHEN THE BATTERY IS OUTSIDE OF THE
VEHICLE A SPARK IN THE VICINITY OF THE BATTERY MAY CAUSE
AN EXPLOSION TO REDUCE THE RISK OF SPARKS GENERATING NEAR
THE BATTERY:
a) Check polarity in the battery post. The POSITIVE (POS, P +) battery
post OF THE BATTERY, USUALLY HAS A LARGER DIAMETER THAN THE
(NEG, N, -) post.
b) Attach a 24-inch long, insulated battery cable, at least 6-gauge (AWG),
to the NEGATIVE (NEG, N, -) pole of the battery.
c) Connect the POSITIVE (RED) clamp on the charger to the POSITIVE
(POS, P, +) post on the battery.
d) Place your body and the free end of the cable as far away from the
battery as possible. Then connect the NEGATIVE (BLACK) charger
clamp to the free end of the cable.
e) Do not stand in front of the battery when making the final connection.
f) When disconnecting the charger, do so in reverse sequence to the
connection procedure and disconnect the first connection by placing
yourselves as far away as possible.
g) The battery of a marine boat must be removed and charged on land.
Specially designed marine equipment is required to charge on board.
INSTRUCTIONS TO GROUND AND CONNECT AN ALTERNATE
CURRENT CABLE
To reduce the risk of electric shock, the charger shall be grounded. The
charger is equipped with an electric cable with a grounded conductor
and a grounded plug. The plug shall be connected into power supply
dully installed and grounded complying with the local codes and
ordinances.
NEVER modify the cable or the alternate
current plug installed in the equipment. If it cannot be
plugged in the power supply, call a certified electrician to
connect the suitable power supply. A connection if not
adequate may cause an electric shock.
This battery charger is manufactured to be used in a 127 V~ rated power
circuit and a grounded plug that looks like indicated in figure A.
A temporary adapter similar to the adapter shown in figures B and C
can be used if an adequate power supply is not available. The adapter
can be plugged into a two-pole power supply as shown in figure B. This
temporary adapter shall only be used until a certified electrician will
install a duly grounded power supply.
Before using the adapter as shown, double
check the screw in the center of the power supply plate (if
existing) is grounded. The rigid ring or green connection lug
coming out from the adapter shall be connected into a grounded
power supply.
If necessary, replace the plate screw with a longer screw to fasten
the rigid ring or lug and to make a grounded connection with the
grounded power supply.
When the battery charger is connected and the switch is in the ON
position, be careful not to touch together the connection grippers.
Never charge a battery in the ON position. Do not charge a 6 V battery
in the 12 V position.
ELECTRIC DIAGRAM

OPERATION
Verify the area around the battery is well ventilated when charging.
You can spread the gas away from the area, blowing it away using a
piece of carboard or any non-metallic material as a fan.
OPERATION INSTRUCTIONS FOR THE CHARGER AND THE BATTERY
To ensure correct use of the charger and battery, and that the machine
is not damaged, the following instructions should be followed:
1. Operation instructions for the battery to be charged.
2. When the battery has a low charge, the terminal voltage is usually
normal. The physical phenomenon of low energy is the change of
gravity in the solution in the battery. Normally it is 1.28 kg/L. If it is
less than 1.16 kg/L it means that you should charge the battery
3. The battery voltage changes from normal when it is recharged or
discharged. It is higher when charging and lower when discharging.
If the voltage does not return to its normal value after half an hour,
it means that the battery is malfunctioning.
4. This is a manual charger and does not have a full charge indicator.
The amperemeter indicates the current the charger supplies to the
battery and the current will depend on the battery's state of charge.
It is not recommended to use the amperemeter reading to determine
if the battery has been fully charged. To determine the battery charge
level, the voltage at the battery terminals should be measured
frequently with a voltmeter. When the measured voltage is at the
nominal level, the battery is charged.
START METHOD:
The use of the start function shall comply with the product work cycle.
1. Read carefully the motor instructions.
2. Charge the battery during 10 to 15 minutes.
• Connect any electrode of the charger to the battery terminal that is
not connected to the chassis and the other one to the terminal
connecting the chassis.
• Check the connection once again: If there is no problem, set the
charger switch in the start position and turn ON the battery charger.
The work cycle to start a motor is 3 seconds
ON and 360 seconds OFF. (CARBA – 140)
The work cycle to start a motor is 3 seconds ON and 240
seconds OFF. (CARBA – 200)
NOTE: If the 3 seconds start span is exceeded the charger will get
damaged.
MAINTENANCE
• The battery charger shall regularly be maintained and checked to
work correctly and safely.
• Never open the battery charger housing or try to disassemble it.
Only a Truper® Authorized Service Center can repair the battery.
• The Warranty period of the battery charger es 1 year. Repairs shall
be carried out with the supplier or in a Truper® Authorized Service
Center showing your invoice.
• Before carrying out any type of maintenance, first cut the power
supply.
• Clean regularly the charger using a soft cloth. After recharging,
clean the clamps to prevent corrosion.
Protect your skin against burns.
• Store the battery charger in a clean, dry place away from air drafts.
• In the event of any defect, call a Truper® Authorized Service Center
SAFETY INSTRUCTIONS
1. Keep the work area tidy. Cluttered areas and work benches favor
accidents
2. Pay attention to your work area conditions. Do not use
machinery or power devices in wet or damp areas. Do not
expose the equipment to rain. Keep your work area well lit.
Do not use power equipment in the presence of gas or
flammable liquids.
3. Prevent against electric shock. Prevent against electric
shock not touching grounded appliances such as pipes,
radiators and refrigerators.
4. Keep children away. Children shall never be near your work area.
Do not allow children to hold machinery, extension cables or
equipment. Do not allow other people to touch the equipment. Keep
them away from your work area.
5. Store the equipment while not in use. When not in use, the
equipment, shall be stored away in a dry and dust free place. Always
store the equipment locked away from children’s reach.
6. Do not force the equipment. It will perform better and safer when
used within its scope. do not use inadequate attachments to exceed
the capacity of the equipment.
7. Use the right power equipment. Do not use power equipment for
heavy-duty jobs. Do not use power equipment to carry out
heavy-duty jobs beyond the machine scope.
8. Wear adequate clothes. Do not use lose clothes, gloves, tie or jewelry
which could get caught in the mobile parts. Do not wear slippery
shoes. Wear hair protection to hold long hair.
9. Wear eye protection. Always wear adequate safety
accessories accepted in the Official Mexican Standard (NOM)
such as goggles, face mask and anti-dust face mask when
working with materials that shed metal parts, shavings, or
chemical dust.
10. Do not use the power cable for purposes different from its design.
Do not carry the tool by the cable. do not pull the cable to
disconnect the plug from the power outlet. Protect the cable against
heat, oil, and sharp edges.
11. Fasten the work piece. Use fixing devices or clamps to keep the
piece firm. It is safer than working one-handed and allows having
both hands free. keep adequate footing all time. do not try to
overreach over the machine or try go across when it is running
12. Do not overreach. Avoid tiresome positions. Your stance shall be
safe and balanced.
13. Keep the equipment in the best working conditions. Keep the
equipment clean to gain a better job and safety. Follow the
lubrication and accessories replacement instructions. Verify
regularly the tool power cables. If damaged, go to a Truper®
Authorized Service Center. The handles shall always stay clean and
free of oil and grease.
14. Disconnect the equipment when not in use and before carrying
out maintenance.
15. Reduce the risk of accidental start up. Never carry a
power tool still connected to the power supply with your
finger on the switch. Double check the switch is in the
OFF position before connecting the power cable.
16. Outdoor Extension Cables. When outdoors, use only
dedicated and duly marked extension cables.
17. Stay alert. Pay attention to the work. Use your common sense.
Do not operate power tools when tired.
18. Check for damaged parts. Before you continue using the machine,
the protectors and other mobile parts that could be damaged shall
be carefully checked to assure adequate performance. Verify mobile
parts. Look for alignment, probable break age of parts mounting
and any other condition that could affect the tool operation. All
the components shall be correctly mounted and comply with the
requirements to guarantee the tool is working correctly. A protector
or other damaged part shall be repaired or replaced. Any
deteriorated switch shall be replaced in a Truper® Authorized Service
Center. Never use a power tool if the switch is not making contact.
19. Parts and accessories replacement. When in need of replacement
parts, use only Truper® original replacement parts specially
manufactured for this tool.
20. For your person al safety use only
accessories or additional devices indicated in the handling
instructions or with the recommendation of the tool
manufacturer.
Using accessories different from those indicated in the
handling instructions may turn into a personal risk.
21. Hearing protection. Use hearing protection when carrying
out services producing noise above 85 dB.
ADDITIONAL SAFETY RULES FOR THE BATTERY CHARGER
GENERAL SAFETY FOR BATTERIES
The battery chargers can be used to charge deep cycle lead acid
batteries. They can also be used as an auxiliary in the startup of engines.
These chargers have an overheating protection and protection against
current peaks. They are safe and reliable when used.
The battery charger functions include current load selection. This control
is integrated in the charger front panel and is easy to use.
The charger is built with a belt to move the charger. To protect the
safety of people and their property, the following safety rules shall be
followed when using the battery charger:
1. Do not expose the charger to rain or snow.
2. Use of accessories not recommended or sold by the battery
manufacturer may cause fire, electric discharge or personal injuries.
3. When disconnecting the charger, hold and pull the plug, not the cable.
Failure to follow this instruction may damage both the cable and the
plug.
4. Unless strictly necessary, do not use extension cables. Using the
wrong extension cable may cause fire and electric shock.
If using an extension cable is necessary, make sure that:
a) The plug prongs in the extension cable are the same number, size
and shape than the charger plug;
b) The extension cable is wired correctly and in good electric condition;
c) The cable gauge is big enough for the load ampere arc as specified
in the following table:
Minimum gauge for extension cords (AWG)
(When using 127 V~ only)
(1) It is safe to use only if the extensions have an over current protection
device.
(2) One of the conductors should be grounded. All conductors are the
same gauge including the one that is grounded. Reference: NMX
–J-195-ANCE
5. Do not operate the charger if the cable or plug are damaged. Take
it to a Truper® Authorized Service Center.
6. Do not use the charger if it received a strong bump, it fell or is
damaged in any way. Take it to a Truper® Authorized Service Center.
7. Do not disassemble the charger. If you assemble it back it may cause
fire or electric shock. When needing to service or repair the device,
take it to a Truper® Authorized Service Center.
8. To reduce the risk of electric shock, disconnect the charger from
the power supply before carrying out maintenance or cleaning
service. Turning OFF the controls DOES NOT reduce those risks.
9. RISK OF EXPLOSIVE GAS
A) WORKING NEAR AN ACID LEAD BATTERY IS DANGEROUS.
BATTERIES GENERATE EXPLOSIVE GASSES DURING THE
BATTERY NORMAL OPERATION. THEREFORE, IT IS VERY
IMPORTANT THAT BEFORE USING THE CHARGER, YOU READ
AND FOLLOW THE INSTRUCTIONS TO THE VERY DETAIL.
b) To reduce the risk of the battery exploding, follow these instructions
and the instructions of the manufacturer of the equipment to be
used in the vicinity of the battery. Review the precautions on this
product and on the engine.
10. Personal precaution:
a) There shall be second person close to the user to help, when working
with an acid lead battery.
b) Have handy plenty of fresh water and soap in case battery acid make
contact with your skin, clothes or eyes.
c) Use full eye protection and protective clothing. Avoid touching your
eyes when working near the battery.
d) If battery acid comes in contact with your skin or clothes, wash
immediately with water and soap. If acid gets into your eyes, flush
with plenty of cold water for at least 10 minutes and seek medical
attention immediately.
e) NEVER smoke or allow sparks or flames near the battery or the
motor.
f) Be very careful not to drop a metal tool on the battery. This may
cause a spark or short circuit in the battery or other electrical part
and cause an explosion.
g) Remove all metal particles like rings, bracelets and watches when
working with an acid lead battery. An acid lead battery may cause
a short circuit with extremely high current capable or welding a ring
or any other metal article causing severe burns.
h) Use the charger only to recharge ACID LEAD batteries. It is not
designed to supply electricity to low tension systems different from
the motor starting application. Do not use the battery charger to
charge dry batteries used commonly with domestic appliances. These
types of batteries may explode and injure people and damage
property.
i) NEVER recharge a frozen battery.
PREPARING TO CHARGE
a) If you need to remove the battery from the vehicle toward the
charger, always remove first the battery ground terminal. Verify all
the vehicle accessories are OFF to prevent causing an arc.
b) Verify the area around the battery is well ventilated when charging
the battery. You can spread the gas from the area blowing it away
using a piece of carboard or any nonmetallic material as a fan.
c) Clean the battery terminals. Be careful the corrosion is not making
contact with your eyes.
d) Add distilled water into each cell until the battery acid is reaching
the specified level indicated by the battery manufacturer. This
operation is helpful to purge excessive gas in the cells. Do not overfill.
For batteries built without caps in the cells, follow carefully the
recharge instructions indicated by the manufacturer.
e) Study all the preventive measures indicated by the battery
manufacturer, such as to remove or no remove the cells caps when
recharging and the recommended rates.
f) Determine the battery tension checking the automobile manual. If
the charger has an adjustable loading speed, charge the battery first
in the lowest speed.
LOCATION OF THE CHARGER
a) Place the charger as far as the c.c. battery cables allow.
b) Never place the charger directly on the battery being charged. Gasses
from the battery can corrode and damage the charger.
c) Do not allow the battery acid to drip on the charger when checking
gravity or when filling up.
d) Do not operate the charger in an enclosed area. Do not block
ventilation in any way.
e) Do not place the battery on the charger. The device produces heat
in the machine while it is running. To allow heat to escape, do not
cover the ventilation slot with any object.
CAUTION MEASURES
a) Connection and disconnection of the direct current output clamps
can only be carried out having the charger switches in the OFF
position, and the power cable disconnected from the power supply.
Never let the clamps touch one to the other.
b) Set the clamps in the battery and chassis as indicated in 1 (e), 1 (f),
1 (b) and 1 (d).
1. FOLLOW THESE STEPS WHEN THE BATTERY IS INSTALLED IN THE
VEHICLE. A SPARK NEAR THE BATTERY MAY CAUSE AN EXPLOSION.
TO REDUCE THE RISK NEAR THE BATTERY:
a) To reduce the risk of damage, place the current cables on the hood,
door or any place in the motor.
b) Keep them away from the fan blades, bands, pulleys and other parts
that could injure people.
c) Check the polarity of the battery posts. The POSITIVE (POS, P +)
battery post, usually is of a larger diameter than the NEGATIVE
(NEG, N, -) post.
d) Determine which of the battery posts is grounded (connected) to
the chassis. If the negative post is grounded to the chassis (as it is
in most vehicles), see item (e). If the positive post is grounded to
the chassis, see item (f).
e) In vehicles grounded with the negative, connect the POSITIVE (RED)
of the charger to the post that is not grounded POSITIVE (POS, P +)
post of the battery. Do not connect the clamp in the carburetor,
fuel lines or body metal sheets. Connect into a metal part with tick
caliber or a block in the motor.
f) In vehicles grounded with the positive, connect the NEGATIVE (BLACK)
clamp of the battery charger to the post that is not grounded to the
NEGATIVE (NEG, N, -) post of the battery. Connect the POSITIVE (RED)
clamp to the vehicle chassis or to a block in the motor away from
the battery.
g) When disconnecting the charger, also disconnect the power cable.
Remove the clamp from the vehicle chassis and then, remove the
clamp from the battery terminal.
e) In vehicles grounded with the negative, connect the POSITIVE (RED)
clamp of the charger to the post that is not grounded POSITIVE (POS,
P +) of the battery. Do not connect the clamp in the carburetor, fuel
lines or body metal sheets. Connect into a metal part with tick caliber
or a block in the motor.
f) In vehicles grounded with the positive, connect the NEGATIVE (BLACK)
clamp to the post that is not grounded to the NEGATIVE (NEG, N, -)
post of the battery. Connect the POSITIVE (RED) clamp to the vehicle
chassis or to a block in the motor away from the battery.
g) When disconnecting the charger, also disconnect the power cable.
Remove the clamp from the vehicle chassis and thorn, remove the
clamp from the battery terminal.
2. FOLLOW THESE STEPS WHEN THE BATTERY IS OUTSIDE OF THE
VEHICLE A SPARK IN THE VICINITY OF THE BATTERY MAY CAUSE
AN EXPLOSION TO REDUCE THE RISK OF SPARKS GENERATING NEAR
THE BATTERY:
a) Check polarity in the battery post. The POSITIVE (POS, P +) battery
post OF THE BATTERY, USUALLY HAS A LARGER DIAMETER THAN THE
(NEG, N, -) post.
b) Attach a 24-inch long, insulated battery cable, at least 6-gauge (AWG),
to the NEGATIVE (NEG, N, -) pole of the battery.
c) Connect the POSITIVE (RED) clamp on the charger to the POSITIVE
(POS, P, +) post on the battery.
d) Place your body and the free end of the cable as far away from the
battery as possible. Then connect the NEGATIVE (BLACK) charger
clamp to the free end of the cable.
e) Do not stand in front of the battery when making the final connection.
f) When disconnecting the charger, do so in reverse sequence to the
connection procedure and disconnect the first connection by placing
yourselves as far away as possible.
g) The battery of a marine boat must be removed and charged on land.
Specially designed marine equipment is required to charge on board.
INSTRUCTIONS TO GROUND AND CONNECT AN ALTERNATE
CURRENT CABLE
To reduce the risk of electric shock, the charger shall be grounded. The
charger is equipped with an electric cable with a grounded conductor
and a grounded plug. The plug shall be connected into power supply
dully installed and grounded complying with the local codes and
ordinances.
NEVER modify the cable or the alternate
current plug installed in the equipment. If it cannot be
plugged in the power supply, call a certified electrician to
connect the suitable power supply. A connection if not
adequate may cause an electric shock.
This battery charger is manufactured to be used in a 127 V~ rated power
circuit and a grounded plug that looks like indicated in figure A.
A temporary adapter similar to the adapter shown in figures B and C
can be used if an adequate power supply is not available. The adapter
can be plugged into a two-pole power supply as shown in figure B. This
temporary adapter shall only be used until a certified electrician will
install a duly grounded power supply.
Before using the adapter as shown, double
check the screw in the center of the power supply plate (if
existing) is grounded. The rigid ring or green connection lug
coming out from the adapter shall be connected into a grounded
power supply.
If necessary, replace the plate screw with a longer screw to fasten
the rigid ring or lug and to make a grounded connection with the
grounded power supply.
When the battery charger is connected and the switch is in the ON
position, be careful not to touch together the connection grippers.
Never charge a battery in the ON position. Do not charge a 6 V battery
in the 12 V position.
ELECTRIC DIAGRAM AUTHORIZED SERVICE CENTER TRUPER®
Sale parts, componets, supplies and accessories.
In the event of any problem contacting a Truper Authorized Service Center, please see our webpage www.truper.com
to get an updated list, or call our toll-free numbers 800 690-6990 or 800 0187-8737 to get information about the
nearest Service Center.
AGUASCALIENTES
BAJA
CALIFORNIA
BAJA
CALIFORNIA SUR
CAMPECHE
CHIAPAS
CHIHUAHUA
MEXICO CITY
COAHUILA
COLIMA
DURANGO
ESTADO DE
MÉXICO
GUANAJUATO
GUERRERO
HIDALGO
JALISCO
MICHOACÁN
MORELOS
NAYARIT
NUEVO LEÓN
OAXACA
PUEBLA
QUERÉTARO
QUINTANA ROO
SAN LUIS
POTOSÍ
SINALOA
SONORA
TABASCO
TAMAULIPAS
TLAXCALA
VERACRUZ
YUCATÁN
DE TODO PARA LA CONSTRUCCIÓN
GRAL. BARRAGÁN #1201, COL. GREMIAL, C.P. 20030,
AGUASCALIENTES, AGS. TEL.: 449 994 0537
SUCURSAL TIJUANA
AV. LA ENCANTADA, LOTE #5, PARQUE INDUSTRIAL EL
FLORIDO II, C.P 22244, TIJUANA, B.C.
TEL.: 664 969 5100
FIX FERRETERÍAS
FELIPE ÁNGELES ESQ. RUIZ CORTÍNEZ S/N, COL. PUEBLO
NUEVO, C.P. 23670, CD. CONSTITUCIÓN, B.C.S.
TEL.: 613 132 1115
TORNILLERÍA Y FERRETERÍA AAA
AV. ÁLVARO OBREGÓN #324, COL. ESPERANZA
C.P. 24080 CAMPECHE, CAMP. TEL.: 981 815 2808
FIX FERRETERÍAS
AV. CENTRAL SUR #27, COL. CENTRO, C.P. 30700,
TAPACHULA, CHIS. TEL.: 962 118 4083
SUCURSAL CHIHUAHUA
AV. SILVESTRE TERRAZAS #128-11, PARQUE INDUSTRIAL
BAFAR, CARRETERA MÉXICO CUAUHTÉMOC, C.P. 31415,
CHIHUAHUA, CHIH. TEL. 614 434 0052
FIX FERRETERÍAS
EL MONSTRUO DE CORREGIDORA, CORREGIDORA # 22,
COL. CENTRO, C.P. 06060, CUAUHTÉMOC, CDMX.
TEL: 55 5522 5031 / 5522 4861
SUCURSAL TORREÓN
CALLE METAL MECÁNICA #280, PARQUE INDUSTRIAL
ORIENTE, C.P. 27278, TORREÓN, COAH.
TEL.: 871 209 68 23
BOMBAS Y MOTORES BYMTESA DE MANZANILLO
BLVD. MIGUEL DE LA MADRID #190, COL. 16 DE
SEPTIEMBRE, C.P. 28239, MANZANILLO, COL.
TEL.: 314 332 1986 / 332 8013
TORNILLOS ÁGUILA, S.A. DE C.V.
MAZURIO #200, COL. LUIS ECHEVERRÍA, DURANGO,
DGO.TEL.: 618 817 1946 / 618 818 2844
SUCURSAL CENTRO JILOTEPEC
AV. PARQUE INDUSTRIAL #1-A, C.P. 54240, JILOTEPEC,
EDO. DE MÉX. TEL: 761 782 9101 EXT. 5728 Y 5102
CÍA. FERRETERA NUEVO MUNDO S.A. DE C.V.
AV. MÉXICO - JAPÓN #225, CD. INDUSTRIAL, C.P. 38010,
CELAYA, GTO. TEL.: 461 617 7578 / 79 / 80 / 88
CENTRO DE SERVICIO ECLIPSE
CALLE PRINCIPAL MZ.1 LT. 1, COL. SANTA FE, C.P. 39010,
CHILPANCINGO, GRO. TEL.: 747 478 5793
FERREPRECIOS S.A. DE C.V.
LIBERTAD ORIENTE #304 LOCAL 30, INTERIOR DE PASAJE
ROBLEDO, COL. CENTRO, C.P. 43600, TULANCINGO,
HGO. TEL.: 775 753 6615 / 775 753 6616
SUCURSAL GUADALAJARA
AV. ADOLFO B. HORN # 6800, COL: SANTA CRUZ DEL
VALLE, C.P.: 45655, TLAJOMULCO DE ZUÑIGA, JAL.
TEL.: 33 3606 5285 AL 90
FIX FERRETERÍAS
AV. PASEO DE LA REPÚBLICA #3140-A, COL.
EX-HACIENDA DE LA HUERTA, C.P. 58050, MORELIA,
MICH. TEL.: 443 334 6858
FIX FERRETERÍAS
CAPITÁN ANZURES #95, ESQ. JOSÉ PERDIZ, COL.
CENTRO, C.P. 62740, CUAUTLA, MOR.
TEL.: 735 352 8931
HERRAMIENTAS DE TEPIC
MAZATLAN #117, COL. CENTRO, C.P. 63000, TEPIC, NAY.
TEL.: 311 258 0540
SUCURSAL MONTERREY
CARRETERA LAREDO #300, 1B MONTERREY PARKS,
COLONIA PUERTA DE ANÁHUAC, C.P. 66052, ESCOBEDO,
NUEVO LEÓN, TEL.: 81 8352 8791 / 81 8352 8790
FIX FERRETERÍAS
AV. 20 DE NOVIEMBRE #910, COL. CENTRO, C.P. 68300,
TUXTEPEC, OAX. TEL.: 287 106 3092
SUCURSAL PUEBLA
AV PERIFÉRICO #2-A, SAN LORENZO ALMECATLA,
C.P. 72710, CUAUTLACINGO, PUE.
TEL.: 222 282 8282 / 84 / 85 / 86
ARU HERRAMIENTAS S.A DE C.V.
AV. PUERTO DE VERACRUZ #110, COL. RANCHO DE
ENMEDIO, C.P. 76842, SAN JUAN DEL RÍO, QRO.
TEL.: 427 268 4544
FIX FERRETERÍAS
CARRETERA FEDERAL MZ. 46 LT. 3 LOCAL 2, COL EJIDAL,
C.P. 77710 PLAYA DEL CARMEN, Q.R.
TEL.: 984 267 3140
FIX FERRETERÍAS
AV. UNIVERSIDAD #1850, COL. EL PASEO, C.P. 78320,
SAN LUIS POTOSÍ, S.L.P. TEL.: 444 822 4341
SUCURSAL CULIACÁN
AV. JESÚS KUMATE SUR #4301, COL. HACIENDA DE LA
MORA, C.P. 80143, CULIACÁN, SIN.
TEL.: 667 173 9139 / 173 8400
FIX FERRETERÍAS
CALLE 5 DE FEBRERO #517, SUR LT. 25 MZ. 10, COL.
CENTRO, C.P. 85000, CD. OBREGÓN, SON.
TEL.: 644 413 2392
SUCURSAL VILLAHERMOSA
CALLE HELIO LOTES 1, 2 Y 3 MZ. #1, COL. INDUSTRIAL,
2A ETAPA, C.P. 86010, VILLAHERMOSA, TAB.
TEL.: 993 353 7244
VM ORINGS Y REFACCIONES
CALLE ROSITA #527 ENTRE 20 DE NOVIEMBRE Y GRAL.
RODRÍGUEZ, FRACC. REYNOSA, C.P. 88780, REYNOSA,
TAMS. TEL.: 899 926 7552
SERVICIOS Y HERRAMIENTAS INDUSTRIALES
PABLO SIDAR #132, COL . BARRIO DE SAN BARTOLOMÉ,
C.P. 90970, SAN PABLO DEL MONTE, TLAX.
TEL.: 222 271 7502
LA CASA DISTRIBUIDORA TRUPER
BLVD. PRIMAVERA. ESQ. HORTENSIA S/N, COL.
PRIMAVERA C.P. 93308, POZA RICA, VER.
TEL.: 782 823 8100 / 826 8484
SUCURSAL MÉRIDA
CALLE 33 #600 Y 602, LOCALIDAD ITZINCAB Y MULSAY,
MPIO. UMÁN, C.P. 97390, MÉRIDA, YUC.
TEL.: 999 912 2451

OPERATION
Verify the area around the battery is well ventilated when charging.
You can spread the gas away from the area, blowing it away using a
piece of carboard or any non-metallic material as a fan.
OPERATION INSTRUCTIONS FOR THE CHARGER AND THE BATTERY
To ensure correct use of the charger and battery, and that the machine
is not damaged, the following instructions should be followed:
1. Operation instructions for the battery to be charged.
2. When the battery has a low charge, the terminal voltage is usually
normal. The physical phenomenon of low energy is the change of
gravity in the solution in the battery. Normally it is 1.28 kg/L. If it is
less than 1.16 kg/L it means that you should charge the battery
3. The battery voltage changes from normal when it is recharged or
discharged. It is higher when charging and lower when discharging.
If the voltage does not return to its normal value after half an hour,
it means that the battery is malfunctioning.
4. This is a manual charger and does not have a full charge indicator.
The amperemeter indicates the current the charger supplies to the
battery and the current will depend on the battery's state of charge.
It is not recommended to use the amperemeter reading to determine
if the battery has been fully charged. To determine the battery charge
level, the voltage at the battery terminals should be measured
frequently with a voltmeter. When the measured voltage is at the
nominal level, the battery is charged.
START METHOD:
The use of the start function shall comply with the product work cycle.
1. Read carefully the motor instructions.
2. Charge the battery during 10 to 15 minutes.
• Connect any electrode of the charger to the battery terminal that is
not connected to the chassis and the other one to the terminal
connecting the chassis.
• Check the connection once again: If there is no problem, set the
charger switch in the start position and turn ON the battery charger.
The work cycle to start a motor is 3 seconds
ON and 360 seconds OFF. (CARBA – 140)
The work cycle to start a motor is 3 seconds ON and 240
seconds OFF. (CARBA – 200)
NOTE: If the 3 seconds start span is exceeded the charger will get
damaged.
MAINTENANCE
• The battery charger shall regularly be maintained and checked to
work correctly and safely.
• Never open the battery charger housing or try to disassemble it.
Only a Truper® Authorized Service Center can repair the battery.
• The Warranty period of the battery charger es 1 year. Repairs shall
be carried out with the supplier or in a Truper® Authorized Service
Center showing your invoice.
• Before carrying out any type of maintenance, first cut the power
supply.
• Clean regularly the charger using a soft cloth. After recharging,
clean the clamps to prevent corrosion.
Protect your skin against burns.
• Store the battery charger in a clean, dry place away from air drafts.
• In the event of any defect, call a Truper® Authorized Service Center
SAFETY INSTRUCTIONS
1. Keep the work area tidy. Cluttered areas and work benches favor
accidents
2. Pay attention to your work area conditions. Do not use
machinery or power devices in wet or damp areas. Do not
expose the equipment to rain. Keep your work area well lit.
Do not use power equipment in the presence of gas or
flammable liquids.
3. Prevent against electric shock. Prevent against electric
shock not touching grounded appliances such as pipes,
radiators and refrigerators.
4. Keep children away. Children shall never be near your work area.
Do not allow children to hold machinery, extension cables or
equipment. Do not allow other people to touch the equipment. Keep
them away from your work area.
5. Store the equipment while not in use. When not in use, the
equipment, shall be stored away in a dry and dust free place. Always
store the equipment locked away from children’s reach.
6. Do not force the equipment. It will perform better and safer when
used within its scope. do not use inadequate attachments to exceed
the capacity of the equipment.
7. Use the right power equipment. Do not use power equipment for
heavy-duty jobs. Do not use power equipment to carry out
heavy-duty jobs beyond the machine scope.
8. Wear adequate clothes. Do not use lose clothes, gloves, tie or jewelry
which could get caught in the mobile parts. Do not wear slippery
shoes. Wear hair protection to hold long hair.
9. Wear eye protection. Always wear adequate safety
accessories accepted in the Official Mexican Standard (NOM)
such as goggles, face mask and anti-dust face mask when
working with materials that shed metal parts, shavings, or
chemical dust.
10. Do not use the power cable for purposes different from its design.
Do not carry the tool by the cable. do not pull the cable to
disconnect the plug from the power outlet. Protect the cable against
heat, oil, and sharp edges.
11. Fasten the work piece. Use fixing devices or clamps to keep the
piece firm. It is safer than working one-handed and allows having
both hands free. keep adequate footing all time. do not try to
overreach over the machine or try go across when it is running
12. Do not overreach. Avoid tiresome positions. Your stance shall be
safe and balanced.
13. Keep the equipment in the best working conditions. Keep the
equipment clean to gain a better job and safety. Follow the
lubrication and accessories replacement instructions. Verify
regularly the tool power cables. If damaged, go to a Truper®
Authorized Service Center. The handles shall always stay clean and
free of oil and grease.
14. Disconnect the equipment when not in use and before carrying
out maintenance.
15. Reduce the risk of accidental start up. Never carry a
power tool still connected to the power supply with your
finger on the switch. Double check the switch is in the
OFF position before connecting the power cable.
16. Outdoor Extension Cables. When outdoors, use only
dedicated and duly marked extension cables.
17. Stay alert. Pay attention to the work. Use your common sense.
Do not operate power tools when tired.
18. Check for damaged parts. Before you continue using the machine,
the protectors and other mobile parts that could be damaged shall
be carefully checked to assure adequate performance. Verify mobile
parts. Look for alignment, probable break age of parts mounting
and any other condition that could affect the tool operation. All
the components shall be correctly mounted and comply with the
requirements to guarantee the tool is working correctly. A protector
or other damaged part shall be repaired or replaced. Any
deteriorated switch shall be replaced in a Truper® Authorized Service
Center. Never use a power tool if the switch is not making contact.
19. Parts and accessories replacement. When in need of replacement
parts, use only Truper® original replacement parts specially
manufactured for this tool.
20. For your person al safety use only
accessories or additional devices indicated in the handling
instructions or with the recommendation of the tool
manufacturer.
Using accessories different from those indicated in the
handling instructions may turn into a personal risk.
21. Hearing protection. Use hearing protection when carrying
out services producing noise above 85 dB.
ADDITIONAL SAFETY RULES FOR THE BATTERY CHARGER
GENERAL SAFETY FOR BATTERIES
The battery chargers can be used to charge deep cycle lead acid
batteries. They can also be used as an auxiliary in the startup of engines.
These chargers have an overheating protection and protection against
current peaks. They are safe and reliable when used.
The battery charger functions include current load selection. This control
is integrated in the charger front panel and is easy to use.
The charger is built with a belt to move the charger. To protect the
safety of people and their property, the following safety rules shall be
followed when using the battery charger:
1. Do not expose the charger to rain or snow.
2. Use of accessories not recommended or sold by the battery
manufacturer may cause fire, electric discharge or personal injuries.
3. When disconnecting the charger, hold and pull the plug, not the cable.
Failure to follow this instruction may damage both the cable and the
plug.
4. Unless strictly necessary, do not use extension cables. Using the
wrong extension cable may cause fire and electric shock.
If using an extension cable is necessary, make sure that:
a) The plug prongs in the extension cable are the same number, size
and shape than the charger plug;
b) The extension cable is wired correctly and in good electric condition;
c) The cable gauge is big enough for the load ampere arc as specified
in the following table:
Minimum gauge for extension cords (AWG)
(When using 127 V~ only)
(1) It is safe to use only if the extensions have an over current protection
device.
(2) One of the conductors should be grounded. All conductors are the
same gauge including the one that is grounded. Reference: NMX
–J-195-ANCE
5. Do not operate the charger if the cable or plug are damaged. Take
it to a Truper® Authorized Service Center.
6. Do not use the charger if it received a strong bump, it fell or is
damaged in any way. Take it to a Truper® Authorized Service Center.
7. Do not disassemble the charger. If you assemble it back it may cause
fire or electric shock. When needing to service or repair the device,
take it to a Truper® Authorized Service Center.
8. To reduce the risk of electric shock, disconnect the charger from
the power supply before carrying out maintenance or cleaning
service. Turning OFF the controls DOES NOT reduce those risks.
9. RISK OF EXPLOSIVE GAS
A) WORKING NEAR AN ACID LEAD BATTERY IS DANGEROUS.
BATTERIES GENERATE EXPLOSIVE GASSES DURING THE
BATTERY NORMAL OPERATION. THEREFORE, IT IS VERY
IMPORTANT THAT BEFORE USING THE CHARGER, YOU READ
AND FOLLOW THE INSTRUCTIONS TO THE VERY DETAIL.
b) To reduce the risk of the battery exploding, follow these instructions
and the instructions of the manufacturer of the equipment to be
used in the vicinity of the battery. Review the precautions on this
product and on the engine.
10. Personal precaution:
a) There shall be second person close to the user to help, when working
with an acid lead battery.
b) Have handy plenty of fresh water and soap in case battery acid make
contact with your skin, clothes or eyes.
c) Use full eye protection and protective clothing. Avoid touching your
eyes when working near the battery.
d) If battery acid comes in contact with your skin or clothes, wash
immediately with water and soap. If acid gets into your eyes, flush
with plenty of cold water for at least 10 minutes and seek medical
attention immediately.
e) NEVER smoke or allow sparks or flames near the battery or the
motor.
f) Be very careful not to drop a metal tool on the battery. This may
cause a spark or short circuit in the battery or other electrical part
and cause an explosion.
g) Remove all metal particles like rings, bracelets and watches when
working with an acid lead battery. An acid lead battery may cause
a short circuit with extremely high current capable or welding a ring
or any other metal article causing severe burns.
h) Use the charger only to recharge ACID LEAD batteries. It is not
designed to supply electricity to low tension systems different from
the motor starting application. Do not use the battery charger to
charge dry batteries used commonly with domestic appliances. These
types of batteries may explode and injure people and damage
property.
i) NEVER recharge a frozen battery.
PREPARING TO CHARGE
a) If you need to remove the battery from the vehicle toward the
charger, always remove first the battery ground terminal. Verify all
the vehicle accessories are OFF to prevent causing an arc.
b) Verify the area around the battery is well ventilated when charging
the battery. You can spread the gas from the area blowing it away
using a piece of carboard or any nonmetallic material as a fan.
c) Clean the battery terminals. Be careful the corrosion is not making
contact with your eyes.
d) Add distilled water into each cell until the battery acid is reaching
the specified level indicated by the battery manufacturer. This
operation is helpful to purge excessive gas in the cells. Do not overfill.
For batteries built without caps in the cells, follow carefully the
recharge instructions indicated by the manufacturer.
e) Study all the preventive measures indicated by the battery
manufacturer, such as to remove or no remove the cells caps when
recharging and the recommended rates.
f) Determine the battery tension checking the automobile manual. If
the charger has an adjustable loading speed, charge the battery first
in the lowest speed.
LOCATION OF THE CHARGER
a) Place the charger as far as the c.c. battery cables allow.
b) Never place the charger directly on the battery being charged. Gasses
from the battery can corrode and damage the charger.
c) Do not allow the battery acid to drip on the charger when checking
gravity or when filling up.
d) Do not operate the charger in an enclosed area. Do not block
ventilation in any way.
e) Do not place the battery on the charger. The device produces heat
in the machine while it is running. To allow heat to escape, do not
cover the ventilation slot with any object.
CAUTION MEASURES
a) Connection and disconnection of the direct current output clamps
can only be carried out having the charger switches in the OFF
position, and the power cable disconnected from the power supply.
Never let the clamps touch one to the other.
b) Set the clamps in the battery and chassis as indicated in 1 (e), 1 (f),
1 (b) and 1 (d).
1. FOLLOW THESE STEPS WHEN THE BATTERY IS INSTALLED IN THE
VEHICLE. A SPARK NEAR THE BATTERY MAY CAUSE AN EXPLOSION.
TO REDUCE THE RISK NEAR THE BATTERY:
a) To reduce the risk of damage, place the current cables on the hood,
door or any place in the motor.
b) Keep them away from the fan blades, bands, pulleys and other parts
that could injure people.
c) Check the polarity of the battery posts. The POSITIVE (POS, P +)
battery post, usually is of a larger diameter than the NEGATIVE
(NEG, N, -) post.
d) Determine which of the battery posts is grounded (connected) to
the chassis. If the negative post is grounded to the chassis (as it is
in most vehicles), see item (e). If the positive post is grounded to
the chassis, see item (f).
e) In vehicles grounded with the negative, connect the POSITIVE (RED)
of the charger to the post that is not grounded POSITIVE (POS, P +)
post of the battery. Do not connect the clamp in the carburetor,
fuel lines or body metal sheets. Connect into a metal part with tick
caliber or a block in the motor.
f) In vehicles grounded with the positive, connect the NEGATIVE (BLACK)
clamp of the battery charger to the post that is not grounded to the
NEGATIVE (NEG, N, -) post of the battery. Connect the POSITIVE (RED)
clamp to the vehicle chassis or to a block in the motor away from
the battery.
g) When disconnecting the charger, also disconnect the power cable.
Remove the clamp from the vehicle chassis and then, remove the
clamp from the battery terminal.
e) In vehicles grounded with the negative, connect the POSITIVE (RED)
clamp of the charger to the post that is not grounded POSITIVE (POS,
P +) of the battery. Do not connect the clamp in the carburetor, fuel
lines or body metal sheets. Connect into a metal part with tick caliber
or a block in the motor.
f) In vehicles grounded with the positive, connect the NEGATIVE (BLACK)
clamp to the post that is not grounded to the NEGATIVE (NEG, N, -)
post of the battery. Connect the POSITIVE (RED) clamp to the vehicle
chassis or to a block in the motor away from the battery.
g) When disconnecting the charger, also disconnect the power cable.
Remove the clamp from the vehicle chassis and thorn, remove the
clamp from the battery terminal.
2. FOLLOW THESE STEPS WHEN THE BATTERY IS OUTSIDE OF THE
VEHICLE A SPARK IN THE VICINITY OF THE BATTERY MAY CAUSE
AN EXPLOSION TO REDUCE THE RISK OF SPARKS GENERATING NEAR
THE BATTERY:
a) Check polarity in the battery post. The POSITIVE (POS, P +) battery
post OF THE BATTERY, USUALLY HAS A LARGER DIAMETER THAN THE
(NEG, N, -) post.
b) Attach a 24-inch long, insulated battery cable, at least 6-gauge (AWG),
to the NEGATIVE (NEG, N, -) pole of the battery.
c) Connect the POSITIVE (RED) clamp on the charger to the POSITIVE
(POS, P, +) post on the battery.
d) Place your body and the free end of the cable as far away from the
battery as possible. Then connect the NEGATIVE (BLACK) charger
clamp to the free end of the cable.
e) Do not stand in front of the battery when making the final connection.
f) When disconnecting the charger, do so in reverse sequence to the
connection procedure and disconnect the first connection by placing
yourselves as far away as possible.
g) The battery of a marine boat must be removed and charged on land.
Specially designed marine equipment is required to charge on board.
INSTRUCTIONS TO GROUND AND CONNECT AN ALTERNATE
CURRENT CABLE
To reduce the risk of electric shock, the charger shall be grounded. The
charger is equipped with an electric cable with a grounded conductor
and a grounded plug. The plug shall be connected into power supply
dully installed and grounded complying with the local codes and
ordinances.
NEVER modify the cable or the alternate
current plug installed in the equipment. If it cannot be
plugged in the power supply, call a certified electrician to
connect the suitable power supply. A connection if not
adequate may cause an electric shock.
This battery charger is manufactured to be used in a 127 V~ rated power
circuit and a grounded plug that looks like indicated in figure A.
A temporary adapter similar to the adapter shown in figures B and C
can be used if an adequate power supply is not available. The adapter
can be plugged into a two-pole power supply as shown in figure B. This
temporary adapter shall only be used until a certified electrician will
install a duly grounded power supply.
Before using the adapter as shown, double
check the screw in the center of the power supply plate (if
existing) is grounded. The rigid ring or green connection lug
coming out from the adapter shall be connected into a grounded
power supply.
If necessary, replace the plate screw with a longer screw to fasten
the rigid ring or lug and to make a grounded connection with the
grounded power supply.
When the battery charger is connected and the switch is in the ON
position, be careful not to touch together the connection grippers.
Never charge a battery in the ON position. Do not charge a 6 V battery
in the 12 V position.
ELECTRIC DIAGRAM
Models: CARBA-140
CARBA-200
13028
13029
Codes:
Brand: TRUPER
Warranty Policy
This product is guaranteed for 1 year. To make the warranty valid or purchase parts
and components you must present the product in Corregidora 22, Col. Centro, Alc.
Cuauhtémoc, CDMX C.P. 06060 or at the establishment where you purchased it, or
at any Truper® Service Center listed in the annex to the warranty policy and/or in
www.truper.com Transportation costs resulting from compliance of this warranty
will be covered by
For questions or comments, call 800-690-6990.
Made in China. Imported by Truper S.A. de C.V.
Parque Industrial 1, Jilotepec,
Edo. de Méx. C.P. 54240
09-2020
Stamp of the business:
Delivery date:
This manual suits for next models
3
Table of contents
Languages:
Other Truper Batteries Charger manuals


