Truper PITI-687 User manual

Manual
Air Texture
Gun
3Output
diameters
Model Code
PITI-687
Applies for:
19233
PITI-687
Read the entire manual
before using the tool
CAUTION
ENGLISH
ESPAÑOL

Technical data
Pneumatic Requirements
2
PITI-687
19233
2 GAL
40 PSI- 90 PSI
1/4 NPT
Air Texture Gun
Code
Description
Hopper Capacity
Work Pressure
Connection Diameter
2.4 - 2.55CFM
Air Consumption
3/16”, 1/4” and 5/16”
Nozzle Diameter
Technical data
Pneumatic Requirements
Safety Warnings for Using
Pneumatic Tools
Safety Warnings for Using Texture guns
Parts
Setting Up
Start Up
Maintenance
Troubleshooting
Notes
2
2
3
4
5
6
7
8
9
10
Regulating
Filter
Air
Compressor
• It is recommended to use compressors with at least 3 CV with a 100 liters deposit.
• To carry out the job comfortably use high-pressure hoses with the right length.
• Dust and water condensed inside the compressor tank may cause a deficient finish onto the working
surface. It is recommended to install a regulating filter between the compressor and the cement plastering machine.
CAUTION
Pressure
Hose
ENGLISH
Contents
CAUTION
Keep this manual for future references.
The illustrations in this manual are for reference
only. They might be different from the real tool.
To gain the best performance of
the tool, prolong the duty life,
make the Warranty valid if
necessary, and to avoid hazards
of fatal injuries please read and
understand this Manual before
using the tool.

3
Safety Warnings for Using
Pneumatic Tools
ENGLISH
Keep your work area clean, tidy and well lit.
Cluttered and dark areas can cause accidents.
Never use the tool in explosive environments or in the
presence of flammable liquids or with no ventilation.
Sparks generated by the tool could cause
explosion or fire.
Keep children and other people at a
safe distance while using the tool.
Distractions can make lose control and cause accidents.
Avoid making contact with power lines and circuits.
Place an avoid power lines and circuits especially
hidden wiring including grounded objects.
Stay alert, be cautious and use common sense.
Familiarity with the use of the tool could distract you
while operating it. This can cause accidents.
Do not use the tool if tired or under the influence of
drugs, alcohol or medication.
A moment distraction while using the tool can cause
severe personal injury.
Use the tool with all its parts in place and in good
repair.
Failure to comply with this instruction can expose you to
severe injury.
Secure and support correctly the work piece .
Use vices and a stable work surface.
Never force the tool.
Working within the range of the tool design
assures a better and safer job.
Store the tool in a safe place away from children reach.
Pneumatic tools are dangerous in
inexperienced hands.
Wear the right clothing.
Loose clothing, jewelry or long hair
can get caught in the moving parts.
Keep hands away from the moving and / or rotating
parts.
Failure to comply with this warning expose you to
severe personal injury such as cuts, burns and
crushing.
Wear the adequate personal protection equipment.
Use of eye protection, dust mask, anti-squid safety shoes,
and protection helmet and safety gloves considerably
reduce risk of injuries.
Disconnect the air hose from the tool before servicing or
changing accessoriess.
To prevent the tool from accidentally starting up and
cause accidents.
Never use the tool if the switch is not working or if it is
not correctly assembled.
Using the tool in disrepair expose you to severe personal
injury. Repair immediately in a Au-
thorized Service Center.
Do not overreach.
Good footing and balance allow having better control on the
tool in unexpected situations.
Never pull the air hose.
Do not use the hose to carry the tool or disconnect it
from the air supply. Damaged or tangled hoses may
burst and shoot residues towards the operator.
Prevent accidentally starting the tool.
Double check the air intake is disconnected before
lubricating, setting accessories or servicing
the tool.
Remove all the vices before starting the tool.
Additional tools, or vices set onto a rotating piece in the
tool may cause severe personal injury.
Service the tool and verify it is in excellent conditions
before using it.
Double-check carefully all the mobile parts, alignment
and assembly. Do this inspection regularly. Look for any
damaged element or malfunctioning part. Replace
immediately in a Authorized
Service Center.
Accessories.
Use only accessories or spare parts indicated in this
Manual or certified by .
Never leave the tool running unattended.
Disconnect the tool from the air supply after operating
and before storing in a safe place to prevent accidents.
WARNING
CAUTION
CAUTION
CAUTION
CAUTION
DANGER
DANGER
CAUTION
CAUTION
CAUTION
CAUTION
CAUTION
DANGER
DANGER
WARNING
WARNING
WARNING
WARNING
WARNING
WARNING
WARNING
WARNING

Safety Warnings for
Using Texture guns
4
• The equipment’s design is for applying
covering materials such as paint, varnish, enamel, etc., with
an ignition point not lower to 70 °F. See the product label
in the can or container.
• Do not spray substances with which
you are not familiar and not know the potential dangers.
• Do not spray flammable substances.
• Be careful of the dangers the spayed substances
originate. Read the text and information in the cans and
containers or the manufacturer specifications.
Substances and materials
• The equipment shall not be used in
closed spaces or in explosive environments.
• If working outside, consider the wind direction. Wind can
carry the covering over long distances and cause damage
as well as making the job very difficult.
• If working indoors, verify there is
adequate ventilation.
• Your work area shall be free of any
ignition source. Do not smoke during spraying or near the
work area.
• Wear a mask and safety eyeglasses
when spraying to prevent injuries in lungs and eyes.
• It is advisable to wear gloves and an overall to protect
hands and clothes from the product you are applying.
Before Operating the Equipment
CAUTION
CAUTION
CAUTION
CAUTION
WARNING
WARNING
WARNING
• Never aim the texture gun to paint
against yourself, third parties or animals.
• Double check the equipment is not absorbing any
solvent vapor.
• If pausing during the applying process
do not set aside the plastering machine. Support it by the
hook so it stays in a vertical position.
While Operating the Equipment
• When finishing the job, clean the
texture gun thoroughly to eliminate any product residues.
Product accumulations may damage the texture gun and
nullify the Warranty.
After Operating the Equipment
CAUTION
CAUTION
WARNING
ENGLISH

5
Parts
Assembly
Rest the hopper in an inverted position onto a table or the floor. Set the bracket in
the hopper neck. Turn the texture gun so that the handle sits in the same side than
the hopper handle. Push it downwards until the material feed is well set in the
hopper. Tighten the bracket. Lastly, connect the compressor hose to the fast
connection in the texture gun base.
Handle
Stud
Seal
Stud
Seal
Threaded
Body
Trigger Adjust
Stopper
Hopper
Handle
Air Flow
Control
Air Input
(Quick
Connector)
Bracket
Nozzles
Trigger
ENGLISH

Setting Up
6
• There are plenty manufacturers of texturizing materials.
It is important to follow the manufacturer instructions
when preparing the materials. The texture gun can apply
practically, any texturizing material that can be fed and
atomized through gravity.
• When using all-purpose sealing compound or light finish
compound, dilute material with approximately 1/3 gallon
water per each gallon of material. After mixing the texture
material it shall get a thick paint or diluted paste thickness.
• Verify the manufacturer instructions if there is
compatibility contraindication between the material and
the aluminum guns.
• Never operate the texture gun with a dry or too pasty
mix. It damages the machine.
• If the paste turns pasty, add more water to get a more
liquid consistency.
• To increase the useful life of the plastering machine, DO
NOT leave the mix inside the machine or the hopper for
long periods of time. Clean thoroughly with water after
each use.
• Do not fill the hopper with more than 2 gallons of mix.
Otherwise it may spill out and cause an accident.
Materials
Air Compressor
• This texture gun is a precision tool designed to give
texture to walls and ceilings. Manufactured to offer
long-term use with minimum maintenance. To give texture
to your space you need only the texture gun, an air
compressor and texturizing material.
• Use the tool correctly following this manual to assure
your texture gun performs well and is profitable. Do not
neglect oiling and cleaning it thoroughly after each use.
• Use a compressor that works with 40 PSI and 90 PSI.
• If the compressor is adjusted to deliver low pressure, the
texture gun will apply a thicker texture. If adjusted for high
pressure, the texture will be finer.
• Air supply shall be uniform or the texture patter will be
deficient.
• Test the mix using panels made of plaster, plywood or
cardboard.
• The desired texture will depend upon the last adjustments
to the plaster machine (trigger run).
• The following table shows the basic parameters to prepare
the type of spray.
Spraying Nozzles
• Use smaller nozzles to get fine textures and larger nozzles
to get thicker textures. Always use a tip for large spray when
applying acoustic material.
Texture Pattern Compressor Pressure
PSI
Mix
Thickness Nozzle Trigger
Run
Dotted- Light
Rough Surface
Dotted - Intermediate
Dotted - Rough
Acoustic
Thick paint Small 23 -25 1/3
2/3
Complete
Run
1/220 -23
17 - 20
17 - 20
10 - 15
Medium
Medium
Large
Large
Thick paint
Thick paint
Thin Mortar
Manufacturer
Specifications
ENGLISH

7
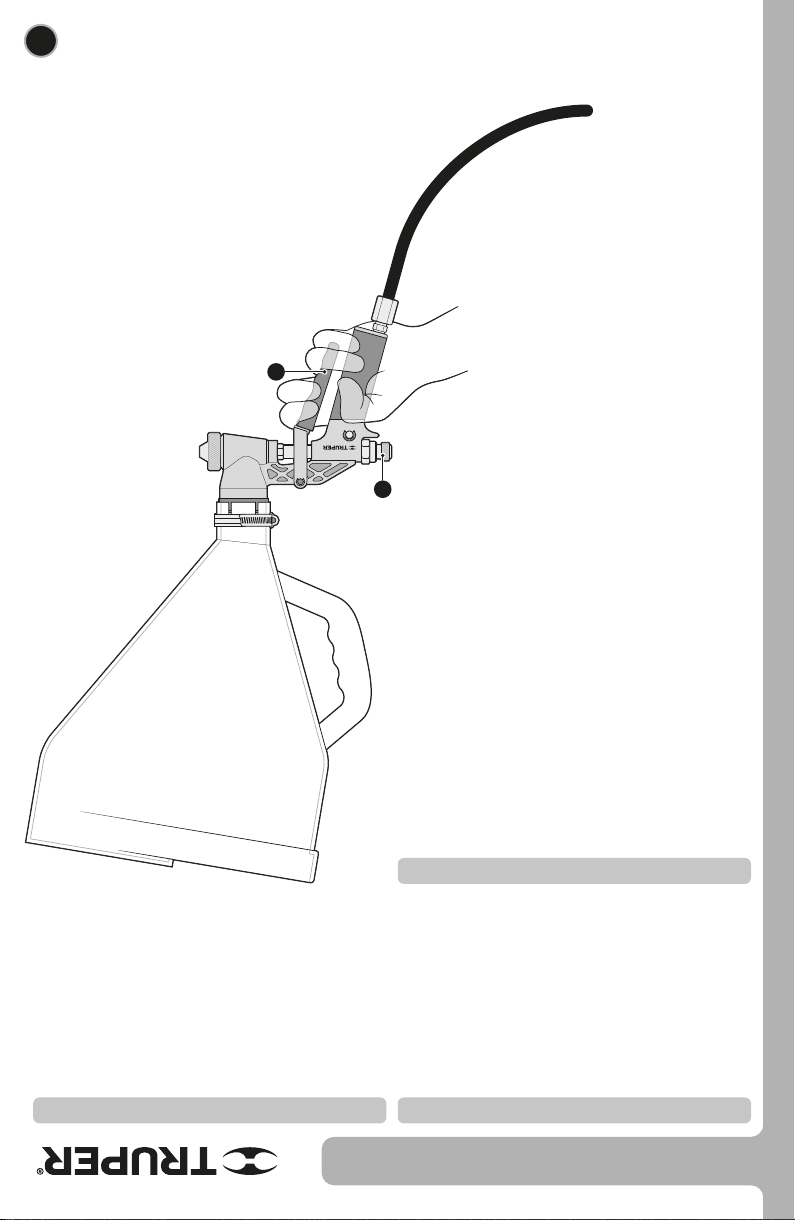
Start Up
• The trigger position will establish the volume of material
the texture gun will spray and expel. Upon pushing the
trigger, the air flow delivered through the compressor
opens. The more the trigger is pushed, the more material
will be expelled producing a thicker pattern.
• After coupling the nozzle and adjusting the compressor
pressure, adjust the trigger run. Turn the knob (A) to the
right to shorten the trigger run. Turn left to lengthen the
trigger run.
Plastering Materials Volume
• Turn the compresso on.
• Press the trigger (B) to open the air flow and start
suctioning the product from the hopper. Point the texture
gun toward a piece of cardboard until the product starts
spraying.
• Release the trigger to stop the spray flow.
• To get an excellent job keep the texture gun 27” to 39”
away from the surface to be sprayed.
• Always spray from the floor to the ceiling and back from
the ceiling to the floor. Never stop in the middle of the
wall.
• Maintenance, cleaning and lubrication after each use is
very important.
• Always test the spray pattern before applying on the work
surface. We recommend spraying on a plywood or
cardboard sheet to check out the results.
• If using the texture gun for the first time, we suggest
experimenting different set ups changing the trigger
pressure and pneumatic pressure, depending upon the
material and pattern needed.
• If upon spraying onto the wall, the result is not adequate,
remove immediately (while wet) using a spatula and start
all over again.
• To get a good finish it is important to prepare the surface
to be sprayed. Reduce thickness to get the right viscosity
before applying.
• Double check the surface to be sprayed is free of dust,
dirt and grease.
• Make sure to cover the areas you will not be spraying
using adhesive tape, paper and / or plastic.
Starting
Spraying Techniques
B
A
ENGLISH

8
Maintenance
• It is very important to clean the texture gun thoroughly
after each use.
• Cleaning the machine carelessly will, in
the long run, lead to malfunctioning and will nullify the
Warranty.
• Never immerse the texture gun in
solvent. The washers may be damaged.
• Wear gloves and safety glasses.
• Disconnect the hose from the plastering machine.
Remove nozzle and hopper.
• Clean the hopper and the texture gun body with a cloth
damp with water.
• For a deeper cleansing, disassemble the rest of the
components. Clean with a brush and water, or air-blow the
texture gun to eliminate any texture material or water
inside the components.
• Before assembling back, apply a small amount of grease
(grease for wheel bearings or lithium based) in all the
O-rings. Slide the pneumatic stud in the texture gun from
back side of the machine and set the knobs in each of their
positions.
• Use care with the O-rings when reassembling the
pneumatic stud. The O-rings may get cut in the threads or
rip inside the texture gun inside chamber wall. Set the
adequate nozzle.
• Rest the machine in an inverted position and place 5 to
10 drops low viscosity and domestic use oil in the fast
connection. This will make the oil lubricate the pneumatic
stud and the O-rings. After lubricating with oil, press the
trigger a couple of times.
• Connect back the compressor hose and purge using
water to remove all the remaining texture material.
Cleansing and Care
WARNING
WARNING
ENGLISH

9
Troubleshooting
Air flows continuously
through the plastering
machine.
The material is not
spayed correctly.
The material is
scattered when hitting
the wall or ceiling.
The material is not
being shoot out
through the nozzle.
• The texture gun internal valve is activated
with the trigger and may be stuck or dirty
.
• The compressor is too small.
• The mix is too thick or is dry.
• The pressure is too high.
• The material was not prepared right.
• Disassemble the texture gun to clean and
check there are no damaged O-rings. If so,
replace.
• The compressor shall be able to work with
pressure between 40 PSI and 90 PSI.
• Thin the mix with water.
• Verify adjustments. See the textures table. If
using a tank compressor, regulate the air.
• Check the mix preparation procedure.
Problem Cause Solution
TRUPER, S.A. de C.V.
Parque Industrial No.1, Jilotepec, C.P. 54240, Estado de México, México
TEL. 01(761) 782 91 00, (TIN) R.F.C.: THE-791105-HP2
www.truper.com
03-2019 ENGLISH

Notes
10 ENGLISH

Notas
10 ESPAÑOL

9
Solución de problemas
ESPAÑOL
El aire fluye
continuamente a
través de la tirolera.
El material no se
atomiza
correctamente.
El material se
desperdiga al chocar
contra la pared o
techo.
El material no sale
disparado por la
boquilla.
• La tirolera tiene una válvula interna que se
activa con el gatillo y puede estar atorada o
sucia.
• El compresor es demasiado pequeño.
• La mezcla es demasiado espesa o está seca.
• La presión es muy alta.
• La mezcla fue preparada inapropiadamente.
• Desarme la tirolera para limpiarla y revisar
que no tenga un O-Ring dañado, de ser así
reemplácelo.
• El compresor debe trabajar a presiones entre
276 kPa (40 PSI) y 620,5 kPa (90 PSI).
• Rebaje con agua.
• Verifique los ajustes en la tabla de texturas. Si
está usando un compresor con tanque, regule
el aire del compresor.
• Revise el procedimiento de preparación de la
mezcla.
Problema Causa Solución
TRUPER, S.A. de C.V.
Parque Industrial No.1, Jilotepec, C.P. 54240, Estado de México, México.
TEL. 01(761) 782 91 00, R.F.C.: THE-791105-HP2
www.truper.com
03-2019

8
Mantenimiento
ESPAÑOL
• Es muy importante limpiar la tirolera por completo
después de cada uso.
Una limpieza inadecuada a la larga
dará como resultado un mal funcionamiento e invalidará la
garantía.
• Nunca sumerja la tirolera en
solvente pues los empaques podrían resultar dañados.
• Utilice guantes y lentes de seguridad.
• Desconecte la manguera de la tirolera, retire la boquilla y
la tolva.
• Limpie la tolva y el cuerpo de la tirolera con un trapo
humedecido con agua.
• Para una limpieza más profunda desmonte los demás
componentes para limpiarlos con un cepillo y agua, o
sople con aire la tirolera para eliminar cualquier material
de textura o agua que hubiese podido introducirse en los
componentes.
• Antes de ensamblarla de nuevo, aplique una pequeña
cantidad de grasa (grasa de cojinete de rueda o con base
de litio) en todos los O-Rings. Deslice el vástago
neumático en el cuerpo de la tirolera desde la parte
posterior de la misma y coloque las perillas en su
respectiva posición.
• Tenga cuidado de no dañar los O-Rings al volver a
ensamblar el vástago neumático. Los O-Rings se pueden
cortar en las roscas o rasgarse en la pared interior de la
cámara de la tirolera. Coloque la boquilla apropiada.
• Invierta la tirolera y coloque de 5 a 10 gotas de aceite de
baja viscosidad y uso doméstico en la conexión rápida.
Esto permitirá que el aceite lubrique el vástago neumático
y los O-Rings. Después de lubricar con aceite, presione el
gatillo varias veces.
• Conecte de nuevo la manguera del compresor y purgue
con agua para retirar todo el material de textura
remanente.
Limpieza y cuidados
ADVERTENCIA
ADVERTENCIA
7
Puesta en marcha
ESPAÑOL
• La posición del gatillo determina el volumen de material
que se atomiza y expulsa de la tirolera. Al apretar el gatillo
se abre el flujo de aire suministrado por el compresor.
Entre más apriete el gatillo, mayor cantidad de material
será expulsado, produciendo un patrón más grueso.
• Después de acoplar la boquilla y ajustar la presión en el
compresor será necesario ajustar la carrera del gatillo. Gire
a la derecha la perilla (A) para acortar la carrera del gatillo.
Gire a la izquierda para alargar la carrera del gatillo.
Volumen de material
• Encienda el compresor.
• Presione el gatillo (B) para abrir el flujo de aire y
comience a succionar el producto de la tolva. Apunte la
tirolera hacia un pedazo de cartón hasta que salga el
rocío del producto.
• Suelte el gatillo para detener el flujo de rocío.
• Para un trabajo óptimo mantenga la tirolera de 70 cm a
1 m de distancia de la superficie a rociar.
• Rocíe siempre del piso al techo y del techo al piso. Nunca
se detenga a la mitad de la pared.
• El mantenimiento, limpieza y lubricación de la tirolera y el
compresor después de cada uso son muy importantes.
• Siempre realice una prueba del patrón de rocío antes de
aplicar sobre la superficie de trabajo. Se recomienda rociar
sobre una hoja de contrachapado o cartón para asegurarse
de obtener los resultados obtenidos.
• Si es la primera vez que usa la tirolera, le sugerimos que
experimente diferentes ajustes, dependiendo del material y
el patrón que se busque. Haga varias pruebas hasta que
logre obtener el patrón deseado, variando la posición del
gatillo y la presión neumática.
• Si al rociar sobre la pared el resultado no es el deseado,
remueva de inmediato (mientras todavía está húmeda)
con una espátula y vuelva a empezar.
• Para obtener un buen trabajo es importante que prepare
la superficie a rociar y adelgace el producto para obtener la
viscosidad correcta antes de su aplicación.
• Confirme siempre que la superficie a rociar esté libre de
polvo, suciedad y grasa.
• Asegúrese de cubrir las áreas que no requiera rociar con
cinta adhesiva, periódico y/o plástico.
Encendido
Técnicas de rociado
B
A

Preparación
6ESPAÑOL
• Hay muchos fabricantes de materiales para texturizar. Es
importante que al prepararlos, siga las instrucciones del
fabricante. La tirolera puede aplicar prácticamente
cualquier material para texturizar que pueda ser
alimentado por gravedad y atomizado.
• Si va a utilizar compuesto para juntas para todo tipo de
uso o compuesto de acabado liviano, diluya el material
con aproximadamente 3 L (1/3 de galón) de agua por cada
4 L (1 galón) de material. Después de mezclar el material
para la textura deberá obtener una consistencia de pintura
espesa o de pasta diluida.
• Verifique que en las instrucciones del fabricante no haya
alguna contraindicación de compatibilidad entre el material
y pistolas de aluminio.
• Nunca opere la tirolera con mezcla seca o muy pastosa,
ya que puede dañarse.
• Si la mezcla se ha vuelto pastosa, se deberá agregar agua
para darle una consistencia más liquida.
• Para aumentar su vida útil, NO deje la mezcla dentro de
la tirolera o la tolva por mucho tiempo y limpie
completamente con agua después de cada uso.
• No llene la tolva con más de 8 litros de mezcla, de lo
contrario podría derramarse y ocasionar algún accidente.
Material
Compresor de aire
• Esta tirolera es una herramienta de precisión, diseñada
para dar textura a paredes y techos. Está fabricada para
ofrecer un uso prolongado con un mínimo de
mantenimiento. Para dar textura a su espacio solo necesita
la tirolera, un compresor de aire y material para texturizar.
• Para asegurar que la vida de su tirolera sea larga y
rentable, úsela adecuadamente de acuerdo con este
instructivo. No olvide lubricarla y limpiarla profundamente
después de cada uso.
• Use un compresor capaz de trabajar a 276 kPa (40 PSI) y
620,5 kPa (90 PSI).
• Si el compresor se ajusta para suministrar baja presión la
tirolera aplicará una textura más gruesa, si se ajusta para
alta presión la textura será más fina.
• El suministro de aire debe ser uniforme o el patrón de
textura será deficiente.
• Efectúe pruebas utilizando paneles de paredes de yeso,
madera contrachapada o cartón.
• Según el tipo de textura deseada dependerán los últimos
ajustes a la tirolera (carrera del gatillo).
• La siguiente tabla muestra los parámetros básicos para
preparar el rociado.
Boquillas para rociar
• Use boquillas pequeñas para obtener patrones de textura
finos y boquillas más grandes para patrones de textura más
gruesos. Siempre debe usar una punta para rociar grande
para la aplicación de material acústico.
Patrón de textura Presión del compresor
kPa PSI
Espesor de
la mezcla Boquilla Carrera
del gatillo
Salpicado liviano
Superficie rugosa
Salpicado intermedio
Salpicado grueso
Acústico
Pintura espesa Pequeña 158,5 - 172 23 -25 1/3
2/3
Carrera
completa
1/220 -23
17 - 20
17 - 20
10 - 15
138 - 155,5
117 - 138
69 - 103
117 - 138
Mediana
Mediana
Grande
Grande
Pintura espesa
Pintura espesa
Argamasa delgada
Especificaciones
del fabricante

5
Partes
ESPAÑOL
Ensamble
Apoye la tolva en posición invertida sobre una mesa o el piso. Coloque la
abrazadera en el cuello de la tolva. Gire la tirolera para que el mango quede del
mismo lado que el mango de la tolva y empújela hacia abajo hasta que la entrada
de material esté bien asentada en la tolva. Apriete la abrazadera. Finalmente conecte
la manguera del compresor a la conexión rápida en la base del mango de la tirolera.
Mango
Sello del
vástago
Sello del
vástago
Cuerpo
roscado
Tope de ajuste
del gatillo
Tolva
Mango
Control de
flujo de aire
Entrada
de aire
(Conexión
rápida)
Abrazadera
Boquillas
Gatillo

4ESPAÑOL
Advertencias de Seguridad
para uso de tiroleras
• El equipo está diseñado para aplicar
materiales de recubrimiento como pintura, barniz, esmalte,
etc. Los cuales deben tener un punto de inflamación no
menor de 21 °C, consulte la etiqueta de la lata o
contenedor del producto.
• No rocíe substancias con las cuales
no esté familiarizado y desconozca su peligro potencial.
• No rocíe substancias inflamables.
• Tenga cuidado con los peligros que se originen por las
substancias rociadas. Consulte el texto y la información de
las latas y contenedores o las especificaciones del
fabricante.
Substancias y materiales
• El equipo no debe utilizarse en
espacios cerrados ni en ambientes explosivos.
• Si va a trabajar en exteriores considere la dirección del
viento. El viento puede llevar el recubrimiento a grandes
distancias y ocasionar daños, además de dificultar el
trabajo.
• Si va a trabajar en interiores verifique
que haya ventilación adecuada.
• El área de trabajo debe de estar
libre de cualquier fuente de ignición. No fume durante el
trabajo de rociado ni cerca del área de trabajo.
• Utilice una mascarilla y lentes
de seguridad cuando rocíe para evitar daños en
los pulmones y los ojos.
• Se recomienda utilizar guantes y overol para proteger sus
manos y ropa del producto a aplicar.
Antes de operar el equipo
ATENCIÓN
ATENCIÓN
ATENCIÓN
ATENCIÓN
ADVERTENCIA
ADVERTENCIA
ADVERTENCIA
• Nunca apunte la tirolera para pintar
hacia usted ni a otras personas o animales.
• Asegúrese de que el equipo no absorba ningún vapor
solvente.
• Si va a hacer una pausa durante el
proceso de aplicación, no ponga de lado la tirolera,
sosténgala en algún lugar por el gancho para que quede
en posición vertical.
Mientras opera el equipo
• Limpie perfectamente la tirolera
para eliminar cualquier residuo de producto al terminar el
trabajo. Las acumulaciones pueden estropear la tirolera e
invalidar la garantía.
Después de operar el equipo
ATENCIÓN
ATENCIÓN
ADVERTENCIA

3
ESPAÑOL
Advertencias de Seguridad
para uso de herramientas neumáticas
Mantenga su área de trabajo limpia, ordenada y bien
iluminada.
Áreas desordenadas y obscuras pueden provocar
accidentes.
Nunca utilice la herramienta en ambientes explosivos, o
en presencia de líquidos inflamables o sin ventilación.
Las chispas que genera la herramienta podría
provocar una explosión o incendio.
Mantenga a los niños y a otras personas a una distancia
segura mientras utiliza la herramienta.
Las distracciones pueden hacerle perder el
control y provocar accidentes.
Evite hacer contacto con líneas y circuitos eléctricos.
Ubique y evite todas las líneas y circuitos
eléctricos, especialmente el cableado oculto.
Así como cualquier objeto conectado a tierra.
Esté siempre alerta, sea prudente y utilice el sentido común.
No deje que la familiaridad con el uso de la
herramienta lo distraiga mientras la utiliza.
Esto puede provocar accidentes.
No utilice la herramienta si está cansado, o bajo la
influencia de drogas, alcohol o medicamentos.
Un momento de distracción mientras utiliza la
herramienta puede provocar lesiones
personales graves.
Utilice la herramienta con todas sus piezas en su lugar
y en buen estado.
De no hacerlo se expone a lesiones personales graves.
Asegure y apoye adecuadamente la pieza de trabajo.
Utilice abrazaderas y una superficie de trabajo estable.
Nunca fuerce la herramienta.
Trabajar dentro del rango para el que fue diseñada
asegura un mejor trabajo y es más seguro.
Guarde la herramienta en un lugar seguro fuera del
alcance de los niños.
Las herramientas neumáticas son peligrosas en
manos inexpertas.
Utilice la indumentaria adecuada.
La ropa suelta, joyas o cabello largo pueden
ser atrapados por las piezas móviles.
Mantenga las manos alejadas de las partes giratorias
y/o móviles.
De no hacerlo se expone a lesiones personales graves,
como cortes, quemaduras o aplastamiento.
Utilice equipo adecuado de protección personal.
Utilice protección para los ojos. Mascarilla antipolvo,
zapatos de seguridad antideslizantes, casco y protección
para los oídos en condiciones adecuadas reducen
considerablemente el riesgo de lesiones.
Desconecte la manguera de aire de la herramienta antes
de darle mantenimiento o cambiar sus accesorios.
Para evitar encendidos accidentales que
deriven en accidentes.
Nunca utilice la herramienta si el interruptor no
funciona o no está debidamente ensamblada.
De hacerlo se expone a lesiones personales
graves, repárela inmediatamente.
No sobre extienda su campo de acción.
Un buen apoyo y equilibrio permiten un mejor control
de la herramienta en situaciones inesperadas.
Nunca tire de la manguera de aire.
No la use para cargar la herramienta o desconectarla de
la toma de aire. Las mangueras dañadas o enredados
pueden reventar y lanzar residuos al operador.
Evite encendidos accidentales.
Asegúrese de que la toma de aire está desconectada
antes de lubricar, colocar accesorios o dar
mantenimiento a la herramienta.
Retire cualquier llave de ajuste antes de encender la
herramienta.
Herramientas adicionales o llaves colocadas
en una pieza giratoria de la herramienta
puede provocar lesiones personales graves.
Déle mantenimiento a la herramienta y cerciórese que
se encuentra en condiciones óptimas antes de utilizarla.
Revise cuidadosamente sus partes móviles, su
alineación y montaje. Hágalo periódicamente.
Busque cualquier elemento dañado o pieza que no
funcione adecuadamente para su inmediata reparación.
Accesorios.
Utilice sólo los accesorios o refacciones
indicados en este Instructivo o
certificados por .
Nunca deje la herramienta en marcha sin supervisión.
Desconecte la herramienta de la toma de aire después de
operarla y antes de dejarla para evitar accidentes graves.
ATENCIÓN
ATENCIÓN
ATENCIÓN
ATENCIÓN
ATENCIÓN
ATENCIÓN
ATENCIÓN
ATENCIÓN
ATENCIÓN
ADVERTENCIA
ADVERTENCIA
ADVERTENCIA
ADVERTENCIA
ADVERTENCIA
ADVERTENCIA
ADVERTENCIA
ADVERTENCIA
ADVERTENCIA
PELIGRO
PELIGRO
PELIGRO
PELIGRO

Í
ndice
Especificaciones técnicas
Requerimientos neumáticos
2
PITI-687
19233
8 L
276 kPa - 620,5 kPa (40 PSI- 90 PSI)
1/4 NPT
Tirolera neumática
Código
Descripción
Capacidad de la tolva
Presión de trabajo
Diámetro de conexión
66 L/min - 72 L/min (2.4-2.55CFM)
Consumo de aire
5 mm, 6 mm y 8 mm
Diámetro de la boquilla
Especificaciones técnicas
Requerimientos neumáticos
Advertencias de Seguridad
para uso de herramientas neumáticas
Advertencias de Seguridad
para uso de tiroleras
Partes
Preparación
Puesta en marcha
Mantenimiento
Solución de problemas
Notas
Guarde este Instructivo para futuras referencias.
Los gráficos de este Instructivo son para
referencia, pueden variar del aspecto real de la
herramienta.
2
2
3
4
5
6
7
8
9
10
Para poder sacar el máximo
provecho de la herramienta,
alargar su vida útil, hacer válida
la garantía en caso de ser
necesario y evitar riesgos o
lesiones graves, es fundamental
leer este Instructivo por
completo antes de usar la
herramienta.
ESPAÑOL
ATENCIÓN
Filtro
regulador
Compresor
de aire
• Se recomienda utilizar compresores de al menos 3 CV con depósito de 100 litros.
• Utilice mangueras de alta presión con una longitud adecuada para realizar el trabajo cómodamente.
• El polvo y agua condensada dentro del tanque del compresor pueden ocasionar un acabado deficiente
en la superficie a trabajar. Se recomienda instalar un filtro regulador entre el compresor y la tirolera.
ATENCIÓN
Manguera
de presión

Lea este Instructivo por completo
antes de usar la herramienta.
ATENCIÓN
Instructivo de
Tirolera
neumática
3Diámetros
de salida
Modelo Código
PITI-687
Este Instructivo es para:
19233
PITI-687
ESPAÑOL
ENGLISH
This manual suits for next models
1
Table of contents
Other Truper Tools manuals


Popular Tools manuals by other brands


Panduit
Panduit PPTMT Operation instructions

Milescraft
Milescraft PantographPro 1221 instruction manual

claber
claber Rotoroll EVOLUTION 20 instructions

Scheppach
Scheppach GS650 Translation of original operating manual

FireClass
FireClass FC490ST user manual

Matco Tools
Matco Tools BRK4TB operating instructions