Truper DES-550 User manual
Manual
Electric string
trimmer/edger
DES-550
ModelCode
DES-550
Applies for:
101263
Power
550 W
CAUTION
ENGLISH
ESPAÑOL
Read this manual thoroughly
before using the tool.

Contents
2
Technical Data
Power Requirements
General power tool safety warnings
Safety warnings for string trimmers
Parts
Assembly
Start Up
Maintenance
Troubleshooting
Authorized Service Centers
Warranty Policy
3
3
4
5
6
7
8
10
10
11
12
DES-550
ENGLISH
CAUTION
Keep this manual for future references.
The illustrations in this manual are for reference
only. They might be different from the real tool.
To gain the best performance of
the tool, prolong the duty life,
make the Warranty valid if
necessary, and to avoid hazards
of fatal injuries please read and
understand this Manual before
using the tool.
Power Requirements
3
DES-550
101263
Class II
60 Hz
Electric string trimmer/edger
13”
4.3 A
550 W
Code
Description
Voltage
Frequency
Current
Power
10 000 RPM
Speed
1.6 mm
Cutting string diameter
50 minutes work per 20 minutes idle. Maximum six hours daily.
Duty cycle
Cutting capacity
Insulation
Build Quality: Double Insulation.
Thermal insulation on motor winding: Class E
127 V
Technical Data
ENGLISH
WARNING
WARNING Avoid the risk of electric shock or severe injury. When the power cable gets damaged
it should only be replaced by the manufacturer or at a Authorized Service Center.
The build quality of the electric insulation is altered if spills or liquid gets into the tool while in use.
Do not expose to rain, liquids and/or dampness.
Before gaining access to the terminals all power sources should be disconnected.
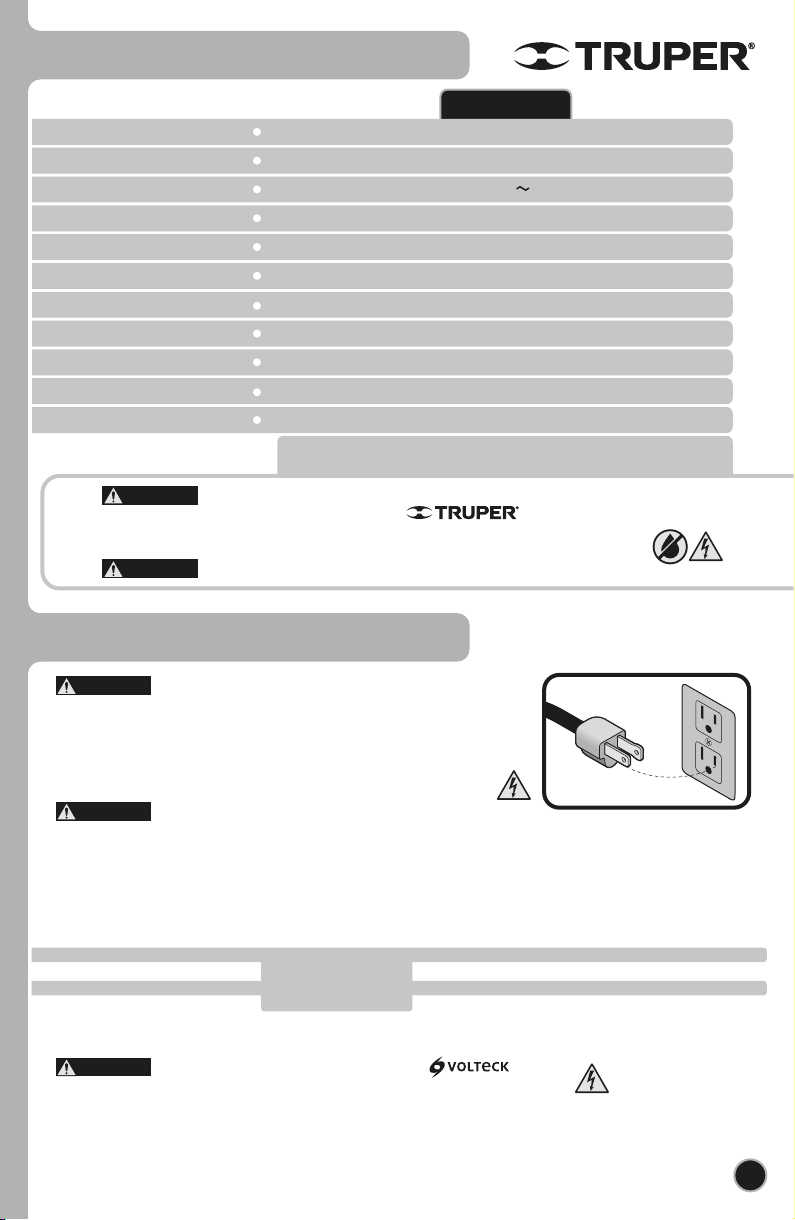
Tools with double insulation are equipped with a polarized plug
(one prong is wider than the other). This plug will only fit in the right way into a
polarized outlet. If the plug cannot be introduced into the outlet, reverse the plug. If
it still doesn’t fit, call a qualified electrician to install for you a polarized outlet. Do
not alter the plug in any way. Double insulation eliminates the need of both a
grounded third power cord with three prongs or a grounded power connection.
When using an extension cable, verify the gauge is enough for
the power that your product needs. A lower gauge cable will cause voltage drop in the line, resulting in power loss and
overheating. The following table shows the right size to use depending on cable’s length and the ampere capability shown in
the tool’s nameplate. When in doubt use the next higher gauge.
WARNING
WARNING
WARNING
from 0 A and up to 10 A
from 10 A and up to 13 A
from 13 A and up to 15 A
from 15 A and up to 20 A
18 AWG(*)
16 AWG
14 AWG
8 AWG
16 AWG
14 AWG
12 AWG
6 AWG
3 (one grounded)
from 6’ m to 49’ | higher than 49’
Ampere
Capacity Number of
Conductors Extension gauge
*It is safe to use only if the extensions have a built-in artifact for over current protection.
AWG = American Wire Gauge. Reference: NMX-J-195-ANCE
When operating power tools outdoors, use a grounded
extension cable labeled “For Outdoors Use”. These extensions are especially designed
for operating outdoors and reduce the risk of electric shock.
4
General Power Tool
Safety Warnings
ENGLISH
Work area
Keep your work area clean, and well lit.
Cluttered and dark areas may cause accidents.
Never use the tool in explosive atmospheres, such as in the
presence of flammable liquids, gases or dust.
Sparks generated by power tools may ignite the flammable material.
Keep children and bystanders at a safe distance while operating
the tool.
Distractions may cause loosing control.
Electrical Safety
The tool plug must match the power outlet. Never modify
the plug in any way. Do not use any adapter plugs with
grounded power tools.
Modified plugs and different power outlets increase the risk of electric shock.
Avoid body contact with grounded surfaces, such as pipes,
radiators, electric ranges and refrigerators.
The risk of electric shock increases if your body is grounded.
Do not expose the tool to rain or wet conditions.
Water entering into the tool increases the risk of electric shock.
Do not force the cord. Never use the cord to carry, lift or unplug
the tool. Keep the cord away from heat, oil, sharp edges or
moving parts.
Damaged or entangled cords increase the risk of electric shock.
When operating a tool outdoors, use an extension cord suitable
for outdoor use.
Using an adequate outdoor extension cord reduces the risk of electric shock.
If operating the tool in a damp location cannot be avoided, use
a ground fault circuit interrupter (GFCI) protected supply.
Using a GFCI reduces the risk of electric shock.
Personal safety
Stay alert, watch what you are doing and use common sense
when operating a tool. Do not use a power tool while you are
tired or under the influence of drugs, alcohol or medication.
A moment of distraction while operating the tool may result in personal injury.
Use personal protective equipment. Always wear eye
protection.
Protective equipment such as safety glasses, anti-dust mask, non-skid shoes,
hard hats and hearing protection used in the right conditions significantly
reduce personal injury.
Prevent unintentional starting up. Ensure the switch is in the
“OFF” position before connecting into the power source and /
or battery as well as when carrying the tool.
Transporting power tools with the finger on the switch or connecting power
tools with the switch in the “ON” position may cause accidents.
Remove any wrench or vice before turning the power tool on.
Wrenches or vices left attached to rotating parts of the tool may result in personal
injury.
Do not overreach. Keep proper footing and balance at all times.
This enables a better control on the tool during unexpected situations.
Dress properly. Do not wear loose clothing or jewelry. Keep
hair, clothes and gloves away from the moving parts.
Loose clothes or long hair may get caught in moving parts.
If you have dust extraction and recollection devices connected
onto the tool, inspect their connections and use them correctly.
Using these devices reduce dust-related risks.
Power Tools Use and Care
Do not force the tool. Use the adequate tool for your
application.
The correct tool delivers a better and safer job at the rate for which it was designed.
Do not use the tool if the switch is not working properly.
Any power tool that cannot be turned ON or OFF is dangerous and should be
repaired before operating.
Disconnect the tool from the power source and / or battery
before making any adjustments, changing accessories or
storing.
These measures reduce the risk of accidentally starting the tool.
Store tools out of the reach of children. Do not allow persons
that are not familiar with the tool or its instructions to
operate the tool.
Power tools are dangerous in the hands of untrained users.
Service the tool. Check the mobile parts are not misaligned or
stuck. There should not be broken parts or other conditions that
may affect its operation. Repair any damage before using the
tool.
Most accidents are caused due to poor maintenance to the tools.
Keep the cutting accessories sharp and clean.
Cutting accessories in good working conditions are less likely to bind and are
easier to control.
Use the tool, components and accessories in accordance with
these instructions and the projected way to use it for the type of
tool when in adequate working conditions.
Using the tool for applications different from those it was designed for, could
result in a hazardous situation.
Service
Repair the tool in a Authorized Service Center
using only identical spare parts.
This will ensure that the safety of the power tool is maintained.
Children or people with reduced physical, sensory or mental
capabilities shall not operate the tool, neither inexperienced
people or without knowledge in the use of the tool, unless
supervised by a person responsible of their safety or if receiving
previous instructions about the tool operation.
Children shall be kept under supervision to double-check they will not play
with the tool. Tight supervision shall be used with children or disabled
persons to prevent from using or being close to any household tool.
WARNING! Read carefully all safety warnings and instructions listed below. Failure to comply with any of
these warnings may result in electric shock, fire and / or severe damage. Save all warnings and instructions for
future references.
This tool is in compliance with
the Official Mexican Standard
(NOM - Norma Oficial Mexicana).

5
Safety Warnings for
Power Trimmers
ENGLISH
Before operating the trimmer
• It is recommended that the trimmer is
connected by means of a Residual current device (RCD)
with a cutting current no higher than 30 mA.
• Read the instructions carefully. Familiarize yourself with
the controls and the proper use of the equipment.
• Keep the additional flexible cord away from the cutting
elements.
• Wear eye protection.
• Never allow children or people not familiarized with the
equipment to use it.
• Do not use the equipment while there people around,
especially children or pets.
• Use the equipment only in daylight or where there is
good lighting.
• Never operate the machine with a damaged guard or
protection, or without guards and protections in place
Switch on the motor only when the hands and feet are
away from the cutting elements.
• Never assemble metal cutting elements.
• Use only replacement parts and accessories
recommended by the manufacturer.
• Always disconnect the device from the power supply
when not in use.
• Disconnect the equipment from the power source
before doing maintenance or cleaning.
• Inspect and provide regularly maintenance to the unit.
The equipment must only be repaired in an authorized
distribution center.
• Take care of not hurting with the knives used for
adjusting the line length. After placing a new cutting line,
put the tool back to its normal position before turning it
on again.
• Make sure that the ventilation holes are free of waste.
• When not using the device, keep it away from the reach
of the infants.
• Carefully inspect the area to cut, to
avoid any obstacle and remove any foreign object that
could be thrown out by the trimmer. Otherwise, you
could cause an accident and the useful life of the trimmer
can be reduced.
• The area to cut should be well
illuminated.
• Double-check every part in the
trimmer is in excellent working condition and the cutting
string is correctly set. Inspect the ventilation slots are free
of debris. Refrain from using the trimmer if the guard is
damaged or has missing parts.
• Use only the original nylon string and
for no reason at all replace it with metal string.
• For best results it is recommended to use only original
thread replacements such as: HTA-65B, HIDE-65P,HTA-65
and HDU-15-65 Truper®brand.
• Remember this tool is designed to cut grass as indicated
in this Manual. For no reason at all it can be used for a
different purpose.
• To prevent from electric shock refrain
from working in humid environments, such as when is
raining or there is dew on the grass.
While operating the trimmer
• Do not operate the trimmer close to
passersby, children or animals.
• Never set the cutting head above
11.8” of height and do not aim it towards people or
animals.
• Use the trimmer only to cut at
ground level. For no reason at all use it to cut vegetation
on stones or walls.
• Do not walk on gravel when the
trimmer is running. The cutting string might shoot out
gravel pieces towards the user or passersby causing
injuries.
• To prevent the cutting string damaging
the cable always keep the trimmer’s power cable visible.
• Refrain from putting your hands or
feet close to the cutting head while the tool is running.
• EIn case of working close to transit
roads stop cutting until there are no vehicles on sight.
The trimmer could shoot debris towards the moving
vehicles, thus causing a severe accident.
After operating the trimmer
• Cutting elements continue to rotate
after the engine is turned off
• Do not try to stop the cutting string’s rotating movement
in any other way than releasing the switch. Wait until the
spool comes to a complete stop after releasing the switch,
this takes a few seconds.
CAUTION
CAUTION
CAUTION
CAUTION
WARNING
WARNING
WARNING
CAUTION
CAUTION
CAUTION
WARNING
WARNING
WARNING
DANGER
6
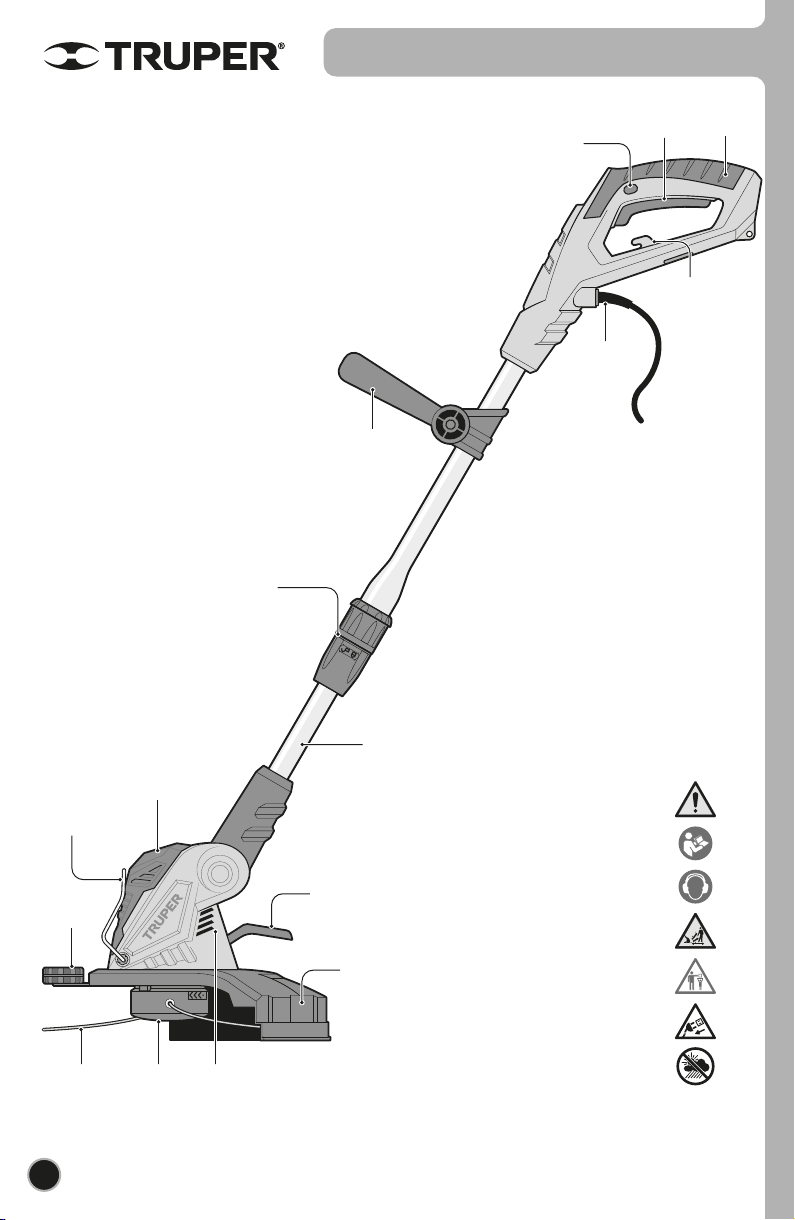
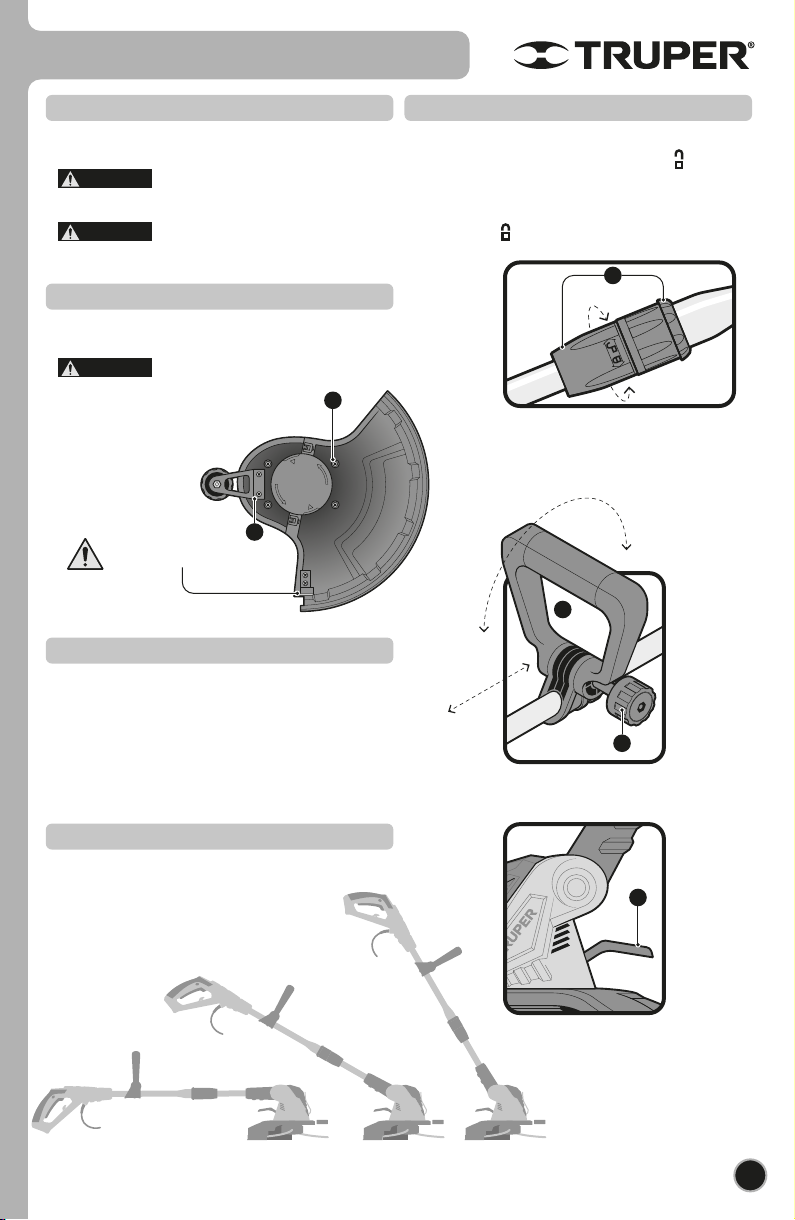
Parts
Retractable
stop
ENGLISH
Power cord
fastener
Cutting
Head
Cutting
Line
Telescopic
Shaft
Telescopic Shaft
Adjusting Knob
Switch
trigger
Switch
Lock
Handle
Auxiliary
handle
Trimmer
head
Edger
Cutter
Guide
Guard
Head angle
adjustment pedal
Extension
Cord
Output
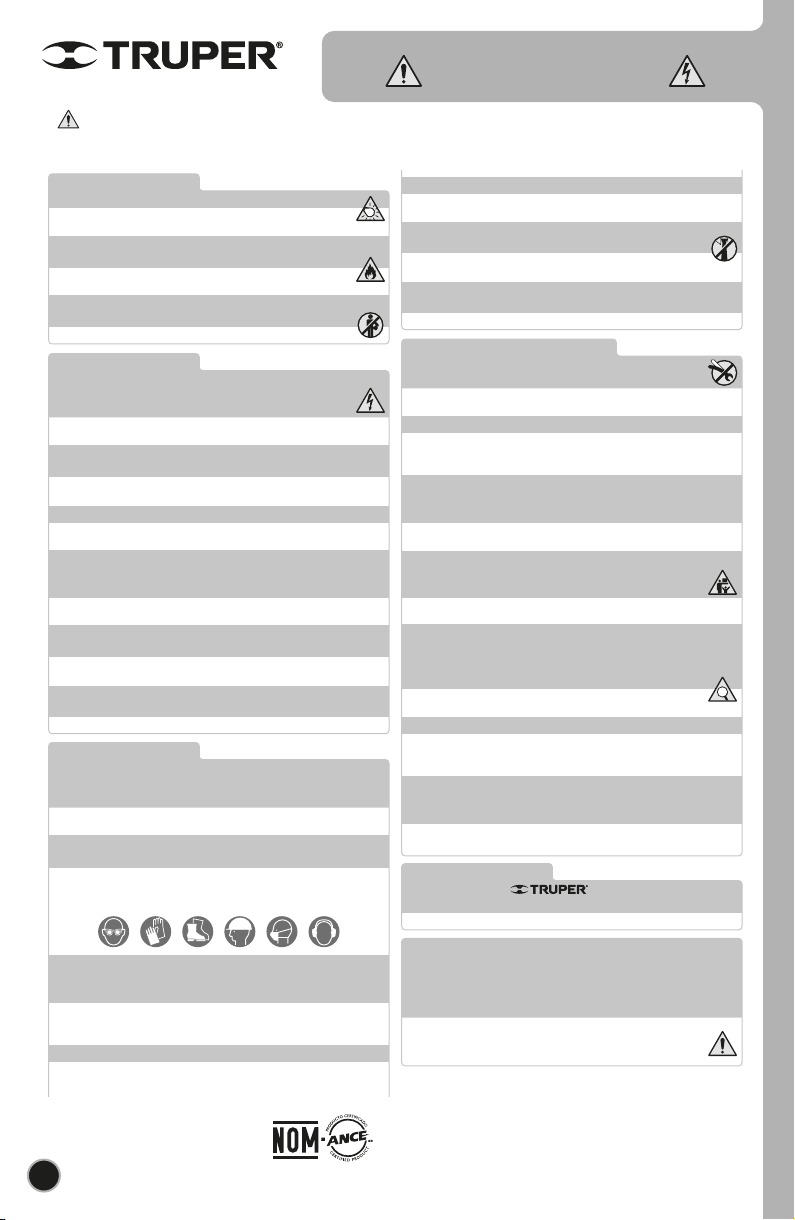
Safety alert.
Security alert tag
Read the operator’s manual before using the tool.
Wear ear protectors.
Keep bystanders away.
Keep away from children’s reach.
Do not use if the cord is damaged.
Do not expose to rain.
Ventilation
slots
Use care and do not touch the
thread cutter blade sharp edge.
7
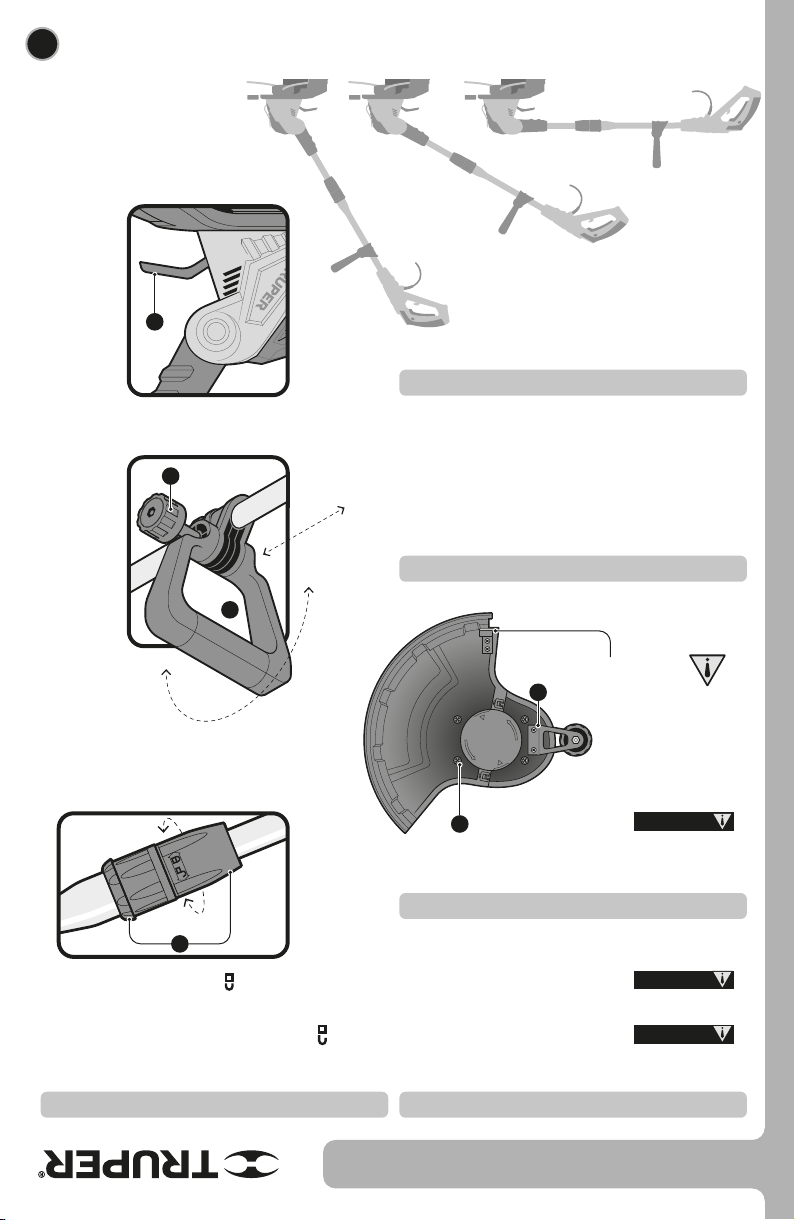
Assembly
Guard
• To assemble and disassemble the guard tighten or
loosen the four screws (A) in the bottom of the guard.
• Operating the tool with the guard
removed increases the risk of accidents and damage to
the tool.
• Turn off and disconnect the trimmer
before assembling or disassembling the guard.
Guide to Trim Edges
Adjust the Telescopic Shaft
• To assemble and disassemble the edger guide tighten or
loosen the two screws (B) in the bottom of the guard.
• Turn off and disconnect the trimmer
before assembling or disassembling the guide.
• Disconnect the Trimmer. Unscrew the adjusting
knob (A) turning into the open lock direction( ).
• Expand or retract the shaft into the position it suits
best.
• Tighten the adjusting knob turning into the closed
lock direction ( ).
D
G
C
B
A
ENGLISH
CAUTION
CAUTION
CAUTION
H
Adjusting the auxiliary handle
• Place the auxiliary handle on the main handle housing (D).
• Insert the screw into the handle and housing hole (E).
• Adjust the auxiliary handle to the desired angle (F).
• Tighten the knob (G) to lock the handle´s position.
Head tilt Adjustment
• Step on the pedal (H) and tilt the head to the best
position for the work to be done.
60° for mowing in open areas
30° for hard to reach areas
0° for edging (see page 8)
Upper
section Lower
section
8
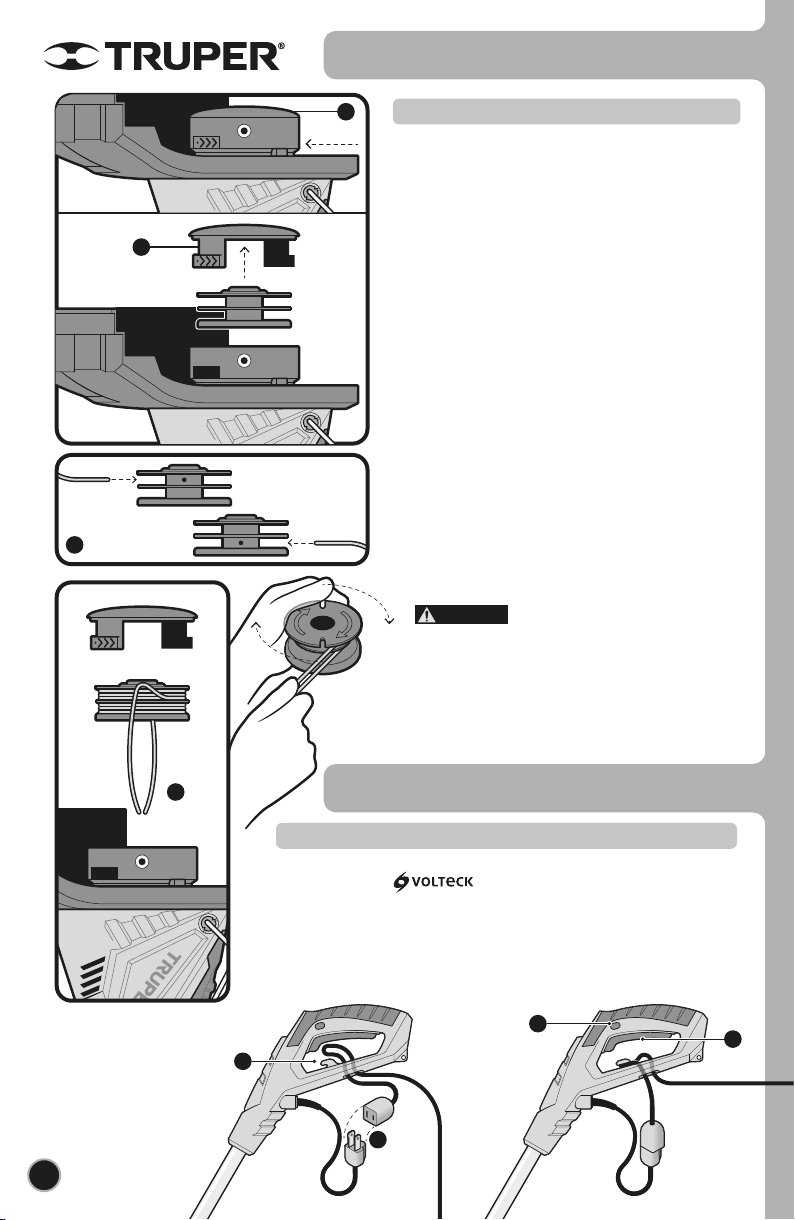
Cutting string spool
• The trimmer shall be off and disconnected. Remove the
spool-retaining cap (B) pressing towards the side tabs.
Pull the cap upward.
• Remove the empty spool. Double check is clean and has
no damaged or worn parts.
• Cut two 8.85 feet cutting string lengths.
• Insert both string ends in the corresponding orifices on
each of the spool sections (upper and lower) (C).
• Hold both lines and spin in the direction indicated in the
spool with an arrow. Double check each length of line is
spun in their respective section (upper and lower). Do not
spin too much line. After spinning there shall be a
minimum 1/4” distance between the spool edge and the
spun line.
• Leave a length of approximately 6” of both lines. Insert
the line from the upper section in one of the notches in
the spool cover. Give the spool another half-a-turn and
insert the lower section line in the opposite notch in the
spool cover.
This is done to prevent the line to get loose while
installing the spool in the brush trimmer. Later, you will
release the lines from the notches.
• Set back the spool in the cutting head (D). Pass the ends
of each line through the cover orifices. If in this step, the
line gets released or tangled spin it again in the spool and
secure it in the notches.
• Pull hard and outward both cutting
string ends to release them from the grooves in the spool
upper part.
• When installing a new spool release the ends of the line
from the notches and unroll approximately 6” of both lines
to secure them back in the notches before setting the spool
in its cover.
Assembly
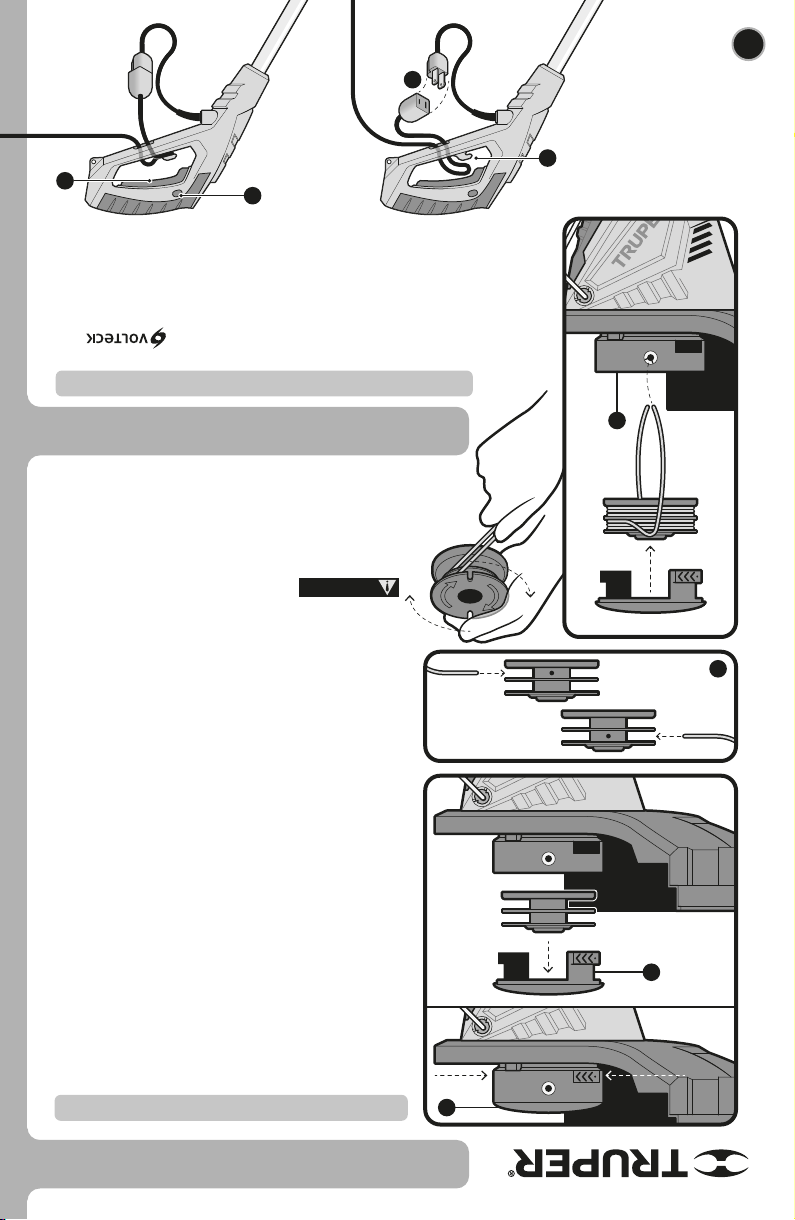
Start up
Turning on
• Connect one end of the extension cable into the brush cutter power plug (E).
Using an ERA-4X14 brand extension cable is recommended.
• Fasten the extension through the cable fastener (F).
• Stretch out the extension cable and connect into a power outlet with the voltage
specified for the brush trimmer.
• To start the brush trimmer, release the trigger lock (G). Then, press the trigger
switch (H). To turn off release the trigger switch.
C
D
B
B
H
F
G
E
ENGLISH
CAUTION
Cutting
movement
Waist
rotation
9
Start up
B
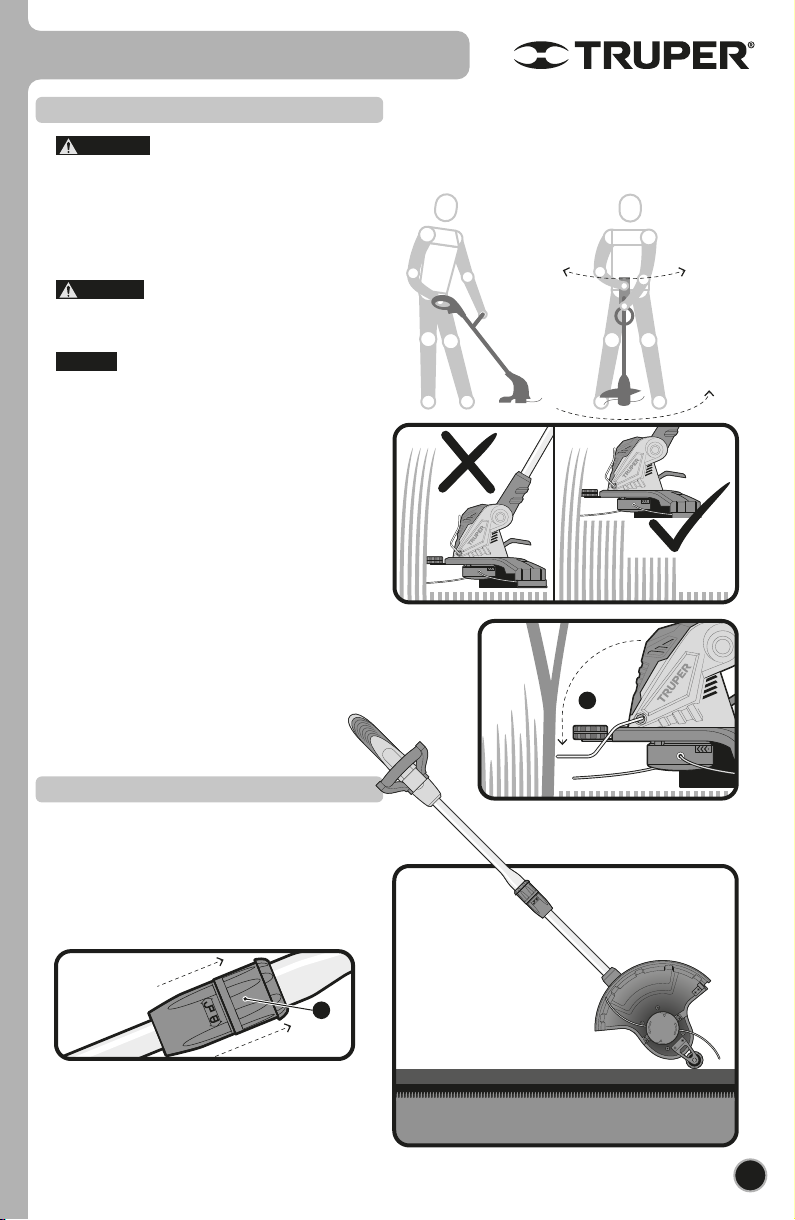
Edge Trimming
• To trim grass edges in the curbs or paths, turn the
brush trimmer head 180° and use the edge trimmer
guide.
• Pull the adjusting knob (B) towards the handle to
release the telescopic boom and be able to turn it.
• Make your cuts as shown in the image.
Operation
• Remember that the trimmer users are responsible of their safety as well as the safety of people near
the work area. Follow all the safety standards (pages 4 and 5) before, during and after operating the tool.
• Keep a balanced stance and good footing with both feet on the ground.
• Hold firmly the trimmer in front of you. Keep your right
hand on the handle and at your hip’s height. The left hand
on the auxiliary handle to align the tool with your body
and pointing the cutting head downwards and away from
your feet.
• Do not turn on or operate the trimmer
in a position different from the standard.
• Turn on the trimmer and cut from left to right while
rotating your waist and keeping the tool’s position.
• The trimmer is built with as self-feeding
head. Hitting the head to make the cutting string advance
will make the trimmer warranty void.
• As the cut is being done the cutting string will wear out
and will eventually fall apart.
To release more string from the spool, operate the
trimmer, and release the switch trigger. Wait two seconds
and press the switch trigger. The cutting string becomes
larger approximately 1/4” every time the trigger switch is
on and off, until cutting string reaches the guard blade
length.
• To cut shrubs or tall grass make it gradually. Do not try to
cut in one pass from its base. Residues may clog the
cutting head or cause loosing control on the trimmer.
• Lower the retractable stop (A) to avoid damaging
branches or walls while cutting.
ENGLISH
CAUTION
NOTICE
DANGER
Curb
A

• Carbon brushes should be checked periodically.
• When one or both carbon brushes show signs of wear
go to a Authorized Service center to
have both carbon brushes replaced. When replaced, see if
the new carbon brushes move freely in the carbon brush
housing. Ask to turn on the tool during five minutes to
make the contact in the carbon brushes and the
commuter even.
• Use only original spare carbon
brushes, designed specifically with the right strength and
electric resistance for each type of motor. Carbon brushes
with different specifications may damage the motor.
• When replacing carbon brushes, always change both.
10
Troubleshooting
Cleaning
• Cleaning after each use will keep the trimmer in the
best of working conditions and will lengthen its useful
life.
• To clean use a cloth dampened with hot water and a
soft brush.
• After each use disassemble all the tool parts. Remove
all grass particles and ground stuck in it. Use special care
with the cutting string spool and its slots, also the guard.
• Clean thoroughly the trimmer ventilation slots so there
is no grass or dirt obstructing.
Carbon brush replacement
• All repairs and service should be made only in a
Certified Service Center.
Service
• After the tool has reached its full duty life all discarded
material such as joints, damaged parts or the tool itself
shall not be handled as garbage. Take to a recycling
center to be adequately disposed off and taking care of all
the environmental standards.
Environment protection
Storage
• To prevent rust clean the tool before storing.
• Store the trimmer in a dry temperate place away from
sunlight (preferably in a dark place) and away from
children reach.
• Prevent from storing the trimmer in plastic bags.
Otherwise the humidity generated could damage it.
• Do not store the trimmer with the guard against the
floor. It could get distorted. The trimmer shall be stored
hanging from the upper handle preventing the guard to
touch the floor.
• The string has stuck itself.
• There is not enough string in the spool.
• The string is tangled in the spool.
• The string has not been liberated from the
spool grooves.
• The extension cable is not well connected.
• The power circuit breaker blew.
• You are cutting grass too high from the ground
level on.
The cutting string is
not advancing when
release and press the
switch trigger.
The motor will not
start.
Grass gets tangled
around the lower
spindle and the
cutting head.
• Lubricate the cutting head with a
aerosol silicon lubricant.
• Set new string in the spool (see page 7).
• Turn off the trimmer and wind again the string
onto the spool (see page 7).
• Turn off the trimmer and pull both cutting
strings ends to release them.
• Connect the extension cable correctly.
• Check the power circuit breaker .
• Cut grass gradually as explained in page 8.
Problem Cause Solution
ENGLISH
Maintenance

11
ENGLISH
Authorized Service Centers
In the event of any problem contacting a Authorized Service Center, please see our webpage
www.truper.com to get an updated list, or call our toll-free numbers 800 690-6990 or 800 0187-8737 to get
information about the nearest Service Center.
AGUASCALIENTES
BAJA
CALIFORNIA
BAJA
CALIFORNIA SUR
CAMPECHE
CHIAPAS
CHIHUAHUA
MEXICO CITY
COAHUILA
COLIMA
DURANGO
ESTADO DE
MÉXICO
GUANAJUATO
GUERRERO
HIDALGO
JALISCO
MICHOACÁN
DE TODO PARA LA CONSTRUCCIÓN
GRAL. BARRAGÁN #1201, COL. GREMIAL, C.P. 20030,
AGUASCALIENTES, AGS. TEL.: 449 994 0537
SUCURSAL TIJUANA
AV. LA ENCANTADA, LOTE #5, PARQUE INDUSTRIAL EL
FLORIDO II, C.P 22244, TIJUANA, B.C.
TEL.: 664 969 5100
FIX FERRETERÍAS
FELIPE ÁNGELES ESQ. RUIZ CORTÍNEZ S/N, COL. PUEBLO
NUEVO, C.P. 23670, CD. CONSTITUCIÓN, B.C.S.
TEL.: 613 132 1115
TORNILLERÍA Y FERRETERÍA AAA
AV. ÁLVARO OBREGÓN #324, COL. ESPERANZA
C.P. 24080 CAMPECHE, CAMP. TEL.: 981 815 2808
FIX FERRETERÍAS
AV. CENTRAL SUR #27, COL. CENTRO, C.P. 30700,
TAPACHULA, CHIS. TEL.: 962 118 4083
SUCURSAL CHIHUAHUA
AV. SILVESTRE TERRAZAS #128-11, PARQUE INDUSTRIAL
BAFAR, CARRETERA MÉXICO CUAUHTÉMOC, C.P. 31415,
CHIHUAHUA, CHIH. TEL. 614 434 0052
FIX FERRETERÍAS
EL MONSTRUO DE CORREGIDORA, CORREGIDORA # 22,
COL. CENTRO, C.P. 06060, CUAUHTÉMOC, CDMX.
TEL: 55 5522 5031 / 5522 4861
SUCURSAL TORREÓN
CALLE METAL MECÁNICA #280, PARQUE INDUSTRIAL
ORIENTE, C.P. 27278, TORREÓN, COAH.
TEL.: 871 209 68 23
BOMBAS Y MOTORES BYMTESA DE MANZANILLO
BLVD. MIGUEL DE LA MADRID #190, COL. 16 DE
SEPTIEMBRE, C.P. 28239, MANZANILLO, COL.
TEL.: 314 332 1986 / 332 8013
TORNILLOS ÁGUILA, S.A. DE C.V.
MAZURIO #200, COL. LUIS ECHEVERRÍA, DURANGO,
DGO.TEL.: 618 817 1946 / 618 818 2844
SUCURSAL CENTRO JILOTEPEC
AV. PARQUE INDUSTRIAL #1-A, C.P. 54240, JILOTEPEC,
EDO. DE MÉX. TEL: 761 782 9101 EXT. 5728 Y 5102
CÍA. FERRETERA NUEVO MUNDO S.A. DE C.V.
AV. MÉXICO - JAPÓN #225, CD. INDUSTRIAL, C.P. 38010,
CELAYA, GTO. TEL.: 461 617 7578 / 79 / 80 / 88
CENTRO DE SERVICIO ECLIPSE
CALLE PRINCIPAL MZ.1 LT. 1, COL. SANTA FE, C.P. 39010,
CHILPANCINGO, GRO. TEL.: 747 478 5793
FERREPRECIOS S.A. DE C.V.
LIBERTAD ORIENTE #304 LOCAL 30, INTERIOR DE PASAJE
ROBLEDO, COL. CENTRO, C.P. 43600, TULANCINGO,
HGO. TEL.: 775 753 6615 / 775 753 6616
SUCURSAL GUADALAJARA
AV. ADOLFO B. HORN # 6800, COL: SANTA CRUZ DEL
VALLE, C.P.: 45655, TLAJOMULCO DE ZUÑIGA, JAL.
TEL.: 33 3606 5285 AL 90
FIX FERRETERÍAS
AV. PASEO DE LA REPÚBLICA #3140-A, COL.
EX-HACIENDA DE LA HUERTA, C.P. 58050, MORELIA,
MICH. TEL.: 443 334 6858
FIX FERRETERÍAS
CAPITÁN ANZURES #95, ESQ. JOSÉ PERDIZ, COL.
CENTRO, C.P. 62740, CUAUTLA, MOR.
TEL.: 735 352 8931
HERRAMIENTAS DE TEPIC
MAZATLAN #117, COL. CENTRO, C.P. 63000, TEPIC, NAY.
TEL.: 311 258 0540
SUCURSAL MONTERREY
CARRETERA LAREDO #300, 1B MONTERREY PARKS,
COLONIA PUERTA DE ANÁHUAC, C.P. 66052, ESCOBEDO,
NUEVO LEÓN, TEL.: 81 8352 8791 / 81 8352 8790
FIX FERRETERÍAS
AV. 20 DE NOVIEMBRE #910, COL. CENTRO, C.P. 68300,
TUXTEPEC, OAX. TEL.: 287 106 3092
SUCURSAL PUEBLA
AV PERIFÉRICO #2-A, SAN LORENZO ALMECATLA,
C.P. 72710, CUAUTLACINGO, PUE.
TEL.: 222 282 8282 / 84 / 85 / 86
ARU HERRAMIENTAS S.A DE C.V.
AV. PUERTO DE VERACRUZ #110, COL. RANCHO DE
ENMEDIO, C.P. 76842, SAN JUAN DEL RÍO, QRO.
TEL.: 427 268 4544
FIX FERRETERÍAS
CARRETERA FEDERAL MZ. 46 LT. 3 LOCAL 2, COL EJIDAL,
C.P. 77710 PLAYA DEL CARMEN, Q.R.
TEL.: 984 267 3140
FIX FERRETERÍAS
AV. UNIVERSIDAD #1850, COL. EL PASEO, C.P. 78320,
SAN LUIS POTOSÍ, S.L.P. TEL.: 444 822 4341
SUCURSAL CULIACÁN
AV. JESÚS KUMATE SUR #4301, COL. HACIENDA DE LA
MORA, C.P. 80143, CULIACÁN, SIN.
TEL.: 667 173 9139 / 173 8400
FIX FERRETERÍAS
CALLE 5 DE FEBRERO #517, SUR LT. 25 MZ. 10, COL.
CENTRO, C.P. 85000, CD. OBREGÓN, SON.
TEL.: 644 413 2392
SUCURSAL VILLAHERMOSA
CALLE HELIO LOTES 1, 2 Y 3 MZ. #1, COL. INDUSTRIAL,
2A ETAPA, C.P. 86010, VILLAHERMOSA, TAB.
TEL.: 993 353 7244
VM ORINGS Y REFACCIONES
CALLE ROSITA #527 ENTRE 20 DE NOVIEMBRE Y GRAL.
RODRÍGUEZ, FRACC. REYNOSA, C.P. 88780, REYNOSA,
TAMS. TEL.: 899 926 7552
SERVICIOS Y HERRAMIENTAS INDUSTRIALES
PABLO SIDAR #132, COL . BARRIO DE SAN BARTOLOMÉ,
C.P. 90970, SAN PABLO DEL MONTE, TLAX.
TEL.: 222 271 7502
LA CASA DISTRIBUIDORA TRUPER
BLVD. PRIMAVERA. ESQ. HORTENSIA S/N, COL.
PRIMAVERA C.P. 93308, POZA RICA, VER.
TEL.: 782 823 8100 / 826 8484
SUCURSAL MÉRIDA
CALLE 33 #600 Y 602, LOCALIDAD ITZINCAB Y MULSAY,
MPIO. UMÁN, C.P. 97390, MÉRIDA, YUC.
TEL.: 999 912 2451
MORELOS
NAYARIT
NUEVO LEÓN
OAXACA
PUEBLA
QUERÉTARO
QUINTANA ROO
SAN LUIS
POTOSÍ
SINALOA
SONORA
TABASCO
TAMAULIPAS
TLAXCALA
VERACRUZ
YUCATÁN

12 ENGLISH
2
YEARS
www.truper.com
12-2020
101263
Warranty
policy
Stamp of the business. Delivery date:
Code
DES-550
Model Brand
This product is guaranteed for 2 years. To make the warranty valid or purchase parts and components you
must present the product in Corregidora 22, Col. Centro, Alc. Cuauhtémoc, CDMX C.P. 06060 or at the
establishment where you purchased it, or at any Truper®Service Center listed in the annex to the warranty
policy and/or in www.truper.com . Transportation costs resulting from compliance of this warranty will be
covered by
For questions or comments, call 800-690-6990. Made in China. Imported by Truper S.A. de C.V. Parque
Industrial 1, Jilotepec, Edo. de Méx. C.P. 54240

12 ESPAÑOL
2
AÑOS
101263
Póliza de
Garantía
Sello del establecimiento comercial. Fecha de entrega:
Código
DES-550
Modelo Marca
Este producto está garantizado por 2 años. Para hacer válida la garantía o adquirir piezas y componentes deberá
presentar el producto en Corregidora 22, Col. Centro, Alc. Cuauhtémoc, CDMX C.P. 06060 o en el
establecimiento donde lo compró, o en algún Centro de Servicio Truper®de los enlistados en el anexo de la
póliza de garantía y/o en www.truper.com . Los gastos de transportación que resulten para su cumplimiento
serán cubiertos por
Para dudas o comentarios, llame al 800-690-6990. Hecho en China. Importado por Truper S.A. de C.V. Parque
Industrial 1, Jilotepec, Edo. de Méx. C.P. 54240
www.truper.com
12-2020

11
Centros de Servicio Autorizados
ESPAÑOL
En caso de tener algún problema para contactar un Centro de Servicio Autorizado
consulte nuestra página www.truper.com donde obtendrá un listado actualizado, o llame al:
800 690-6990 ó800 0187-8737 donde le informarán cuál es el Centro de Servicio más cercano.
AGUASCALIENTES
BAJA
CALIFORNIA
BAJA
CALIFORNIA SUR
CAMPECHE
CHIAPAS
CHIHUAHUA
CIUDAD DE
MÉXICO
COAHUILA
COLIMA
DURANGO
ESTADO DE
MÉXICO
GUANAJUATO
GUERRERO
HIDALGO
JALISCO
MICHOACÁN
MORELOS
NAYARIT
NUEVO LEÓN
OAXACA
PUEBLA
QUERÉTARO
QUINTANA ROO
SAN LUIS
POTOSÍ
SINALOA
SONORA
TABASCO
TAMAULIPAS
TLAXCALA
VERACRUZ
YUCATÁN
DE TODO PARA LA CONSTRUCCIÓN
GRAL. BARRAGÁN #1201, COL. GREMIAL, C.P. 20030,
AGUASCALIENTES, AGS. TEL.: 449 994 0537
SUCURSAL TIJUANA
AV. LA ENCANTADA, LOTE #5, PARQUE INDUSTRIAL EL
FLORIDO II, C.P 22244, TIJUANA, B.C.
TEL.: 664 969 5100
FIX FERRETERÍAS
FELIPE ÁNGELES ESQ. RUIZ CORTÍNEZ S/N, COL. PUEBLO
NUEVO, C.P. 23670, CD. CONSTITUCIÓN, B.C.S.
TEL.: 613 132 1115
TORNILLERÍA Y FERRETERÍA AAA
AV. ÁLVARO OBREGÓN #324, COL. ESPERANZA
C.P. 24080 CAMPECHE, CAMP. TEL.: 981 815 2808
FIX FERRETERÍAS
AV. CENTRAL SUR #27, COL. CENTRO, C.P. 30700,
TAPACHULA, CHIS. TEL.: 962 118 4083
SUCURSAL CHIHUAHUA
AV. SILVESTRE TERRAZAS #128-11, PARQUE INDUSTRIAL
BAFAR, CARRETERA MÉXICO CUAUHTÉMOC, C.P. 31415,
CHIHUAHUA, CHIH. TEL. 614 434 0052
FIX FERRETERÍAS
EL MONSTRUO DE CORREGIDORA, CORREGIDORA # 22,
COL. CENTRO, C.P. 06060, CUAUHTÉMOC, CDMX.
TEL: 55 5522 5031 / 5522 4861
SUCURSAL TORREÓN
CALLE METAL MECÁNICA #280, PARQUE INDUSTRIAL
ORIENTE, C.P. 27278, TORREÓN, COAH.
TEL.: 871 209 68 23
BOMBAS Y MOTORES BYMTESA DE MANZANILLO
BLVD. MIGUEL DE LA MADRID #190, COL. 16 DE
SEPTIEMBRE, C.P. 28239, MANZANILLO, COL.
TEL.: 314 332 1986 / 332 8013
TORNILLOS ÁGUILA, S.A. DE C.V.
MAZURIO #200, COL. LUIS ECHEVERRÍA, DURANGO,
DGO.TEL.: 618 817 1946 / 618 818 2844
SUCURSAL CENTRO JILOTEPEC
AV. PARQUE INDUSTRIAL #1-A, C.P. 54240, JILOTEPEC,
EDO. DE MÉX. TEL: 761 782 9101 EXT. 5728 Y 5102
CÍA. FERRETERA NUEVO MUNDO S.A. DE C.V.
AV. MÉXICO - JAPÓN #225, CD. INDUSTRIAL, C.P. 38010,
CELAYA, GTO. TEL.: 461 617 7578 / 79 / 80 / 88
CENTRO DE SERVICIO ECLIPSE
CALLE PRINCIPAL MZ.1 LT. 1, COL. SANTA FE, C.P. 39010,
CHILPANCINGO, GRO. TEL.: 747 478 5793
FERREPRECIOS S.A. DE C.V.
LIBERTAD ORIENTE #304 LOCAL 30, INTERIOR DE PASAJE
ROBLEDO, COL. CENTRO, C.P. 43600, TULANCINGO,
HGO. TEL.: 775 753 6615 / 775 753 6616
SUCURSAL GUADALAJARA
AV. ADOLFO B. HORN # 6800, COL: SANTA CRUZ DEL
VALLE, C.P.: 45655, TLAJOMULCO DE ZUÑIGA, JAL.
TEL.: 33 3606 5285 AL 90
FIX FERRETERÍAS
AV. PASEO DE LA REPÚBLICA #3140-A, COL.
EX-HACIENDA DE LA HUERTA, C.P. 58050, MORELIA,
MICH. TEL.: 443 334 6858
FIX FERRETERÍAS
CAPITÁN ANZURES #95, ESQ. JOSÉ PERDIZ, COL.
CENTRO, C.P. 62740, CUAUTLA, MOR.
TEL.: 735 352 8931
HERRAMIENTAS DE TEPIC
MAZATLAN #117, COL. CENTRO, C.P. 63000, TEPIC, NAY.
TEL.: 311 258 0540
SUCURSAL MONTERREY
CARRETERA LAREDO #300, 1B MONTERREY PARKS,
COLONIA PUERTA DE ANÁHUAC, C.P. 66052, ESCOBEDO,
NUEVO LEÓN, TEL.: 81 8352 8791 / 81 8352 8790
FIX FERRETERÍAS
AV. 20 DE NOVIEMBRE #910, COL. CENTRO, C.P. 68300,
TUXTEPEC, OAX. TEL.: 287 106 3092
SUCURSAL PUEBLA
AV PERIFÉRICO #2-A, SAN LORENZO ALMECATLA,
C.P. 72710, CUAUTLACINGO, PUE.
TEL.: 222 282 8282 / 84 / 85 / 86
ARU HERRAMIENTAS S.A DE C.V.
AV. PUERTO DE VERACRUZ #110, COL. RANCHO DE
ENMEDIO, C.P. 76842, SAN JUAN DEL RÍO, QRO.
TEL.: 427 268 4544
FIX FERRETERÍAS
CARRETERA FEDERAL MZ. 46 LT. 3 LOCAL 2, COL EJIDAL,
C.P. 77710 PLAYA DEL CARMEN, Q.R.
TEL.: 984 267 3140
FIX FERRETERÍAS
AV. UNIVERSIDAD #1850, COL. EL PASEO, C.P. 78320,
SAN LUIS POTOSÍ, S.L.P. TEL.: 444 822 4341
SUCURSAL CULIACÁN
AV. JESÚS KUMATE SUR #4301, COL. HACIENDA DE LA
MORA, C.P. 80143, CULIACÁN, SIN.
TEL.: 667 173 9139 / 173 8400
FIX FERRETERÍAS
CALLE 5 DE FEBRERO #517, SUR LT. 25 MZ. 10, COL.
CENTRO, C.P. 85000, CD. OBREGÓN, SON.
TEL.: 644 413 2392
SUCURSAL VILLAHERMOSA
CALLE HELIO LOTES 1, 2 Y 3 MZ. #1, COL. INDUSTRIAL,
2A ETAPA, C.P. 86010, VILLAHERMOSA, TAB.
TEL.: 993 353 7244
VM ORINGS Y REFACCIONES
CALLE ROSITA #527 ENTRE 20 DE NOVIEMBRE Y GRAL.
RODRÍGUEZ, FRACC. REYNOSA, C.P. 88780, REYNOSA,
TAMS. TEL.: 899 926 7552
SERVICIOS Y HERRAMIENTAS INDUSTRIALES
PABLO SIDAR #132, COL . BARRIO DE SAN BARTOLOMÉ,
C.P. 90970, SAN PABLO DEL MONTE, TLAX.
TEL.: 222 271 7502
LA CASA DISTRIBUIDORA TRUPER
BLVD. PRIMAVERA. ESQ. HORTENSIA S/N, COL.
PRIMAVERA C.P. 93308, POZA RICA, VER.
TEL.: 782 823 8100 / 826 8484
SUCURSAL MÉRIDA
CALLE 33 #600 Y 602, LOCALIDAD ITZINCAB Y MULSAY,
MPIO. UMÁN, C.P. 97390, MÉRIDA, YUC.
TEL.: 999 912 2451

10
Mantenimiento
Solución de problemas
Limpieza
• Limpiar la desbrozadora después de cada uso la
mantendrán en óptimas condiciones y prolongará su
vida útil.
• Para la limpieza utilice un trapo humedecido con agua
caliente y un cepillo suave.
• Después de cada uso desmonte todas las partes de la
herramienta y retire de ellas todas las partículas de pasto
y tierra adheridas. Ponga especial atención al carrete del
hilo de corte y sus ranuras, así como la guarda.
• Limpie perfectamente las ranuras de ventilación de la
desbrozadora para dejarlas libres de cualquier
obstrucción de pasto o tierra.
• Los carbones deben revisarse periódicamente, y ser
reemplazados siempre por un Centro de Servicio
Autorizado cuando se hayan
desgastado. Después de que hayan sido reemplazados,
pida que se inspeccione si los nuevos carbones pueden
moverse libremente en el porta-carbón y solicite que
enciendan la herramienta durante 5 minutos para
emparejar el contacto de los carbones y el conmutador.
• Sólo se deben de usar carbones de repuesto originales,
diseñados específicamente con la
dureza y la resistencia eléctrica adecuadas para cada tipo
de motor. Los carbones fuera de especificaciones pueden
dañar el motor.
Cuando se haga el cambio de carbones siempre deben
reemplazarse los dos carbones.
Cambio de carbones
• Cualquier reparación o mantenimiento debe ser
realizado únicamente en un Centro de Servicio
Autorizado .
Servicio
• El material de desecho de la herramienta como
empaques, piezas dañadas o la herramienta en sí
después de haber cumplido con su vida útil, no deben de
ser manejados como basura. Deben de ser llevados a un
centro de reciclaje para ser tratados de forma adecuada
respetando todas las normas ambientales.
Protección ambiental
Almacenaje
• Limpie la herramienta antes de guardarla para evitar
enmohecimiento.
• Almacene la desbrozadora en un lugar seco y templado,
lejos de la luz del sol (de preferencia un lugar oscuro) y
fuera del alcance de los niños.
• Evite almacenar la desbrozadora en bolsas de plástico,
de lo contrario la humedad generada podría estropearla.
• Evite almacenar la desbrozadora con la guarda apoyada
en el piso, pues ésta podría deformarse. La desbrozadora
debe almacenarse colgada del mango superior de
manera que la guarda no toque el piso.
• El hilo se pegó entre sí.
• No hay hilo suficiente en el carrete.
• El hilo está enredado en el carrete.
• El hilo no ha sido liberado de las muescas del
carrete.
• La extensión no está debidamente conectada.
• Se disparó un disyuntor del circuito casero.
• Está cortando pasto demasiado alto al nivel del
suelo.
El hilo de corte no
avanza al soltar y
apretar el gatillo
interruptor.
El motor no arranca.
El pasto se enrolla
alrededor del eje
inferior y del cabezal
de corte.
• Lubrique el cabezal de corte con lubricador de
silicón en aerosol.
• Coloque hilo nuevo en el carrete (consulte la
página 7).
• Apague la desbrozadora y enrede de nuevo el
hilo en el carrete (consulte la página 7).
• Apague la desbrozadora y jale los extremos de
ambos hilos de corte para liberarlos.
• Conecte correctamente la extensión.
• Revise el disyuntor del circuito.
• Corte el pasto alto de manera gradual como se
explica en la página 8.
Problema Causa Solución
ESPAÑOL

Movimiento
de corte
Rotación de
la cintura
9
Puesta en marcha
B
Recorte de bordes
• Para recortar bordes de césped al inicio de banquetas
o veredas es necesario girar 180° el cabezal de la
desbrozadora y utilizar la guía para recortar bordes.
• Jale hacia el mango la perilla de ajuste (B), para liberar
el brazo telescópico y así poder girarlo.
• Realice el corte como se muestra en la imagen.
Operación
• Recuerde que usted como operador de la desbrozadora es responsable de su seguridad, así como de
quienes se encuentren cerca del área de trabajo. Siga todas las normas de seguridad (páginas 4 y 5) antes, durante y
después de operar la herramienta.
• Mantenga una postura equilibrada con ambos pies
apoyados firmemente en el piso.
• Sostenga la desbrozadora con firmeza frente a usted con
la mano derecha en el mango a la altura de la cadera y la
izquierda en el mango auxiliar de manera que la
herramienta quede alineada a su cuerpo y apuntando el
cabezal de corte hacia abajo, lejos de sus pies.
• No encienda ni opere la desbrozadora
en cualquier otra posición.
• Encienda la desbrozadora y realice los cortes de
izquierda a derecha rotando su cintura manteniendo la
posición de la herramienta.
• La desbrozadora esta equipada con una
cabeza de auto-alimentación. Golpear la cabeza para tratar
de avanzar el hilo de corte invalidará la garantía de la
desbrozadora.
• Conforme se realice el corte de pasto el hilo de corte se
desgastará y terminará por desprenderse. Para liberar más
hilo del carrete mientras la desbrozadora esté operando
suelte el gatillo del interruptor, espere dos segundos y
oprima el gatillo del interruptor. El hilo de corte se
extiende aproximadamente 6.5 mm (1/4 pulg.) cada vez
que se apaga y enciende el gatillo del interruptor hasta
que el hilo de corte alcanza la longitud de la cuchilla de la
guarda.
• Para cortar maleza o pasto altos hágalo gradualmente,
no intente cortarlo de una sola vez desde la base, pues los
residuos pueden atascar el cabezal de corte o hacerle
perder el control de la desbrozadora.
• Baje el tope retráctil (A) para evitar dañar ramas o
paredes mientras realiza el trabajo de corte.
ATENCIÓN
AVISO
PELIGRO
ESPAÑOL
Banqueta
A
Sección
superior Sección
inferior
8
Carrete del hilo de corte
• Con la desbrozadora apagada y desconectada retire la tapa
de retención del carrete (B) presionando hacia adentro sus
pestañas laterales. Tire de la tapa hacia arriba.
• Retire el carrete vacío, asegúrese de que esté limpio y que
no tenga partes dañadas o gastadas.
• Corte dos piezas de hilo de corte de 2.7 m (8.85´).
• Inserte los extremos de ambas piezas de hilo en los orificios
correspondientes de cada una de las secciones del carrete
(superior e inferior)(C).
• Tome ambos hilos y enrédelos en el sentido que indica la flecha
marcada en el carrete. Asegúrese de que cada pieza de hilo se
enrede en su sección respectiva (superior e inferior). No enrede
demasiado hilo, después de enredarlo debe quedar una
distancia mínima de 6 mm entre el borde del carrete y el hilo
enredado.
• Deje sin enredar aproximadamente 15 cm (6”) de ambos
hilos e inserte el hilo de la sección superior en una de las
muescas de la cubierta del carrete. De media vuelta más al
carrete e inserte el hilo de la sección inferior en la ranura
contraria de la cubierta del carrete.
Esto es con el fin de que el hilo no se desenrede mientras
instala el carrete en la desbrozadora, más adelante deberá
liberar los hilos de sus muescas.
• Coloque de nuevo el carrete en el cabezal de corte (D)
haciendo pasar los extremos de cada hilo por los orificios de la
cubierta. Si el hilo se suelta o enreda en este paso vuelva a
enredarlo en el carrete y asegúrelo en sus muescas.
• Jale hacia afuera y con fuerza ambos
extremos del hilo de corte para liberarlo de las muescas de la
parte superior del carrete.
• En el caso de instalar un carrete nuevo libere las puntas de los
hilos de sus muescas y desenrede 15 cm (6”) de ambos hilos
aproximadamente para volver a asegurarlos en sus muescas
antes de colocar el carrete en su cubierta.
Montaje
Puesta en marcha
C
D
B
B
H
F
G
E
Encendido
• Conecte el extremo de una extensión al enchufe de la desbrozadora (E).
Se recomienda utilizar una extensión ERA-4x14 marca .
• Sujete la extensión a través del sujetador del cable (F).
• Estire perfectamente el cable de extensión y conéctelo a una toma de
corriente que tenga la tensión especificada para la desbrozadora.
• Para encender la desbrozadora libere el seguro del gatillo (G) y después
presione el gatillo interruptor (H). Para apagarla suelte el gatillo interruptor.
ATENCIÓN
ESPAÑOL
Tenga cuidado de no tocar el filo de
la cuchilla para cortar el hilo de corte.
60° para siega de areas abiertas
30° para lugares de difícil acceso
0° para desorillar (ver página 8)
7
Montaje
Guarda
• Para montar y desmontar la guarda apriete o afloje los
cuatro tornillos (A) por la parte inferior de la guarda.
• Operar su equipo sin la guarda
incrementa el riesgo de accidente y puede ocasionar que
la máquina se dañe.
• Apague y desconecte la desbrozado-
ra antes de montar o desmontar la guarda.
Ajuste del mango auxiliar
• El ángulo y altura del mango auxiliar (D) pueden ser
ajustados.
• Afloje la perilla (G) para colocar el mango en la posición
deseada.
• Apriete la perilla para bloquear la posición del mango.
Ajuste de inclinación del cabezal
• Presione el pedal (H) e incline el cabezal a la posición
más conveniente para el trabajo a realizar.
Guía para recortar bordes
Ajuste del brazo telescópico
• Para montar y desmontar la guía para
recortar bordes apriete o afloje los dos
tornillos (B) por la parte inferior de la guarda.
• Apague y desconecte
la desbrozadora antes de montar o
desmontar la guía.
• Con la desbrozadora desconectada afloje la perilla
de ajuste (C) girándola en la dirección del candado
abierto ( ).
• Extienda o retraiga el brazo a la posición deseada.
• Apriete la perilla de ajuste girándola en la dirección
del candado bloqueado ( ).
B
A
D
G
C
ESPAÑOL
ATENCIÓN
ATENCIÓN
ATENCIÓN
H

Sujetador
del cable
Cabezal
de corte
Hilo de
corte
Brazo
telescópico
Perilla de ajuste
del brazo telescópico
Gatillo
Interruptor
Seguro del
Interruptor
Mango
Mango
auxiliar
Cabezal de la
desbrozadora
Guía para
recortar
bordes
Guarda
Tope
retráctil
Pedal de ajuste
del ángulo del
cabezal
Enchufe
para extensión
Ranuras de
ventilación
6
Partes
ESPAÑOL
Alerta de seguridad.
Etiqueta de alertas de Seguridad
Lea el instructivo de uso antes de operar
la máquina.
Use protección auditiva.
Use lentes de seguridad.
No se deje al alcance de los niños.
No se exponga a la humedad.
Despejar el área donde vaya a cortarse
el césped de objetos que puedan salir
lanzados. Se deben mantener alejados
del área de corte a personas y animales.
En caso de dañarse el cable de
alimentación desconecte
inmediatamente la clavija.

5
Advertencias de Seguridad
para uso de desbrozadoras eléctricas
ESPAÑOL
ATENCIÓN
Antes de utilizar la desbrozadora
• Se recomienda que la desbrozadora
este conectada por medio de un dispositivo de corriente
residual (RCD) con una corriente de corte no mayor
que 30 mA.
• Lea las instrucciones cuidadosamente. Familiarícese con
los controles y el uso apropiado del equipo.
• Mantenga el cordón flexible adicional alejado de los
elementos de corte.
• Utilice protección para los ojos.
• Nunca permita que los niños o personas no
familiarizadas con el aparato lo utilicen.
• Evite el uso del aparato, mientras exista gente alrededor,
especialmente niños o mascotas.
• Utilice el aparato únicamente a la luz del día o cuando
exista una buena iluminación.
• Nunca opere el aparato con alguna guarda o protección
dañada, o sin guardas y protecciones en su lugar.
•Encienda el motor solo cuando las manos y los pies se
encuentren alejados de los elementos de corte.
• Nunca ensamble elementos de corte de metal.
• Utilice solamente las partes y accesorios de reemplazo
recomendados por el fabricante.
• Siempre desconecte el aparato de la alimentación
cuando no se utilice.
• Desconecte el aparato de la alimentación antes de llevar
a cabo el mantenimiento o limpieza.
• Inspeccione y brinde regularmente un mantenimiento al
aparato. El equipo solo debe repararse en un centro de
servicio autorizado.
• Tenga cuidado de no lastimarse con las navajas que
sirven para ajustar la longitud de los filamentos. Después
de colocar un nuevo filamento de corte, vuelva a colocar
el aparato a su posición normal de uso antes de
encenderlo nuevamente.
• Asegúrese siempre de que los orificios de ventilación
estén libre de residuos.
• Cuando no utilice el aparato manténgalo lejos de
alcance de los infantes.
• Inspeccione detenidamente el área que se va a recortar
para evitar cualquier obstáculo y retirar objetos extraños
que puedan ser lanzados por la desbrozadora. De lo
contrario puede provocar un accidente y reducir la vida
útil de la herramienta.
• El área que se va a recortar debe de
estar perfectamente iluminada.
• Asegúrese de que la desbrozadora
cuenta con todas sus partes en óptimo estado y tenga la
guarda del hilo de corte debidamente colocada. Revise
que las ranuras de ventilación estén libres de desechos.
No use la desbrozadora si la guarda está dañada o no
cuenta con todas sus partes.
• Utilice únicamente hilo de nailon
original, y por ningún motivo reemplazarlo por hilo de
metal.
• Para mejores resultados se recomienda utilizar sólo
reemplazos de hilo originales tales como: HTA-65B,
HIDE-65P,HTA-65 y HDU-15-65 marca Truper®.
• Recuerde que esta herramienta está diseñada para
cortar césped como se indica en este instructivo. De
ninguna manera se debe emplear para cualquier otro
propósito.
• Para evitar descargas eléctricas
evite realizar trabajos en ambientes húmedos, mientras
llueva y/o cortar césped con rocío.
Después de utilizar la desbrozadora
• Los elementos de corte
continúan girando después de apagar el motor.
• No intente detener el movimiento giratorio del hilo de
corte de ninguna otra forma que soltando el interruptor.
Espere a que el carrete se detenga por sí mismo después
de apagar la desbrozadora, esto demorará unos cuantos
segundos.
ADVERTENCIA
Mientras utiliza la desbrozadora
• No utilice la desbrozadora cerca de
otras personas, niños o animales.
• Nunca permita que el cabezal
de corte sobrepase los 30 cm de altura y no lo dirija a
personas o animales.
• Utilice la desbrozadora para
cortar únicamente a nivel del piso, por ningún motivo la
utilice para cortar vegetación sobre piedras o paredes.
• No camine por suelos de graba con
la desbrozadora funcionando, el hilo de corte puede
lanzar fragmentos de graba al operador u otras personas
provocando lesiones.
• Mantenga siempre a la vista el cable
de alimentación para evitar dañarlo con el hilo de corte.
• No acerque las manos o los
pies al cabezal de corte mientras la desbrozadora está
funcionando.
• En caso de realizar trabajos cerca de
vías de tránsito suspenda el corte hasta que no haya
vehículos a la vista. Ya que las partículas extrañas que
pueden ser lanzadas por la desbrozadora hacia los
vehículos en movimiento pueden desencadenar un
accidente grave.
ATENCIÓN
ATENCIÓN
ATENCIÓN
ADVERTENCIA
ADVERTENCIA
ADVERTENCIA
PELIGRO
ATENCIÓN
ATENCIÓN
ADVERTENCIA
ADVERTENCIA
This manual suits for next models
1
Table of contents
Other Truper Trimmer manuals

Truper
Truper DES-30C User manual

Truper
Truper DES-26C User manual

Truper
Truper DES-30R User manual

Truper
Truper MAX-40C User manual

Truper
Truper DES-430 User manual

Truper
Truper COS-26X User manual

Truper
Truper MAX-40D User manual

Truper
Truper DES-25R User manual

Truper
Truper DES-330 User manual

Truper
Truper PRETUL DES-25P User manual

Popular Trimmer manuals by other brands


Makita
Makita RST210 instruction manual

IBEA
IBEA 45 - Z owner's manual

Qualcast
Qualcast SHT19 Assembly manual

Husqvarna
Husqvarna 325HDA55X-Series, 325HE3X-Series, 325HE4X-Series,... Operator's manual

Elem Garden Technic
Elem Garden Technic CBE25022-1B22 Original instructions

Greencut
Greencut GHT56LI-ION instruction manual