TrustOne Global TSG-550 User manual

TSG-550/750 Operation / Installation Manual v1.3
1
© 2015 ClockReports.com All rights reserved.
Document 002-120401 Rev.A
TSG-550/750
Fingerprint Identification Reader
Operation & Installation Manual v1.3
TSG-550 TSG-750

TSG-550/750 Operation / Installation Manual v1.3
2
Table of Contents
SECTION 1 – TSG-550/750 Installation Manual
1Power ------------------------------------------------------------------------------- 5
2RS-485 communication ------------------------------------------------------------5
3LAN communication --------------------------------------------------------------- 6
4Sensor connection ----------------------------------------------------------------- 6
5Wiegand output connection ------------------------------------------------------- 7
6External reader connection ------------------------------------------------------- 7
7Lock connection -------------------------------------------------------------------- 8
8Anti-passback ---------------------------------------------------------------------- 8
SECTION 2 – TSG-550 Operation Manual
9-Terminal ID & Network Setup ---------------------------------------------------- 9
10 User Registration ----------------------------------------------------------------- 10
11 User Delete ------------------------------------------------------------------------ 11
12 Temporary User ID Registration ------------------------------------------------- 11
13 Basic Setup ----------------------------------------------------------------------- 11
14 Advanced Setup ------------------------------------------------------------------ 12
15 Schedule -------------------------------------------------------------------------- 12
16 WiFi (Wireless) -------------------------------------------------------------------- 13
17 Event Setup ----------------------------------------------------------------------- 13
18 Access Setup --------------------------------------------------------------------- 14
19 Memory Card --------------------------------------------------------------------- 14
20 Memory Information -------------------------------------------------------------- 15
21 Test -------------------------------------------------------------------------------- 15
22 Voice Communication ------------------------------------------------------------ 16
23 How to use sub sensor --------------------------------------------------------- 16
24 Features of optical and sub sensor ------------------------------------------- 17
25 Product Specification ----------------------------------------------------------- 18
© 2015 ClockReports.com All rights reserved.
Document 002-120401 Rev.A

TSG-550/750 Operation / Installation Manual v1.3
3
SECTION 3 – TSG-750 Operation Manual
27 Terminal ID & Network ------------------------------------------------------------ 19
26 User Registration ----------------------------------------------------------------- 20
27 Temporary User ID Registration ------------------------------------------------- 21
28 User Delete ------------------------------------------------------------------------ 21
29 Data Search ----------------------------------------------------------------------- 22
30 Screen Setup ---------------------------------------------------------------------- 23
31 Advanced Setup ------------------------------------------------------------------ 23
32 Camera Setup --------------------------------------------------------------------- 24
33 Memroy Save --------------------------------------------------------------------- 25
34 Access Setup -------------------------------------------------------------------- 25
35 Operation Mode ------------------------------------------------------------------- 26
36 Schedule -------------------------------------------------------------------------- 27
37 Test -------------------------------------------------------------------------------- 27
38 Memory Information -------------------------------------------------------------- 27
39 How to use Visual Communication ---------------------------------------------- 28
40 How to use sub sensor ----------------------------------------------------------- 28
41 Features of optical sensor and sub sensor ------------------------------------- 29
42 Product Specification ------------------------------------------------------------ 30
© 2015 ClockReports.com All rights reserved.
Document 002-120401 Rev.A
TSG-550/750 Operation / Installation Manual v1.3
4
SECTION 1 – TSG-550/750 Installation Manual
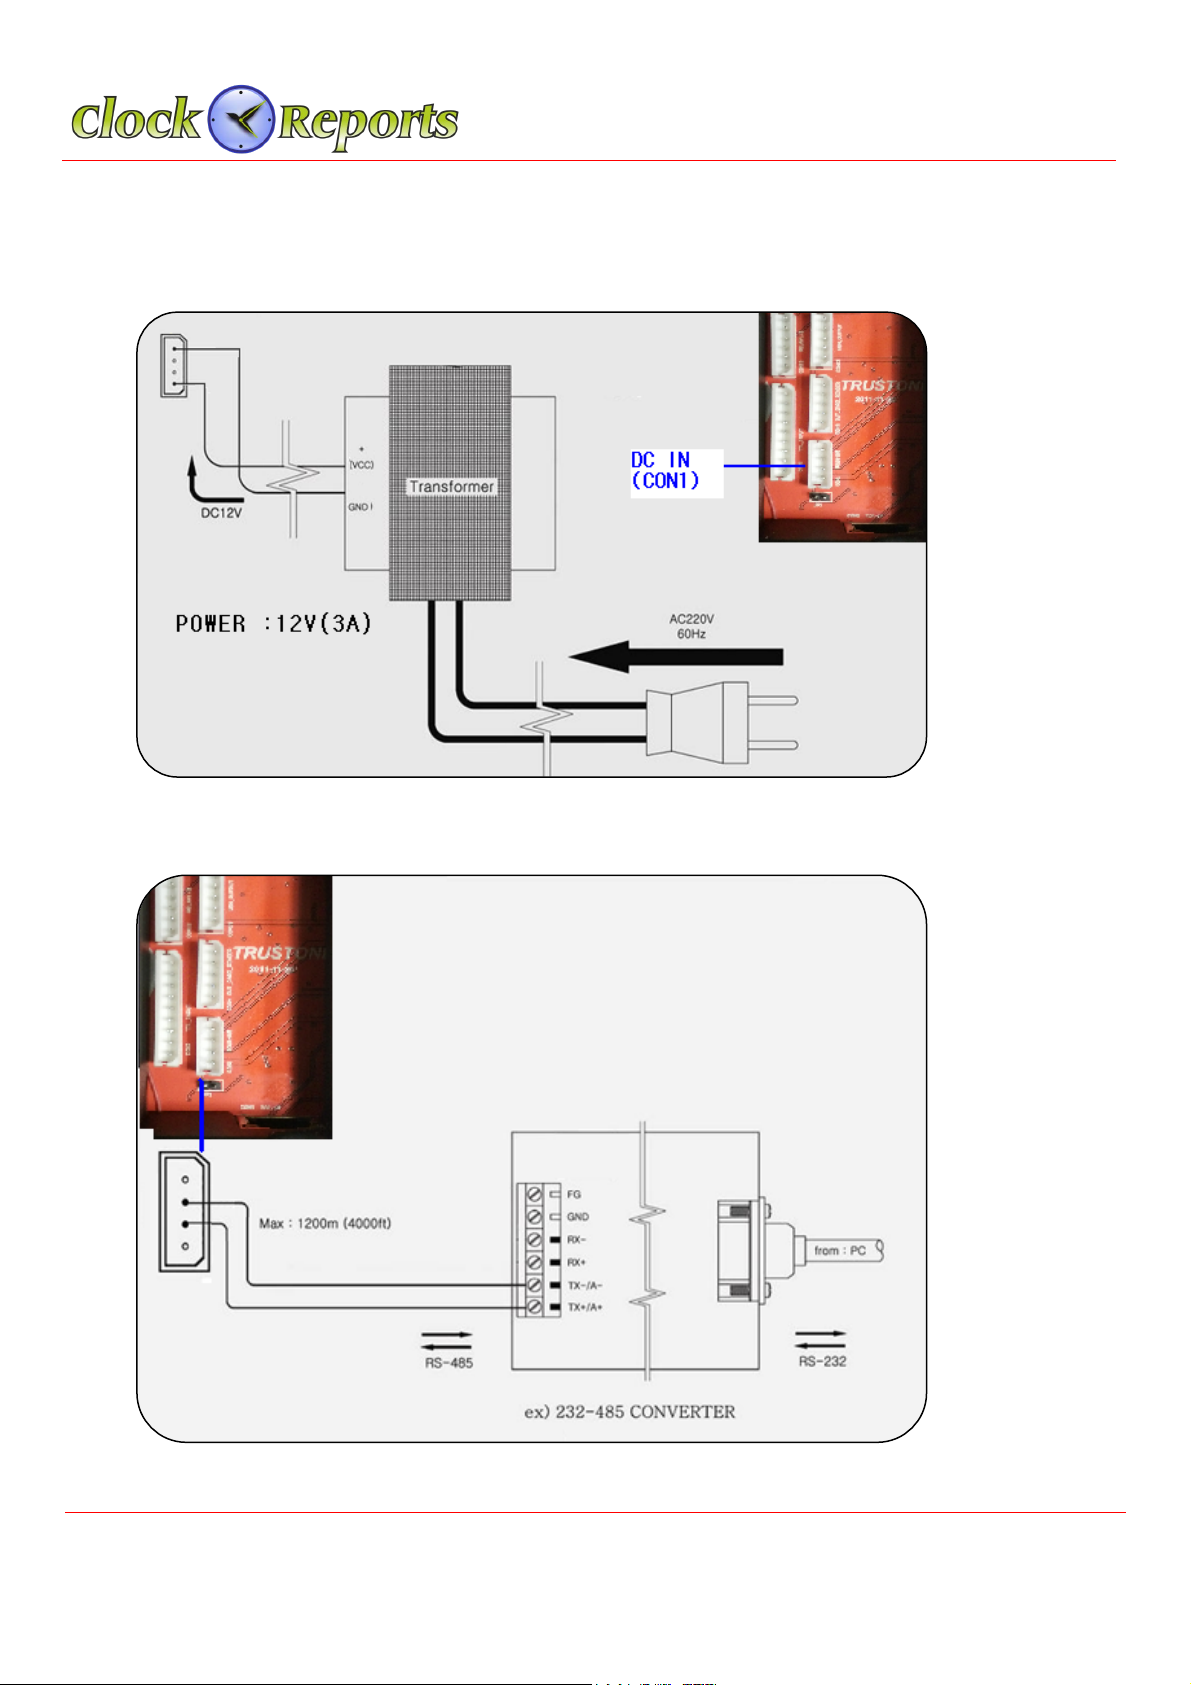
1.
Power can come from a 12V DC transformer or via LAN PoE
2.
RS-485 Connection for old legacy installs
© 2015 ClockReports.com All rights reserved.
Document 002-120401 Rev.A
TSG-550/750 Operation / Installation Manual v1.3
5
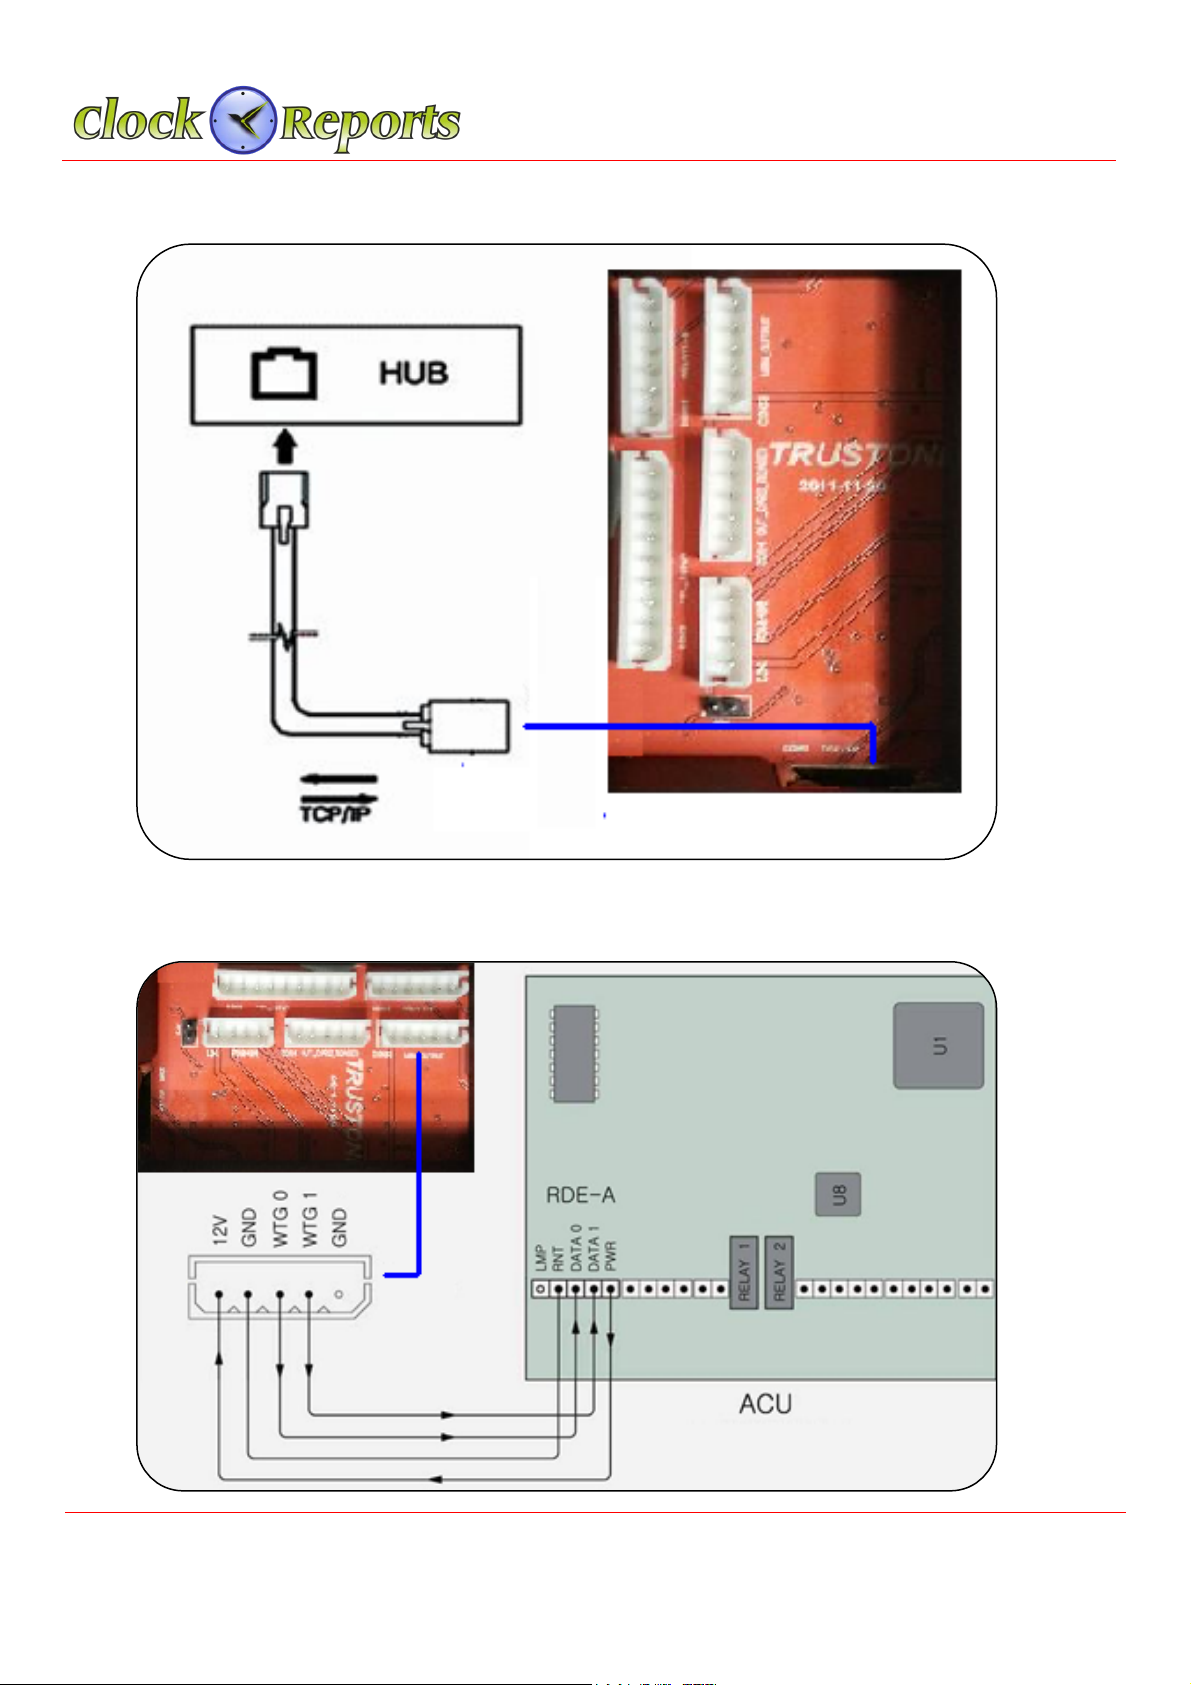
3.
LAN Network Communication
4.
Sensor Connection for Access controller
© 2015 ClockReports.com All rights reserved.
Document 002-120401 Rev.A

TSG-550/750 Operation / Installation Manual v1.3
6
5.
Wiegand Output Connection for Access controllers
6.
External CARD Reader Connection
© 2015 ClockReports.com All rights reserved.
Document 002-120401 Rev.A

TSG-550/750 Operation / Installation Manual v1.3
7
7.
Direct 12Volt Lock Connection
8.
Access Control Anti-passback between two TSG Devices
© 2015 ClockReports.com All rights reserved.
Document 002-120401 Rev.A

TSG-550/750 Operation / Installation Manual v1.3
8
SECTION 2 – TSG-550 Operation Manual
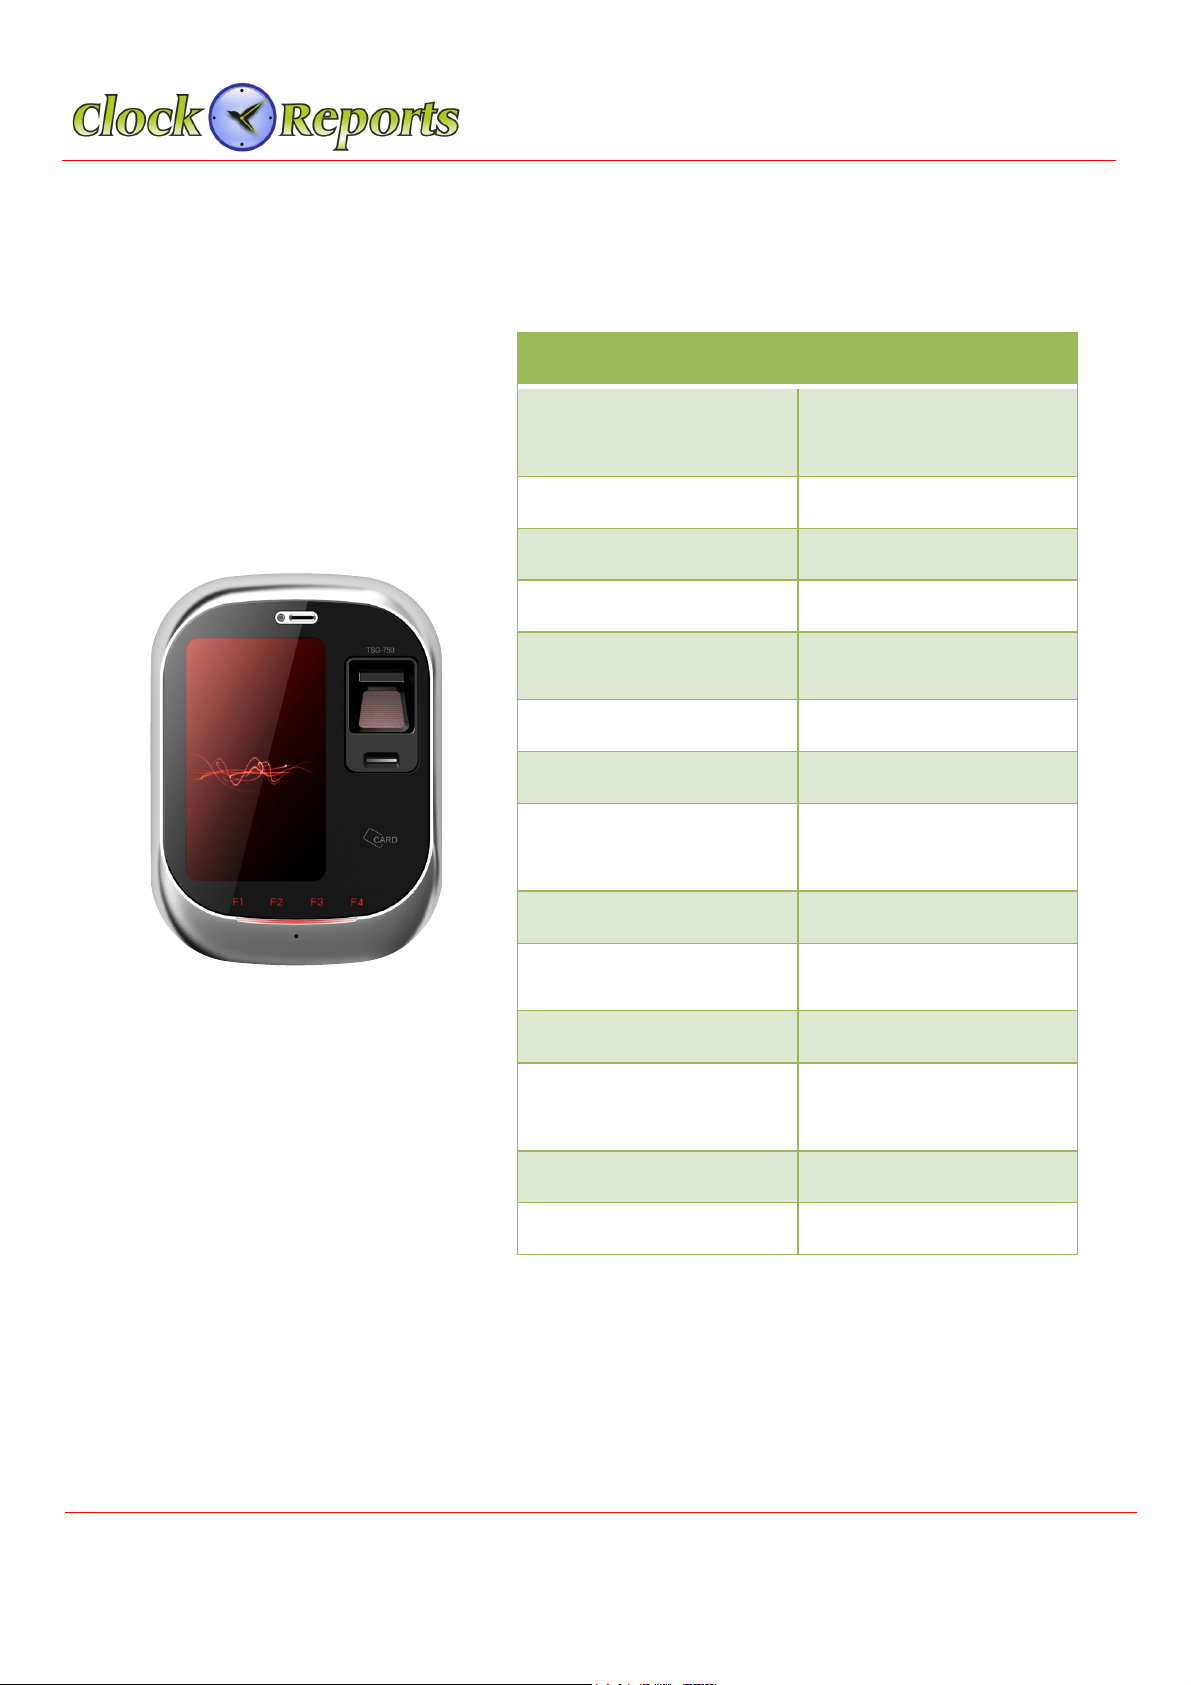
9. Product Specification for TSG-550
Feature
TSG-550
User Capacity
10,000 (Default)
50,000 (Optional)
1:N 10,000 Speed
< 1 Sec
Event Log
500,000
LCD
2.8 Inch TFT
Camera
No
SD Memory
Yes
POE
Yes
Communication
TCP/IP, RS-485
Wi-Fi (Optional)
Spoof Detection
Yes
VoIP
Yes
P2P
Yes
Card
EM, Mifare, HID Prox or
iClass
FAR/FRR
0.00001% / 0.01%
Size (W * H * D)
118 * 163 * 40 Cm
© 2015 ClockReports.com All rights reserved.
Document 002-120401 Rev.A
TSG-550/750 Operation / Installation Manual v1.3
9
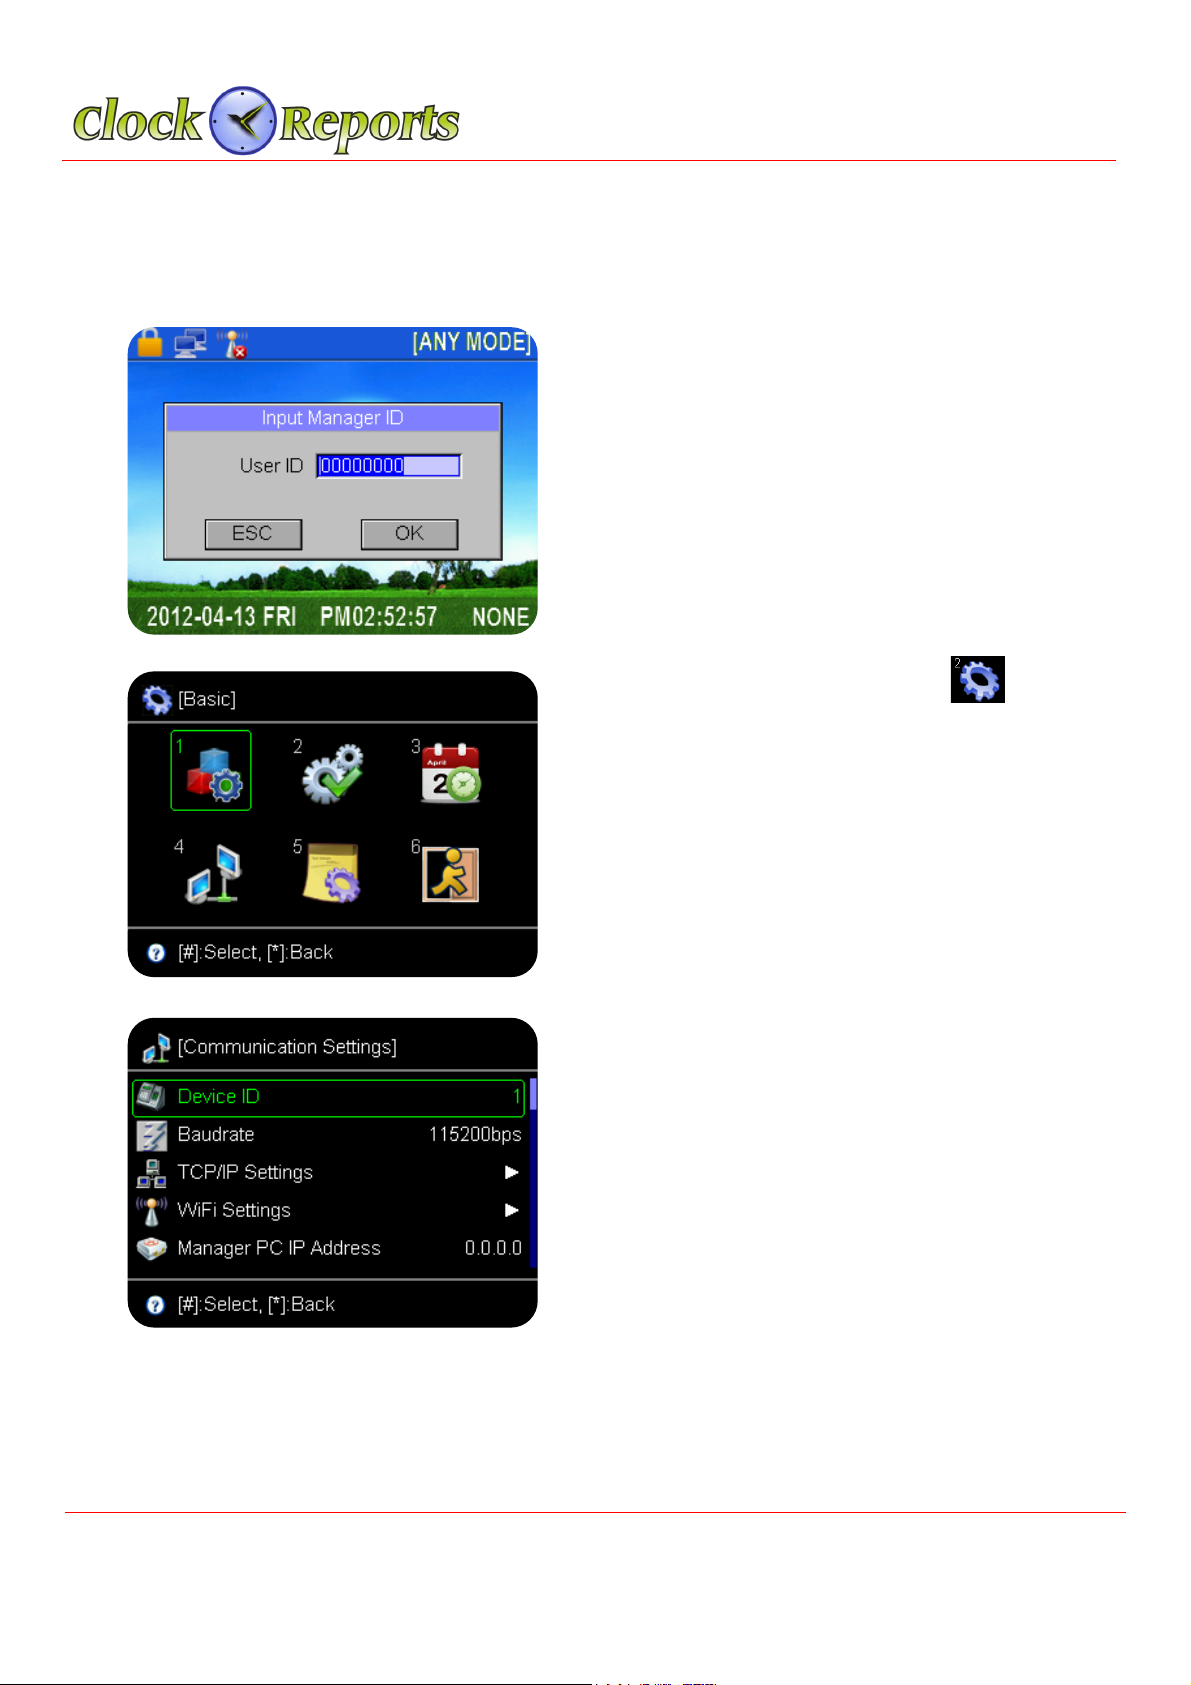
10. Terminal ID and Network Setting
Terminal should have a unique ID in order to communicate with PC.
[Note] If the ID is duplicated, there should be a communication error.
From the main menu, click * button. Input
admin ID, “1 2 3 4”and then press # button.
Press no 2 or F2 button and choose
icon and press # button to get into basic setup
menu.
Press No 4 button or F2 button to go to network
setting icon and then press # button. In the
communication setting, choose the terminal ID
and change the ID number. And using F2
button, go to network setting where IP address
should be changed. Subnet mask/Gateway
address/Port number should be done in the
same way.
© 2015 ClockReports.com All rights reserved.
Document 002-120401 Rev.A

TSG-550/750 Operation / Installation Manual v1.3
10
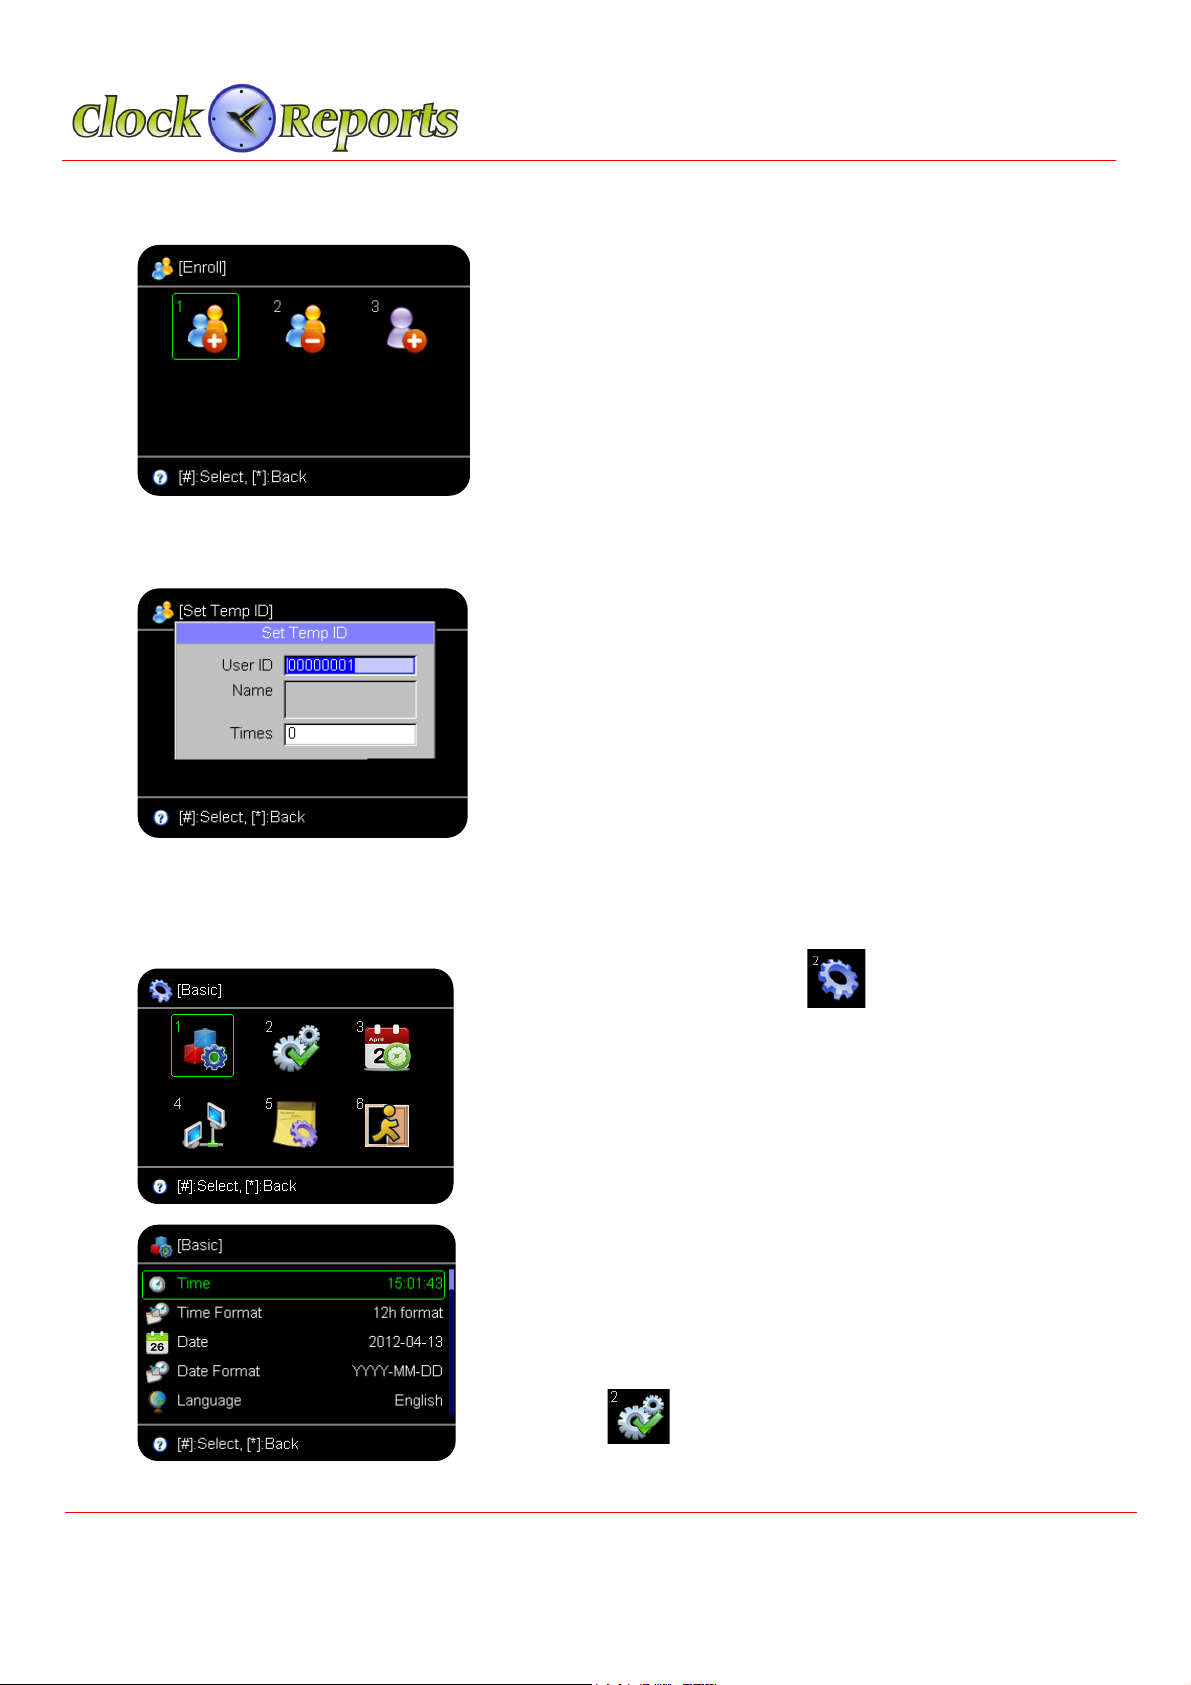
11. User Registration
Input Admin ID number, 1 2 3 4 and press # button.
Click icon to register a user.
There will be a pop up window related to user’s
registration information. Input user ID.
Name should be registered on software Privilege can be
chosen by user or administrator and click # button.
Register a first finger in three times
If want to register second finger, do the same way as the
first finger.
(If want to register on optical sensor, place a finger on
the optical sensor in three times and if want to register
on sub-sensor, swife a finger on the sub-sensor in three
times)
Caution) The sub-sensor works only in 1:1 type, so ID or
Card should be accompanied)
Choose card registration when needed. Wiegand data output is related to card data, so
when connected with ACU, should input card data. Once all registration process is
completed, press * button until the main menu comes back.
© 2015 ClockReports.com All rights reserved.
Document 002-120401 Rev.A
TSG-550/750 Operation / Installation Manual v1.3
11
12. User Delete
Input Admin ID number, 1 2 3 4 and press # button.
Move to No 2 icon to delete a user. Fingerprint/card
data can be deleted and user can also be deleted.
13. Temporary User ID Registration
Temporary ID registration for visitors Input temporary
ID and the number of times and then press # button.
The Temporary ID will be counted as use and it will be
deleted after the count is finished automatically.
14. Basic Setup
From the main menu, choose
press # button. On this menu, press No 1 button.
Use F1 and F2 button to scroll the menu and setup
Time/Date/Language. Press the # button.
Once all registration process is completed, press *
button until the main menu comes back. Input Admin
ID number, 1 2 3 4 and press # and from the basic setup
menu, click icon and press # button.
© 2015 ClockReports.com All rights reserved.
Document 002-120401 Rev.A
TSG-550/750 Operation / Installation Manual v1.3
12
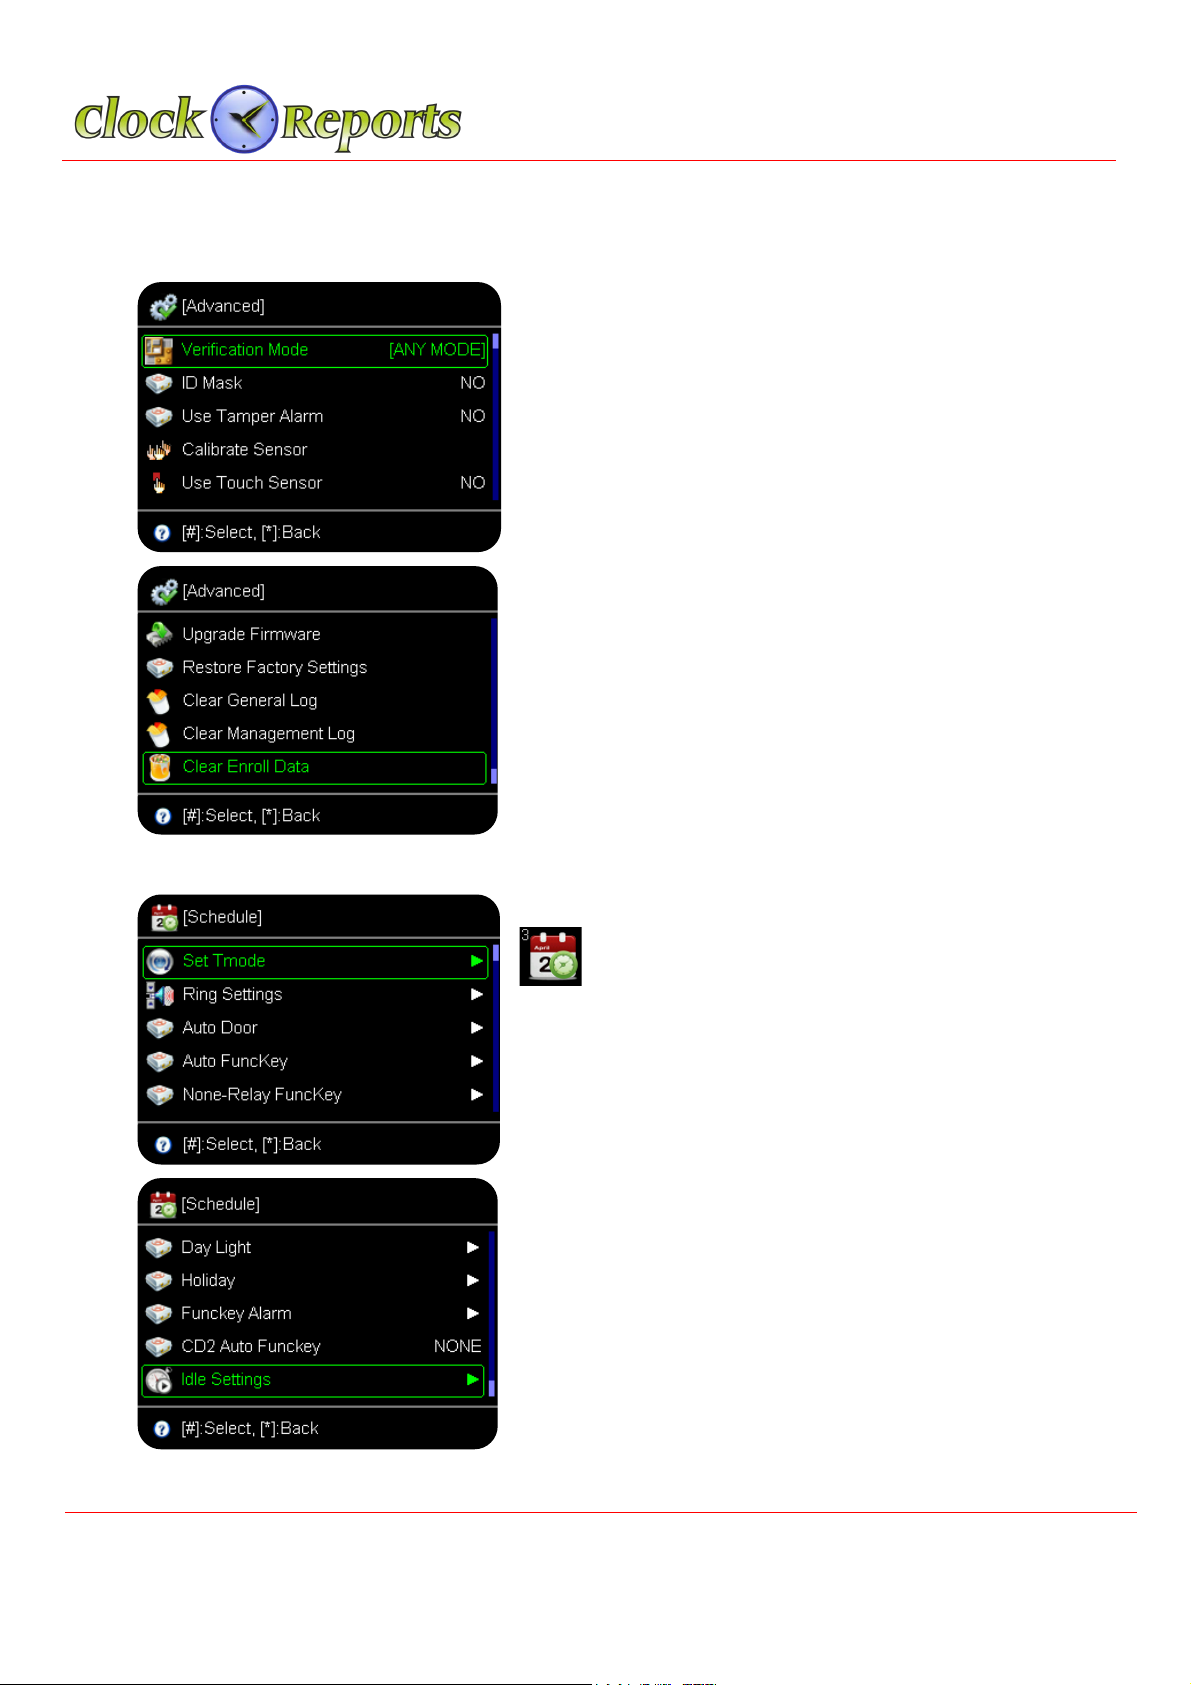
15. Advance Setting
- Opeation mode can be chosen by administrator.
- ID index security will not show a user’s ID on the
screen.
- Case open alarm will make a alarm when detach
from the bracket.
- Sensor brightness adjustment will adjust the
sensor’s brightness.
- Touch sensor use is related to the sensor’s “On
and Off”
- Firmware update can be used by SD memory card.
Initial setting is a factory setting. Access
event/management event/all registration can be
deleted.
16. Schedule
Input the addmin number 1 2 3 4 and choose
icon and then press # button.
PC operation time zone can be checked by PC
program. Operation for Fingerprint/Card/Password
will be setup by time zone.
Alarm can be setup by time zone. Automatic door
operation time/Auto Function Key/Relay/Auto time
change can
© 2015 ClockReports.com All rights reserved.
Document 002-120401 Rev.A
TSG-550/750 Operation / Installation Manual v1.3
13
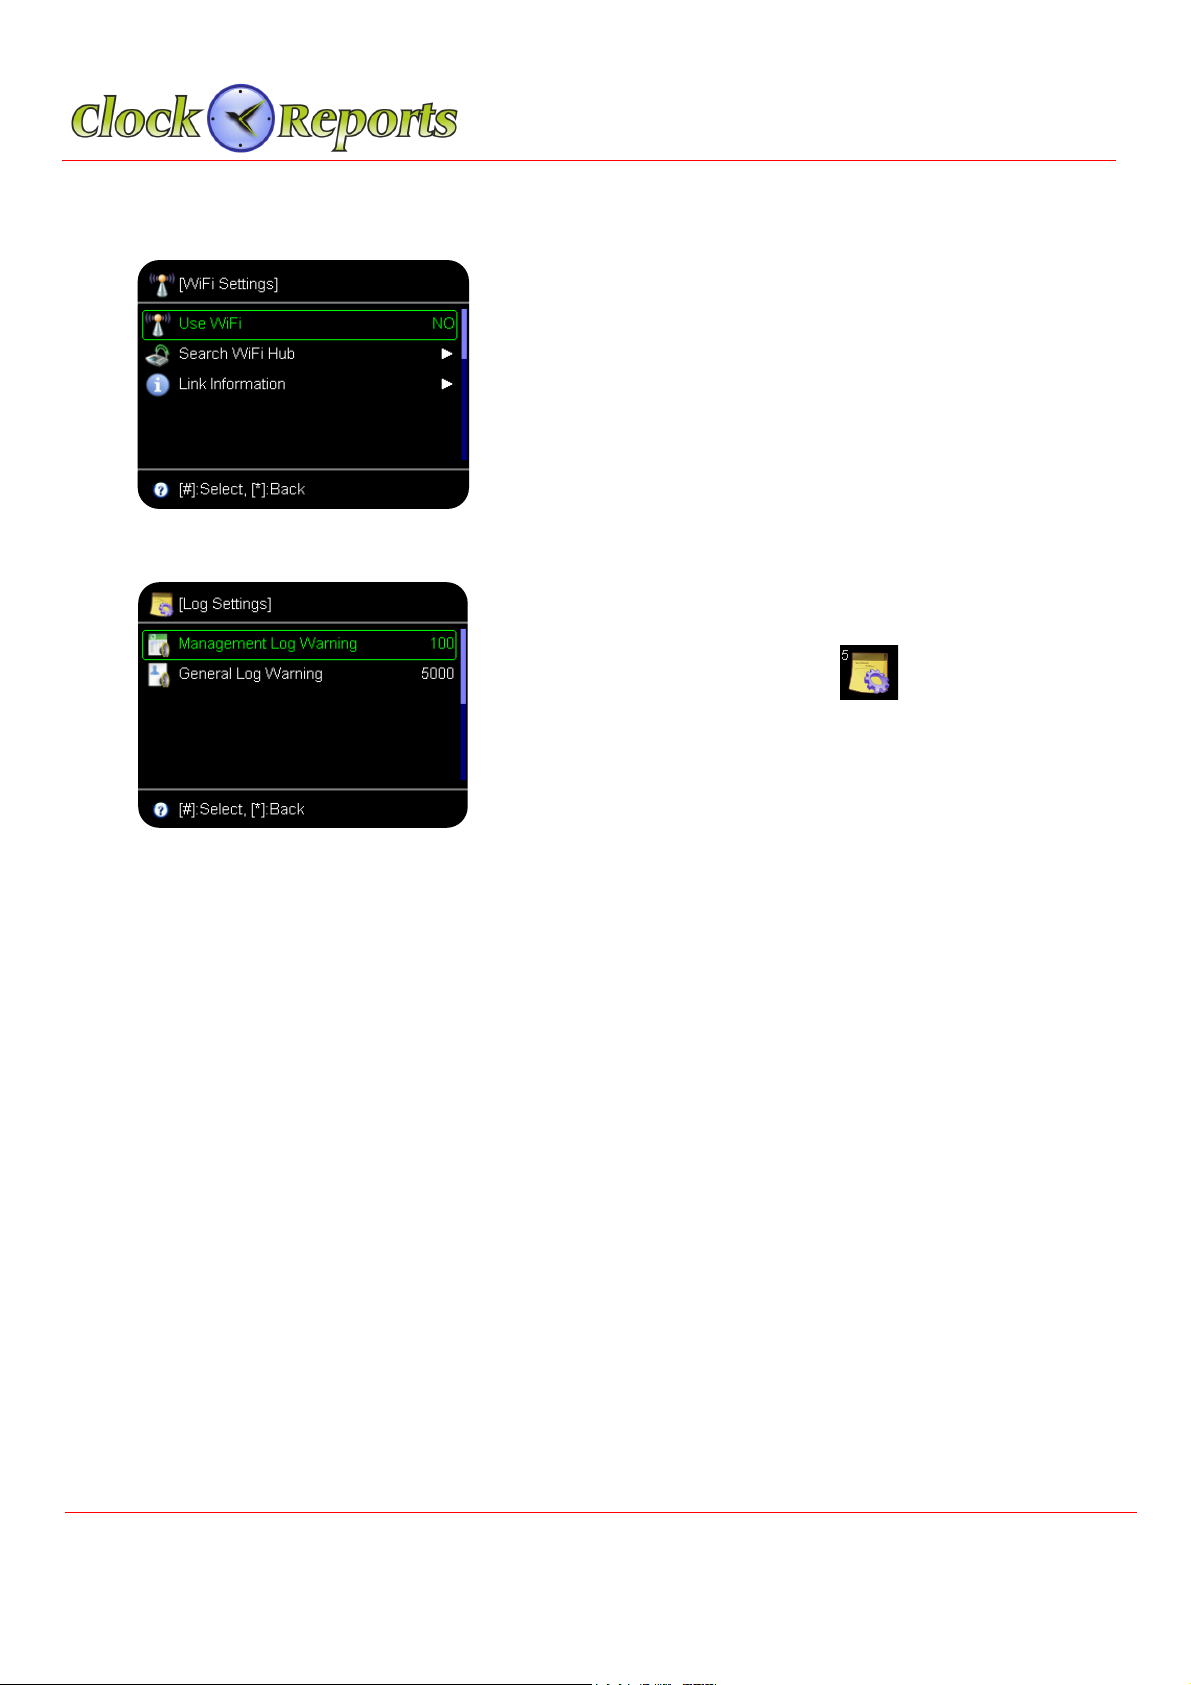
17. Wireless LAN Setting
From the Network menu (No 9), choose Wireless LAN
option and then click # button.
Choose Wireless LAN and click # button.
Search the wireless LAN and click the # button.
Choose the appropriate WiFi.
Input Admin ID number, 1 2 3 4 and press # button and
from the basic setup menu, click and then press
# button.
Without PC program, before overwrite the events when reach to full events it will be
warning you in advance. If you set it up 1000 events, since its maximum size is 500K
events, It will be warning you when reach to 499,000 events.
© 2015 ClockReports.comAll rights reserved.
Document 002-120401 Rev.A
18. Memory Log Full Warning

TSG-550/750 Operation / Installation Manual v1.3
14
19. Access Setting
Input Admin ID number, 1 2 3 4 and press # button and from the basic setup menu,
click and press # button.
- Sub-sensor use: It is an innerskin sensor.
It can be setup both Optical and Sub-sensor
- External reader setup: It is related for a reader
to send the FP templates only.
- Timezone/User access setup: The contents
can be checked by PC program.
- Periodic type: It shows that the lock type is NC
(Normal Close) or NO (Normal Open) type.
- Door Open Time: It is a door open time
duration.
- Wiegand format: It is to set the BIT numbers
for the prox card.
© 2015 ClockReports.comAll rights reserved.
Document 002-120401 Rev.A
TSG-550/750 Operation / Installation Manual v1.3
15
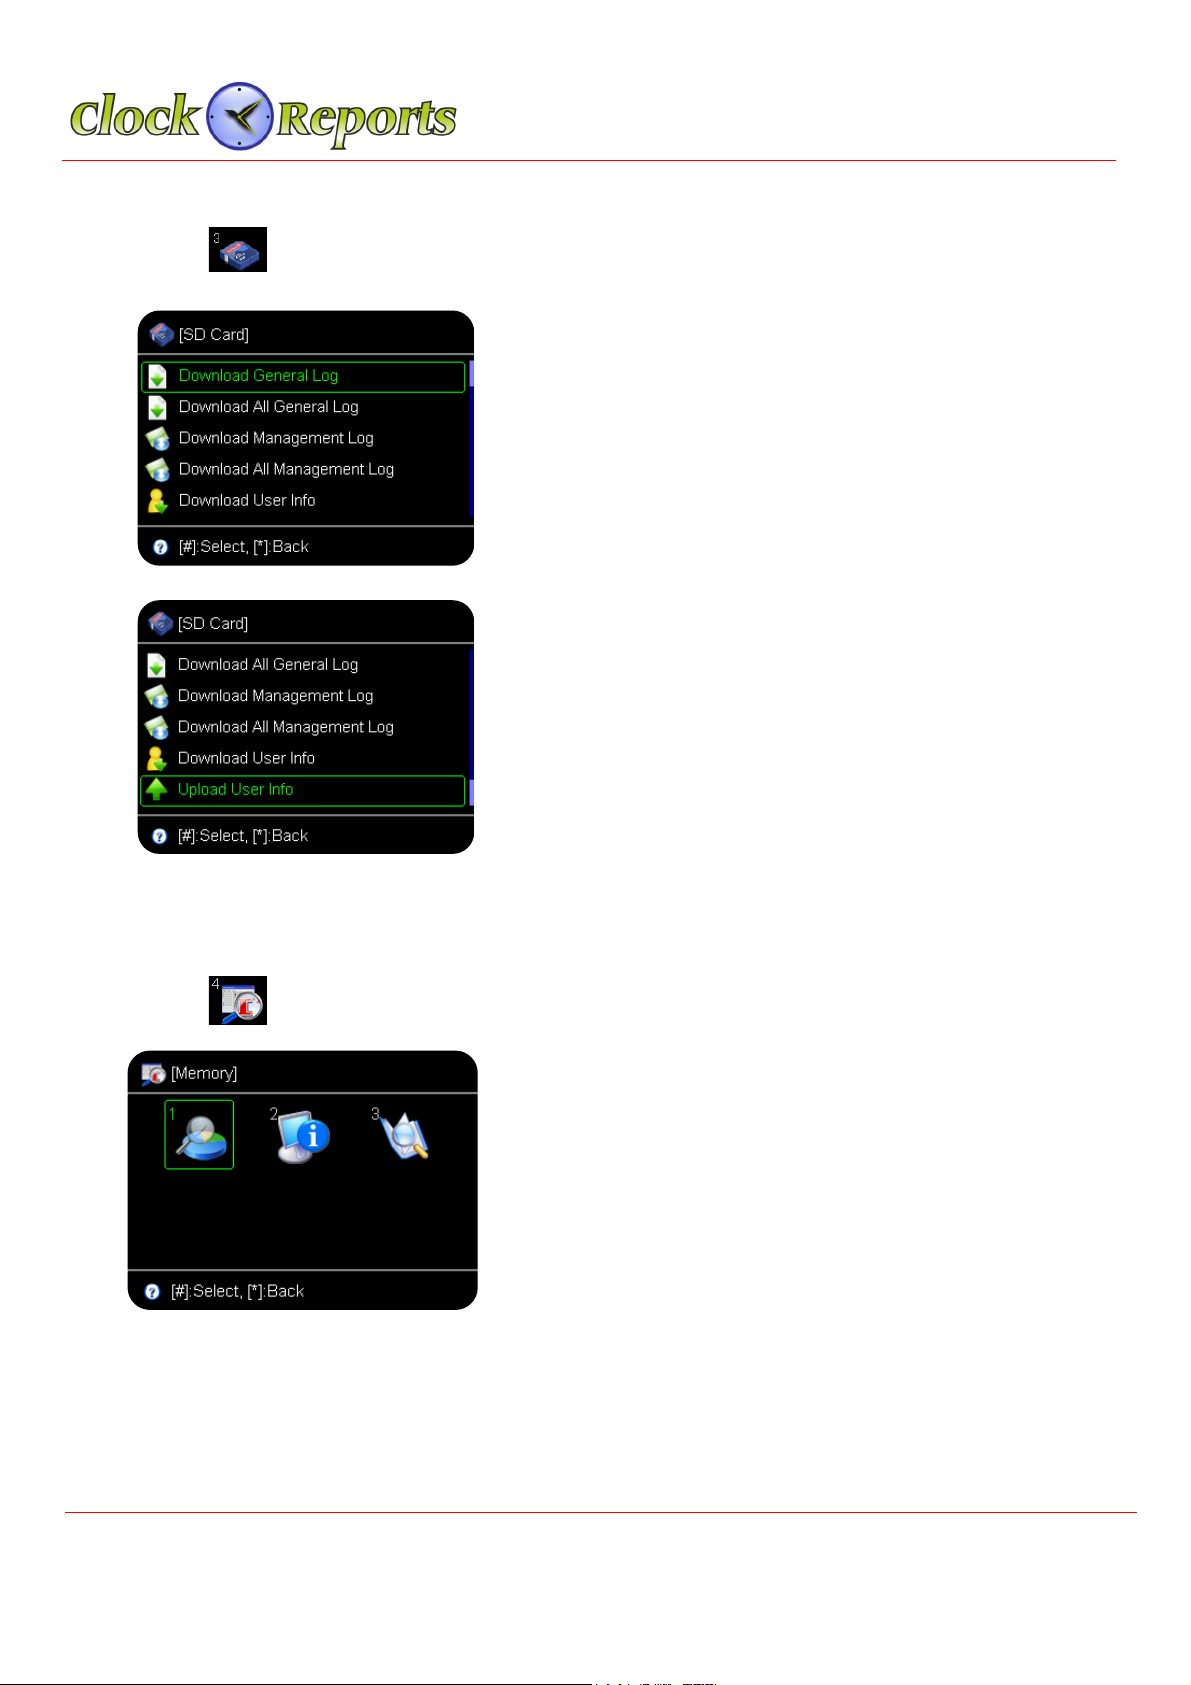
Input Admin ID number, 1 2 3 4 and press # button and from the basic setup menu,
click and press # button.
By using MICRO SD Memory card, save user’s
information/ events data and upload to a different
device.
Once download from No 1 terminal and upload to No 2
terminal, the terminal’s user information
(fingerprint/card) can be transferred to a different
terminal.
21. Memory Information
Input Admin ID number, 1 2 3 4 and press # button and from the basic setup menu,
click and press # button.
Once check out the No 1 memory information, current
terminal will show the user storage and event
numbers. For the No 2, device information, it shows
the Product of production date, serial number, etc. No
3 shows user search and check the events.
20. Memory Card
© 2015 ClockReports.com All rights reserved.
Document 002-120401 Rev.A

TSG-550/750 Operation / Installation Manual v1.3
16
22. Test
Input Admin ID number, 1 2 3 4 and press # button and from the basic setup menu,
click and press # button.
It is a self-test for the device. It can test either full
details or subsection.
23.
Voice Communication (subject to availability)
From the main menu, Press # button. There is a voice communication function. It is
a purpose of communicating with visitors, so the administrator can control the door for
them to be access.
[Note] Please check whether the network is fine with the administrator’s computer.
24.
Sub-Sensor (optional not fitted as standard)
The Sub-sensor is an inner-skin sensor that is mainly used for fake FP
detection/damaged/dry/distorted FP. This is a swipe type sensor so
the finger should be swiped vertically.
[Note 1] In PC, you can register a particular user as ‘Sub-sensor user.’
In this case, the user can use the sub-sensor only without putting his
finger on the optical sensor.
[Note 2] Since it is 1:1 verification type, so the user who needs to use
the sub-sensor has to input the ID number first and then swipe it on
the sub-sensor.
© 2015 ClockReports.com All rights reserved.
Document 002-120401 Rev.A

TSG-550/750 Operation / Installation Manual v1.3
17
25. Specification of Optical and Sub-Sensor
1. Registration
Both optical and sub-sensor can register the fingerprint.
Suggestion) When a user registers two fingerprints, it is better the user enroll one
fingerprint on optical sensor and the other finger is on sub-sensor for the dual
registration.
Caution)It should not be working if user who registered on sub-sensor cannot be
verified on optical sensor. The sub-sensor is only worked as 1:1.
It will be fine if a user who registered on optical-sensor can use the sub-sensor for
the verification.
2. Verification Mode
A. [FINGER], [CARD] or [FP]
- Use and Register on optical sensor
- Input ID and use sub-senor
- Input ID and use optical sensor
B. [ANY MODE]
Except for [CARD], [ID or CARD], [ID or FP], [ID & CD] modes, 1:1
verification will be working by using the sub-sensor.
© 2015 ClockReports.com All rights reserved.
Document 002-120401 Rev.A
TSG-550/750 Operation / Installation Manual v1.3
18
SECTION 3 – TSG-750 Operation Manual
26. Product Specification for TSG-750
Feature
TSG-750
User Capacity
10,000 (Default)
50,000 (Optional)
1:N 10,000 Speed
< 1Sec
Event Log
500,000
LCD
4.3 Inch Full Touch
Camera
Yes
SD Memory
Yes
POE
Yes
Communication
TCP/IP, RS-485
Wi-Fi (Optional)
Spoof Detection
Yes
VoIP
Yes
P2P
Yes
Card
EM, Mifare, HID Pro or
iClass
FAR/FRR
0.0001% / 0.01%
Size (W * H * D)
118 * 163 * 40 Cm
© 2015 ClockReports.com All rights reserved.
Document 002-120401 Rev.A

TSG-550/750 Operation / Installation Manual v1.3
19
27. Terminal ID & Network Setup
The Terminal should be input unique ID in order to communicate with PC program.
[Note] If the ID is duplicated, there will be a communication error.
Click this icon from the menu.
Input admin ID 1,2,3,4 and then click ‘OK’
After input the admin password, the main screen will be shown.
Click the icon in the bottom and then the terminal ID and
Network setup menu will be shown
.
Input the desiged Device ID. The terminal ID should not be
duplicated. On TCP/IP setting menu, input allocated IP, Subnet
Mask, Gateway, Port number. For the management PC IP
address, it should be input appropriate PC IP in order to make
Video & Voice communication.
© 2015 ClockReports.com All rights reserved.
Document 002-120401 Rev.A

TSG-550/750 Operation / Installation Manual v1.3
20
28. User Registration
Users can be registered by ID, Fingerprint, and RF card. Input admin password and
then click the icon .
- Input User ID
If Employee ID is needed, input the Employee ID. Otherwise
input the same User’s ID
- Input User’s Name
- Privilege can be selected as User or Adminiatrator.
Click Fingerprint 1 to register first finger three times. Click
Fingerprint 2 to register second fingerprint. Thus, one user can
register two fingerprints. If only one finger is needed, user can
only use Fingerprint 1.
When register RF card, place the card on the reader.
Caution) The sub-sensor is only worked as 1:1 type, so when
use the sub-sensor, user should use ID or CD with the sub-
sensor.
Click the photo section when wish to take a picture. The taken
picture will be saved automatically
© 2015 ClockReports.com All rights reserved.
Document 002-120401 Rev.A
Other manuals for TSG-550
1
This manual suits for next models
1
Table of contents


