Tsumara L-70 User manual

Page 1
Page 1

Thank you for purchasing Tsumara L70
»Motorcams Ltd retains all rights to this manual in accordance with copy right laws.
»Motorcams Ltd will occasionally update the firmware for this product. All information and
specifications in this manual are subject to change without a prior notice.
»We take no responsibility for accidental damage, injuries and other losses caused by
improper use of the product.
»This product is a video event data recorder for vehicles but does not guarantee that all
accidents will be recorded.
»This product creates a recorded video to help determine what happened before, during
and after a crash or event.
Warranty and Disclaimer
»In the event of an accident Motorcams Ltd do not take any responsibility for damages
(property, business and/or indirect damages).

Contents
1. Safety Instructions . . . . . . . . . . . . . . . . . . . . . . . . . . . . . . . . . . . . . . . . .
2. What’s Included? . . . . . . . . . . . . . . . . . . . . . . . . . . . . . . . . . . . . . . . . . . .
3. Product Features . . . . . . . . . . . . . . . . . . . . . . . . . . . . . . . . . . . . . . . . . . .
4. Installing the Camera . . . . . . . . . . . . . . . . . . . . . . . . . . . . . . . . . . . . . . . . .
5. Product Overview . . . . . . . . . . . . . . . . . . . . . . . . . . . . . . . . . . . . . . . . . .
6. Operating Instructions . . . . . . . . . . . . . . . . . . . . . . . . . . . . . . . . . . . . . . . . .
8. Specifications . . . . . . . . . . . . . . . . . . . . . . . . . . . . . . . . . . . . . . . . . . . .
7. Viewing Software . . . . . . . . . . . . . . . . . . . . . . . . . . . . . . . . . . . . . . . . . . . .
4
7
8
10
12
16
26
24
• Menu Navigation
• Operation
• Connecting the Camera to a Computer
• Reset

Page 4
1Safety Instructions
Do not disassemble, repair and/or alter the product.
Thismaycauseare,anelectricshockand/ormalfunction.Contacttheservice
centerifyouneedtohavetheproductxed.Usermaynotbeentitledtofree
serviceifandwhenproductmalfunctioniscausedbyuser’sfault.
Donotinstalltheproductinalocationwhereitobscuresthedriver’sview.
ThismaybeinviolationofTheRoadTrafcActRegulation79a
Donotoperatetheproductwhiledriving.
Useafterstopping/parkingyourcarinasafeplace.
Donotwettheproduct.
Thismaycauseare,anelectricshockand/ormalfunction.
This manual covers what should be done to protect the user’s safety and prevent
property damage. Please make sure to read these safety instructions before using
the product.

Page 4
Page 5
Drasticchangesinbrightness(onentry/exitoftunnels),strongbacklightinthe
daytime, and no light source at night may result in diminished video quality.
Excessivelytintedwindscreensmaycauserecordedimagestolook
blurry or distorted.
»Installingoroperatingthedevicewhiledrivingmaycauseanaccident.Onlyinstalland/
oroperatethedevicewhilethevehicleisnotinmotion.
»Ifthecigarettelighterreceptacleemitsfumesorafunnysmell,stopusingtheproduct
immediatelyandcontactusoroneofourdealerships.
»Dustanddirtbuild-upinthecigarettelighterreceptaclemaycauseheatorare.Clean
it on a regular basis.
»Wedonottakeanyresponsibilityformalfunction,injuriesordamagetotheproduct
caused by inappropriate use.
Installation Cautions

Page 6
»
DonotforcefullyremovetheSDcardwhiletheproductisinrecordingmode.
BesuretoturnoffthecamerabeforeremovingtheSDcard.
»FormattingtheSDCard
FormattingtheSDcardonaregularbasiscanhelppreventpotentialread-writeerrors
andcorruptedles.
»ThemaximumlifespanofaSDcardissixmonths.
WearenotliableforanySDcarderrorsafterthisperiod.
»Besuretobackupyourrecordedvideosusinganadditionalstoragedevice.
»FormattheSDcardbyusingthecamera’sformatfunctionfoundinthesettingsmenu.
Select“YES”whenprompted.
»AlwaysuseSDcardsrecommendedbyourcompany.Wearenotresponsibleforany
issuescausedbyusinganincompatibleSDcard.
Memory Card Cautions
Page 6
Page 7
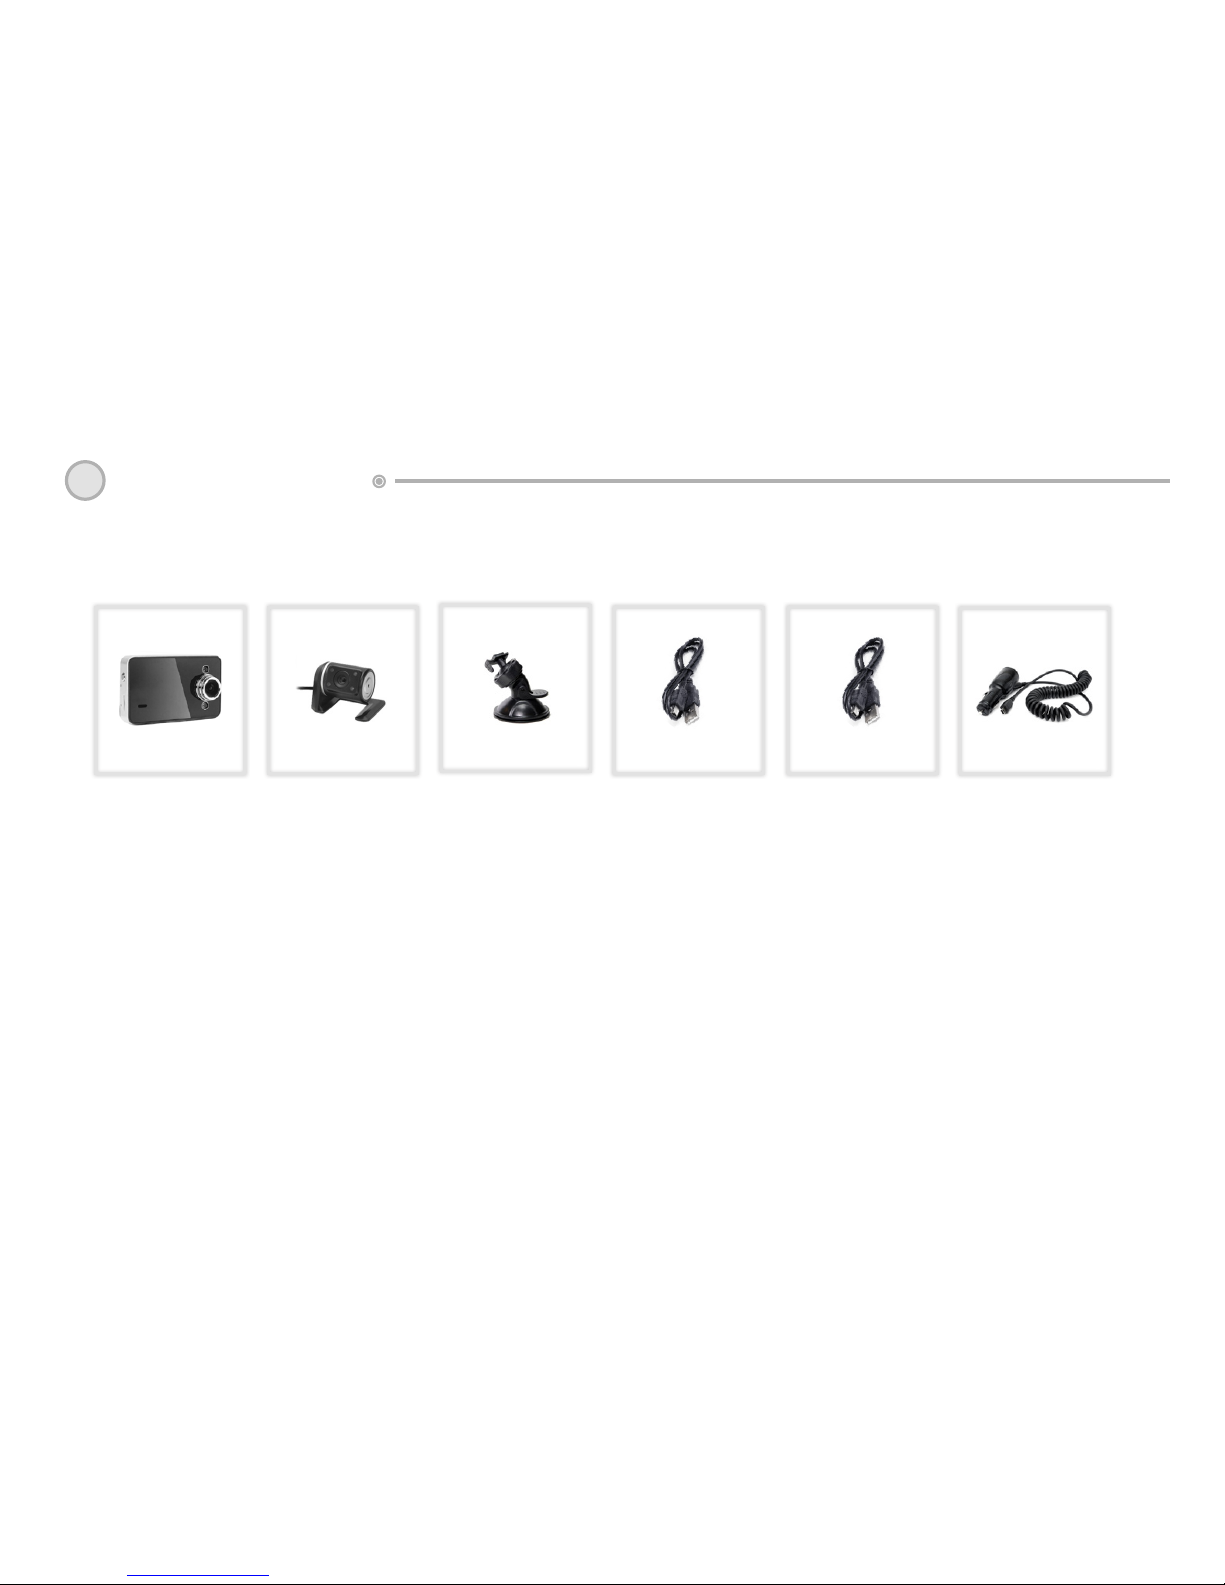
2Whats Included?
MainUnit MountRear Camera USB-cable Ext.cable Car Charger
»Checktomakesureallthecomponentsaboveareincluded.
»Componentsmaybechangedwithoutnoticetoimproveproductfunctionalityand/or
quality.
»OriginalTsumaracomponentsarerecommended.Theuseofthirdpartycomponents
mayrestrictwarranty.
»AllTsumaraunitscomewithapre-installed8GBmemorycard.

Page 8
3Product Features
• Dual camera support:
ConnecttheexternalcameratotheAV(9)portandselect“DoubleRecord”from
the“RecordMode”menuforfulldualcameraoperation.Thevideolesarepre-
xedwithA(front)andB(rear)foreasyidenticationandareperfectlysynced
upwitheachother.
• G-Sensor:
Whenthecameradetectsgravityaccelerationof2Gormorethecurrentlewill
automaticallybesavedandcannotbedeletedbytheLoopRecordfunction.The
protectedleswillbepre-xedwiththeletter“ZW”.TheG-sensorsensitivityis
adjustablefrom2–8G.Thedefaultis4G.
Whenbrowsingvideosonthecameratheprotectedleswillbedistinguishableby
akeyicon.

Page 8
Page 9
• Motion Detection:
WithMotionDetectionenabled(settingsmenu)thecamerawillstartrecording
whenitdetectsmotioninfrontofthecarwhileparked.NOTE:Thisfunction
requireshardwiringthecameraintothecar’sfusebox.
• NightVision:
TsumaraL70Dualusesanextremelylightsensitiveimagesensortoensure
clear images at night.
• HoldFunction(EmergencySave):
PresstheHOLDbutton(9)tosavethecurrentvideomanually.Thiswillsave
footagefrom20secspriorto20secsafterthebuttonwaspressed.Theprotected
lewillbepre-xedwiththeletters“ZW”
• TimeStamp:
Dateandtimecanbeembeddedinthevideowiththe“DateStamp”functionin
the setting menu.
Page 10
4Installing the Camera
»Makesurethesurfaceiscleananddryintheinstallationarea.Removetheredlm
fromtheadhesivemount.Positionthecameraonthewindshieldwiththelenspointing
forwardsandadjusttheanglebyrotatingthecamerabody.
»Werecommendinstallingthecamerabehindtherearviewmirrortoavoidobstructing
thedriver’sview.
Page 10
Page 11
»Makesurethesurfaceiscleananddryintheinstallationarea.Removetheredlm
fromtheadhesivemount.Positionthecameraonthewindshieldwiththelenspointing
forwardsandadjusttheanglebyrotatingthecamerabody.
»Turnontheignition.Thecamerashouldpowerupandstartrecordingautomatically.
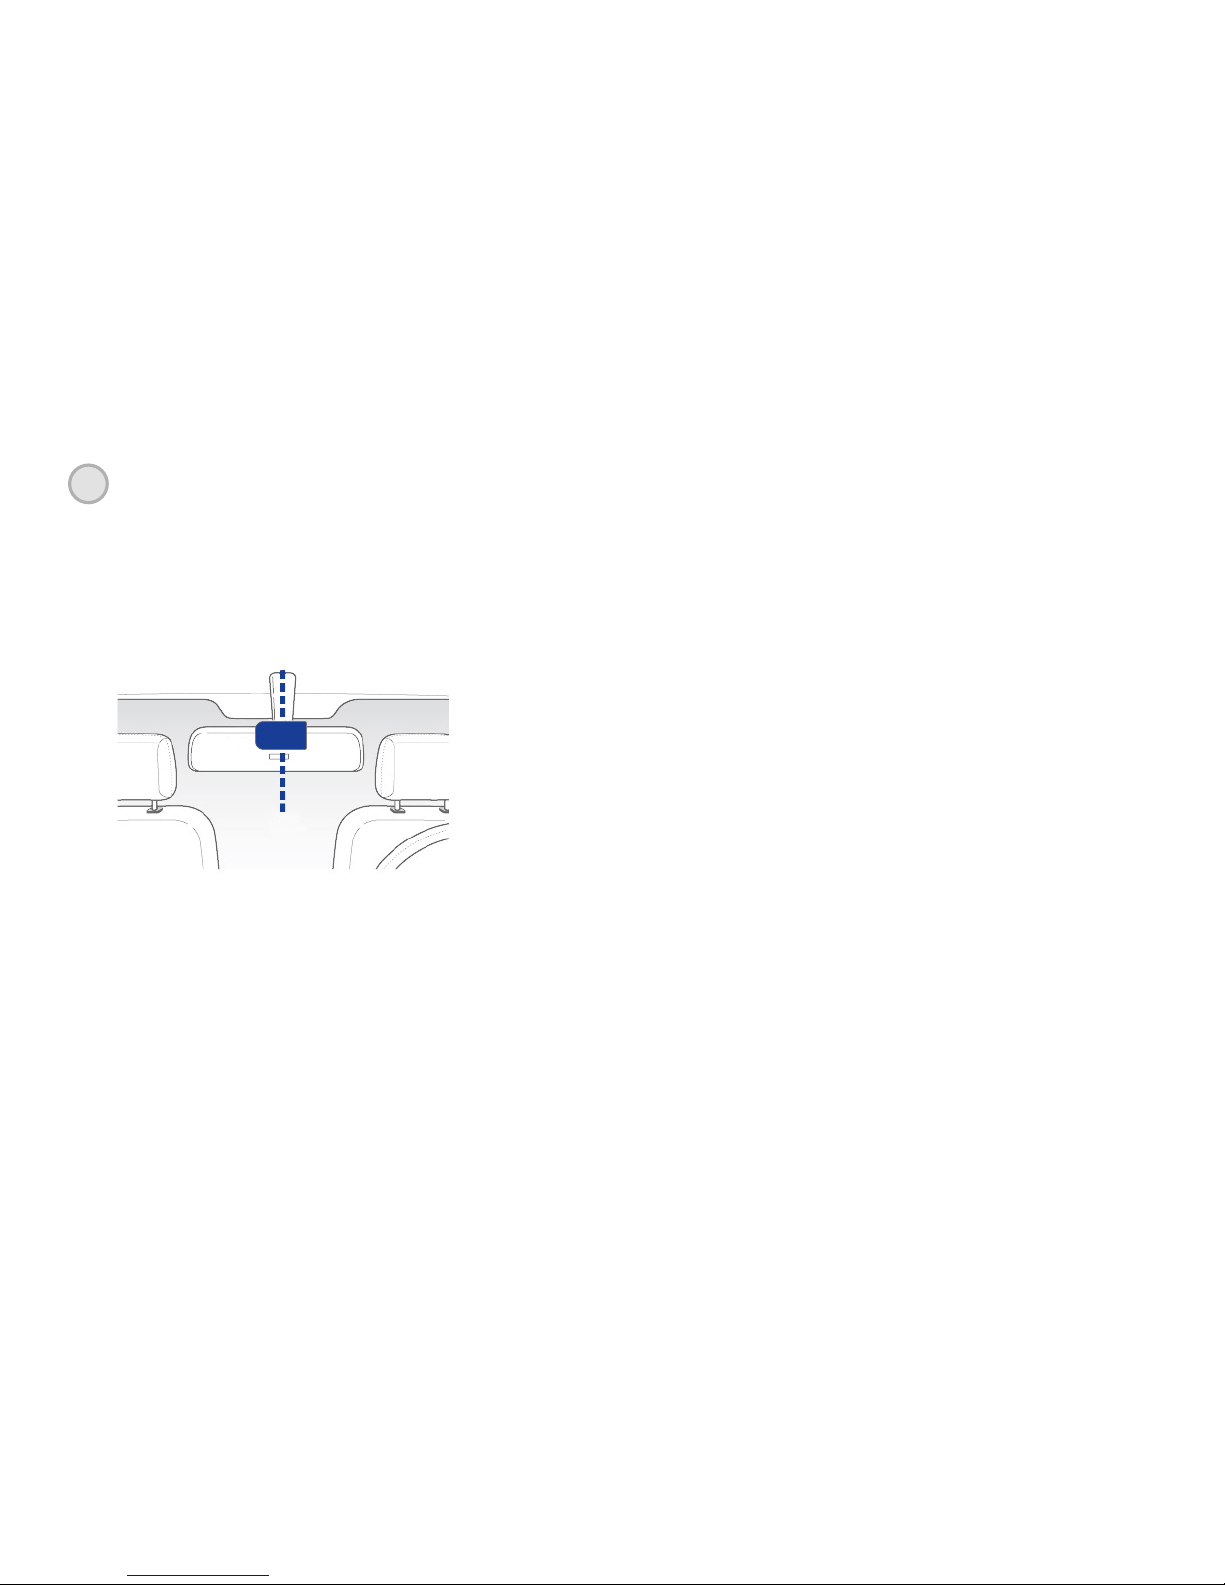
»Rear Camera: Theexternalcameramountstotheinsideoftherearwindowwith
anadhesivepad.Centrethecameraatthetopofthewindowandadjusttheangle
appropriately.
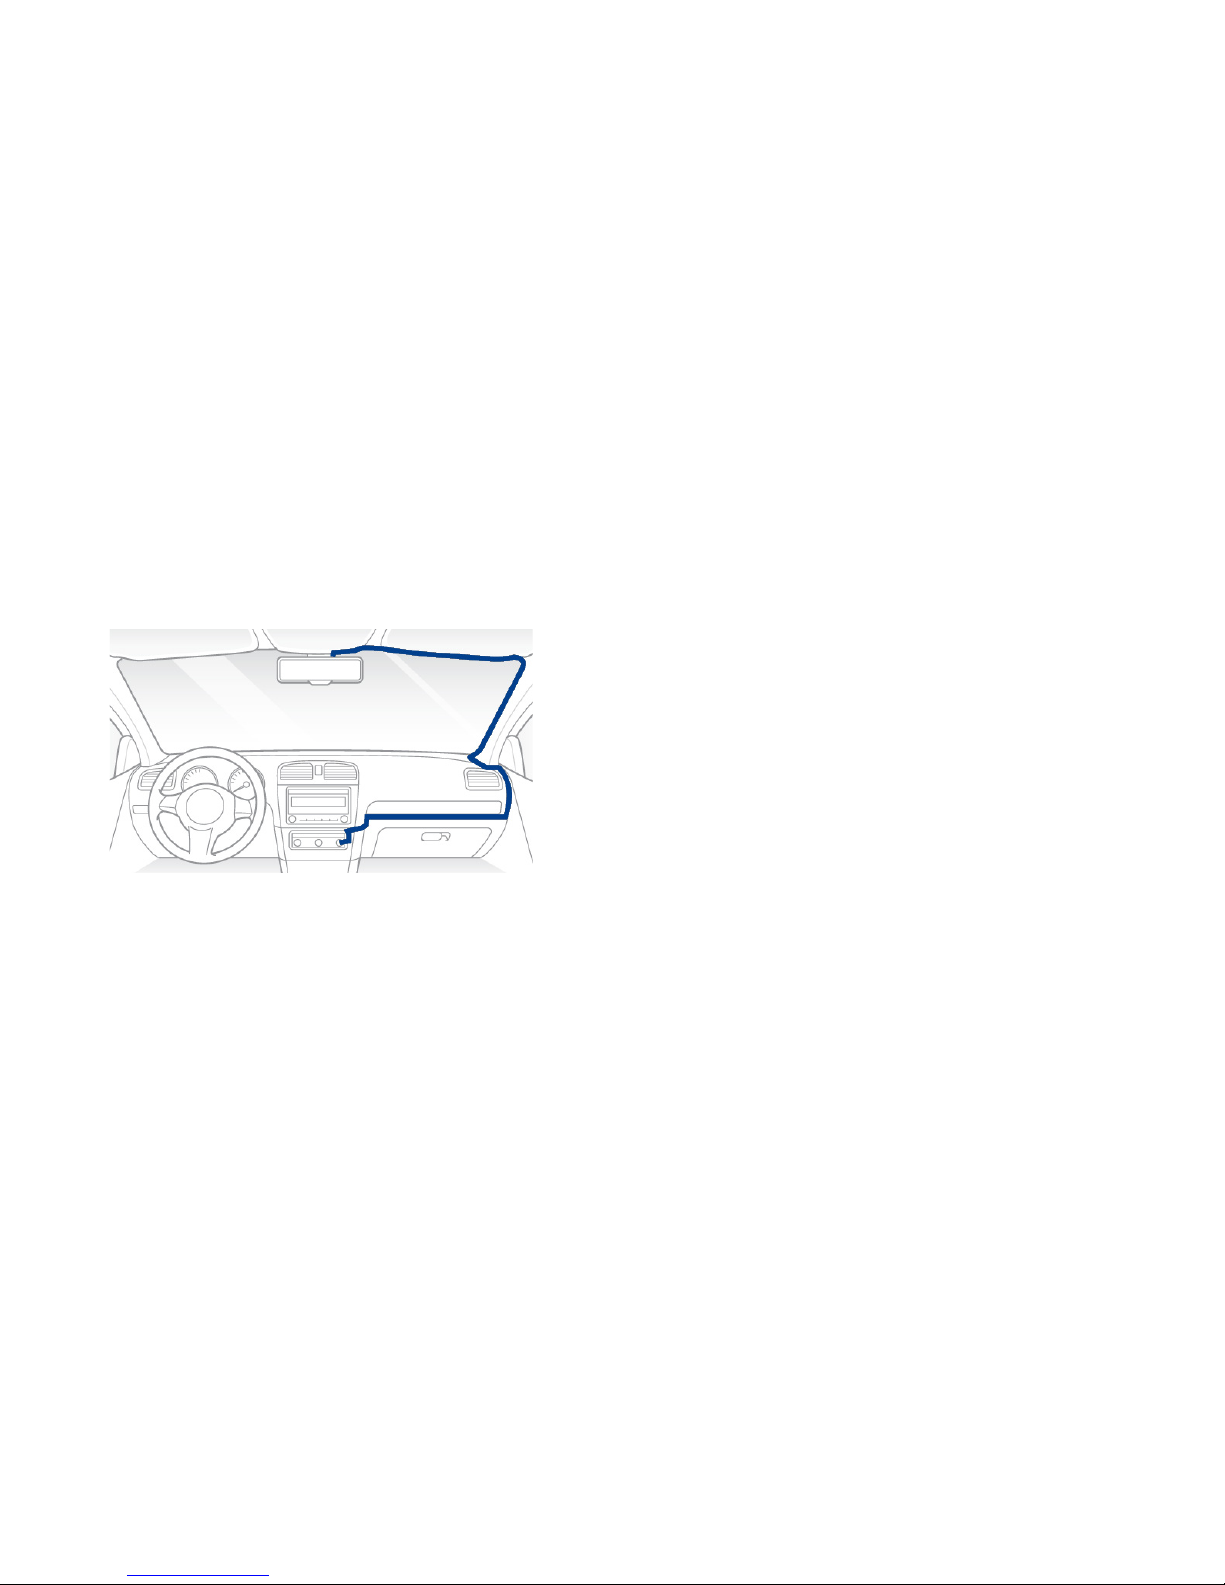
»PlugthepowercableintotheUSBportonthecamera.Routethecableneatlyaround
theedgeofthewindshieldbytuckingitintoanyavailablegapinrubberseal,roofliner
etc.Continuearoundthedashboardtowardsthe12/24vsocket.
Page 12
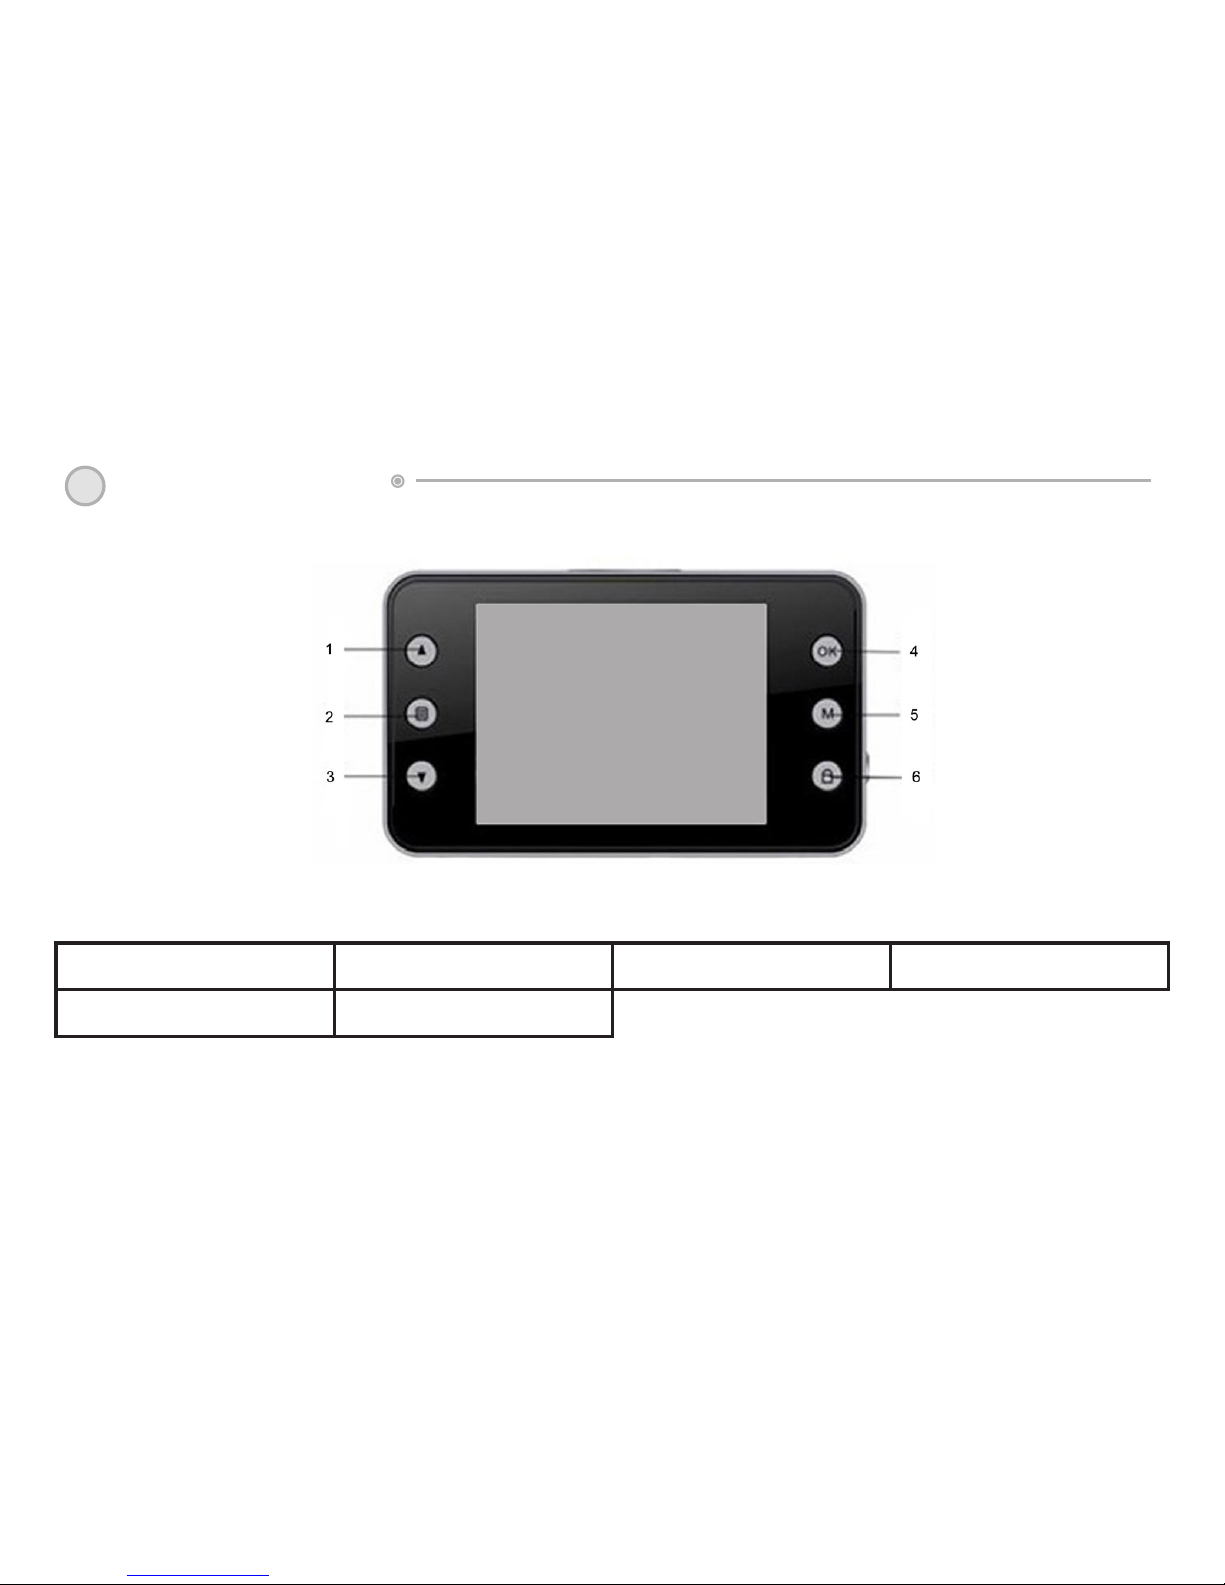
1.Up 2. Menu 3.Down 4. OK
5. Mode 6. Hold
5Product Overview

Page 12
Page 13
7.USB 8. Mount 9.AV(RearCam) 10.Power
11.SD-card

Page 14
Menu Navigation
1)UP
Instandbymodepressthe“UP”buttontoswitchbetweendifferentviews.Frontlensonly,rearlens
onlyorboth(Pictureinpicture).ThecurrentviewisindicatedontheLCDscreenwithA(Front),B
(Rear)orA+B(Front&Rear)
2)MENU
- Press this button to access the settings menu
- Press and hold to change setting options
3)DOWN
Inmenumodeusethiskeytonavigatetheoptions
5)MODE
PresstoswitchbetweenVideo/Stills/Playbackmodes
4)OK
In video mode press to start/stop recording
InStillsmodeusetotakepictures
InMenumodeusetoconrmselections.

Page 14
Page 15
7)USB
Connectthecarchargerherewhilethecameraisinoperation
ConnecttheincludedUSBcableheretotransferlestoacomputer
8)MOUNT / BRACKET HOLE
Attachthemountingbrackettothecameraherebyscrewingitinclockwise.Tightenthelocking
nut to secure in place.
9)AV Port
Connecttheexternal(Rear)camerahere
10)POWER
Press to activate the night vision LED lights
Pressandholdtopowertheunitoff.
11)TF Slot
TFMemorycardslot(Supportsupto32GBMicroSDcards)
6)HOLD
PresstomanuallysavealefrombeingoverwrittenbytheLoopRecordfunction

Page 16
6Operating Instructions
Menu Navigation
Video (MP)
# Options Function
1VGA/720p Setsthevideoresolution
Loop Recording (RT)
# Options Function
1 1min / 2min / 5min
/Off
Setslelength
Pressthe“Menu”buttontoenterVideo(MP)menuandpressthe“menu”buttonagaintoenterthe
LoopRecording(RT),RecordModeandSettingsmenusrespectively.Selectthedifferentoptions
byusingtheUp/DownbuttonsandpressOKtoconrmselections.
NOTE:Thesettingsmenucannotbeaccessedwhilethecameraisrecording.PressOKtostop
the recording then proceed as described above.

Page 16
Page 17
Recording Mode
# Options Function
1FrontRecord/BackRecord
/ Double Record
Setsthevideoresolution
Settings
#Sub-Menu Description Function
1 Brightness Auto/Sunlight/Fluorescents/
CloudySky/Tungsten
Adjustsbrightness
2Exposure -3, -2, -1, 0, 1, 2, 3 Adjustsexposure
3 Color Standard,Black&White,Nega-
tive,Ancient,Reseda
Choose to apply a digital visual
effecttotherecording
4Autodetect OFF, ON
5Watermark OFF, ON Time&DateStamp
6 Record OFF, ON

Page 18
#Sub-Menu Description Function
7AutoRecord Off,On Recordswhenunitpowersoff/
on
8 Language English,Chinese(Traditional),
Chinese(Simplied),Russian,
Japanese, Korean
Setlanguage
9Frequency 50hz, 60hz Adjustpowerfrequency
10 AVin PAL,NTSC Setsvideoformat
11 Auto-off 30s,45s,1min,2min,5min,Off Delaybeforeshuttingdown
afterturningoffignition
12 Saversetting 15s,30s,45s,1min,2min,Off Setsthedelaybeforethe
screenturnsitselfofwhile
recording
13 G-sensor 2G,4G,6G,8G Setsg-sensorsensitivity
14 DateSet Setsdate&time

Page 18
Page 19
#Sub-menu Description Function
16 Defaultset Revertscameratofactory
defaultsettings
17 Version Displaysrmwareversion
WiththeAutoRecordfunctionenabledandthecarchargerconnectedtheL70Dualwillpower
upandstartrecordingautomaticallywhentheignitionisturnedon.Whentheignitionisturned
offthecamerawillsavethedurrentleandpowerdown.
Toturntheuniton/offmanuallypressthe«ON»button.
TheBlueLEDwilllightuptoindicatethattheunitisonandashwhentheunitisrecording.
Usethe“M”buttontoswitchbetweenVideo,PhotoandMediamode.
InPhotoModeusetheOKbuttontotakeastillphoto.
Operation

Page 20
InMediaModeusetheUp/Downbuttonstobrowsevideosandstillscurrentlyonthememory
card.Toplay/stopavideopresstheOKbutton.TodeletealepresstheMENUbuttonand
conrmwithOK.
• Connecting the Camera to a Computer
UsetheincludedUSBcablegtoconnectyourcameratoaPC
Whenthecamerapowersupselect“USB_Diskandthecamerawillconnectasastandard
USBstoragedevice.Theles(*.mov)andarelocatedinsidetheDCIMdirectory.DCIMA
containstheforwardfacingfootageandDCIMBtherear.Filesthathavebeensaved
manually(EmergencySave)orautomatically(G-Sensor)areeasilydistinguishablebythe
“SW”pre-xtothelename.
Intherareeventthatyourcamerashouldfreezeupandbecomeunresponsiveyoucan
resetitbyinsertingathinrigidobjectinthelittleholeunderneaththecamerabodymarked
“RESET”
• Reset
Table of contents


