TTS Easi-Ears User manual

WARNING: Do not dispose of this product in
household waste. Hand it over to a collection point
for recycling electronic appliances.
WARNING! Not suitable for children under
36 months due to small parts – choking hazard.
Made in China, on behalf of the TTS Group Ltd.
TTS Product Code:
EL00295
Support & Warranty
This product is provided with a one-year warranty for problems found during normal
usage. Mistreating the Easi-Ears or opening the unit will invalidate this warranty. Any
data stored on the unit and any consequential loss is not covered by this warranty.
All out of warranty repairs will be subject to a replacement fee.
n
Warranty is void if the product casing is opened for any reason
n
The warranty does not cover any data loss from the unit nor any
consequential loss of information
Technical Support
Please visit www.tts-group.co.uk for the latest product information.
TTS Group Ltd.
Park Lane Business Park
Kirkby-in-Ashfield
Nottinghamshire,
NG17 9GU, UK.
Freephone: 0800 318686 Freefax: 0800 137525
Easi-Ears
Nxxxxx
N448
7.5V
TTS is proud to be part of plc
EL00295 Easi-Ears UG ENGLISH.indd 1 10/03/2015 16:30

A new listening experience
Easi-Ears®
USER GUIDE
TTS is proud to be part of plc
EL00295 Easi-Ears UG ENGLISH.indd 2 10/03/2015 16:30

Contents
Ideas for using Easi-Ears .......................................................................................... p. 3
Getting Started ........................................................................................................... p. 4
Charging the headphones and remote control unit
Installing the software............................................................................................... p. 4
Minimum system requirements
Licensing
Updates
Using the Headphones............................................................................................. p. 5
Operating the controls
Replacing the ear pads
Using the Remote Control Unit..............................................................................................p. 7
Playing MP3 Files
Transmitting Audio to the Headphones
Controlling the Headphones
Recording Audio Files
Using the Software...................................................................................................p. 10
Setting Up Library Files
Connecting the Headphones
Copying Files
Teacher Menu (Configuration)
Library Organisation
Playlist Organisation
Copying Playlist to Devices
Loading and Saving Playlists
Importing New Files
Importing and Converting Files
Ripping CDs
Recording Files
Editing ID3 Tags
Frequently Asked Questions...................................................................................p. 20
Support and Warranty.............................................................................................p. 24
Technical Support....................................................................................................p. 24
Please read all the instructions carefully before use.
2
EL00295 Easi-Ears UG ENGLISH.indd 3 10/03/2015 16:30

Thank you for purchasing Easi-Ears
Easi-Ears brings a new listening experience to your classroom! It couldn’t be easier
to create your own recordings or download audio content, then transfer this onto the
wireless headphones so that children can listen individually or as a group, inside or
outdoors.
Easi-Ears is designed for primary schools and nursery settings. The headphones
are rechargeable and extremely robust. The software allows you to put the same or
different audio content on the headphones and is straightforward to use.
We hope you enjoy using Easi-Ears. We welcome feedback. If you’d like to get in touch,
Ideas for Easi-Ears
Easi-Ears can be used to support teaching and learning in lots of different ways, both
across the curriculum and across the school. Here are a few examples: of what you
could listen to:
n
stories, rhymes, poems and non-fiction text
n
recordings done by other children
n
instructions, e.g. add features to a map from a description
n
creative music, e.g. be inspired to write stories, make models or paint
pictures
n
information to extract answers or to help create a presentation
n
clues, e.g. treasure hunts, maths shape trails
For more suggestions and sample audio files to help get you started visit our website,
www.tts-shopping.com/easiears
Important Information
Please read carefully:
n
Easi-Ears has non-replaceable rechargeable batteries
n
The foam pads can be removed and replaced with new ones. For
instructions on how to replace, see p.6. To order new foam pads call 0800
318 686 or visit www.tts-shopping.com/easiears
n
Easi-Ears is an electrical product and should not be immersed in water or
used outside during wet conditions 3
Easi-Ears®
EL00295 Easi-Ears UG ENGLISH.indd 4 10/03/2015 16:30

Getting Started
Charging the headphones and remote control unit
The Easi-Ears headphones and remote control unit are fully rechargeable. These
rechargeable batteries are however not user replaceable.
It’s advised that the headphones and remote control unit are fully charged before use.
To do this ensure that the headphones and remote control unit are properly docked in
the docking station and plug the docking station into a mains power supply.
It will take approx 16 hours to fully charge the set.
When the headphones require more charge the red light will flash slowly. You will know
when the remote control unit needs more charge because a low battery symbol will show.
The red LED light on the headphones and the remote control unit will flash slowly during
charging and will stay on when fully charged.
Installing the software
The Easi-Ears software enables you to manage the audio tracks you want on each
headphone – uploading the same content to all of them, or differentiating each
headset. More on using the software on p.10
To install the Easi-Ears software: ......
n
Insert the CD into your PC and the installation will begin. If it doesn’t start,
browse to the CD and click on setup.exe.
n
There are no options to select during installation, simply press “Next” to
progress from one screen to the next one.
n
When installation is complete click “Finish”, and the Easi-Ears application will
start
4
EL00295 Easi-Ears UG ENGLISH.indd 5 10/03/2015 16:30

Minimum system requirements
The minimum system requirements for Easi-Ears software are:
n
Windows XP, Vista or Windows 7
n
100MB free disk space
n
At least 1GB memory
Updates
Please check the website www.tts-group.co.uk/easiears for new version update
information and the latest downloads.
Licensing
The Easi-Ears software is a site licence and licensed for use on any PC in school.
Using the Headphones
Operating the Controls
The headphones operate independently and audio content is uploaded to them via the
docking station and Easi-Ears software (see p.10). They can also receive signals from the
remote control unit as they contain an infra-red wireless receiver and are rechargeable
(see p. 4). The headphones have also been carefully designed so that the headband
easily adjusts to comfortably fit different head sizes.
n
To switch the headphones on, simply extend the headband and they will be
ready to play. The best way to do this is to put them on. After a few seconds
they will have booted up.
n
To switch them off again, close the headband up. This will happen
automatically when you take them off
n
The headphones have an automatic pause feature. When removed (e.g.
they may be taken off temporarily for a short break) they change to a low-
power “standby” mode for 20 minutes. This allows them to start playing
again immediately when you put them on again. After 20 minutes, they will
switch off completely.
5
Easi-Ears®
EL00295 Easi-Ears UG ENGLISH.indd 6 10/03/2015 16:30
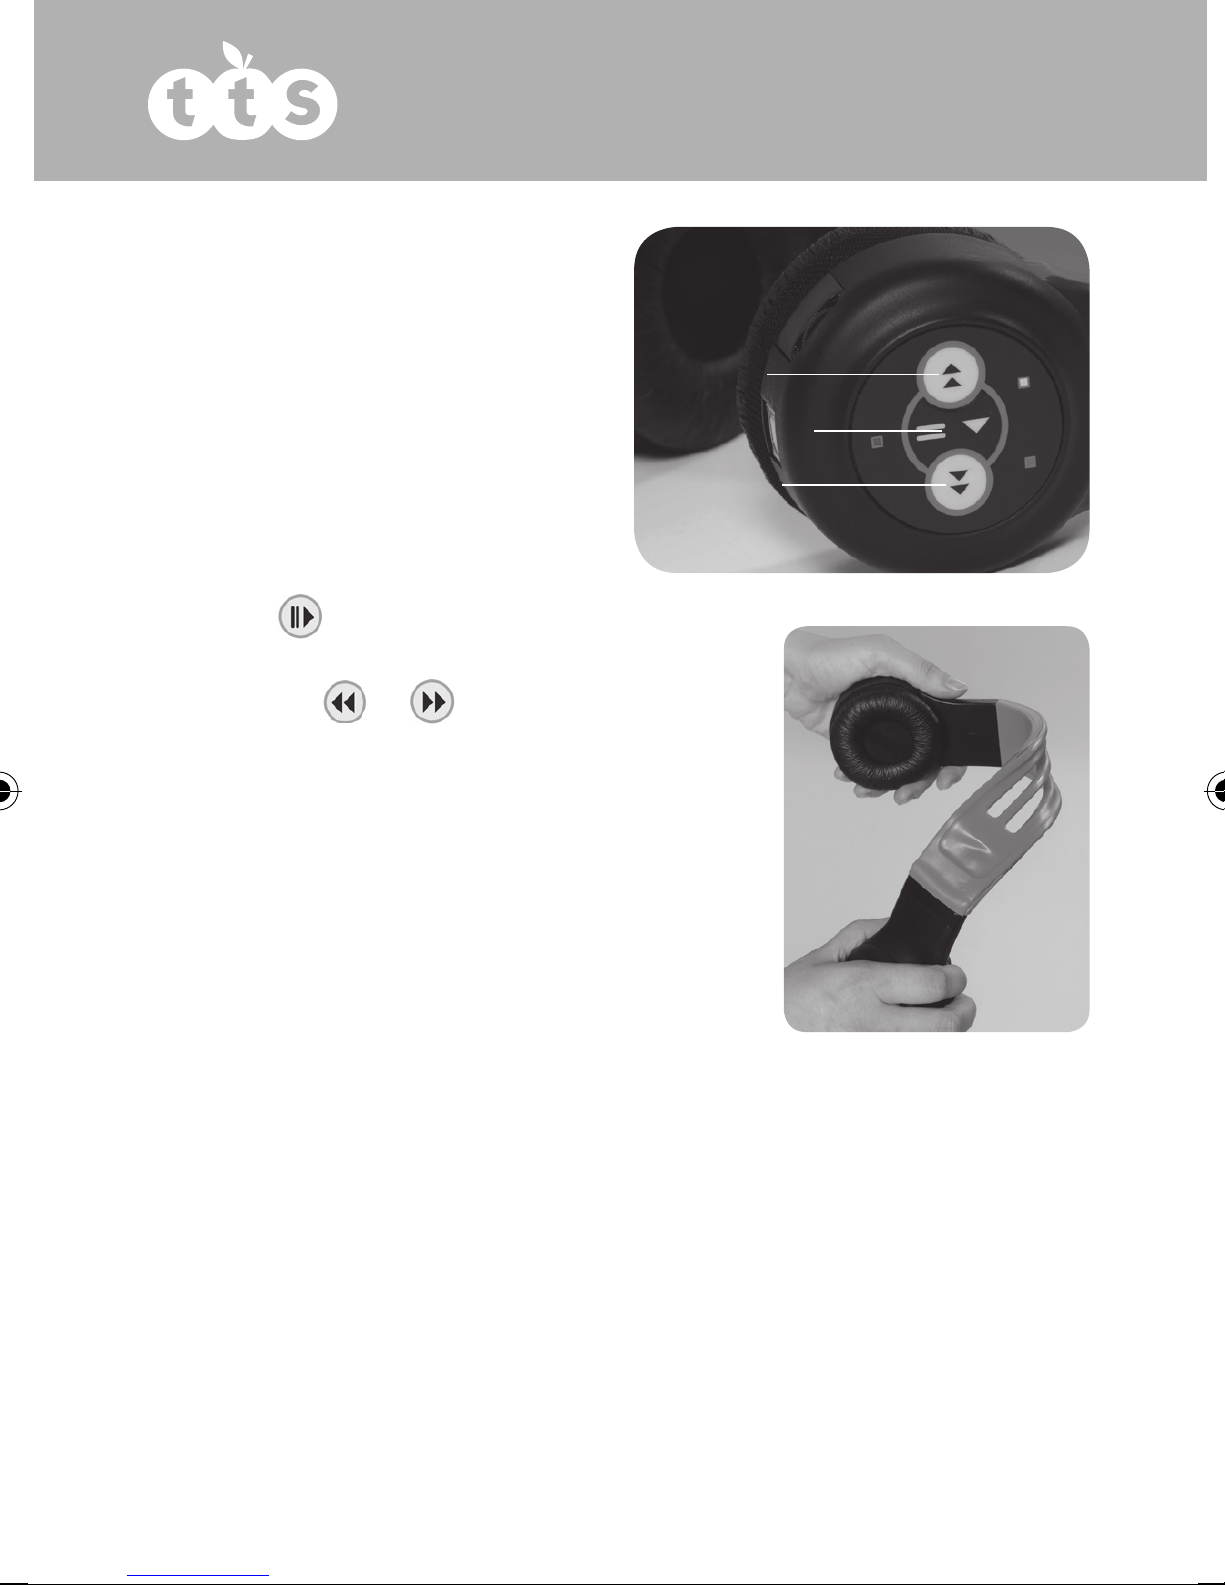
The coloured LEDs on the headphones
indicate:
n
Red light is ON indicates normal
use. It flashes slowly in standby
mode and when charging
n
Green light is ON when playing It
flashes when paused
n
Amber light is ON when the remote
control unit is transmitting to the
headphones (more on p.7)
n
Press to play the current track, or to pause
it if already playing
n
Press the or buttons to move to the
previous or next track
n
To adjust the volume on the headphones use
the thumbwheel on the side of the headphones
near the USB socket
n
To charge the headphones place them firmly
into the docking station, ensuring that the
docking station is connected to power. The red
light will flash slowly during charging and will
stay on when fully charged.
n
The headphones are designed to be extremely
robust and no damage is caused when the headband is twisted.
Replacing the Ear Pads
The foam pads can be removed and replaced with new ones. To order new foam pads
call 0800 318 686 or visit www.tts-shopping.com/easiears
Please note that what is removed and replaced is the complete earpiece assembly
including the plastic clips and the material that holds the foam on.
n
To remove: Grip the ear pad firmly and rotate anticlockwise 1/8th turn. The
whole ear pad assembly can then be removed
n
To replace: Locate the lugs on the ear pad assembly into the headphones,
and then rotate clockwise 1/8th turn until it clicks.
Rewind
Play/pause
Forward
6
EL00295 Easi-Ears UG ENGLISH.indd 7 10/03/2015 16:30
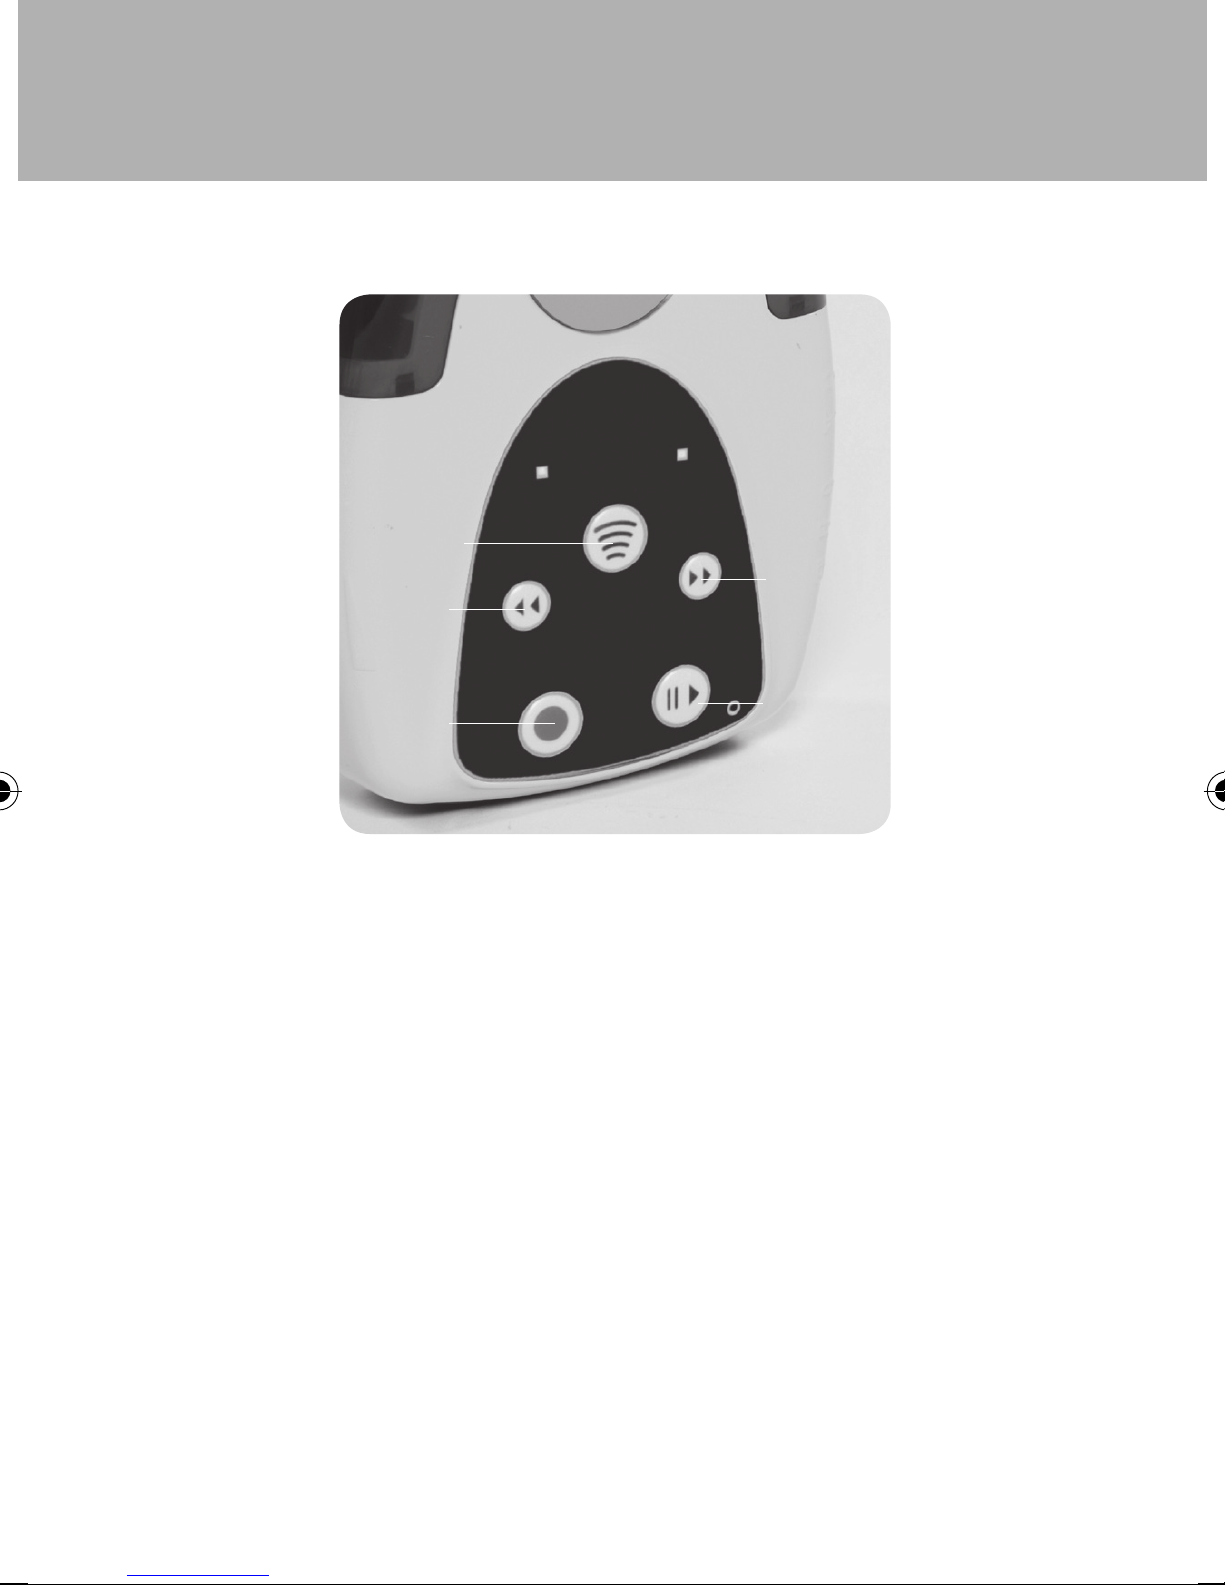
Using the Remote Control Unit
The remote control unit is an MP3 player, with an MP3 recorder, and has an infra-red
wireless transmitter so that the teacher can collectively control the headphones. With
this unit you are able to:
n
Play MP3 files through the built-in speaker, or plug in a pair of
headphones
n
Transmit audio content to the headphones. This content could be:
n
uploaded to the remote control unit via the Easi-Ears software (see p. 10)
n
streamed MP3: transmitted directly from a microphone or other audio
device that’s plugged into the unit.
n
Control the headphones’ play, pause and next/ previous track functionality
n
Record audio directly into MP3 format using the built-in microphone, or an
external microphone plugged into the microphone socket.
Rewind
Transmit
Record
Forward
Power on
Play/pause
7
Easi-Ears®
EL00295 Easi-Ears UG ENGLISH.indd 8 10/03/2015 16:30

Playing MP3 Files
n
Ensure the Source switch is set to MP3 and the Control switch is set to
LOCAL. Press and hold the button until the LCD display turns on
n
Use the and buttons to select the required track then press
to start playing
n
Press the button again to pause the track
Transmitting Audio to the Headphones
n
Ensure the Control switch is set to LOCAL
n
Select the source you want to transmit from: external audio device (“
LINE-IN”), external microphone (“MIC”) or local MP3 file (“MP3”) on the
remote
n
If using a local MP3 file, ensure that it is playing
n
Press the button to start transmitting. The Green LED will light up
n
Press the button again to stop transmitting
The transmission will be sent to all of the headsets in use. The audio cannot be
transmitted to individual headsets.
Transmission range
The range between the headphones and remote control unit is about 12m (depending
on the environment) to receive a transmission. If used outdoors or in rooms with high
ceilings, the transmission will only be line of sight.
Controlling the Headphones
n
Ensure the Control switch is set to REMOTE
n
Use the and buttons to select the track you want to play on
the headphones. Note that the same track number will be played on the
headphones, even if the content of that track is not the same as on the
remote control unit. When controlling the headphones, it is usually best to
ensure that the same tracks are on the headphones in the same order as
Control switchSource switch
8
EL00295 Easi-Ears UG ENGLISH.indd 9 10/03/2015 16:30

the remote control unit, so there’s no confusion.
n
Press the button to start the audio playing on the headphones
n
Press the button again to pause the audio
n
The headphones controls will continue to work, so pupils are still free to
change and pause tracks. However the next controlling signal sent from the
remote control unit will revert the headphones to that currently selected on
the remote control unit.
The transmission will be sent to all of the headsets in use. The remote control unit
cannot control individual headsets.
Recording Audio Files
The recording feature on the remote control unit is extremely useful. You can:
n
Record directly into the remote control unit using the built-in microphone
n
Plug an external microphone into the microphone socket and record directly
into the remote control unit
n
Plug in any external audio device to the “Line In” socket, e.g. a cassette
player, CD player, radio, TV, MP3 player and record, and record the tracks
onto the remote control unit. This means that if the file format wasn’t in MP3
format it will neatly be converted
Any recordings captured by the remote control unit will be evident when the unit is
synchronised via the docking station with the Easi-Ears software (see p.10). From here
the MP3 recordings can be saved locally on your PC.
To record:
n
Ensure the Control switch is set to LOCAL and the Source switch is set to the
required input (Microphone or Line-In)
n
Press the button to start the recording, then press again to finish
the recording. The audio file will be saved as an MP3 file with the name
VOICExxx.MP3 where the xxx is replaced by the next filename in sequence,
starting from 001. This file name will be evident in the remote control unit
panel in the Easi-Ears software, next time you dock the remote control unit
and open up the software (see p.11).
The remote control unit can be charged by placing it firmly onto the docking station
and ensuring that the docking station is connected to power. The red LED light will flash
slowly during charge and will stay on solidly when fully charged (see p.4).
9
Easi-Ears®
EL00295 Easi-Ears UG ENGLISH.indd 10 10/03/2015 16:30
Using the Software
The Easi-Ears software has been purpose designed to work with Easi-Ears. It’s
straightforward to use and enables you to add and remove tracks on the headphones
and remote control unit.
See p.4 for software installation and minimum system requirements.
The software will run without any devices (Easi-Ears headphones or the remote control
unit) attached to your PC. However, should you wish to upload or remove audio from
the headphones or remote control unit, these will need to be docked in the docking
station and the docking station plugged into your PC via USB connection.
Once installed, click on the icon on the desktop to open the software.
Alternatively go to Start | All Programs | TTS Group | Easi-Ears.
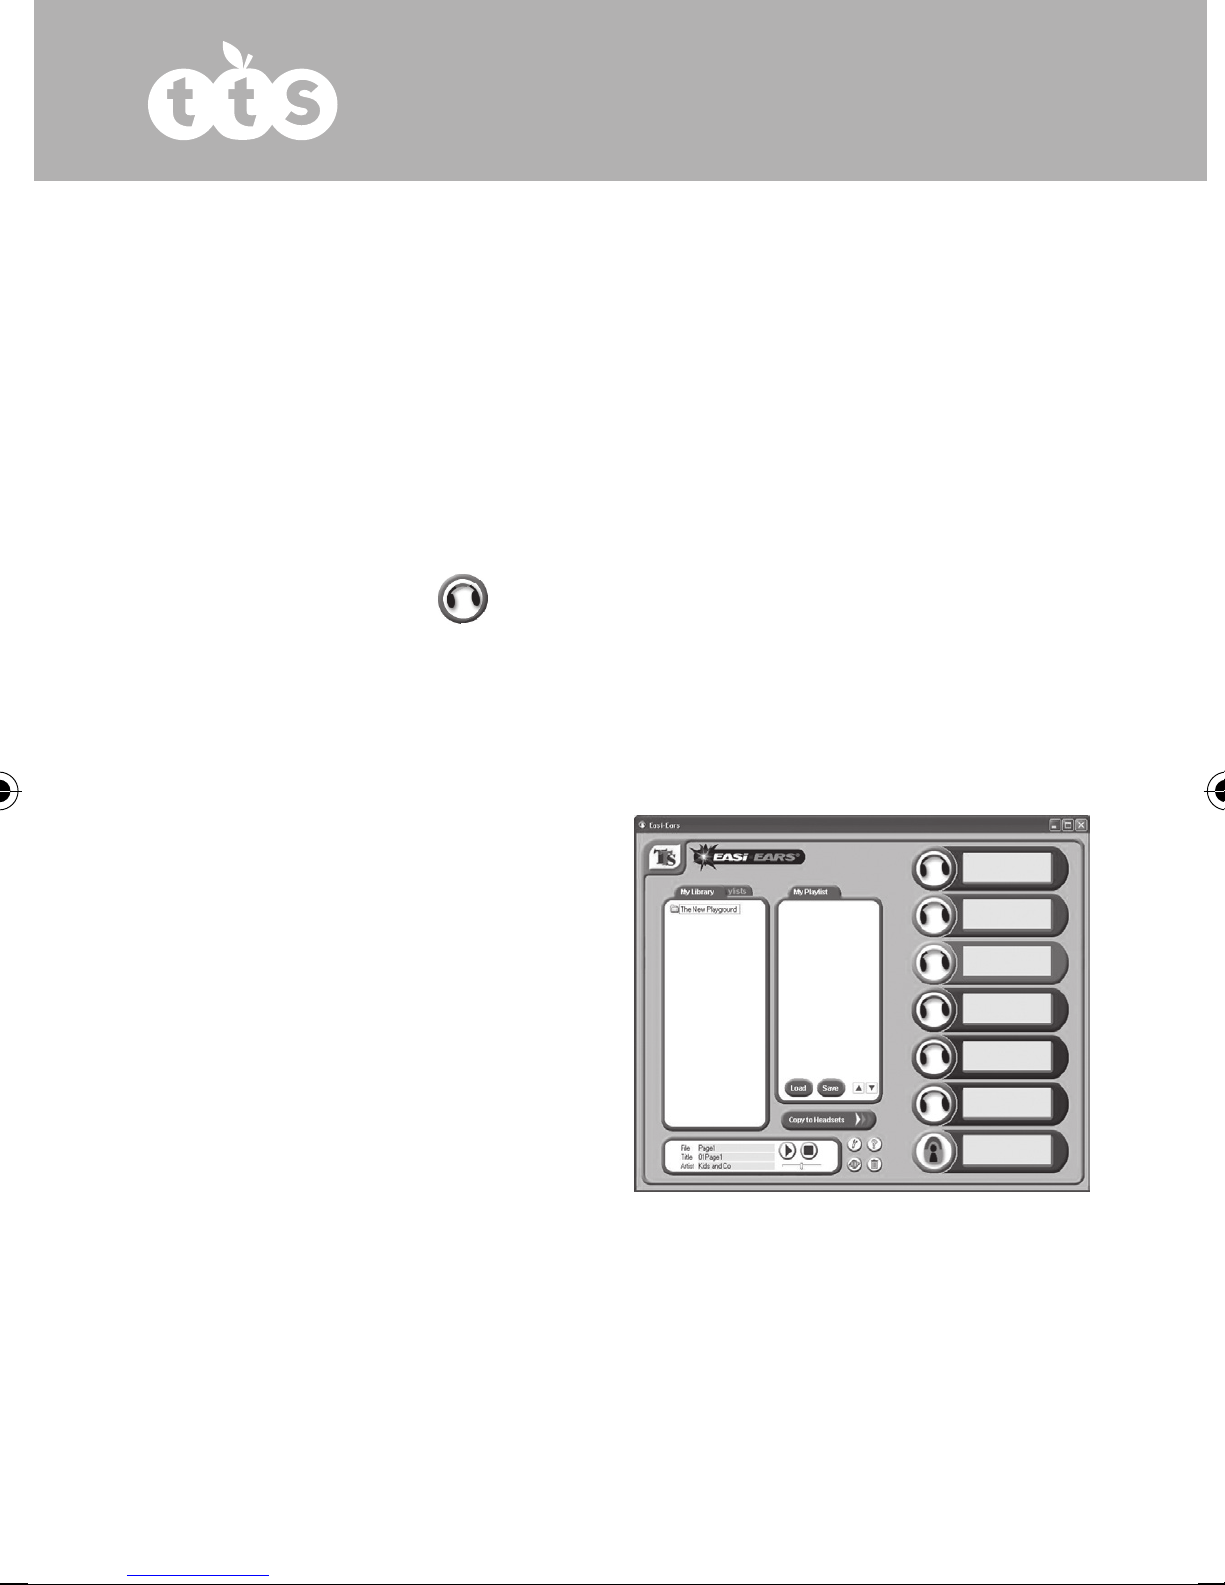
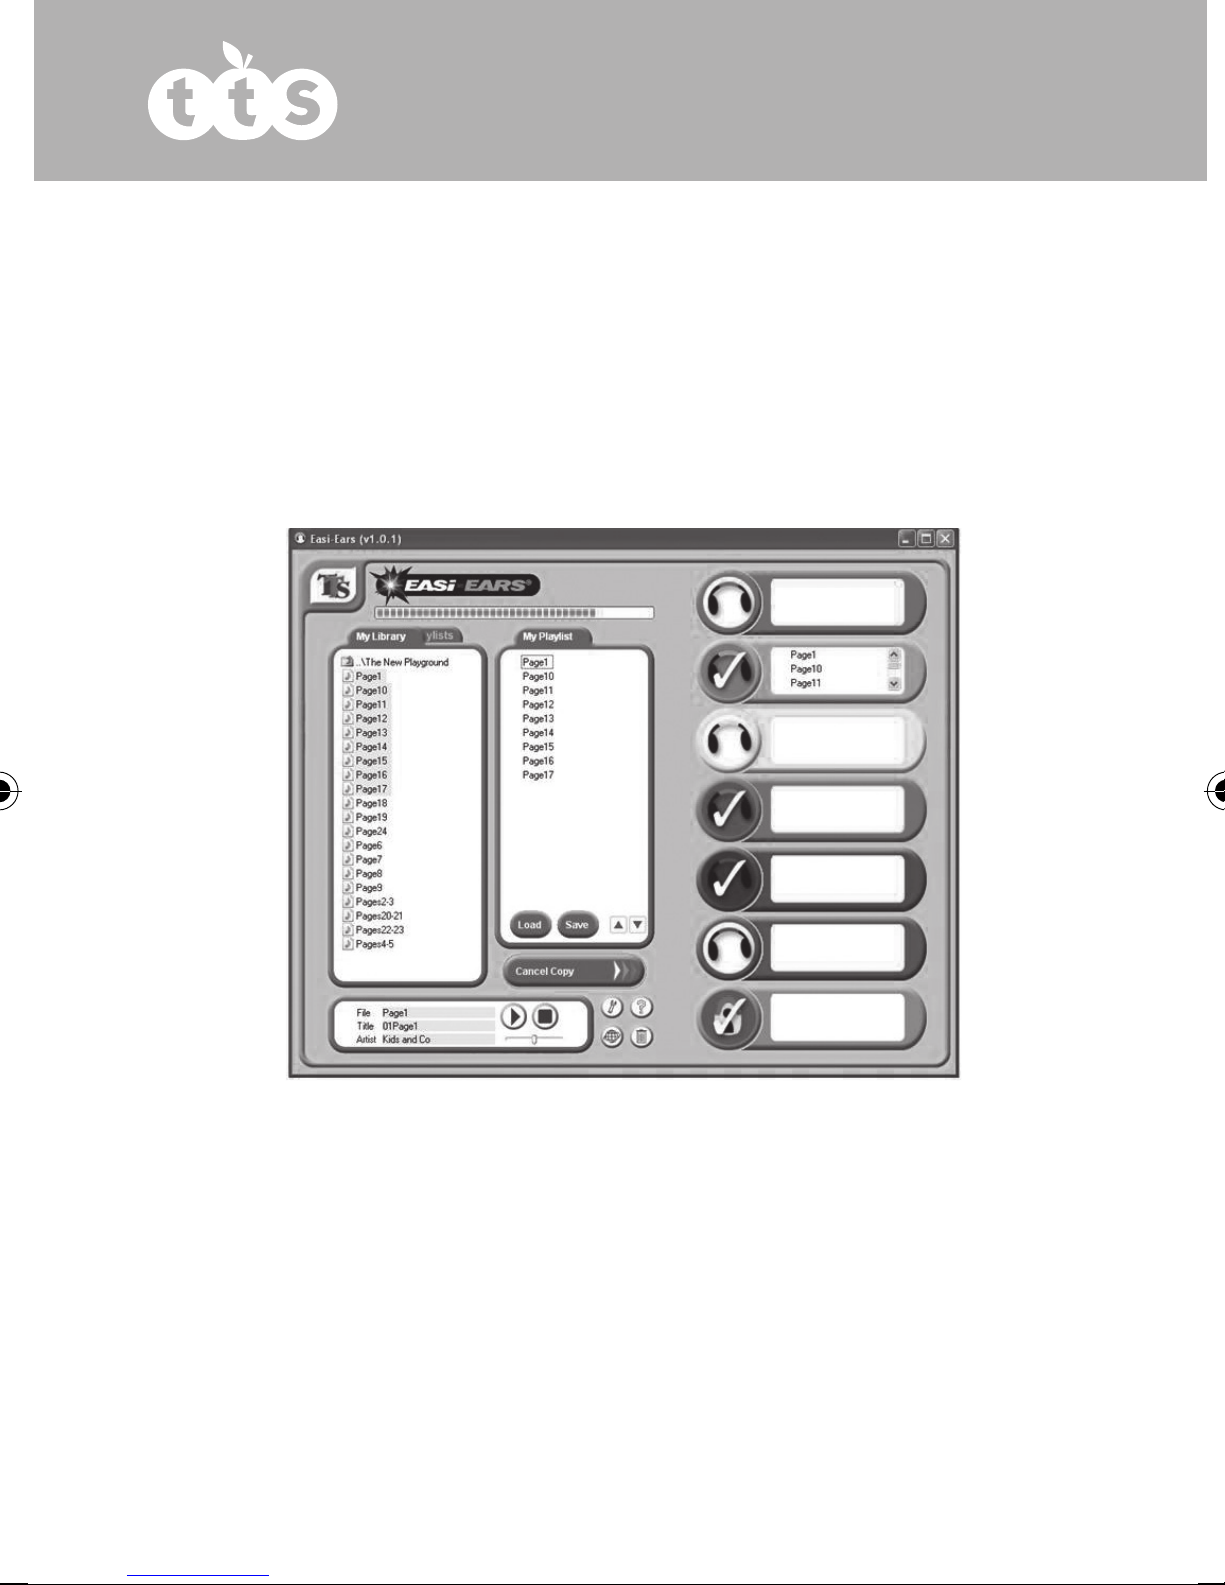
Initially, the “My Library” will contain a folder called “The New Playground” (a sample
audio book title from the Kids & Co series by Rising Stars), “My Playlist” will be empty
and all the devices will be greyed out and disabled as shown below.
Setting up Library Files
Before creating a library of useful stories or music, you should first set up the location of
your library files. From the main screen, press <Ctrl-T> (ie. press the “Ctrl” key and the
“T” key on your keyboard simultaneously). This will open the “Teacher Menu” that allows
you to change a variety of settings. You can password protect this menu if you want.
Select the folder that you want to use for your library and click “Done”. This can be a
network folder to enable all users to access the same library of tracks.
You will note that the headphone panels
are colour coded to reflect the colours of
each of the headphones.
The idea is that you access MP3 files on
your PC through “My Library” and from
here then select files in “My Library” to
create individual play lists, by simply
dragging and dropping the files into the
“My Playlist” folder. From here, you can
then copy to all headsets or select specific
tracks for specific headphones.
Figure 1
10
EL00295 Easi-Ears UG ENGLISH.indd 11 10/03/2015 16:30
Connecting the Headphones
Copying Files
To copy files to any of the connected devices, you can drag an MP3 file from any open
window on your PC (not just within the Easi-Ears software) to the device in the Easi-Ears
software that you require. You can also drag and drop from any list to any other list
within the software, so it is simple to copy a file from one device to another, from the
library to a device or from a device (e.g. remote control unit) to the library.
If you right-click on a file, a menu will pop-up allowing you to copy, paste, rename,
delete and play files directly.
Hold down the ‘Shift’ or ‘Ctrl’ keys to select multiple files to copy, paste or delete.
At the end of the copy process, the software will set the headphones to play
continuously if the “Continuous play” checkbox in the Teacher Menu is ticked. Otherwise,
the headphones will be set to play one track then stop.
See “Copying Playlist to Devices” (p.14) for a quick and easy way to create the same
content on several devices simultaneously.
Headphone capacity
The headphones and remote control unit contain 256Mb of Flash memory, which is
enough to store more than 2 hours of MP3 recordings.
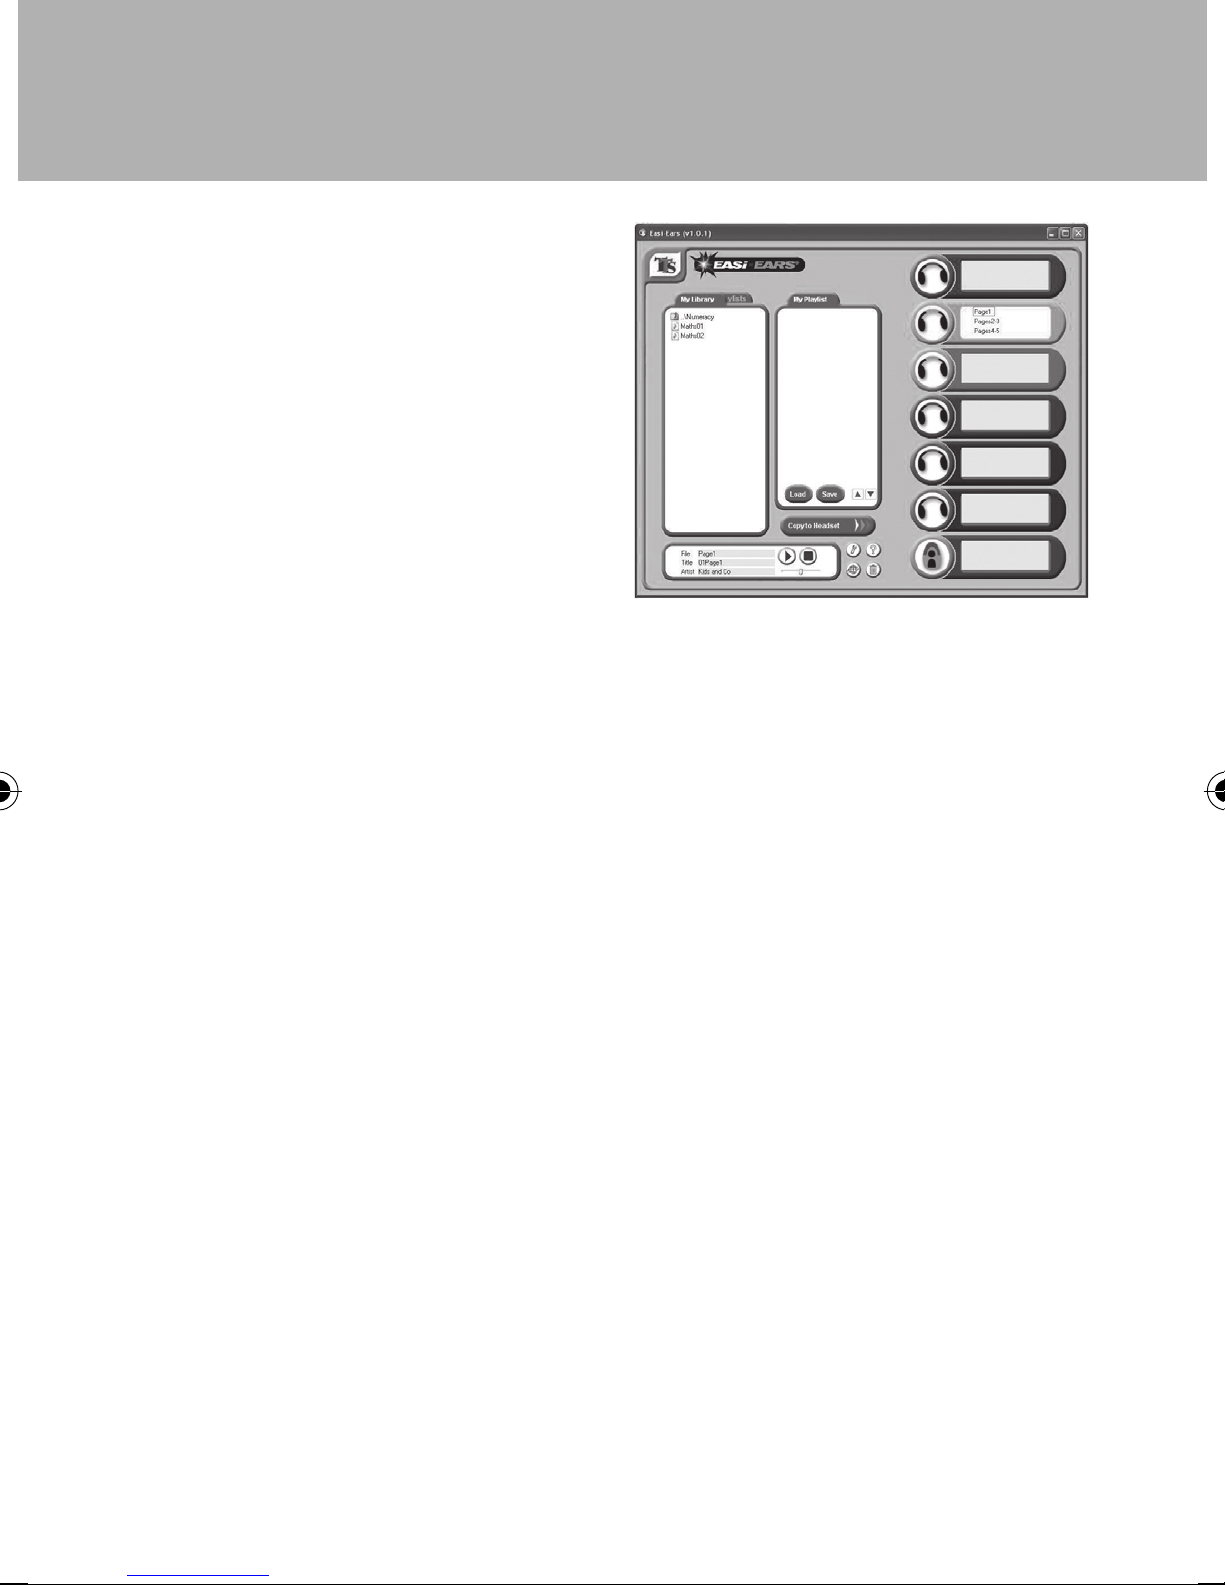
Ensure that the docking station has power
and connect the USB lead to your PC.
When you dock the headphones or
remote control unit in your docking
station they will appear in the software as
enabled devices, and the audio contents
will be shown. See Fig 2 - the orange
headphones have been connected, but
all other devices are not connected.
Figure 1
Figure 2
11
Easi-Ears®
EL00295 Easi-Ears UG ENGLISH.indd 12 10/03/2015 16:30
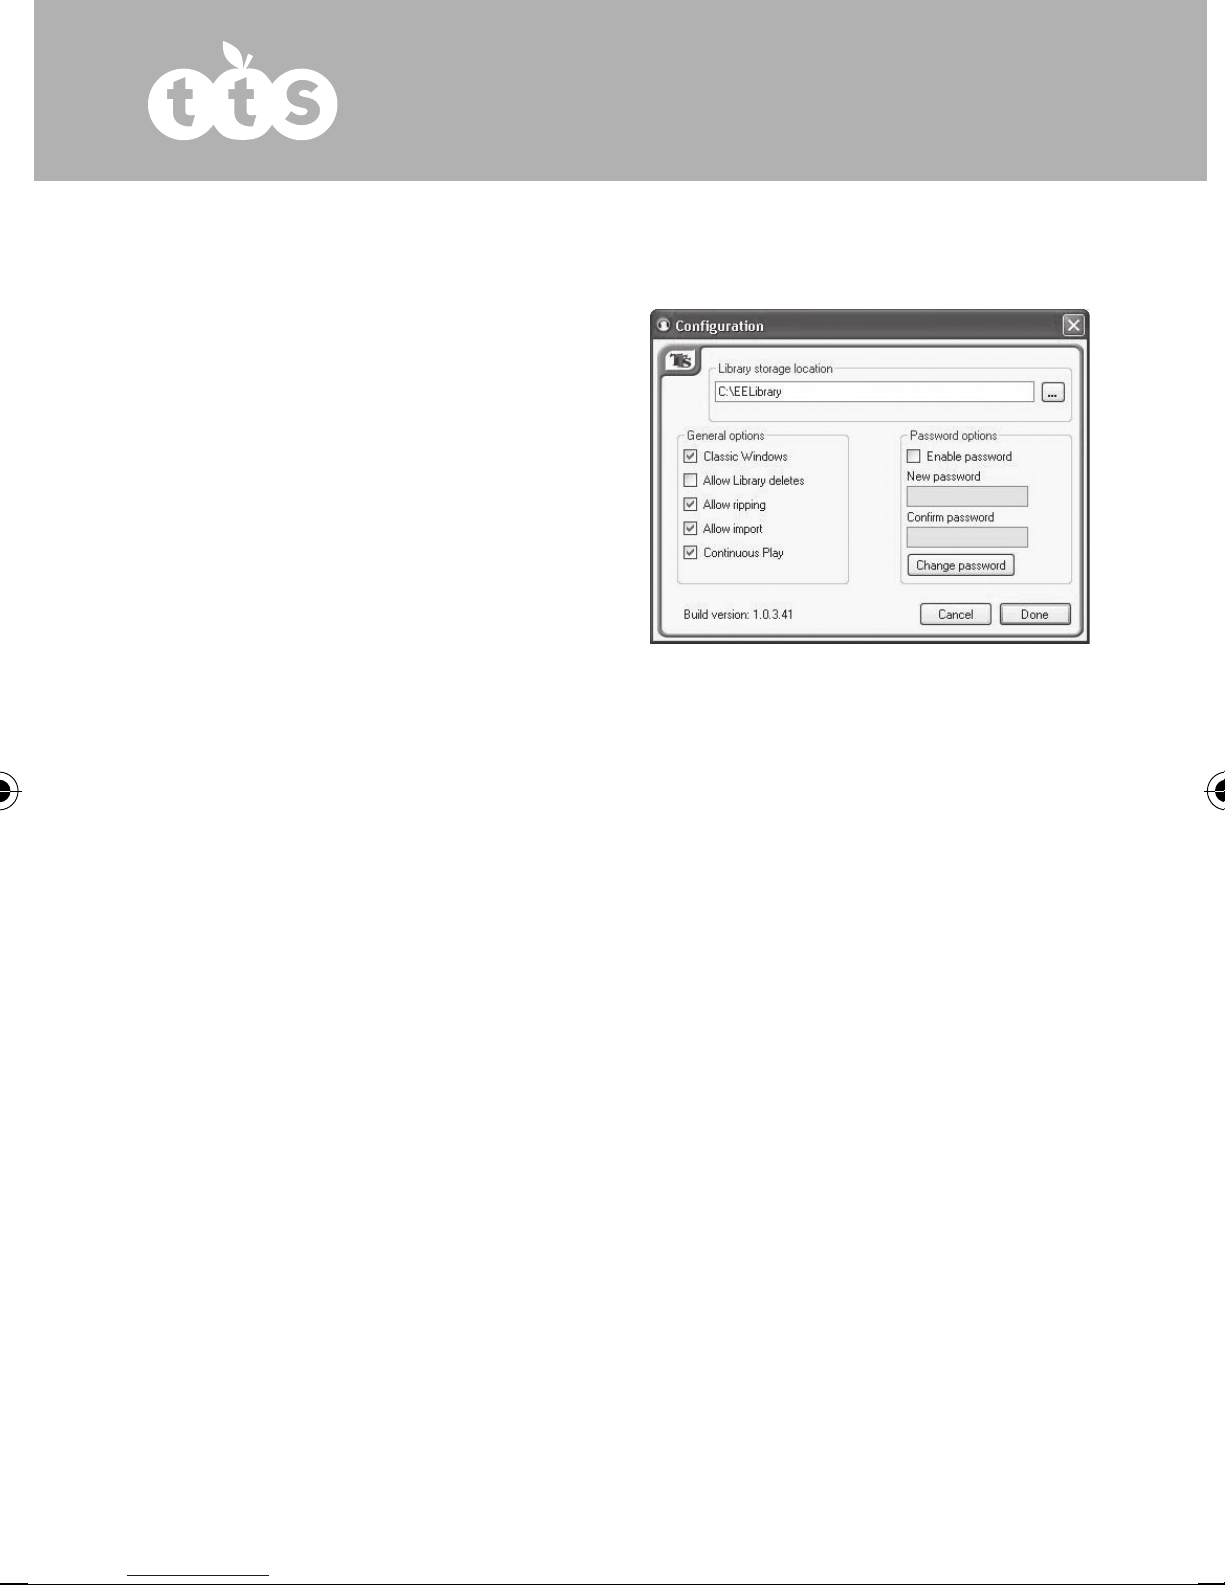
Teacher Menu (Configuration)
Pressing <Ctrl-T> will open the “Teacher Menu” Configuration dialog:
n
Allow Library deletes: Check this to enable files to be deleted from the
Library. This is a transitory setting and will need to be checked each time
you run the program if you want to delete files from the library. Deleting
from the devices or the current playlist is not affected.
n
Allow ripping: If you want to allow ripping CDs into MP3 files, then check
this box. “Ripping” is the term used to convert CD audio tracks into digitised
computer tracks in some format. The software only supports the conversion
of CD audio directly into MP3.
n
Allow importing: Check this to enable importing of external files into the Library,
e.g. files elsewhere on your PC or on the network. This function also allows you to
convert from other audio formats into MP3 while you are importing.
n
Allow Continuous Play: Check this to enable the files copied across to the
headsets and RC unit to be played as a single file. Pressing play once on the
headset or on the RC unit will play all tracks without stopping between each
track. This function can only be applied to a whole playlist at any one time
.
n
To enable the “Teacher Menu” to be password protected, check the “Enable
password” box and enter your new password twice. If the password is
accepted, then this will need to be entered the next time you access this
menu. There is a master password if you forget yours, you will need to
n
Click “Done” to save your new settings and return to the main screen.
n
Classic Windows: With this
checked, the standard Windows
dialogs will appear with a title bar
across the top containing the usual
Minimise and Maximise buttons.
When it is un-checked, borderless
windows with rounded corners
are displayed. When you have a
borderless window, use the mouse
near the top of the dialog to drag
it around the screen, or click and
drag the bottom right corner to
re-size the window.
Figure 3
12
EL00295 Easi-Ears UG ENGLISH.indd 13 10/03/2015 16:30

Library Organisation
The Library can contain files or folders. You can create a new folder within the Library by
right-clicking within the Library area and selecting “New Folder”.
There is no limit on the number of new of folders, or the depth of the folder structure,
so you should use this to create a well-structured storage area for your content. For
instance, your top level folders could be for Numeracy, Literacy, MFL, etc. and lower
level folders for Key Stage 1, Key Stage 2, etc.
Within the Library area, there are different symbols used at the start of each line:
This allows you to return to a higher level within the Library structure. Double-click
to select.
This indicates a lower level folder that you can access. Double-click to select
This indicates a valid MP3 sound file. Single-click to show the properties, or
double-click to play the file.
Playlist Organisation
The “My Playlist” panel allows you to select a number of files from anywhere on your PC
and place them in the order in which you want them to play on the devices.
You can drag and drop MP3 files from “My Library or the devices panels into the “My
Playlist” panel, or copy and paste them. You can also play, rename, or delete by right-
clicking and selecting the required action.
The files will play on the devices in the order shown (top to bottom). There are two
methods of changing the playing order:
1. Select a file and use the sor tbuttons to move it up and down the list
2. Drag and drop a file within the list to the required position
The playing order is set by data within the files, called the “ID3 Tags”. Whenever you
adjust the order within the Playlist or on the devices, these ID3 tags are re-written with
different information so that the playing order is correct.
13
Easi-Ears®
EL00295 Easi-Ears UG ENGLISH.indd 14 10/03/2015 16:30
Copying Playlist to Devices
Easi-Ears software makes it simple to copy your playlist to whichever selection of
devices you require.
Once you have collected all the files you require within your “My Playlist” panel and
settled on a playing order, simply select the required devices and click “Copy to
Headsets”. In Fig 4, the orange, green and blue headphones as well as the remote
control unit have been selected and copying is in progress (see highlighted boxes with
strike through ticks).
Figure 4
This method of copying files to the devices will duplicate the playlist to each selected
device. Therefore all existing files on the selected devices will be deleted before the new
files are copied across. If you click “Cancel Copy” after the copying process has started
on a particular device, all the original files will still have been deleted. However, devices
are updated one at a time, so all devices that have not been processed yet, will still
contain their original files.
At the end of the copy process, the software will set the headphones to play
continuously if the “Continuous play” checkbox in the Teacher Menu is ticked. Otherwise,
the headphones will be set to play one track then stop.
14
EL00295 Easi-Ears UG ENGLISH.indd 15 10/03/2015 16:30

Loading and Saving Playlists
When you are happy with your playlist, you can save it.
Click the “Save” button in the “My Playlist” panel and name the folder (playlist) that you
want to store. If you are using an existing playlist you will be asked if you want to over-
write it.
You can also load a saved playlist, by clicking the “Load” button within the “My Playlist”
panel and selecting the folder (playlist) that you require.
Another way of loading a playlist is to click on the on the “My Playlists” tab in the Library
panel. You can then browse the folders within the playlist structure in the same way that
you browse the Library. Click on the “My Library” tab to return to the Library view.
Figure 5 - My Library view Figure 6 - My Playlists view
How to play a track
You can play a track by double clicking on it and selecting play, or selecting it and
playing it through the play panel (see Fig 7).
Figure 7
15
Easi-Ears®
EL00295 Easi-Ears UG ENGLISH.indd 16 10/03/2015 16:31

Importing New Files
There are various tools provided within the software to enable you to import sounds,
voice and music from a variety of sources into your Library, e.g. you may have
purchased some books that have an audio CD or you want to record your own story.
All files to be used on the Easi-Ears devices must be in MP3 format, so these tools will
automatically convert the files for you to MP3 if necessary.
The options available are:
1. Import MP3 files from outside the Library
2. Convert WAV, WMA and other sound formats into MP3
3. Record sounds directly from a microphone or line-in socket and these
sounds will be automatically converted to MP3
4. Rip tracks from an audio CD
To access any of these functions, click the “Import Tools” button on the main screen.
Note that some of the functions may have been disabled by the teacher from within the
“Teacher Menu”.
See also:
n
Importing and Converting Files (p.16)
n
CD Ripping (p.17)
n
Recording Files (p.18)
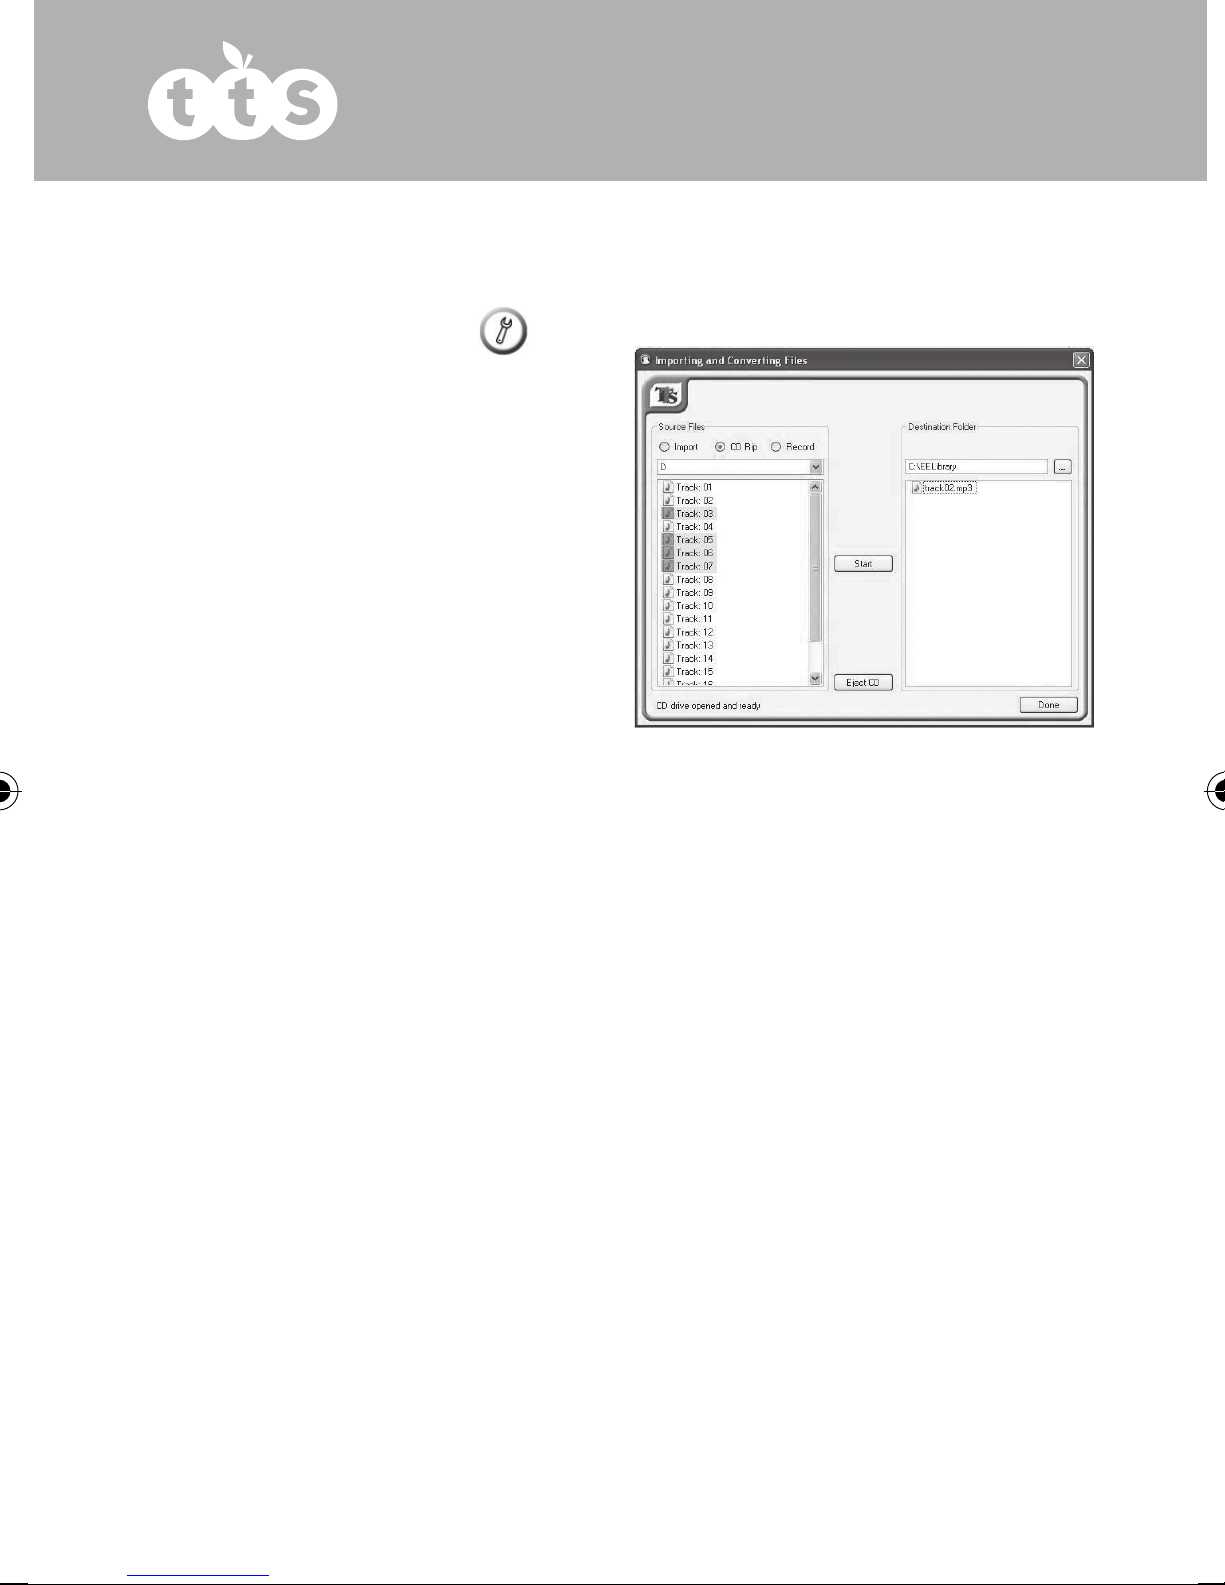
Importing and Converting Files
Many audio files are stored in a format
such as WAV or WMA. These files need
to be converted to MP3 format to enable
the Easi-Ears to play them. The importing
function will automatically convert any file
into MP3 if necessary, before importing into
the Library. To do this:
n
Click the “Tools” button on
the main screen
n
Select the “Import” Source Files
option as shown in Fig 8
Figure 8
16
EL00295 Easi-Ears UG ENGLISH.indd 17 10/03/2015 16:31

n
Select the files that you want to import/convert
n
Select the destination folder
n
Click the “Start” button
n
All files that you have selected will be copied to the destination folder and
converted to MP3 format if necessary
Ripping CDs
If you have a CD with audio content on that you want to use on your Easi-Ears, you will
need to “rip” the audio off the CD and into an MP3 format file. The Easi-Ears software
has a built-in tool to enable this. When you select the ripping function, the Easi-Ears
software will show you the contents of the first CD drive on your PC. You can select other
CD drives, if available, from the drop down list. To rip as CD:
n
Click the “Tools” button on
the main screen
n
Select the “CD Rip” Source Files
option
n
The first available CD drive will be
shown
n
If you have more than one CD
drive, select the one you require
n
Select the tracks that you want to
rip
n
Select the destination folder
n
Click “Start”
n
You will be requested to accept the terms of copying before the ripping
begins
Please note that it is an offence to use copyrighted material for profit making or non-
personal use. Please ensure that you have the necessary permissions and rights to
make a copy before doing so. You will be prompted to accept these terms before CD
Ripping can be performed.
Figure 9
17
Easi-Ears®
EL00295 Easi-Ears UG ENGLISH.indd 18 10/03/2015 16:31
Recording Files
It is straightforward to record your own files directly into the software.
n
Click the “Tools” button on
the main screen
n
Select the “Record” Source Files
option
n
Select the destination folder
n
Select the output filename (default
is “VOICE001”)
n
Ensure the microphone is
switched on, or the external player
is plugged in
n
Click the “Start” button
n
During recording, the audio level
meter will be shown. Keep this in the green area for best results
n
When you have finished recording, press “Stop”.
Figure 10
18
EL00295 Easi-Ears UG ENGLISH.indd 19 10/03/2015 16:31
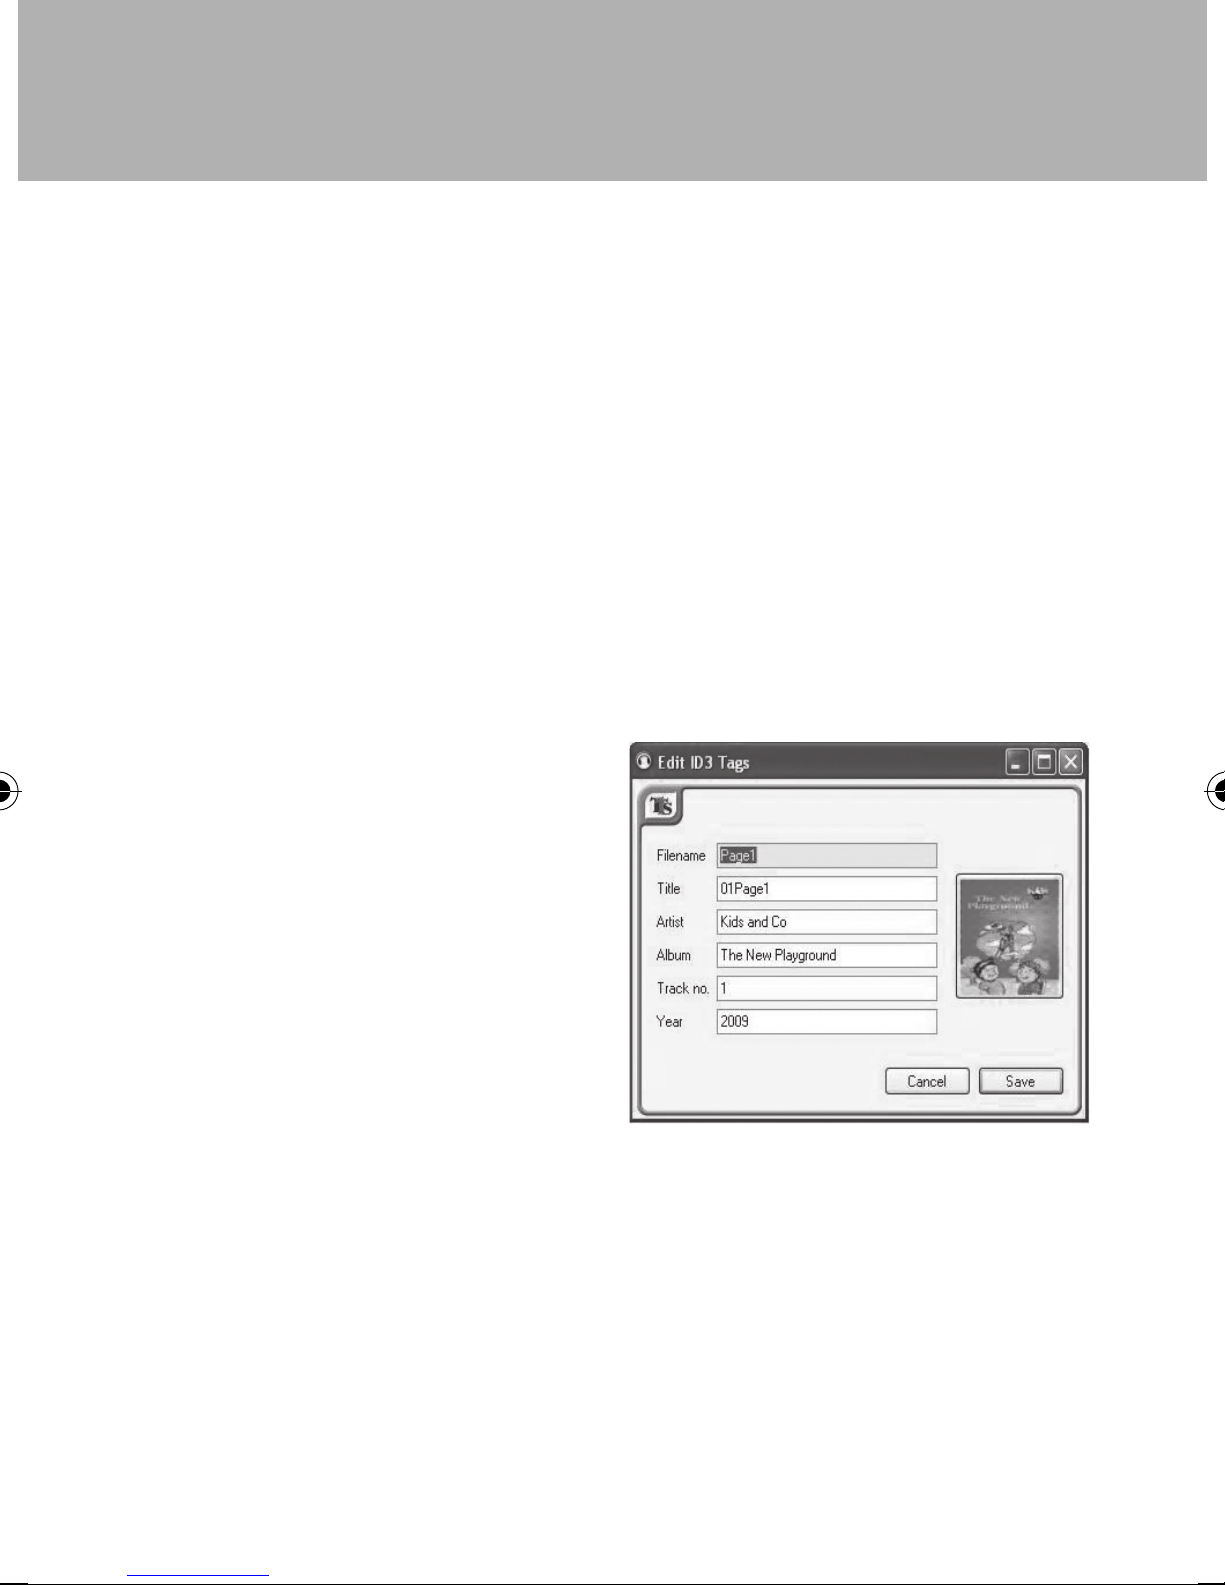
Editing ID3 Tags
ID3 tags are used within MP3 files to provide additional information about the track,
such as the author, album name, year of recording etc. You can also add an image
to each file which can be shown, when the track is selected, by MP3 playing software
such as Easi-Ears, or an MP3 playback device.
The Easi-Ears software uses the ID3 title tag to play the tracks in the required order. This
is done by appending a track number to the front of the title. This number will replace
any other number that has been placed there. You may want to do this to force the play
order of the file. To do this and so change the title field appropriately but be aware that
this field will be modified whenever the file is re-ordered.
The Easi-Ears software allows you to change the following information. You may wish
to do this as you can use the tags to store information about each track which is then
visible to all users of that track at a later date. The use of these tags is fully optional.
n
Title
n
Artist
n
Album
n
Track Number
n
Year
n
Image
To edit the ID3 tags for any file, right click
on the file and select the “Edit ID3 tags”
option from the list.
To edit any text field, simply type in the text
you require. To change the associated
image, click on the image and then
browse to the image file you want to use.
You can delete the image by right-clicking
on it and selecting “Delete”.
Figure 11
19
Easi-Ears®
EL00295 Easi-Ears UG ENGLISH.indd 20 10/03/2015 16:31
Other manuals for Easi-Ears
1
This manual suits for next models
1
Table of contents
Other TTS Headphones manuals


