Tulli Zuccari COLLEZIONE SVIZZERA PLUS Instruction Manual

SVIZZERA PLUS_ CONSIGLI DI INSTALLAZIONE E MANUTENZIONE / RECOMMENDATIONS FOR INSTALLATION AND MAINTENANCE
www.tullizuccari.com
01.2009
Pag 1 di 6
CONSIGLI DI INSTALLAZIONE E MANUTENZIONE
/RECOMMENDATIONS FOR INSTALLATION AND MAINTENANCE
MOBILE PORTALAVABO + SIDE-BOARD COLLEZIONE SVIZZERA PLUS
Tulli Zuccari Design Department. All right reserved. Made in Italy
1. Si declina ogni responsabilità relativa alle eventuali inesattezze contenute in queste informazioni che sono consigli utili per il
montaggio del prodotto, che dovrà essere eseguito da installatore specializzato. Maneggiare sempre con cura ogni
componente del prodotto. /The company declines any responsibility for inaccuracies in the present information providing
suggestions useful for installation of the product. Remember installation must always be performed by a skilled installation
technician. Always handle all product components withutmost care.
2. Tulli Zuccari invita il cliente a controllare l’integrità dei componenti contenuti nell’imballo prima del montaggio e comunicare
immediatamente eventuali difetti. /Tulli Zuccari invites you to check that the components contained in the package are intact before
installation and immediately communicate any defects found.
3. SVIZZERA PLUS è un prodotto artigianale e le fasi di lavorazione sono eseguite a mano, pertanto piccoli imperfezioni riscontrabili non
sono da considerarsi come difetti di produzione. /SVIZZERA PLUS furniture is an artisan crafted product and the processing phases are
performed by hand; for this reason the minor imperfections found cannot be considered production defects.
4. Tulli Zuccari srl si riserva il diritto di apportare in qualsiasi momento modifiche tecniche, costruttive, dimensionali utili al miglioramento dei
propri prodotti, senza obbligo di preavviso o di sostituzione. /Tulli Zuccari srl reserves the right to make any technical, construction,
dimensional modifications it deems fitting to improve its products at any time and without being required to give prior notice or make
replacements.
5. Il montaggio del prodotto deve essere eseguito da un installatore specializzato /Product installation must be performed by a skilled
installation technician.
6. Lo smaltimento dell’imballo e del prodotto alla fine del suo utilizzo deve essere realizzato secondo le modalità previste dall’azienda di
smaltimento rifiuti competente sul territorio ove è installato il prodotto. /Always dispose of packaging, and the product when it is no longer
used, in compliance with the standards in force and applied by the competent waste disposal company operating in the territory where the
product is installed.
7. Tulli Zuccari srl. declina ogni responsabilità per un uso improprio del prodotto, per danneggiamenti a cose o persone dovute al non
corretto montaggio del prodotto, o alla rottura accidentale o casuale dello stesso. /Tulli Zuccari srl declines any responsibility for
improper use of the product, property damage or injury due to incorrect installation or accidental breakage of the product.
Tulli Zuccari Srl. – Zona Industriale Bevagna (PG) ITALIA
T+39 0742 362040 F+39 0742 361936 - www.tullizuccari.com
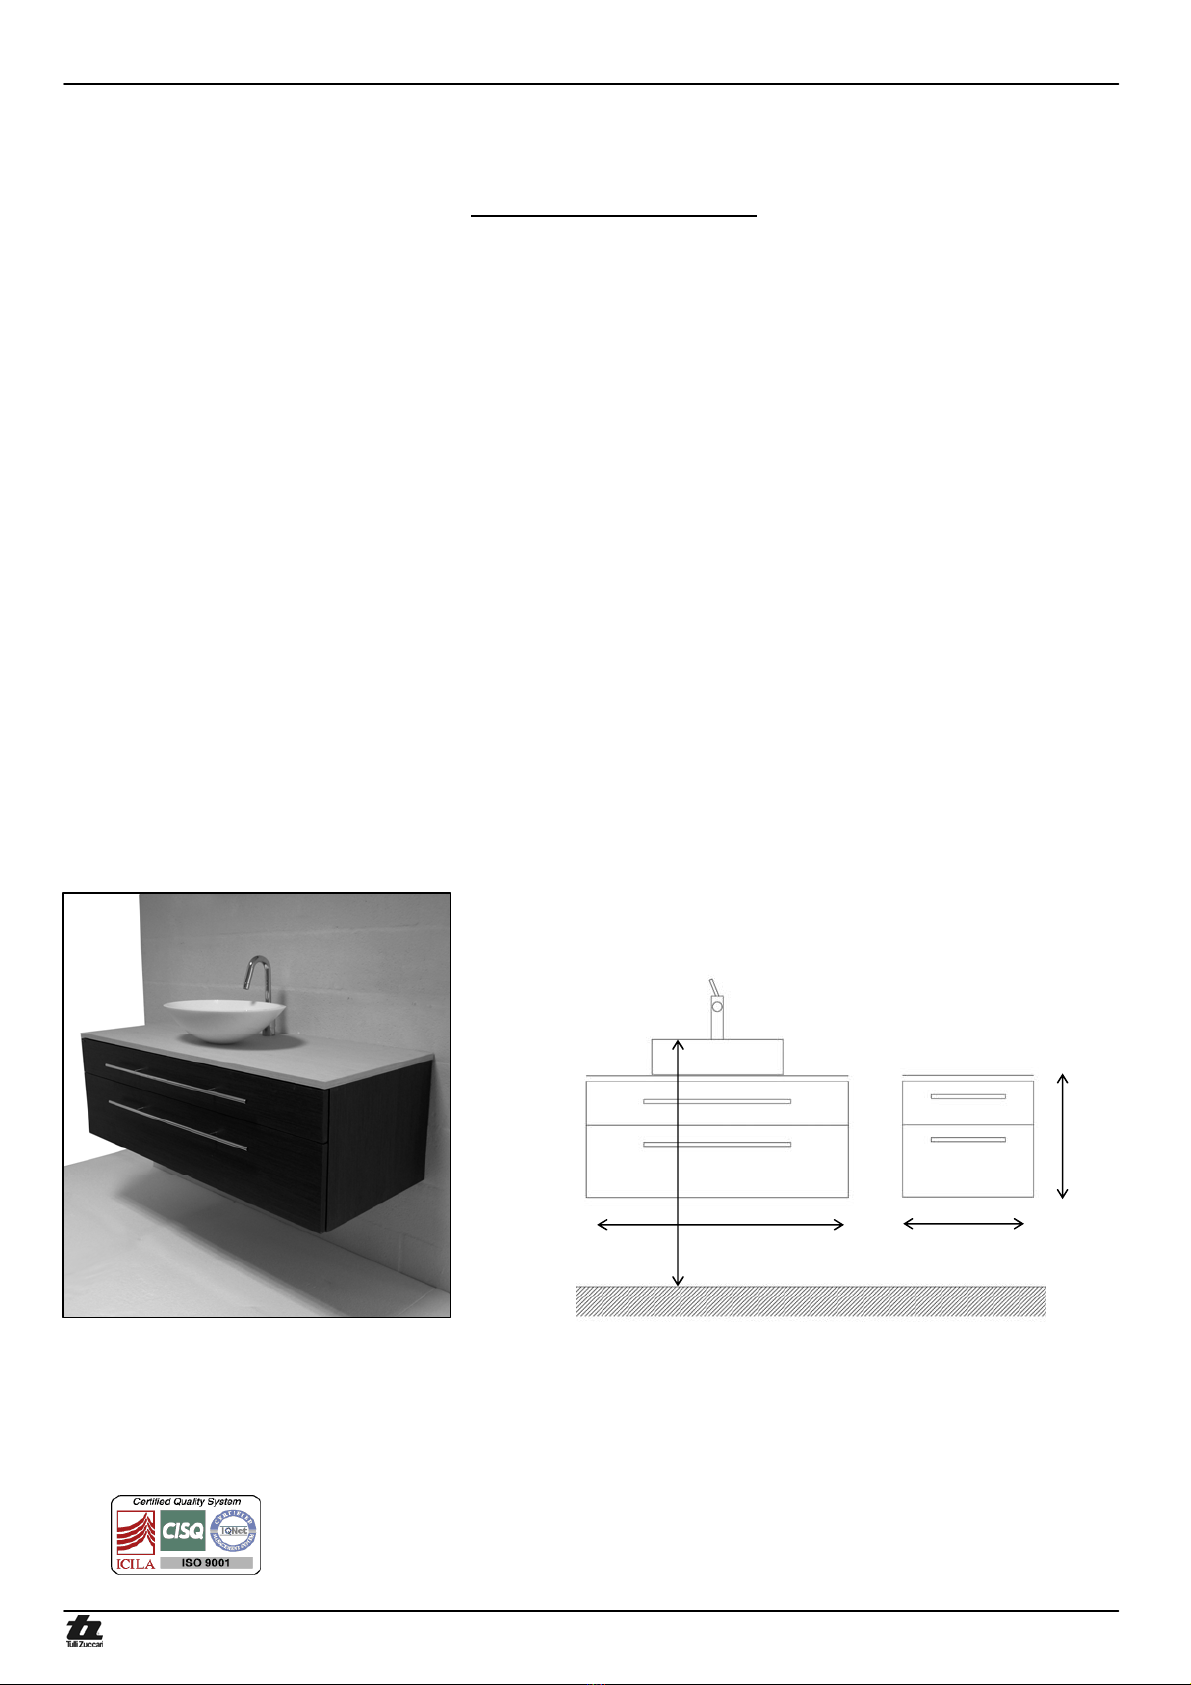
MOBILE PORTALAVABO
L: 50/90/125/145/160/180 cm
H: 40 cm
P: 40/52 cm
L
40cm
SIDE BOARD
L: 50/70/90/105/125/145/160/180 cm
H: 40 cm
P: 27/40/52 cm
L
86 cm

SVIZZERA PLUS_ CONSIGLI DI INSTALLAZIONE E MANUTENZIONE / RECOMMENDATIONS FOR INSTALLATION AND MAINTENANCE
www.tullizuccari.com
01.2009
Pag 2 di 6
01
02
03
04
05
06
07
08
AE
V2
AE
SS
SB
S
ASSE X
ASSE Y
3mm
3mm 3mm

SVIZZERA PLUS_ CONSIGLI DI INSTALLAZIONE E MANUTENZIONE / RECOMMENDATIONS FOR INSTALLATION AND MAINTENANCE
www.tullizuccari.com
01.2009
Pag 3 di 6
FASI DEL MONTAGGIO
A_ DISIMBALLO DEL PRODOTTO
•Estrarre i componenti del prodotto dall’imballo aprendo con cura la confezione dal lato indicato
•L’imballo contiene: 1) Il mobile contenitore 2) Staffe in acciaio, tasselli, viti per fissaggio a muro 3) Istruzioni di montaggio
Prima di smaltire l’imballo attendere di avere installato il prodotto e verificato il corretto funzionamento
B_ FISSAGGIO DELLE STAFFE A MURO PER MOBILE PORTALAVABO E SIDEBOARD (01, 02, 03)
•Dopo avere individuato la posizione del mobile sulla parete (01), per determinare un’altezza di mm 860 del filo superiore della
vaschetta scelta (altezza consigliata), in relazione al top scelto, fissare le staffe AE (03) a muro, utilizzando gli appositi tasselli in
dotazione (diametro foro 8 mm) ad un’altezza (*H ASSE X – 01, 02) evidenziata nel disegno tecnico allegato al prodotto.
•La distanza Ltra gli ASSI Y passanti per il centro delle staffe (AE) dipenderà dalla larghezza del mobile (M) secondo il disegno che
segue.
•Si raccomanda l’uso di una livella per verificare che le staffe (AE) siano perfettamente orizzontali (03) e si consiglia di verificare la
corretta tenuta del muro prima di agganciare il mobile.
M 1450 1600 1800
L1 715 790 890
L2 575 650 750
M 500 700 900 1050 1250
L394 540 740 890 1090
D 53 80 80 80 80
M 1450 1600 1800
L3 352 390 440
L4 586 660 760

SVIZZERA PLUS_ CONSIGLI DI INSTALLAZIONE E MANUTENZIONE / RECOMMENDATIONS FOR INSTALLATION AND MAINTENANCE
www.tullizuccari.com
01.2009
Pag 4 di 6
C_ INSTALLAZIONE DEL MOBILE PORTALAVABO E SIDE BOARD (02, 03, 04, 05)
•Dopo avere verificato che le staffe AE sono perfettamente allineate (03), sollevare il mobile dai lati (necessari due operatori) ed
agganciarlo con molta cura sulle staffe AE (04) verificando che sia perfettamente in piano con l’aiuto della livella (05).
•Per ottenere la perfetta planarità agire sulla vite distanziatrice V2 presente nella parte inferiore della staffa AE (02, 05)
•Bloccare infine il mobile agendo sulla vite V1 della staffa AE (02, 05)
D_ INSTALLAZIONE TOP (04, 06)
•Togliere la pellicola dalle strisce di bi-adesivo (SB), come indicato nella figura 04.
•Posizionare il top con molta attenzione (06) verificando che fuoriesca ai lati e davanti di circa 3 millimetri
•Per impedire infiltrazioni d’acqua, applicare ESCLUSIVAMENTE silicone neutro (S) sull’angolo posteriore tra il top e la parete
•Seguire la stessa procedura per il top del side board
•Per l’installazione del rubinetto fare riferimento alle specifiche istruzioni (solo per mobile portalavabo)
E_ REGOLAZIONE ANTE (07)
•Rimuovere la targhetta presente sulla cerniera o l’ammortizzatore Blumotion
•Regolazione orizzontale: agire sulla vite A
•Regolazione in altezza: agire sulle viti B
•Regolazione in profondità: agire sulla vite C
F_ REGOLAZIONE DEI FRONTALI CASSETTI E LORO SMONTAGGIO (08)
•Rimuovere la targhetta di copertura
•Regolazione orizzontale: agire sulla vite RA fino ad ottenere la regolazione corretta (+/- 2 mm)
•Smontaggio frontale cassetto: agire con il cacciavite sulla croce metallica RB
•Regolazione in altezza: agire sulla vite RC fino ad ottenere la regolazione corretta (+/- 2 mm)
•Riposizionare la targhetta di copertura
•Rimozione cassetto: estrarlo e sollevarlo leggermente seguendo il movimento indicato dalla freccia in figura 08
•Aggancio cassetto: estrarre le guide, appoggiare il cassetto tenendolo sollevato anteriormente e chiuderlo sino all’avvenuto aggancio
G_ MANUTENZIONE E PULIZIA DEL PRODOTTO
•Per la pulizia delle superfici laccate od in essenza utilizzare esclusivamente acqua con sapone liquido neutro. Evitare l’impiego di
solventi, abrasivi e prodotti acidi
•Per la pulizia dei top in vetro utilizzare alcool etilico o prodotti per vetro in commercio. Evitare l’impiego di solventi, abrasivi e prodotti
acidi

SVIZZERA PLUS_ CONSIGLI DI INSTALLAZIONE E MANUTENZIONE / RECOMMENDATIONS FOR INSTALLATION AND MAINTENANCE
www.tullizuccari.com
01.2009
Pag 5 di 6
ASSEMBLY PROCEDURES
A_ UNPACKING THE PRODUCT
•Remove the product parts from the packaging taking care to open the pack where indicated.
•The pack contains: 1) The unit 2) Steel brackets, wall plugs, screws for fixing to the wall 3) Assembly instructions
Before disposing of the packaging wait until the product has been assembled and checked that it is in good working order.
B_ INSTALLING THE BRACKETS FOR THE WASHBASIN UNIT AND SIDEBOARD (01, 02, 03)
•Decide on the position of the cabinet on the wall, and in order to install the counter-top at a height of 860 mm from the floor (the
recommended height) install the brackets (AE) on the wall, using the dowels which are included (8 mm diameter) at a height of (*H
ASSE X 01, 02) from the floor, as shown in the technical illustration which is included.
•The distance Lbetween the Y AXIS (“ASSE Y”) going through the middle of the brackets (EA) will depend on the width of the unit (M)
as can be seen in the diagram that follows.
•You are advised to use a level to check that the brackets (EA) are exactly horizontal (03) and also to check that the wall supports well
before fixing the unit.
M 1450 1600 1800
L1 715 790 890
L2 575 650 750
M 500 700 900 1050 1250
L394 540 740 890 1090
D 53 80 80 80 80
M 1450 1600 1800
L3 352 390 440
L4 586 660 760

SVIZZERA PLUS_ CONSIGLI DI INSTALLAZIONE E MANUTENZIONE / RECOMMENDATIONS FOR INSTALLATION AND MAINTENANCE
www.tullizuccari.com
01.2009
Pag 6 di 6
C_ INSTALLING THE UNIT/SIDE BOARD (02, 03, 04, 05)
•When the brackets AE are exactly horizontal (03), lift the unit by its sides (two workers are needed) and carefully fix the unit on the
•Work on the V2 screw (which is on the AE bracket) to make the unit exactly horizontal (02, 05).
•Fix the unit working on the screw V1 of the bracket AE (02, 05)
D_ INSTALLING THE TOP (04, 06)
•Remove the backing from the double sided tape (SB), as indicated in the picture (04)
•Rest the top very carefully (06) checking that it top juts out about a couple of millimetres on the three sides.
•Apply ONLY neutral silicone (S) on the back angle between the top and the wall to avoid water damage. Use the same procedure as
with the top of the side board.
•For tap installation use the specific instructions (only for washbasin units).
E_DOOR ADJUSTMENT (07)
•Remove the label from the hinge or the Blumotion shock-absorber
•Horizontal adjustment: Use the screw labeled A
•Height adjustment: Use the screw labeled B
•Depth adjustment: Use the screw labeled C
F_DRAWER FRONT ADJUSTMENTS AND DISMANTLEMENT (08)
•Remove the cover label
•Horizontal adjustments: Use the screws labeled RA until the correct distance is obtained (+/- 2 mm)
•Dismantlement of drawer front: Loosen the metallic RB cross with a screwdriver
•Height adjustment: use the screws labeled RC until the correct distance is obtained (+/- 2mm)
•Place the cover label back in the correct position
•Drawer removal: Pull it out while lifting it slightly following the movement indicated by the arrow in figure 08
•Drawer hinging: Take out the runners, place the drawer on them, keeping the front end elevated and close it until it hooks in to the
hinge
G_ MAINTAINING AND CLEANING THE PRODUCT
•For cleaning the lacquered or wood surfaces use only neutral liquid soap and water. Avoid using abrasive solvents or acidic products.
•For cleaning the glass tops use ethylic alcohol or products for cleaning glass on the market. Avoid using abrasive solvents or acidic
products.
Table of contents
Languages:
Popular Indoor Furnishing manuals by other brands

Regency
Regency LWMS3015 Assembly instructions

Furniture of America
Furniture of America CM7751C Assembly instructions

Safavieh Furniture
Safavieh Furniture Estella CNS5731 manual

PLACES OF STYLE
PLACES OF STYLE Ovalfuss Assembly instruction

Trasman
Trasman 1138 Bo1 Assembly manual

Costway
Costway JV10856 manual