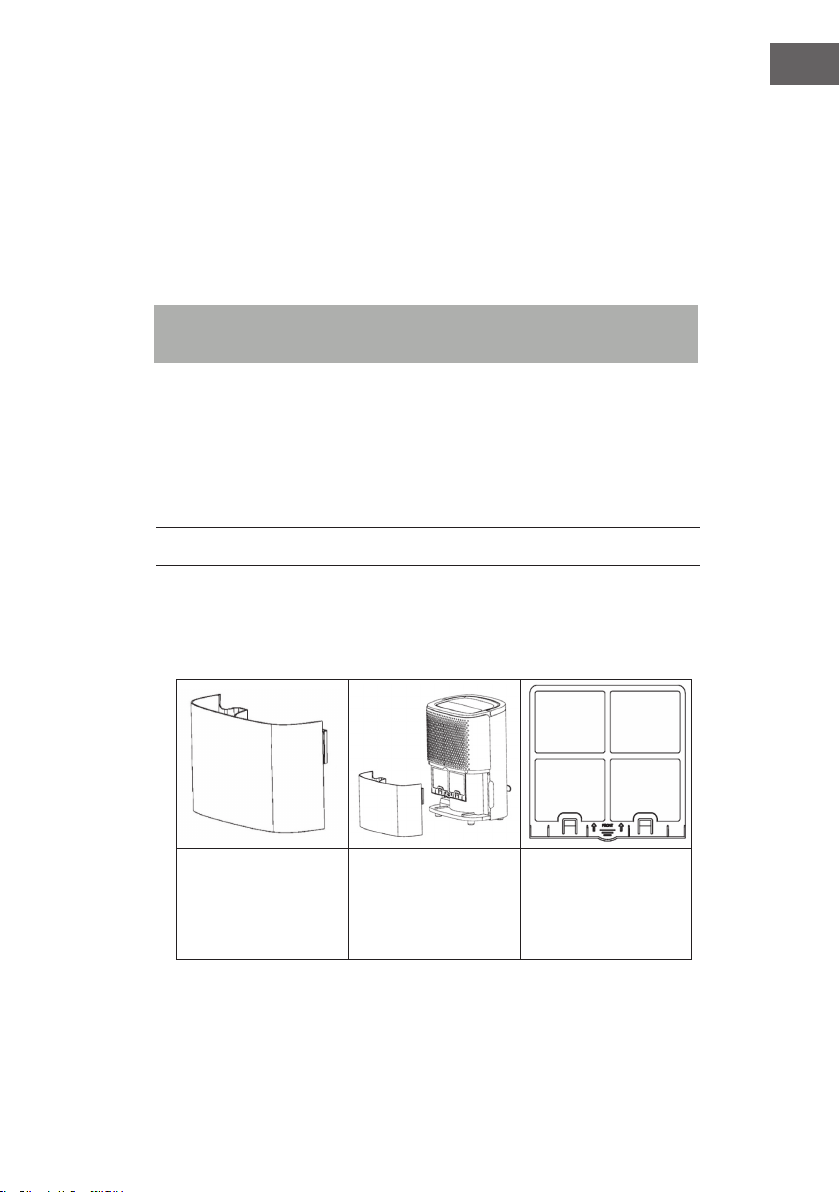
turbionaire Smart 10 Eco User manual

Smart 10 Eco
Smart 12 Eco
Dezumidificator de aer
Dehumidifier
Luftentfeuchter
Déshumidificateur d’air
Deumidificatore
Deshumidificador de aire
www.turbionaire.com


EN
Dear Customer,
Congratulations on purchasing this equipment. Please read this manual carefully and
take care of the following hints to avoid damages. Any failure caused by ignoring the
mentioned items and cautions mentioned in the instruction manual are not covered by
our warranty and any liability.
TECHNICAL DATA
Power supply 220-240 V ~ 50 Hz
Power consumtion 200 W
Dehumidifying capacity 10L/ 12L day Smart 10 Eco / Smart 12 Eco ( 30°C, RH 80%)
Water tank 1.8 L Smart 10 Eco / Smart 12 Eco
Manufacturer:
Intax Trading SRL, Str. Libertății A1-A3, 140017,
Alexandria, Teleorman, Romania.
This product complies with the following European
directives:
2014/30/EU (EMV)
2014/35/EU (LVD)
2011/65/EU (RoHS)
206/2012/EU (ErP)
Declaration of conformity
Model EAN: 5949096154028 (Smart 10 Eco) / 5949096154011 (Smart 12 Eco)

EN
SAFETY INSTRUCTIONS
•Please read the operating instructions carefully before using your dehumidier for
the rst time and keep it on a safe oor.
• Never immerse the appliance in water or other liquids.
•Place the unit on a stable at surface to avoid loud noises and vibrations.
• Never operate the appliance if a cable or connector has been damaged, after
appliance malfunction or if the appliance was dropped or otherwise damaged.
•The appliance may only be repaired by qualied personal, improper repair work
can be a source of considerable danger for the users.
• Pull out the power plug before transporting it and / or before cleaning.
•Operate the appliance only at the voltage specied on the rating label.
• The device may not be connected to a power strip with other household appliances.
• Use the appliance only in the household, and only for the purpose it was
developed for.
•Do not operate this unit near heating appliances and ammable or dangerous
objects.
•If the dehumidier is operated in a room with gas driven devices, so the room must
be aired regularly and often.
• Please use the function of the internal drying, if the device is not used for a long
time. This will prevent formation of mildew and unpleasant smell inside the unit.
• Do not place heavy objects on the appliance.
• Do not hang curtains or wet clothes in front of the air outlet, this will overload the
device.
• The drainage hose may not be installed outdoors at low temperatures.
• To prevent spillage, empty the water tank before relocating the appliance.
• Do not tip the appliance to any side as escaping water could damage the
appliance.
•If the supply cord is damaged, it must be replaced by a qualied person to avoid
a hazard.
• If you smell the smoke during start-up or if you can see the smoke, immediately
disconnect the power plug out and contact your dealer.
• The unit should be installed with a minimum distance of 20 cm from the wall or other
obstacles.
• This appliance can be used by children aged from 8 years and above and persons
with reduced physical, sensory and mental capabilities or lack of experience and
knowledge if they have been given supervision or instruction concerning use of the
appliance in a safe way and understand the hazards involved. Cleaning and user
maintenance shall not be made by children without supervision.

EN
INSTALLATION
• Empty the water tank before turn on the unit.
• During the operation, keep unit closed to the door and windows closed to save
energy.
• Make sure no block at air inlet and outlet
• Place the appliance on a stable surface and allow at least 20 cm of space around
the appliance and at least 50 cm in the area to allow air to circulate sufciently.
PRODUCT DESCRIPTION
Front
Water
tank
Control
Panel
Filte
r

EN
Back
CONTROL PANEL AND KEYS
Control Panel
Handle
Air Outlet
Wires Hook
Continuous
Drainage Mouth

EN
Keys and Functions
Timer: 24 hour countdown, press the key to turn the timer on or off, each press will increase the
operating time by one hour; the unit will operate for 1 to 24 hours. The counting is canceled, pressing
the key again until the number 0 appears on the display.
Internal drying function: Press the INSIDE DRYING key to start the internal drying function
before turning off the unit. This feature prevents mold formation inside the device due to moisture
remaining after it has stopped.
Fan: In automatic dehumidification mode (AUTO) and drying mode (CONTINUOUS), press this
key to change the speedFan: Low Speed / High Speed. For proper operation of the appliance, the fan
operates continuously until it stops.
Display: In automatic dehumidification mode (AUTO) or in textile drying mode (CONTINUOUS),
it will indicate the actual room humidity, the humidity set, and in TIMER mode will indicate the
time set in hours.
Humidity adjustment: In Auto Dehumidification mode (AUTO), press the key to set the
desired humidity, the range of humidity that can be set may vary from 30% to 80%. Starting
from a percentage, you can drop 5% each time you press. (Example: 50% moisture on the screen,
press the humidity adjustment key once and you will reach a value of 45%)
Mode: When you turn on the device or start the timer, press this key to choose Automatic
Dehumidification (AUTO) or Continuous Dehumidification (CONTINOUS) - which can be used
as a drying function for textiles. The LEDs will alternately illuminate when choosing the desired
mode.
On / Off: Press the key to turn on / off the device.
OPERATION AND FUNCTIONS
TIMER to turn off the device
When the device is on, press the TIMER key to activate the function; to set the desired time, press this key
successively, the interval is from 1 to 24 hours and the operating time will be adjusted one hour each time.
When the set time is exhausted, the device will turn off. The number of hours set will be displayed and will
blink 5 times at the setting time for confirmation.
Automatic Dehumidification Mode (AUTO)
In this mode, if the room humidity is higher than 5% humidity, the compressor and fan will start. If the room
humidity is lower than the set humidity by 5%, the compressor will shut down and the fan will operate
according to the initial setting and to read the humidity in the air.
The initial humidity value is 50%.
Continuous dehumidification (CONTINUOUS) - drying function of textile materials
In this Mode, the unit will work regardless of the humidity in the room. The compressor and fan will work, the
fan speed being adjustable.

EN
DRAINAGE
Drainage manually
When the water tank is full (the water level indicator in the reservoir can be visually viewed at any
time), until it is drained, the unit will stop running under the action of the float in the tank, a beep
will sound 10 times briefly, and the message "FL" and the red red tank LED full will be displayed.
Remove the water tank from the device and empty it from the water. Reinstall the water drain tank
and the dehumidifier will restart. Install the water tank as instructed in the following figures.
NOTE: Note: Before inserting the water tank, make sure that the float at the top of the tank is mobile
(avoid being blocked)..

EN
Continuous drainage (optional)
CAREFUL! Remove the rubber plug attached to the continuous drain connector from the back of
the device before connecting the hose. Remove the water tank and lock with the rubber plug
removed, the hole on the front of the device, which normally drains the water in the tank, thus water
being directed to be discharged through the rear part to which it connects drain hose.
Connect a water drain hose (included in the pack) to the back of the device
(inner diameter of the connector: 9 mm), the water can be drained continuously. Check that the
hose is properly connected to the drainage hole to avoid accidental water leakage.
Note: The drain hose may not be too long (usually 0.6 m), it should not be positioned above the
level of the drain hole to ensure drainage of the drained water.
Anti-frost Function
This function will be activated when the ambient temperature falls below 16°C. The
display will show „P1“. It will be activated for a period of 8 minutes every 38 minutes
between 2-12°C. It will also be activated for a period of 5 minutes every 60 minutes
between 12-16°C.
CARE AND CLEANING
• Turn off this appliance and pull out plug before maintaining or repairing.
•Pull out plug if dehumidier is not used for long time
• Please do not use benzene, alcohol, gasoline or other chemical reagent to clean
unit.
Clean the water tank
with soft cloth.
Use wet cloth to clean
appliance surface,
do not use detergent
or grinding sponge to
damage surface.
Clean the filter at least once every two weeks or whenever it is needed. The impurities accumulated
in an uncleaned filter can be absorbed by the fan fixing on the vaporizer, condenser, and other
components inside the unit, resulting in decreased performance and the occurrence of various failures
that do not, in this case, constitute the object of the warranty.
If impurities are found inside the unit, contact your nearest authorized service center for cleaning it.
Do not perform internal cleaning (other than cleaning and washing the washable filter) than with
specialist personnel.

EN
TROUBLESHOOTING
Problem Possible Cause Suggested Solution
Unit doesn’t
work.
Is the power plug connected? Put the plug in the socket.
Water tank is full or water tank
is not assembled well.
Pour away the water in water-
tank, and put water tank into
the unit.
Operation temperature is too
low or too high
Use this dehumidier under the
environment 5-32°C.<
No outlet air. Operation temperature or
humidity is too low.
Under dry environment,
dehumidifying effect will be not
so obvious.
Is air outlet or air inlet
blocked?
Clean the air outlet or air inlet.
No outlet air. Is lter blocked? Clean the lters.
Water leakage. Drainage pipe is not tightly
connected.
Check the drainage pipe.
Pipe is blocked. Clean the debris in pipe.
HINTS ON DISPOSAL
According to the European waste regulation 2012/19/
EU this symbol on the product or on its packaging indicates
that this product may not be treated as household waste.
Instead it should be taken to the appropriate collection point
for the recycling of electrical and electronic equipment. By
ensuring this product is disposed of correctly, you will help
prevent potential negative consequences for the environment
and human health, which could otherwise be caused by
inappropriate waste handling of this product. For more
detailled information about recycling of this product, please
contact your local council or your household waste disposal
service.

Before starting
To avoid damage, place the unit in the upright position at least 24 hours before starting.
Ensure that the air inlets and outlets are not blocked.
Place the unit only on a horizontal surface to avoid water leakage.
Warnings
The impedance of the unit must not exceed 0.236 ohms. Failure to comply with these
requirements may result in restrictions being imposed by the power supply authorities.
Refer to the local power supply authorities if the electrical impedance exceeds 0.236
ohms.
•Any person working with a refrigerant or cooling circuit must hold a valid
certificate issued by an accredited assessment authority competent in the
field to authorize the safe handling of refrigerants according to the
recognized assessment specifications in the field.
•Take into consideration the protection of the environment when
removing the packing of the unit and the unit itself at the end of its useful
life.
•The appliance must be stored in a well-ventilated area where the room size
is in line with the operating conditions.
•The appliance must be stored in such a way that mechanical damage
cannot occur.
•Information for spaces where refrigerant pipes are allowed:
-the installation of the pipes must be kept to a minimum;
-the pipes must be protected from physical damage and, in
the case of flammable refrigerants, must be installed in a
well-ventilated area;
-compliance with national gas regulations;
-mechanical connections must be accessible for maintenance;
-in the case of units containing flammable refrigerants, the
minimum area of the room must be mentioned under the form
of a table or of a single figure without reference to a formula;
•Ventilation holes should be kept free.
•Any service intervention will only be performed in accordance with the
manufacturer's recommendations;
•The pipes connected to an appliance should not contain a potential
source of fire;
•When the portable air conditioner or the dehumidifier is turned on, the
fan can operate permanently under normal conditions to ensure a
minimum air volume of 80 m3 / h, even when the compressor is closed
due to the temperature controller.
•Do not perforate or burn.
•Use only the tools recommended by the manufacturer for defrosting
or cleaning
•Do not perforate any of the components of the refrigerant circuit. The
cooling gas may be odourless.
EN

•Carefully store the appliance to prevent mechanical damage.
•Only the persons authorized by an accredited agency certifying their
competencies can handle refrigerants in accordance with the local
legislation.
•All repairs must be carried out in accordance with the manufacturer's
recommendations.
•Maintenance and repairs requiring the assistance of qualified personnel
must be carried out under the supervision of specialists in the use of
flammable refrigerants.
•Do not perforate any of the components of the refrigerant circuit. The
refrigerant may be odourless.
Additional warnings for the unit using the R290 refrigerant (refer to technical
data plate for the type of refrigerant used).
FIRE HAZARD!
CAREFULLY READ THE MANUAL BEFORE USING THE APPLIANCE.
R290 refrigerant complies with the European directives regarding the protection
of the environment.
Turbionaire Smart 10 Eco contains approximately 40g of R290 refrigerant.
The unit must be installed, used and stored in a room larger than 1.90 m2.
Turbionaire Smart 12 Eco contains approximately 55g of R290 refrigerant.
The unit must be installed, used and stored in a room larger than 2.64 m2.
Instructions regarding the repairs brought tounits containing R290
1) Checking the working area
Before starting the works on systems containing flammable refrigerants, safety
checks are required to reduce the risk of fire. To repair the cooling system, the
following precautions must be observed before carrying out works on the system.
2) The working procedure
The works shall be carried out in accordance with a controlled procedure so as to
minimize the risk of leakage of flammable gas or vapours during working
procedures.
3) The general working area
All maintenance personnel and the others working in adjacent places should be
trained on the nature of their work. Working in enclosed spaces should be avoided.
EN

The area around the workspace will be delimited. Ensure that safety conditions are
met in the working area by controlling the flammable material.
4) Checking the presence of the refrigerant
The area will be checked with a suitable refrigerant detector before and during
working to ensure that the technician is aware of the potentially flammable
atmosphere. Ensure that the leakage detection equipment used is suitable in case
flammable refrigerants arise, i.e. spark proof, properly protected or sealed.
5) The presence of the fire extinguisher
In case heating work must be carried out in the refrigeration system or in any
associated parts, adequate fire-fighting equipment must be always available for you.
Make sure there is a dry powder or a CO2 fire extinguisher adjacent to the working
area.
6) No sources of open flame
No person working within the refrigeration system involving direct exposure to
flammable refrigerant will use an open flame source, otherwise it will significantly
increase the risk of fire or explosion. All ignition sources, including cigarettes,
should be kept sufficiently far from the place of installation, repair, removal and
disposal, during which the flammable refrigerant could be released in the
surrounding area. Before working on such a plant, the surrounding area must be
monitored to ensure that there is no risk of ignition. Also, the message "No
smoking" should be displayed.
7) Ventilated area
Make sure that there is an open or well ventilated area before starting working on
the cooling system or performing any heating work. The presence of a fan is
compulsory throughout the work. Through ventilation, any released coolant should
be safely dispersed and preferably expelled out into the atmosphere.
8) Checking the refrigeration equipment
If the electrical components are replaced, they must comply with the technical
specifications. Strictly observe the instructions for maintenance and service of the
manufacturer. If in doubt, consult the manufacturer's technical department for
assistance.
The following verifications apply to installations using flammable refrigerants:
-the amount of cargo is in line with the size of the room where the
components containing the refrigerant are installed;
-the fans and air outlets work properly and are not obstructed;
-if an indirect cooling circuit is used, the secondary circuit must be checked
EN

to see if it contains refrigerant;
-The marking of the equipment must be visible. The signs and symbols that
are illegible will be corrected;
-The pipes or components of the refrigeration plant are placed in a position
where they are unlikely to be exposed to any substance that may corrode
the components containing refrigerant unless the components are made of
corrosion-resistant materials or suitably protected materials against
corrosion.
9) Checking electrical devices
The repair and the maintenance of electrical components must include initial safety
checks and component inspection procedures. If there is a failure that could
compromise the safety, the circuit must not be connected to any power source until
the failure is treated satisfactorily. If the failure cannot be corrected immediately,
but operating is still necessary, an appropriate temporary solution should be used.
This must be reported to the owner of the equipment so that all parties are informed.
The initial safety checks shall be carried out if:
-capacitors are discharged: this is done in a safe manner to avoid the
occurrence of sparks;
-electrical components and electrical cables are not exposed during charging,
refurbishing or cleaning the plant;
-there is grounding continuity.
10) Repair of sealed items
While sealed items are being repaired, all power sources must be disconnected from
the equipment it must be intervened on, before any removal of the sealed caps, etc.
If it is absolutely necessary to power the equipment during service, then a continuous
leakage detection system should be considered at the most critical point to warn in
case of a potentially hazardous situation.
Particular attention must be paid to the following aspects in order to ensure that
while working on the electrical components, the housing is not modified in such a
way that the protection level is affected. These include cable damage, excessive
number of connections, terminals which do not comply with the original
specifications, seals damage, improper seals fitting, etc.
Ensure that the appliance is safely mounted. Ensure that the seals or the sealing
materials are not degraded so that they are no longer used for the purpose of
preventing the penetration of flammable gases. Spare parts must be in accordance
with the specifications of the manufacturer.
11) Repairs brought to intrinsically safe components
Do not use permanent inductive or capacitive loads in the circuit without ensuring
that they do not exceed the voltage and power allowed for the equipment used.
The intrinsically safe components are the only types it can be worked on in the
EN

presence of a flammable atmosphere. The test appliance must be correctly evaluated.
Replace the components only with the parts specified by the manufacturer. Other
components may cause the ignition of the refrigerant in the atmosphere due to a
leakage.
12) Cables
Check that the cables will not be subjected to wear, corrosion, excessive pressure,
vibrations, sharp edges or other adverse effects on the environment. Verification
should also take into account the effects of the deterioration over time or of the
continuous vibrations from sources such as compressors or fans.
13) Detection of flammable refrigerants
Potential sources of ignition should not be used under any circumstances when
searching or detecting refrigerant leakage. Do not use a halogen flash light (or any
other detector using an open flame).
14) Removal and disposal
When intervening in the circuit of the refrigerant for repairs - or for any other
purpose - conventional procedures will be used. However, in the case of
refrigerants, it is important to observe the best practices as there is a high risk of
fire. Observe the following procedure:
• Remove the refrigerant;
• Purge the circuit with inert gas;
• Drain;
• Purge again with inert gas;
• Open the circuit by cutting or brazing.
The quantity of refrigerant is recovered in the corresponding recovery cylinders.
For the units containing refrigerants, the system must be purged with OFN to
protect the unit. This process may be repeated several times. Do not use
compressed air or oxygen for this procedure. Washing is performed by forced
introduction of OFN (oxygen-free nitrogen) into the system until the working
pressure is reached, followed by venting into the atmosphere and finally
aspiration. This process is repeated until the refrigerant is evacuated from the
system. When the final quantity of OFN is used, the system must be ventilated at
atmospheric pressure to allow works to be carried out. This operation is
absolutely vital if the brazing operations on the pipes are to be carried out. Ensure
that the socket of the vacuum pump is not close to the open flame sources and
that there is ventilation available.
15) Filling procedures
In addition to conventional filling procedures, the following requirements must
be observed:
- When filling equipment is used ensure that different refrigerants are not
EN

contaminated. The hoses should be as short as possible to minimize the
quantity of the refrigerant contained therein.
- The cylinders must be kept upright.
- Ensure that the cooling system is grounded before filling the system
with refrigerant.
- Label the system after filling it with refrigerant (if it is not already
labelled).
- Do not overload the cooling system.
Before refilling the system, it must be tested with OFN. The system must be
checked for leakage when the filling procedure is completed but before the unit
is placed in service. After the filling procedure, perform a leakage detection test.
16) Decommissioning
Before performing this procedure, it is essential that the technician is completely
familiar with the equipment and with all its components. It is recommended that
all refrigerants are safely recovered. Before performing this procedure, a sample
of oil and refrigerant is taken if an analysis is required before re-using the
regenerated refrigerant. It is essential that the power supply is available before
the procedure begins.
a. Familiarize yourself with the equipment and with its operation.
b. Insulate the system from the electrical point of view.
c. Before proceeding, make sure that:
d. Mechanical handling equipment is available if it is necessary for the
handling of coolant cylinders;
e. All individual protection equipment are available and correctly used;
f. the recovery process is permanently supervised by a qualified
person;
g. The recovery equipment and cylinders are in accordance with the
appropriate standards.
h. If possible, drain the cooling system.
i. If aspiration is not possible, use a collector so that the refrigerant can
be removed from different parts of the system.
j. Ensure that the cylinder is in upright position before recovery.
k. Start the recovery machine and use it in accordance with the
instructions of the manufacturer.
l. Do not fill the cylinders. (Must not exceed 80% of the quantity of
liquid).
m. Do not exceed the maximum working pressure of the cylinder, even
temporarily.
n. When the cylinders have been correctly loaded and the process has
been completed, make sure that the cylinders and the equipment are
quickly removed from the working area and that all the insulation
valves of the equipment are closed.
EN

o. The recovered refrigerant must not be loaded into another cooling
system unless it has been cleaned and checked.
17) Labelling
The equipment must be labelled with the mention that it has been dismantled and
emptied by the refrigerant. The label must be dated and signed. Ensure that there
are labels on the equipment showing that the equipment contains flammable
refrigerant.
18) Recovery
When performing the procedure of removing the refrigerant from a system, either
for service or for decommissioning, it is recommended that all refrigerants are
safely removed. When transferring the refrigerant to cylinders, make sure that
only the recovery cylinders are used for the refrigerant. Ensure that the correct
number of cylinders is available to take up the total quantity of the refrigerant in
the system. All cylinders to be used are intended for the recovered refrigerant and
labelled for the respective refrigerant (i.e. special cylinders for the recovery of
the refrigerant). The cylinders must be equipped with the pressure valve and the
associated shut-off valves in good working order. Drained recovery cylinders are
evacuated and, if possible, cooled before recovery.
The recovery equipment must be in good working order, provided with a set of
available equipment instructions and be suitable for the recovery procedure of
flammable refrigerants. In addition, a set of calibrated scales must also be
available in good working order. Hoses must be equipped with connection
mechanisms without leakage and in good condition. Before using the recovery
machine, make sure it is in good working condition, that it was properly
maintained and that all associated electrical components are sealed to prevent
ignition when a coolant is released. Consult the manufacturer if in doubt. The
recovered refrigerant will be accordingly returned to the supplier of the
refrigerant in the recovery cylinder and the note referring to the transfer of waste
will be prepared. Do not mix coolants in the recovery units and especially not in
the cylinders. If the compressors or the oils in the compressors have to be
removed, make sure they have been discharged to an acceptable level to ensure
that the flammable refrigerant does not remain in the lubricant. The evacuation
process must be carried out before returning the compressor to the suppliers. Only
use electrical heating of the compressor body to accelerate this process. When the
oil is removed from a system, this must be performed in safety conditions.
EN

ATTENTION This symbol shows that the
operating manual should be
read carefully.
ATTENTION This symbol indicates that a
qualified person has to deal
with this equipment by
referring to the installation
manual.
ATTENTION This symbol indicates that
information such as the
operating manual or the
installation manual is
available.
Symbol Note Explanations
WARNING This symbol indicates that this
appliance uses a flammable
refrigerant. If the refrigerant is
flowed and exposed to an
external ignition source, there
is a risk of fire.
EN

MANUAL DE UTILIZARE
Vă mulțumim că ați ales un dezumidificator de calitate superioară. Citiți cu atenție acest manual
înainte utilizarea produsului. Dacă aveți întrebări, vă rugăm să contactați un serviciu autorizat
pentru ajutor. Păstrați manualul pentru referințe viitoare.
Declarație de Conformitate
Producător:
Intax Trading SRL , Str. Libertatii A1-A3, 140017,
Alexandria, Teleorman, Romania.
Acest produs respectă următoarele directive europene:
2014/30/EU (EMV)
2014/35/EU (LVD)
2011/65/EU (RoHS)
206/2012/EU (ErP)
RO
SPECIFICAȚII TEHNICE
Tensiune:220-240 V ~ 50 Hz
Putere Nominală: 200 W
Capacitate de dezumidificare 10L/ 12L zi Smart 10 Eco / 12 Eco ( 30°C, RH 80%)
Rezervor de apă: 1.8 L Smart 10 Eco / Smart 12 Eco
Model EAN: 5949096154028 (Smart 10 Eco) / 5949096154011 (Smart 12 Eco)

1. Vă rugăm să citiți cu atenție instrucțiunile de utilizare înainte de a utiliza pentru prima
dată dezumidificatorul și așezați-l pe o podea sigură.
2. Nu scufundați niciodată unitatea în apă sau alte lichide.
3. Așezați unitatea pe o suprafață plană stabilă pentru a evita zgomotele și vibrațiile
puternice.
4. Nu utilizați niciodată unitatea dacă un cablu sau conector a fost deteriorat, după defectarea
acesteia sau dacă unitatea a fost aruncată la podea sau deteriorată.
5. Dezumidificatorul poate fi reparat numai de personal calificat, iar lucrările de reparații
necorespunzătoare pot reprezenta o sursă de pericol considerabil pentru utilizatori.
6. Scoateți ștecherul din priza de alimentare înainte de a transporta dezumidificatorul și /
sau înainte de a-l curăța.
7. Folosiți unitatea numai la tensiunea specificată pe placuța cu date tehnice.
8. Sezumidificatorul nu trebuie conectat la o priză de alimentare împreună cu alte aparate de
uz casnic.
9. Unitatea este destinată uzului casnic și trebuie folosită numai în scopul pentru care a fost
creată.
10. Nu utilizați acest dezumidificator în apropierea aparatelor de încălzire și a obiectelor
inflamabile sau periculoase.
11. Dacă dezumidificatorul funcționează într-o încăpere împreună cu dispozitive pe bază de gaz,
camera trebuie să fie aerisită în mod regulat și des.
12. Vă rugăm să utilizați funcția de uscare internă (INSIDE DRYING), dacă unitatea nu este
utilizată mult timp. Acest lucru va împiedica formarea mucegaiului și a mirosului neplăcut
în interiorul unității.
13. Nu așezați obiecte grele pe unitate.
14. Nu atârnați perdele sau haine ude în fața grilei de evacuare a aerului, acest lucru va
supraîncărca unitatea.
RO
INFORMAȚII PRIVIND SIGURANȚA
This manual suits for next models
3
Table of contents
Languages:
Other turbionaire Dehumidifier manuals

turbionaire
turbionaire EPI 12 User manual

turbionaire
turbionaire SMART 16 eco User manual

turbionaire
turbionaire PRO 50N User manual

turbionaire
turbionaire SENSO 12 User manual

turbionaire
turbionaire PRO 50 User manual

turbionaire
turbionaire PRO 90N User manual

turbionaire
turbionaire SMART 8eco User manual

turbionaire
turbionaire Practical 12 User manual