Tuscany 9148WWME User manual

1-800-892-3986 IS2044
Pg 1of 12
Before You Begin:
Thank you for purchasing this product. Please identify all parts and hardware pieces before you begin.
When laying out parts, place them on a soft surface to prevent scratching.
If any pieces are missing, call our Toll Free Number 1-800-892-3986 between 8:00AM-5:00PM EST Monday
through Friday.
Antes de que empiece:
Muchas gracias por comprar este producto. Identifique todas las piezas y las piezas de ferretería antes de
comenzar. Al distribuir las piezas, colóquelas sobre una superficie suave para evitar que se rayen.
Si faltaran piezas, llame a nuestro número gratuito 1-800-892-3986 entre las 8:00 a.m.- 5:00 p.m., hora
del este, de lunes a viernes.
Avant de commencer :
Merci d’avoir acheté ce produit. Veuillez identifier toutes les pièces et les accessoires de montage avant de
commencer. Lorsque vous déballez les pièces, placez-les sur une surface non rugueuse afin d’éviter les
éraflures.
S’il venait à vous manquer des pièces, appelez notre numéro sans frais 1.800.892.3986 entre 8 h et 17 h
(heure de l’Est des États-Unis), du lundi au vendredi.
MCS 5/20/2015
Assembly Instructions / Instrucciones de Ensamblado / Instructions d'assemblage
Model / Modelo / Modèle
9148WWME (White / Blanco / blanc) / 9848CHME (Espresso / Espresso / espresso)
9148GYME (
Milano Gray / Gris Milano / gris milanais)

1-800-892-3986 IS2044
Pg 2of 12
Tools Needed:
Herramientas Necesarias:
Outils nécessaires :
(C) 2 Bottom Side Panels
2 Paneles Laterales Inferiores
2 panneaux latéraux inférieurs
(B) 2 Top Side Panels
2 Paneles Laterales Superiores
2 panneaux latéraux supérieurs
(A) 2 Fixed Shelves
2 Repisas fijas
2 étagères fixes
(D) 1 Bottom Shelf
1 Repisa inferior
1 étagère inférieure
(F) 3 Adjustable Shelves
3 Repisas ajustables
3 étagères amovibles
Parts List:
Lista de Partes:
Liste des pièces :
(G) 1 Door
(actual door style may differ)
1 Puerta
(el modelo exacto de la puerta puede diferir)
1 porte
(le style de porte peut varier)
(H) 1 Back Panel
1 Panel posterior
1 panneau arrière
(E) 1 Trim Piece
1 Pieza de terminación
1 garniture
top
superior
haut

1-800-892-3986 IS2044
Pg 3of 12
(13) 8 Screw Caps
8 Cubiertas para tornillos
8 cache-vis
(18) 1 Allen Wrench for use with Large Screws (1)
1 Llave Allen hexagonal para ser usada con
los tornillos grandes (1)
1 clé hexagonale pour les vis longues (1)
(2) 4 Cambolts
4 Pernos para levas
4 boulons à cames
(12) Nails
Clavos
Clous
(4) 4 Cams
4 Levas
4 cames
(6) 2 Magnet Screws
2 Tornillos imantados
2 vis aimantées
(14) 1 Nylon Strap
1 Tira de Nylon
1 bande en nylon
(16) 1 Anti-topple Screw
1 Tornillo antivolcante
1 vis de retenue
(8) 1 Knob Screw
1 Tornillo para perilla
1 vis pour boutons de porte
(7) 1 Knob
1 Perilla
1 bouton
(5) 1 Magnet
1 Imán
1 aimant
(3) 6 Dowels
6 Clavijas
6 goujons
(17) 12 Shelf Clips
12 Soportes de repisa
12 attaches pour étagère
(9) 2 Hinges
2 Bisagras
2 charnières (10) 2 Hinge Bushings
2 Cojinetes para bisagras
2 douilles pour charnières
(15) 2 Washers
2 Empaques o Arandelas
2 rondelles
(11) 2 Hinge Screws
2 Tornillos para bisagras
2 vis pour charnières
(1) 12 Large Screws
12 Tornillos largos
12 vis longues

1-800-892-3986 IS2044
Pg 4of 12
Attach the cambolts (2) and the wood
dowels (3) to a fixed shelf (A), as shown.
Fije los pernos de levas (2) y las clavijas de
madera (3) a repisa fija (A), como se ilustra.
Fixez les boulons à cames (2) et les goujons
en bois (3) sur une étagère fixe (A), comme
illustré.
1.
A
3
finished edge
borde con acabado
bord fini
2
A
3
2

1-800-892-3986 IS2044
Pg 5of 12
2. Attach the fixed shelf (A) to the top side
panels (B), as shown.
Fije la repisa fija (A) a los paneles laterales
superiores (B), como se ilustra.
Fixez l’étagère fixe (A) aux panneaux
latéraux supérieurs (B), comme illustré.
finished edge
borde con acabado
bord fini
A
B
B
1
3. Attach the fixed shelf (A) to the top side
panels (B), as shown.
Fije la repisa fija (A) a los paneles laterales
superiores (B), como se ilustra.
Fixez l’étagère fixe (A) aux panneaux
latéraux supérieurs (B), comme illustré.
finished edge
borde con acabado
bord fini A
A
B
B
AB
1
1
A
B
1
1

1-800-892-3986 IS2044
Pg 6of 12
Insert wood dowels (3) to the bottom side
panel (C).
Attach the trim piece (E) and the bottom
shelf (D) to the bottom side panel (C), as
shown.
Inserte las clavijas de madera (3) en el
panel lateral inferior (C).
Fije la pieza de terminación (E) y la repisa
inferior (D) al panel lateral inferior (C), como
se ilustra.
Insérez les goujons en bois (3) dans le
panneau latéral inférieur (C).
Fixez la garniture (E) et l’étagère
inférieure (D) au panneau latéral
inférieur (C), comme illustré.
4.
finished edge
borde con acabado
bord fini
holes on top
orificios en la parte superior
trous vers le haut
D
E
C
3
5. Attach the magnet (5) to the other
bottom side panel (C), as shown.
NOTE: If you want the door to swing open
to the right, install the magnet (5) to the
bottom side panel in step 4.
As shown for door opening to the left.
Fije el imán (5) al otro panel lateral
inferior (C), como se ilustra.
NOTA: Si desea que la puerta se abra
hacia la derecha, instale el imán (5) en
el panel lateral inferior en el paso 4.
Como se ilustra para la puerta que abre
a la izquierda.
Fixez l’aimant (5) à l’autre panneau latéral
inférieur (C), comme illustré. REMARQUE : si
vous désirez que la porte s’ouvre vers la
droite, installez l’aimant (5) sur le panneau
latéral inférieur à l’étape 4.
L’illustration montre la porte s’ouvrant vers
la gauche.
C
finished edge
borde con acabado
bord fini
6
5
C
1
1E
D
C

1-800-892-3986 IS2044
Pg 7of 12
Insert wood dowels (3) to the bottom side
panel (C).
Attach the bottom side panel (C) to the
trim piece (E) and the bottom shelf (D),
as shown.
Inserte las clavijas de madera (3) en el
panel lateral inferior (C).
Fije el panel lateral inferior (C) a la pieza de
terminación (E) y a la repisa inferior (D),
como se ilustra.
Insérez les goujons en bois (3) dans le
panneau latéral inférieur (C).
Fixez le panneau latéral inférieur (C) à la
garniture (E) et à l’étagère inférieure (D),
comme illustré.
6.
D
E
C
3
finished edge
borde con acabado
bord fini
3
1
1
C
D
E

1-800-892-3986 IS2044
Pg 8of 12
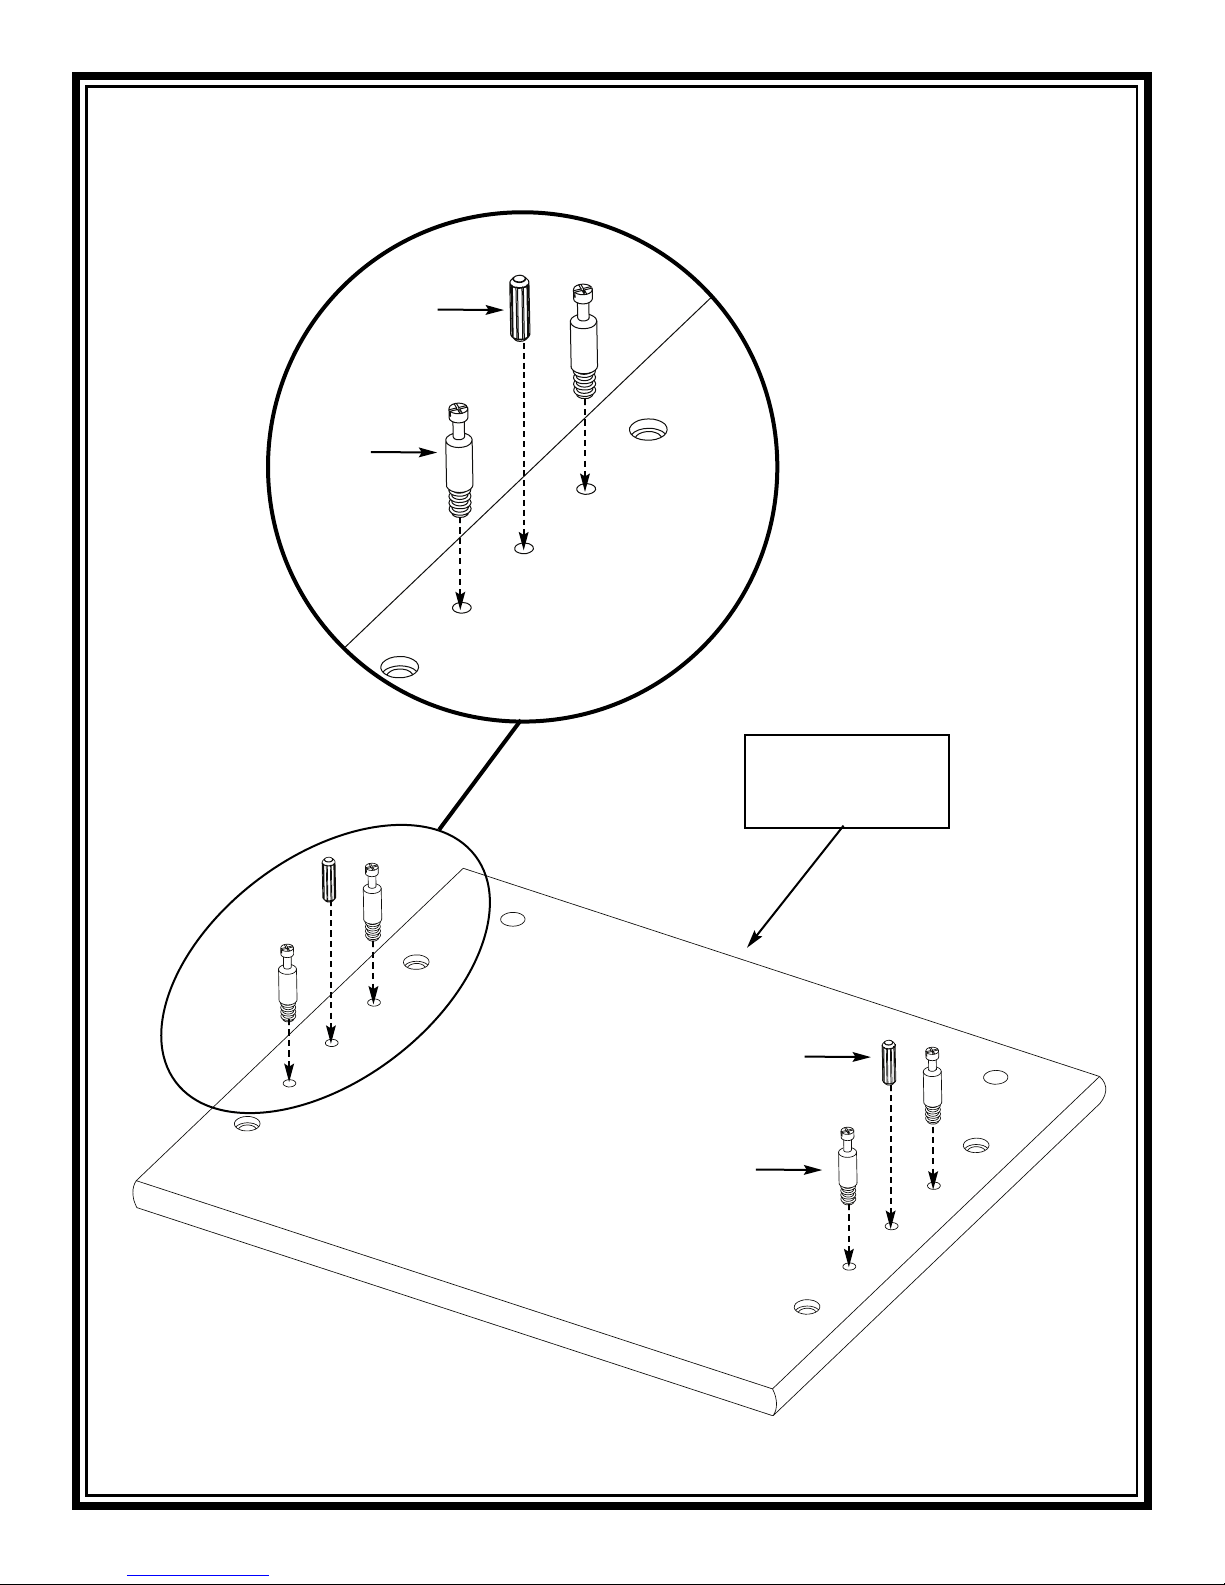
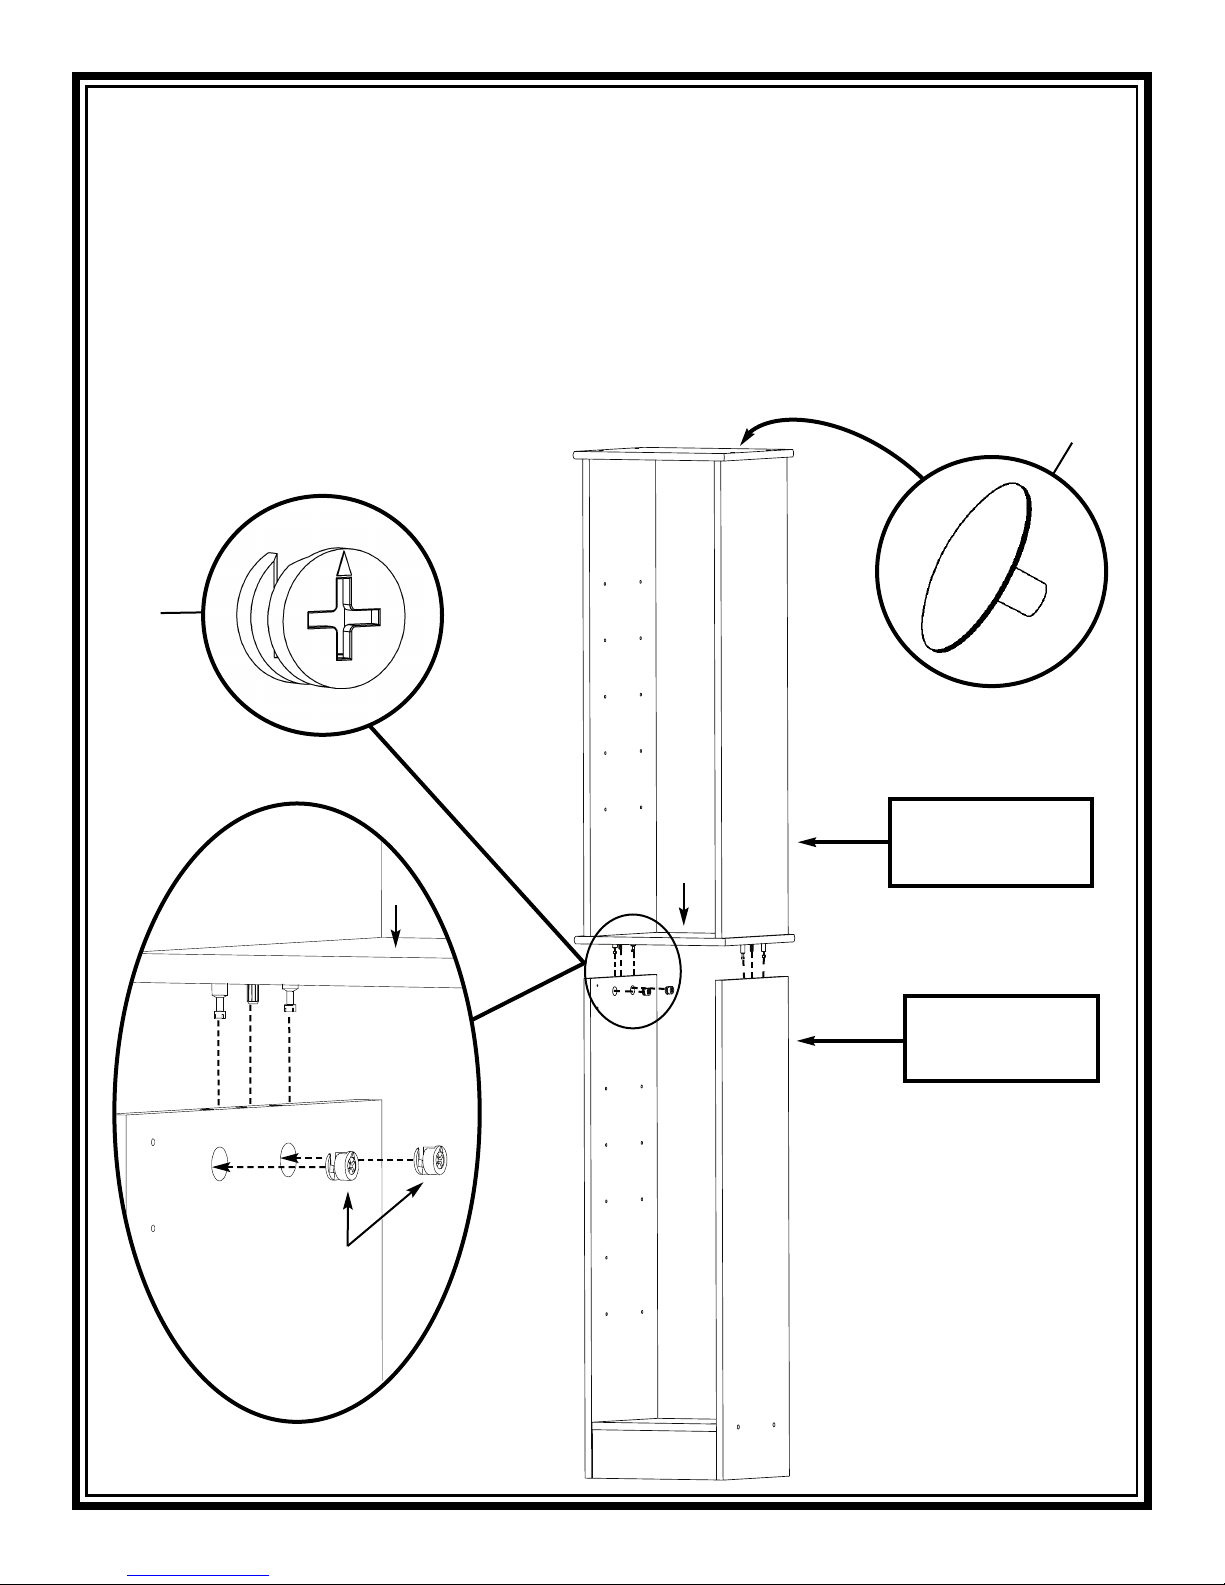
First insert cams (4) into bottom side
panels (C), as shown. NOTE: the direction of
the arrow on each cam (4).
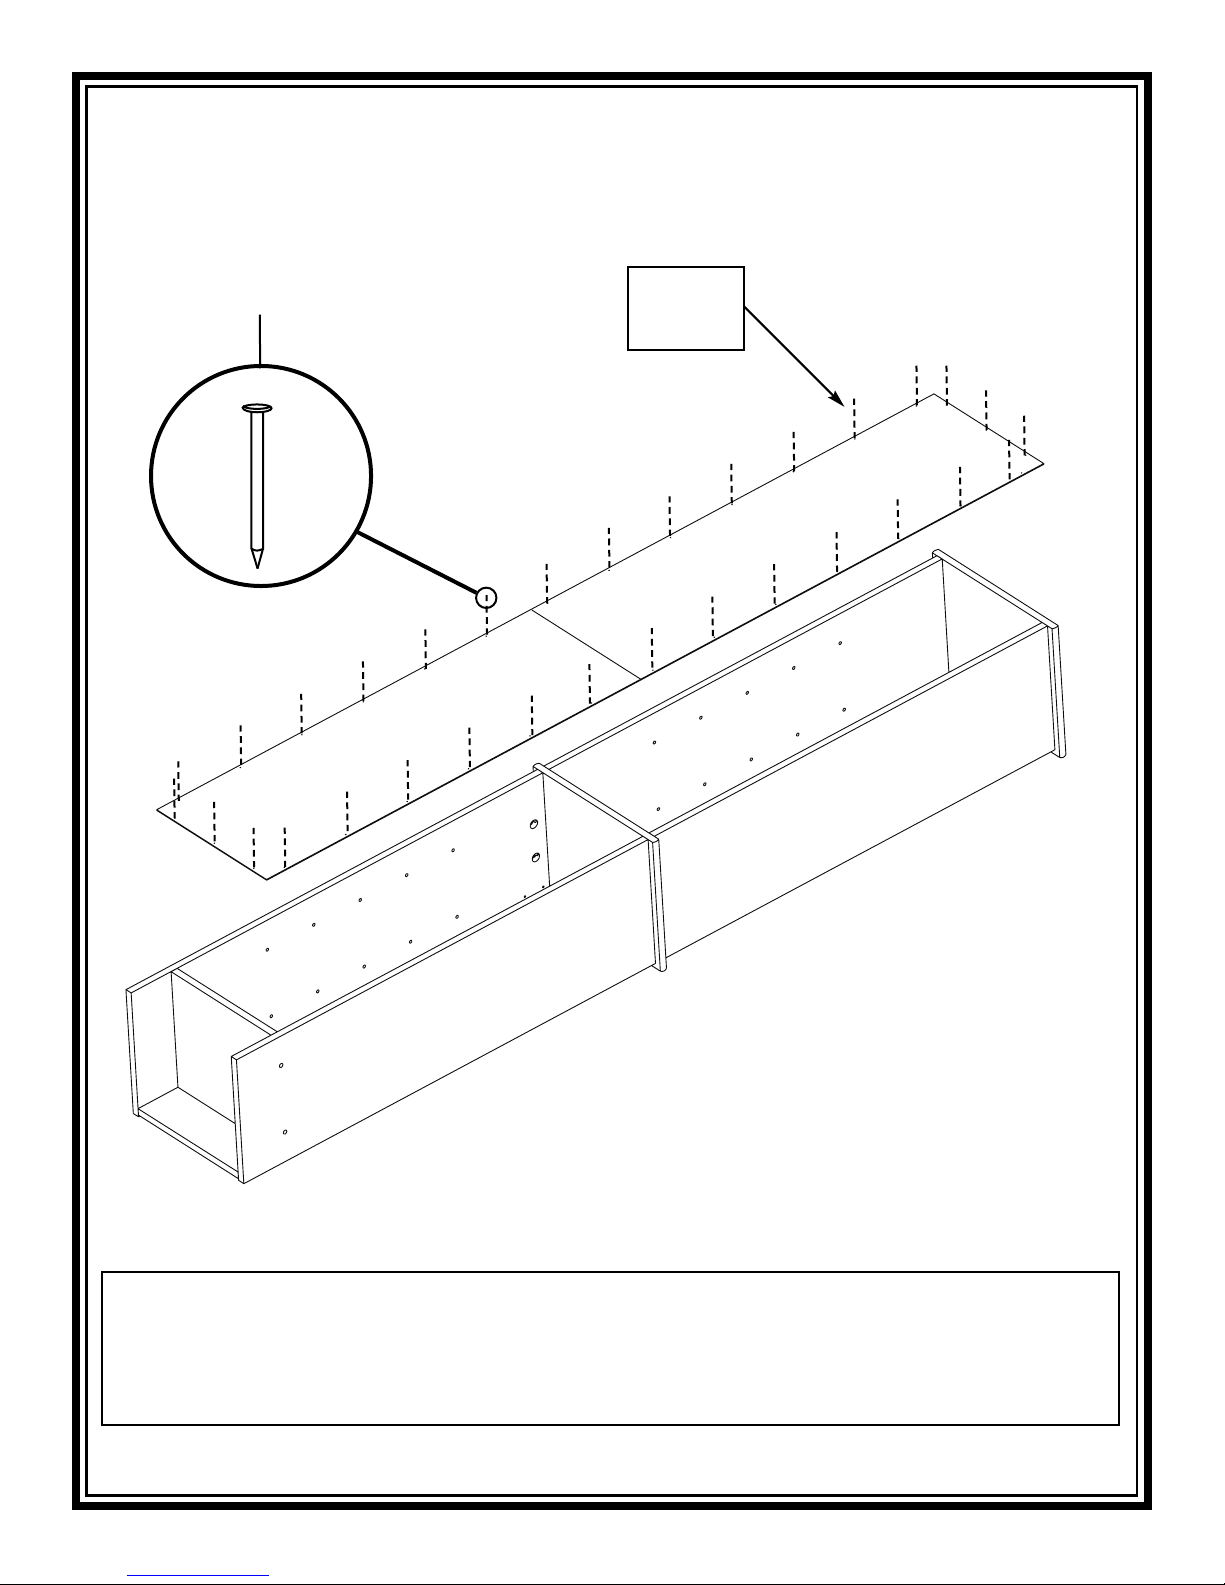
Now carefully place top assembly on the
bottom assembly. NOTE: Be sure to align
cambolts (2) with holes in bottom side
panels (C).
Fasten top assembly to the bottom assembly
by tightening the cams (4) by turning them
clockwise approximately
a half a turn or until snug. DO NOT
OVERTIGHTEN!
Apply screw caps (13) to screws (1) on
exterior of unit.
Inserte primero las levas (4) en los paneles
laterales inferiores (C), como se ilustra.
OBSERVE: el sentido de la flecha en cada
leva (4).
Ahora coloque con cuidado el ensamble
superior sobre el ensamble inferior. NOTA:
Asegúrese de alinear los pernos de levas (2)
con los orificios de los paneles laterales
inferiores (C).
Fije el ensamble superior al ensamble inferior
apretando las levas (4) girándolas en
el sentido de las agujas del reloj
aproximadamente media vuelta o hasta
que se ajusten. ¡NO AJUSTE DE MÁS!
Aplique cubiertas para tornillos (13) a los
tornillos (1) en la parte externa de la
unidad.
Insérez tout d’abord les cames (4) dans les
panneaux latéraux inférieurs (C), comme
illustré. NOTEZ le sens de la flèche sur
chaque came (4).
Placez ensuite délicatement l’unité supérieure
sur l’unité inférieure. REMARQUE : assurez-vous
d’aligner les boulons à cames (2) et les
trous percés dans les panneaux latéraux
inférieurs (C).
Pour monter l’unité supérieure sur l’unité
inférieure, resserrez les cames (4) en les
vissant dans le sens horaire d’environ un
tour et demi jusqu’à ce qu’elles soient bien
serrées. NE SERREZ PAS TROP!
Appliquez les cache-vis (13) sur les vis (1) à
l’extérieur du meuble.
7.
top assembly
ensamble superior
unité supérieure
bottom assembly
ensamble inferior
unité inférieure
A
B
C
C
B
13
4
A
4
C
B

1-800-892-3986 IS2044
Pg 9of 12
Lay unit face down on floor.
Fasten back panel (H) to back of unit.
NOTE: Make sure finished side of back
panel (H) is facing down.
Coloque la unidad boca abajo en el
piso. Asegure el respaldo (H) a la parte
posterior de la unidad.
NOTA: Asegúrese de que el lado
con acabado del respaldo (H) esté
orientado hacia abajo.
Placez le meuble à plat sur le sol, côté
arrière sur le dessus. Fixez le panneau
arrière (H) au dos du meuble.
REMARQUE : assurez-vous que le côté
fini du panneau arrière (H) se trouve sur
le dessous.
8.
B
C
H
12
Helpful Hint: To help align the back panel properly, fasten a nail in each of the corners of the back panel first.
Consejo Útil: Para ayudar a alinear el respaldo apropiadamente, asegure primero un clavo en cada una de las esquinas del respaldo.
Conseil utile : pour aligner correctement le panneau arrière, enfoncez d'abord un clou dans chacun des coins du panneau.
top
superior
haut

1-800-892-3986 IS2044
Pg 10 of 12
Fasten hinge (9) to the door (G),
as shown.
Inserte el eje de la bisagra (9) en la
puerta (G), como se ilustra.
Insérez la charnière (9) dans la porte
(G), comme illustré.
9.
G
11
unfinished edge
borde sin acabado
bord non fini
9
G
9
11
G
11
Incorrect!!
¡¡Incorrecto!!
Incorrect!
Correct!!
¡¡Correcto!!
Correct!
G
9
11
9

1-800-892-3986 IS2044
Pg 11 of 12
Insert hinge bushings (10) into
shelves (A, D).
Set bottom hinge (9) into bottom hinge
bushing (10). Fit top hinge (9) into top hinge
bushing (10) and fasten top hinge (9)
to door (G).
Inserte los manguitos de las bisagras (10)
en las repisas (A, D).
Coloque la bisagra inferior (9) dentro del
manguito de la bisagra inferior (10).
Calce la bisagra superior (9) dentro del
manguito de la bisagra superior (10) y
fije la bisagra superior (9) a la puerta (G).
Enfilez les douilles pour charnières (10)
dans les étagères (A, D).
Enfilez la charnière inférieure (9) dans la
douille pour charnière inférieure (10).
Enfilez la charnière supérieure (9) dans la
douille pour charnière supérieure (10),
puis fixez la charnière supérieure (9) à la
porte (G).
10.
Attach the door knob (7) to door (G)
using knob screw (8), as shown.
Fije la perilla de la puerta (7) a la
puerta (G), con un tornillo para la
perilla (8), como se ilustra.
Fixez le bouton de porte (7) à la porte
(G) à l’aide de la vis pour bouton de
porte (8), comme illustré.
11.
78
G
G
G
9
11
10
D
A
G
10

1-800-892-3986 IS2044
Pg 12 of 12
12.
It is imperative that unit be fastened
to the wall for safety reasons.
Il est impératif que le meuble
soit fixé au mur.
Mounting Instructions:
WARNING:
BEFORE CUTTING OR DRILLING INTO
ANY
WALL SURFACE,
VERIFY THE
LOCATION
OF ELECTRICAL,
PLUMBING, AND GAS
LINES. CUTTING ANY OF THESE MAY
CAUSE SERIOUS INJURY.
Carefully stand the unit up and fasten
the nylon strap (14) to the top of the
unit using one washer (15) and the
anti-topple screw (16) as shown. Fasten
nylon strap to wall, using appropriate
mounting hardware (not provided). We
recommend using a mounting screw of
at least two inches in length. If you do
not screw directly into wall studs,
appropriate wall anchors should be
used.
Install adjustable shelves (F) into
desired location, using shelf clips (17).
Instrucciones de Montaje:
ADVERTENCIA:
ANTES DE CORTAR O TALADRAR EN
CUALQUIER SUPERFICIE DE PARED,
VERIFIQUE LA UBICACIÓN DE LAS
LÍNEAS ELÉCTRICAS, DE PLOMERÍA Y DE
GAS. CORTAR CUALQUIERA DE ESTAS
LÍNEAS PUEDE CAUSAR UNA LESIÓN
GRAVE.
Ponga con cuidado la unidad en
posición vertical y fije la correa de
nylon (14) a la parte superior de la
unidad con una arandela (15) y el
tornillo antivolcante (16) como se ilustra.
Asegure la tira de nylon a la pared
utilizando el artículo
de ferretería de
montaje apropiado (no
proporcionado).
Le recomendamos utilizar un tornillo
de montaje de por lo menos dos
pulgadas (5.08 cms.) de largo.
Sedeben
utilizar anclas para pared
apropiadas si usted no atornillará
directamente en los soportes de pared.
Instale las repisas ajustables (F) en la
ubicación deseada utilizando los
sujetadores de repisa (17).
Instructions de montage :
AVERTISSEMENT :
AVANT DE DÉCOUPER OU DE PERCER
TOUTE SURFACE MURALE, VÉRIFIEZ
L'EMPLACEMENT DES CANALISATIONS
ÉLECTRIQUES, DE PLOMBERIE ET
DE
GAZ. DES BLESSURES GRAVES POUR-
RAIENT SURVENIR SI L'UNE DE
CES C
ANALISATIONS ÉTAIT SECTIONNÉE.
Redressez délicatement le meuble et
fixez la bande en nylon (14) en haut du
meuble à l’aide d’une rondelle (15) et
de la vis de retenue (16), comme illustré.
Fixez la bande de nylon au mur à l'aide
d'une pièce de montage appropriée
(non fournie).
Il est recommandé d'utiliser des vis de
montage d'au moins 5 cm (2 po) de long.
Si vous ne vissez pas directement dans
des poteaux muraux, utilisez de
chevilles murales.
Installez les étagères réglables (F) sur
l'endroit désiré, utilisant les agrafes
d'étagère (17).
Por razones de seguridad es
imperativo que la unidad se
asegure a la pared.
Not Included
No Incluido
Non incluse
Top of the unit
Parte superior de la unidad
Haut du meuble
15
14
16
This manual suits for next models
2
Table of contents
Other Tuscany Indoor Furnishing manuals
Popular Indoor Furnishing manuals by other brands

Costway
Costway AC10010US user manual

Night & Day Furniture
Night & Day Furniture S-06D Assembly instruction

Cooper Lighting
Cooper Lighting LUMARK PR Parker Specification sheet

Tutti Bambini
Tutti Bambini Tivoli 211463 Assembly instructions

Sorelle
Sorelle Sedona Crib and Changer Assembly instruction

SIHOO
SIHOO M18 user manual