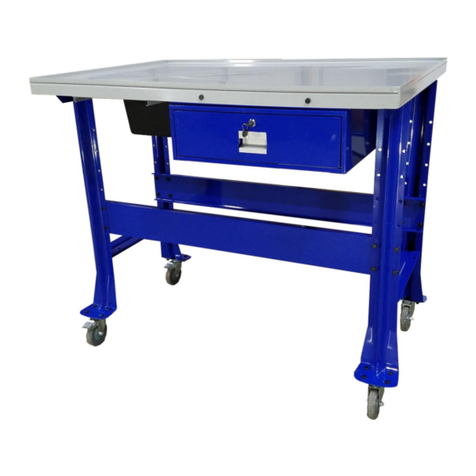
Tuxedo IDEAL PTDT-PW-1000 User manual

PTDT-PW-1000
Mar 2020
PREMIUM TEAR-DOWN TABLE
& 3.5 GALLON PARTS WASHER
(PTDT-PW-1000)
HEAVY DUTY STEEL CONSTRUCTION
1,000 LBS. CAPACITY
INSTALLATION INSTRUCTIONS
CAUTION
BEFORE USE, PLEASE READ ALL SAFETY AND OPERATION INSTRUCTIONS TO PREVENT
INJURY OR DAMAGES.

2
PTDT-PW-1000
Mar 2020
PRODUCT DESCRIPTION
The iDEAL PTDT-PW-1000 is a Premium Tear-Down Table with retractable Parts Washer designed
for a wide range of shop related applications. Standard with a large 46.8" x 31.5" tabletop work area
& max weight capacity of 1000 lbs., the unique Tear-Down Table also features an integrated Table
Drain & Catch Basin as well as a lockable Storage Drawers. The iDEAL Tear-Down Table is
constructed with heavy duty 13 Gauge (.093”) Steel yet still easily maneuverable with 4" swivel poly
casters, two being locking type to secure in place.
SPECIFICATIONS
GENERAL SAFETY RULES
WARNING: The warnings, cautions, and instructions noted in this instruction manual
cannot cover all possible conditions or situations that could occur. It must be
understood by the operator that common sense and caution are factors which cannot be built
into this product but must be supplied by the operator.
SAVE THESE INSTRUCTIONS
WORK AREA
ØKeep the work area clean, free of clutter and well lit. Cluttered and dark work areas can cause
accidents.
ØKeep children and bystanders away while operating. Distractions can cause you to lose
control or focus, thus visitors should remain at a safe distance from the work area.
ØBe aware of all power lines, electrical circuits, water pipes and other mechanical hazards in
your work area, particularly those hazards below the work surface hidden from the operator’s
view that may be unintentionally contacted and may cause personal harm or property damage.
PERSONAL SAFETY
ØUse safety apparel and equipment. Use safety goggles or safety glasses with side shields to
comply with current national standards, or when needed, a face shield. Use dust mask in dusty
work conditions, which applies to all persons in the work area. Wear non-skid safety shoes,
hardhat, gloves, dust collection systems and hearing protection when appropriate.
ØDo not overreach. Always keep the proper footing and balance.
Product Model PTDT-PW-1000
Support Capacity 1,000 lbs.
Overall Size 47”W x 32”L x 41”H
Work Top Area 46.8”W x 31.5”L
Storage Cabinet Size 19”W x 19”L x 5”H
Steel Thickness 2.38mm (.093”)
Fluid Basin Size 9"W x 15"L x 6"H
Fluid Basin Capacity 3 Gallons
Parts Washer Size 13”W x 17”L x 8.5”H
Parts Washer Capacity
3.5 Gallons
Parts Washer Power 110VAC-60HZ, 0.23A
Ship Weight 213 lbs. (5 pcs)

3
PTDT-PW-1000
Mar 2020
ØSecure your work with clamps or vise instead of using your hands to hold work, when practical.
(This safety precaution allows for the proper tool operation using both hands.)
ØStore idle tools. When tools are not is use, store them in a dry, secure place out of the reach of
children. Inspect your tools to ensure that they are in good working condition prior to storage and
before re-use.
ØUse only accessories that are recommended by the manufacturer for your model.
ØKeep guards in place and in proper working order.
ØUse only on a flat, level surface.
ELECTRICAL SAFETY
WARNING: Always check to ensure the power supply corresponds to the voltage on
the rating plate.
ØDo not abuse the cord. Never carry a portable tool by its power cord or yank the tool or
extension cord from the receptacle. Keep power cords and extension cords away from heat, oil,
sharp edges or moving parts. Replace damaged cords immediately. Damaged cords may cause a
fire and increase the risk of electric shock.
ØGrounded tools must be plugged in to an outlet properly installed and grounded in accordance
with all codes and ordinances. Never remove the grounding prong or modify the plug in any way.
Do not use adapter plugs. Check with a qualified electrician if you are in doubt as to whether the
outlet is properly grounded.
ØDouble insulated tools are equipped with a polarized plug (one blade is wider than the other).
This plug will only fit in a polarized outlet one way. If the plug does not fit fully in the outlet,
reverse the plug. If it still doesn’t fit, contact a qualified electrician to install a polarized outlet. Do
not modify or alter the plug in any way.
ØAvoid body contact with grounded surfaces such as pipes, radiators, ranges and refrigerators.
There is an increased risk of electric shock if your body is grounded.
ØWhen operating a parts washer outside, use an outdoor extension cord marked “W-A”or “W.”
These cords are rated for outdoor use and reduce the risk of electric shock.
ØExtension Cord & Usage:
Recommended extension cord wire gauge for Parts Washer: 14G (Medium Duty w/ 3-Prong Plug)
A. Replace damaged or worn cords immediately.
B. Check the nameplate rating of your tool. Using an improper size or gauge of extension cord
may cause unsafe or inefficient operation of your tool. Be sure the extension cord is rated to allow
enough current flow to the motor.
Always be sure to check the voltage & amperage requirements of the tool along with the incoming
power source.
ØDo not expose power tools to rain or wet conditions. Water entering a power tool will increase the
risk of electric shock.
ØDo not let your fingers touch the terminals of the plug when inserting or removing it from the
outlet.
ØGround fault circuit interrupters. If the work area is not equipped with a permanently installed
Ground Fault Circuit Interrupter outlet (GFCI), use a plug-in GFCI between the power tool or
extension cord and the power receptacle.

4
PTDT-PW-1000
Mar 2020
ASSEBMLY INSTRUCTIONS
1. Remove the Fixed Mounts (A & B) from the Tabletop (2).
2. Remove the Drawer from the Shell (4).
3. Attach the Fixed Mounts (A & B) to the Drawer Shell (4) with Bolts, and then carefully insert
Drawer into the Shell.
2
B
A
4
4
2

5
PTDT-PW-1000
Mar 2020
4. Assemble the Drawer (4) with the Fixed Mounts to Tabletop.
5. Attach the Two Leg Assemblies (1) to the Tabletop’s two Terminals. Then connect the
Support Rails (6 & 7) with the bottom four holes on the legs, as shown below.
4
1
1
7
6

6
PTDT-PW-1000
Mar 2020
6. Carefully rotate the assembled Table with Leg Assemblies (1) and Support Rails (6 & 7) in
the upright position.
7. There are 8 bolts at the right side of Support Rails (6 & 7) connected to Legs; remove the 8
these bolts. Slide the Rack Assembly (9) into the Support Rails & retighten the 8 bolts as
shown below.
7
4
6
1
1
7
4
2
1
1
2
6
9
9

7
PTDT-PW-1000
Mar 2020
8. Affix Casters (5) to bottom of Leg Assemblies for easy maneuverability. It’s recommended to
install locking casters on same side.
9. Insert the Liquid Collection Box (3) into the rails on the underside of the Tabletop (2) &
insert the Parts Washer (10) onto the sliding Rack Base (9) and affix both, as shown below.
5
5
5
5
2
3
9
10

8
PTDT-PW-1000
Mar 2020
OPERATION INSTRUCTIONS
1. To locate the Parts Washer into the operating position, first release it from its locked position
on the sliding Support Rack by rotating the Rotary Arm Tab, which is attached to the Pin
Lock from the horizontal to the vertical position. This lifts the Pin Lock out of the locking hole
in the Support Rack allowing to slide out, as shown below.
2. Once the Parts Washer has been released from the locked position, slide it out from under the
tabletop. Do this by pulling the Handle on the front of the Parts Washer Tray. Once the Parts
Washer is fully extended, then lower the Rotary Arm Tab into the rear locking hole on the
support rack, so that it’s locked in the extended position.

9
PTDT-PW-1000
Mar 2020
3. Next, raise the Parts Washer using Handles (A & B) until the swing rods supporting the Parts
Washer are in the vertical position and Parts Washer is positioned against tabletop.
4. Flip the Fixed Hook (49) down and place the head of the Hook Insert into the hole of Front
Swing Rod (61) to assure stability and to lock the Parts Washer into the operating position.

10
PTDT-PW-1000
Mar 2020
5. To store Parts Washer when not in use, release the Fixed Hook (49), then raise the Rotary
Arm Lever to the vertical position to unlock and then lower the Parts Washer to the rack and
slide it under the tabletop. Once the Parts Washer is stored below the tabletop, lower the
Rotary Arm Lever to the horizontal position to lock the Parts Washer in place.
MAINTENANCE
WARNING: Make sure this tool is disconnected from its power source before
attempting any maintenance, cleaning, or inspection.
vMaintain Tools. It is recommended that the general condition of any tool be examined before
use. Keep your tools in good repair by adopting a program of conscientious repair and
maintenance in accordance with the recommended procedures found in this manual. If any
abnormal vibrations or noise occurs, turn the tool off immediately and have the problem
corrected before further use. Have all necessary repairs made by qualified service
professional.
vCleaning. Use only soap and a damp cloth to clean your tools. Many household cleaners are
harmful to plastics and other insulation. Never let liquid get inside a tool.

11
PTDT-PW-1000
Mar 2020
EXPLODED VIEW

12
PTDT-PW-1000
Mar 2020
PARTS LIST
ITEM
TUX P/N
DESCRIPTION
QTY
1
PTDT
-
PW
-
1000
-
001
TDT PLATFORM TOP
1
2 PTDT-PW-1000-002
STORAGE DRAWER, PLATE 1
3
PTDT
-
PW
-
1000
-
003
PLASTIC CATCH BASIN
1
4
PTDT
-
PW
-
1000
-
004
STORAGE
DRAWER
1
5
PTDT
-
PW
-
1000
-
005
LEG ASSEMBLY
2
6
PTDT
-
PW
-
1000
-
006
BOLT
,
M8
X
15
MM
16
7 PTDT-PW-1000-007
WASHER, M8 16
8
PTDT
-
PW
-
1000
-
008
LOCKNUT
, M8
16
9
PTDT
-
PW
-
1000
-
009
LOCKING / SWIVEL
CASTER
S
2 / 2
10
PTDT
-
PW
-
1000
-
010
(PTDT
-
PW
)
FRONT,
PANEL BRACKET
1
11
PTDT
-
PW
-
1000
-
011
BOLT
,
M8X15
MM
16
12 PTDT-PW-1000-012
WASHER, M8 16
13
PTDT
-
PW
-
1000
-
013
LOCKNUT
, M8
16
14
PTDT
-
PW
-
1000
-
014
(PTDT
-
PW
)
REAR,
PANEL BRACKET
1
15
PTDT
-
PW
-
1000
-
015
ROTARY ARM LOCK
1
16
PTDT
-
PW
-
1000
-
016
STORAGE
DRAWER SHELL
1
17 PTDT-PW-1000-017 STORAGE DRAWER, FRAME 1
18
PTDT
-
PW
-
1000
-
018
BOLT
,
M8X15
MM
16
19
PTDT
-
PW
-
1000
-
019
WASHER
, M8
16
20
PTDT
-
PW
-
1000
-
020
LOCKNUT
, M8
16
21
PTDT
-
PW
-
1000
-
021
BOLT
,
M8X30
MM
2
22 PTDT-PW-1000-022 DRAIN PAN 1
23
PTDT
-
PW
-
1000
-
023
RESERVOIR
TANK
1
24
PTDT
-
PW
-
1000
-
024
LID
LINKAGE
1
25
PTDT
-
PW
-
1000
-
025
LID
HINGE
1
26
PTDT
-
PW
-
1000
-
026
RIVETS
4
27
PTDT
-
PW
-
1000
-
027
WASHER LID
1
28
PTDT
-
PW
-
1000
-
028
CABLE CLAMP
1
29
PTDT
-
PW
-
1000
-
029
BOLT
,
M4
5
30
PTDT
-
PW
-
1000
-
030
GASKET
,
M4
5
31
PTDT
-
PW
-
1000
-
031
CABLE SHEATH
1
32
PTDT
-
PW
-
1000
-
032
FLEXIBLE
METAL
PIPE
1
33
PTDT
-
PW
-
1000
-
033
O“RING, D
10
X
2.65”
1
34
PTDT
-
PW
-
1000
-
034
FLUID
SWITCH
1
35
PTDT
-
PW
-
1000
-
035
O“RING
, D
14
X
2.65”
1
36
PTDT
-
PW
-
1000
-
036
FLUID
PUMP
1
37
PTDT
-
PW
-
1000
-
037
CROSS BOLT
, M4
5
38
PTDT
-
PW
-
1000
-
038
SWITCH BOX
1
39
PTDT
-
PW
-
1000
-
039
CABLE PLUG
1
40
PTDT
-
PW
-
1000
-
040
BOAT SWITCH
1
41 PTDT-PW-1000-041 BASE TRAY 1
42
PTDT
-
PW
-
1000
-
042
FLANGE BOLT
, M10
2
43
PTDT
-
PW
-
1000
-
043
HANDLE
1
44
PTDT
-
PW
-
1000
-
044
SHAFT CIRCLIP
, D12
8
45
PTDT
-
PW
-
1000
-
045
SHORT
,
SWING ROD
4
46 PTDT-PW-1000-046 BACK, SWING ROD 1
47
PTDT
-
PW
-
1000
-
047
BEARING
CLIP
, D12
8
48
PTDT
-
PW
-
1000
-
048
SLIDING
RACK
BASE
1
49
PTDT
-
PW
-
1000
-
049
FIXED HOOK
1
50
PTDT
-
PW
-
1000
-
050
ELASTIC PIN
, D
6
X
30
MM
1
51 PTDT-PW-1000-051 LONG, SWING ROD 4
52
PTDT
-
PW
-
1000
-
052
GUIDE WHEEL
,
BASE
4
53
PTDT
-
PW
-
1000
-
053
GUIDE WHEEL
4
54
PTDT
-
PW
-
1000
-
054
SMALL PULLEY
4
55
PTDT
-
PW
-
1000
-
055
BIG PULLEY
4
56 PTDT-PW-1000-056 FLANGE BOLT, M6 16
57
PTDT
-
PW
-
1000
-
057
LOCKNUT
, M
6
16
58
PTDT
-
PW
-
1000
-
058
GUIDE WHEEL AXIS
4
59
PTDT
-
PW
-
1000
-
059
SHAFT CIRCLIP
, D10
4
60
PTDT
-
PW
-
1000
-
060
SHAFT
CIRCLIP
, D12
16
61 PTDT-PW-1000-061 FRONT, SWING ROD 1
62
PTDT
-
PW
-
1000
-
062
BACK
,
SWING ROD
1

13
PTDT-PW-1000
Mar 2020
LIMITED WARRANTY
Structural Warranty:
The following parts and structural components carry a five-year warranty:
Columns Arms Uprights Swivel Pins
Legs Carriages Overhead Beam
Tracks Cross Rails Top Rail Beam
Limited One-Year Warranty:
Tuxedo Distributors, LLC (iDEAL) offers a limited one-year warranty to the original purchaser of Lifts and Wheel Service
equipment in the United States and Canada. Tuxedo will replace, without charge, any part found defective in materials or
workmanship under normal use, for a period of one year after purchase. The purchaser is responsible for all shipping
charges. This warranty does not apply to equipment that has been improperly installed or altered or that has not been
operated or maintained according to specifications.
Other Limitations:
This warranty does not cover:
1. Parts needed for normal maintenance
2. Wear parts, including but not limited to cables, slider blocks, chains, rubber pads and pulleys
3. Replacement of lift and tire changer cylinders after the first 30 days. A seal kit and installation instructions will be
sent for repairs thereafter.
4. On-site labor
Upon receipt, the customer must visually inspect the equipment for any potential freight damage before signing clear on
the shipping receipt. Freight damage is not considered a warranty issue and therefore must be noted for any potential
recovery with the shipping company.
The customer is required to notify Tuxedo of any missing parts within 72 hours. Timely notification must be received to be
covered under warranty.
Tuxedo will replace any defective part under warranty at no charge as soon as such parts become available from the
manufacturer. No guarantee is given as to the immediate availability of replacement parts.
Tuxedo reserves the right to make improvements and/or design changes to its lifts without any obligation to previously
sold, assembled or fabricated equipment.
There is no other express warranty on the Tuxedo lifts and this warranty is exclusive of and in lieu of all other warranties,
expressed or implied, including all warranties of merchantability and fitness for a particular purpose.
To the fullest extent allowed by law, Tuxedo shall not be liable for loss of use, cost of cover, lost profits, inconvenience,
lost time, commercial loss or other incidental or consequential damages.
This Limited Warranty is granted to the original purchaser only and is not transferable or assignable.
Some states do not allow exclusion or limitation of consequential damages or how long an implied warranty lasts,
so the above limitations and exclusions may not apply. This warranty gives you specific legal rights and you may
have other rights, which may vary from state to state.
8320 E Hwy 67, Alvarado, TX 76009
Ph. 817-558-9337 / Fax 817-558-9740
Table of contents
Other Tuxedo Indoor Furnishing manuals
Popular Indoor Furnishing manuals by other brands

Ropox
Ropox FlexiBasic 30-63 Series user manual

John Lewis
John Lewis 87702431 instructions

Germania
Germania Kombitisch 1689 Assembly instructions

PHI VILLA
PHI VILLA THD7-322-116 Use and care guide

Crate&Barrel
Crate&Barrel Ronin manual

John Lewis
John Lewis Alba Slatted Chair 83610603 Instructions and warnings

Whalen Furniture
Whalen Furniture Golden Oak ZTCD-B quick start guide

Manhattan Comfort
Manhattan Comfort BL 03-06 Assembly instructions

2K Furniture Designs
2K Furniture Designs BK1640 Assembly instructions

Clarke
Clarke CSR5175 Series Aassembly Instructions

Coaster
Coaster 100771 Assembly instructions

Impact Acoustics
Impact Acoustics Chatpod 350 Assembly instructions