TVS electronics LP 46 LITE User manual

i
USER MANUAL
LP 46 LITE
THERMAL TRANSFER/DIRECT THERMAL BAR
CODE PRINTER

ii
Copyright Information
The copyright in this manual, the software, and firmware in the printer described therein are owned by the
company. All rights reserved.
Information in this document is subject to change without notice and does not represent a commitment on the
part of the company. No part of this manual may be reproduced or transmitted in any form or by any means, for
any purpose other than the purchaser’s personal use, without the expressed written permission of the
company.
Agency Compliance and Approvals
IS 13252 (Part 1): 2010 /
IEC 60950-1 : 2015
LP 46 LITE
R-41110507
www.bis.gov.in

iii
Important safety instructions:
1. Read all of these instructions and keep them for later use.
2. Follow all warnings and instructions on the product.
3. Disconnect the power plug from the AC outlet before cleaning or if fault happened.
Do not use liquid or aerosol cleaners. Using a damp cloth is suitable for cleaning.
4. The mains socket shall be installed near the equipment and easily accessible.
5. The unit must be protected against moisture.
6. Ensure the stability when installing the device, Tipping or dropping could cause damage.
7. Make sure to follow the correct power rating and power type indicated on marking label provided by
manufacturer.
8. Please refer to user manual for maximum operation ambient temperature.
WARNING:
Hazardous moving parts, keep fingers and other body parts away.
CAUTION:
(For equipment with RTC (CR2032) battery or rechargeable battery pack)
Risk of explosion if battery is replaced by an incorrect type.
Dispose of used batteries according to the Instructions as below.
1. DO NOT throw the battery in fire.
2. DO NOT short circuit the contacts.
3. DO NOT disassemble the battery.
4. DO NOT throw the battery in municipal waste.
5. The symbol of the crossed out wheeled bin indicates that the battery should not be placed in municipal waste.
Caution: The print head may be hot and could cause severe burns. Allow the print head to cool
CAUTION:
Any changes or modifications not expressly approved by the grantee of this device could void the user's authority to
operate the equipment.

iv
Contents
1.
Introduction ................................................................................................................ 1
1.1
Product Introduction.................................................................................................. 1
1.2
Product Features ....................................................................................................... 2
1.2.1
Printer Standard Features ............................................................................... 2
1.2.2
Printer Optional Features................................................................................ 3
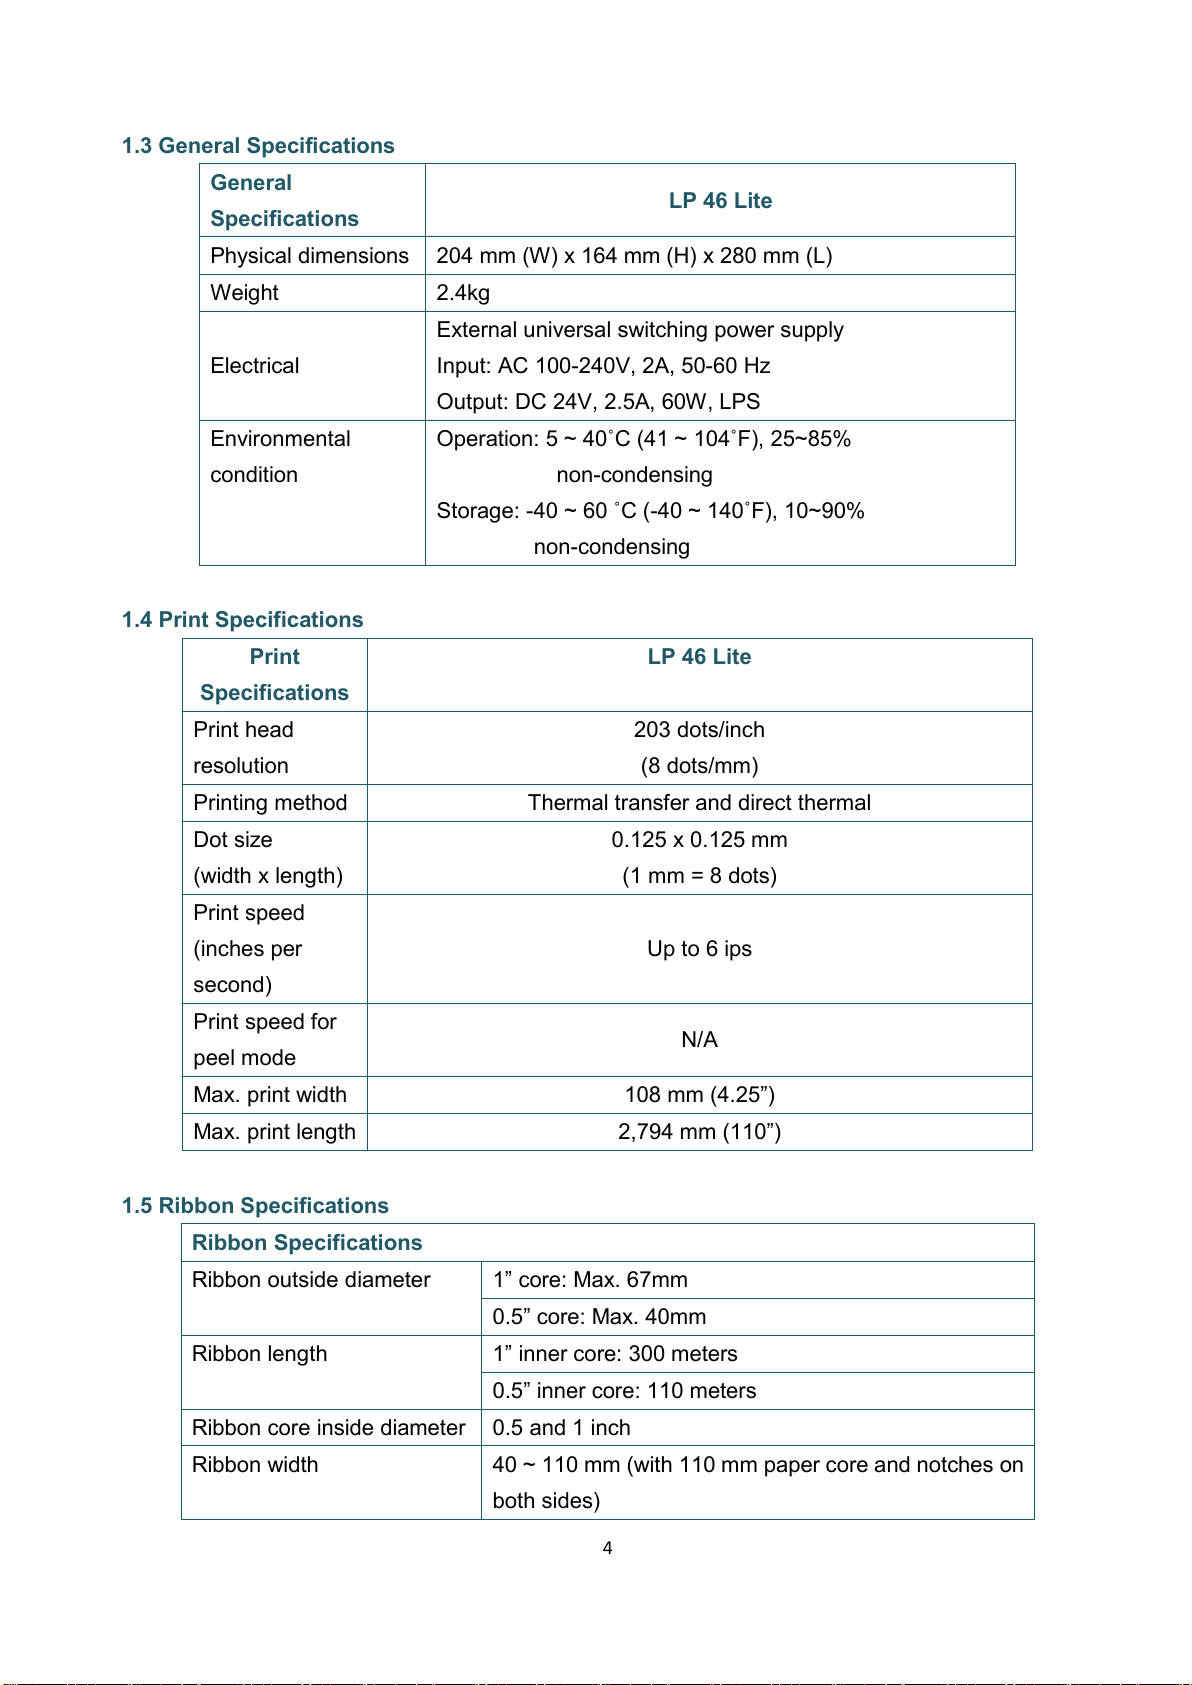
1.3
General Specifications................................................................................................ 4
1.4
Print Specifications .................................................................................................... 3
1.5
Ribbon Specifications................................................................................................. 3
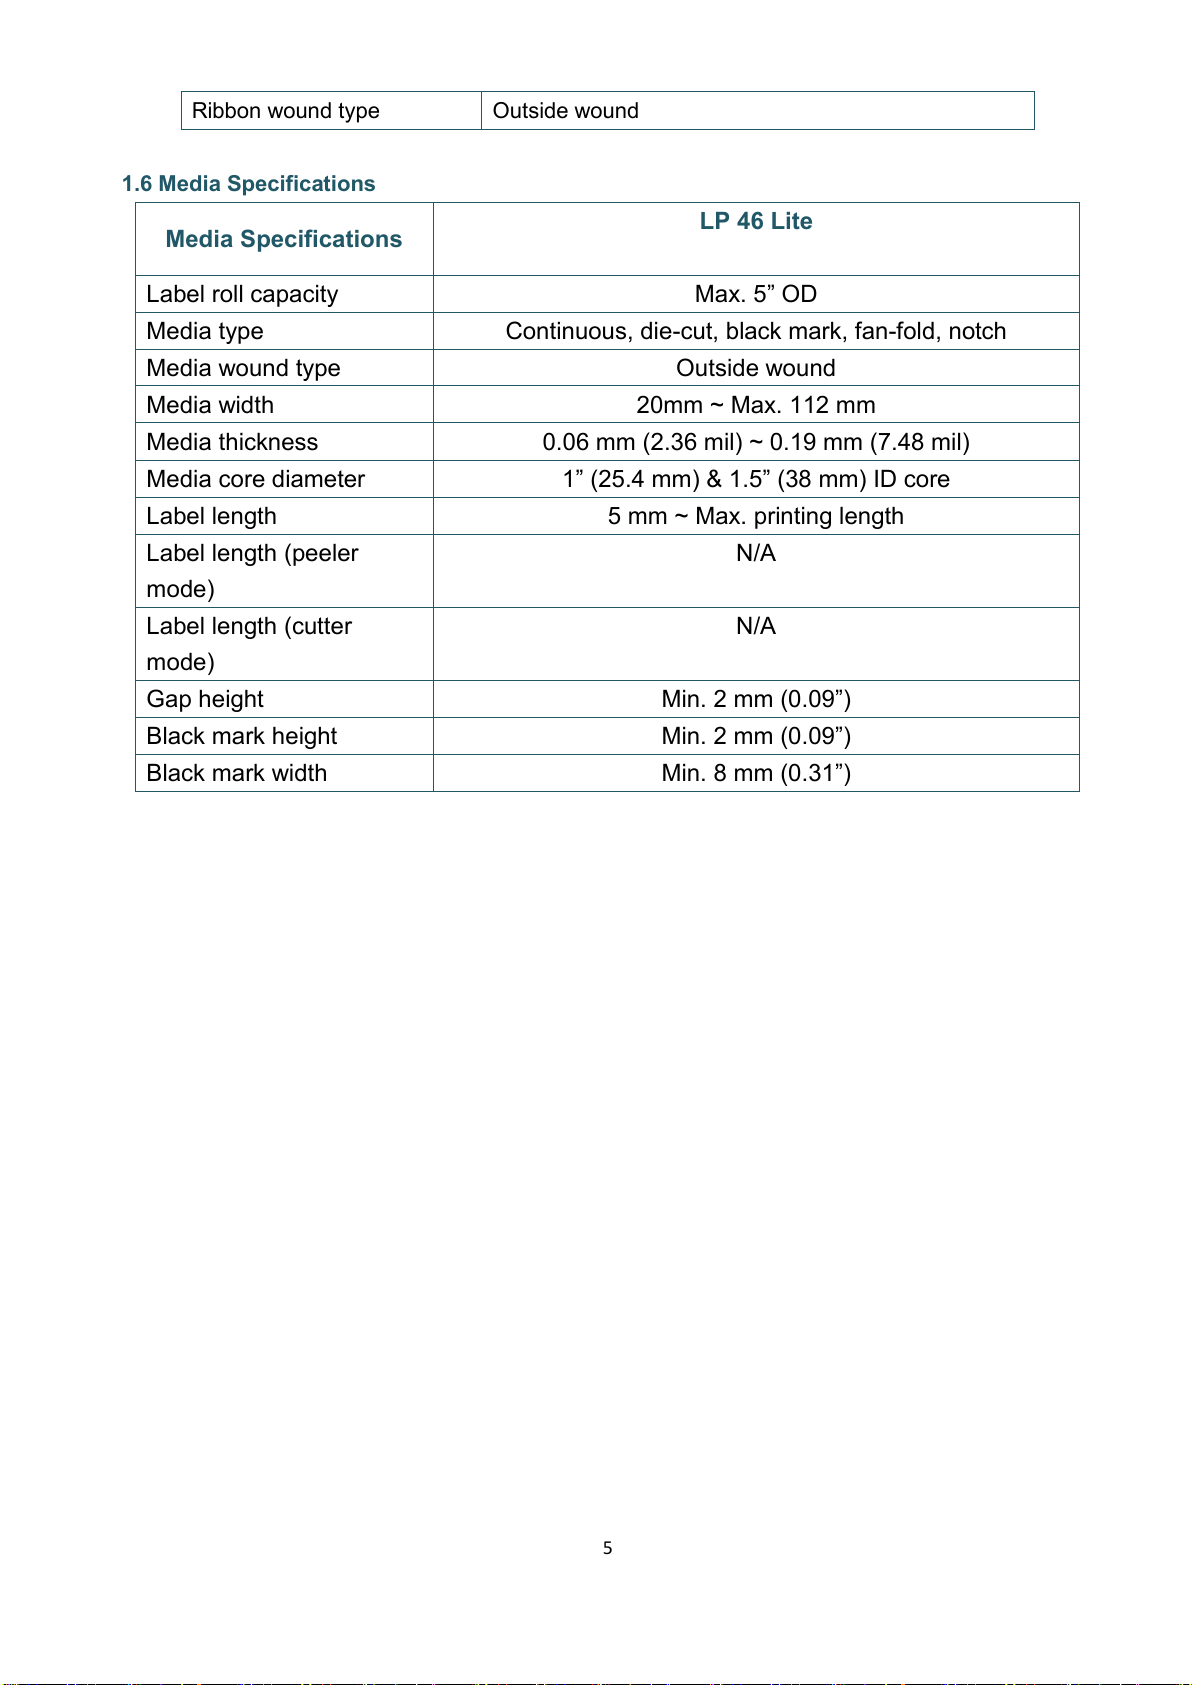
1.6
Media Specifications.................................................................................................. 4
2.
Operations Overview................................................................................................... 5
2.1
Unpacking and Inspection .......................................................................................... 5
2.2
Printer Overview ....................................................................................................... 6
2.2.1
Front View...................................................................................................... 6
2.2.2
Interior View .................................................................................................. 7
2.2.3
Rear View....................................................................................................... 9
3.
Setup ........................................................................................................................10
3.1
Setting up the Printer...............................................................................................10
3.2
Loading the Ribbon ..................................................................................................11
3.3
Loading the Media ...................................................................................................14
3.3.1
Loading the Roll Labels ......................................................................................... 14
3.3.2 External Label Roll Mount Installation (Option)..................................................... 17
4.
LED and Button Functions ..........................................................................................18
4.1
LED Indicator ...........................................................................................................18
4.2
Regular Button Functions.........................................................................................18
4.3
Power-on Utilities....................................................................................................19
4.3.1
Gap/Black Mark Sensor Calibration ...............................................................20
4.3.2
Gap/Black Mark Calibration, Self-test and Dump Mode .................................20
4.3.3
Printer Initialization......................................................................................23
4.3.4
Set Black Mark Sensor as Media Sensor and Calibrate the Black Mark Sensor .24
4.3.5
Set Gap Sensor as Media Sensor and Calibrate the Gap Sensor.......................24
4.3.6
Skip AUTO.BAS .............................................................................................25
5.
Diagnostic Tool..........................................................................................................25

V
5.1
Start the Diagnostic Tool.......................................................................................... 25
5.2
Printer Function....................................................................................................... 27
5.3
Calibrating Media Sensor by Diagnostic Tool ............................................................ 28
5.3.1
Auto Calibration ........................................................................................... 28
6.
Troubleshooting ........................................................................................................ 29
6.1
Common Problems................................................................................................... 29
7.
Maintenance ............................................................................................................. 31

1
1. Introduction
1.1 Product Introduction
Thank you very much for purchasing the bar code printer.
The LP 46 LITE series printer features the single motor that is capable of handling a
large capacity of 300 meters ribbon and large rolls of media inside its sleek design. If the
5”interior label capacity is not enough, simply add an external media roll mount and the
LP 46 LITE can easily handle 8”OD rolls of labels designed for expensive industrial
label printers.
The movable black mark sensor design can accept a wide range of label media. All of
the most frequently used bar code formats are included. Fonts and bar codes can be
printed in any one of the four directions.
The LP 46 LITE printer is built-in the high quality, high-performance MONOTYPE
IMAGING®True Type font engine and one CG Triumvirate Bold Condensed smooth font.
With flexible firmware design, user can also download the True Type Font from PC into
printer memory for printing labels. Besides the scalable font, it also provides a choice of
eight different sizes of the alphanumeric bitmap font. By integrating rich features, it is the
most cost-effective and high-performance printer in its class!
To print label formats, please refer to the instructions provided with your labeling
software; if you need to write the custom programs, please refer to the programming
manual that can be found on our website http://www.tvs-e.in.
.
Applications
oManufacturing & Warehousing
Work in Progress
Item Labels
Instruction labels
Agency labels
oHealthcare
Patient Identification
Pharmacy
Specimen Identification
oParcel Post
Shipping/ Receiving
Labels
oSmall Office/ Home Office
oRetail Marking
Price tags
Shelf labels
Jewelry tags

2
1.2 Product Features
1.2.1 Printer Standard Features
The printer offers the following standard features.
Product standard feature of LP 46 Lite
1. Thermal transfer printing
2. Direct thermal printing
3. Plastic
4. Gap sensor
5. Reflective, full-range moveable black mark sensor
6. Ribbon sensor
7. Head open sensor
8. USB 2.0 (Hi-Speed) interface
9. 16 MB DRAM memory
10. 8 MB Flash memory
11. One button for feed and pause
12. One LED indicator for 3 colors
13. Standard industry emulations right out of the box including Eltron®and Zebra®
language support
14. Internal 8 alpha-numeric bitmap fonts
15. Fonts and bar codes can be printed in any one of the four directions (0, 90,180, 270
degrees)
16. Internal Monotype Imaging® true type font engine with one CG Triumvirate Bold
Condensed scalable font
17. Downloadable fonts from PC to printer memory
18. Downloadable firmware upgrades

3
19. Text, bar code, graphics/image printing (Please refer to the TSPL/TSPL2
programming manual for supporting code page)
Supported bar code
Supported
image
1D bar code
2D bar code
BITMAP,
BMP,
PCX
(Max. 256
colors
graphics)
Code128UCC,
Code128 subsets
A、B、C, EAN128,
Interleaved 2 of 5,
Interleaved 2 of 5
with check digit,
Code39, Code39
with check digit,
Code93, EAN13,
EAN8, UPCA,
UPCE, EAN and
UPC 2 (5) digits
add-on, Codabar,
Postnet, MSI, MSI
with check digit,
PLESSEY, China
post, ITF14,
Code11,
TELEPEN,
TELEPENN,
PLANET,
Code49,
Deutsche Post
Identcode,
Deutsche Post
Leitcode,
LOGMARS
GS1
DataBar,
GS1Data
Matrix,
Maxicode
, AZTEC,
PDF417,
QR
Code,
Micro
PDF 417
1.2.2 Printer Optional Features
The printer offers the following optional features.
Product option feature
User
options
Dealer
options
Factory
options
Extended plate for external roll mount assembly with
3”core label spindle (8.4 OD)
yes
Internal Bluetooth v4.0
yes

4
1.3 General Specifications
General
Specifications
LP 46 Lite
Physical dimensions
204 mm (W) x 164 mm (H) x 280 mm (L)
Weight
2.4kg
Electrical
External universal switching power supply
Input: AC 100-240V, 2A, 50-60 Hz
Output: DC 24V, 2.5A, 60W, LPS
Environmental
condition
Operation: 5 ~ 40˚C (41 ~ 104˚F), 25~85%
non-condensing
Storage: -40 ~ 60 ˚C (-40 ~ 140˚F), 10~90%
non-condensing
1.4 Print Specifications
Print
Specifications
LP 46 Lite
Print head
resolution
203 dots/inch
(8 dots/mm)
Printing method
Thermal transfer and direct thermal
Dot size
(width x length)
0.125 x 0.125 mm
(1 mm = 8 dots)
Print speed
(inches per
second)
Up to 6 ips
Print speed for
peel mode
N/A
Max. print width
108 mm (4.25”)
Max. print length
2,794 mm (110”)
1.5 Ribbon Specifications
Ribbon Specifications
Ribbon outside diameter
1”core: Max. 67mm
0.5”core: Max. 40mm
Ribbon length
1”inner core: 300 meters
0.5”inner core: 110 meters
Ribbon core inside diameter
0.5 and 1 inch
Ribbon width
40 ~ 110 mm (with 110 mm paper core and notches on
both sides)

5
Ribbon wound type
Outside wound
1.6 Media Specifications
Media Specifications
LP 46 Lite
Label roll capacity
Max. 5”OD
Media type
Continuous, die-cut, black mark, fan-fold, notch
Media wound type
Outside wound
Media width
20mm ~ Max. 112 mm
Media thickness
0.06 mm (2.36 mil) ~ 0.19 mm (7.48 mil)
Media core diameter
1”(25.4 mm) & 1.5”(38 mm) ID core
Label length
5 mm ~ Max. printing length
Label length (peeler
mode)
N/A
Label length (cutter
mode)
N/A
Gap height
Min. 2 mm (0.09”)
Black mark height
Min. 2 mm (0.09”)
Black mark width
Min. 8 mm (0.31”)

6
2. Operations Overview
2.1 Unpacking and Inspection
This printer has been specially packaged to withstand damage during shipping. Please carefully
inspect the packaging and printer upon receiving the bar code printer. Please retain the
packaging materials in case you need to reship the printer.
Unpacking the printer, the following items are included in the carton.
One printer unit
One quick installation guide
One power cord
One external universal switching power supply
One USB interface cable
A pair of 1”Ribbon spindles for 300M ribbon
One 1’’ ribbon paper core
One label spindle with two fixing tabs and two 1.5”adapters
If any parts are missing, please contact the Customer Service Department of your purchased
reseller or distributor.

7
2.2 Printer Overview
2.2.1 Front View
1. LED indicator
2. Feed/Pause button
3. Top cover open tab
4. Paper exit chute
1
2
4
3

8
2.2.2 Interior View
1. Printer top cover
8. Media supply spindle
2. Ribbon supply spindle
9. Platen roller
3. Ribbon supply hub
10. Black mark sensor
4. Ribbon rewind hub
11. Gap sensor
5. Ribbon rewind spindle
12. Media guide
6. Print head release button
13. Media guide hub
7. Fixing tab
14. Print head
WARNING
HAZARDOUS MOVING PARTS
KEEP FINGERS AND OTHER
BODY PARTS AWAY
OPEN
7
6
1
4
5
8
13
12
14
9
11
10
2
3

9
2.2.3 Rear View
1. Power switch
2. Power jack socket
3. USB interface (USB 2.0/Hi-Speed mode)
4. USB host (PE210/PE310 Series only)
5. RS-232 interface (PE210/PE310 Series only)
6. Ethernet interface (PE210/PE310 Series only)
Note:
The interface picture here is for reference only. Please refer to the product
specification for the interfaces availability.
1
2
3
6
5
4

10
3. Setup
3.1 Setting up the Printer
Place the printer on a flat, secure surface, then
follow the steps below:
1. Plug the power cord into the AC power cord
socket at the rear of the printer. Then, plug
the other side into a properly grounded
power outlet.
2. Connect the printer to the computer with the
provided USB cable.
3. Push the power switch on “-”side to open the
power of printer.
Note:
* Please switch OFF printer power switch prior to plugging in the power cord to printer power jack.
* The interface picture here is for reference only. Please refer to the product specification for the
interfaces availability.

11
3.2 Loading the Ribbon
1. Open the printer top cover by
pressing the top cover open tabs
located on each side of the printer.
2. Insert the paper core to the ribbon
rewind spindle.
Note: Please follow the direction
when installing the ribbon rewind
spindle.
3. Insert the right side of ribbon rewind
spindle first. Then, insert the left side
to the hole at the left side of ribbon
rewind hub (green).
Note:
It can also be substituted by 0.5 or
1 inch paper roll with notches on
both sides. Please insert it at the
ribbon rewind hub directly.
R
L

12
4. Push the print head release button to
open the print head mechanism.
5. Insert the ribbon to the ribbon
spindle.
Note: The ribbon spindle can be
substituted by insert the ribbon
with notches on both sides to the
ribbon mechanism directly.
6. Insert the right side of ribbon supply
spindle (marked “R”) to the ribbon
supply hub first. Then, insert the left
side of ribbon supply spindle to the
hole at the left side of ribbon supply
hub (green).
OPEN

13
7. Pull the leader of the ribbon through
the print head and stick the leader of
the ribbon onto the ribbon rewind
paper core.
8. Turn the ribbon rewind hub until the
ribbon plastic leader is thoroughly
wound and the black section of the
ribbon covers the print head.
9. Close the print head mechanism with
both hands and make sure the
latches are engaged securely.
Ribbon loading path

14
3.3 Loading the Media
3.3.1 Loading the Roll Labels
1. Open the printer top cover by
pressing the top cover open tabs
located on each side of the printer.
2. Insert the paper roll into the media
supply spindle and use two fixing
tabs to fix the paper roll onto the
center of the spindle. (If your paper
width is 4”, you can remove the
fixing tabs on both side of the
media supply spindle.)

15
3. Place the paper roll onto the paper
roll mount.
4. Push the print head release button
to open the print head mechanism.
Note: The black mark sensor position is moveable and the gap sensor is fixed.
Please make sure the gap or black mark is at the location where media gap/black
mark will pass through for sensing.
5. Feed the paper, printing side face
up, through the media bar, media
sensor and place the label leading
edge onto the platen roller. Move
the media guides to fit the label
width.
Platen roller
Black mark sensor
Gap sensor
Media spindle attached with two fixing
tabs and two 1.5” adapters
Table of contents
Other TVS electronics Barcode Reader manuals