Twister Sea King 2.4 Setup guide

This high performance model must be assembled according to the
instructions. May cause serious injury to persons or property if not
used responsibly or if operated without due caution.
Unsuitable for children under 14 years old.
TWISTER SEA KING 2.4
Ready to fly 4 channel R/c helicopteR
Assembly & Flight Training guide
T7
SpecificationS
Main rotor diameter............................................................................. 340mm
Fuselage length.................................................................................... 410mm
R/C transmitter.....................................................Planet 7 Advanced 2.4ghz
Receiver.............................................................................Planet R7M 2.4ghz
Cyclic steering..................................hi-torque EnErG digital micro servos
On-board electronic control............................................Twister 3-in-1 unit
On-board power......................11.1V Li-polymer (with cell balancer lead)
Flying weight................................................................................around 280g
Flight time per charge .............................. up to 10 minutes (approximate)
Main drive ................................twin motors + ballraced steel main shafts
Primary electronic stabilisation.................on-board piezo yaw rate gyro
Kit contentS
Twister Sea King helicopter ..........................................................................1
Planet 7 Advanced 2.4ghz transmitter.........................................................1
Planet R7M 2.4ghz receiver...........................................................................1
Twister “3 in1” on-board electronics unit...................................................1
EnErG digital micro servos ............................................................................2
Twister 11.1V lithium polymer battery pack................................................1
Twister Lithium polymer 12V DC balancer charger...................................1
Twister mains power supply .........................................................................1
Twister Sea King instruction manual...........................................................1
FREE main blades (upper & lower)........................................................ 1 set
AA transmitter batteries ................................................................................4
V9.10

Vital Safety info
Please read all instructions carefully before using this
model. If any information in this manual is unclear,
please contact your supplier for help.
Please note especially the potential dangers associated
with the rotating parts in this model:
DANGER—Wear protective eyewear when using model
helicopters!
DANGER—Do not wear loose clothing or ties!
DANGER—Keep well clear of rotating blades!
DANGER—Never fly near children or animals!
about the flyinG aRea
ReQuiRed
The Twister Sea King is designed primarily for indoor
use—or outdoors in flat calm conditions. A hard, flat
surface clear of all obstacles with an area of around 400
square feet is the minimum recommended requirement.
However, you should fly only where it is safe to do so.
about tRaininG,
cRaSheS & SpaRe paRtS
The Twister Sea King has been designed to be strong
and very easy to repair, however, the helicopter is not
invulnerable and most people will tip their helicopter
over or break parts during their flying career. This is
quite normal. All parts are available as spares from
your supplier. Study the exploded view of the helicopter
carefully to understand the relationship between parts
and how to replace them if necessary. Crash damage is
not covered by warranty.
GuaRantee/waRRanty
J. Perkins Distribution Ltd. guarantee this product to be free of
manufacturing and assembly defects for a period of one year
from time of purchase and Model Engines Pty Ltd. for 30 days.
This does not affect your statutory rights. This warranty is not
valid for any damage or subsequent damage arising as a result
of a crash, misuse, modification or for damage or consequential
damage arising as a result of failure to observe the procedures
outlined in this manual. Operation of this model is carried out
entirely at the risk of the operator. Please note that, whilst
every effort is made to ensure the accuracy of instructions and
material included with this product, mistakes can occur and
neither J. Perkins Distribution Ltd/Model Engines (Aust.) Pty.
Ltd. nor it’s distributors will be held liable for any loss or damage
arising from the use of this model or for any loss or damage
arising from omissions or inaccuracies in the associated
instructions or materials included with this product.
We reserve the right to modify the design of this product,
contents and manuals without prior notification.
© 2010 J Perkins Distribution Ltd, Lenham, Kent, UK ME17 2DL.
www.jperkinsdistribution.co.uk
Model Engines (Aust.) Pty. Ltd., Noble Park, Victoria 3174,
Australia. www.modelengines.com.au. All rights reserved. E&OE.
table of contentS
Introduction ........................................................3
New to R/C helicopters? ..................................3
General safety concerning helicopters ........4
Welcome .............................................................4
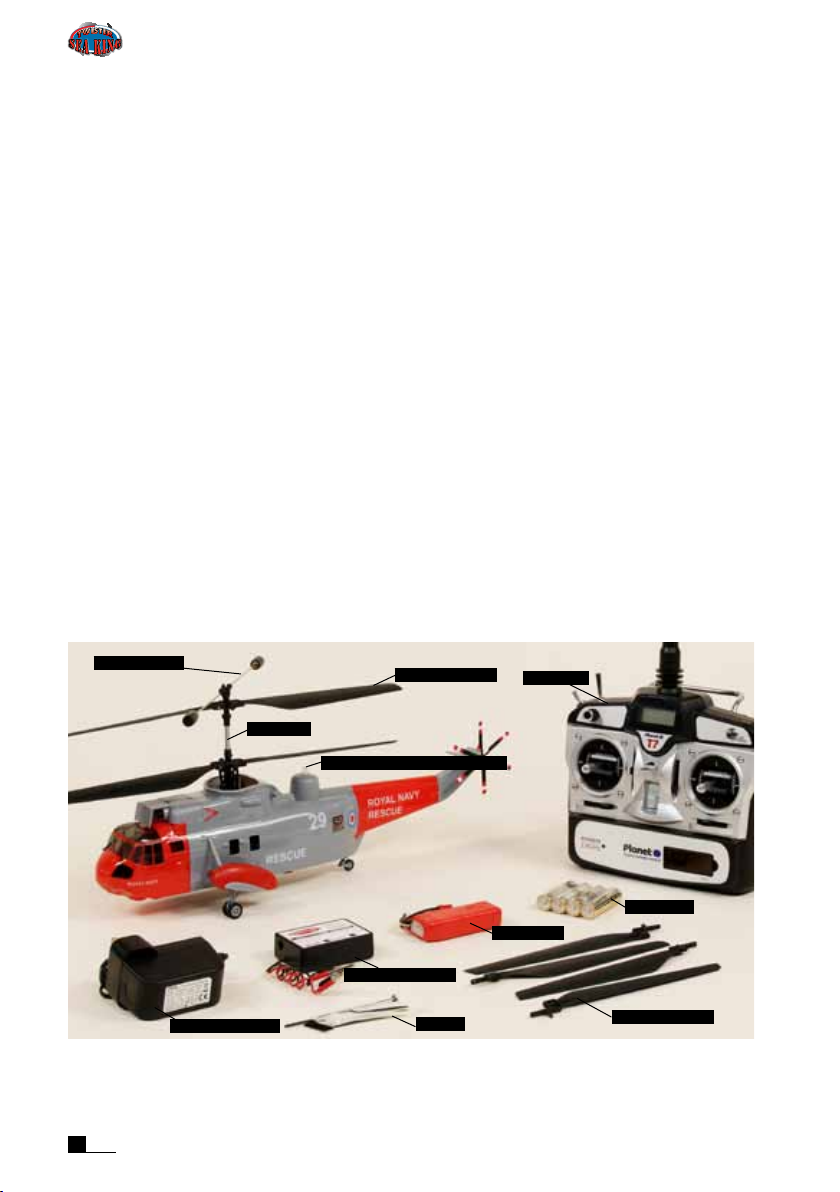
A. Kit contents..............................................4
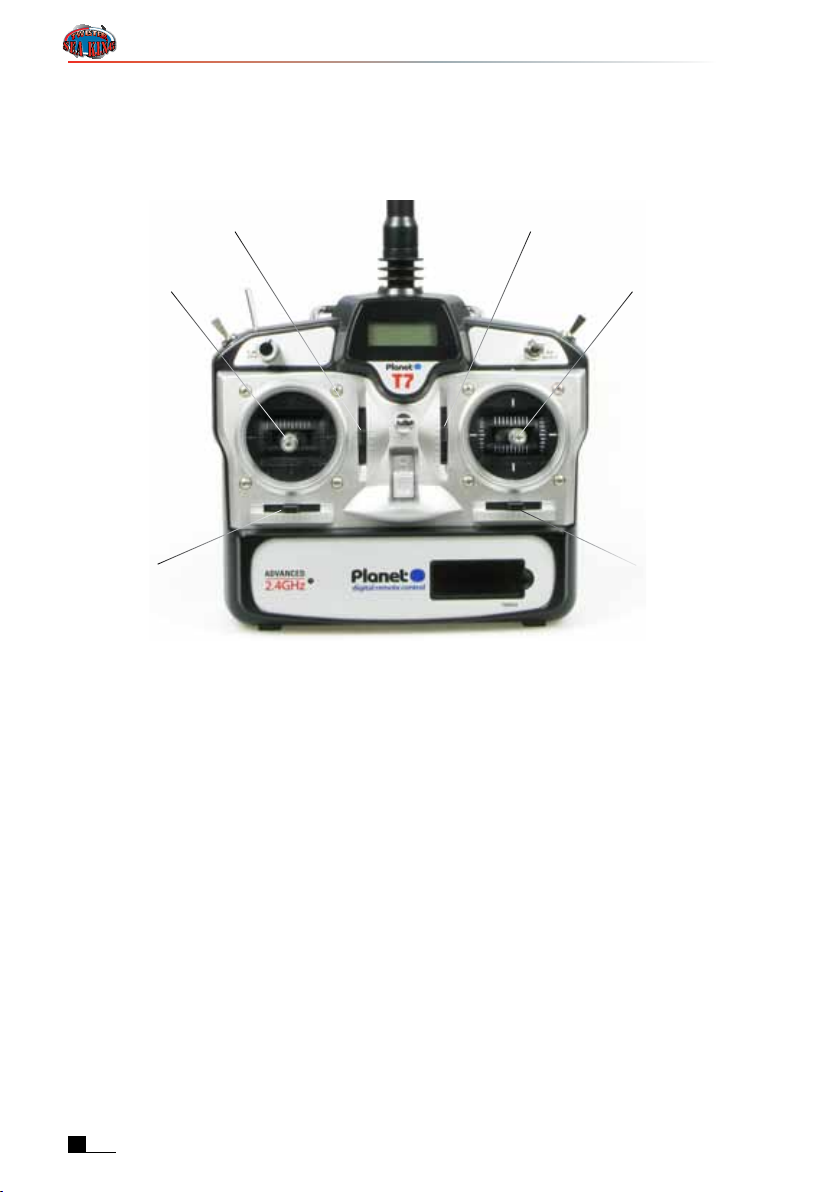
B. Transmitter part names..........................5
C. Reversing switches ................................5
D. Transmitter mode conversion...............5
Flight preparation..............................................6
A. Lithium polymer flight battery ...............6
B. Charging the flight battery.....................6
C. Fitting the flight battery ..........................7
D. Linkage checks .......................................7
Transmitter layout throttle left (mode 2)........8
Stick and trim control summary ................8
Transmitter layout throttle right (mode 1) .....9
Stick and trim control summary ................9
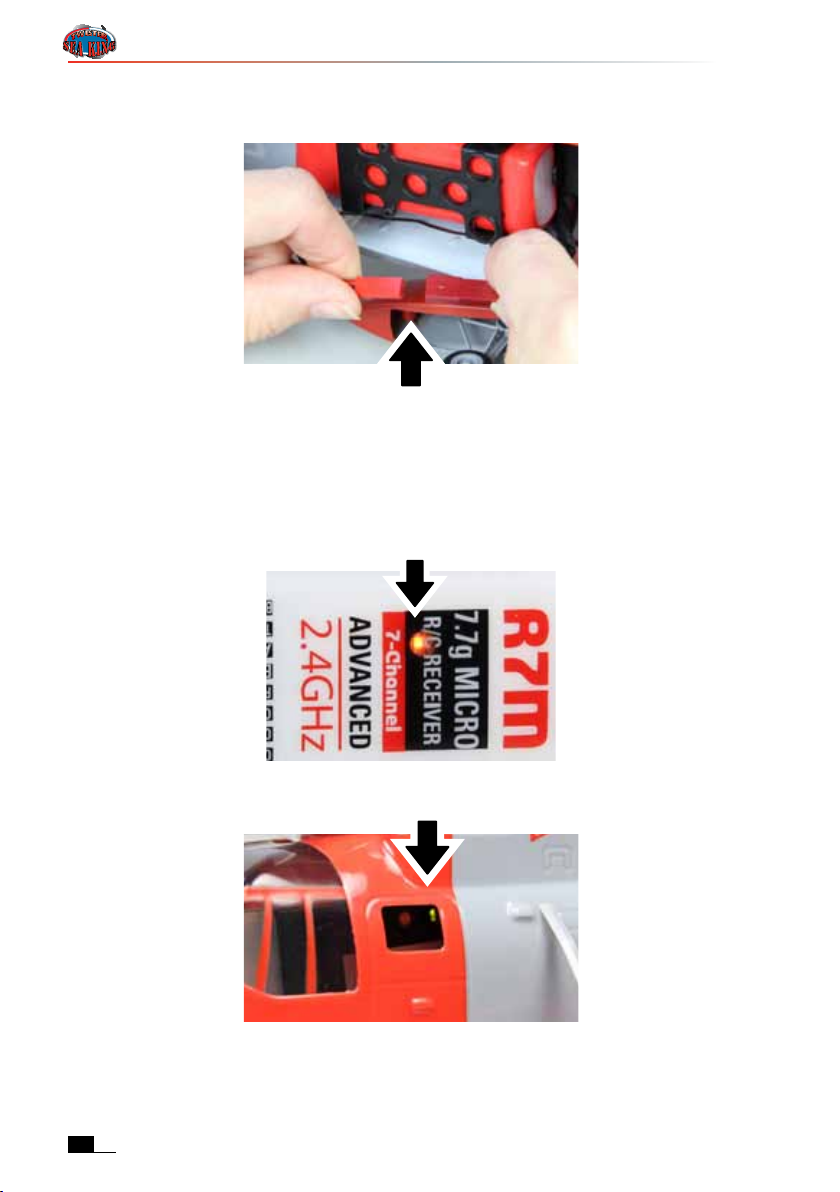
Power checks and connecting up ...............10
A. Connecting the Li-po battery ..............10
B. Swashplate level check.......................11
C. Swashplate roll check..........................11
D. Swashplate elevator check ................12
E. Throttle check........................................12
F. Yaw check...............................................12
G. Range & power check .........................13
Flight controls mode 2 ....................................13
A. flight controls layout.............................13
B. Right stick unit functions .....................14
C. Left stick unit functions........................14
Flight controls mode 1 ....................................15
A. Flight controls layout............................15
B. Right stick unit functions .....................16
C. Left stick unit functions........................17
Fine tuning of yaw control.............................18
3 in 1 unit adjustors ...................................18
Damage prevention features.........................18
LBW beacon...............................................18
MOPS...........................................................18
Twister Sea King winch system ...................19
Practice using your winch system .........19
How does a helicopter fly?............................20
Flight training guide........................................21
The flying area ...........................................21
Positioning your Twister Sea King..........21
Increase throttle gently ............................21
Walking the helicopter..............................21
Taking the first 'hop'..................................22
Hovering and manoeuvres.......................22
Beyond the hover ......................................22
Troubleshooting ...............................................23
Lithium polymer battery safety......................23
Exploded view..................................................24
Spare parts listing...........................................26
Option parts ......................................................29
Binding the receiver to the transmitter.......30

intRoduction
Thank you for buying the Twister Sea King! One of
the most complete, most stable, high quality scale
RC helicopters available today and packed with
more features than ever before!
It almost hovers by itself!
The co-axial rotors and ingenious design of this
helicopter make RC helicopter flight accessible
and practical to virtually anyone interested in RC
helicopters!
The Twister Sea King demonstrates remarkable
hovering stability and will help guide pilots into
successful flight in the shortest possible time.
Test-flown, Flight Guaranteed and Ready to Fly!
The Twister Sea King is ready to fly and is designed
for use indoors and outdoors (in calm conditions)
in an adequate and safe space. The helicopter is
designed by expert engineers and assembled at the
factory. It is strong and designed with numerous
innovative safety and damage prevention features.
The Twister Sea King uses the highest quality drive,
power and control systems.
Above all, this is one of the most fun-packed
models we have ever flown and we hope you will
enjoy flying it as much as we have!
State-of-the-art electronics in one package
The '3-in-1' on-board electronics package includes
piezo gyro, electronic mixers and speed controllers
PLUS an LED system check and a motor safe-start
facility.
Damage prevention and safe-start systems
included
The safe-start only allows starting when the throttle
stick and throttle trim are low–so there is no
danger of connecting the flight battery and thereby
inadvertently powering up the main rotors.
Integral LBW (Low Battery Warning) beacon
helps prevent damage to your helicopter &
Lipo battery by flashing when it’s time to land &
recharge!
Revolutionary MOPS (Motor Overload Protection
System)
helps prevents damage to your motors &
electronics by killing the motors automatically on
blade-stalling tipovers—then automatically re-
energising the system some seconds later!
Professional Planet 7 2.4ghz R/C included
The transmitter and receiver have been designed
for precision helicopter and aircraft flying and
feature Advanced 2.4ghz control and high quality
adjustable height stick units (convertible between
Mode II (throttle left) and Mode I (throttle right)).
The transmitter incorporates full 4-function
control via two dual axis control sticks, a unique
5th function for lights/retracts, etc, a 6th rotary
switch for flaps or spoilers etc., and a 7th 3-way
switch to operate the winch system featured on the
Twister Sea King. There is also a trainer socket to
allow a pupil/trainer relationship to exist between
two Planet radios, reversing switches, moulded
ergonomic rear and side grips, carry handle,
neckstrap hang point and a charging socket
(for charging optional rechargeable transmitter
batteries).
Spares
All spare parts are available for the Twister Sea
King and can be purchased through model and
hobby outlets. Some FREE spares are included
which will help you through your learning phase.
new to R/c
helicopteRS?
The model is not a toy and requires preparation
before flight. If you are new to RC helicopters,
please do not expect to be able to open the box and
immediately 'fly around'. RC helicopters are fun to
fly but require some time and training in order to be
flown successfully.
If this is not what you were expecting, we advise
you not to buy this model.
Although the Twister Sea King is easy to fly, please
note that we do not guarantee that by following
the information included with this product you
will be bound to achieve successful helicopter
flight. Neither do we guarantee you will not break
anything!!

4http://www.jperkinsdistribution.co.uk
GeneRal Safety conceRninG helicopteRS
Please be aware that rotating blades can inflict painful and possibly serious injury or damage to people,
animals or objects should the rotors strike someone or something.
We recommend people use protective eyewear when operating this model and that you read the manual
carefully before operating your Twister Sea King.
Radio controlled models themselves can reach high speeds and cover significant distances rapidly if
control is lost. This model is capable of speeds of around 20mph (30kph) or greater.
The model must therefore be used responsibly and with great care generally.
The model operates on the 2.4ghz radio band using the latest 2.4ghz technology, thereby providing prob-
ably the best interference rejection of any R/C system available today. This technology eliminates pilot
frequency worries as the radio encodes it's own unique frequency data at startup in a manner similar to a
bluetooth device.
In the UK, we recommend you observe the model flying safety code of the British Model Flying Association
which can be found at the following address:
http://www.bmfa.org
In Australasia, please contact your hobby supplier.
welcome
A. KIT CONTENTS
▼ 1. Carefully remove the model and other items from the packaging and check all items are included.
▼ 2. Insert the 4AA alkaline batteries into the transmitter battery compartment being careful to observe
battery polarity.
Although the Twister Sea King is strong, all model helicopters require careful handling and a delicate
touch. In particular, take great care with the electrical connections to and from the '3-in-1' control unit and
also the main rotor associated parts.
LBW - Low Battery Warning beacon
Flybar assembly
Main shaft
Main blades upper
DC balancer charger
Tool set
Li-po battery
Tx batteries
Mains power supply Spare main blades
Transmitter
R/C Twister Sea King

5
http://www.modelengines.com.au
B. TRANSMITTER PART NAMES
The battery compartment is in the rear of the transmitter.
Aerial
Battery status LCD
Neck strap hang
point
Ail/Ele Dual Rate
Switch
Carry handle
5th channel switch
6th channel
rotary switch
7th channel
switch
Trainer switch
Dual axis control
stick with
adjustable height/
spring tension
Control trim
Reversing
switches
ON/OFF switch
C. REVERSING SWITCHES
Reversing switches are used to reverse the direction of each channel.
They are factory-set and should NOT be switched for flying your Twister Sea King.
They may be useful if you use other models or fly the many models available within R/C flight simulators.
The reversing switches are located on the front panel of the transmitter.
Reversing
switches
5th Channel
Normal/Slow rate Switch
Dual rate travel
adjuster pots
NOTE: Both the transmitter
and receiver must be
switched off before changing
throttle reverse function.
Ail
Ch5
Ch6
Ch7
Elevon
Ele
Thro
Rud
D. TRANSMITTER MODE CONVERSION
The transmitter can be converted from throttle left to throttle right and vice versa (i.e. between mode 1 and
mode 2). Please consult the Planet Transmitter manual for instructions on how to do this. If you are not
confident doing this yourself please contact your local hobby store.
Twister Sea King R/C

6http://www.jperkinsdistribution.co.uk
R/C Twister Sea King
fliGht pRepaRation
A. LITHIUM POLYMER FLIGHT BATTERY
Charging lead only
The Lithium polymer (Li-po) flight battery is a high power battery designed to give a flight time of around 10
minutes per charge. It is supplied in a partially charged state.
As well as a red JST polarised lead (for connection later to the 3-in-1 board), the battery is also fitted with a
white 3-pin polarised connector. This is the charge lead.
When you have finished flying for the day, recharge the battery and always leave it in a partially or fully
charged state. Never leave your battery in a discharged state as this may damage the battery and shorten
it's life.
The battery must be recharged when the LBW beacon on the top of the helicopter starts to flash blue, or if
you notice the helicopter is losing power. At this point, land and recharge the battery.
Do not be tempted to run the battery past this stage as you will be over-discharging and the battery may be
damaged.
WARNING!
We recommend that you use only the supplied Twister charger with this battery.
WARNING!
Over-discharging will shorten the life of the battery or damage it. Stop flying immediately the LBW (Low
Battery Warning) beacon starts flashing and recharge the battery.
WARNING!
Do not short circuit—battery may explode! See page 22
PLEASE READ THE SAFETY PROCEDURES FOR HANDLING LI-POLY BATTERIES ON PAGE 22 BEFORE
PROCEEDING FURTHER.
B. CHARGING THE FLIGHT BATTERY
The charger is designed to automatically charge the Li-Po battery in about 1 hour from a discharged state.
The 12V DC automatic charger is powered by the 240 Volt power supply illustrated above.
Alternatively, you can use a 12 volt sealed lead acid battery to power the DC automatic charger.

7
http://www.modelengines.com.au
Twister Sea King R/C
▼ 1. Connect the charger to your power source. The 'POWER' LED will flash red.
▼ 2. Plug the 3-pin connector on your Li-po battery into the socket in the right side of the charger.
The green LED will light and the red LED will glow solid red.
▼ 3. When the battery is fully charged the green LED goes out. Disconnect the battery from the charger.
▼ 4. Disconnect the power source from the charger. Your Li-po battery is ready for use.
C. FITTING THE FLIGHT BATTERY
▼ 1. Slide the charged battery pack into the rear part of the battery holder - but do not connect the
power lead yet!
▼ 2. Push the battery forward to fit it securely.
Ensure the battery is slid all the way home.
D. LINKAGE CHECKS
▼ 1. Check that all linkages and connectors are attached and that rotating parts are free to rotate
smoothly.
▼ 2. Check that all linkages move freely with no binding or stiffness. Free off any linkages that show any
sign of tightness or binding.

8http://www.jperkinsdistribution.co.uk
R/C Twister Sea King
tRanSmitteR layout thRottle left (mode 2)
STICK AND TRIM CONTROL SUMMARY
Your Planet T7 supplied with the Twister Sea King can be flown in either throttle left or throttle right format.
The throttle stick is on the left side of the transmitter in the below arrangement.
The primary flying controls are shown here:
Throttle trim Elevator trim
Rudder trim Aileron trim
Throttle/
Rudder
stick
Elevator/Aileron
stick
▼ 1. Move the throttle (left stick) and throttle trim of your transmitter to the lowest (low throttle) position.
▼ 2. Centre the trim levers of the 3 other transmitter functions.
▼ 3. Switch on the transmitter.

9
http://www.modelengines.com.au
Twister Sea King R/C
tRanSmitteR layout thRottle RiGht (mode 1)
STICK AND TRIM CONTROL SUMMARY
The throttle stick is on the right side of the transmitter in the below arrangement.
The primary flying controls are shown here:
Rudder trim Aileron trim
Elevator trim Throttle trim
Rudder/Elevator
stick
Throttle/Aileron
stick
▼ 1. Move the throttle (right stick) and throttle trim of your transmitter to the lowest (low throttle)
position.
▼ 2. Centre the trim levers of the 3 other transmitter functions.
▼ 3. Switch on the transmitter.

10 http://www.jperkinsdistribution.co.uk
R/C Twister Sea King
poweR checKS and connectinG up
A. CONNECTING THE LI-PO BATTERY
WARNING!
The working tail rotor on this model will begin to turn as soon as the battery is plugged in. Ensure that the
tail rotor is clear of all obstacles before plugging in the battery.
▼ 1. Plug the battery connector into the matching battery lead emerging from the side of the canopy.
WARNING!
Keep hands, clothing, eyes, animals and children well clear when connecting power to this model or
when flying it!
▼ 2. RECEIVER: After the receiver has completed satisfactory systems checks, the on-board LED will
glow orange continuously.
▼ 3. 3-in-1 UNIT: After the on-board 3-in-1 unit has completed satisfactory systems checks, the on-board
LED will glow green continuously.
WARNING!
Do not move the helicopter during the checking and calibration process.
Do not operate the throttle yet!

11
http://www.modelengines.com.au
Twister Sea King R/C
B. SWASHPLATE LEVEL CHECK
(MODE 2 TRANSMITTER)
The next stage requires you check control servo operation. Proceed as follows:
Adjust cyclic trims to level swashplate
(Mode 2 transmitter shown)
▼ The helicopter swashplate should be horizontal when viewed from the front and from the side of the
helicopter. If it is not, adjust it's position by operating the cyclic trims. See pics above.
The ball joints snapped to the swashplate can be unsnapped and screwed/unscrewed if further adjustment
is needed after the model has flown.
C. SWASHPLATE ROLL CHECK
(MODE 2 TRANSMITTER)
▼Roll cyclic - Move the transmitter roll (aileron) stick to the left.
The swashplate will tilt as indicated above.

12 http://www.jperkinsdistribution.co.uk
R/C Twister Sea King
D. SWASHPLATE ELEVATOR CHECK
(MODE 2 TRANSMITTER)
▼ Fore and aft cyclic - Move the fore and aft (elevator) stick forward.
The swashplate will tilt as indicated above.
E. THROTTLE CHECK
(MODE 2 TRANSMITTER)
▼ Throttle - Slowly push the throttle stick forward by a small amount and check that the main rotors
start to rotate.
Then immediately throttle back.
F. YAW CHECK
▼ Yaw - Tail control is achieved by altering the relative speed of the main rotors and can only be
checked just before take-off as the helicopter becomes light on its skids.

13
http://www.modelengines.com.au
Twister Sea King R/C
G. RANGE & POWER CHECK
It is important to check the transmitter will operate the model satisfactorily at maximum range. The Planet
T7 included with your Twister Sea King has a built in range check function. When the range check button
is pressed & held output power is reduced by approximately 65% and range should be around 80 metres.
▼ To operate this function place your model on the ground and press the range check button located
under the reverse switch cover, you will see R-C appear In the LCD screen and hear a slow BEEP-
BEEP sound.
NOTE: The range check function is active only while the range check button is pressed, once released the
T7 will go back to full range.
▼ Walk away from the model whilst operting the swashplate controls with the range check button
pressed.
▼ Check that range with the button pressed is 80m ±15m prior to flight.
▼ Check the transmitter Battery Status LCD shows that the transmitter batteries have a voltage above
4.4V. Do not fly if battery voltage is below 4.4V.
Your Twister Sea King is ready for flight, but...
WARNING!
...If you are not an experienced R/C model helicopter pilot you must read the ENTIRE manual before flying.
WARNING!
Do not fly at 100 metres distance or greater. At distances of greater than 50 metres, it will become difficult
to see your model and at 100 metres it will be very difficult to see accurately and therefore to control
safely.
We strongly recommend you fly no further away than 50 metres.
WARNING!
After finishing flying, always disconnect the battery from the helicopter FIRST. Then switch off the
transmitter. Do not switch off the transmitter first and disconnect battery second.
WARNING!
You must take care and ensure the flying area is large enough and contains no obstacles (such as
children, animals or furniture), which could be hit while you are flying your Twister Sea King.

14 http://www.jperkinsdistribution.co.uk
R/C Twister Sea King
fliGht contRolS mode 2
A. FLIGHT CONTROLS LAYOUT
Rotate
nose right
Rotate
nose left
Climb
Descend
Crab
right
Crab
left
Forwards
Backwards
▼ Each dual axis stick unit of your transmitter controls 2 helicopter functions (complete with trimmers
on each function) giving you control about all 4 axes of flight). See above.
B. RIGHT STICK UNIT FUNCTIONS
▼ The right stick operates the 'cyclic' steering controls and moves the helicopter forwards/
backwards and to the left/right in the horizontal plane. See below:
Crab
right
Crab
left
Forwards
Backwards
Crab
right
Crab
left
Forwards
Backwards

15
http://www.modelengines.com.au
Twister Sea King R/C
C. LEFT STICK UNIT FUNCTIONS
▼ The left stick operates throttle (main rotor speed) and yaw control.
Throttle is increased to climb the helicopter and reduced to descend:
Climb
Descend
▼ The model hovers at approximately half power (at the middle stick position):
Hover at
this
position
▼ Moving the stick to the left or right will rotate the nose to left or right. This is called 'yaw control'.
See below:
Rotate
nose right
Rotate
nose left
Rotate
nose right
Rotate
nose left
Climb
Descend

16 http://www.jperkinsdistribution.co.uk
R/C Twister Sea King
fliGht contRolS mode 1
A. FLIGHT CONTROLS LAYOUT
Rotate
nose right
Rotate
nose left
Forwards
Backwards
Crab
right
Crab
left
Climb
Descend
▼ Each dual axis stick unit of your transmitter controls 2 helicopter functions (complete with trimmers
on each function) giving you control about all 4 axes of flight).
B. RIGHT STICK UNIT FUNCTIONS
▼ The right stick operates the throttle (main rotor speed) and the 'cyclic' steering which moves the
helicopter to the left/right in the horizontal plane. See below:
Crab
right
Crab
left
Climb
Descend
Crab
right
Crab
left
▼ The right stick also operates the throttle (main rotor speed).
Throttle is increased to climb the helicopter and reduced to descend:

17
http://www.modelengines.com.au
Twister Sea King R/C
Climb
Descend
▼ The model hovers at approximately half power (at the middle stick position):
Hover at
this
position
C. LEFT STICK UNIT FUNCTIONS
▼ The left stick operates both yaw control and the forwards/backwards 'cyclic' steering controls.
▼ Moving the stick to the left or right will rotate the nose to left or right. This is called 'yaw control'.
See below:
Rotate
nose right
Rotate
nose left
Rotate
nose right
Rotate
nose left
Forwards
Backwards
▼ Moving the stick forwards or backwards will cause the helicopter to move forwards or backwards.
See below:
Forwards
Backwards

18 http://www.jperkinsdistribution.co.uk
R/C Twister Sea King
fine tuninG of yaw contRol
3 IN 1 UNIT ADJUSTORS
The 2 trimmers on the front of the '3-in-1' unit are factory adjusted and usually require no adjustment. The
status LED is next to the trimmers. The trimmers perform these functions:
▼Gyro gain. The right trimmer (GAIN) adjusts the amount of gyro tail stabilisation from 0 to 100%. 90%
is usually the best setting.
▼Yaw trimmer. The left trimmer adjusts tail trim (centring of the tailboom).
NB if you adjust this trimmer you must restart the helicopter in order to observe an effect on yaw
trim.
Adjustment of the yaw trimmer has no effect until the li-po battery is disconnected then reconnected and
the system restarted in the usual manner.
WARNING!
If your model tips over or crashes you should close the throttle immediately, disconnect the battery and
carefully inspect the model for damage. Make any repairs as necessary.
Crash damage is not covered by warranty.
damaGe pReVention featuReS
Unique features built into your Twister Sea King are designed to prevent accidental damage to the power,
drive and electronics systems.
LBW (LOW BATTERY WARNING) BEACON
The LED on the cabin of the helicopter will flash blue when the battery needs charging.
You must land immediately and recharge the battery. If you ignore the LBW beacon you risk damaging your
battery!
WARNING!
Damage caused to the battery is not covered by warranty.
MOPS (MOTOR OVERLOAD PROTECTION SYSTEM)
In the event of a crash or tip-over where the blades become stalled, MOPS cuts power to the drive motors
and electronics in order to prevent damage to these components.
If you crash the helicopter badly causing a blade stall, MOPS will kill the power automatically. You should
return the transmitter throttle stick to the low power position. The system will automatically re-arm some
seconds later.

19
http://www.modelengines.com.au
Twister Sea King R/C
how doeS a helicopteR fly?
A hovering helicopter is controlled about 4 axes; yaw, pitch, roll and height. Your transmitter has 2 dual-axis
precision stick units with two controls on each stick.
In a throttle left (mode 2) transmitter
▼The left stick controls height (climb or descent) and tail rotor controls yaw (left or right).
▼The right stick operates the cyclic steering controls which are used to pitch the helicopter nose up/
nose down and to roll the helicopter left or right.
In a throttle right (mode 1) transmitter
▼The right stick controls height (climb or descent) and cyclic aileron control to roll the helicopter left
or right.
▼The left stick operates the tail rotor controls yaw (left or right) and cyclic elevators controls which
are used to pitch the helicopter nose up/nose down.
The revolutionary contra-rotating system used in the Twister Sea King transforms helicopter flight by
making control so easy that the helicopter almost flies itself!
Transmitter stick movements
Helicopters require relatively small control inputs of relatively small duration. Do not move the sticks to
extreme positions. A delicate touch is required on the sticks. The sticks should be allowed to return to
neutral almost immediately after a control input is made. If you watch an experienced pilot hovering his
helicopter, you will see that his transmitter sticks hardly move. This is the goal you will be working towards
in this guide.
Height control
A helicopters rotating wings - the rotor blades, generate lift, in the same way that a propeller generates
thrust. The lift generated by the main rotor blades increases as rotor speed rises causing the helicopter to
climb. Conversely as the main rotor speed is reduced, the helicopter descends.
This method of helicopter height control is called 'fixed pitch'.
Height is managed using the throttle stick of your transmitter.
Push forward to climb, pull back to descend.
Yaw control
Yaw control is achieved by altering the speed of one main rotor relative to the other which causes a
change in the torque generated by the main rotor and hence a rotation to left or right about the main rotor
shaft.
When a helicopter is in the hover it can be yawed left or right.
Push the rudder stick left to yaw the nose of the helicopter to the left and push to the right to yaw the nose
right.
Your Twister Sea King helicopter is fitted with a micro piezo gyro and electronic mixing system which
automatically helps stabilise the tail making for much easier flight.
Steering control - fore and aft cyclic
When hovering, a brief forward push on the cyclic control stick will tilt the rotor disc forward causing the
helicopter to move off in that direction. Pull the stick back gently to stop it. If you pull the stick back further,
you start flying backwards.
Steering control - roll cyclic
When hovering, a brief right control stick movement will roll the rotor disc to the right and the helicopter
will start moving to the right. By briefly moving the stick to the left any right drift or movement will be
arrested or reduced.
Mastering the hover
Both experienced model and full-size helicopter pilots in the hover will gently 'nudge' the cyclic controls
automatically in order to keep their helicopter in one spot and prevent it from moving away from that spot.
A large part of the initial learning phase in helicopter flight is about mastering the cyclic controls and
learning to hover. Control commands will become 'instinctive' when you have 'mastered' the hover.

20 http://www.jperkinsdistribution.co.uk
R/C Twister Sea King
fliGht tRaininG Guide
THE FLYING AREA
The flying area should be indoors in a large room or a hall or office. In this room you should have all doors
closed as any wind can affect the movement of the Twister Sea King.
Make sure the take-off floor has a smooth surface rather than carpet which can trip up the Twister Sea
King during ground handling.
WARNING!
You should be aware that the main rotor blades spin at a high rpm and are capable of inflicting serious
damage to objects, people and animals.
You must take care when you are flying and make sure there are no children or animals in the room or
flying area.
In addition, make sure the flying area is large enough and contains no obstacles (such as furniture) which
could be hit while you are learning to come to terms with the flight characteristics of your Twister Sea
King.
POSITIONING YOUR TWISTER SEA KING
First, double check that all the controls are working and operating correctly.
Place the model in the middle of the room.
Position yourself at least 2 metres behind the helicopter and slightly off to one side so that you are able to
see the nose of the helicopter.
Useful tip........................... Please note when flying that you must always watch the nose of the helicopter.
For example, if the nose of the helicopter yaws to the left the tail swings right, therefore you must apply
right tail rotor to correct this by pushing the yaw stick to the right.
INCREASE THROTTLE GENTLY
Watch the nose and apply just enough throttle until the model becomes light on its skids.
Useful tip........................... All helicopters exhibit a degree of instability when approaching take-off as friction
from the ground is reduced as the helicopter gets nearer to 'unsticking' from the surface.
Observe whether or not the helicopter is tending to move forwards or backwards.
If it tilts forward, you will need to apply rear elevator (rear cyclic) trim to correct. And vice versa if the
Twister Sea King tends to tilt backwards towards you.
Observe the helicopter about the roll axis and adjust the trims in the same way–if it tends to roll or hop to
the left, apply a little right roll trim and vice versa.
Adjust the trims until the Twister Sea King shows no detectable forward, backwards or sideways drift
tendencies.
Useful tip........................... When applying throttle, you must apply it gently and in small amounts.
At this stage the Twister Sea King MUST STAY ON THE GROUND!
Too much throttle will cause the helicopter to leave the ground and you may have difficulty in bringing it
under control quickly enough to avoid tipping it over.
WARNING!
Too much throttle applied too quickly will cause your helicopter to leap rapidly and uncontrollably into
the air!
Never apply too much throttle too quickly.
WALKING THE HELICOPTER
The helicopter should now be trimmed and you should be in a position to start learning to 'take your Twister
Sea King for a walk'.
These first flights should be made with the Twister Sea King in contact with the ground at all times.
Apply just enough power to make the helicopter light on the skids and add a few clicks of forward trim to tilt
the rotor disc forwards.
Apply enough power so that the machine starts to move slowly forwards. Watch for any change of
direction of the model and use the controls to correct.
At this point, you will be able to check yaw operation. Applying left yaw will tend to swing the nose to the
left and right yaw will swing the nose right. Note that the on-board piezo gyro damps out any tail direction
changes and so stabilizes the helicopter.
Table of contents
Other Twister Toy manuals

Twister
Twister CPX Setup guide

Twister
Twister Aggressor2.4 Setup guide

Twister
Twister MicroTwister Ninja User manual

Twister
Twister Medevac 2.4 Setup guide

Twister
Twister Skylift 2.4 Setup guide

Twister
Twister Micro Twister User manual

Twister
Twister 400 SPORT V2 User manual

Twister
Twister 400 SPORT V2 User manual

Twister
Twister Storm 3DX Setup guide

Twister
Twister 400 SPORT V2 Setup guide