TXU Energy iThermostat 1F88-300 User manual

TXU Energy iThermostat
In-Home User Manual
Model: 1F88-300
7-Day Programming

Copyright November 2009
Data, drawings, and other material contained herein are proprietary to TXU Energy Retail
Company LLC and may not be reproduced or duplicated in any form without the prior
permission of TXU Energy.
TXU Energy iThermostat is a trademark of TXU Energy Retail Company LLC.
TXU Energy iThermostat is manufactured in partnership with Comverge and White-
Rodgers.
Portions © 2009 TXU Energy Retail Company LLC. All rights reserved.
REP Certificate Number 10004.
Version v3.0 rev1 (November 9, 2009)

TXU Energy iThermostat In-Home User Manual
Table of Contents
1
Table of Contents
Getting Started with Your iThermostat™...................................................................................3
Overview............................................................................................................................. 3
iThermostat™ Buttons .......................................................................................................... 4
iThermostat™ Display........................................................................................................... 5
Normal Thermostat Display ................................................................................................... 6
Selecting Heating or Cooling ................................................................................................. 6
Setting the Current Day and Time.......................................................................................... 8
10
Resetting the FLTR Display ................................................................................................. 1
Programming Your iThermostat™............................................................................................11
Programming Tips .............................................................................................................. 12
Planning Your Program ....................................................................................................... 13
Programming Heating and Cooling....................................................................................... 14
Setting Holds ..................................................................................................................... 16
Configuration Menu Options ....................................................................................................19
Configuration Menu Options ................................................................................................ 20
Troubleshooting Assistance Guide...........................................................................................24
iThermostat Display............................................................................................................ 24
Programming..................................................................................................................... 25
Holds ................................................................................................................................ 27
Equipment......................................................................................................................... 28

TXU Energy iThermostat In-Home User Manual
2

TXU Energy iThermostat In-Home User Manual
Getting Started with Your iThermostat™
3
Getting Started with Your iThermostat™
Overview
Your iThermostat™ has a door that opens so you can access the buttons to operate and
program the iThermostat.
Open the iThermostat door:
•Gently pull the door down so the buttons are visible, as shown here.
Close the iThermostat door:
•Push the door up until it snaps into place.
iTherm
o
st
a
t
doo
r

TXU Energy iThermostat In-Home User Manual
Getting Started with Your iThermostat™
4
iThermostat™ Buttons
Programming Functions
The functions that appear below the buttons (TIER, SELECT, MODE)
become active when you press PGRM to enter programming mode.
Otherwise, these buttons perform their alternate functions, which appear
above the buttons.
HOLD
Holds system at
current temperature
setting until you
release by pressing
RUN.
INFO
Displays the
information screen
(if available) or
moves to next info
screen.
PRGM
Enters
thermostat
programming
mode.
SYSTEM
Selects the system
mode: cooling,
heating, auto-
changeover,
emergency heat
(heat pumps only),
or Off.
RUN
•Cancels holds and
returns system to
programmed
settings.
•Exits programming
and saves all
settings.
TIER
(Programming
mode) Selects a
price tier (Low,
Medium, High,
or Critical).
SELECT
(Programming
mode) Toggles
between
temperature
setpoint and
period start time.
MODE
(Programming
mode) Toggles
between
heating and
cooling
programs.
FAN
Controls your
system’s indoor
fan. For energy
efficiency, this
is normally set
to AUTO, but
can be set to
ON.

TXU Energy iThermostat In-Home User Manual
Getting Started with Your iThermostat™
5
iThermostat™ Display
Note: Filter indicator (FLTR) not shown. See page 11.
Day of the Week
Indicates the current day of
the week.
Message Area
Indicates the current period of the day.
Also displays other messages such as
consumption, bill, rate, etc. if enabled
and AUX if the strip heat of a heat
pump system is turned on.
Time / Temperature
Setpoint
Displays the current
time. Press up arrow,
down arrow, or RUN
once to display the
current temperature
setpoint. Displays OFF
when the HVAC system
is turned off.
System Indicator
•COOL – Air conditioning is active
•HEAT – Heat is active
•HEAT/COOL – Auto-changeover is
active (also displayed when system
is Off)
•EMER – Emergency heat (heat
pump only) is active
•STG 1 – First stage of heat or cool
is running
•STG 1+2 – First and second stage
of heat or cool (if used) are
running
Antenna Icon
Indicates that a system update or a
web programming update to your
thermostat’s heating or cooling
program, hold mode, or system
mode is occurring.
Press any key to remove the display
of the antenna icon.
Room Temperature
Displays the current
room temperature.
HOLD
•Flashing - Indicates a
temporary system
temperature hold.
•Solid (not flashing):
Indicates a
permanent system
temperature hold.

TXU Energy iThermostat In-Home User Manual
Getting Started with Your iThermostat™
6
Normal Thermostat Display
The “normal” thermostat display is what displays on your thermostat during normal
operation. The following display elements appear in normal display:
•Time period – Top left. DAY in this example.
•Day of the week – Top. MO (for Monday) in this example.
•Current time – Left center. 7:00 AM in this example.
•System mode – Center. COOL in this example.
•Current room temperature – Right. 75 in this example.
Displaying the Current Temperature Setpoint
To display the current temperature setpoint, press or once. The setpoint
appears in the left center area where the time is normally displayed.
Note: Pressing the up or down arrow key more than once will change the temperature
setpoint temporarily (see “Setting Temporary Holds” on page 18).
Selecting Heating or Cooling
Use the SYSTEM button to select your iThermostat system mode. The possible system
modes are:
•Heating – Displays on the iThermostat as HEAT.
•Cooling – Displays on the iThermostat as COOL.
•Auto-changeover (see below) – Both HEAT and COOL icons are on.
•Emergency heat – Displays EMER (flashing) and HEAT.
•Off – Displays on the iThermostat as OFF.
When heating or cooling is called (compressor turned On), STG 1 or STG 1+2 will display
(depending on how many stages of heating/cooling your system is configured for).

TXU Energy iThermostat In-Home User Manual
Getting Started with Your iThermostat™
7
Auto-Changeover Mode
In auto-changeover mode, iThermostat automatically switches between your heating and
cooling programs to maintain your home’s temperature within your programmed
setpoints. The iThermostat will call for heat or cool as needed, but never both at the
same time. Auto-changeover is convenient during the fall and spring when days may be
cool in the early morning hours and hot in the afternoons.
Important: In auto-changeover mode, the programmed heat setpoint must be at least
2 degrees lower than the cool setpoint.
Selecting Heating or Cooling
Follow this procedure to select the system mode.
QUICK GUIDE PROCEDURE DISPLAY
Press one or more
times to select
the desired mode.
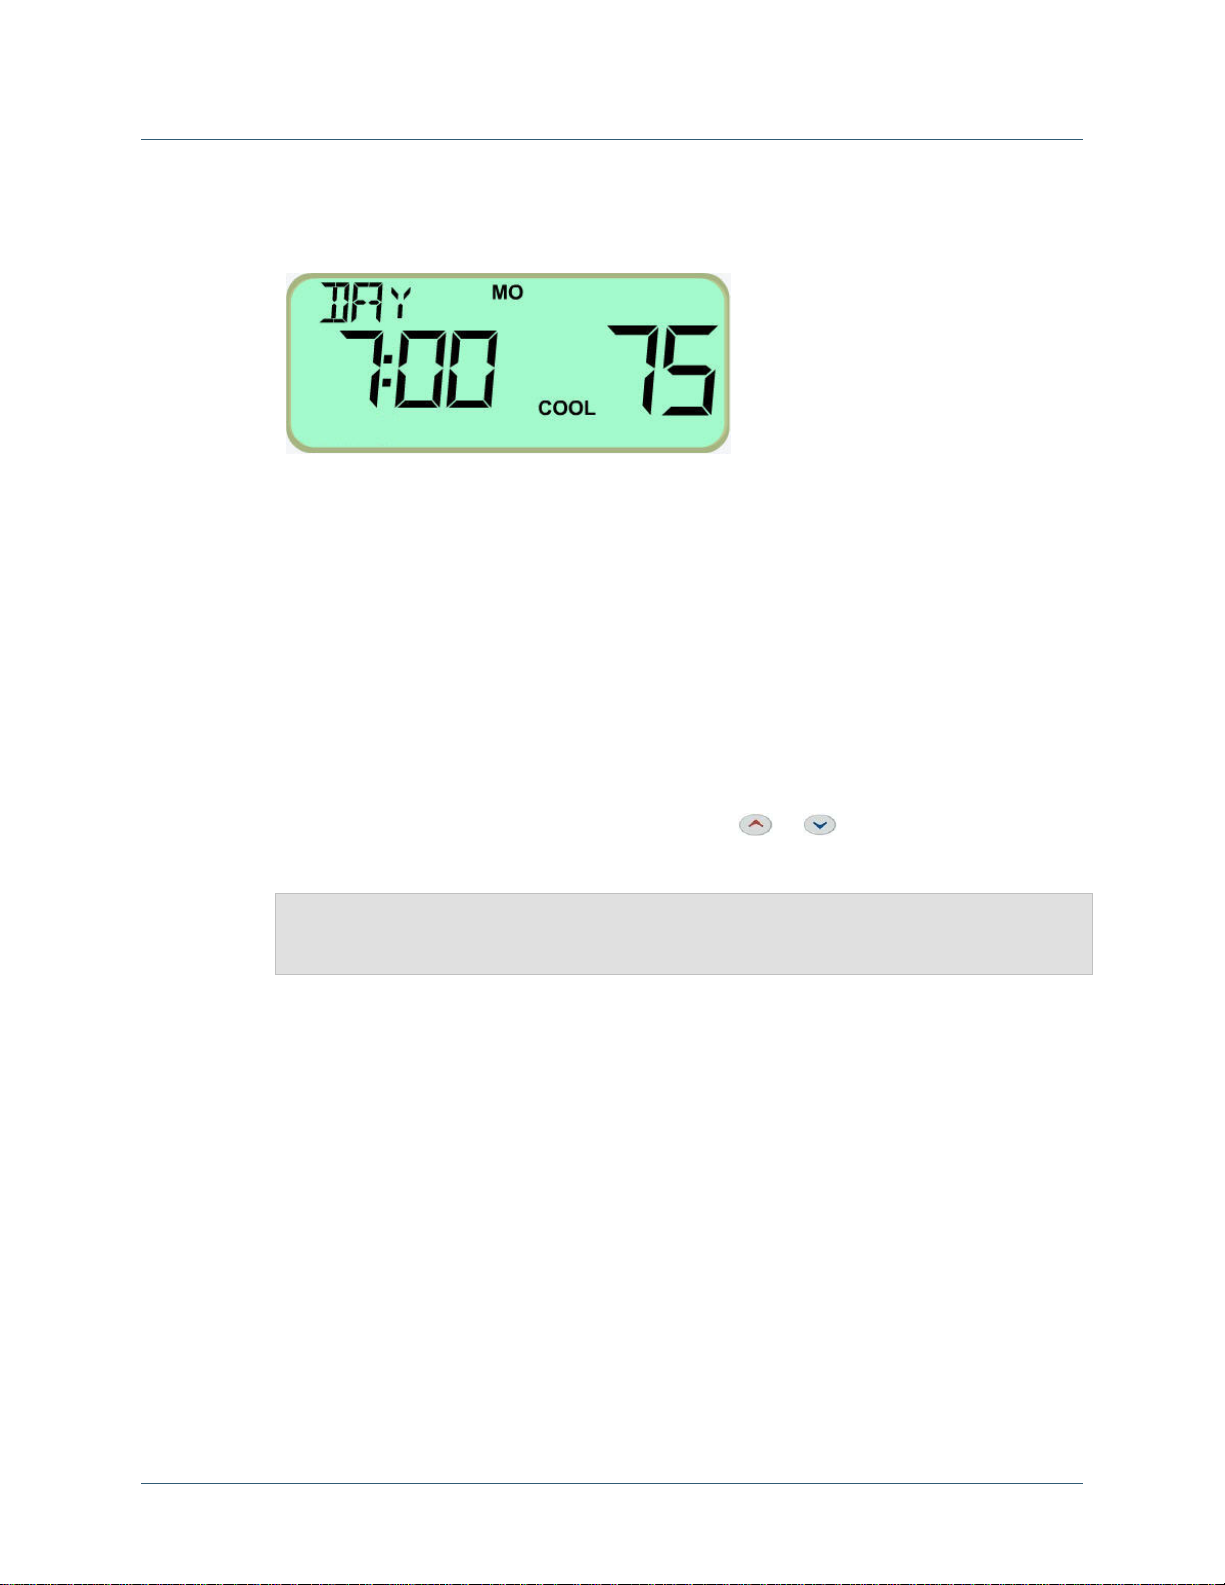
Press the SYSTEM button one or more times to
select the desired mode.
•When heating is selected, HEAT is displayed.
•When cooling is selected, COOL is displayed.
•When auto-changeover mode is selected, both
HEAT and COOL are displayed.
•When emergency heat is selected (heat pump
systems only), EMER HEAT is displayed (EMER
flashes).
•When the system is Off, OFF displays to the
left.
When heating or cooling is called (compressor
turned On), STG 1 or STG 1+2 will display
(depending on how many speeds your
heating/cooling system is capable of using).
Cooling On:
System Off:

TXU Energy iThermostat In-Home User Manual
Getting Started with Your iThermostat™
8
Setting the Current Day and Time
After establishing communication with the Gateway, the current day and time on your
iThermostat will be automatically updated within 24 hours. In case the system does not
update with the current the day and time, you may need to set it yourself manually.
QUICK GUIDE STEP DESCRIPTION DISPLAY
Press once. 1 Press PRGM. The current time displays.
Press once.
Press to select
the hour.
2
Press SELECT. The hour flashes.
Press and hold the up arrow or down arrow
button until you reach the correct hour and
AM/PM designation.
Press once.
Press to select
the minute.
3
Press SELECT. The minute flashes.
Press and hold the up arrow or down arrow
button until you reach the correct minute.
Press once.
Press to select
the desired time
zone setting.
4
Press SELECT. The Time Zone (TZ) option
displays.
Press the up arrow or down arrow button to
select the correct Time Zone:
-5 = Eastern
-6 = Central
-7 = Mountain
-8 = Pacific

TXU Energy iThermostat In-Home User Manual
Getting Started with Your iThermostat™
9
Setting the Current Day and Time (Continued)
QUICK GUIDE STEP DESCRIPTION DISPLAY
Press once.
Press to select
desired DST
setting.
5
Press SELECT. The Daylight Saving Time
(DST) option displays.
Press the up arrow to select On (DST) or the
down arrow to select OFF (Standard Time).
Press once.
Press to select
the year.
6
Press SELECT. The year (in 2-digit format)
displays. For example: 09 for 2009.
Press and hold the up arrow or down arrow
button until you reach the correct year.
Press once.
Press to select
the month.
7
Press SELECT. The month (in numeric
format) displays. For example: 11 for
November.
Press and hold the up arrow or down arrow
button until you reach the correct month.
Press once.
Press to select
the day.
8
Press SELECT. The day of the month
displays.
Press and hold the up arrow or down arrow
button until you reach the correct day.
Press once to
exit
programming. 9 Press RUN to exit programming.

TXU Energy iThermostat In-Home User Manual
Getting Started with Your iThermostat™
10
Resetting the FLTR Display
If FLTR appears in your iThermostat display, this is a reminder that you need to change
or clean the filter in your HVAC system. After you change or clean the filter, you can
reset the display so FLTR no longer appears.
QU I C K GU I D E P R O C E D U R E D ISP L A Y
Press both
buttons at the
same time.
Press the RUN and HOLD buttons at the same
time.
The FLTR display no longer appears on the
iThermostat.
FLTR indicator
displayed:

TXU Energy iThermostat In-Home User Manual
Programming Your iThermostat™
11
Programming Your iThermostat™
This chapter explains how to manually program your iThermostat, including
programming heating and cooling, and setting and clearing holds.
Your iThermostat offers the following options for flexible programming:
•Separate programs for heating and cooling.
•Flexibility in how you program days of the week. You can program all 7 days
separately if desired, or you can program the 5 weekdays and/or the 2 weekend
days as groups.
•Four time periods per day – Morning, Day, Evening, and Night. You can specify start
times and temperatures for each time period.
Conserve Energy While Maximizing Comfort
The iThermostat’s programming options help you maximize comfort during the times
when you are typically at home. You can also conserve energy during the times when
you are typically away from home or sleeping by allowing the temperature in your home
to increase (summer) or decrease (winter).
Periods of the Day
Your thermostat allows you to program 4 different periods of the day: MOR (morning),
DAY, EVE (evening), and NHT (night). You select the start time and temperature for each
period. Press PRGMto cycle through the periods.
Day of the Week Groups
You can program days of the week individually or in groups, to create heating and
cooling programs that work with your schedule.
•Weekday schedule – Programs 5 weekdays together (displays as MO TU WE TH FR)
•Weekend schedule – Programs Saturday and Sunday together (displays as SA SU)
•Individual day schedule
•Each day or group includes the 4 periods described above.
Press PRGMto cycle through the days and periods.

TXU Energy iThermostat In-Home User Manual
Programming Your iThermostat™
12
Programming Tips
Skipping a Day or Group
If you don’t want to program a particular day or group, you can skip it. Press PRGMone
or more times until you reach the day or group you want to program.
Programming Days in a Group
If you want to program the days in a group basically the same with only slight
differences, program the group first, then program individual days as needed. The
individual day program overrides the group program for that day.
Switching Between Cooling and Heating
At any point in the programming process, you can switch between heating and cooling
programs by pressing MODE.
Display of -- or --:-- in Programming Mode
If the temperature shows “--” while in the programming mode for a group of days, it
indicates that at least one of the days in the group has a different temperature program
than the other days.
If the time shows “--:--” while in the programming mode for a group, it indicates that at
least one of the days in the group has a different period start time than the other days.
To find out which one is different, press PRGMto cycle through the individual days. You
can make the setting the same for all the days within the group by changing the item
(setpoint or time).

TXU Energy iThermostat In-Home User Manual
Programming Your iThermostat™
31
Planning Your Program
Before you begin programming your thermostat, you can use the charts below to help
you plan your program.
Period
Day: Day: Day: Day:
Start
Time Temp
Start
Time Temp
Start
Time Temp
Start
TimeTemp
HEAT
MOR
DAY
EVE
NHT
COOL
MOR
DAY
EVE
NHT
Period
Day: Day: Day: Day:
Start
Time Temp
Start
Time Temp
Start
Time Temp
Start
TimeTemp
HEAT
MOR
DAY
EVE
NHT
COOL
MOR
DAY
EVE
NHT

TXU Energy iThermostat In-Home User Manual
Programming Your iThermostat™
14
Programming Heating and Cooling
QU I C K GU I D E S T E P D E S C R IPTIOND ISPL A Y
Press twice.
Press only if
you want to
program
heating.
1
Press PRGMtwice. The thermostat enters
cooling programming mode (COOL
displays). If you want to program heating,
press MODE (HEAT displays).
Programming starts with the weekday
schedule. The programmed temperature for
the first period (MOR) flashes.
Note: If you do not want to program the 5
weekdays together, press PRGMmultiple
times until you reach the day of the week
you want to program.
Temperature will flash:
Press to
select
desired
temperature.
2
Press the up or down arrow button to
change the temperature to the desired
setting for the MOR period.
Temperature will flash:
Press once.
Press to
select
desired start
time for
MOR period.
3
Press SELECT. The programmed start time
for the MOR period flashes.
Press the up or down arrow button to select
the desired start time for the MOR period.
The time changes in 15 minute increments.
Time will flash:
Press once. 4
Press PRGMto move on to the next period
(DAY). The start time for the DAY period
flashes.
Time will flash:
Press once. 5Press SELECT. The programmed
temperature for the DAY period flashes.
Temperature will flash:
Repeat Steps
2 & 3. 6
Repeat Steps 2 and 3 to select the
temperature and start time for the DAY
period.

TXU Energy iThermostat In-Home User Manual
Programming Your iThermostat™
51
Programming Heating and Cooling (Continued)
QU I C K GU I D E S T E P D E S C R IPTIOND ISPL A Y
Press and
repeat
Steps 2 & 3
for EVE and
NHT.
7Press PRGMand repeat steps 2 and 3 for the
EVE and NHT periods.
Press once. 8Press PRGMto move on to the weekend
schedule.
Repeat
steps 2 – 7
for the
weekend
schedule.
9
If you want to program Saturday and Sunday
together, repeat steps 2 through 7 to program
the periods of the day for the weekend
schedule.
Note: If you do not want to program the 2
weekend days together, press PRGMmultiple
times until you reach the day of the week you
want to program.
Press to
select the
desired day. 10
If you want to program any days of the week
individually, press PRGMone or more times
to select the day you want to program. The
individual day schedule overrides the weekday
or weekend schedule for the selected day.
Repeat
steps 2 to 7
for the
selected
day.
11 Repeat steps 2 through 7 to program the
periods of the day for the selected day.
Repeat
Steps 10 &
11.12 Repeat Steps 10 and 11 for any additional
days you want to program individually.
Press once. 13
Press the RUN button once to save and exit
programming.
Your thermostat is now ready to provide
maximum comfort and efficiency.

TXU Energy iThermostat In-Home User Manual
Programming Your iThermostat™
16
Setting Holds
You can override your heating or cooling program by setting a temporary or permanent
hold. To clear holds, see “Clearing Holds” on page 19.
Temporary Holds
A temporary hold is when you override a programmed setting to be in effect until the
next programmed time period begins (Morning, Day, Evening, or Night). You do not have
to manually clear a temporary hold. When your next programmed time period begins, the
temporary hold ends and the setting for the next time period is in effect. If desired,
however, you can manually clear the hold at any time.
Permanent Holds
A permanent hold is when you override a programmed setting for an indefinite period of
time. A permanent hold lasts until you manually clear it. The iThermostat display
indicates a permanent hold by displaying the HOLD icon below the Day of the Week bar.
Tip:Use a permanent hold when you go on vacation or have guests in
your home and want to override your programmed settings for an
extended period of time. Don’t forget to clear it when you come back
home or your guests leave.

TXU Energy iThermostat In-Home User Manual
Programming Your iThermostat™
71
Setting Temporary Holds
QU I C K GU I D E D E S C R IPTIOND ISPL A Y
Press to change
the setpoint to
the desired
temperature.
Be sure your screen shows the normal display. Press
the Up or Down arrow to change the temperature
setpoint higher or lower.
The first time you press an arrow button, the current
temperature setpoint will display. Press the Up or
Down arrow again to select the desired temperature.
The HOLD icon flashes, indicating a temporary hold.
The system will return to its normal, pre-programmed
schedule at the beginning of the next period of the
day.
HOLD flashes:
Tip:To clear a temporary or permanent
hold at any time, press the RUNbutton.
Setting Permanent Holds
QU I C K GU I D E S T E P D E S C R IPTIOND ISPL A Y
Press to
change the
setpoint to
the desired
temperature.
1
Be sure your screen shows the normal display.
Press the arrow buttons to change the
temperature setpoint higher or lower. The
HOLD icon flashes, indicating a temporary
hold.
HOLD flashes:
Press once. 2
Press the HOLD button. The HOLD icon stops
flashing, indicating that you have placed the
system on permanent hold.
HOLD stops flashing:

TXU Energy iThermostat In-Home User Manual
Programming Your iThermostat™
18
Clearing Holds
QU I C K GU I D E D E S C R IPTIO N D ISP L A Y
Press once
in normal
display.
Make sure your display shows the normal display. Press
the RUN button.
The HOLD icon disappears, indicating that you have
cleared the hold. This action clears temporary and
permanent holds on heating and cooling.
Tip: You do not have to manually clear temporary holds.
When your next programmed time period begins, the
temporary hold ends and the setting for the next time
period is in effect.
Table of contents
Other TXU Energy Thermostat manuals
Popular Thermostat manuals by other brands

Pentair
Pentair Raychem QuickStat-TC Installation and operation manual

TOTALINE
TOTALINE P474-0220 owner's manual

Spyder Robotics
Spyder Robotics Herpstat HP user manual

Honeywell
Honeywell T8611G Chmnothern IV Instruciton

Goodman
Goodman TSTATG4272GT Owner's manual and installation instructions

REMEHA
REMEHA Celcia 20 Assembly and operating guide