TysonBio AC100 User manual

User’s Manual
For in vitro diagnostic use only
TysonBio
AC100
Blood Glucose Monitoring System

Table of Contents
Introduction ....................................................................1
About the Product ..........................................................2
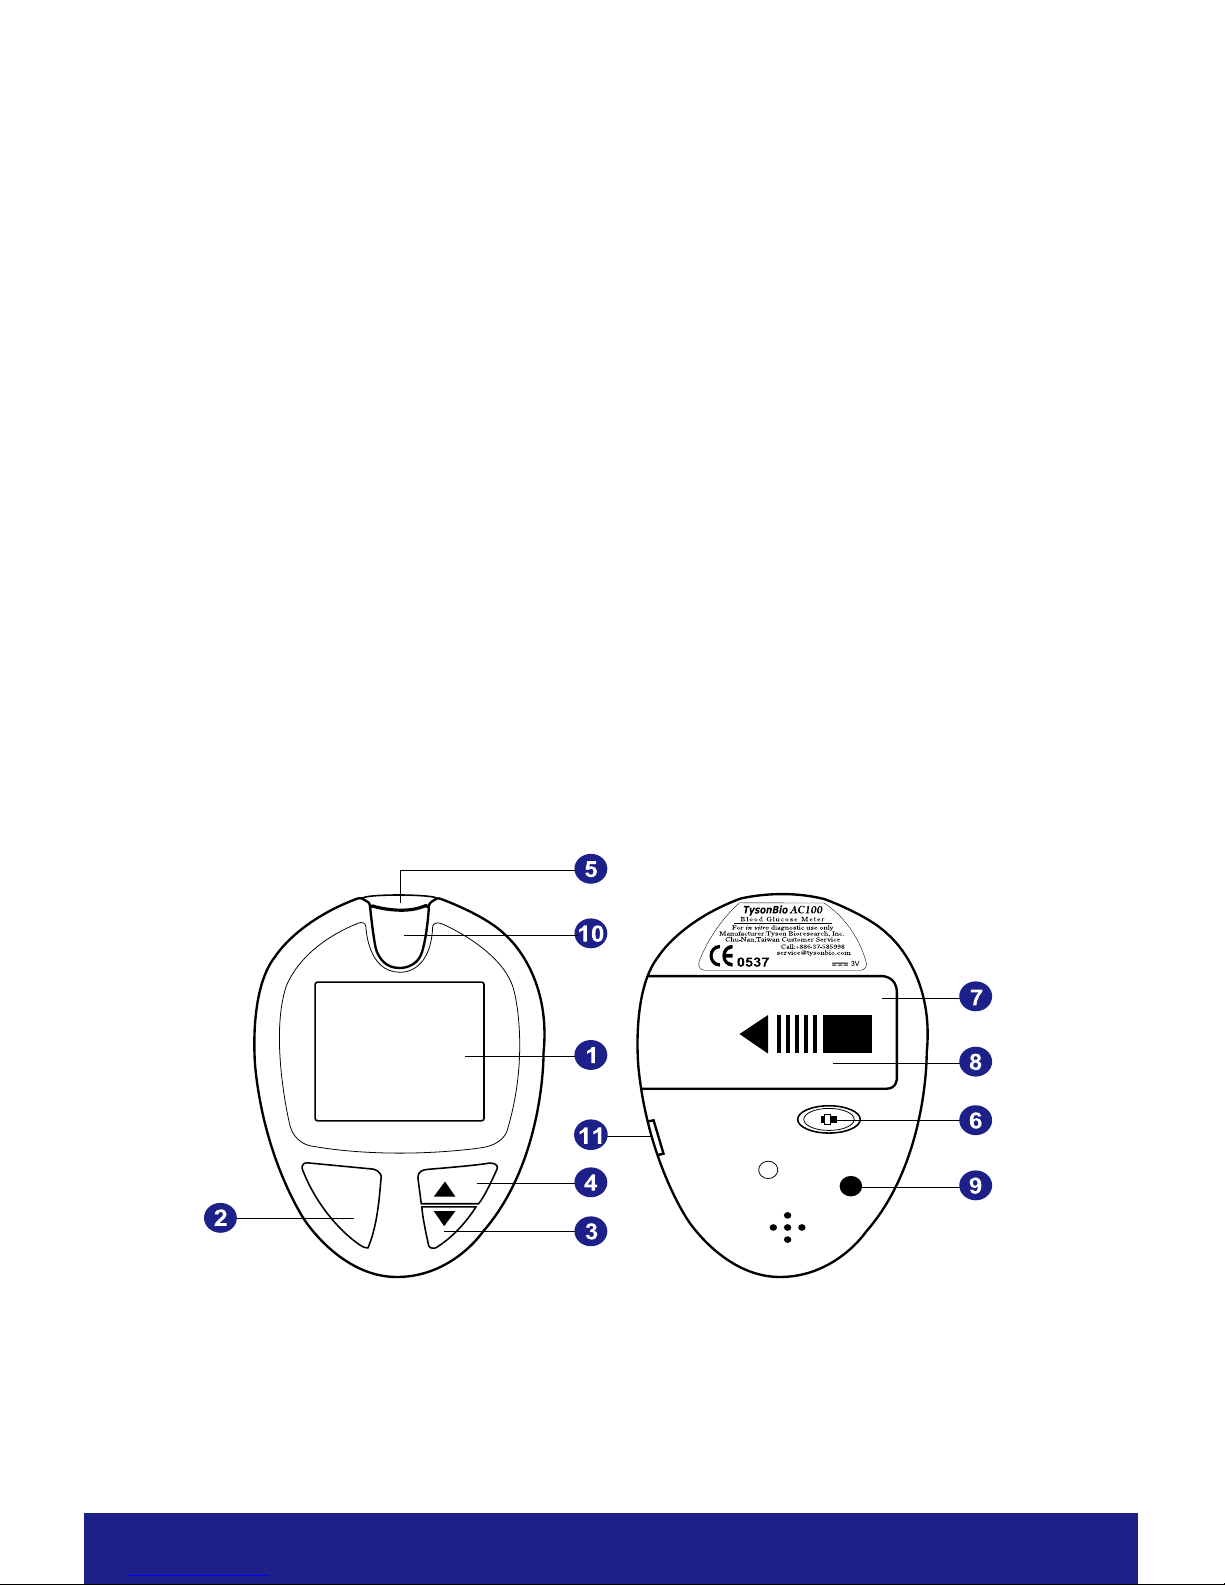
About the TysonBio AC100 Meter ..........................2
About the TysonBio AC100 Meter Display .............4
About the TysonBio AC100 Test Strip ....................5
About the TysonBio AC100 Test Strip Vial .............6
Installing/Replacing the Battery .............................6
Setting Up the Meter ......................................................7
Setting Up the Date, Time ......................................7
Setting Up Reminder Alarm ...................................8
Setting Up HI / LO Alarm.........................................9
Setting Up Voice Guidance...................................10
Unit Selection.......................................................10
Important Information ..................................................11
Testing Your Blood Glucose Level .............................12
Preparing the Test Strip .......................................12
Obtaining a Blood Sample ...................................13
Applying Blood Sample to Test Strip ......................14
Available Alternate Sites Testing.............................16
The Control Solution Test ...........................................17
Memory Features .........................................................20
Transfer Test Results to a Computer ..........................23
Care and Storage .........................................................24
Display Messages ........................................................25
Specications ..............................................................29
Limitations of the Procedure ................................31
Service and Warranty ..................................................31
Customer Service ........................................................33

1
Introduction
Thank you for choosing the TysonBio AC100 Blood Glu-
cose Monitoring System. As you already know, self moni-
toring of blood glucose (SMBG) is a necessary part of the
treatment plan of people with diabetes mellitus. The Dia-
betes Control and Complications Trial (DCCT) has con-
rmed the signicant benets from SMBG when practiced
as part of a larger intensive strategy to tightly control blood
glucose concentrations.
Adapted for its ease of use and quick response time, the
TysonBio AC100 System has the ability to process accu-
rate results utilizing only a small volume of blood for in vitro
diagnostics.
The TysonBio AC100 System is been designed with auto
coding feature. It means the meter will code itself auto-
matically every time you insert a test strip. The voice guid-
ance feature with TysonBio AC100 system provides a aid
for user with visually impaired to get safe accurate test
results every time.
TysonBio AC100 Blood Glucose Monitoring System is in-
tesded for use in the home and in professional settings
to monitor whole blood glucose levels obtained from the
ngertip, palm and forearm. This is an over the counter
(OTC) product.
Please read the entire User’s Manual carefully before us-
ing this product.

Your TysonBio AC100 System is made up of several com-
ponents. This booklet is designed to guide you through
the operation of the system with detailed directions and
pictures. Your TysonBio AC100 System contains:
● TysonBio AC100 Meter
● One vial of TysonBio AC100 Test Strips (10 strips)
● One Lancing Device (option)
● Ten Lancets (option)
● One Control Solution
● One carrying case
● User’s Manual
● Log book (option)
● Quick Reference Guide
Note: 25, 50 test strips vial can be purchased individually.
1. Display Shows blood glucose results and messages.
2. M Button Press this button to set the year/date/time;
to view results and test average in memory or to turn
the meter off.
3. ▼ Button Press this button to set alarm; to enter
control solution test mode or to decrease number/
move forward in meter setting.
About the Product
About the TysonBio AC100 Meter
2

Front view Back view
4. ▲Button Press this button to set voice guidance on/
off and select languages or to increase number/move
backward in meter setting.
5. Test Port Insert the test strip here.
6. Unit Switch Switch for mmol/l or mg/dL.
7. Battery Cover Slide cover to install and replace bat-
teries.
8. Label Contains meter serial number and customer
service phone number.
9. Reset Button Press this button to re-set the system.
10. Strip Eject Button Press this button to ejects the test
strip.
11. Data Port Connect interface cable to transfer data.
M
TysonBio
RESET
mmol/l mg/dL
3

About the TysonBio AC100 Meter Display
1. Date
2. Time
3. Control Solution Test
Appears when doing a control solution test and mark-
ing the result as a control solution test.
4. Memory Symbol
Indicates in memory mode.
5. Units of Measurement
Unit of mmol/l or mg/dL will appear with the test result.
6. Battery Symbol
Appears when the battery is low or must be replaced.
7. Blood Drop Symbol
Flashes when it is ready to apply sample to test strip.
8. Warning Symbol
Appears when result is out of the range of your setting
reference value.
9. Alarm Function Symbol
Appears when the clock alarm is set.
4
3
5
2
7
10
1
13
4
6
8
9
11
12
1
4

10. Test Strip Symbol
Appears to tell you when the meter is ready for test.
11. Day Average Symbol
Shows the average value of test results.
12. Test Result Area
Display test results.
13. Temperature Message
Appears if your meter is out of operating temperature
range.
14. Meal Indicator Pre-meal and post-meal
About the TysonBio AC100 Test Strip
The TysonBio AC100 test strip is used to perform the
blood glucose test in conjunction with the TysonBio
AC100 meter.
Each strip can be used only once.
The test strip consists of the following parts:
1. Contact Bar
This end of the test strip is inserted
into the test port to activate the meter.
(white side face up).
2. Conrmation Window
This is where you can confirm that
enough blood has been applied to the
target area.
3. Target Area
This is where blood is drawn into the
test strip.
5
1
2
3

About the TysonBio AC100 Test Strip Vial
Installing/Replacing the Battery
0537
Manufacturer:
Tyson Bioresearch, Inc.
5F, #22, Ke E. Road III Science-
Based Industrial Park, Chu Nan,
Taiwan Tel : +886-37-585998
Store at 4-30°C ( 39-86°F). Do not refrigerate.
Do not store test strips outside this vial.
Re-cap immediately.
WARNING: Always close lid tightly.
For testing of glucose in capillary whole blood.
For in vitro diagnostic use.
Use within 90 days after first opening.
Use
TysonBio
AC100 meter only !
TysonBio
H8T121205
Aug 2011
31-61
84-144
348-438
1.7-3.4
4.7-8.0
19.3-24.3
Low:
Normal:
High:
AC100
Control Solution Range
Lot Number
Expiration Date
Vial Label Test Strip Vial
When the battery is low, the meter will
show a warning signal. When this display
appears, it is time to replace a new bat-
tery. When the low battery warning signal
is shown, the meter will provide accurate
results for approximately 50 more mea-
surements.
How to Replace the Battery
1. From the back of the meter, gently slide and remove
the battery cover.
2. Insert the batteries with the + and – ends matching the
marks in the battery compartment.
3. Slide battery cover back into place.
6

Setting Up the Meter
Setting Up the Date, Time
To turn the meter on, rst install the batteries, then press
the reset button located at the back of the meter and pro-
ceed with the following instructions.
1. Press and hold Mfor 4 seconds with meter turn off to
enter this mode.
(With the voice function on, you will hear “Please set date and time”.)
2. Press ▲ or ▼ to select “24hr” or “12hr” setting. Press
Mto set.(Fig.1)
3. The year will now appear and ash. Press ▲ or ▼ to
select the year. Press Mto set.(Fig.2)
4. The number in the month position will now ash. Press
▲ or ▼ to select the month. Press Mto set. (Fig.3)
5. The date will now ash. Press ▲ or ▼ to select the
date. Press Mto set.(Fig.3)
6. The number in the hour position will now ash. Press
▲ or ▼ to select the hour. Press Mto set. (Fig.4)
7. The minute will now ash. Press ▲ or ▼ to select the
minute. Press Mto set and meter will turn off automati-
cally. You have now completed the meter date/ time
setting. (Fig.4)
(Fig.1) (Fig.2) (Fig.3) (Fig.4)
7

TysonBio AC100 meter provides four user setting remind-
er alarms for worry free testing. (Default is alarm off.)
1. Press and hold ▼ for 4 seconds with meter turn off to
enter this mode.
(With the voice function on, you will hear “Please set reminder
alarm”.)
2. The first reminder alarm will appear on the display.
(Fig.5). Press ▲ or ▼ to seclect which alarm you want
to set (number 1 to 4). Press M to conrm.
3. Press ▲ or ▼ to select “yes” or “no”. If “no” is chosen
and Mis pressed, the meter goes to next reminder
alarm setting. If “yes” is chosen, press M to confirm
and the time will appear. (Fig.6)
4. The number in the hour position will now ash. Press
▲ or ▼ to seclect hour. Press Mto set. (Fig.7)
5. The minutes will now ash. Press ▲ or ▼ to select the
minutes. Press Mto set and meter will goes to next
reminder alarm setting. (For the fourth reminder alarm,
press Mwill goes to HI alarm setting.) (Fig.8)
Setting Up Reminder Alarm
8
(Fig.5) (Fig.6) (Fig.7) (Fig.8)

1. After nishing the reminder alarm setting, the HI alarm
setting will appear. (Fig. 9) (With the voice function on, you
will hear “Please set Hyperglycemic value”.)
2. To change HI alarm setting, press ▲ or ▼ until you
reach your desired HI setting and then press Mto
set. (The HI alarm value range is 100-400mg/dL /
5.5-22.0mmol/L, default is 100mg/dL / 5.5mmol/L.)
(Fig. 9)
3. LO alarm setting will appear. (Fig.10) (With the voice
function on, you will hear “Please set Hypoglycemic value”.) To
change this setting, press ▲ or ▼ until you reach
your desired LO setting and then press Mto set.
Meter will turn off automatically, you have now com-
pleted the meter alarm setting. (The HI alarm value
range is 100-400mg/dL / 5.5-22.0mmol/L, default is
40mg/dL / 2.0mmol/L.)
(Fig.9)
9
Setting Up HI / LO Alarm
(Fig.10)
6. Repeat steps 3 to 5 to set the next three reminder
alarms. (if needed).
7. After finishing reminder alarm setting, keep pressing
and releasing ▼ until HI alarm setting appear.
Note: When the alarm is ringing, press any one button
to turn off or the alarm will turn off automatically after
30 sec.

1. Select unit, mg/dL or mmol/L on the back.
Note: The mg/dL is the standard unit in the
United States.
Meters used in the United States must be
set to read in mg/dL.
10
Unit Selection
10
mmol/L mg/dL
2. The word “on” will appear on the display.
Press Mto turn on the voice function,
or press ▼ to display “OFF” and then
press Mto turn off voice function.
(With the voice function on, you will hear “voice
guidance on” or “ voice guidance off”.)
3. After setting the voice guidance func-
tion “on”, “L1” will appear on the display.
Press ▲ or ▼ to choose langnage L1
(English) or L2 (Spanish), and then
press Mto set. Meter will turn off auto-
matically, you have now completed the
voice guidance setting.
Setting Up Voice Guidance
1. Press and hold ▲ for 4 seconds with meter turn off to
set voice function. (With the voice function on, you will hear
“Please set voice guidance”.)
RESET
mmol/l mg/dL

11
● Always keep the test strips in the original vial only.
Tightly close the vial immediately after removing a test
strip.
● Do not use test strips and controol solutions beyond the
expiration date printed on the package since this may
cause inaccurate results.
● Use each strip immediately after removing it from the
vial. Each test strip can be used once
● The sample must only be applied to the tip of the test
strip.
● Any change or administer of medication based on
the TysonBio AC100 blood glucose test results
without the consent and advice of a physician or
healthcare professional is not recommended.
● Low or high blood glucose readings can indicate a
potentially serious medical condition. If your blood
glucose reading is unusually low or high, or if you do
not feel the way your reading indicates, repeat the test
with a new test strip. If your reading is not consistent
with your symptoms or if your blood glucose result
is less than 60 mg/dL (3.3 mmol/L) or higher than
240 mg/dL (13.3 mmol/L) you should contact your
healthcare professional and follow his or her treatment
advice.
● Severe dehydration and excessive water loss may
cause false low results. If you believe you are suffering
from severe dehydration, consult your physician
immediately.
Important Information
You have to know before testing

Preparing the Test Strip
Testing Your Blood Glucose Level
Before testing blood glucose, you need the following
items:
1. TysonBio AC100 meter
2. TysonBio AC100 test strip
3. Adjustable automatic lancing device
4. Sterile lancet
Caution: To reduce the chances of infection:
● Never share a lancing device and lancet with another
person.
● Always use a new and sterile lancet. Lancets are for
single use only.
Always use a new test strip.
● Test strips are for single use only.
● Do not get lotion, oil, dirt or debris in or on the lancet
and lancing device.
1. Wash hands using soap and warm
water. Rinse and dry thoroughly.
2. Pull out a test strip from the vial and
re-cap the vial immediately.
3. Insert the test strip, white side face
up, into the test port. The meter will
automatically turn on.(Fig.10)
4.A beep will sound, and a clockwise
moving dotted lines will appear.
(With the voice function on, you will hear “system
checking”.)
12

Obtaining a Blood Sample
5. After system checking ok, a ashing “ “ symbol will
appear. You can press ▲or▼ to select the meal indicator
for marking the test as premeal or postmeal test (de-
fault premeal).
SAMPLE MAY BE OBTAINED FROM FINGER, PALM or
FOREARM
For further instructions please see the insert provided
with lancing device.
1. Unscrew and remove the endcap of the lancing device.
2. Insert the lancet into the lancet holder.
3. Twist and remove the protective lancet cover to expose
the sterile needle tip.
4. Recapping and screwing the endcap to the body of the
lancing device.
5. Pull back on the cocking mechanism until it comes to a
stop.
6. Place the lancing device firmly against the finger tip
and press the release button.
7. After sampling, remove the endcap containing the used
lancet carefully.
8. Remove the lancet from the lancing device. Discard the
used lancet properly in accordance with local, state,
and federal law.
13
6. Now you are ready to obtain a blood
sample.
(With the voice function on, you will hear “Please
apply blood sample” “Premeal” or “Postmeal”.)

Applying Blood Sample to the test strip
1. After obtaining a blood sample, touch the tip of the test
strip to the drop of blood. Blood is automatically drawn
into the test strip. Hold the tip of the test strip touching
the blood drop until the meter beeps.
2. As soon as enough blood has filled the confirmation
window (see picture) of the test strip, the meter will
starts the countdown from 5 to 1. Your blood glucose
result will appear on the display and will be stored into
the meter memory automatically.
(With the voice function on, you will hear “Premeal/Postmeal blood
glucose test result is (number) Milligram Per Deciliter/Millimole Per
Liter”.)
Note: To ensure accurate results, make sure the conr-
mation window of the test strip is completely lled with
your blood sample.
3. After the test result appears, if no further
tests are performed, the meter will auto-
matically shut off after 3 minutes. After
nishing the test, you can push the strip
eject button to remove the used strip or
use a tissue to remove test strip from the
meter for proper disposal.
Warning: Always discharge the used test
strip into suitable waste container.
14
M
TysonBio
M
TysonBio

HI and LO Readings
1. TysonBio AC00 meter is designed to display test re-
sults range between 20 to 600 mg/dL (1.1 to 33.3
mmol/l). If a “HI” message appears on the display,
your meter has detected that your blood glucose level
is higher than 600 mg/dL(33.3 mmol/l). It is suggested
that you review your testing procedure and test again
with a new test strip to conrm the result. If the same
result occurs, consult your healthcare professional im-
mediately. (Fig.11)
2. If a “LO” message appears on the display, your meter
has detected that your blood glucose level is lower
than 20 mg/dL (1.1 mmol/l). It is suggested that you re-
view your testing procedure and test again with a new
test strip to conrm the result. If the same result oc-
curs, consult your healthcare professional immediately.
(Fig.12)
(Fig.11) (Fig.12)
15

16
TysonBio AC100 Blood Glucose Monitoring System
provides you alternate sites testing (AST). This system
provides you to test on the palm and the forearm with the
equivalent results to ngertip testing.
CAUTION:
1. Physiologic differences in the circulation between the
finger and other test sites like the forearm and palm
may result in differences in blood glucose measure-
ments from the other test sites and your fingertips.
Changes in blood glucose may be observed in nger
blood samples sooner than blood samples from the
forearm and other alternate sites. Rub the alternate
test sites about 20 seconds before lancing. If you are
testing for hypoglycemia (low blood glucose), or if you
suffer from hypoglycemia unawareness, we recom-
mend that you test on your ngertips.
There are limitations for
doing AST. Please consult
your healthcare profes-
sional before you do AST.
Forearm
Palm
Available Alternate Sites Testing : Palm and
Forearm

17
2. Talk to your doctor to see if alternate site testing is right
for you. With a little bit of education, you can give your
ngertips a rest and maybe test more often than you
do now. For people with diabetes, more frequent test-
ing is a good thing. Just remember: any time you want
to be sure of an accurate, up-to-date blood glucose
reading, test on your ngertip.
3. We strongly recommend you do AST ONLY in the fol-
lowing intervals:
● In a pre-meal or fasting state (more than 2 hours
since the last meal).
● Two hours or more after taking insulin.
● Two hours or more after exercise.
DO NOT use AST if:
● You think your blood glucose is low.
● You are unaware of hypoglycemia.
● Your AST results do not match the way you feel.
● You are testing for hyperglycemia.
● Your routine glucose results are often uctuating.
● If you are pregnant.
The Control Solution Test
The control solution is used to check and ensure that the
TysonBio AC100 system is working properly and that you
are performing the test correctly.

1. When you are using your TysonBio AC100 system for the
rst time.
2. When you are using a new batch of test strips.
3. Anytime you question the performance of the system,
or on a regular basis to ensure accuracy, e.g. once a
week.
4. When you adjust your diabetic medication plans.
5. When your blood glucose test result is lower or higher
than your normal level.
When to Perform a Control Solution Test
To Perform a Control Solution Test
1. Make sure the control solution is at room
temperature (15ºC to 35ºC or 59ºF to
95ºF) prior to testing.
2. Insert a test strip, white side face up,
contact bar’s end rst, into the test port.
The meter will automatically turn on.
(Fig.10) (With the voice function on, you will
hear “meter power on music”.)
3. All segments of the LCD display will ap-
pear, a beep will sound, and a clockwise
moving dotted lines will appear.
(With the voice function on, you will hear “system
checking”.)
18
Note:
There are three control solutions at different desired
range of aqueous glucose (Low, Normal or High). For
more information about the control solution, please read
your control solution package insert. Two sets of control
solution should be used, a high level and a low level con-
trol solution of your choice. For order information, please
contact customer service.
Other manuals for AC100
1
Table of contents
Other TysonBio Blood Glucose Meter manuals

TysonBio
TysonBio HT100-B User manual

TysonBio
TysonBio TB200 User manual

TysonBio
TysonBio TB 100 User manual

TysonBio
TysonBio EVOLVE User manual

TysonBio
TysonBio AC500 User manual

TysonBio
TysonBio SuperB User manual

TysonBio
TysonBio HS100-B User manual

TysonBio
TysonBio HS200-B User manual

TysonBio
TysonBio AC100 User manual

TysonBio
TysonBio EZ Smart-608 User manual