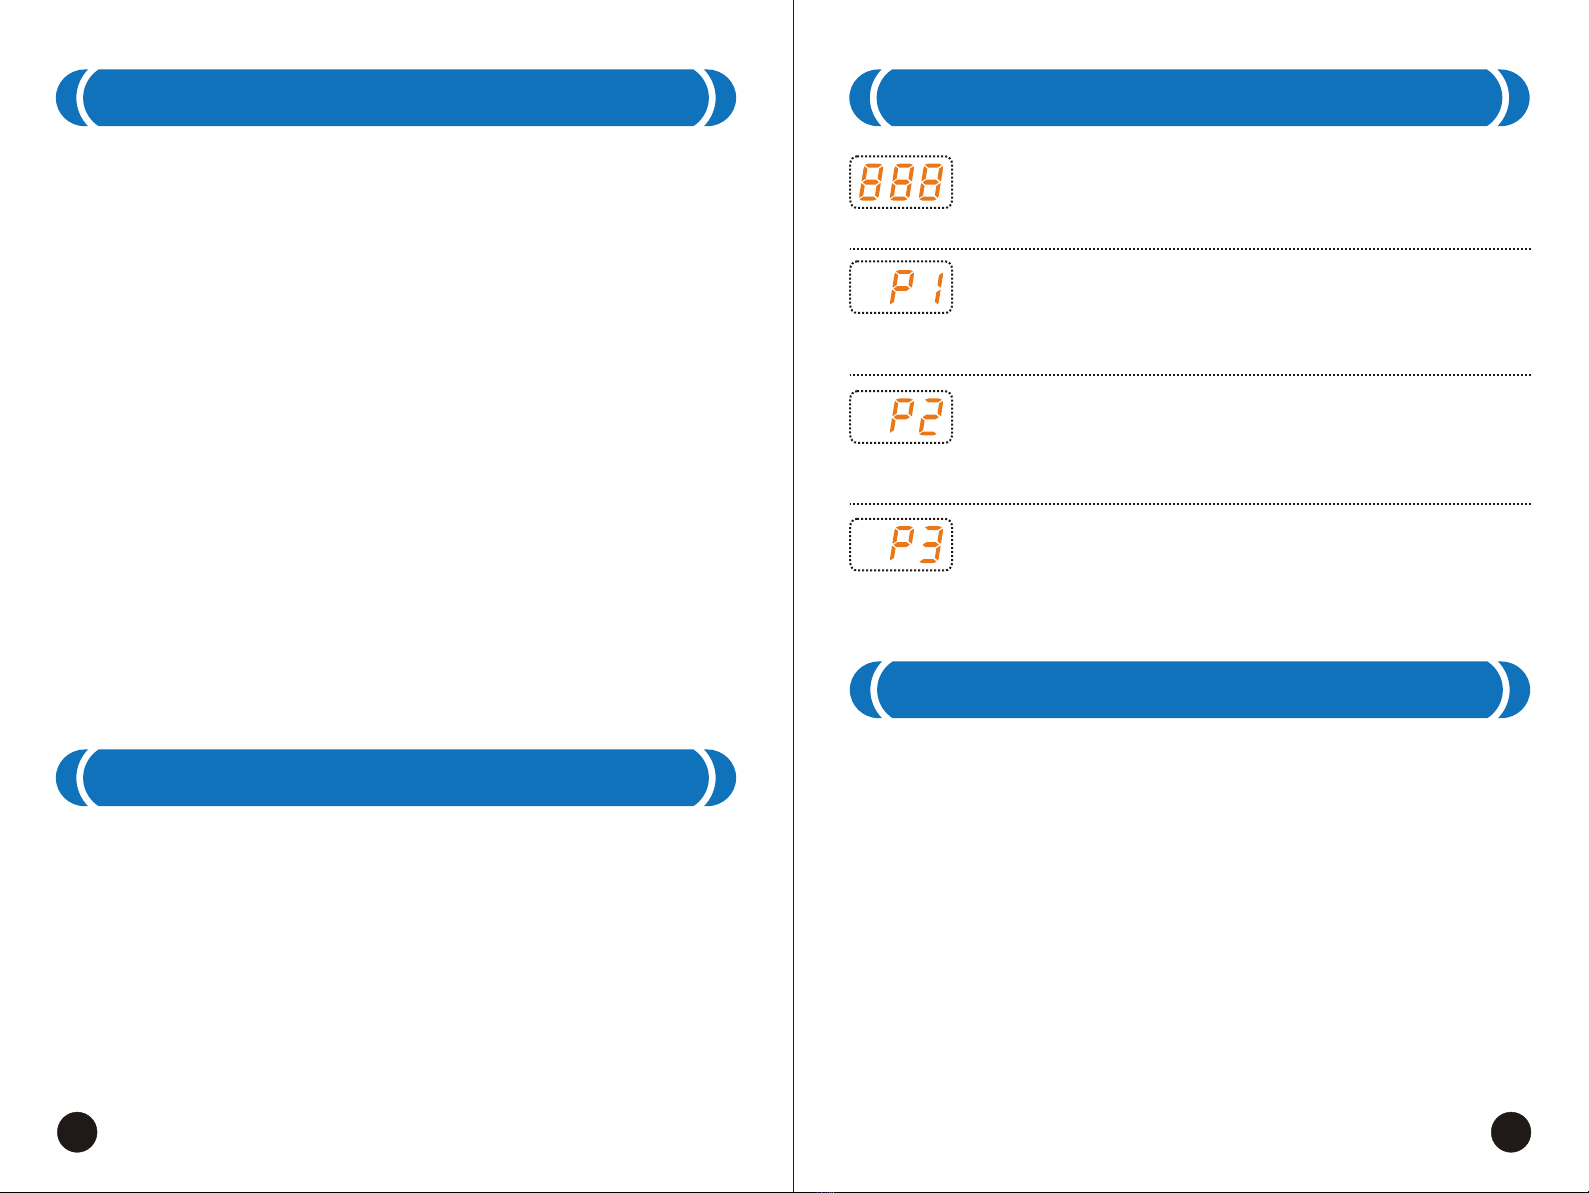
U.S. Jaclean VITALITY STEP User manual

Speed
Time
Time Mod e
Reset
Speed-down
Fat te stin g/Mo de
Speedup
SAVE THESE INSTRUCTIONS
Please read the Operating Instructions carefully before operating this unit.
Please save this manual for future reference.
Limited Warranty
This warranty guarantees that the product purchased is to be free from defects in
material and workmanship under normal usage and local voltage for a period of
one year. This warranty expires in TWO (2) years on parts, and ONE (1) year on
labor after the date of purchase.
U.S. Jaclean, Inc. (referred to as “the Warrantor”) will repair this product with new
or rebuilt parts in case of defects in material or workmanship, free of charge, in
the USA provided that:
1) The product is operated in accordance to the printed instructions supplied.
2) The product is used under normal conditions for which it is designed.
3) The product is not subjected to misuse, negligence, or accident.
4) The product receives proper care, protection, and maintenance.
This warranty is extended to the original buyer only, after purchase from an
authorized U.S. Jaclean, Inc. distributor. A deductible or shipping allowance may
apply. A purchase receipt or other proof of date of the original purchase is
required for service and parts replacement under this warranty.
Claims of defect in this product are subject to U.S. Jaclean, Inc.’s authorized
distributor inspection and judgment.
This warranty only covers failures due to defects in materials and workmanship
and does not cover normal wear or cosmetic damages. The warranty does not
cover damages which occur in shipment, or failures which result from accident,
misuse (including, without limitation, failure to comply with instructions and use
limitations contained in the Operating Instructions), abuse, neglect, mishandling,
faulty installation, set-up adjustments, improper operation or maintenance,
alteration, modification, power line surge, lightening, improper line voltage,
commercial use such as hotel, office, restaurant, or other business or rental use
of product, or service by anyone other than from U.S. Jaclean, Inc., or damage
that is attributable to “acts of God.”
Continued use of this product after discovering a defect voids warranty. This
warranty shall be governed by the state of California, United States of America.
Please retain this Warranty Certificate, together with the original purchase
receipt, and present it to our technician for inspection during service.
For assistance and more information, please contact U.S. Jaclean, Inc. Please
call before sending back the merchandise.
USJ-631 VITALITY STEP
Gardena, CA 90249
1-310-538-2298
9AM~5PM PST (Monday thru Friday)

Thank you for purchasing the USJ-631 Vitality Step.
Before using the product, please read this manual carefully, paying special
attention to the safety precautions. Retain this manual for future reference.
General Safety Precautions • • • • • • • • • • • • 2
User Suitability • • • • • • • • • • • • 3
Part Names • • • • • • • • • • • • 4
Installation • • • • • • • • • • • • 5
Control Panel Operation • • • • • • • • • • • • 7
Operating Instructions • • • • • • • • • • • • 8
Digital Display • • • • • • • • • • • • 8
Modes of Vibration • • • • • • • • • • • • 9
Product Maintenance • • • • • • • • • • • • 9
Exercises • • • • • • • • • • • • 10
Additional Exercises • • • • • • • • • • • • 11
Exercise Programs • • • • • • • • • • • • 13
Specifications • • • • • • • • • • • • 13
1
Contents

• Remove all plastic wrapping before use. Keep plastic wrapping
out of the reach of children.
• Before you use it for the first time, check whether the unit is in
good condition. If it is damaged, do not use it. Please return it to
your vendor.
• This unit is intended for personal and indoor use, not commercial
use.
• The dealer is not responsible for any damages caused by
inappropriate use or intentional harm.
• This unit is NOT suitable for use by children or pregnant women.
• Never pull out the plug by its cable.
• Do not jump on the unit or its plate. Doing so may cause damage.
• Stop using the unit if any visible damages appear. Unplug it and
contact a technician.
• If the power cord becomes damaged, contact a service agent or
the manufacturer of the product for replacement.
• Never try to repair the unit by yourself. Instead, consult your
vendor or its customer service center.
• After each use, switch off and unplug the unit.
• Before cleaning the unit, switch off power and disconnect its plug
from the electric outlet.
• When using this unit on a carpeted surface, make sure the
ventilation holes are not blocked.
• Some warm-up exercises are necessary before using the unit.
• Always increase exercise speed, intensity, and duration at a
gradual pace.
• Stop using this unit if you feel dizziness or other discomfort.
Consult your doctor immediately.
• Keep this unit dry and away from water at all times. Be especially
vigilant that no electric components get wet.
• Clean the unit with a moist cloth. Use non-chemical detergents
only.
• The unit is intended for use by one person at a time.
• This unit is NOT intended for use by children or by persons with
reduced physical, sensory or mental capabilities, or lack of
experience and knowledge, unless they are supervised or have
been instructed by a responsible adult.
• Do not allow children to play with the unit.
2
DANGER
• Disassembling the unit by yourself can cause hazardous injury.
• Inserting your fingers into the slot on the footplate can cause
hazardous injury.
• Excessive weight on either one end of the footplate or the other
may damage the unit and cause it to emit strange noises.
3
User Suitability
This unit is not suitable for:
• Persons experiencing trauma or other emotional disturbances
• Persons currently undergoing any type of illness
• Children without proper supervision
• Pregnant women and women during menstruation
General Safety Precautions

54
Speed
Time
Time Mode
Reset
Speed-do wn
Fatt est ing/ Mode
Speedup
Armrest
Control Panel
Upper Stand
Decorative Cover
Lower Stand
Footplate / Base
Resistance Bands
Pedestal Cover
Adjustable Feet
Part Names
Accessories
Installation
2. Grasp the cord attached to the Control Panel and
tuck it into one end of the Upper Stand. Fit the
Control Panel onto that end, making sure that it is
and 2 M5 lock washers to fasten the Control Panel
to the top end of Upper Stand
inserted all the way in. Use the two M5x14 screws
3.
1. Remove all protective wrapping from the unit’s
parts. Unscrew the two bolts on the bottom of the
Control Panel. Install to the Tube seen in Figure 2.
IMPORTANT! Please perform the following steps in the order described
below. Failure to do so could potentially make the product unusable.
3
• M5x14 screws (2)
• M8 washers (2)
• Knobs (2)
• M5 lock washers (2)
• M6 lock washers (2) • M6 washers (2)
• M8 lock washers (2)
• Knob pin (1)
•
Allen wrench & Phillips screwdriver
• M6x35 screws (2)
• M8x20 screws (2)
Screws for Footplate Screws for Armrest
Then use the two M8x20 screws, 1 M8 washer
and 1 M8 lockwasher to each screw. Fasten to
underneath overhang flange with handlebar
bracket pocket facing down.
5. Draw out the cord from the bottom of the Lower
Stand.
6. Connect the modular plug to the jack on one end of
the Base.
4.
Turn clockwise to lock the both Upper and Lower
Stand into position.
4
5
6

67
Installation
7. Insert the Lower Stand into its corresponding hole
on the one end of the Base.
8. Align the screw holes. Lock into place with two
M6 washers, two M6 x 35 lock washers, and two
M6x35 screws.
9. If desired, attach resistance bands to rings on
either side of the Lower Stand, near the Footplate.
Your Vitality Step is now ready for use.
Speed
Time
Mode
Reset
Speedup
Ti me
Speed-down
Mode
Control Panel Operation
On / Off key: Press this key to start operation.
Press this key again to turn off power.
Mode key: Switch among four different modes.
Manual mode: Adjust your desired time and speed during operation
P1, P2, P3: Automatic programs
Time key: Press to adjust your exercise time up to ten
minutes. Each push adds one minute.
Reset key: Restore all programs to their initial settings.
Speed Up key: Press to increase speed of vibration.
Slow Down key: Press to decrease speed of vibration.
7
8
9

Product Maintenance
• Before daily cleaning, be sure to switch the unit off and
disconnect the power plug from the electrical outlet.
• Never use alcohol or other harsh chemicals to clean the unit.
• To clean the power switch and the circumference of the
control panel, use a cloth that is soft and dry, rather than wet.
• Do not allow liquids to seep into any crevice on the unit.
• If the power cord becomes damaged, do not attempt to
replace it on your own. Instead, contact the manufacturer
directly for a suitable replacement.
8 9
Operating Instuctions
1. Connect the power plug into an electrical outlet and switch
the power on.
2. If you choose to exercise in the standing position, step onto
the footplate before starting operation. If you choose to use
this vibrator on another body part, you may either place that
part of your body on the footplate after starting operation, or
get into your desired position and ask another individual to
help operate the Control Panel.
3. On the Control Panel, press the On / Off key to start
operation. To pause operation, press this key again.
4. Refer to the Control Panel Instructions for using the other
keys on the Control Panel.
5. For best results, limit each workout session to 20 minutes.
Prolonged treatment may cause ill effects.
Digital Display
Speed: From 2 – 36, in even-numbered increments.
Elapsed Time: From 10 minutes down to 1 minute.
Mode: Alternates among Manual, P1, P2, and P3.
Modes of Vibration
Manual Mode
The vibration speed can be manually adjusted.
P1 Automatic Mode
The vibration speed automatically increases and decreases by
one increment every 0.5 seconds, from 2 to 36 and 36 to 2.
P2 Automatic Mode
The vibration speed automatically increases and decreases by
two increments every 5 seconds, from 4 to 36 and 36 to 4.
P3 Automatic Mode
The vibration speed automatically fluctuates between 2 and 36
every 5 seconds.

10 11
Exercises
LUNGES
Stand with both feet on the platform. Grip its
handles with your hands. Place one foot on the
center of the platform and shift your weight onto
one foot. Extend the other foot backward until it
rests on the floor. Keeping the toes of both feet
pointed toward the platform, lean forward and hold.
Repeat this exercise with your other foot.
BASIC
Stand with both feet on the platform. Grip its
handles with your hands. Balance yourself as the
platform moves.
BICEP CURLS
Stand with both feet on the platform. Grip the
handle of one armband in each hand, with your
palms facing up. Start with arms at your sides.
Bend the elbows and slowly curl hands up toward
your shoulders. Lower and repeat.
REAR LEG RAISES
Stand with both feet on the platform. Grip its
handles with your hands. Hook the handle of one
armband around the center of one foot. Shift your
weight onto the foot still on the platform and raise
the other foot backward until you feel the muscles
in your glutes, hamstrings, and calves all tighten.
Lower your foot and repeat. Repeat this exercise
with your other foot.
Additional Exercises
The following exercises are suitable for use in conjunction with
dumbbells of your preferred weight.
SQUATS
Suggested Exercises with Dumbbells
• Stand on the platform, grasping the handles
with both hands. Do not pull on the handles.
• Slowly bending your knees, lower yourself into
a sitting position. Do not allow your knees to
extend forward past your toes.
• Hold for 5 seconds. Repeat.
BICEP CURLS
• Stand on the platform holding one dumbbell in
each hand, with arms straight down the sides of
your body, palms facing each other.
• Bending at the elbow, raise both dumbbells until
they reach the height of your shoulders. Slowly
lower your arms back down to your sides.
• Do NOT to jerk your upper body to help you lift the
weights.
FRONT RAISE
• Stand on the platform holding one 5 lb. dumbbell in
each hand, with arms straight down the sides of your
body, palms facing behind you.
• Raise the dumbbells forward and upward until your
arms form a right angle with the rest of your body.
• Keep your arms extended and hold for 30 seconds.
Repeat.

Additional Exercises Cont.
LATERAL RAISE
The following exercise is suitable for use with resistance bands.
Suggested Exercises with Resistance Bands
LATERAL RAISES
• Stand on the platform and hold the handle of
one resistance band in each hand, with arms
straight down the sides of your body, palms
facing your calves.
• Raise your arms straight one to each side until
they are level with your shoulders.
• Hold for 2-3 seconds before slowly lowering.
Repeat.
• Stand on the platform and hold one dumbbell
with each hand beside each hip, palms facing
each other.
• Raise the dumbbells to your sides until your
arms are close to being parallel to the ground,
and lower them back down after a short pause.
• Do not lock your elbows while performing this
exercise.
SHOULDER PRESS
• Stand on the platform and hold one dumbbell
with each hand, with arms straight down the
sides of your body, palms facing behind you.
• Bend your arms at the elbows into a 90° angle.
Raise your hands until the dumbbells are at
the same height as your shoulders, palms
facing forward.
• Raise the dumbbells straight up above your
head until your arms are almost straight.
Briefly hold this position. Lower the dumbbells
back down to their previous position next to
your shoulders. Repeat.
12 13
Exercise Programs
Specifications
Model Number: USJ-631
Product Name: Vitality Step
Power Supply: 120 ~ 60Hz
Power Consumption: 300W
Scope of Vibration: 12mm
Maximum User Weight: 330 lbs
Type of Exercise
Frequency Duration
Speed
Normal Exercise
1~3 times
per day
5~20 minutes Consistent
Fat Reduction
4~8 times
per day
10~20 minutes Slow
This manual suits for next models
1
Table of contents