manuals.online logo
Brands
  1. Home
  2. •
  3. Brands
  4. •
  5. UDIZINE
  6. •
  7. Indoor Furnishing
  8. •
  9. UDIZINE SW196SP User manual

UDIZINE SW196SP User manual

This manual suits for next models

1

Other UDIZINE Indoor Furnishing manuals

UDIZINE Vertik User manual

UDIZINE

UDIZINE Vertik User manual

UDIZINE Palo System IPSK002 User manual

UDIZINE

UDIZINE Palo System IPSK002 User manual

UDIZINE Vertik User manual

UDIZINE

UDIZINE Vertik User manual

Popular Indoor Furnishing manuals by other brands

Regency LWMS3015 Assembly instructions

Regency

Regency LWMS3015 Assembly instructions

Furniture of America CM7751C Assembly instructions

Furniture of America

Furniture of America CM7751C Assembly instructions

Safavieh Furniture Estella CNS5731 manual

Safavieh Furniture

Safavieh Furniture Estella CNS5731 manual

PLACES OF STYLE Ovalfuss Assembly instruction

PLACES OF STYLE

PLACES OF STYLE Ovalfuss Assembly instruction

Trasman 1138 Bo1 Assembly manual

Trasman

Trasman 1138 Bo1 Assembly manual

Costway JV10856 manual

Costway

Costway JV10856 manual

moss DESIGN Caisson Credenza Assembly instructions

moss DESIGN

moss DESIGN Caisson Credenza Assembly instructions

Aquaglide FULL DECK 15.0 owner's manual

Aquaglide

Aquaglide FULL DECK 15.0 owner's manual

AREBOS AR-HE-SW30 user manual

AREBOS

AREBOS AR-HE-SW30 user manual

Till-Hilft Fulda 87005.330 Assembly instructions

Till-Hilft

Till-Hilft Fulda 87005.330 Assembly instructions

Twoey Outside 2010 quick start guide

Twoey Outside

Twoey Outside 2010 quick start guide

Hettich Easys 200 operating instructions

Hettich

Hettich Easys 200 operating instructions

The bedboss RELAX 404 Series owner's manual

The bedboss

The bedboss RELAX 404 Series owner's manual

Oeseder Möbelindustrie Bern 991 720 Assembly instructions

Oeseder Möbelindustrie

Oeseder Möbelindustrie Bern 991 720 Assembly instructions

Costway HW68469 user manual

Costway

Costway HW68469 user manual

Next ALIX A27743 Assembly instructions

Next

Next ALIX A27743 Assembly instructions

BROSA Hans Assembly guide

BROSA

BROSA Hans Assembly guide

Prodigg MINIKA PBA015T-FUR installation manual

Prodigg

Prodigg MINIKA PBA015T-FUR installation manual

manuals.online logo
manuals.online logoBrands
  • About & Mission
  • Contact us
  • Privacy Policy
  • Terms and Conditions

Copyright 2025 Manuals.Online. All Rights Reserved.

SlatStrip Assembly Instructions
General Note: It is the responsibility of the purchaser and/or installer to verify that the mounting surface is solid and capable of supporting the intended weight of
display. It is recommended to consult with a professional and determine the appropriate fastener/anchor needed for the mounting surface. UDIZINE is solely responsible
for the quality of its products and not accountable for faulty installation and ill use of its products beyond recommended limitations. WWW.UDIZINE.COM
Maximum Weight Load (lbs)
24”
44”
Shelf
Hanging Rail
22” 22”
44”
The maximum weight load is based on an evenly distributed weight load between 2 points
The maximum weight load for regular glass is approximately 1/4 of tempered glass
Item #: SW196SP SW1107SP
Length: 47” 91”
# of Slits: 17 32
Max Weigh Load*
Per Strip: 260lbs 520lbs
Per Slit: 88lbs 88lbs
Page 1 of 3
LevelPhillips Screw Driver Screwdriver
Please Note:
For mounting on sheet rock/drywall, we recommend using 3/16” Molly Bolts
or Toggle Bolts. Tools and mounting hardware are not provided
Molly Bolts
Toggle Bolts
Recommended Hardware
*The weight refers to the
SlatStrip’s ability to support
a certain weight load. The
nal result depends on
the type of wall, anchor,
hardware and installation.
Metal SlatStripMetal SlatStrip
L - Shelf/Bar Width
24” 36” 48”
Distance Between Supports (Ls)
Shelf Type Thickness 20” 22” 22” 24” 32” 22” 24” 36”
Tempered
Glass
1/4” 42
66 66 66
22
99 44
22
5/16” 70 38 38
3/8” 80* 85 85
MDF 3/4” 30 40 40 40 18 50 25 18
Hanging Bar 77 120 60 31 66
2”
2 3/4”
11”
2 3/4”
SW196SP
SW1107SP
SlatStrip Assembly Instructions
General Note: It is the responsibility of the purchaser and/or installer to verify that the mounting surface is solid and capable of supporting the intended weight of
display. It is recommended to consult with a professional and determine the appropriate fastener/anchor needed for the mounting surface. UDIZINE is solely responsible
for the quality of its products and not accountable for faulty installation and ill use of its products beyond recommended limitations. WWW.UDIZINE.COM
Wall Preparation and Installation
Page 2 of 3
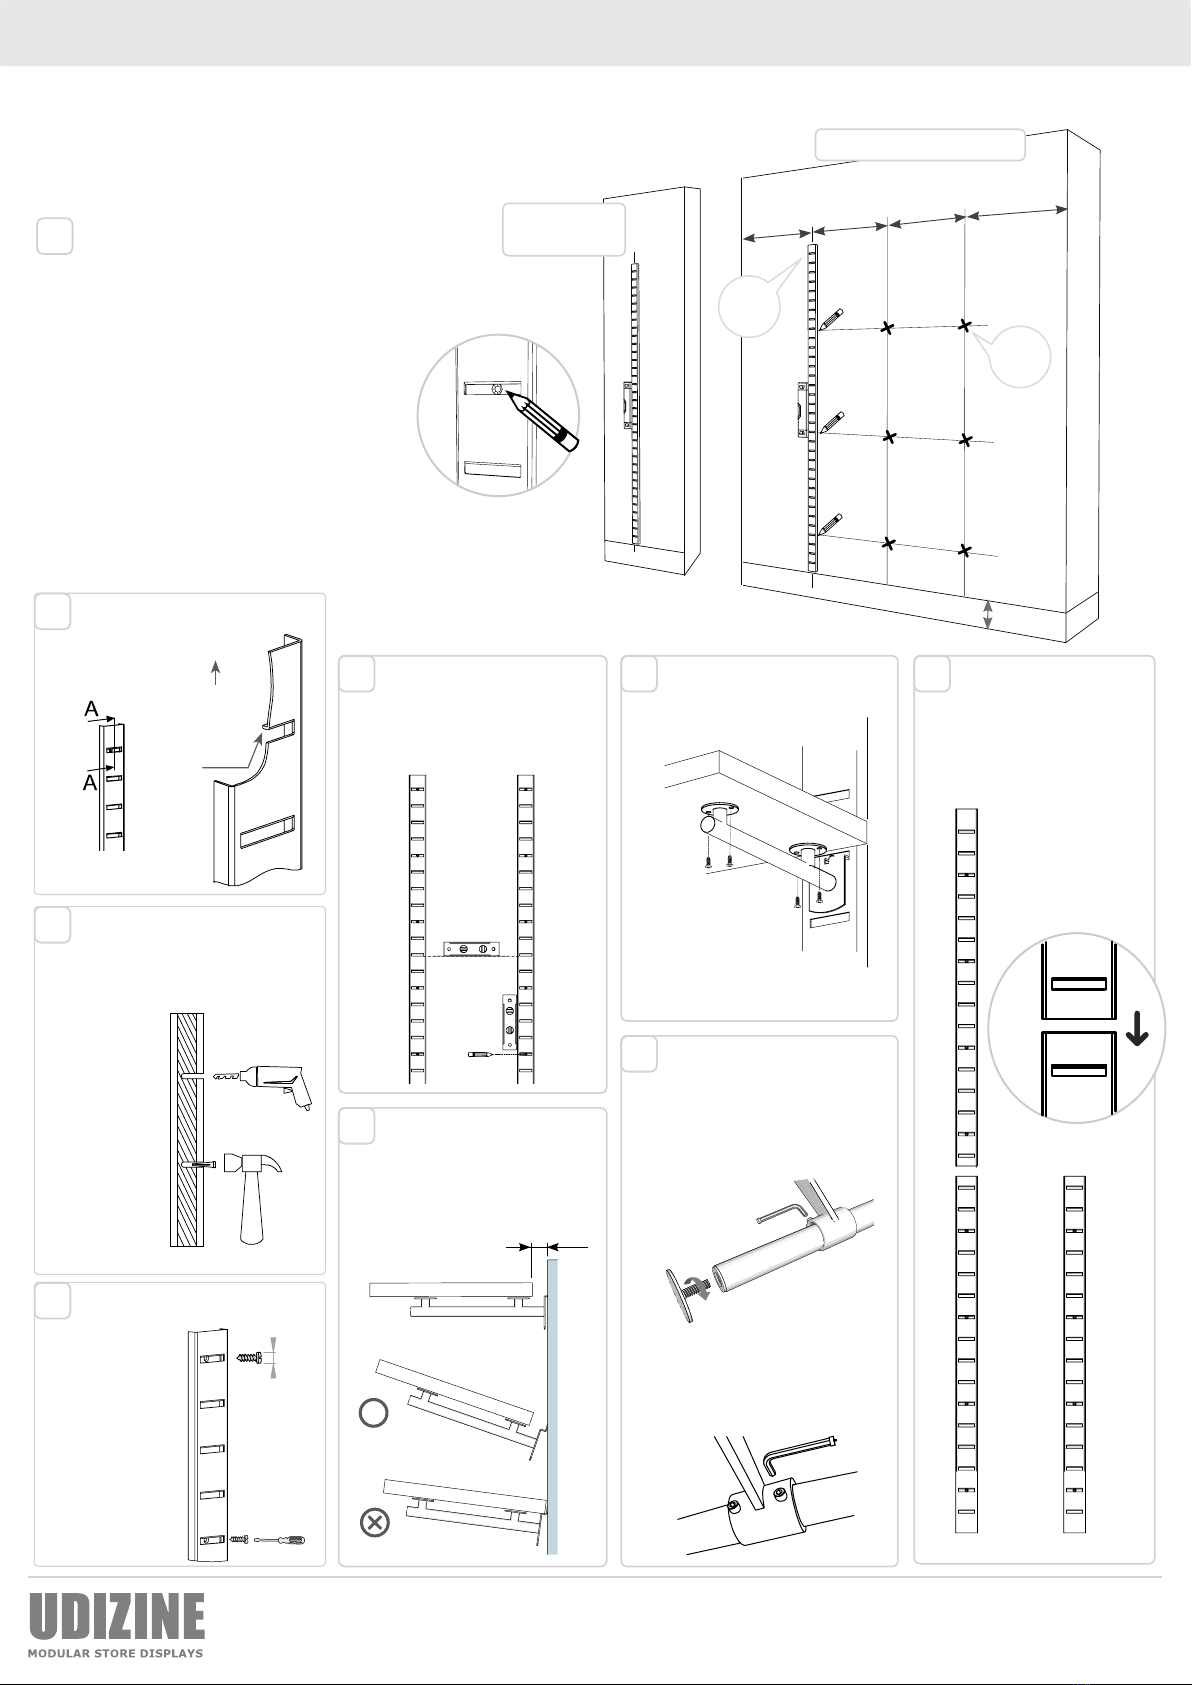
Mark on the wall the SlatStrip connection
points based on the setting calculation
on Page 3.
• The points are from the center of each strip
• The strips should be installed 8” above
the oor, in heavy duty setting place the
SlatStrip directly on the oor
• Allow 12” from wall edge to strip edge -
*in frontal hanging/clothing setting only
• Use a level to ensure accurate vertical
positioning
You can create the long
strip by using 2 of the 47”
Slatstrip, add one on top
of each other.
22”/24” 22”/24” 12” Min.*
8” Recommanded
*In frontal
hanging/
clothing
setting only
End
Points
Start
Points
12” Min.*
1
Metal SlatStrip
2
3
5 7 9
8
6
4
1/2”

Drill holes and apply anchors.
Use appropriate fastening
hardware for the wall type
11/32” Max
Mount strip to the
wall using screws
with a maximum
of 11/32” head
diameter
Install the rest of the strips
as marked in Step 1. Ensure
that slits of all strips are
parallel to one another
Allow 1/2” from the
SlatStrip to shelf, in order
to be able to change the
shelf location as needed
Unscrew the stopper, insert the
hangrail into the bracket.
Tighten with Allen Key to lock in
place, then screw stopper back
into place.
Secure wood shelf to shelf
bracket with 4 screws
Recommended wood screws,
round head, #8 x 5/8”
Insert the hangrail into the bracket.
Tighten with Allen Key to lock in
place, then screw stopper back into
place.
Mark according
to the holes in
the slots for the
screws - 9 holes
For Multiple SlatStrips
For Single
SlatStrip
For mounting
on sheet rock/
drywall, we
r e c o m m e n d
using 3/16”
Molly Bolts or
Toggle Bolts.
Ensure that the bend in the
slit face upwards
Top
Bended
Slit
SlatStrip Assembly Instructions
General Note: It is the responsibility of the purchaser and/or installer to verify that the mounting surface is solid and capable of supporting the intended weight of
display. It is recommended to consult with a professional and determine the appropriate fastener/anchor needed for the mounting surface. UDIZINE is solely responsible
for the quality of its products and not accountable for faulty installation and ill use of its products beyond recommended limitations. WWW.UDIZINE.COM
Calculations for Multiple SlatStrips
Bracket Types
Select required your setting from below. Check suitable brackets for each setting.
Note: W= Distance between SlatStrips - (Maximum recommended distance between SlatStrips is 36” due to shelf weight load limits)
A= Shelf Width
W=A–2WS
Glass Shelf Bracket
Wood Shelf Bracket
Heavy Duty Bracket
Decorative Bracket
Decorative Bracket
Hang Rail Bracket
Hang Rail Bracket
WS
WS
W=A–2WS
A A
WS
WS
W=A–2WSWS
WS
A
W=A–2WSWS
WS
A
W=A–2WSWS
WS
A
Bracket Types
A
W=A W=A–WS
W=A–WS
WSWS
A
Bracket Types
A
W+1/2”W+1/2” W+1/2”
A A
Heavy Duty Bracket
Page 3 of 3
1
Metal SlatStrip
2
3