Ulti Mate KORUS K80 MKII User manual

Thank you for purchasing Ultimate loudspeakers. At Ultimate we strive to create loudspeakers engineered to deliver the best value in
loudspeaker technology, for stereo or home-theatre applications.
Ultimate loudspeakers are designed for ease of installation and will provide you with excellent sound quality for years to come. Reading
this manual will assist you in getting acquainted with your Ultimate loudspeakers. To obtain servicing please contact your Ultimate rep-
resentative. The original bill of sale is required for warranty service.
KORUS K80 MKII
KORUS K50 MK II
KORUS K40 MKII
KORUS K30 MKII
KORUS K6 MKII
KORUS K5 MKII
KORUS KC6 MKII
KORUS KC5 MKII
MK II

Step 1
Loudspeaker Placement
Placement of your loudspeakers will greatly affect their performance. The following guidelines should be considered:
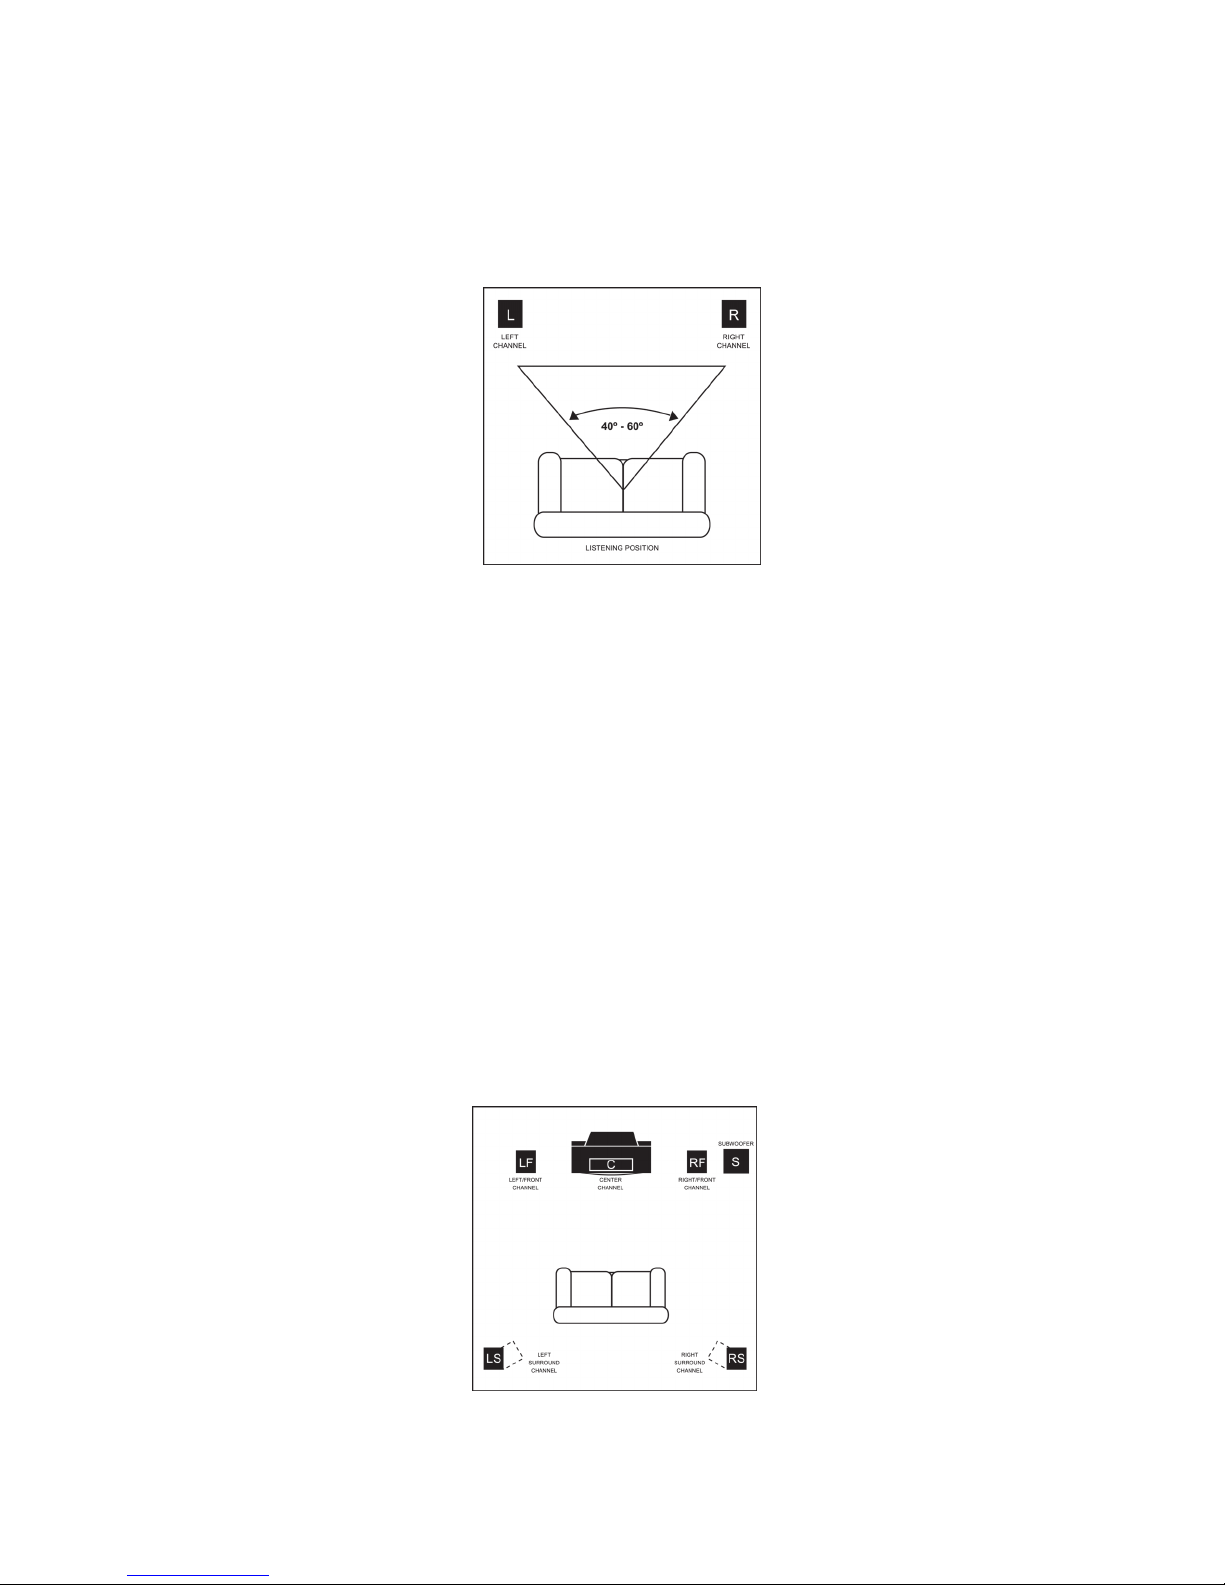
• Placing the loudspeakers at least 6-8 feet (1.8-2.5m) apart will provide the best stereo sound and image.
• The shape of the room will affect the bass performance, especially when loudspeakers are placed in the corner of the room.
• Positioning the tweeters so that they play at the listeners ear level provides for optimum playback.
• Keeping the loudspeaker wire away from AC outlets will reduce interference.
The shape of the listening room and the furnishings will change the way your system sounds. The bass frequencies will generally be affected by the positioning and treat-
ment of the room. There will be more perceived bass when a speaker is moved closer to a wall boundry. In general, however, loudspeakers should be kept away from side
walls as much as possible, as these surfaces can adversely affect the stereo imaging experienced at the listening position. Positioning the loudspeakers at least 12-15”
away from the side walls will generally provide the best performance.
Home-Theatre
Today’s home theatre systems typically comprise front loudspeakers, side and/or rear loudspeakers, a centre channel loudspeaker and a powered subwoofer. Building your
system with loudspeakers of the same brand produces the best performance as the tonal characteristics will remain the same throughout your surround system.
Front Channels
Placement of your front loudspeakers is critical to the performance of your system. The 3 front loudspeakers should ideally be placed with the tweeters at the same height
and the same distance form the main listening position. If this not possible, place the centre channel on top of, or just below, the television, with the front left and front
right loudspeakers on either side of the TV monitor.
Rear Channels
Rear channel loudspeakers can be either floor standing or smaller bookshelf type loudspeakers. Bookshelf loudspeakers should be placed on stands or on a shelf to maxi-
mize their performance. Aiming the loudspeakers to the listening position or aiming them away from the listening position will provide different sound fields (direct or dif-
fused), based on your preference.
Powered Sub
A powered subwoofer will reinforce the lower frequencies in any system and will also greatly enhance your stereo and home-theatre listening experience. Today’s media,
such as CD’s, DVD’s and other high quality music and movie software feature low frequency sounds that are difficult for most loudspeakers to reproduce. Adding a pow-
ered subwoofer will greatly improve the overall systems frequency response because it is designed to play the frequencies that your main loudspeakers cannot play effi-
ciently. Your authorized Ultimate dealer can assist you in choosing the subwoofer that is right for you.

Step 2
Connecting the loudspeakers
Before any connections are made, please ensure that all equipment in the system is turned off.
Loudspeaker wire throughout the system should be good quality, loudspeaker grade audio cable with polarity coding. For loudspeaker wire that runs less than 25 feet, the
cable should be a minimum of 18 AWG, for loudspeaker wire that runs up to 50 feet, the cable should be 16 AWG and for loudspeaker wire that runs longer than 50 feet,
the cable should be at least 14 AWG.
Installation:
Remove 3/8" of insulation from the end of the loudspeaker wires to be connected. Connect the positive lead of the loudspeaker wire (indicated with a "+" or other mark-
ing) to the Red (or positive) loudspeaker terminal. Connect the other loudspeaker wire lead to the Black (or negative) loudspeaker terminal. Connect the opposite end of
the loudspeaker wire to your amplifier making sure that the polarity is preserved ("+" to "+" or Red to Red, and "-" to "-" or Black to Black – see diagram).
Step 3
Listening Test
To ensure that all connections have been made correctly, turn on your system and begin playback of material you are familiar with. Start off by listening at a low volume,
then slowly raise the volume to a comfortable listening level. A proper stereo image should be present. If the loudspeakers do not produce a solid stereo image, please
verify the wiring to ensure that the polarity of the connection is not reversed.
The KORUS K80 MK2 is equipped with powered subwoofers that provide tremendous bass performance. Once the speaker is connected and turned on, a red LED (Light
Emitting Diode) will illuminate to indicate the speaker is in a standby mode. This LED will turn green during play. These speakers are also equipped with the following
features to help adjust the bass of the speaker to your room and taste.
On/Auto/Off
Once connected to your receiver and plugged into the wall outlet, the speaker will need to be turned on and can be left in the “auto” position so it will sense a signal
from your receiver and automatically turn on. The speaker will automatically switch into Standby mode once it does not sense a signal for approximately 10 minutes.
Gain
You can add or subtract bass to suit your taste by adjusting the gain control. Rotate the knob towards 0dB to remove bass or towards +6dB to add bass.
Input Toggle
Select “Hi Level Input” to draw bass signal from the speaker wire or select “LFE” (Low Frequency Extension) when connected via the receivers Subwoofer output.
Maintenance
Ultimate loudspeakers are finished in a high gloss lacquer and black wood grain vinyl. Cleaning the loudspeakers should be done with a damp cloth. Chemical cleaners
should be avoided, as they may damage the finish.

Specifications
At Ultimate we continuously strive to update and improve our products.
As such the specifications indicated above are subject to change without notice.
MODEL KORUS K6 MK2KORUS K30 MK2KORUS K40 MK2
KORUS K50 MK2
KORUS K80 MK2 KORUS KC6 MK2
Description
Dimensions (HxWxD)
Tweeter
Drivers
Max Power Handling
Frequency Response
Sensitivity
Impedance
3-Way Dual 6.5” Powered
Tower Loudspeaker with Dual
8” Front Firing Subwoofers
1”Titanium Dome
491/4” x 101/8” x 1615/16”
8 Ohms
92dB
36Hz - 20kHz
300 Watts
200 Watts
Integrated Amp
2.5-Way Triple 6.5”
Tower Loudspeaker
1”Titanium Dome
435/16” x 101/8” x 1415/16”
8 Ohms
90dB
40Hz - 20kHz
250 Watts
2-Way Dual 6.5”
Tower Loudspeaker
1”Titanium Dome
403/8” x 101/8” x 1415/16”
8 Ohms
90dB
45Hz - 20kHz
200 Watts
2-Way 6.5”
Tower Loudspeaker
1”Titanium Dome
351/2” x 91/2” x 121/4”
8 Ohms
89dB
55Hz - 20kHz
150 Watts
1”Titanium Dome
173/4” x 81/4” x 97/8”
8 Ohms
88dB
75Hz - 20kHz
100 Watts
8 Ohms
89dB
65Hz - 20kHz
150 Watts
1”Titanium Dome
71/2” x 225/8” x 71/2”
KORUS K5 MK2
8 Ohms
88dB
80Hz - 20kHz
85 Watts
1”Titanium Dome
113/4” x 63/4” x 63/4”
Triple 6.5” PolyMica
Infusuion cones
Dual 6.5” PolyMica
Infusuion cones
6.5” Polymer
Enhanced Fiber cones
KORUS KC5 MK2
2-Way Dual 5.25” Center Channel
Loudspeaker
8 Ohms
89dB
70Hz - 20kHz
100 Watts
Dual 5.25” PolyMica
Infusuion cones
1”Titanium Dome
63/4” x 193/4” x 63/4”
Dual 6.5” PolyMica
Infusuion cones
Dual 8” PolyMica
Infusion cones
Video Shielding YES YES YES YES YES YES
YES YES
2-Way 6.5”
Bookshelf Loudspeaker
2-Way 5.25”
Bookshelf Loudspeaker
2-Way Dual 6.5” Center
Channel Loudspeaker
6.5” PolyMica
Infusuion cone
5.25” PolyMica
Infusuion cone
Dual 6.5” PolyMica
Infusuion cones

21000 TransCanada
Baie D’Urfé, QC, Canada, H9X 4B7
Tel.: (514) 457-2555 • Fax: (514)457-5507
WWW.ULTIMATE-SOUND.COM
© 2007 Jam Industries Ltd.
This manual suits for next models
7
Table of contents
Other Ulti Mate Speakers manuals