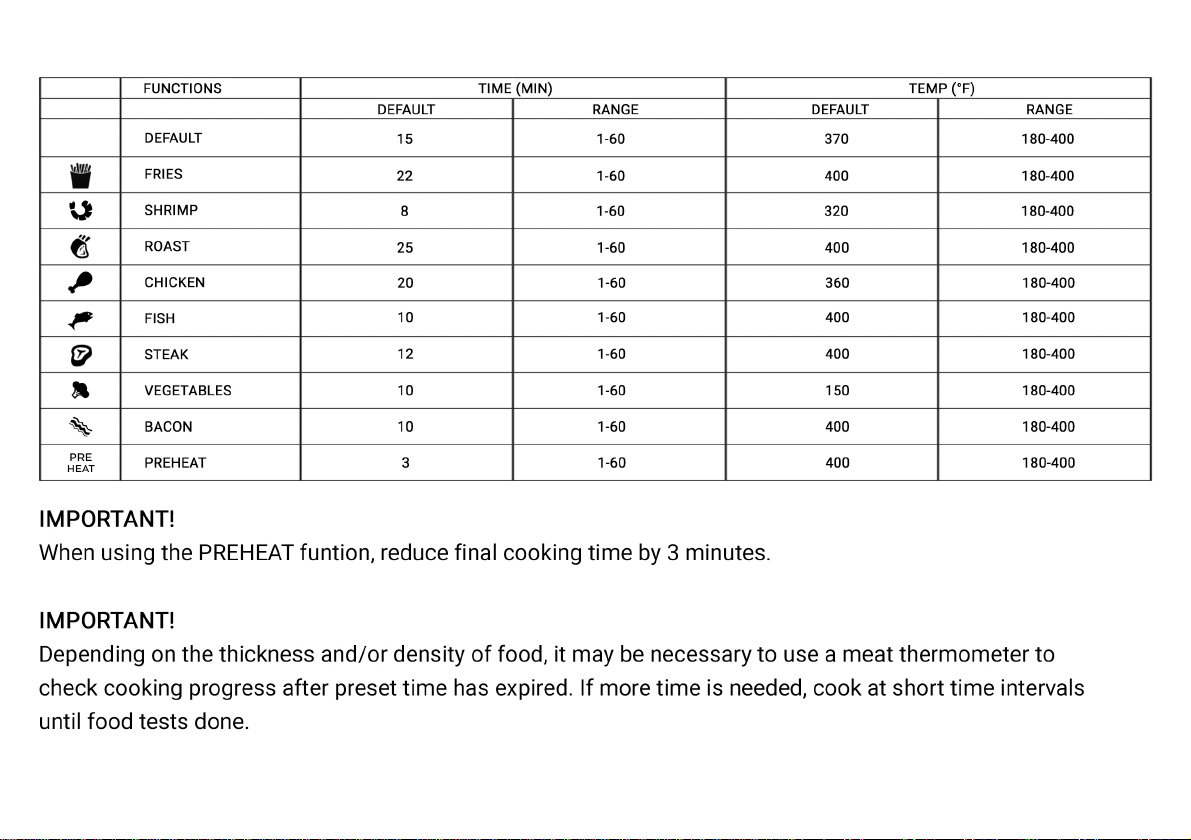
Ultima PRESTO LUXE GRANDE User manual


2
IMPORTANT SAFEGUARDS
When using electrical appliances, basic safety precautions should always be followed, including the following:
READ ALL INSTRUCTIONS.
Do not touch hot surfaces. Use handles or knobs. Use oven mitts or potholders.
Do not immerse cord, plugs, or appliance in water or other liquid to protect against electric shock.
This appliance is not intended for use by persons (including children) with reduced physical, sensory or mental
capabilities, or lack of experience and knowledge, unless they have been given supervision or instruction concerning use
of the appliance by a person responsible for their safety.
Ensure children do not play with the appliance for safety purposes. Unplug from outlet when not in use and before
cleaning. Allow to cool before putting on or taking off parts, and before cleaning the appliance.
Do not operate any appliance with a damaged cord or plug or after the appliance malfunctions, or has been damaged in
any manner. Bring it to a qualified technician for examination, repair or electrical or mechanical adjustment.
The use of accessory attachments may cause injuries and is not recommended by the appliance manufacturer.
Do not use outdoors.
Do not let cord hang over edge of table or counter, or touch hot surfaces.
Do not place on or near a hot gas or electric burner, or in a heated oven.
Use extreme caution when moving an appliance containing hot oil or other hot liquids.
Always attach plug to appliance first, then plug cord into the wall outlet. To disconnect, turn any control to “off”, then
remove plug from wall outlet.
Do not use appliance for other than intended use.
The crisping tray must be in place before adding food to be air fried.
Make sure the frying basket is locked securely into the front of the Air Fryer, while the Air Fryer is in operation.
WARNING
: The Air Fryer will not operate unless frying basket is fully closed.
CAUTION
: After hot air frying, extreme caution must be used when handling the hot frying basket, crisping tray, and cooked foods.

3
ADDITIONAL IMPORTANT SAFEGUARDS
CAUTION HOT SURFACES:
This appliance generates heat and escaping steam during use. Proper precautions must be
taken to prevent the risk of burns, fires, or other injury to persons or damage to property.
CAUTION:
This appliance is hot during operation and retains heat for some time after turning OFF. Always use oven mitts
when handling hot materials and allow metal parts to cool before cleaning. Do not place anything on top of the appliance
while it is operating or while it is hot.
Before operating or cleaning this appliance, all users must read and understand this instruction manual.
The cord to this appliance should be plugged into a 120V AC electrical outlet only.
If this appliance begins to malfunction during use, pull the frying basket drawer out of the body. Then remove plug from
wall outlet. Do not use or attempt to repair the malfunctioning appliance.
Do not leave this appliance unattended during use.
Do not immerse power cord in any liquid. If the power cord
to this appliance is damaged, it must be replaced by contacting Consumer Service.
To avoid the risk of electric shock and choking, keep the cord out of reach from children and infants.
Place the Air Fryer on a flat, heat-resistant work area.
Do not obstruct the air outlet or air inlets on the back and sides of the Air Fryer, with any objects. Avoid escaping steam
from the
air outlet during air frying.
During operation, keep appliance at least 4 inches away from walls or other objects.
To open frying basket drawer, always use the frying basket handle.
WARNING
: After air frying, make sure to place the frying basket drawer on a flat, heat-resistant surface.
WARNING
: Over-filling the frying basket may damage the Air Fryer and could result in serious personal injury.
Never move a hot Air Fryer or an Air Fryer containing hot food. Allow to cool before moving.
Do not clean with metal scouring pads. Pieces can break off the pad and touch electrical parts, creating a risk of electric
shock.

4
NOTES ON THE PLUG
This appliance has a polarized plug (one blade is wider than the other). To reduce the risk of electric shock, this plug will
fit in a polarized outlet only one way. If the plug does not fit fully into the outlet, reverse the plug. If it still does not fit,
contact a qualified electrician.
Do not modify the plug in any way.
NOTES ON THE CORD
A short power-supply cord (or detachable power-supply cord) is to be provided to reduce the risk resulting from becoming
entangled in or tripping over a longer cord.
Longer detachable power-supply cords or extension cords are available and may be used if care is exercised in their use.
If a long detachable power-supply cord or extension cord is used:
1.
The marked electrical rating of the cord or extension cord should be at least as great as the electrical rating of the
appliance;
2.
If the appliance is of the grounded type, the extension cord should be a grounding-type3-wire cord.
3.
The longer cord should be arranged so that it does not drape over the countertop or table top where it can be pulled on
by children or tripped over unintentionally.
PLASTICIZER WARNING
CAUTION:
To prevent Plasticizers from migrating to the finish of the counter top or table top or other furniture, place
NON-PLASTIC coasters or place mats between the appliance and the finish of the counter top or table top. Failure to do
so may cause the finish to darken; permanent blemishes may occur or stains can appear.
ELECTRIC POWER
If the electrical circuit is overloaded with other appliances your appliance may not operate properly. It should be operated
on a separate electrical circuit from other appliances.


6
Timer Control Buttons
Selecting the timer control (min), add or decrease cooking time using the + and – symbols. This enables you to add or
decrease cooking time, one minute at a time. Keeping the button held down will rapidly change the time.
Temperature Control Buttons
Selecting the temperature control (°F), add or decrease temperature using the + and – symbols. This enables you to add
or decrease cooking temperature 5°F at a time. Keeping the button held down will rapidly change the temperature.
Temperature control range: 180°F – 400°F.
MENU Preset Choices
8 presets to choose from: French Fries, Shrimp, Roast, Chicken, Fish, Steak, Vegetables and Bacon.
Digital Display
The digital display will keep track of the temperature and remaining cook time.
White Fan Icon
When the Air Convection Fryer is turned on (and for up to 20 seconds after it is turned off) the flashing, White Fan Icon will
appear.
Adjustable Control (Temperature and Timer)
The + and – symbols enable you to increase or decrease cooking temperature and time.


8
Before Using for the First Time
1.
Remove all packing material and labels from the inside and outside of the air fryer. Check that there is no
packaging underneath and around the frying basket.
2.
Your air fryer is shipped with the frying basket locked inside the air fryer body. Firmly grasp the frying basket handle
to open frying basket and place on a flat, clean work area.
3.
Wash frying basket and crisping tray in hot, soapy water.
4.
DO NOT IMMERSE THE AIR FRYER BODY IN WATER. Wipe the air fryer body with a damp cloth.
Dry all parts thoroughly.
5.
To ensure the crisping tray fits snugly into the frying basket drawer, there are 3 rubber tips attached to the sides of
the tray. Before using, check to make sure all 3 rubber tips are in place. If they become separated from the tray,
simply slide onto the tabs as shown. (See fig 2.)
Figure 2

9
Operating Instructions
IMPORTANT!
The maximum food capacity recommended for this air frying basket is 4.4 lbs,
4 - 6 cups, depending. The air frying basket will accommodate up to a 9-inch round x 3-inch-deep bake or pie pan.
WARNING! This Air Convection Fryer SHOULD NOT be used to boil water.
WARNING! This Air Convection Fryer SHOULD NEVER be used to deep fry foods.
Place the Air Fryer on a flat, heat-resistant work area, close to an electrical outlet.
Firmly grasp the frying basket handle to open frying basket; then remove from the machine and place on a flat, clean
surface.
Place the crisping tray into the base of the frying basket.
Insert the assembled frying basket drawer into the front of the Air Convection Fryer. Always make sure frying basket
drawer is fully closed.
Plug cord in the wall outlet. An audible beep will sound and a red POWER ( ) button will appear on a black background.
To begin, press the red POWER ( ) button.
The touchscreen control panel will appear. POWER ( ) button will turn white.
The default TIME and TEMP: 15:00 minutes and 370ºF will alternate on the digital display.
IMPORTANT
: If no buttons are pressed, the Digital Air Convection Fryer will remain in standby mod
Manual Operation
To adjust the default air frying TIME, select timer control button (MIN), press the (+) or (–) on the right side of the control
panel to advance or decrease TIME in 1-minute increments, from 1 to 60 minutes.
NOTE: Timer can also be adjusted when time reflects on the digital display
To adjust the default air frying Temperature, select temperature control button (°F), press the (+) or (–) on the left side of
the control panel to adjust the default (370°F) TEMP from 180°F to 400°F in 5-degree increments.
NOTE: Temperature can also be adjusted when temperature reflects on the digital display using
When the desired TIME and TEMP appear on the digital display, press the START ( ) button to turn the Air Convection
Fryer ON. The white convection fan ( ) will twirl when the Air Convection Fryer is in operation. The preset TIME will
begin to count down. TEMP and remaining TIME will alternate on the digital display.

10
IMPORTANT: If no buttons are pressed, the Digital Air Convection Fryer will remain in standby mode.
To turn the Air Convection Fryer OFF at any time, or to reset the TIME, simply press the white POWER ( ) button.
NOTE: To halt air frying immediately, pull the frying basket drawer out of the body at any time. When the drawer is
replaced, air frying will resume.
When the remaining TIME reaches 00:00, the red POWER button will appear and the white convection fan ( ) will
continue to twirl for 20 seconds. 5 beeps will sound as the Air Convection Fryer automatically turns OFF.
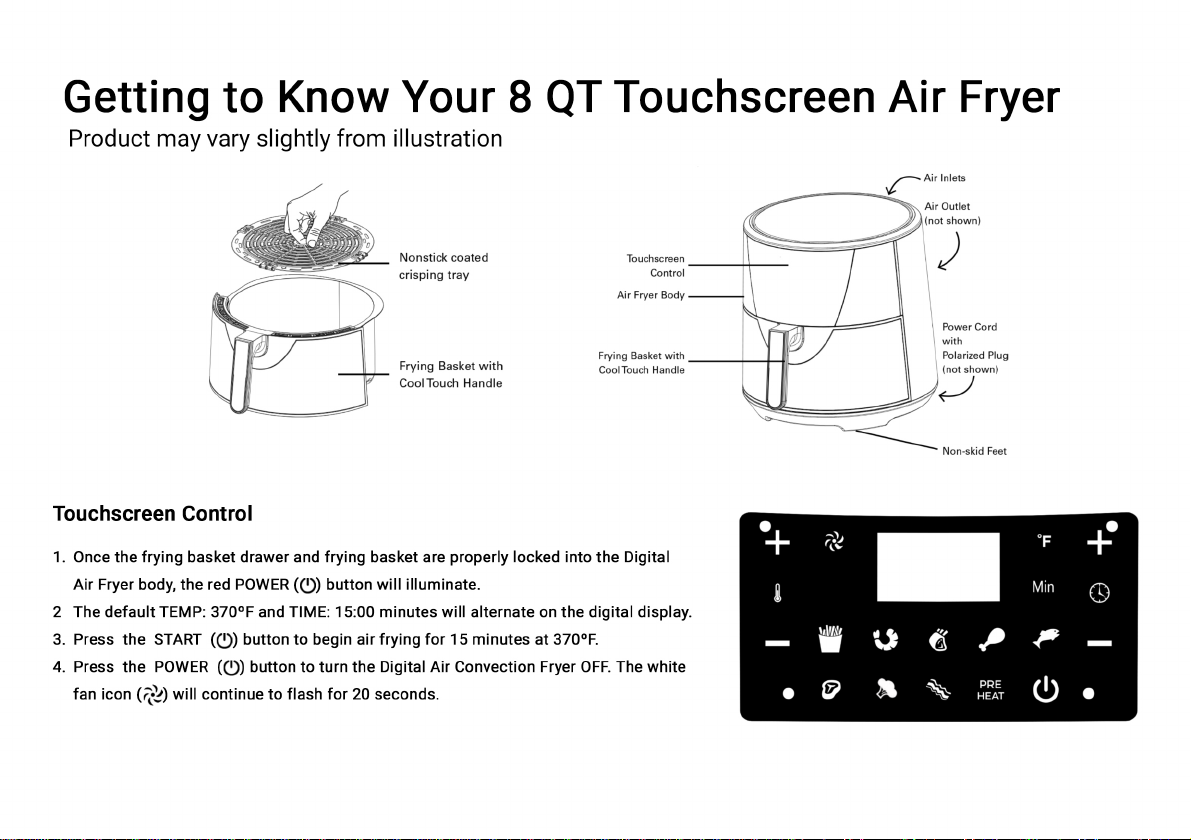
8 FOOD MENU PRESETS (French Fries | Shrimp | Roast | Chicken | Fish | Steak | Vegetables | Bacon | Preheat)
To use food MENU options, simply press the desired food icon
When the desired food menu option icon is illuminated, press the START ( ) button to turn the Air Convection Fryer ON.
NOTE: The quantity, density, weight of food will alter the total cooking time necessary. Remember, frying smaller batches
will result in shorter cooking times and higher food quality.
IMPORTANT: Always check food halfway through cooking time to determine final cook TIME and TEMP.
To adjust the air frying TIME during operation, press (+) or (–) on the right side
of the control panel to advance or decrease time in 1-minute increments to 60 minutes. Press the (+) or (–) on the right
side of the control panel to adjust TEMP in 10-degree increments.
Easy-assist Function: PREHEAT
Make perfect air frying effortless AND save time.
PREHEAT: When cooking meats or proteins that benefit from a hot initial sear or if a recipe calls for a preheated oven, use
PREHEAT (P) function. Insert the empty air frying basket/ drawer into the body of the Air Convection Fryer.
Press the START ( ) button to begin.
The default TIME and TEMP: 3:00 minutes and 400ºF will alternate on the digital display.
Place food into frying basket when 5 beeps sound. Program the Air Convection Fryer, and air fry to perfection.
IMPORTANT!
When using the PREHEAT (P) function, reduce final cooking recipe or preset TIME by 3 minutes.

11
Air Frying Technique
Follow package directions or consult the Air Frying Chart for suggested TIME and TEMP.
Before cooking pat food dry to encourage browning and to avoid excess smoke.
ALWAYS open the basket drawer halfway through the cook time and check, turn or shake foods in the frying basket to
assure even cooking/browning,
Some recipes may call for brush or spray oil halfway through cooking. Adjust TIME or TEMP if needed.
CAUTION:
When handling the hot air fryer basket, ALWAYS use oven mitts.
CAUTION:
Make sure the clear basket lock is in the locked position when shaking foods
for the Air Convection Fryer. To avoid damage to persons or personal property, do not press the basket release button
while shaking the frying basket.
CAUTION:
Hot oil can collect at the base of the drawer. To avoid risk of burns or personal injury, or to avoid oil from
contaminating air fried foods, always unlock and remove the frying basket from the drawer before emptying. NEVER turn
the drawer upside down with the frying basket attached.
Always let cooked food rest for 5 to 10 minutes. Remove the drawer from the machine and place on a flat, heat resistant
surface. Then remove frying basket from the drawer.
Shake air fried foods out onto serving area. Promptly return the frying basket to the drawer and lock into place. Continue
air frying subsequent batches, if any.
To avoid excess smoke, when cooking naturally high fat foods, such as bacon, chicken wings or sausages, it may be
necessary to empty fat from the frying basket drawer between batches.
For crispier results, air fry small batches of freshly breaded foods. Create more surface area by cutting food into smaller
pieces. Press breading onto food to help it adhere. Refrigerate breaded foods for at least 30 minutes before frying.
Arrange breaded food in frying basket so that food is not touching to allow air flow on all surfaces.
Spray oils work best. Oil is distributed evenly and less oil is needed. Canola, olive, avocado, coconut, grapeseed, peanut, or
vegetable oil work well.
Unplug the Air Convection Fryer when not in use.

12
Air Frying Pre-Packaged Frozen Foods
Air convection frying assures reasonably fast, crispy, delicious results where microwave ovens often produce hot, mushy
results and toaster ovens take forever.
As a rule, depending on the food and amount to be cooked, suggested cook TIMES may have to be reduced slightly.
Always check food halfway through cooking time to determine final cook TIME and TEMP.
Always check cooking progress after TIME has expired.
Air Frying Chart (Includes Preset Food Menu Items)
WARNING
!
Times are estimated and based on average sizes and weights.
ALWAYS USE A MEAT THERMOMETER TO ENSURE THAT MEAT, POULTRY AND FISH ARE COOKED THOROUGHLY BEFORE
SERVING.
NOTE:
Adjust air frying temperatures and times as necessary to suit your taste. Frying smaller batches will result in
shorter cooking times and higher food quality.
NOTE:
Unless food is pre-packaged and pre-oiled, for browned and crispy results, all foods should be lightly oiled before
air frying.

13
FOOD
TEMP
AIR FRY TIME
ACTION
Root Vegetables, 3 - 4 cups fresh (roasted) 370°F 15-20 minutes toss with oil shake 3x
Asparagus, 3 - 4 cups, fresh thin stems 370°F 7-9 minutes spray with oil, shake 2x
Green Beans, Sugar Snap Peas, 3 - 4 cups fresh 370°F 7-9 minutes spray with oil, shake 1x
Broccoli, 3 - 4 cups fresh (roasted) 370°F 5-7 minutes spray with oil, shake 3x
Brussels Sprouts, halved, 3 - 4 cups fresh 370°F 8-10 minutes spray with oil, shake 2x
Butternut Squash, seeded, 1/2-inch chunks, 3 - 4 cups
fresh 370°F 15 minutes spray with oil, shake 3x
Fennel, fresh, chopped, 3 - 4 cups 370°F 7-9 minutes spray with oil, shake 2x
Fried Sweet Potato Fries
(fresh, hand cut, 1/8 to 1/4-inch thick) 400°F 13-15 minutes spray with oil, shake 3x
French Fries, Idaho Potatoes, 2 - 3
(fresh, hand cut, 1/4 to 1/3-inch-thick) (frozen, 1/4 to
1/3 inch thick)
400°F
400°F
12 minutes
12 minutes
spray with oil, shake 3x
Meat, Roast, Chops
360ºF
25 min
rub or spray with oil, add seasoning, turn over test for
doneness
Ribeye Steaks, (2) 1.25 lb.,
1-1/2-in. thick,
room
temp.
medium rare
medium
well done
400°F
400°F
400°F
Preheat
+ 6 min
Preheat
+ 10 min
Preheat
+ 14 min
rub or spray with oil, add seasoning, turn over test for
doneness, rest 15 minutes - check at 12 minutes, rest 15
minutes
Hamburgers, 1/3 lb. (up to 4),
rare-well 350°F
Preheat
+ 3 – 6 min spray with oil, add seasoning, turn over test for doneness
Chicken Wings, 2-3 lb. (fresh/thawed) 360°F 20 minutes spray with oil, shake 2x, test for doneness
Chicken Tenders/Fingers,
boneless
360°F 18 - 20 min spray with oil, shake 1x
Chicken Pieces, bone in 360°F 20-30 minutes spray with oil, turn over, test for doneness
Fish Filet (fresh, thawed, battered) 400°F 10 minutes spray with oil, turn over, test for doneness
Shrimp (thawed, battered), 1- 2 lb. 320°F 8 minutes spray with oil, turn over, shake

14
PLEASE NOTE:
The USDA recommends that meats such as beef and lamb, etc. should be cooked to an internal temperature of
145°F/63°C. Pork should be cooked to an internal temperature of 160°F/71°C and poultry products should be cooked to
an internal temperature of 170°F/77°C - 180°F/82°C to be sure any harmful bacteria has been killed. When reheating
meat/poultry products, they should also be cooked to an internal temperature of 165°F/74°C.
User Maintenance Instructions
This appliance requires little maintenance. It contains no user-serviceable parts.
Any servicing requiring disassembly other than cleaning must be performed by a qualified appliance repair technician.
Care & Cleaning Instructions
WARNING! Allow the Air fryer to cool fully before cleaning.
Unplug the Air Fryer.
Remove frying basket.
Make sure the frying basket and crisping tray have cooled completely before cleaning.
To lift crisping tray up and out of the frying basket, use the center hole of the crisping tray.
Wash the frying basket and crisping tray in hot soapy water.
Do not use abrasive cleansers or cleaning products, or metal kitchen utensils as this may damage the nonstick coating.
The frying basket and crisping tray are dishwasher-safe. For best results, place in the top rack of your dishwasher to
clean.
Wipe the air fryer body with a soft, non-abrasive damp cloth to clean.
Storing Instructions
Make sure the Air Convection Fryer is unplugged and all parts are clean and dry before storing.
Never store the Air Convection Fryer while it is hot or wet.
Lock the frying basket into the drawer, and store inside the Air Convection Fryer body.
Store Air Convection Fryer in its box or in a clean, dry place.

15
Trouble Shooting
Problem Possible Cause Solution
The AIR FRYER does
not work
•
The Air Fryer is not plugged in.
•
The Air Fryer has turned itself OFF
•
Plug cord into the wall outlet.
•
To begin, press the red POWER ( ) button.
•
Make sure the frying basket/drawer is assembled correctly and fully
inserted into the Air Fryer body.
Food not cooked
•
The Frying Basket is overloaded.
•
Fry smaller batches of food.
•
Shake foods 2x or 3x during the cooking process.
•
Increase TEMP.
•
Increase air fry TIME.
Food is not fried
evenly
•
The Frying Basket is overloaded.
•
Fry smaller batches of food.
•
Apply a light, even coat of spray oil to food before frying
•
Shake foods 2x or 3x during the cooking process.
•
Fry smaller batches of food.
Frying basket/
drawer won’t slide
into the Air Fryer
body properly
•
The Frying Basket is overloaded.
•
Fry smaller batches of food.
•
Air Fryer will not turn ON until the frying basket/drawer is assembled
correctly and fully inserted into the Fryer body
White smoke
coming from
the Air Fryer
•
The Air Convection Fryer is
overloaded with oil.
•
The frying basket and drawer have not
been cleaned.
•
When frying heavily oily foods, such as bacon, it may be necessary to
clean the frying basket drawer more frequently.
•
Clean frying basket and drawer after each use.
Fresh fries are not
fried evenly
•
The Frying Basket is overloaded.
•
Soak, rinse and fully dry potatoes before frying.
•
Use fresh, firm potatoes.
Fries are not crispy
•
Raw fries have too much water.
•
Use a clean kitchen towel to wrap and dry potato sticks thoroughly before
adding oil.
•
Cut potato sticks smaller.
•
Shake and spray potatoes frequently.

16
Limited One-Year Warranty
Ultima Cosa hereby warrants that for a period of One Year from the date of purchase, this product will be free from
mechanical defects in material and workmanship, and for 90 days in
respect to non-mechanical parts. At its sole discretion, Ultima Cosa will either repair or replace the product found to be
defective, or issue a refund on the product during the warranty period.
Exclusions:
The warranty does not cover normal wear of parts or damage resulting from any of the following: negligent use of the
product, use of improper voltage or current, improper routine maintenance, use contrary to the operating instructions,
disassembly,
repair, or alteration by anyone other than qualified Ultima Cosa personnel. Also, the warranty does not cover
Acts of God such as fire, floods, hurricanes, or tornadoes.
Ultima Cosa shall not be liable for any incidental or consequential damages caused by the breach of any express or
implied warranty. Apart from the
extent prohibited by applicable law, any implied warranty of merchantability or
The warranty is only valid for the original retail purchaser from the date of initial retail purchase and is not transferable.
Keep the original sales receipt, as proof of purchase is required to obtain warranty validation. Retail stores selling this
product do not have the right to alter, modify, or in any way revise the terms and conditions of the warranty.
For customer service questions or comments
+1-888-969-6199
www.ultimacosa.com

17
GARANTIES IMPORTANTES
Lors de l'utilisation d'appareils électriques, des précautions de sécurité de base doivent toujours être suivies, y
compris les suivantes:
LISEZ TOUTES LES INSTRUCTIONS.
Ne touchez pas les surfaces chaudes. Utilisez des poignées ou des boutons. Utilisez des gants de cuisine ou des maniques.
Ne plongez pas le cordon, les fiches ou l'appareil dans l'eau ou tout autre liquide pour vous protéger contre les chocs électriques.
Cet appareil n'est pas destiné à être utilisé par des personnes (y compris des enfants) dont les capacités physiques, sensorielles ou
mentales sont réduites ou qui manquent d'expérience et de connaissances, sauf si elles ont été supervisées ou ont reçu des
instructions concernant l'utilisation de l'appareil par une personne responsable de leur sécurité.
Assurez-vous que les enfants ne jouent pas avec l'appareil pour des raisons de sécurité. Débranchez-le de la prise lorsque vous ne
l'utilisez pas et avant le nettoyage. Laisser refroidir avant de mettre ou de retirer des pièces et avant de nettoyer l'appareil.
Ne pas faire fonctionner un appareil dont le cordon ou la fiche est endommagé ou après un dysfonctionnement de l'appareil ou qui a
été endommagé de quelque manière que ce soit. Apportez-le à un technicien qualifié pour examen, réparation ou réglage électrique ou
mécanique.
L'utilisation d'accessoires peut provoquer des blessures et n'est pas recommandée par le fabricant de l'appareil.
Ne l'utilisez pas à l'extérieur.
Ne laissez pas le cordon pendre du bord de la table ou du comptoir, ni toucher des surfaces chaudes.
Ne pas placer sur ou à proximité d'un brûleur à gaz ou électrique chaud, ou dans un four chauffé.
Soyez extrêmement prudent lorsque vous déplacez un appareil contenant de l'huile chaude ou d'autres liquides chauds.
Branchez toujours d'abord la fiche sur l'appareil, puis branchez le cordon dans la prise murale. Pour déconnecter, mettez n'importe
quelle commande sur «off», puis retirez la fiche de la prise murale.
N'utilisez pas l'appareil à d'autres fins que celles pour lesquelles il a été conçu.
Le plateau croustillant doit être en place avant d'ajouter les aliments à frire à l'air.
Assurez-vous que le panier de friture est bien verrouillé à l'avant de la friteuse à air, pendant que la friteuse à air est en fonctionnement.
ATTENTION
: La friteuse à air ne fonctionnera que si le panier à friture est complètement fermé.
ATTENTION
: Après une friture à l'air chaud, il faut faire preuve d'une extrême prudence dans la manipulation du panier à friture
chaud, du plateau à croustiller et des aliments cuits.

18
DES GARANTIES SUPPLÉMENTAIRES IMPORTANTES
ATTENTION AUX SURFACES CHAUDES:
Cet appareil génère de la chaleur et de la vapeur pendant son utilisation. Des
précautions appropriées doivent être prises pour éviter les risques de brûlures, d'incendie ou d'autres blessures aux personnes ou
dommages aux biens.
ATTENTION:
Cet appareil est chaud pendant son fonctionnement et conserve la chaleur pendant un certain temps après avoir été
éteint. Utilisez toujours des gants de cuisine lorsque vous manipulez des matériaux chauds et laissez les pièces métalliques refroidir
avant de les nettoyer. Ne posez rien sur l'appareil pendant son fonctionnement ou lorsqu'il est chaud.
Avant d'utiliser ou de nettoyer cet appareil, tous les utilisateurs doivent lire et comprendre ce manuel d'instructions.
Le cordon d'alimentation de cet appareil doit être branché sur une prise électrique de 120V AC uniquement.
Si cet appareil commence à mal fonctionner pendant l'utilisation, tirez le tiroir du panier à friture hors du corps. Ensuite, retirez la fiche
de la prise murale. N'utilisez pas et ne tentez pas de réparer l'appareil défectueux.
Ne laissez pas cet appareil sans surveillance pendant l'utilisation.
N'immergez pas le cordon d'alimentation dans un liquide. Si le cordon d'alimentation
à cet appareil est endommagé, il doit être
remplacé en contactant le service consommateurs.
Pour éviter tout risque de choc électrique et d'étouffement, gardez le cordon d'alimentation hors de portée des enfants et des
nourrissons.
Placez la friteuse à air sur une surface de travail plane et résistante à la chaleur.
N'obstruez pas la sortie ou les entrées d'air à l'arrière et sur les côtés de la friteuse, avec des objets. Évitez que la vapeur ne s'échappe
de la friteuse.
sortie d'air pendant la friture à l'air libre.
Pendant le fonctionnement, maintenez l'appareil à une distance d'au moins 10 cm des murs ou d'autres objets.
To open frying basket drawer, always use the frying basket handle.
ATTENTION
: Après la friture à l'air, veillez à placer le tiroir du panier à friture sur une surface plane et résistante à la chaleur.
ATTENTION
: Un remplissage excessif du panier à frites peut endommager la friteuse et peut entraîner des blessures graves.
Ne déplacez jamais une friteuse à air chaud ou une friteuse à air contenant des aliments chauds. Laissez-les refroidir avant de les
déplacer.
Ne nettoyez pas avec des tampons à récurer en métal. Des morceaux peuvent se détacher du tampon et toucher des pièces
électriques, créant ainsi un risque de choc électrique.

19
NOTES SUR LA FICHE
Cet appareil possède une prise polarisée (une lame est plus large que l'autre). Pour réduire le risque de choc électrique, cette fiche ne
peut être insérée dans une prise polarisée que d'une seule manière. Si la fiche ne s'insère pas complètement dans la prise de courant,
inversez la fiche. Si elle ne s'adapte toujours pas, contactez un électricien qualifié.
Ne modifiez pas la fiche de quelque manière que ce soit.
NOTES SUR LE CORDON
A un cordon d'alimentation court (ou un cordon d'alimentation détachable) doit être prévu pour réduire le risque de s'emmêler dans un
cordon plus long ou de trébucher sur celui-ci.
Des cordons d'alimentation détachables ou des rallonges électriques plus longs sont disponibles et peuvent être utilisés si l'on fait
preuve de prudence dans leur utilisation.
Si un long cordon d'alimentation détachable ou une rallonge est utilisé:
1.
La puissance électrique indiquée du cordon ou de la rallonge doit être au moins aussi élevée que la puissance électrique de l'appareil
2. Si l'appareil est de type mis à la terre, la rallonge doit être une rallonge à 3 fils de type mis à la terre.
3. Le cordon le plus long doit être disposé de manière à ne pas passer sur le comptoir ou le plateau de table où il pourrait être tiré par
des enfants ou sur lequel on pourrait trébucher involontairement.
AVERTISSEMENT CONCERNANT LES PLASTIFIANTS
ATTENTION:
Pour éviter que les plastifiants ne migrent vers la finition du comptoir ou du plateau de table ou d'autres meubles,
placez des sous-verres ou des tapis NON-PLASTIQUES entre l'appareil et la finition du comptoir ou du plateau de table. Si vous ne le
faites pas, la finition risque de s'assombrir ; des taches permanentes peuvent apparaître.
ALIMENTATION ÉLECTRIQUE
Si le circuit électrique est surchargé par d'autres appareils, votre appareil peut ne pas fonctionner correctement. Il doit fonctionner sur
un circuit électrique distinct de celui des autres appareils.

This manual suits for next models
1
Table of contents
Languages:
Popular Fryer manuals by other brands

Pitco
Pitco 14T Installation and operation manual

HAEGER
HAEGER Family Series instruction manual

Frymaster
Frymaster LOV BIGL30 Series Installation, operation and maintenance manual

Kenwood
Kenwood DF380 instructions

Henny Penny
Henny Penny LOV LVE-200 Series quick start guide

Domo
Domo DO458FR Instruction booklet