UNAcare UNAwheel Mini Basic User manual

1
UNAwheel Mini
Basic & Active
User Manual
08/2019 | v0014
v0024
Español - 31
English - 3
Português - 61
Italiano - 91
Nederlands - 121
Česky - 151


3
English - 3
08/2019 v0014En
v0024En
User Manual
Preface
The UNAwheel Mini power add-on is a quality product oering versatile use in everyday
life. Its dening characteristics are:
•Compact design
•Compatible with almost all wheelchairs
•Powerful
•Classy
Before using the power add-on, please read this user manual thoroughly.
The design is subject to technical alterations without notice.

4
Compliance
The UNAwheel and corresponding o-board charger comply with the
applicable sections of standard EN 12184 for electric wheelchairs and meet
the currently applicable EC directive for medical devices, 93/42/EEC.
The UNAwheel is a Class I medical device.
The declaration of conformity was therefore created by UNAcare Pte. Ltd. with sole
responsibility.
In regard to the climate and splash-proof test, the UNAwheel Mini fullls the
requirements for indoor and outdoor use.
Copyright & Disclaimer
The information in this document is subject to change without prior notication.
All rights reserved. Nothing in this material may be simplied, modied or translated
without prior written permission from UNAcare, apart from insofar as permitted under
the Copyright Act. The only guarantees for UNAcare products and services are set out in
the warranty documents that are provided with the products and services concerned.
Nothing herein may be considered to be an additional warranty. UNAcare is not liable for
technical or other errors in or omissions from this material.
UNAcare and its sales partners accept no liability in the event of non-compliance with
national trac laws.
© 2019 UNAcare Pte. Ltd.

5
1 Introduction 6
1.1 Intended use 6
1.2 Warranty & Contact 6
1.3 Icons & Symbols used in this manual 7
1.4 Safety 7
1.5 Use 7
1.6 Storage & Transport 9
1.7 Charging 9
1.8 Maintenance 9
1.9 Cleaning 9
2 The UNAwheel 10
2.1 Description 10
2.2 Technical specications 11
3 Installation 12
3.1 Delivery contents 12
3.2 Requirements 12
3.3 Active adapter 13
3.4 Basic adapter 18
4 Attach & Detach the UNAwheel Mini 21
4.1 Active Adapter 21
4.2 Basic Adapter 23
5 Use the UNAwheel Mini 25
5.1 Controls & Display 25
5.2 Driving 26
5.3 Charging 26
5.4 Driver training 27
6 Maintenance 28
6.1 Inspection 28
6.2 Cleaning 28
7 Disposal 29
Content

6
1 Introduction
This user manual is intended for users and owners of the UNAwheel Mini. It contains all
the information necessary to safely and successfully use the UNAwheel Mini.
1.1 Intended use
The UNAwheel Mini is intended to be used as a wheelchair power add-on. It should be
connected to a wheelchair through either its Basic or Active adapter and used according
to the instructions in this manual. Using the UNAwheel Mini in any other way than
described in this manual can lead to injury or product damage.
1.2 Warranty & Contact
UNAcare provides two warranty periods upon purchase of the UNAwheel Mini:
•1 year or 1000 km (600 miles) for the UNAwheel’s battery, display and controller.
•2 years or 2000 km (1200 miles) for the UNAwheel’s motor, frame and adapters.
Product damage resulting from unintended use can void the warranty. For more
information about the warranty conditions or questions regarding this document, please
see our contact information:
Address UNAcare Pte. Ltd, 6 Eu Tong Sen Street, #09-09, Singapore,
zipcode 059817
Phone + (351) 308 - 800002
Website www.unacare.eu
Salesquestions [email protected]
CEO Nick Yudin, [email protected]
European
Commission
(EC) Authorized
Representative
CEpartner4U BV
Esdoornlaan 13, Maarn
3951 DB, Netherlands
+(31)343-444875
www.CEpartner4U.com

7
1.3 Icons & Symbols used in this manual
Risk of serious or deadly injury or severe product damage.
Risk of injury or product damage.
Useful information unrelated to safety.
1.4 Safety
Carefully read the following safety instructions before installing, using, transporting,
storing or maintaining the UNAwheel Mini and its adapters.
1.5 Use
•Before use, check all connections, battery level, brake function of the UNAwheel
and wheelchair parking brakes, display, and the central adapter. Never travel
when anything listed above is not working correctly.
•Make sure the brakes are working correctly before using the product on a slope.
•Risk of toppling! Your wheelchair with connected UNAwheel represents a three-
wheeled means of transport. When turning corners, crossing obstacles and
travelling perpendicular to slopes a three-wheel vehicle tends to tip over more
easily than a four-wheel vehicle. Adjust your driving behaviour and your speed
accordingly.
•Turn corners only at low speeds adapted to the driving conditions in order to
avoid toppling the wheelchair and UNAwheel.
•Become familiar with the product on level ground before using it on a slope. This
prevents potentially dangerous situations such as toppling and collision.
•Never go perpendicular to slopes, cross obstacles only in forward direction.
•Do not drive faster than 6 km/h (4 mph) on public roads.
•Do not use the product without assistance on slopes.
•Do not use product while going downhill or uphill if battery level is less than 50%.
•The product is splash-proof, but not waterproof. Do not use the product during
rain and avoid mud and puddles.
•In the (unlikely) event of the battery pack overheating or catching on re, you
must ensure that the battery pack does not come into contact with water or other
liquids. The only suitable extinguishing agent that is recommended by the battery
manufacturers is sand.
•The wheelchair user must decide in each case whether it is safe to travel the
intended trip based on factors such as driving experience and physical strength.
Particular importance in or near the following hazardous areas, the navigation of
which is left to the judgement and risk of the UNAwheel user:
–Quay walls, berths and marinas, paths and areas near water, bridges and dykes
without railings
–Narrow footpaths, gradients (e.g. ramps and driveways), narrow paths along
slopes, mountain paths

8
–Narrow and/or steep/inclined paths along main and side roads or near
precipices
–Paths covered with leaves, snow or ice
–Ramps and lifting equipment on vehicles.
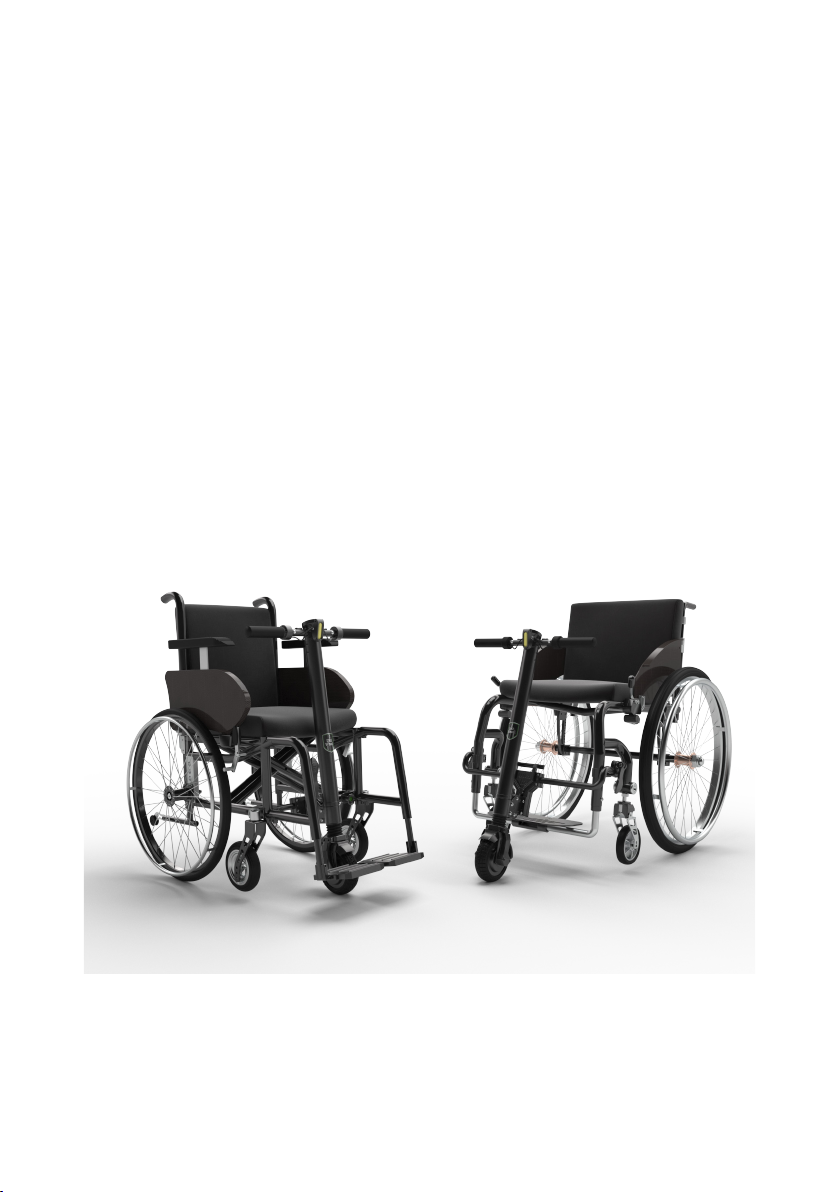
•The product’s maximum load is 100 kg or 220lbs (incl. a wheelchair).
•Do not use the product at temperatures colder than -5ºC (23°F) or warmer than
40ºC (104°F).
•The product’s driving characteristics can be inuenced by electromagnetic elds
as emitted by mobile phones or other radiating devices.
•If you have any metal constructions in your spinal cord use product cautiously.
•When the UNAwheel is switched on, never reach into the wheels of your
wheelchair
•Distance between user’s body and handlebar, when it’s in max turned position,
should be no less than 5 cm (2”).
•Distance between user’s legs and adapter, should be no less than 1 cm (1/2”).
•Do not use the product on slippery surfaces or on coarse ground such as gravel.
•Traverse obstacles (such as kerbs) in forwards travel only. The maximum
permitted obstacle height is 3 cm (1.5 inch). Travel slowly and carefully forwards
until the wheels of your UNAwheel come into contact with the obstacle and then
carefully travel over the obstacle. You may require the help of another person.
•Switch o the product and apply the brakes when on an elevator, lifting platform,
when attach and detach.
•You must not use the UNAwheel on escalators or moving walkways.
•Do not throw or drop the product.
•Never leave the UNAwheel unattended, even if it is switched o.
•Especially when device is not in use, do not expose your UNAwheel to strong
sunlight for long periods of time, if possible. This could cause the motor and
battery to heat up and in an extreme case, not be able to operate. Plastic parts
also age quicker under intense sunlight. In the event of overheating caused by
sunlight or excessive use: leave the UNAwheel until it has cooled down.
•If used intensively, the motor and the central tube can heat up. Do not touch
these parts (risk of burning). Leave the UNAwheel until it has cooled down. Heat
can also cause oil or grease to escape at various points.
•The UNAwheel is only intended for transporting persons with limited mobility
and must not be misused, for example by children playing with it or as a drive for
transporting mobile goods.
•The maximum speed allowed on public roads depends on local trac regulations.
•Speed above 6 km/h (3.7 mph) may only be driven on private property.
•The product can generate electromagnetic elds that might cause interference in
other devices. For this reason, switch o the product when it is not in use.
•If you hear unusual noises or notice unusual vibrations during travel, it is possible
that parts of the UNAwheel or wheelchair have become loose. It is also possible
that foreign matter has entered the device during travel. In these cases, contact
your specialist dealer.

9
1.6 Storage & Transport
•Always store and transport the product in its original case.
•Make sure the product’s handlebars are removed during transport.
•Store the product charged.
•The temperature during transport and storage must be between -10°C (14°F ) and
40°C (104°F).
•The product must be switched o during transport.
1.7 Charging
•Charge the product in a dry environment, at a temperature between 10ºC (50°F)
and 30ºC (86°F).
•Switch o the UNAwheel Mini during charging.
•Never let the battery fully discharge. Damage resulting from a completely
discharged battery voids the warranty.
•When the UNAwheel Mini is not used for a longer period of time, its battery must
be charged and discharged once in 6 months to maintain the batteries’ capacity.
•Avoid dust and dirt from aecting the function of the battery charger. To clean the
charger, use a dry piece of cloth.
•Place the charger on its rubber feet on level ground.
•The charger may only be opened by authorized personnel.
1.8 Maintenance
•Make sure the product is checked and serviced at least once a year by an
authorized dealer.
•Ensure all screws are rmly retightened after making any adjustments.
•Do not disassemble the product in ways other than described in this document.
•Be careful of your ngers while assembling or adjusting the product.
•Switch o the UNAwheel Mini before attaching or detaching it to an adapter.
1.9 Cleaning
•Never use a water hose or high-pressure cleaning apparatus to clean the product.
•Avoid direct contact of water with the product’s motor, battery and any
electronics.
•Do not use any scouring agents to clean the product.

10
2 The UNAwheel
2.1 Description
The UNAwheel Mini is a wheelchair power add-on that provides wheelchair users with
an easy-to-use power boost. It is designed for people who are unable to walk but who
are able to independently move in a wheelchair. Thanks to its quick and easy adjustment
possibilities for standard ttings and its modular design, the UNAwheel Mini can be used
by patients with a wide variety of walking impediments.
The UNAwheel Mini is the lightest power add-on on the market. Despite its portable size,
it is powerful enough to drive its users around both indoors and outdoors.
The UNAwheel Mini features two adapters, which allow it to be connected to both Basic
and Active wheelchair types (gure 1).
Figure 1: The UNAwheel Mini with its Basic adapter (left) and Active adapter (right).

11
2.2 Technical specications
Total weight 5.3 kg (11.7 lbs)
Motor Electric, 250W DC
Battery LG 153.6 Wh (air transportation compatible)
Suspension Dual; spring and soft solid tire
Braking type Electric
Public roads speed Max. 6 km/h (3.7 mph)
Private territory
speed
Max. 16 km/h (10 mph)
Climbing capability Max. inclination of 14%
Range* Max. 15 km (9.3 miles)
Weight of user Max. 100 kg (220 lbs), incl. a wheelchair
* Dependent on terrain, temperature, and user weight.

12
3 Installation
3.1 Delivery contents
The UNAwheel Mini is delivered in two packages:
•A travel case containing the UNAwheel Mini and its charger.
•A box containing all parts of the Active Adapter.
OR
•A box containing all parts of the Basic Adapter.
3.2 Requirements
To determine which of the two adapters is compatible with your wheelchair, see the
following requirements:
Active adapter Basic adapter
•The wheelchair should have a
rigid or foldable metal frame and
undetachable leg supports.
•The basic wheelchair should have
swing-away and detachable leg
supports.
•The wheelchair’s front tubes should
have a vertical straight part of 40 mm
(1-1/2”) at a height of 270 - 350 mm
(10-1/2 - 14 inch) above the ground.
•The wheelchair’s frame should have
a horizontal straight part of 50 mm
(2”) under its cushion (or up to 100
mm (4”) to the rear) at a height of 210
- 290 mm (8-1/4” - 11-3/8”) above the
ground.
•The width between the centers of
front tubes should be 300 - 355 mm
(11-7/8” - 14”) (up to 435 mm (17-1/8”)
with optional tubes).*
* If the width is less than 300 mm (11-
7/8”), the adapter’s tubes can be cut to
the desired width; min. 180 mm (7”).
•The width between the tubes should
be 415 - 458 mm (16-3/8” - 18”).*
* If the width is less than 415 mm (16-
3/8”), the adapter’s tubes can be cut to
the desired width; min. 180 mm (7”).
•The tubes should be round
(Ø35 (1-3/8”), 32 (1-1/4”), 30 (1-1/8”), 25
(1”) or 22 (7/8”) mm) or oval (Progeo
Ego, Quickie Helium).
•The tubes should be round
(Ø25 (1”) or 22 (7/8”) mm).
•Total weight with user should be less
than 100 kg (220 lbs).
•Total weight with user should be less
than 100 kg (220 lbs).

13
3.3 Active adapter
3.3.1 Contents
The Active Adapter consists of the following parts:
A Central adapter.
B Curved tubes (x2).
C Clamps for 22-30 mm (7/8” - 1-1/8”) frame (x2).
D Clamps for 32-35 mm (1-1/4” - 1-3/8”) and oval frame (x2).
E Spacers for 22 mm (7/8”) frame (x2).
F Spacers for 25 mm (1”) frame (x2).
G Spacers for 32 mm (1-1/4”) frame (x2).
H Spacers for Quickie Helium frame (x2).
I Spacers for Progeo Ego frame (x4).
J Optional XL curved tubes (x2).
The following tools are required to install the adapter:
•Ruler.
•2 mm Allen wrench.
•3 mm Allen wrench.
•4 mm Allen wrench.
1x 3
1x
1x
2
Tools
1x 4
C
B
A
G
F
DEH
I
J

14
3.3.2 Attach the clamps
1 Disassemble the clamps by unscrewing their front two bolts. Use a 4 mm Allen
wrench.
2 Place the two halves of the clamps around the front tubes of the wheelchair’s
frame. In case of 30 mm (1-1/8”) or 35mm (1-3/8”) tube diameter use one layer
of cloth insulating tape to protect wheelchair frame, for other sizes use rubber
spacers.
3 Lightly tighten the clamps by screwing on their two front bolts. You should still be
able to slide the clamp up and down the tube.
4
4

15
4 Place the clamps approx. 33 cm (13”) above the ground. Use a ruler.
5 Loosen the third bolt of the clamps. This allows you to take out and rotate the
clamps’ brackets.
6 Rotate the brackets to a position of approx. 15O relative to the oor. Make sure
brackets face strongly to the front.
7 Tighten the bolts.
3
15O

16
3.3.3 Assemble the central adapter
1 Loosen the 4 bolts on the top part of the central adapter. Use a 4 mm Allen wrench.
2 Loosen the 4 bolts on the bottom part of the central adapter. Use a 3 mm Allen
wrench.
3 Measure distance between centers of wheelchair tubes where clamps are
mounted. For 300 - 355 mm (11-3/4” - 14”) use standard curved tubes, for 355-435
mm (14” - 17-1/8”) use optional XL curved tubes.
4 Insert the long ends of the curved tubes approx. 5 cm into the central adapter.
5 Lightly tighten all 8 bolts of the central adapter.
4
3

17
3.3.4 Attach the central adapter
1 The following steps should be performed with the user seating in the wheelchair.
2 Insert the short ends of the central adapter’s tubes into the clamp’s brackets 1.
3 Adjust the width of the assembly if necessary 2.
4 Use the clamps’ handles to tighten the brackets and secure the central adapter in
place 3.
5 Position the hook of the central adapter 20.5 cm (8”) above the ground, at a
vertical angle of approx. 10º. Adjust the height by sliding the hook up or down in
the central adapter or by clamps up or down the frame.
20,5 cm
6 Tighten the two front bolts of each clamp. Use a 4 mm Allen wrench.
7 Tighten all 8 bolts of the central adapter.
8 Make sure adaper may be easily inserted and taken out of clamps by user himself.
3
2
1
10O
Adjust position
of stop rings and
tighten with 2 mm
Allen wrench

18
3.4 Basic adapter
3.4.1 Contents
The Basic Adapter consists of the following parts:
A Central adapter.
B Clamps (x2).
C Spacers for 22 mm (7/8”) frame (x2).
The following tools are required to install the adapter:
•Ruler
•3 mm Allen wrench.
•5 mm Allen wrench.
1x 5
1x 3
1x
Tools
B
A
C

19
3.4.2 Attach the clamps
1 Loosen the two bolts of the clamps. Use a 5 mm Allen wrench.
2 Place the clamps on the bottom tube on the side of the wheelchair’s frame.
Position it about 10 cm (4”) behind the front edge of the cushion. In case of 25mm
(1”) tube diameter use one layer of cloth insulating tape to protect wheelchair
frame, for 22 mm (7/8”) use rubber spacers.
3 Secure the clamps by tightening their two bolts.
5
5

20
3.4.3 Attach the central adapter
1 Insert the central adapter into the clamps 1. Insert the two pins to secure it 2.
2 Position the central adapter’s hook to be 27 cm (10-5/8”) above the ground, at a
vertical angle of approx. 5º. Use a ruler.
3 Tighten the bolts of the central adapter. Use a 3 and 5 mm Allen wrench.
27 cm 3
2
1
5
Other manuals for UNAwheel Mini Basic
1
This manual suits for next models
1
Table of contents
Languages:
Other UNAcare Wheelchair manuals
Popular Wheelchair manuals by other brands

Amiga
Amiga TravelMate Owner operational manual

Sunrise Medical
Sunrise Medical QUICKIE SOPUR Nitrum Directions for use

Innov
Innov Interlude 500 user manual

Bischoff & Bischoff
Bischoff & Bischoff S-VR instruction manual

Columbia Medical
Columbia Medical 5050 instructions

GILANI ENGINEERING
GILANI ENGINEERING JRWD1003 user manual