manuals.online logo
Brands
  1. Home
  2. •
  3. Brands
  4. •
  5. Unicol
  6. •
  7. Cables And Connectors
  8. •
  9. Unicol PSK User manual

Unicol PSK User manual

Popular Cables And Connectors manuals by other brands

StarTech.com ST124HD20 quick start guide

StarTech.com

StarTech.com ST124HD20 quick start guide

Philips SWV4543S/10 Features

Philips

Philips SWV4543S/10 Features

Larson Electronics 10-50C instruction manual

Larson Electronics

Larson Electronics 10-50C instruction manual

Grip MEK-PM Assembly and operating manual

Grip

Grip MEK-PM Assembly and operating manual

Ultra Products Travel Pack #3 ULT31436 Specifications

Ultra Products

Ultra Products Travel Pack #3 ULT31436 Specifications

Surpass QCH-F Operation manual

Surpass

Surpass QCH-F Operation manual

Philips SWA6310 Specifications

Philips

Philips SWA6310 Specifications

StarTech.com CRJ4550PK quick start guide

StarTech.com

StarTech.com CRJ4550PK quick start guide

Nohau EMUL-IP2K-PC user guide

Nohau

Nohau EMUL-IP2K-PC user guide

Foxun SX-SP144E-HD4K2K operating instructions

Foxun

Foxun SX-SP144E-HD4K2K operating instructions

Philips SWA3305W Specifications

Philips

Philips SWA3305W Specifications

opticis Stretch DVIM1-1P0x user manual

opticis

opticis Stretch DVIM1-1P0x user manual

Volkswagen VAS 6558A operating manual

Volkswagen

Volkswagen VAS 6558A operating manual

NEXIBO N-13 user manual

NEXIBO

NEXIBO N-13 user manual

CYP PU-1H3HBTL Operation manual

CYP

CYP PU-1H3HBTL Operation manual

Allen-Bradley 1784-u2dhp installation instructions

Allen-Bradley

Allen-Bradley 1784-u2dhp installation instructions

Global Caché Flex Link Blaster quick start

Global Caché

Global Caché Flex Link Blaster quick start

Hauppauge USB-Live2 Quick installation guide

Hauppauge

Hauppauge USB-Live2 Quick installation guide

manuals.online logo
manuals.online logoBrands
  • About & Mission
  • Contact us
  • Privacy Policy
  • Terms and Conditions

Copyright 2025 Manuals.Online. All Rights Reserved.

WARNING
Please carefully inspect the product before assembling. If you notice any apparent damage, call your
carrier claims agent and do not continue the installation until it has been reviewed. Please watch for
pinch points. Do not put your fingers between moveable parts. Do not tamper with or disassemble any
spring loaded parts. Before installing, make sure that the supporting surface will support five times the
combined load of the solution and the hardware. Never exceed the maximum load capacity. Please also
layout all components to ensure that you have all of the required parts before proceeding (see BOM list
on following page). Use of this product for anything other than its specified use may result in failure or
personal injury. This product is intended for indoor use only. We recommend using a qualified trades
person for installation. Use an assistant or lifting equipment to lift and position products.
For support, please call: +44 (0)1865 767676 or email: [email protected]
Revised 11/12/20
01865 767676
[email protected]
www.unicol.com
*Please check model specific details before installing*
PSK
Screen Size: N/A Guide Max. Weight: N/A
01865 767676
[email protected]
www.unicol.com
2Revised 11/12/20
COMPONENTS
INSTALLERS REQUIRED
1
# DESCRIPTION QTY
1Securing Ferrules 3
2Brackets 2
3Keys 2
4Barrel Lock 1
5Tetherloc Cable with 1x Securing Ferrule
and 1x Retaining Washer 1
#TOOLS REQUIRED
1 n/a
1
2
3
4
5
01865 767676
[email protected]
www.unicol.com
3
Revised 11/12/20
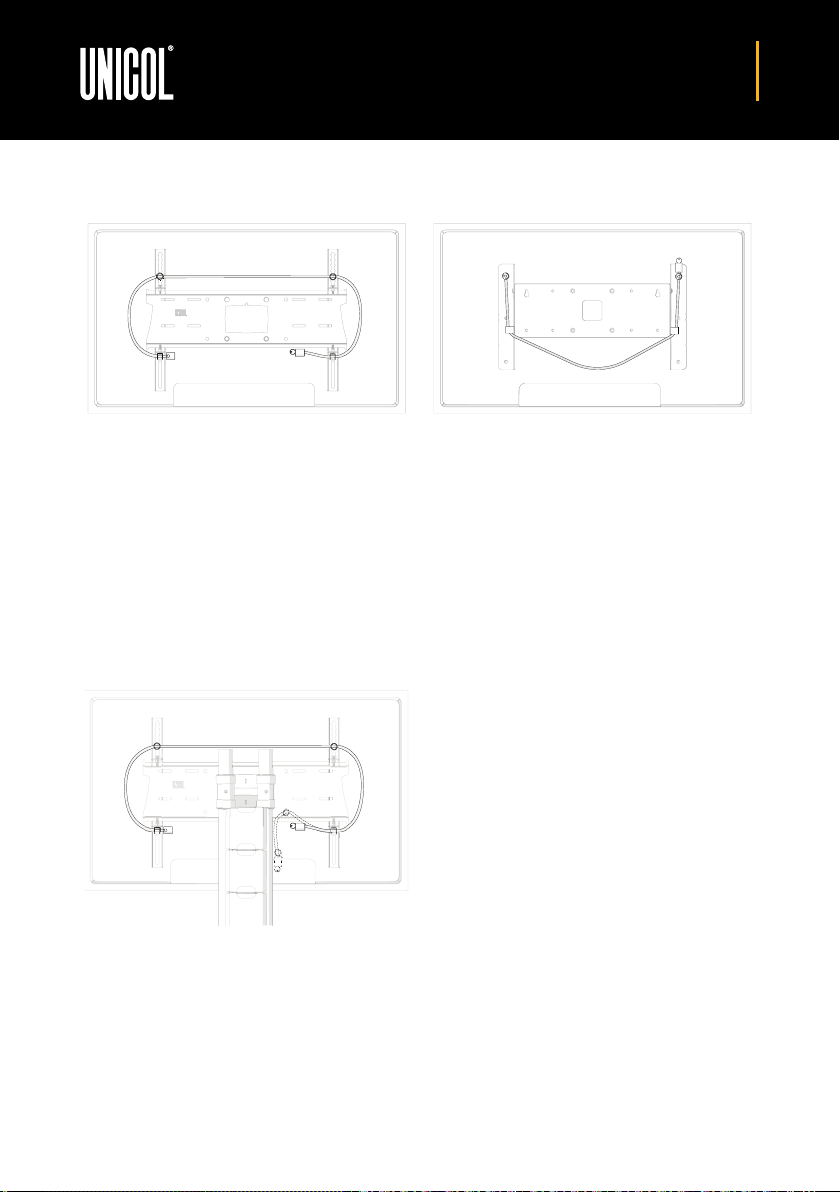
UNIVERSAL MOUNT FIXING (PZX/PZW)
Place the top two fixing screws (a) that hold the
mount to the screen through the two ferrules (1)
and tighten. Place the mount arm securing screws
(b) through the brackets (2) and tighten.
Thread the cable (5) through the ferrules and
brackets. Snap the end of the cable into the barrel
lock (c) to complete the installation.
DEDICATED MOUNT FIXING (PLX/PLW)
Place the top two fixing screws (a) that hold the
mount to the screen through the two ferrules (1)
and tighten. Place one of the fixings that connects
the mount arm and wall plate together (b) at either
end into the two remaining ferrules (1) and tighten.
Thread the cable (5) through the ferrules and
brackets. Snap the end of the cable into the barrel
lock (c) to complete the installation.
STAND / TROLLEY FIXING
Follow the above instructions depending on which
mount you are fitting too.
To secure the solution to the wall, use one of the
ferrules to hide the screw head of one of the stand/
trolley mount fixing points (d). Use the remaining
ferrule (e) to attach to the wall (fixing screw not
included).
aa
aa
b
b
b
b
c
c
a a
b b
c
d
e