Uniden VP300 User manual

1
VP300
For more exciting new products please visit our website:
Australia: www.uniden.com.au
New Zealand: www.uniden.co.nz
Conference Phone System
Installation and PSTN (Analogue) Line Setup

2
IMPORTANT SAFETY INSTRUCTIONS
When using your telephone equipment, basic safety precautions should always be
followed to reduce the risk of fire, electric shock and injury to persons, including
the following:
• This unit is NOT waterproof! DO NOT expose this unit to moisture.
• DO NOT expose this unit to rain.
• Do not use this product near water, for example, near a bath tub, wash bowl,
kitchen sink or laundry tub, in a wet basement or near a swimming pool.
• Avoid using a telephone (other than a cordless type) during an electrical storm.
There may be a remote risk of electric shock from lightning.
• Do not use the telephone to report a gas leak in the vicinity of the leak.
• Use only the power cord indicated in this manual.
SAVE THESE INSTRUCTIONS!
Important Notice:
• Under power failure conditions this appliance may not operate. Please ensure
that a separate telephone, not dependent on local power, is available for
emergency use.
General Notices for New Zealand Model:
• The grant of a NZ Telepermit for any item of terminal equipment indicates only
that Telecom has accepted that the item complies with minimum conditions
for connection to its network. It indicates no endorsement of the product by
Telecom, nor does it provide any sort of warranty. Above all, it provides no
assurance that any item will work correctly in all respects with another item of
Telepermitted equipment of a different make or model, nor does it imply that
any product is compatible with all of Telecom’s network services.
• For telephone networks other than Telecom there may be a charge incurred for
local calls if the Insert 0 feature is on. Turn Insert 0 off.
• This equipment may not provide for the effective hand-over of a call to another
device connected to the same line.

3
CONTENTS
WHAT’S IN THE BOX? ......................................................................................... 4
INSTALLING YOUR PHONE ............................................................................... 5
GETTING TO KNOW YOUR PHONE ....................................................................7
Parts of the Phone .........................................................................................................................7
Keypad ..............................................................................................................................................8
USING YOUR PHONE ..........................................................................................9
USING THE MENU .............................................................................................11
Phonebook ....................................................................................................................................12
Call History .....................................................................................................................................13
Phone Setting ...............................................................................................................................14
PSTN Flash ..................................................................................................................................... 17
ONEYEAR LIMITED WARRANTY .....................................................................18

4
WHAT’S IN THE BOX?
• If any items are missing or damaged, contact your place of purchase
immediately. Never use damaged products!
• Need help? Get answers at our website:
www.uniden.com.au for Australian model
www.uniden.co.nz for New Zealand model.
Extra Microphone (up to 2)
AC Adaptor/Interface Module
RJ 45 Cable X 2
VP300 Conference Phone System
OPTIONAL ACCESSORIES
RJ 11 Cable
(Telephone Line Cord)

5
INSTALLING YOUR PHONE
For best performance of the VP300, avoid the following locations when
selecting an installation location:
• Areas with high background noise. The microphone(s) might pick up these
sounds and prevent the speakerphone from going into receiving mode when
you finish talking.
• Surfaces affected by vibration.
• Recessed areas such as in a corner, under a cupboard, or next to a cabinet.
These locations may cause an echo effect.
NOTE:
• The VP300 is properly installed for PSTN (land line) use if you press and hear
a dial tone - the display will show ‘PSTN Dialing’. Otherwise, recheck all the
installation steps.
• In the event of a power outage, the VP300 will not be able to make and receive
calls.
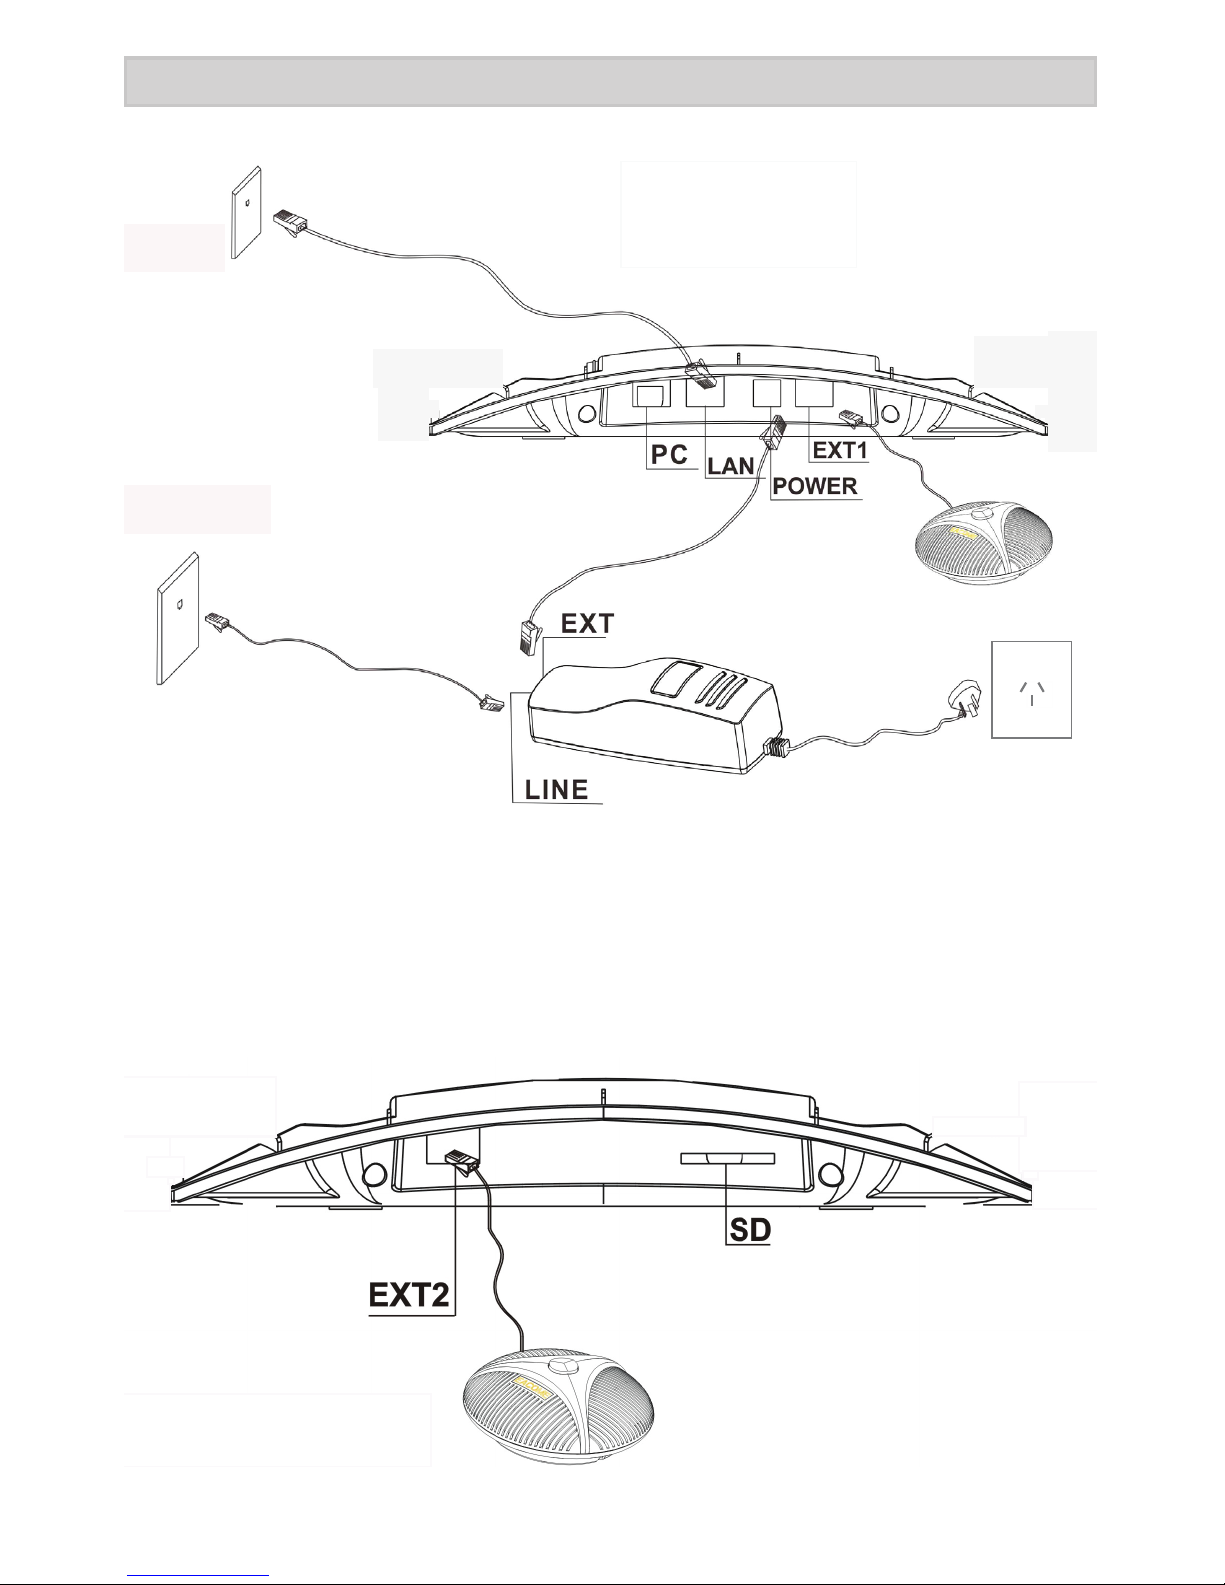
1. Plug one end of an RJ45 (Ethernet) cable into the EXT jack of the AC adaptor/
Interface module. Plug the other end into the POWER jack on the port bay of
the VP300.
See (1) on the connection diagram, page 6.
2. Plug the Telephone Line cord into the LINE jack on the AC adaptor/ Interface
module. Plug the other end into a telephone wall jack.
See (2) on the connection diagram.
3. Plug the AC adaptor/Interface power cord into a standard 240V AC power
outlet. The VP300 display will show ‘SYSTEM BOOTING...’ and then the standby
display. See (3) on the connection diagram.
4. For VoIP calls, and PC Web-Brower control of VP300 settings: Plug one end of
the second RJ45 (Ethernet) cable into the LAN jack of the VP300. Plug the other
end to an Ethernet jack for network/internet access.
See (4) on the connection diagram.
5. Plug the optional extra microphones into the EXT1 and EXT2 jacks of the
VP300.See (5) & (6) on the connection diagram.
CAUTION:
To reduce risk of personal injury, fire, or damage, use only the power adaptor
supplied with this product.

6
INSTALLING YOUR PHONE
1
2
3
4
5
Ethernet jack
Wall phone jack
6
Connection Diagram
1. RJ45 Cable
2. Telephone Line Cord
3. Power Cord
4. RJ45 Cable
5. Extra Microphone 1 (Optional)
6. Extra Microphone 2 (Optional)

7
GETTING TO KNOW YOUR PHONE
Parts of the Phone
1
4
2
3
1. LCD
2. Microphone
3. Keypad
4. Speaker

8
Keypad
Menu
Navigation
Keys
OK
Volume
Conference
VoIP
Selection/Soft
Keys
SIP Keys
Mute
Hold
Redial
On/Off
LCD
Dial Keypad
Keys What it does
Navigation Keys - Helps you navigate through various
options.
OK - Select a particular setting.
VOLUME - Helps you decrease/increase the speaker/ringer
volume.
MUTE - Mute the microphone.
REDIAL - Dial the last dialed number.
HOLD - Places the call on hold.
CONFERENCE - Hold a 3-way conference; two more participants
can join the call.
VoIP - Use this button to make a VoIP call.
Selection/Soft Keys - Helps you select the options that are
displayed on the LCD.
MENU - Displays all the available settings and options.
ON/OFF - Use this button to make a PSTN call.
Use this button to answer or end PSTN & VoIP calls.
SIP Keys - For VoIP function (see VoIP manual)

9
USING YOUR PHONE
Dial a Call
PSTN Line
VoIP Line
To make a call through the PSTN line:
Press and dial the phone number.
To make a call through the VoIP line:
1. Press and dial the phone number.
Answer a Call
You can make a call either through VoIP or PSTN line.
#Receive Another Call
Mute a Call
By muting a call, you can hear the other party but they cannot hear you.
To answer an incoming PSTN call, press .
The LCD displays ‘PSTN in use’.
When you are on call, and another call comes
in you will hear a call waiting tone.
To mute/unmute a call, press . The LCD displays the letter ‘M’.
Hold a Call
When you place a call on hold, both the parties involved in the call cannot hear
each other.
To place a call on hold, press . The LCD displays ‘HOLD’.
Press again to resume the call.
The LCD displays ‘PSTN Dialing’.
The LCD displays ‘IP Dialing’.
Flashing red LEDs indicate an incoming call.
Red LEDs indicate that a call is muted.
Flashing blue LEDs indicate that a call is put on hold.
End a Call
To end a call, press .
To setup the VP300 for VoIP calls, you will need to use PC and web browser, refer to the
VP300 VoIP Owner’s Manual on the Uniden website. (Australia: www.uniden.com.au,
New Zealand: www.uniden.co.nz)
Redial a Call
Press to dial out the last dialed number.

10
Conference Call
To activate a three-way conference call, follow the steps below:
1. Press , the LCD will display ‘IP Dialing’, dial a phone number.
2. Wait for the call to be answered, then press . The LCD will display, ‘PSTN
Dialing’, dial a phone number.
3. After the call is answered, press to enter a 3-way conference mode.
Record a Conversation
#This feature requires and options SD card.
◊ Press the MORE soft key to show the REC soft
key option. Press the REC soft key to record a
conversation.
◊ Press the STOP soft key to stop recording.
◊ Press the PAUSE soft key to pause recording and
press REC to continue recording.
◊ Press the NEXT or PREV soft key to play the
recording.
Call Waiting
You can record a conversation using the VP300
phone conference system.
For Australia:
Press FLASH soft key and then press 2 to accept the
waiting call. The first caller is put on hold, and you will
hear the new caller after a short pause. To return to the
original caller, press FLASH soft key and then 2 again.
For details on the Flash time settings, please refer to page 17.
For New Zealand:
Press FLASH soft key to accept the waiting call. The first caller is put on hold, and
you will hear the new caller after a short pause. To return to the original caller,
press FLASH soft key again.
REC PAUSE MORE
STOP
PREV MORE
STOP NEXT
Call Waiting, a service available from your telephone provider, lets you receive calls
while you are on another call. If you get a call when you are on another call, the
phone can sound a tone to notify you of the waiting call.
MENU FLASH DND MORE
#To make a conference call, you need to ensure that you are connected to VoIP
and PSTN line.
To setup the VP300 for VoIP calls, you will need to use PC and web browser, refer to the
VP300 VoIP Owner’s Manual on the Uniden website.
The selection/soft keys enable you to select the options displayed on the LCD. Press the
MORE soft key to see the additional soft keys.
Selection/Soft Keys

11
USING THE MENU
Authentication
VoIP settings
Use the (menu button), (navigation keys) and OK button to navigate
through various Menu Settings.
The VP300 feature settings can be accessed manually using the keypad and menu
keys. If the network or internet connection is available, then the menu settings can
be easily accessed and changed via a PC web-browser. Refer to the VP300 VoIP
Owner’s Manual on the Uniden website.

12
Phonebook
The Phonebook can store upto 140
entries. If you call a person whose
name is stored in the Phonebook, that
person’s name will be displayed, if not
the phone number will be displayed.
Phonebook 1. Search
2. Add Entry
3. Speed Dial
4. Erase All
• To access Phonebook, either press the Menu soft key or . The cursor, by
default, will be pointing to the option Phonebook. Press OK.
• The LCD will display the options under the setting Phonebook.
• Use the relevant up/down key on the navigation panel to select the desired
option and press OK.
Search For an Entry
1. Access Phonebook, and the cursor, by default, will be pointing to the option
‘Search’. Press OK. The LCD display will show ‘Search:’.
2. Enter the relevant letter, with which you want to begin the search. Press OK.
The entries which begin with that particular letter will be displayed.
Add an Entry
1. Access Phonebook, and then select the option ‘Add Entry’ by using the relevant
up/down key on the navigation panel. Press OK.
◊ The LCD display will show ‘Name:’.
2. Enter the relevant data and press OK.
◊ The LCD will display ‘Number:’
3. Enter the relevant data and press OK.
◊ The LCD will display ‘Saved Successfully’.
#If you key in the wrong number, press the < key on the navigation panel to
delete.
Erase All
1. Access Phonebook, and then select the option ‘Erase All’ by using the relevant
up/down key on the navigation panel. Press OK.
◊ The LCD will display 2 options, Yes or No.
2. Use the relevant up/down arrow on the navigation panel to select the desired
option. Press OK.
Speed Dial
This setting is not available for VP300.
#You can also access the options under the setting Phonebook, by pressing the
PHBK soft key.

13
Call History
• To access the Call History setting, either press the Menu soft key or , and use
the relevant up/down keys on the navigation panel to select Call History. Press
OK.
• The LCD will display the options under the setting Call History.
• Use the relevant up/down arrows on the navigation panel to select the desired
option and press OK.
Incoming Calls
Select the ‘Incoming Calls’ option to get a display of the incoming call list. If there is
no record, the LCD displays ‘List is empty’.
1. If a number is displayed, press OK to get the options, 1. Save 2. Erase, on the LCD.
2. To save the displayed number, select the option Save by using the relevant up/
down key on the navigation panel and press OK.
◊ The LCD will display ‘Name:’. Key in the name and press OK.
◊ The LCD will display the incoming number - ‘Number:xxxxxxx’ Press OK.
◊ The LCD will display ‘Saved Successfully’.
3. To delete the number displayed, select the option Erase and press OK.
Dialed Numbers
Select the ‘Dialed Numbers’ option to get a display of the dialed number list. If there
is no record, the LCD displays ‘List is empty’.
1. If a number is displayed, press OK to get the options, 1. Save 2. Erase, on the LCD.
2. To save the displayed number, select the option Save by using the relevant up/
down key on the navigation panel and press OK.
◊ The LCD will display ‘Name:’. Key in the name and press OK.
◊ The LCD will display the dialed number - ‘Number:xxxxxxx’ Press OK.
◊ The LCD will display ‘Saved Successfully’.
3. To delete the number displayed, select the option Erase. Press OK.
Erase Record
Select the ‘Erase Record’ option and then select :
• All’, to delete all records
• ‘Incoming’, to delete the incoming call list
• ‘Dialed’, to delete the dialed list.
Call History 1. Incoming Calls
2. Dialed Numbers
3. Erase Record 1. All
2. Incoming
3. Dialed
#If you erase all the entries, the LCD will display ‘Phonebook Empty’.

14
Phone Setting
Phone Setting 1. Call Forward
2. Do not Disturb
3. Alarm Setting
4. Date/Time Setting
5. Volume & Gain
6. Ringer
7. Auto Dial
• To access Phone Setting, press the Menu soft key or , then use the relevant
up/down arrow keys on the navigation panel and select Phone Setting. Press OK.
• The LCD display will display the options under Phone Setting.
• Use the relevant up/down arrows on the navigation panel to select the desired
option. Press OK.
Call Forward
To forward a call, access Phone Setting and the cursor, by default, will be on the Call
Forward option. Press OK.
You can opt to foward all calls or calls when there is no answer.
Call Forward 1. All Forward
2. Busy Forward
3. No Answer Forward
4. Ring Timeout
All Forward
1. Access the Call forward option, then use the relevant up/down key to select the
option All Forward. Press OK.
◊ The LCD will display two preferences, 1. Activation 2. Number.
2. Select Activation and press OK. The options, 1. Enable and 2. Disable are displayed
on the screen.
3. Select Enable and press OK.
4. Then press Menu soft key to go back to the previous screen and select the
option Number and press OK.
5. Enter the relevant number to which the calls are to be forwarded to. Press OK.
#The LCD displays “#AF xxxxxx#’ (Forwarded No).
#To forward a call, you need to ensure that you are connected to VoIP and PSTN
line.
To setup the VP300 for VoIP calls, you will need to use PC and web browser, refer to the
VP300 VoIP Owner’s Manual on the Uniden website.

15
Busy Forward
This setting is not available for PSTN.
No Answer Forward
1. Access the Call forward option, then use the relevant up/down key to select the
option No Answer Forward. Press OK.
◊ The LCD will display two preferences, 1. Activation, 2. Number.
2. Select Activation and press OK. The options, 1. Enable, 2. Disable are displayed on
the screen.
3. Select Enable and press OK.
4. Then press Menu soft key to go back to the previous screen and select the
option Number and press OK.
5. Enter the relevant number to which the calls are to be forwarded to. Press OK.
#The LCD displays “#NF xxxxxx#’.
Ring Timeout
1. Access the Call forward option, then use the relevant up/down key to select the
option Ring Timeout. Press OK.
2. The LCD displays Ring: (2-8) Enter a number between 2 and 8 and press OK to
confirm.
#If you have entered 4, then after the 4th ring, all the calls/calls when there is no
answer will be forwarded to the saved number.
Do not Disturb
This setting is available only for VoIP. To setup the VP300 for VoIP calls, you will need
to use PC and web browser, refer to the VP300 VoIP Owner’s Manual on the Uniden
website.
Alarm Setting
You can set an alarm on your conference phone.
1. To activate the Alarm, access the Phone Setting and use the up/down keys on
the navigation panel to select the option Alarm Setting. Press OK.
◊ The LCD will display two preferences, 1. Activation, 2. Number.
2. Select Activation and press OK. The options, 1. Enable, 2. Disable are displayed on
the screen.
3. Select Enable and press OK.
4. Then select Alarm Time, the LCD will display ‘Alarm Time:’
5. Enter the desired time.
#Please ensure that you have enable the Date & Time setting, for the Alarm
setting to work.

16
Date & Time Setting
1. Access Phone Setting and use the up/down keys on the navigation panel to
select the option, Date & Time setting and press OK.
The LCD will display two options, 1. Date & Time 2. SNTP setting.
2. Select Date & Time and press OK.
3. The LCD will display - Date & Time: xxxx-xx-xx xx:xx
4. Enter the year, month and day followed by the time in the 24hour format and
press OK.
◊ The LCD will display the Date & Time.
Once you set the date and time, this will display on the LCD.
#To set the date and time, ensure that the SNTP setting is disabled first.
1. To disable the SNTP setting, access the Phone Setting and use the up/down keys
on the navigation panel to select the option, Date & Time setting. Press OK.
The LCD will display two options, 1. Date & Time 2. SNTP setting.
2. Select SNTP setting and press OK.
3. The LCD will display few options, select the first option 1. SNTP and press OK.
4. The LCD will display 1. Enable 2. Disable. Select the option, Disable and press OK.
Volume & Gain
1. To increase or decrease the volume/gain, access Phone Setting and use the
up/down keys on the navigation panel to select the option Volume & Gain. Press
OK.
2. The LCD will display the options, Speaker Volume and Speaker Gain.
3. Navigate to the desired option, by using the relevant up/down key on the
navigation panel and then press OK.
4. For example, if you have selected Speaker Volume, the LCD will display Speaker
Volume: x (14= Max).
5. Use the up/down key on the navigation panel to select the desired level of
volume and press OK.
The Volume & Gain option, allows you to increase or decrease the speaker volume
and gain.
Adjust Volumes
Speaker Volume: When the phone is in use, press , or on the
navigation keys, to increase or decrease the speaker volume. The
LCD displays the volume level when it is adjusted. The volume
level ranges from 0 (minimum) to 14 (maximum).
Volume & Gain 1. Speaker Volume
2. Speaker Gain

17
Ringer
1. You can change the ringer volume by accessing the Phone Setting and selecting
the option Ringer. To do so, use the up/down keys on the navigation panel and
then press OK.
2. The LCD displays two options, 1. Ringer Volume 2. Ringer Type
3. Select Ringer Volume, and press OK.
4. Use the up/down keys on the navigation panel to increase/decrease the volume
of the ringer and press OK.
Ringer Type - This option is not available for PSTN.
Auto Dial
This setting is available only for VoIP. To setup the VP300 for VoIP calls, you will need
to use PC and web browser, refer to the VP300 VoIP Owner’s Manual on the Uniden
website.
PSTN Flash
1. To access PSTN Flash Setting, either press the Menu soft key or . Then use the
relevant up/down arrow keys on the navigation panel and select PSTN Flash.
Press OK.
2. The LCD will display PSTN Flash Setting. Press OK.
The options 1. Flash Item 2. Flash Input will display on the screen.
3. Use the relevant up/down key on the navigation panel to select the option 1.
Flash Item. Press OK. The LCD will display the various Flash Time options.
4. For New Zealand, using the relevant up/down key on the navigation panel,
select Flash Time: 600.
5. For Australia, using the relevant up/down key on the navigation panel, select
Flash Time: 100.
#By default, Flash time is set to 100.
#The maximum volume setting is 10.

18
ONEYEAR LIMITED WARRANTY
Warrantor
The warrantor is either Uniden Australia Pty Limited ABN 58 001 865 498 (“Uniden
Aust”) or Uniden New Zealand Limited (“Uniden NZ”) as the case may be.
Terms of Warranty
Uniden Aust/NZ warrants to the original retail purchaser only that the VP300(“the
Product”), will be free from defects in materials and craftsmanship for the duration
of the warranty period, subject to the limitations and exclusions set out below.
Warranty Period
This warranty to the original retail purchaser is only valid in the original country of
purchase for a Product first purchased either in Australia or New Zealand and will
expire one (1) year from the date of the original retail sale.
If a warranty claim is made, this warranty will not apply if the Product is found by
Uniden to be:
(A) Damaged or not maintained in a reasonable manner or as recommended in the
relevant Uniden Owner’s Manual;
(B) Modified, altered or used as part of any conversion kits, subassemblies or any
configurations not sold by Uniden Aust or Uniden NZ;
(C) Improperly installed contrary to instructions contained in the relevant Owner’s
Manual
(D) Repaired by someone other than an authorized Uniden Repair Agent in relation
to a defect or malfunction covered by this warranty; or
(E) Used in conjunction with any equipment, parts or a system not manufactured by
Uniden.
Parts Covered
This warranty covers the Product and included accessories.
User-generated Data
This warranty does not cover any claimed loss of or damage to user-generated data
(including but without limitation phone numbers, addresses and images) that may
be stored on your Product.
VP300
IMPORTANT Satisfactory evidence of the original purchase is required for
warranty service
Please refer to our Uniden website for any details or warranty durations offered in
addition to those contained below.

19
Statement of Remedy
If the Product is found not to conform to this warranty as stated above, the Warrantor,
at its discretion, will either repair the defect or replace the Product without any
charge for parts or service. This warranty does not include any reimbursement or
payment of any consequential damages claimed to arise from a Product’s failure to
comply with the warranty.
Our goods come with guarantees that cannot be excluded under the Australian
Consumer Law. You are entitled to a replacement or refund for a major failure and
for compensation for any other reasonably foreseeable loss or damage. You are also
entitled to have the goods repaired or replaced if the goods fail to be of acceptable
quality and the failure does not amount to a major failure.
This warranty is in addition to and sits alongside your rights under either the
COMPETITION AND CONSUMER ACT 2010 (Australia) or the CONSUMER GUARANTEES
ACT (New Zealand) as the case may be, none of which can be excluded.
Procedure for Obtaining Warranty Service
Depending on the country in which the Product was first purchased, if you believe
that your Product does not conform with this warranty, you should deliver the
Product, together with satisfactory evidence of your original purchase (such as
a legible copy of the sales docket) to Uniden at the addresses shown below. You
should contact Uniden regarding any compensation that may be payable for your
expenses incurred in making a warranty claim. Prior to delivery, we recommend that
you make a backup copy of any phone numbers, images or other data stored on
your Product, in case it is lost or damaged during warranty service.
UNIDEN AUSTRALIA PTY LTD
Service Division
345 Princes Highway,
Rockdale, NSW 2216
Phone number: 1300 366 895
Email address: custservice@uniden.com.au
UNIDEN NEW ZEALAND LTD
Service Division
150 Harris Road, East Tamaki
Auckland 2013
Phone number: (09) 273 8377
Email address: service@uniden.co.nz

20
©2012 Uniden Australia Pty Ltd/Uniden New Zealand Limited
Printed in PRC
Table of contents
Other Uniden Conference Phone manuals
Popular Conference Phone manuals by other brands

Polycom
Polycom SoundStation VTX 1000 Application note

Snom
Snom C520 WiMi Administrator and provisioning manual

BT
BT Poly Trio 8300 user guide

Polycom
Polycom SoundStation IP 5000 quick start guide

Poly
Poly IP 6000 Quick start user guide

Polycom
Polycom VoiceStation 100 Installation instructions and user guide