Uniden UH-040XR User manual

UH-040XR
Operating
Guide

➤Do not operate the transmitter of any radio equipment unless all the Radio
Frequency (RF) connectors are secured and any open connectors are
properly terminated.
➤Do not operate the transmitter of any radio equipment near electrical
blasting caps or in an explosive atmosphere.
➤Do not let children operate any transmitter-equipped radio equipment unless
supervised.
➤Have your radio equipment serviced by a qualified Uniden technician.
➤Do not operate the transmitter of any radio equipment with the antenna
touching or close to the eyes, face, or exposed body parts.
The exclamation point within an equilateral triangle is
intended to alert the user to the presence of important
operating and maintenance (servicing) instructions in the
literature accompanying the appliance.
WARNING!

Introduction
Features . . . . . . . . . . . . . . . . . . . . . . . . . . . . . . . . . . . . . . . . . . . 1
Technical Support & Service . . . . . . . . . . . . . . . . . . . . . . . . . . . . 2
Included in your UH-040XR Package . . . . . . . . . . . . . . . . . . . . . . 3
Getting Started
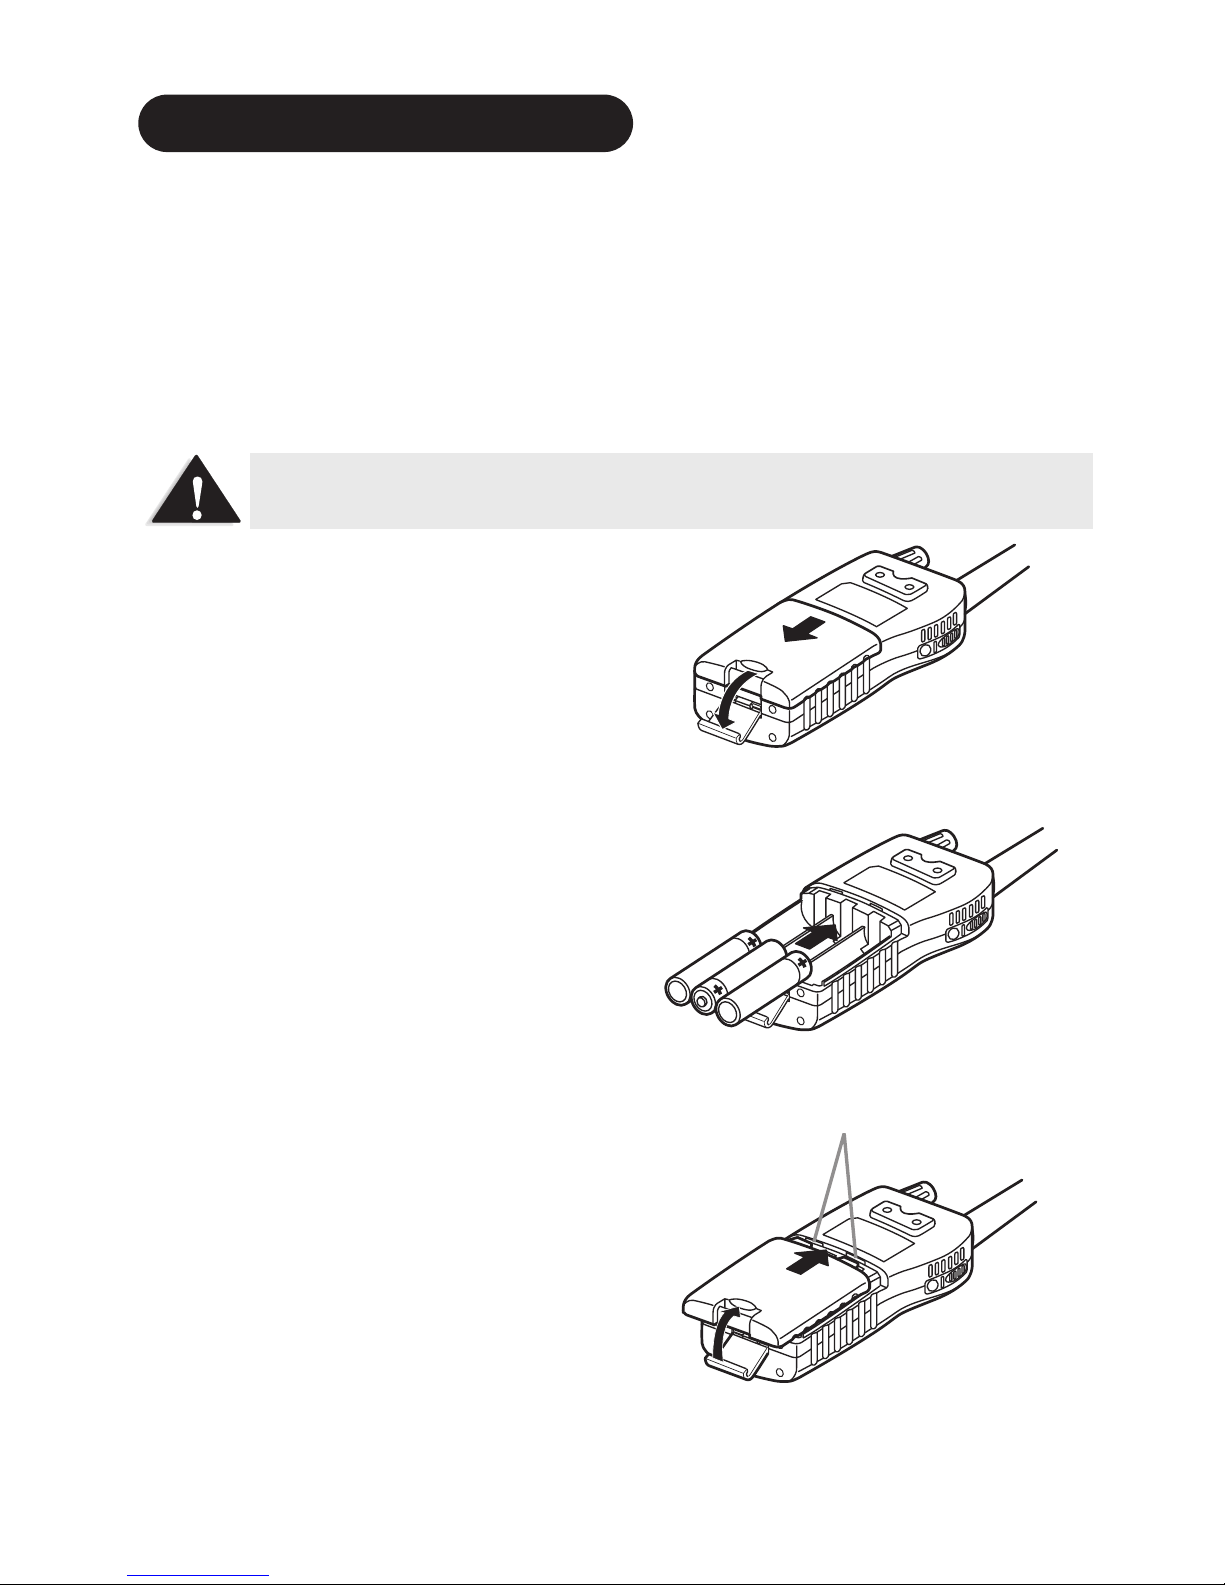
Battery Installation. . . . . . . . . . . . . . . . . . . . . . . . . . . . . . . . . . . . 4
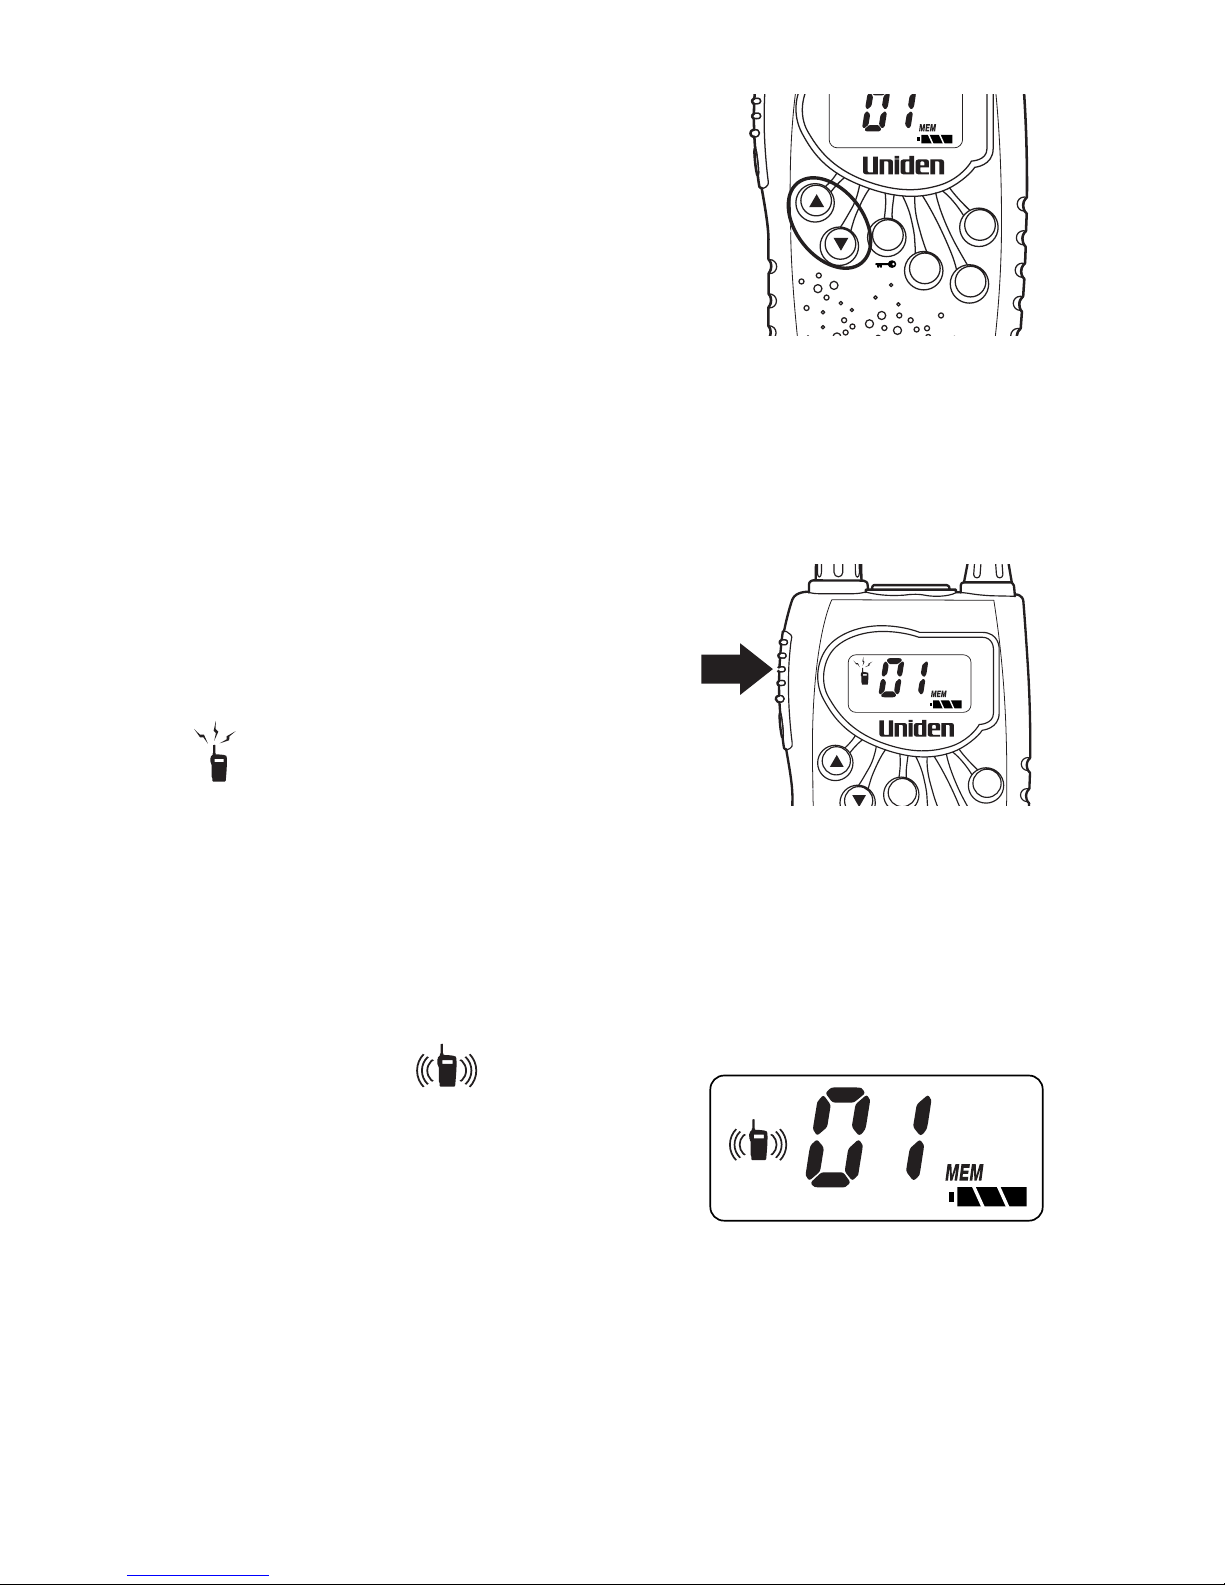
Low Battery Alert . . . . . . . . . . . . . . . . . . . . . . . . . . . . . . . . . . . . . 5
Belt Clip . . . . . . . . . . . . . . . . . . . . . . . . . . . . . . . . . . . . . . . . . . . 5
Operation
Power on/off . . . . . . . . . . . . . . . . . . . . . . . . . . . . . . . . . . . . . . . . 6
Volume . . . . . . . . . . . . . . . . . . . . . . . . . . . . . . . . . . . . . . . . . . . . 6
Selecting Channel . . . . . . . . . . . . . . . . . . . . . . . . . . . . . . . . . . . . 7
To Transmit and Receive . . . . . . . . . . . . . . . . . . . . . . . . . . . . . . . 7
To Operate in Duplex Mode . . . . . . . . . . . . . . . . . . . . . . . . . . . . . 8
Scanning . . . . . . . . . . . . . . . . . . . . . . . . . . . . . . . . . . . . . . . . . . . 8
Open Scan. . . . . . . . . . . . . . . . . . . . . . . . . . . . . . . . . . . . . . . . . . 8
Group Scan . . . . . . . . . . . . . . . . . . . . . . . . . . . . . . . . . . . . . . . . . 9
Programming Scan Channels . . . . . . . . . . . . . . . . . . . . . . . . . . . 10
Drop-Out Delay . . . . . . . . . . . . . . . . . . . . . . . . . . . . . . . . . . . . . 11
Keypad Confirmation Tone/Keypad Tone . . . . . . . . . . . . . . . . . . . 11
Power Save . . . . . . . . . . . . . . . . . . . . . . . . . . . . . . . . . . . . . . . . 11
Backlight. . . . . . . . . . . . . . . . . . . . . . . . . . . . . . . . . . . . . . . . . . 12
Keypad Lock . . . . . . . . . . . . . . . . . . . . . . . . . . . . . . . . . . . . . . . 12
Monitor. . . . . . . . . . . . . . . . . . . . . . . . . . . . . . . . . . . . . . . . . . . 12
Battery Level Display . . . . . . . . . . . . . . . . . . . . . . . . . . . . . . . . . 13
Charging Batteriesº . . . . . . . . . . . . . . . . . . . . . . . . . . . . . . . . . . 14
UHF Channels and Frequencies . . . . . . . . . . . . . . . . . . . . . . . . . 15
Optional Accessories . . . . . . . . . . . . . . . . . . . . . . . . . . . . . . . . . . 16
Technical Specifications. . . . . . . . . . . . . . . . . . . . . . . . . . . . . . . . 16
Warranty . . . . . . . . . . . . . . . . . . . . . . . . . . . . . . . . . . . . . . . . . . . 18
Controls & Functions . . . . . . . . . . . . . . . . . . . . . . . . . . . . . . . . . . 19
CONTENTS

The UH-040XR is a portable two-way UHF-CB radio. It is compact, rugged and
fits easily in your hand. This hand held UHF radio will give you consistent,
outstanding performance in virtually all conditions and situations. To ensure that
you get the most from the UH-040XR’s features, please read this operating guide
carefully before using the unit.
FEATURES
➤40 Channels
➤500mW Output Power
➤Up to 3 km range*
➤LCD Display
➤Group Scan
➤Open Scan
➤Duplex Capability
➤Monitor
➤LCD Back Light (Auto On for 5 Sec)
➤Auto Power Save
➤Battery Level Indicator
➤Built in Keypad Lock
➤Key Lock On/Off
➤Key Touch Tone On/Off
➤Auto Squelch Control
* Range varies depending on the environment. 3km range is noted in a flat open
environment.
INTRODUCTION
1

TECHNICAL SUPPORT AND SERVICE
Should you find it desirable or necessary to service your UH-040XR, we suggest
you contact the Uniden dealer where you purchase your radio. Your dealer will
be able to assist you with the complete service information.
If you require service that is within the terms of your warranty, you should present
a copy of your receipt to your dealer to authenticate your claim.
If you find it inconvenient to obtain service assistance from a dealer, please pack
your radio in a suitable packaging that will provide adequate protection to your
radio. Enclose a note describing the problem, a copy of your receipt, and send it
prepaid to:
AUSTRALIA: NEW ZEALAND:
Uniden Australia Pty Ltd Uniden New Zealand Ltd
Customer Service Division Customer Service Division
345 Princes Highway 150 Harris Road
Rockdale NSW 2216 East Tamaki, Auckland
Ph. (02) 9599-3355 Ph. (9) 273 8383
Fax. (02) 9599-3278 Fax. (9) 274 4253
Toll Free 1300 366 895 Toll Free 0800 4 UNIDEN
4 864336
Caution: Changes or modifications to this product not expressly approved by
Uniden; or operation of this product in any way other than as detailed by this
Operating Guide, can void your warranty and authority to operate this product.
2

INCLUDED IN YOUR UH-040XR PACKAGE
3
3
Note: If any of these items are missing from the box, contact your Uniden Dealer.
Wrist Strap Belt Clip
Operating Guide Product Registration Card
and other printed materials
UH-040XR

BATTERY INSTALLATION
Your UH040XR radio uses 3 AA ALKALINE batteries for power.
Please refer to page 14 should you wish to use rechargeable batteries.
To install the batteries:
1. Make sure your radio is off.
2. Release the battery cover clip, then
remove the battery cover.
3. Insert 3 AA ALKALINE batteries
according to the polarity symbols
inside the battery compartment.
4. Align the battery cover tabs with the
UH040XR tab holes then replace
the cover.
Note: Batteries are not supplied
GETTING STARTED
4
Tab holes
Do not mix old and new batteries to avoid damage to the unit.

LOW BATTERY ALERT
The LCD on your radio shows a battery
meter in the lower right corner.
icon indicates a fully powered
unit. As the batteries lose power,
will flash.
When the batteries in the unit are low,
the unit will go into a Battery Low/Sleep Mode. The Scan Mode, Transmit,
Transmit Call Tone Mode are disabled. Replace the batteries immediately to
continue using the radio.
BELT CLIP
Because you will most likely use your radio
when you are out and about, the unit comes
equipped with a belt clip to securely fasten the
unit to your belt, pocket or purse.
To remove the belt clip, turn the screw
counterclockwise.
To attach the belt clip:
1. Insert the belt clip screw into the slot on
the belt clip.
2. Align the screw with the hole on the
back of the radio and turn it clockwise,
using a Phillips screwdriver to secure
the belt clip. Do not over-tighten.
WRIST STRAP
1. Insert short end of the strap through the
belt clip hole.
2. Slip the long end through the loop to
enclose the clip in the strap and pull tight.
5

➤When you press any key (except PTT), a short tone sounds.
➤See the Controls and Indicators page at the back of this operating guide for
button and key operations.
POWER ON/OFF
To turn the unit ON, rotate the [ON/OFF VOL]
clockwise until a “click” is heard. A channel number
and battery level should appear on the display.
To turn the unit OFF, rotate the [ON/OFF VOL]
knob counter-clockwise until a “click” is heard.
The display will disappear.
VOLUME
1. Press the [MON] button to hear
background noise. The “BUSY” icon will
appear on the display.
2. Turn the [ON/OFF VOL] control clockwise to
increase the volume, counterclockwise to
decrease the volume.
OPERATION
6

SELECTING CHANNEL
Press [▲] or [▼] to select the desired channel.
Note: If you press and hold the [▲] or [▼],
channel numbers will scroll rapidly.
TO TRANSMIT AND RECEIVE
The UH-040XR uses the 40 UHF-CB Channels. For your reference a list of the
available channels and corresponding frequencies is printed at the end of this
manual.
1. The maximum RF transmit power of UH-040XR is 500 mWatts.
2. Before you transmit, listen for
activity on the selected channel.
3. When the channel is clear, press and
hold the [PTT] to transmit.
appears on the LCD.
Hold the radio with microphone approximately two inches in front of your mouth
with the antenna at approximately 45˚ angle away from your head. Speak in a clear,
normal conversational voice.
4. When you have finished speaking, release the [PTT] and listen for a response.
TX indicator then disappears on the LCD.
The display shows when a
transmission is being received by
your radio.
DUP SCAN
PTT
Switch
OS/GS
MEM
DUP SCAN
7

TO OPERATE IN DUPLEX MODE
Eg. CH01 is being used in your area for
repeater use.
Press [DUP] momentarily. The DUP icon appears.
Press [DUP] again to deactivate the duplex operation.
UH-040XR will return to simplex operation.
SCANNING
The UH-040XR has two types of scanning; Open Scanning (OS) and Group
Scanning (GS), giving you flexibility and allowing you to use the radio more
effectively.
Scanning allows you to search for active channels programmed in the OS or GS
memory.
To initiate scanning,
1. Assuming the unit is on CH01 when switched on.
2. Press [SCAN] and scanning starts.
Scan icon flashes during scanning.
1. Open Scan (OS) Mode (the absence of GS icon indicates that the unit is on
OS mode)
Allows continuous scanning of channels stored in the Open Scan (OS) memory. If
an active channel is found, scanning will stop on that channel.
Note: The factory has preprogrammed all the 40 UHF channels into the Open Scan
channel memory. However, you can change or customise the channels by
following the steps on programming Scan Channels on pages 10.
OS/GS
MEM
DUP SCAN
8

Example. CH40 becomes active
If the received signal cease, the unit will wait for at
least 3 seconds for the signal to return, otherwise
scanning resumes.
To skip the active channel, press [MEM] momentarily. Scanning resumes.
To deactivate SCAN, press the [SCAN] or [PTT].
Note:
1. If SCAN is deactivated while in an active channel, the UH-040XR will stay on that
active channel. If no other channels are active, the UH-040XR will reinstate the
starting channel.
2. Pressing [OS/GS] will switch to Group Scanning.
2. Group Scan (GS) Mode
To use GS Mode Scanning, press the [OS/GS]
key. GS icon appears on the display.
1. When [SCAN] SW is pressed
during Group Scan Mode, SCAN icon will blink
and Group Scan Scanning begins.
2. To deactivate GS scan, press [SCAN] or [PTT].
Note:
1. If SCAN is deactivated while it is tuned to an active
channel, the UH-040XR will stay on that active
channel. If none of the channels are active, the UH-
040XR will reinstate the Priority channel.
2. If GS Scanning is initiated when there are no
channels programmed in GS memory, an error tone will be heard and scanning
will not start.
3. Pressing [OS/GS] will switch to Open Scanning.
OS/GS
MEM
DUP SCAN
9

PRIORITY CHANNEL
The Priority Channel feature allows user to monitor one of 40 channels in the
UH-040XR, monitoring it every 1.5secs during Group Scanning.
Choosing a Priority Channel
The starting channel, when Group Scanning is initiated, is always the Priority
Channel. To change the priority channel setting while scanning, (eg. PRI Channel
is CH17 (476.825 MHz))
a. press [▲], to select a higher channel
(scanning pauses)
or
b. press [▼], to select a lower channel
Programming Scan Channels
1. Select which Scanning Mode you wish
to use on the channel
OS or GS Mode
Note: OS is indicated by the absence of the GS icon
2. Select the channel you want to store by
pressing [▲] or [▼]
3. Pressing [MEM] momentarily to store.
MEM icon appears and beep sounds are
heard.
4. To remove the channel from Memory, pressing
[MEM] momentarily. To remove MEM icon
disappears and beep sounds are heard.
OS/GS
MEM
DUP SCAN
OS/GS
MEM
DUP SCAN
10

DROP-OUT DELAY
While scanning, the UH-040XR stops at a busy channel and receives a
transmission. When the received signal is over, the unit will wait for 3 seconds for
the return of the signal, otherwise, the radio resumes scanning.
KEYPAD CONFIRMANTION TONE
Assures the user that the keypad has been properly pressed by emitting a beep
tone. This tone can be switched on or off.
1. Press and hold [SCAN] button for 1.5 sec
“bp on” will appear for 1.5 sec
2. Press and hold [SCAN] button for 1.5 secs
“bp of” will appear for 1.5 secs and you will
hear a beep sound.
POWER SAVE
Battery Save feature extends the battery life by switching the receiver circuit
power ON and OFF. This feature automatically activates during stand by mode
(RX mode without signal). It turns OFF automatically when a signal is present,
and activates again after channel inactivity.
OS/GS
MEM
DUP SCAN
11

BACK LIGHTING
The Liquid Crystal Display (LCD) is backlit for easy viewing at night or in low
light situations. The back lighting automatically switches ON every time a key
(except PTT) is pressed. It turns OFF 5secs after the last key is pressed.
KEYPAD LOCK
To prevent accidental entries, you can
lock the keypad.
Press and hold the [LOCK] button for
1.5 Secs until it beeps to activate Key Lock.
icon appears.
To unlock the keypad, press and hold the [LOCK]
button again for 1.5 Secs. icon disappears.
Note: When the Key Lock is active, a warning beep will be heard if you attempt to
press the keys.
MONITOR
This feature enables users to listen in for
weak signals on the current channel at the press of
a button.
To use monitor,
•For brief listening, press [MON]
•For continuous listening. Press and hold [MON]
for 2 sec. A two tone beep will be heard and
the receiver circuit will stay open, letting in
both the noise & weak signals.
•Display shows icons.
•To return to normal receive mode press [MON],
[SCAN], [PTT] [▲]or [▼].
12

BATTERY LEVEL DISPLAY
The icon in the bottom right hand corner of the screen indicates
the UH-040XR current battery voltage level at all times. The battery
level is displayed in 3 levels:
LEVEL 3
Battery 100% full
LEVEL 1
Battery approx
30% capacity
LEVEL 2
Battery approx
70% capacity
Almost Empty
Note:
When [PTT] SW is pressed at
Level Empty, battery icon and
channel number will flash
13

CHARGING BATTERIES
Warning Notice! Use only the AAD042S
optional power adaptor if rechargeable
batteries will be used in the UH040XR.
•Turn the UH040XR [ON/OFF VOL] knob
off and connect the AC adaptor plug to the
mic jack.
•Battery charging times vary. A longer time is
required to charge higher capacity batteries.
•Disconnect the AC adaptor from the unit when charging is completed.
14
Rechargeable Batteries Charging Time
600mAH Ni-Cad 14-16 hrs
1000mAH Ni-Cad 24-27 hrs
1300mAH Ni-MH 31-35 hrs

* Emergency calling for both simplex and duplex operation
Please do not use this channel in non-emergency cases.
# Back-up Emergency Channel
Ch. Freq. Usage Ch. Freq. Usage
01 476.425 Simplex/Duplex 21 476.925 Simplex
02 476.450 Simplex/Duplex 22 476.950 Simplex
03 476.475 Simplex/Duplex 23 476.975 Simplex
04 476.500 Simplex/Duplex 24 477.000 Simplex
05 *476. 525 Simplex/Duplex 25 477.025 Simplex
06 476.550 Simplex/Duplex 26 477.050 Simplex
07 476.575 Simplex/Duplex 27 477.075 Simplex
08 476.600 Simplex/Duplex 28 477.100 Simplex
09 476.625 Repeater 29 477.125 Simplex
10 476.650 Repeater 30 477.150 Simplex
11 #476.675 Back-up
Emergency Channel 31 477.175 Simplex
12 476.700 Repeater 32 477.200 Simplex
13 476.725 Repeater 33 477.225 Simplex
14 476.750 Repeater 34 477.250 Simplex
15 476.775 Repeater 35 477.275 Simplex
16 476.800 Repeater 36 477.300 Simplex
17 476.825 Repeater 37 477.325 Simplex
18 476.850 Repeater 38 477.350 Simplex
19 476.875 Repeater 39 477.375 Simplex
20 476.900 Repeater 40 477.400 Simplex
UHF CHANNELS & FREQUENCIES
15

•Speaker Microphone (SM-050)
•AC Adaptor (AAD-042S)
•Headset Microphone (HM-050)
General
Channels Transmit 40 (with Duplex Channel Support)
Receive 40
Oper. Temp. 0˚C - +55˚C
Antenna Fixed
Microphone Built-in Electret type
Display Liquid Crystal Display
Speaker 36mm Round, 8Ω
Power Source AA Size Battery x 3pcs
Size (without antenna) 160(H) x 62(W) x 32(D)mm
Weight 150g (with Antenna & without Battery)
Operating Time at 25 hrs (Ni-Cd Batteries)
5-5-90 Duty Cycle 32 hrs (Ni-MH Batteries)
38 hrs (Alkaline Batteries)
Transmitter
Frequency Control Phase Locked Loop
Frequency Range 476.425 to 477.4 MHz
Frequency Stability ±3 ppm
Power Output 0.5W
Spurious Emissions -40 dBm
Current Drain 320mA
TECHNICAL SPECIFICATIONS
OPTIONAL ACCESSORIES
16

Receiver
Receiver Type Dual Conversion
Super Heterodyne
Phase Locked Loop
System for Local Oscillator
Frequency Range 476.425 to 477.4 MHz
Sensitivity @ 0.22 µV
12 dB SINAD
Squelch Sensitivity 0.19 µV (Threshold)
Audio Frequency
Response 500Hz, 5dB
(ref: 1KHz, ± 3KHz Dev.) 2000Hz, -6dB
Selectivity 50dB
Hum & Noise Ratio 37dB
Audio Output Drain 0.15W (10% THD)
Current Drain 150 mA
50mW output
Specifications shown are typical and subject to change without notice.
17
Table of contents
Other Uniden Portable Radio manuals

Uniden
Uniden BC125AT User manual

Uniden
Uniden PC33X User manual

Uniden
Uniden Radio User manual

Uniden
Uniden UH036SX User manual

Uniden
Uniden uh036sx-4 Quad Pack User manual

Uniden
Uniden uh012sx User manual

Uniden
Uniden BCD325P2-AU User manual

Uniden
Uniden Marine Radio User manual

Uniden
Uniden PRO401HH User manual

Uniden
Uniden scanning radio User manual

Uniden
Uniden uh012sx User manual

Uniden
Uniden UH-090 User manual

Uniden
Uniden UH089sx User manual

Uniden
Uniden uh043sx-2 User manual

Uniden
Uniden UH015sx User manual

Uniden
Uniden BC125AT Service manual

Uniden
Uniden SPH 516D User manual

Uniden
Uniden uh049sx-2 User manual

Uniden
Uniden 810e User manual

Uniden
Uniden uh078sx User manual