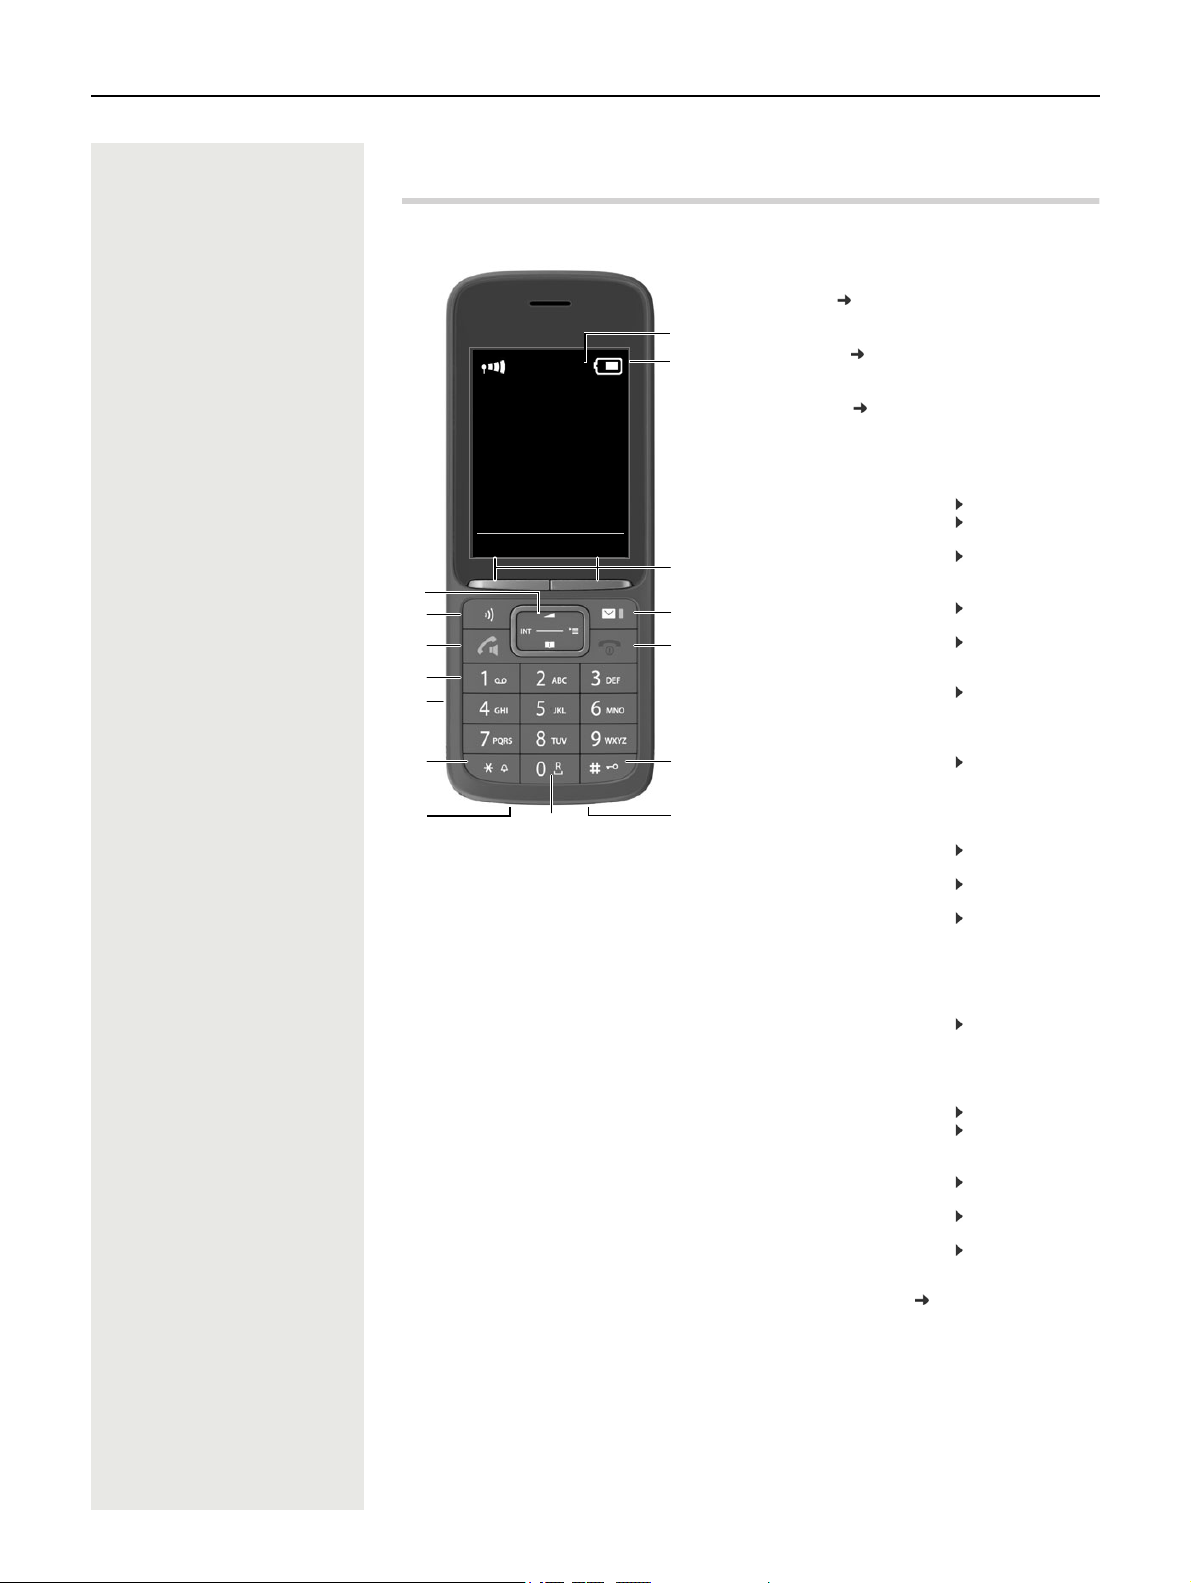
Unify OpenScape SL6 User manual

OpenScape DECT Phone SL6
on Cordless IP
User Guide
A31003-D1000-U111-01-7619

Provide feedback to further optimize this document to [email protected].
As reseller please address further presales related questions to the responsible presales organization at Unify or at your
distributor. For specific technical inquiries you may use the support knowledgebase, raise - if a software support contract is in
place - a ticket via our partner portal or contact your distributor.
Our Quality and Environmental Management Systems are
implemented according to the requirements of the ISO9001 and
ISO14001 standards and are certified by an external certification
company.
Copyright © Unify GmbH & Co. KG 03/2021
All rights reserved.
Reference No.: A31003-D1000-U111-01-7619
The information provided in this document contains merely general descriptions or
characteristics of performance which in case of actual use do not always apply as
described or which may change as a result of further development of the products.
An obligation to provide the respective characteristics shall only exist if expressly agreed in
the terms of contract.
Availability and technical specifications are subject to change without notice.
Unify, OpenScape, OpenStage and HiPath are registered trademarks of Unify GmbH & Co. KG.
All other company, brand, product and service names are trademarks or registered trademarks
of their respective holders.
unify.com

Contents 3
Contents
Overview . . . . . . . . . . . . . . . . . . . . . . . . . . . . . . . . . . . . . . . . . . 5
Handset. . . . . . . . . . . . . . . . . . . . . . . . . . . . . . . . . . . . . . . . . . . . . . . . . . . . . . . . . . . . . . . . . . . 5
Base . . . . . . . . . . . . . . . . . . . . . . . . . . . . . . . . . . . . . . . . . . . . . . . . . . . . . . . . . . . . . . . . . . . . . . 6
Illustration in the user guide . . . . . . . . . . . . . . . . . . . . . . . . . . . . . . . . . . . . . . . . . . . . . . . . . . . . 7
Safety precautions . . . . . . . . . . . . . . . . . . . . . . . . . . . . . . . . . . 8
Getting started . . . . . . . . . . . . . . . . . . . . . . . . . . . . . . . . . . . . . 9
Contents of the package . . . . . . . . . . . . . . . . . . . . . . . . . . . . . . . . . . . . . . . . . . . . . . . . . . . . . . . 9
Handset. . . . . . . . . . . . . . . . . . . . . . . . . . . . . . . . . . . . . . . . . . . . . . . . . . . . . . . . . . . . . . . . . . . . 9
Using the telephone . . . . . . . . . . . . . . . . . . . . . . . . . . . . . . . . . 12
Getting to know your telephone . . . . . . . . . . . . . . . . . . . . . . . . . . . . . . . . . . . . . . . . . . . . . . . . 12
Making calls . . . . . . . . . . . . . . . . . . . . . . . . . . . . . . . . . . . . . . . . . . . . . . . . . . . . . . . . . . . . . . . 15
Call lists. . . . . . . . . . . . . . . . . . . . . . . . . . . . . . . . . . . . . . . . . . . . . . . . . . . . . . . . . . . . . . . . . . . 20
Message lists . . . . . . . . . . . . . . . . . . . . . . . . . . . . . . . . . . . . . . . . . . . . . . . . . . . . . . . . . . . . . . 21
Directories . . . . . . . . . . . . . . . . . . . . . . . . . . . . . . . . . . . . . . . . . . . . . . . . . . . . . . . . . . . . . . . . . 22
Answering machine. . . . . . . . . . . . . . . . . . . . . . . . . . . . . . . . . . . . . . . . . . . . . . . . . . . . . . . . . . 26
Additional functions . . . . . . . . . . . . . . . . . . . . . . . . . . . . . . . . . 27
Sound profiles . . . . . . . . . . . . . . . . . . . . . . . . . . . . . . . . . . . . . . . . . . . . . . . . . . . . . . . . . . . . . . 27
Calendar . . . . . . . . . . . . . . . . . . . . . . . . . . . . . . . . . . . . . . . . . . . . . . . . . . . . . . . . . . . . . . . . . . 27
Timer . . . . . . . . . . . . . . . . . . . . . . . . . . . . . . . . . . . . . . . . . . . . . . . . . . . . . . . . . . . . . . . . . . . . . 29
Alarm clock . . . . . . . . . . . . . . . . . . . . . . . . . . . . . . . . . . . . . . . . . . . . . . . . . . . . . . . . . . . . . . . . 29
Protection against unwanted calls. . . . . . . . . . . . . . . . . . . . . . . . . . . . . . . . . . . . . . . . . . . . . . . 30
Resource Directory . . . . . . . . . . . . . . . . . . . . . . . . . . . . . . . . . . . . . . . . . . . . . . . . . . . . . . . . . . 31
Bluetooth . . . . . . . . . . . . . . . . . . . . . . . . . . . . . . . . . . . . . . . . . . . . . . . . . . . . . . . . . . . . . . . . . . 32
Additional functions using the PC interface. . . . . . . . . . . . . . . . . . . . . . . . . . . . . . . . . . . . . . . . 33
Adjusting the telephone settings . . . . . . . . . . . . . . . . . . . . . . . 35
Appendix . . . . . . . . . . . . . . . . . . . . . . . . . . . . . . . . . . . . . . . . . 40
Manufacturer’s advice . . . . . . . . . . . . . . . . . . . . . . . . . . . . . . . . . . . . . . . . . . . . . . . . . . . . . . . 40
Technical data. . . . . . . . . . . . . . . . . . . . . . . . . . . . . . . . . . . . . . . . . . . . . . . . . . . . . . . . . . . . . . 41
Display icons . . . . . . . . . . . . . . . . . . . . . . . . . . . . . . . . . . . . . . . . . . . . . . . . . . . . . . . . . . . . . . . 43

5
Overview
Handset
2
3
5
12
1
INT 1
Calls Calendar
6
10
9
4
11
13
14
15
7
8
1 Display
2 Status bar ( p. 43)
Icons display current settings and operating
status of the telephone
3 Display keys ( p. 13)
Various functions, depending on the operating
situation
4 Message key ( p. 21)
Access to the call and message lists;
Flashes: new message or new call
5 End call key / On/off key
End call; cancel function;
Go back one menu level Press briefly
Return to idle status Press and
hold
Switch the handset on/off
(in idle status)
Press and
hold
6 Hash key / Lock key
Lock/unlock the keypad
(in idle status)
Press and
hold
Toggle between upper/
lower case and digits
(when inputting text)
Press briefly
Insert a dialling pause Press and
hold
7 Microphone
8 Recall key
Consultation call (flash) Press and
hold
9 USB connection socket
For data exchange between the handset and PC
10 Star key
Enable/disable the ringtone Press and
hold
Open special characters table
(when inputting text)
Press briefly
Switch from pulse dialling to
tone dialling (for an existing
connection)
Press briefly
11 Headset connection
(3.5 mm jack)
12 Key 1
Select network mailbox Press and
hold
13 Talk key / Handsfree key
Accept call; dial number displayed; switch
between receiver and handsfree mode
Open the redial list Press briefly
Start dialling Press and
hold
14 Profile key
Switch between acoustic
profiles (when phone is idle)
Press briefly
Turn on/off the microphone
(during a call)
Press briefly
Set the microphone sensitivity
(during a call and when the
phone is idle)
Press and
hold
15 Control key / Menu key ( p. 12)
Open a menu; navigate in menus and entry fields;
access functions (depending on the situation)

6 Base
Base
Your handset is registered with a OpenScape Cord-
less IP V2 multicell system, that can comprise many
base stations. When you move around with your
handset within range of the multi-cell system, the
handset automatically connects to the base station
having the best connection (roaming). You can also
move around freely during a call without the
connection being interrupted (handover).
Information on starting and administration of base
stations, and on registering a handset with a multi-
cell system:
User guide "OpenScape Cordless IP V2 - Admin-
istrator Documentation"

Illustration in the user guide 7
Illustration in the user guide
Keys
Procedures
Example: Switching Auto answer on/off
Warnings, which if not heeded, can result in injury to persons or damage to devices.
Important information regarding function and appropriate handling or functions
that could generate costs.
Prerequisite for being able to carry out the following action.
Additional helpful information.
or Talk key or Handsfree key
End call key to Number / letter keys
/ Control key rim / centre Message key
Recall key Star key
Hash key Profile key
OK,Back,Select, Change, Save, . . . Display keys
¤. . . use to select Settings OK Telephony OK Auto Answer
Change ( = activated)
Symbols Meaning
¤When in idle status press the centre of the control key.
The main menu opens.
¤
¤OK
Navigate to the icon using the control key .
Select OK to confirm. The submenu Settings opens.
¤Telephony
¤OK
Select the Telephony entry using the control key .
Select OK to confirm. The submenu Telephony opens.
¤Auto Answer The function to switch Auto answer on/off appears as the first menu
item.
¤Change Select Change to activate or deactivate.
Function is activated /deactivated .

8 Safety precautions
Safety precautions
Read the safety precautions and the user guide before use.
The device cannot be used in the event of a power failure. In case of a power failure it
is also not possible to make emergency calls.
Emergency numbers cannot be dialled if the keypad/display lock is activated!
Use only rechargeable batteries that correspond to the specification (see list of
permitted batteries www.wiki.unify.com /wiki/DECT_Mobilteile). Never use a
conventional (non-rechargeable) battery or other battery types as this could result in
significant health risks and personal injury. Rechargeable batteries, which are notice-
ably damaged, must be replaced.
The handset must not be operated if the battery cover is open.
Ensure that the batteries can not be short-circuited by objects in the battery compart-
ment
Do not use the devices in environments with a potential explosion hazard
(e.g. paint shops).
The devices are not splashproof. For this reason do not install them in a damp environ-
ment such as bathrooms or shower rooms.
Use only the power adapter indicated on the device.
Whilst charging, the power socket must be easily accessible.
Remove faulty devices from use or have them repaired by our Service team, as these
could interfere with other wireless services.
Do not use the device if the display is cracked or broken. Broken glass or plastic can
cause injury to hands and face. Send the device to our Service department to be
repaired.
Keep small cells and batteries, which can be swallowed, out of the reach of children.
Swallowing a battery can lead to burns, perforation of soft tissue and death. Severe
burns can occur within 2 hours of swallowing.
In the case of a swallowed cell or battery, seek medical care immediately.
Using your telephone may affect nearby medical equipment. Be aware of the tech-
nical conditions in your particular environment, e.g. doctor's surgery. If you use a
medical device (e.g. a pacemaker), please contact the device manufacturer. They will
be able to advise you regarding the susceptibility of the device to external sources of
high frequency energy (for the specifications of your product see "Technical data").
If a USB adapter cable is included, only use a USB power supply (5Volt) with USB-A
connection. The use of other voltage sources e.g. PC's with USB connection can cause
damage.
If a plug-in power supply is included, please use this power supply.

Getting started 9
Getting started
Contents of the package
•One handset
•One battery cover (rear cover for the handset)
•One battery
•One belt clip
•One user guide
Handset
Connecting the charging cradle
¤Connect the flat plug of the power adapter .
¤Plug the mains unit into your power socket .
To remove the plug from the charging cradle again:
¤Disconnect the power adapter from the mains power
supply.
¤Press the release button .
¤Pull out the plug .
Setting up the handset for use
The display is protected by a plastic film. Please remove the protective film!
Inserting the battery
The charging cradle is designed for use in closed, dry rooms within a temperature
range of +5°C to +45°C.
Never expose the telephone to heat sources, direct sunlight or other electrical
devices.
Protect your telephone from moisture, dust, corrosive liquids and vapours.
The device's feet do not usually leave any marks on surfaces. However, due to the
multitude of different varnishes and polishes used on furniture, contact marks on the
surfaces cannot be completely ruled out.
This device is only suitable for a maximum installation height of 2 m.
Only use a rechargeable battery, as this could otherwise result in significant health
risks and personal injury. For example, the outer casing of the battery could be
destroyed or the battery could explode. The device could also malfunction or be
damaged as a result of using batteries that are not of the recommended type.
¤Insert battery with the contact side pointing
down .
¤Press the battery down until it clicks into
place .
¤Orientate the battery cover with the
side tabs fitting into the slots on the
inside of the casing .
¤Press the cover until it clicks into place.
2
1
3
4
1
2
3
4
2
1
3
1
2
3

10 Handset
Re-opening the battery cover
Charge the battery
¤Charge the battery fully prior to first use in the charging
cradle or using a standard USB mains adapter.
The battery is fully charged when the power icon disappears
from the display.
As soon as power is applied to the handset, a Setup wizard starts.
Setting the display language
¤Press the control key until the language required is selected on the
display, e.g. English press the display key OK
You can also change the display language later on in the Settings menu.
Registering a handset
Register the handset with the OpenScape Cordless IP V2.
On the OpenScape Cordless IP V2
¤Start the registration process
Information for this:
User guide "OpenScape Cordless IP V2 - Administrator Documentation"
or: Contact the administrator of the DECT network.
On the handset
You require the 4-digit system PIN (registration code) generated on the OpenScape Cordless IP V2.
If the handset is not yet registered with a base:
¤Select the base Selection Enter the system PIN Register
If the handset is already registered with a base:
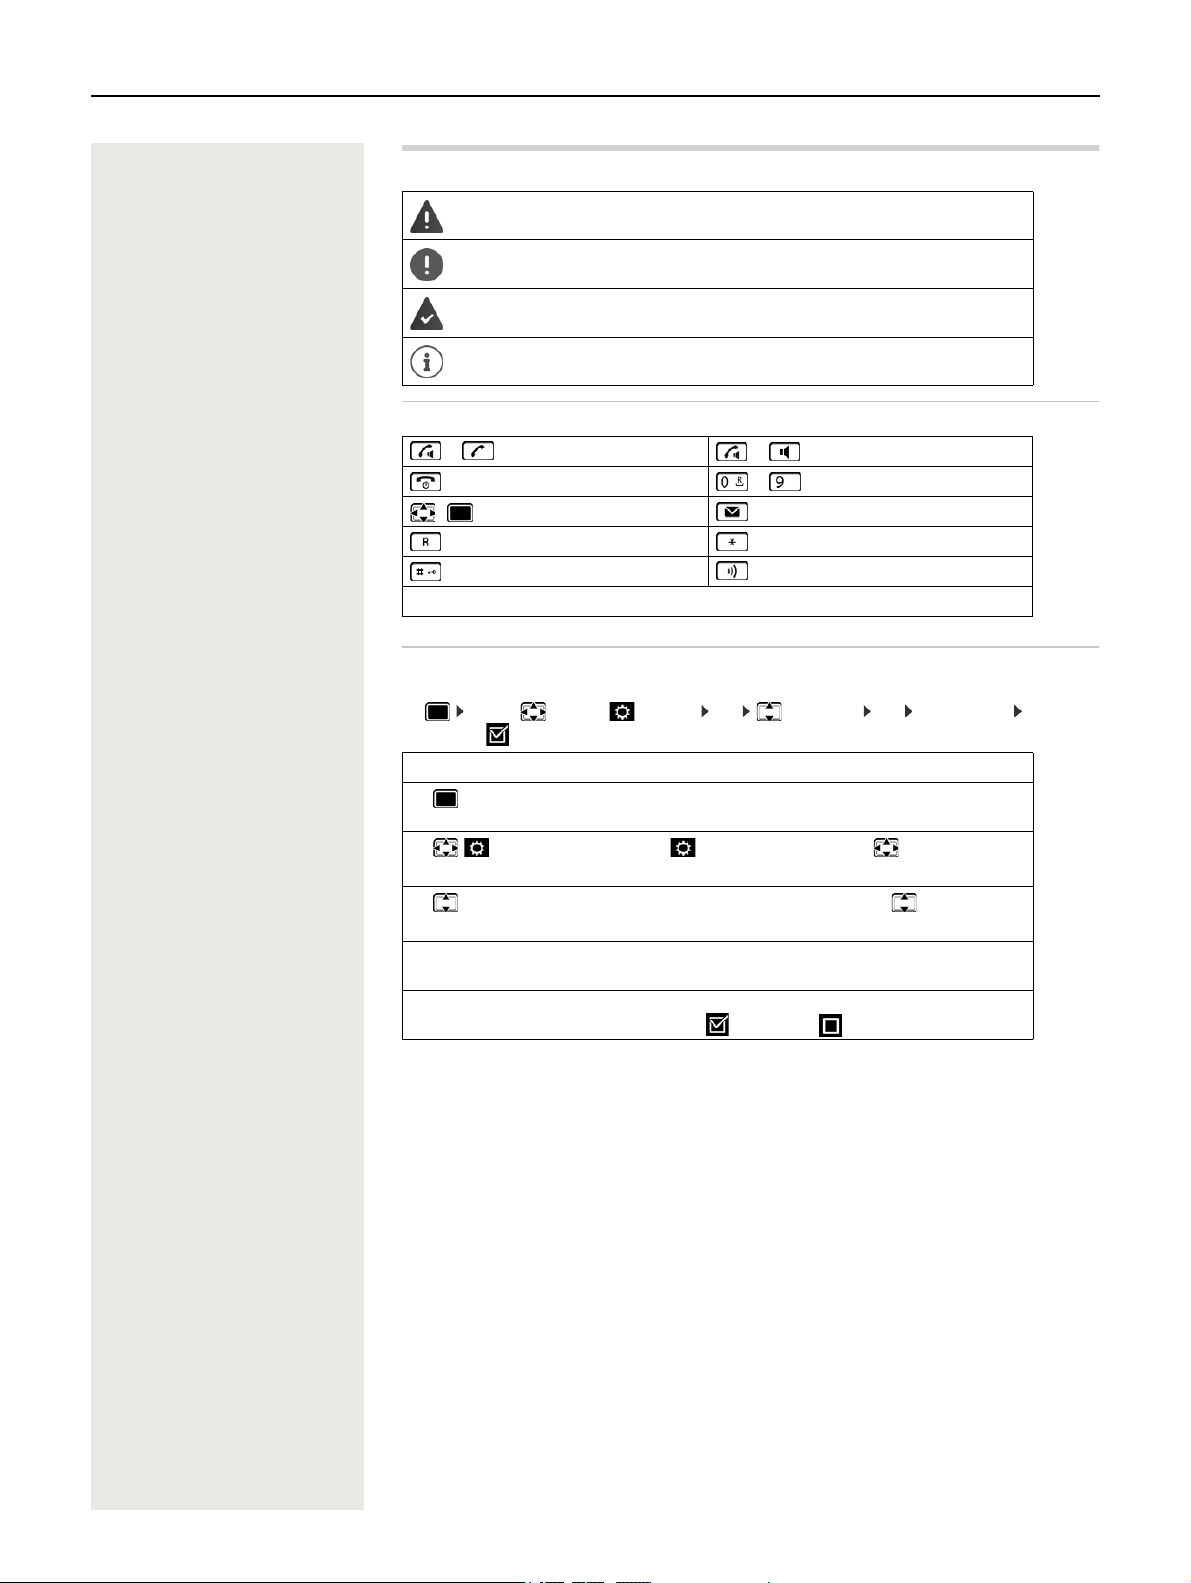
¤. . . Use to select Settings OK Registration OK Register Handset
OK Select the base Selection . . . A search is performed for a base ready for registration
Enter the system PIN OK
Once registration is complete, the handset returns to idle mode. Shown on the idle display is the name set
on the OpenScape Cordless IP V2 for the handset (user name or display name). If it is not, repeat the proce-
dure.
Your phone is now ready for use.
¤Remove the belt clip (if attached).
¤Place your fingernail in the notch underneath
the battery cover and pull the battery cover
up .
¤To change the battery, place your
fingernail in the recess in the housing
and pull the battery up .
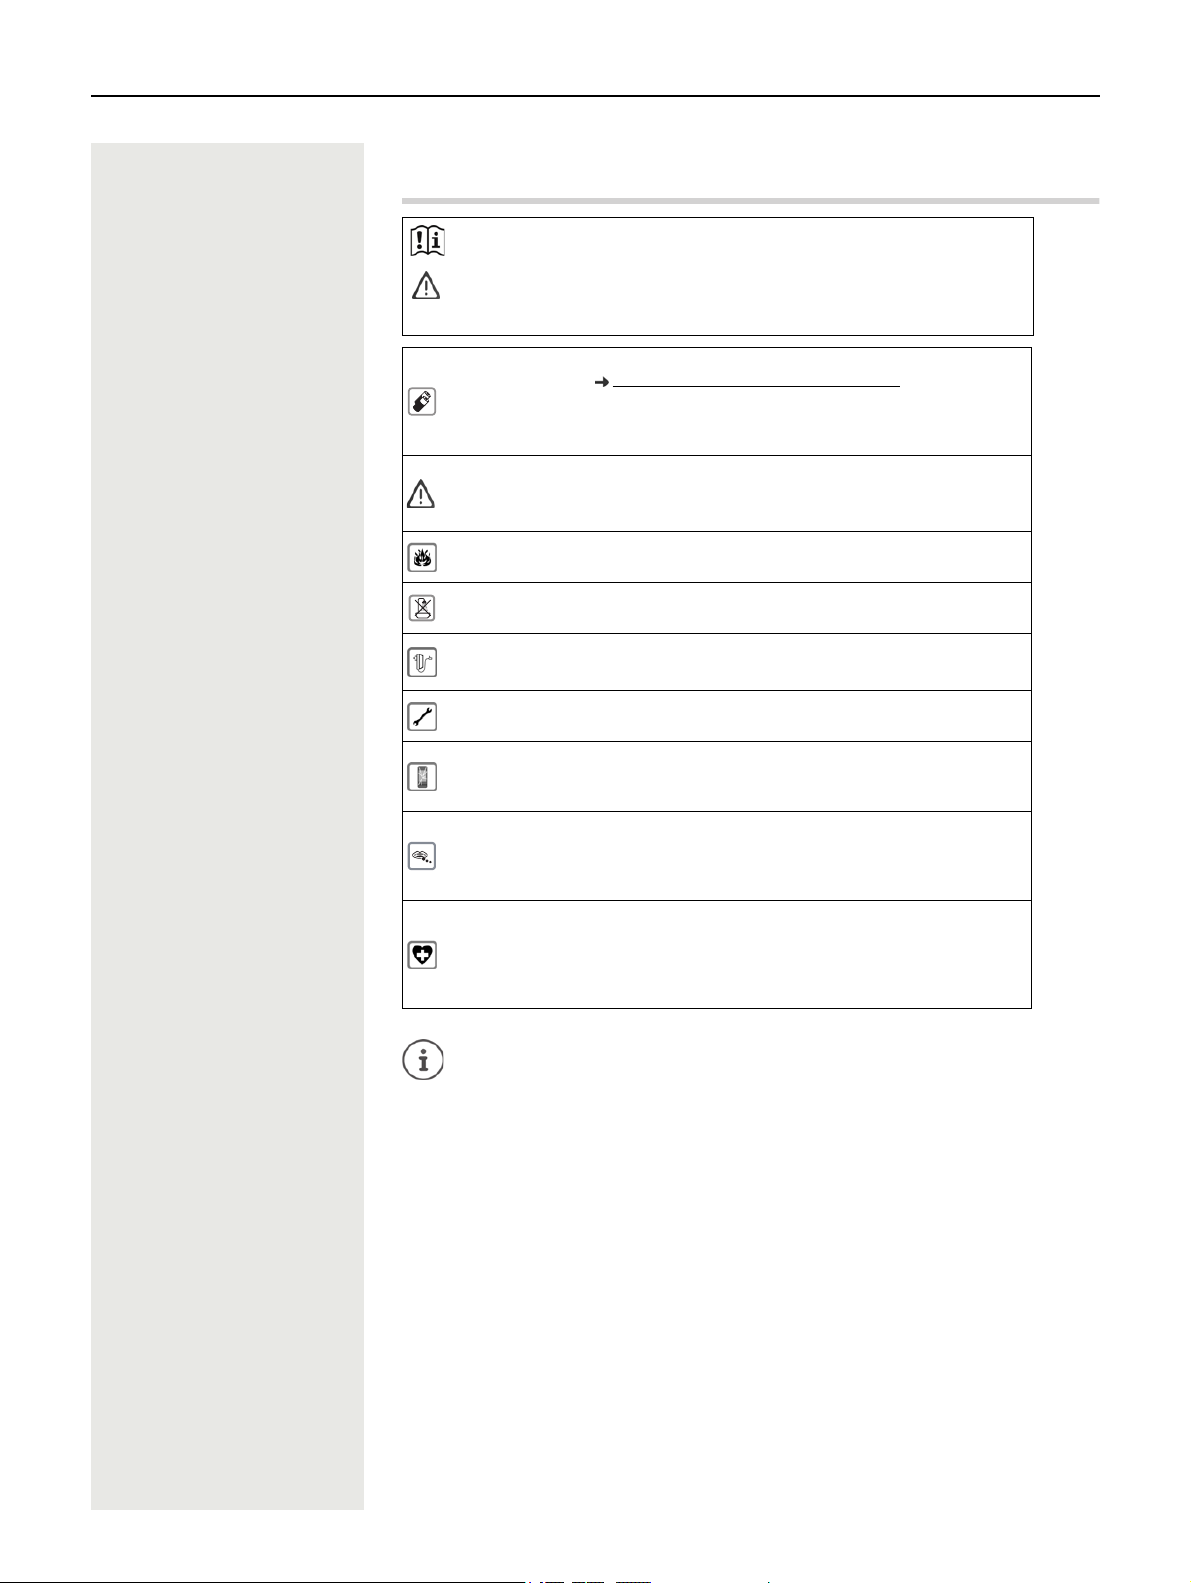
The battery may heat up during charging. This is not dangerous.
After a time, the charge capacity of the battery will decrease for technical reasons.
Registration must be initiated both on the OpenScape Cordless IP V2 and on the
handset. For this, the handset must be within range of the OpenScape Cordless IP V2.
The handset can be registered with up to four base stations. Changing the base:
¤. . . Use to select Settings OK Registration OK
Select Base OK Select the base OK
1
2
1
2
2,5h
Deutsch
English
Francais

Handset 11
Attaching the belt clip
The handset has notches on each side for attaching the belt clip.
•Attaching the belt clip: Press the belt clip onto the back of the
handset so that the tabs on the belt clip click into place in the
notches.
•Removing the belt clip: Press the centre of the belt clip firmly
with your right thumb. Push the nail of your left thumb up
between the clip and the casing. Slide the clip upwards to
remove.
Connecting the headset
¤Connect the headset with 3.5 mm jack to the left side of the handset .
or
Connecting the USB data cable
For data exchange between the handset and PC:
¤Connect the USB data cable with micro-USB plug into the USB
socket at the bottom of the handset .
¤Connect headset via Bluetooth ( p. 32)
Setting the headset volume: p. 36
Connect the handset directly to the PC, not via a
USB hub.
1
1
1
1

12 Getting to know your telephone
Using the telephone
Getting to know your telephone
Switch the handset on/off
Lock/unlock the keypad
The keypad lock prevents any accidental use of the telephone.
Lock/unlock the keypad: Press and hold
Keypad lock activated: the following symbol appears
PIN-protected keypad lock
Once you have assigned a PIN (not 0000) to the handset, you must enter this PIN to cancel the keypad lock.
Control key
In the description below, the side of the control key (up, down, right, left) that you have to press in the
different operating situations is marked in black, e. g. for "press right on the control key" or for
"press the centre of the control key".
When the phone is idle
In submenus, selection and entry fields
During a call
Switch on: ¤When the handset is switched off, press and hold the End call key
Switch off: ¤When the handset is in idle status, press and hold the End call key
If a call is indicated on the handset, the keypad automatically unlocks and you can
accept the call. It then locks again when the call is finished.
The control key enables you to navigate the menus and input fields, and also to
call up certain functions depending on the situation.
Open the main menu or
Open the list of available online directories (e.g. a company directory) Press briefly
Open the local directory: Press and hold
Open the company directory
This function must be enabled on the OpenScape Cordless IP V2.
Set the voice volume for receiver / handsfree function
Confirm a function
Navigate a line up/down /
Select an option, move the cursor to the left/right /
Open the list of available online directories Press briefly
Open the local directory: Press and hold
Open company directory (if enabled)
Mute the microphone Press briefly
Change the voice volume for receiver / handsfree function
The assignment of directories to the key (press briefly or for longer) can be
changed on the OpenScape Cordless IP V2.

Getting to know your telephone 13
Display keys
The display keys perform a range of functions depending on the operating situation.
Display key icons p. 43
Menu guidance
The functions of your telephone are displayed in a menu that consists of several levels.
Selecting/confirming functions
Main menu
In idle status: Press the centre of the control key . . . use the
control key to select a submenu OK
The main menu functions are shown in the display as icons. The icon for
the selected function is highlighted in colour and the name of the associ-
ated function appears in the display header.
Submenus
The functions in the submenus are displayed as lists.
To access a function: . . . use the control key to select a function
OK
Return to the previous menu level:
¤Press the display key Back
or
¤Press the End call key briefly
Returning to idle status
¤Press and hold the End call key
The display keys have a function preset by default in idle status.
Change the assignment: p. 39
Menu overview p. 44
Confirm selection using OK or press the centre of the control key
One menu level back using Back
Change to idle status Press and hold
Switch function on/off using Change on / off
Activate/deactivate option using Select activated / not activated
If a key is not pressed, after 2 minutes the display will automatically change to idle
status.
Current display key
functions
Display keys
Back Save
Example
Settings
Back OK
Settings
Date/Time
Audio Settings
Display & Keypad
Language
Registration
Back OK
Example

14 Getting to know your telephone
Entering text
Input position
¤Use to select an entry field. A field is activated when the cursor is
blinking inside it.
¤Use to move the position of the cursor.
Correcting incorrect entries
•Delete characters to the left of the cursor: Press briefly
•Delete words to the left of the cursor: Press and hold
Entering letters/characters
Multiple letters and numbers are assigned to each key between and
and the key. As soon as a key is pressed, the possible characters
are displayed at the bottom of the display. The selected character is high-
lighted.
•Selecting letters/numbers: Press the key briefly several times in succession
•Switch between lower case, upper case and number entry mode: Press the hash key
When editing a directory entry, the first letter and each letter following a space is automatically in upper
case.
•Entering special characters: Press the star key . . . use to navigate to the desired
character Insert
The availability of special characters depends on the language setting.
Example
New Entry
First Name :
Robert
Surname :
I
Tel.1 - Type:
Abc
‚Save

Making calls 15
Making calls
The base stations of the OpenScape Cordless IP V2 together form the DECT wireless network of the phone
system. You can initiate or answer calls on a handset across the whole wireless network and change base
station during a call (handover).
Making calls
¤. . . Use to enter the number Press briefly the Talk key
or
¤Press and hold the Talk key . . . Use to enter the number
The connection is established over the SIP link assigned to the handset.
Cancel dialling: Press the End call key
Dialling from the redial list
The redial list contains the 20 numbers last dialled with the handset.
¤Briefly press the Talk key . . . The redial list is opened Select the entry Press the Talk
key
If a name is displayed:
¤View . . . The number is displayed Use as required to scroll through the numbers At the phone
number required, press the Talk key
Managing entries in the redial list
¤Briefly press the Talk key . . . The redial list is opened Select an entry Options . . . Possible
options:
Dialling from a call list
The call lists ( p. 20) contain the most recent accepted, outgoing and missed calls.
The handset is located in the wireless cell of at least one of the base stations regis-
tered with the phone system.
The handset is assigned a send and receive connection.
If the display backlight is deactivated, you can reactivate it by pressing any key. Digit
keys that are pressed appear in the display for pre-dialling, other keys have no further
function.
Copy entry to directory:
¤Copy to Directory OK
Copy the number to the display:
¤Display number OK . . . Use as required to change or
add . . . Use to save in the directory as a new entry
Delete the selected entry:
¤Delete entry OK
Delete all entries: ¤Delete List OK
Set automatic redial: ¤Automatic Redial OK . . . The selected number is automati-
cally dialled at fixed intervals (at least every 20 seconds). The
handsfree key flashes, "open listening" is activated.
The participant answers: Press theTalk key . . . The function
is ended
The subscriber does not answer: The call is interrupted after
around 30 secs. The function is terminated after pressing any key
or after ten unsuccessful attempts.
¤. . . Use to select Call Lists OK . . . Use to select the list OK . . .
Use to select an entry Press the Talk key
The call lists can be displayed directly by pressing the display key Calls if the relevant
function has been assigned to the display key.
The Missed calls list can also be opened by pressing the Message key .

16 Making calls
Dialling in extension systems (Delayed Extension Dialling)
When dialling into a large corporate network (PBX systems), it might be possible to dial an extension
number directly after dialling the dial-up number.
¤Open the directory . . . Use to select an entry Press the
Talk key . . . The phone dials the number in front of ** . . . Possible
options:
Dial a saved extension: Dial Ext. . . . The phone dials the number after
**
Dial a different extension: . . . Use to enter the extension number
. . . The phone dials the number entered
Enter a dial pause when dialling
¤Press and hold the hash key . . . A Pis shown on the display
Initiating ringback
If the line of a called subscriber is busy, you can arrange for a ringback (if the phone system or provider
supports the CCBS and CCNR services).
The service code for enabling/disabling CCBS and CCNR must be configured in the provider settings.
Enabling ringback:
¤Enter the service code specified for the phone system / provider, e.g.
If you do not want a ringback, you can disable the function.
¤Enter the service code specified for the phone system / provider, e.g.
Incoming calls
An incoming call for the connection assigned to your handset is indicated by ringing, by a display on the
screen and by the flashing Talk / Handsfree key .
Information about the caller
If it is sent, the number of the caller is displayed. If the caller's number is saved in a directory, the name is
displayed.
Using the Call Manager of the phone system
If a Call Manager is used on the phone system, it is possible to define that incoming calls are accepted
directly by headset or handsfree function. This must be configured for the handset on the OpenScape
Cordless IP V2.
Group accept
Accept incoming calls for a group of subscribers.
Group accept must be enabled, and the phone number or SIP URI of the group must be entered. This must
be configured for the handset on the OpenScape Cordless IP V2.
The phone number can be saved in the directory as follows: Dial-in number, 2 stars,
extension number (e.g. 1234567**128).
CCBS (Completion of Call to busy subscriber) Ringback when busy
CCNR (Completion of Calls on No Reply) Ringback when call is not answered
Accept the call: ¤Press the Talk key or Accept
If Auto Answer is enabled:
¤Remove the handset from the charging cradle
Disable ringtone: ¤Silence . . . You can accept the call as long as it is displayed on the
screen
Reject the call: ¤Press the End call key
Dial Number
1234567**128
Dial Ext. Options

Making calls 17
Accepting/rejecting a waiting call during a call
During an external call, the call waiting tone signals that another party is trying to call you. The number or
name of the caller is displayed if the phone number is sent.
Calls with three parties
Consultation calls
During an external phone call, hold another external call. The first call is placed on hold.
¤Ext. Call . . . Use to enter the number of the second party . . . The active call is put on hold and
the second party is called.
If the second party does not answer: End
Ending a consultation call
¤Options End active call OK . . . The connection to the first caller is reactivated.
or
¤Press the End call key . . . The first party is called again.
Call swapping
Switching between two calls (call swapping). The other call is placed on hold.
¤During an external call, dial the number of a second party (consultation call) or accept a waiting caller
. . . The display shows the numbers/names of both parties.
¤The control key enables you to switch between the parties.
Ending a currently active call
¤Options End active call OK . . . The connection to the other caller is reactivated.
or
¤Press the End call key . . . The first party is called again.
Conference call
You can speak to two people simultaneously.
¤During an external call, dial the number of a second party (consultation call) or accept a waiting caller
. . . Then:
Start the conference call:
¤Conf. . . . All the callers can hear each other and hold a call with each other.
Switching back to call swapping:
¤End Conf. . . . You are reconnected to the party with whom the conference call was initiated.
End call with both participants:
¤Press the End call key
Each party can end their participation in the conference call by pressing the End call key or hanging
up.
Transferring a call to another party
Transfer a call to another party (connect).
¤Use the Display key Ext. Call to start an external consultation call . . . Use to enter the number of
the second party . . . The active call is put on hold . . . The second party is called Press the End call
key (during the call or before the second party has answered) . . . The call is forwarded to the
second party.
Reject the call: ¤Options Reject waiting call OK
Accept the call: ¤Accept Speak to the new caller. The first call is placed on hold.
End the call, resume the call on hold:
¤Press the End call key .
The options for transferring calls must be set up correctly for the phone system.

18 Making calls
During a conversation
Handsfree mode
Activating/deactivating handsfree mode during a call and when establishing a connection:
¤Press the handsfree key
Call volume
Muting the microphone
When the microphone is switched off, callers will no longer hear you.
Switch the microphone on/off during a call: Press .
Adjust the microphone sensitivity
Adjust the microphone sensitivity for the receiver or wired headset.
Set the acoustic profile to loud surroundings:
¤Press and hold the button Use to set the sensitivity Save
Network services
Network services are dependent on the phone system and network provider.
Deactivating Calling Line Identification for the next call
By default for an outgoing call, the phone number is sent and can be shown with the caller on the display
(CLIP = CLI Presentation).When the caller's number is withheld, it is not shown on the called party’s display.
The call is made anonymously.
¤. . . Use to select Select Services OK Next Call Anonym. OK . . . Use
to enter the number Dial . . . The connection is established without CLI
Call divert
When call divert is enabled, incoming calls are forwarded to another connection.
¤. . . Use to select Select Services OK Call Divert OK Select when call
divert is to apply OK
Placing the handset in the charging cradle during a call:
¤Press and hold down the handsfree key . . . Place the handset in the charging
cradle . . . hold for a further 2 seconds
Applies for the mode currently being used (handsfree, receiver or headset):
¤Press . . . use to set the volume Save
The setting is automatically saved after around 3 seconds, even if Save is not pressed.
or: Briefly press the Profile key
¤. . . Use to select Settings OK Audio Settings OK Mic
Sensitivity OK Use to select Earpiece / Corded headset Use to set the
sensitivity Save
To activate/deactivate the features, a code is sent to the telephone network.
All Calls: Calls are forwarded immediately.
No Answer: Calls are diverted if no one accepts the call within several rings.
When Busy: Calls are diverted if the line is busy.
Enable/disable: ¤Status: . . . Use to select On or Off
Enter the number for call divert:
¤To Phone Number . . . Use to enter the number
Enable: ¤Send

Making calls 19
Call waiting
During a call, a call waiting tone indicates another caller. If the number is being transferred, you you see the
number or the name of the caller on the display.
Once you have accepted the waiting call, you can switch between the two parties (Call Swap) or speak to
them both at the same time (Conference).
Prevent/permit call waiting
¤. . . Use to select Select Services OK Call Waiting OK
Do not put through call
When you do not want to be disturbed, you can arrange for no more calls to be put through.
¤. . . Use to select Select Services OK Do Not Disturb OK
Cancelling ringback
After you have initiated a ringback, you can cancel it before the other party calls back.
¤. . . Use to select Select Services OK Ringback Off OK . . . You receive a
confirmation from the phone network Press the End call key
Reject waiting caller: ¤Reject . . . The waiting caller hears the busy tone
Accepting a call: ¤Accept
Enable/disable: ¤Status: . . . Use to select On or Off
Enable: ¤Send
Enable/disable: ¤Status: . . . Use to select On or Off
Enable: ¤Send
You can only activate one ringback at a time. Activating a ringback will automatically
cancel any ringback that is already active.
If the ringback is indicated before you are able to cancel it: Press the End call
key

20 Call lists
Call lists
The telephone saves different types of calls (missed, accepted and outgoing calls) in lists.
List entry
The following information is displayed in the list entries::
•The list type (in the header)
•Icon for the type of entry:
•Caller's number. If the number is stored in the directory, the name and
number type ( Phone (Home), Phone (Office), Phone (Mobile))
are shown instead. In the event of missed calls, the number of missed calls
from this number is also shown in square brackets.
•Connection by which the call was received/made
•Date and time of call (if set)
Opening the call list
Calling back a caller from the call list
Additional options
To display the numbers of missed and received calls in the call lists, the relevant
option must be enabled on the OpenScape Cordless IP V2.
Missed calls,
Accepted calls,
Outgoing calls (redial list)
Via the display key: ¤Calls select the list OK
Via the menu: ¤ . . . use to select Call Lists OK select the
list OK
Via the Message key (missed calls):
¤Press the Message key Missed Calls: OK
¤ . . . use to select Call Lists OK select list OK select entry
Press the Talk key
¤ . . . use to select Call Lists OK select list OK . . . possible
options:
View an entry: ¤select entry View
Number into directory:
¤select entry Options Copy to Directory OK
Delete an entry: ¤select entry Options Delete entry OK
Delete list: ¤Options Delete List OK Yes
All calls
Frank
Today, 15:40 [3]
089563795
13.05.21, 18:32
Susan Black
12.05.21, 13:12
View Options
Example
Other manuals for OpenScape SL6
2
Table of contents
Other Unify Cordless Telephone manuals

Unify
Unify OpenScape SL6 User manual

Unify
Unify Gigaset S400 professional User manual

Unify
Unify Gigaset M2 plus professional User manual

Unify
Unify Gigaset S4 professional User manual

Unify
Unify OpenScape DECT Phone S5 Base User manual

Unify
Unify Gigaset M2 User manual

Unify
Unify OpenStage SL4 professional HiPath Cordless... User manual
Popular Cordless Telephone manuals by other brands

Sanyo
Sanyo CLT-656 instruction manual

Sharper Image
Sharper Image SP6075 user manual

Planet Networking & Communication
Planet Networking & Communication VIP - 191 manual

Motorola
Motorola MA360 Series Start here

Olympia
Olympia DECT 5000 manual

Radio Shack
Radio Shack Wireless Phone Jack System owner's manual