manuals.online logo
Brands
  1. Home
  2. •
  3. Brands
  4. •
  5. Unilamp
  6. •
  7. Outdoor Light
  8. •
  9. Unilamp SIRIUS 300 User manual

Unilamp SIRIUS 300 User manual

1/5 FR-DM-17 REV.03 EFF 15/09/17
INSTALLATION MANUAL
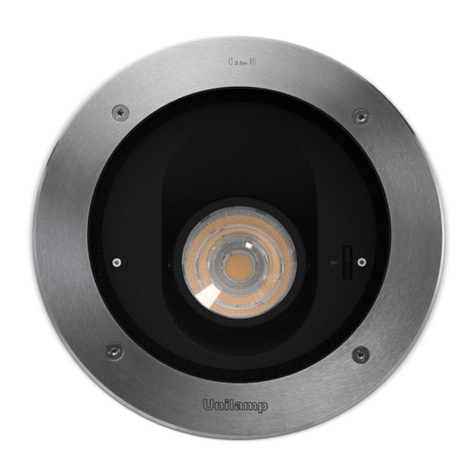
PRODUCT NAME : SIRIUS 300 - CC Ground Recess
No. Ordering Code
1.
2.
3.
4.
5.
6.
Glass
Temperature
At Ta 50°C
Last Revised On : 14/05/2021 REV.02
7.
Input
Light Emitting Diode
(LED)
1-7
1
IP67
lll
: SIRIUS 300 - CV Ground Recess
Recess Housing Available separately/¡Åͧ½§¾×é¹ á¡¨íÒ˹ÒÂ
Ordering Code/ÃËÑÊÊÑè§«×éÍ : 0485-0-9-000-01
1.1
Do not cut or
disconnect the cable
between this area.
ËÒÁµÑ´µÍÊÒÂ俺ÃÔàdz¹Õé
Cable pipe
·ÍÊÒÂä¿
Water drainage pipe
·͹éíÒ·Ôé§
Please note the
ground level.
¢ͤÇÃÃÐÇѧ: ¼ÔÇ˹Ңͧ
µÑÇâ¤Á¡Ñº¼ÔǾ×鹤ÇÃÍÂÙã¹
ÃйҺà´ÕÂǡѹ
370
0°
gravel
¡͹¡ÃÇ´
Cable/ÊÒÂä¿
2.1
2.2
Cable size : 3x1.00 mm. Ø5-9.5mm.
¢¹Ò´ÊÒÂä¿
256
306
2
Take out steel supporter
when concrete completely cured.
¶Í´µÑǤéíÒ¡ÅͧàËÅ硽§¾×é¹ÍÍ¡
àÁ×èͤ͹¡ÃÕµá¢ç§µÑÇ
2
1.2
53
322 93
66
138
135
138
(CV) Constant Voltage - remote driver / 24VDC input 9068-A/B/C/K/H-2-551-01
9068-A/B/C/K/H-3-548/549/550-01
9068-B/C/K/H-2-688-01
9068-A/B/C/K/H-2-552-01
9068-A/B/C/K/H-2-553-01
9068-A/B/C/K/H-5-548/549/550-01
9068-A/B/C/K/H-3/5-695/696/697-01
(CC) Constant Current 500mA - integrate driver / 220-240VAC input
(CC) Constant Current 250mA -remote driver/Uin max 48 VDC input
53
53
56.5
56.5
56.5
53.5
(CC) Constant Current 700mA - integrate driver / 220-240VAC input
2/5
3
FR-DM-17 REV.03 EFF 15/09/17
4
Installation complete
¡ÒõԴµÑé§àÊÃç¨ÊÁºÙó
3.1
3.2
For on-off and remote driver./ÊíÒËÃѺÃкºà»´-»´ áÅÐÃÕâÁ· ä´ÃàÇÍÃ
IP68 water tight connecting device 3 Pole. Cable Diameter 5.0-9.5mm.
Available Separately/ªØ´¢͵ÍÊÒÂ信ѹ¹éíÒIP68, ÊíÒËÃѺÊÒÂä¿ 3ÊÒÂ
¨íÒ˹ÒÂᡵÒ§ËÒ¡ Ordering Code : 0411-0-9-000-00
See connecting detail manual./´ÙÃÒÂÅÐàÍÕ´·Õè¤ÙÁ×Í¡ÒõԴµÑé§
AC/N (Blue) ÊÕ¹éíÒà§Ô¹
AC/L (Brown) ÊÕ¹éíÒµÒÅ
-V (Black) ÊÕ´íÒ
+V (Red) ÊÕá´§
Input/ä¿à¢Ò 220-240v
Output to Luminaires
For Constant Voltage LED 24Vdc (CV)
ÊÒÂÍÍ¡à¢Òâ¤Áä¿
Accessory available separately./ÍØ»¡Ã³ àÊÃÔÁ ¨íÒ˹ÒÂᡵÒ§ËÒ¡ Distance from luminaire to Driver/transformer
ÃÐÂзҧ¨Ò¡µÑÇâ¤Á¶Ö§ ä´ÃàÇÍÃ /ËÁÍá»Å§
Ordering Code Product Name Maximum number of luminaires
for parallel connection /
¨íҹǹâ¤Á㹡ÒõÍẺ¢¹Ò¹
Connected fixtures/
â¤Á·ÕèµÔ´µÑé§
1.00 mm21.50 mm22.00 mm2
Conductor size / ¢¹Ò´ÊÒÂä¿
0446-0-9-000-00 LED Constant Voltage
Driver 24Vdc 40W.
0445-0-9-000-00 LED Constant Voltage
Driver 24Vdc 150W.
1 luminaire/â¤Á 110 m
2 luminaires/â¤Á 55 m
160 m 220 m
80 m 110 m
1-2 luminaires/â¤Á
1 luminaire/â¤Á
2 luminaires/â¤Á
3 luminaires/â¤Á
4 luminaires/â¤Á
6 luminaires/â¤Á 20 m
40 m
22 m
60 m
35 m
30 m
70 m
45 m
40 m
5 luminaires/â¤Á
30 m 40 m 60 m
1-6 luminaires/â¤Á 110 m
55 m
160 m 220 m
80 m 110 m
Last Revised On : 14/05/2021 REV.02
3/5 FR-DM-17 REV.03 EFF 15/09/17
For 1-10V dimming and DALI system.
C B
A
Cable Size/¢¹Ò´ÊÒÂä¿ : 5x1.00 mm. Ø 7.1 -13 mm.
2
ÊíÒËÃѺÃкº´ÔÁ1-10VáÅÐÃкºDALI
A = 38-40 mm.
B = 8-10 mm.
C = 30-32 mm.
Green/Yellow (ÊÕà¢ÕÂÇ/ÊÕàËÅ×ͧ) :
Brown (ÊÕ¹éíÒµÒÅ) : L
Blue (ÊÕ¹éíÒà§Ô¹) : N
White (ÊÕ¢ÒÇ) : +
Black (ÊÕ´íÒ) : -
IP68 water tight connecting device 5 Pole.Cable Diameter 7.1-13mm.
Available Separately/ªØ´¢͵ÍÊÒÂ信ѹ¹éíÒIP68, ÊíÒËÃѺÊÒÂä¿ 5 ÊÒÂ
¨íÒ˹ÒÂᡵÒ§ËÒ¡
Ordering Code : 0413-0-9-000-00
1.
2.
3.
4.
5.
Remark :
ËÁÒÂà˵Ø
Installation should be carried out by a qualified
electrician in accordance with appropriate national
wiring regulation.
¡ÒõԴµÑé§â¤Áä¿¿ÒáÅÐÍØ»¡Ã³ ¤ÇôíÒà¹Ô¹¡ÒÃâ´ÂªÒ§ä¿¿Ò ·ÕèÁÕ
¤ÇÒÁÃÙáÅФÇÒÁªíÒ¹Ò 㹡ÒõԴµÑé§ÍØ»¡Ã³ä¿¿Ò â´Â੾ÒеÒÁ
ÁÒµÃฐÒ¹¢Í§¡ÒÃä¿¿Ò
Disconnect the power before changing the lamp.
»´ÊÇÔ·ªä¿·Ø¡¤ÃÑé§·Õèà»ÅÕè¹ËÅÍ´ä¿
For Class1 luminaire, the installation must be completed
with earthing.
ÊíÒËÃѺâ¤Áä¿·ÕèÁÕ¡Òûͧ¡Ñ¹ä¿¿ÒÃÑèÇÃдѺ1 ¡ÒõԴµÑé§µͧµÍÊÒÂ
´Ô¹µÒÁÁÒµÃฐÒ¹¤ÇÒÁ»ÅÍ´ÀÑ´ÇÂ
Do not exceed the maximum wattage.
ËÒÁãªËÅÍ´ä¿·ÕèÁÕ¢¹Ò´Çѵµà¡Ô¹¡ÇÒ·ÕèÃÐºØ ËÃ×ÍãªËÅÍ´¼Ô´»ÃÐàÀ·
Don't touch LED while maintaining or cleaning.
ËÒÁÊÑÁ¼ÑÊËÅÍ´ LED ¢³ÐºíÒÃØ§ÃÑ¡ÉÒ ËÃ×Í·íÒ¤ÇÒÁÊÐÍÒ´
1.
2.
Warning :
¢ͤÇÃÃÐÇѧ
The manufacturer will not be liable or held responsible
for any incorrect installation, misuse or improper use
and unauthorised modification to the fittings. Failure
to comply with mentioned warning may cause serious
damage or serious injury to persons, animals or
objects. If any modification is required please consult
your dealer for the details.
·Ò§¼Ù¼ÅÔµäÁÊÒÁÒöÃѺ¼Ô´ªÍºã¹¤ÇÒÁàÊÕÂËÒÂã´æ·Õèà¡Ô´¨Ò¡¡ÒÃ
µÔ´µÑé§äÁ¶Ù¡ÇÔ¸Õ, ãª§Ò¹¼Ô´»ÃÐàÀ·ËÃ×Í´Ñ´á»Å§µÑÇâ¤Áã¹·Ø¡¡Ã³Õ
«Öè§ ÊÔè§¼Ô´»¡µÔàËÅÒ¹Õé ÍÒ¨·íÒãËà¡Ô´ÍѹµÃÒ¡Ѻ ¤¹ ÊѵÇ ÊÔ觢ͧ
ËÒ¡ÁÕ¢ÍʧÊÑÂËÃ×ÍÁÕ¤ÇÒÁµͧ¡ÒûÃѺáµ§µÑÇâ¤Á ãËàËÁÒÐÊÁ¡Ñº
¡ÒÃãª§Ò¹ ¡ÃسҵԴµ͵ÑÇá·¹¨íÒ˹ÒÂËÃ×ͼÙ¼ÅÔµ
Where damage has occured to the fittings, please
make the replacement with standard parts before use.
㹡óշÕèÁÕªÔé¹Êǹ»ÃСͺã´à¡Ô´¤ÇÒÁàÊÕÂËÒÂ¡ÃØ³Òà»ÅÕ蹪Ôé¹
ÊǹãËÁ¡͹¡ÒÃãª§Ò¹·Ø¡¤ÃÑé§ à¾×èͤÇÒÁ»ÅÍ´ÀÑÂ
Place the gravel 20-30 cm.depth underneath the casing for water
drainage (Pic-1).Then do the testing by filling water into the casing
and let it drain.The water should be drained out by 30 minutes.
If not,the additional drainage pipe or other system must be applied
(Pic-2)
¤ÇÃÇÒ§¡͹¡ÃÇ´ãµ¡Åͧ½§¾×é¹·ÕèÃÐÂÐÅÖ¡»ÃÐÁÒ³ 20-30 «Á. à¾×èͪÇÂÃкÒÂ
¹éíÒ·Õè·ÇÁ¢Ñ§µÑÇâ¤Áä¿ ÊÒÁÒö·´Êͺ¡ÒÃÃкÒ¹éíÒâ´Âà·¹éíÒãÊ¡ÅͧãËàµçÁ
¹éíҨеͧÃкÒÂÍÍ¡ËÁ´ÀÒÂã¹àÇÅÒ 30¹Ò·Õ ËÒ¡äÁà»¹µÒÁ¹Ñ鹤ÇÃÁÕ¡ÒõÍ
·ÍÃкÒ¹éíÒà¾ÔèÁàµÔÁ
General installation guide ( highly recommended)
¢Íá¹Ð¹íÒ㹡ÒõԴµÑé§
Pic-1
ÃÙ»-1
Pic-2
ÃÙ»-2
20-30 cm.
Water drainage pipe
·͹éíÒ·Ôé§
Cable pipe
·ÍÊÒÂä¿
Last Revised On : 14/05/2021 REV.02
4/5
Installation should not be done under high humidity enviroment i.e.
rainy day or after the rain,foggy weather....ect.
äÁ¤ÇõԴµÑé§â¤Áä¿ã¹ªǧ·ÕèÁÕ¤ÇÒÁª×é¹ÊÙ§àª¹ Çѹ·Õè½¹µ¡µÅÍ´ËÃ×͵ԴµÑé§ËÅѧ
½¹ËÂØ´µ¡à¾ÃÒШзíÒãË¤ÇÒÁª×é¹¶Ù¡¢Ñ§äÇã¹µÑÇâ¤Áä¿ËÅѧ¨Ò¡¹Ñ鹨Ðà¡Ô´¡ÒÃ
¤Çºá¹¹à»¹ÅÐÍͧËÃ×ÍË´¹éíÒà¡ÒеԴºÃÔàdzãµ¡ÃШ¡ÀÒÂã¹µÑÇâ¤Áä¿
Do not let the exposed part of the fittings be covered by the soil,dried weed or
foliage as well as corrosive or aggressive substancechemicals.
ÍÂÒ»ÅÍÂãËÁÕÊÔè§Ê¡»Ã¡àª¹ àÈÉ´Ô¹ ãºäÁ ËÃ×Í ËÒáË§ÃÇÁ¶Ö§à¤ÁÕ·Õèà»¹ÊÒÃ-¡Ñ´¡Ã͹ÁÒ»¡
¤ÅØÁÊÐÊÁºÃÔàdz˹Ò¾×é¹¼ÔǵÑÇâ¤Áä¿
Do not throw or drop any hard objects onto the top of fittings.
ÍÂÒãËÇѵ¶Ø·Õèà»¹¢Í§á¢ç§ËÅ¹ ËÃ×͵¡¡ÃÐá·¡ãÊºÃÔàdz˹Ò¾×é¹¼ÔǢͧµÑÇâ¤Á
The surface temperature of the fitting can be very high after continuation in
service.
àÁ×èÍà»´ä¿·Ôé§äÇã¹ÃÐÂÐàÇÅÒ˹Ö觨Ðà¡Ô´¤ÇÒÁÃ͹ÊÐÊÁºÃÔàdz´Ò¹º¹¢Í§µÑÇâ¤Á俤ÇÃÃÐÁÑ´ÃÐÇѧ
¡ÒÃÊÑÁ¼Ñʶ١ºÃÔàdz´Ñ§¡ÅÒÇ
Proper use of this fitting must be observed.
¤ÇþԨÒóҤÇÒÁàËÁÒÐÊÁ¢Í§¾×é¹·ÕèËÃ×͵íÒá˹§·Õè¨ÐµÔ´µÑé§µÑÇâ¤Áä¿ µÑÇÍÂÒ§ àª¹ ÁÕ
¹éíҢѧà»¹»ÃШíÒ㹺ÃÔàdz¹Ñé¹ËÃ×ÍäÁ? , Çѵ¶ØµÒ§æ àª¹ ´Ô¹,àÈÉãºäÁãºËÒÁÕâÍ¡ÒÈ·Õè¨ÐÁÒ»¡
¤ÅØÁÊÐÊÁº¹Ë¹Òâ¤Áà»¹»ÃÔÁÒ³ÁÒ¡ËÃ×ÍäÁ? áÅÐäÁ¤ÇõԴµÑé§ã¹ºÃÔàdz·ÕèÍÒ¨ÁÕâÍ¡Òȶ١ÊÑÁ¼ÑÊ
â´Â¤¹ â´Â੾ÒÐà´ç¡àÅç¡ËÃ×ÍÊѵÇàÅÕé§
FR-DM-17 REV.03 EFF 15/09/17
No
äÁ¶Ù¡µͧ
Yes
¶Ù¡µͧ No
äÁ¶Ù¡µͧ
Cable Size/¢¹Ò´ÊÒÂä¿ : 3x1.00 mm. Ø5-9.5 mm.
2
NO Do not touch the LED because it may shorten the life time or the LED can be
breaking down.
ËÒÁÊÑÁ¼ÑÊËÅÍ´ LED â´Âà´ç´¢Ò´ à¾ÃÒШзíÒãËËÅÍ´àÊ×èÍÁÊÀÒ¾
Cable Size/¢¹Ò´ÊÒÂä¿ : 2x1.00 mm. Ø5-9.5 mm.
2
For class1
For class3 lll
0.5 m
Minimum distance to lighted surface.
ÃÐÂÐËÒ§¢Ñé¹µèíÒ ¨Ò¡Ë¹Òâ¤Á¶Ö§¾×é¹¼ÔÇ·Õè¶Ù¡ÊͧÊÇÒ§
Last Revised On : 14/05/2021 REV.02
5/5
Not using chemical compounds and aggressive agents such as , weed repellents
fertilizers , acid solvent and contaminated irrigation water near the Luminaires.
ËÒÁãªÊÒÃà¤ÁÕàª¹ »ØÂ, ÂÒ¡íҨѴÈѵÃپת, »Ù¹¢ÒÇ, ÊÒÃÅÐÅÒ·Õèà»¹¡Ã´ áÅйéíÒ»¹à»͹ÊÒÃà¤ÁÕ
ºÃÔàdz·ÕèµÔ´µÑé§â¤Áä¿
Environmental protection: Waste electrical products should not be disposed of
with household waste. please recycle where facilities exist.check with your local
authority or retailer for recycling advice.
ËÒÁ·Ôé§¼ÅÔµÀѳ±¹ÕéÃÇÁ¡Ñº¢ÂÐ㹤ÃÑÇàÃ×͹ª¹Ô´Í×è¹æ àÁ×èÍÊÔé¹ÊØ´ÍÒÂØ¡ÒÃãª§Ò¹ â»Ã´á¡¼ÅÔµÀѳ±
ÍÍ¡¨Ò¡¢Í§àÊÕ»ÃÐàÀ·Í×è¹æ áÅÐÃÕä«à¤ÔÅÍÂÒ§àËÁÒÐÊÁ à¾×èÍÊ§àÊÃÔÁ¡ÒùíÒ·ÃѾÂҡáÅѺÁÒãª«éíÒ «Öè§
¨ÐªÇ»ͧ¡Ñ¹ÍѹµÃÒµÍÊÔè§áÇ´ÅÍÁËÃ×ÍÊØ¢ÀÒ¾¢Í§Á¹ØÉÂ·Õèà¡Ô´¨Ò¡¡Ò÷Ôé§¢ÂÐâ´ÂäÁÁÕ¡ÒäǺ¤ØÁ
FR-DM-17 REV.03 EFF 15/09/17
The luminaire should be positioned so that prolonged staring into the luminaire at
a distance closer than 0.5m in not expected.
µíÒá˹§·ÕèµÔ´µÑ駴ǧâ¤Á¤ÇÃÍÂÙ㹨ش·ÕèáʧäÁÊͧà¢ҴǧµÒâ´ÂµÃ§à»¹àÇÅÒ¹Ò¹ ËÒ¡à¢Òã¡Åã¹
ÃÐÂйÍ¡ÇÒ 0.5 Á.
Any damaged safety glass cover must be replaced only with the original
spare part.
àÁ×èÍ¡ÃШ¡à¡Ô´¤ÇÒÁàÊÕÂËÒ à¾×èͤÇÒÁ»ÅÍ´ÀѤÇÃÊÑè§ÍÐäËÅá·¨Ò¡¼Ù¼ÅÔµà·Ò¹Ñé¹
No
Walk over fittings.
Max 1,000 Kgs. constant pressure load.
Vehicles with pneumatic tyres can drive
over the fittings at the speed of 20 km/h.
Not suitable to be used in traffic lanes.
â¤Ã§ÊÃÒ§¢Í§â¤Á俪¹Ô´¹ÕéÊÒÁÒöà´Ô¹àËÂÕºº¹Ë¹Òâ¤Áä´
áÅÐÃѺáç¡´·Ñºä´ 1,000 ¡¡. ÊÒÁÒöÃѺáçö¹µ·ÕèÇÔè§
¼Ò¹·Õèãª¤ÇÒÁàÃçÇ 20 ¡Á./ªÁ. â¤ÁÃØ¹¹ÕéäÁàËÁÒÐÊÁ¡Ñº¡ÒõԴµÑé§
ºÃÔàdzã¹àÊ¹·Ò§¡ÒèÃÒ¨Ã
Last Revised On : 14/05/2021 REV.02

This manual suits for next models

79

Other Unilamp Outdoor Light manuals

Unilamp HEXAHEDRON User manual

Unilamp

Unilamp HEXAHEDRON User manual

Unilamp Small SIROCCO User manual

Unilamp

Unilamp Small SIROCCO User manual

Unilamp ZOUK2 User manual

Unilamp

Unilamp ZOUK2 User manual

Unilamp QUARK Square - Asymmetric User manual

Unilamp

Unilamp QUARK Square - Asymmetric User manual

Unilamp XEON Cross User manual

Unilamp

Unilamp XEON Cross User manual

Unilamp Mini PETINA 1 User manual

Unilamp

Unilamp Mini PETINA 1 User manual

Unilamp 9007-4-2-361-91 User manual

Unilamp

Unilamp 9007-4-2-361-91 User manual

Unilamp SABER/1 User manual

Unilamp

Unilamp SABER/1 User manual

Unilamp ZET1 User manual

Unilamp

Unilamp ZET1 User manual

Unilamp Medium ALPHA Square User manual

Unilamp

Unilamp Medium ALPHA Square User manual

Unilamp Mini KUBIK - Ground Mount User manual

Unilamp

Unilamp Mini KUBIK - Ground Mount User manual

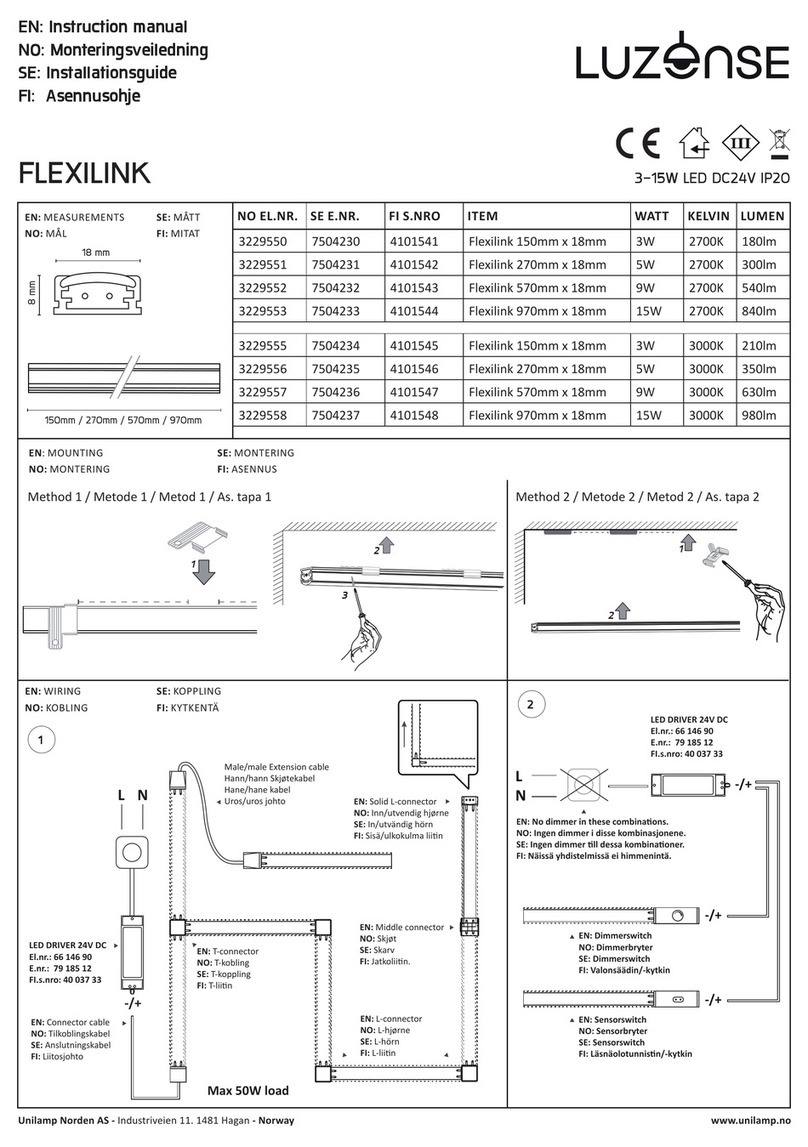
Unilamp FLEXILINK User manual

Unilamp

Unilamp FLEXILINK User manual

Unilamp Mini CHARISMA1 Square-Bollard User manual

Unilamp

Unilamp Mini CHARISMA1 Square-Bollard User manual

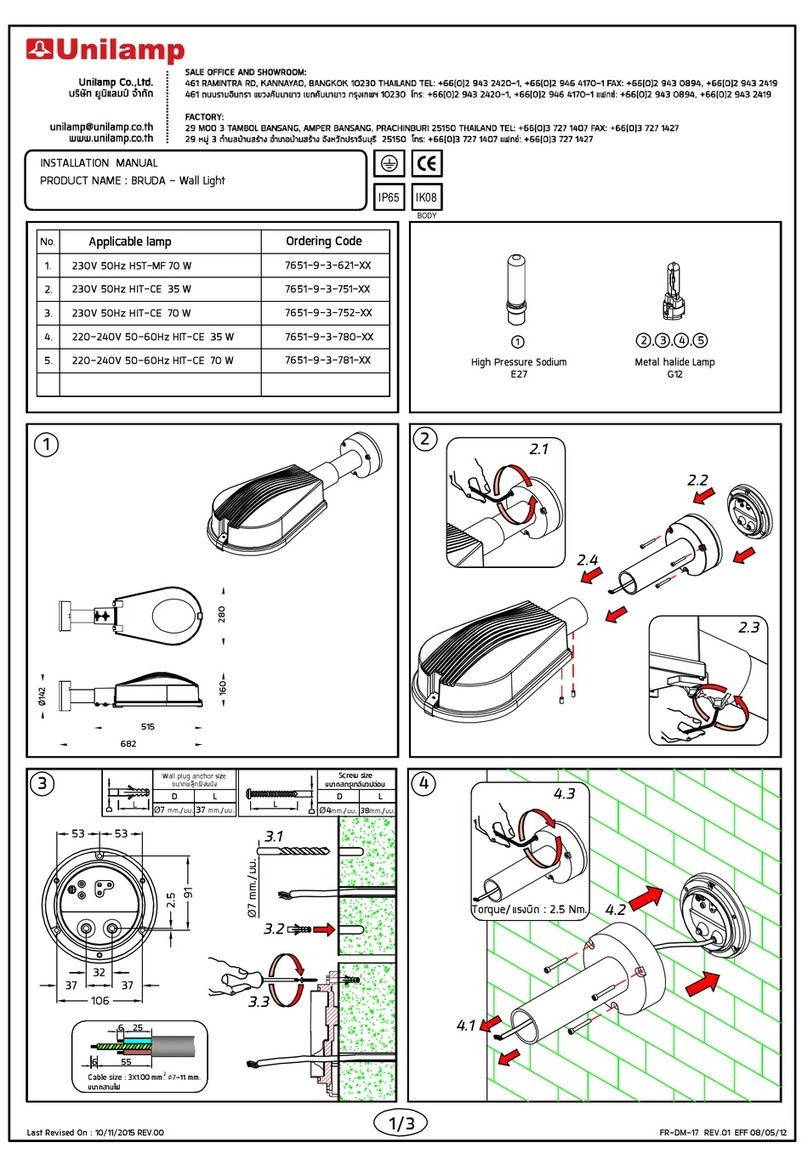
Unilamp BRUDA User manual

Unilamp

Unilamp BRUDA User manual

Unilamp ATOM - CC Spotlight User manual

Unilamp

Unilamp ATOM - CC Spotlight User manual

Unilamp CASA User manual

Unilamp

Unilamp CASA User manual

Unilamp BUZZ1 User manual

Unilamp

Unilamp BUZZ1 User manual

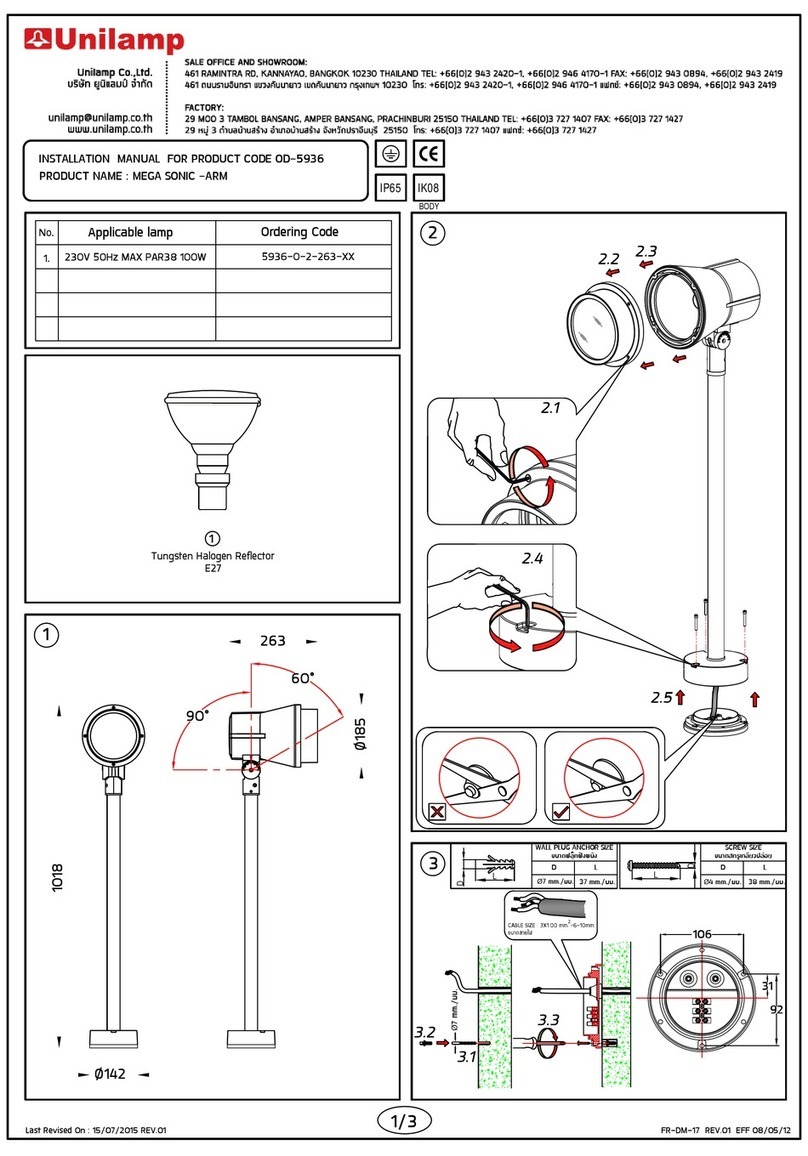
Unilamp MEGA SONIC-ARM User manual

Unilamp

Unilamp MEGA SONIC-ARM User manual

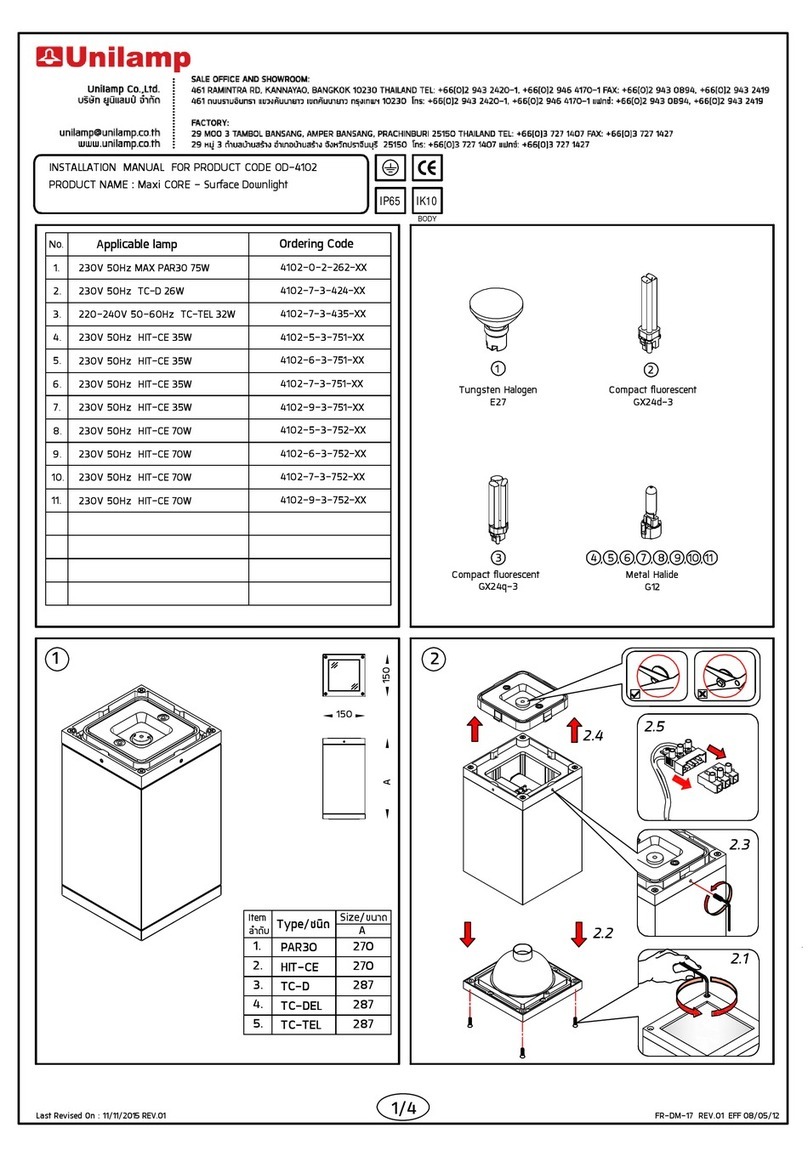
Unilamp Maxi CORE OD-4102 User manual

Unilamp

Unilamp Maxi CORE OD-4102 User manual
Unilamp SIROCCO User manual

Unilamp

Unilamp SIROCCO User manual
Unilamp TOWER3 User manual

Unilamp

Unilamp TOWER3 User manual

Unilamp Mini AGAR Prismatic - Bollard User manual

Unilamp

Unilamp Mini AGAR Prismatic - Bollard User manual

Unilamp MACRON Flat - Bollard User manual
Unilamp

Unilamp MACRON Flat - Bollard User manual

Unilamp CONE 3 User manual

Unilamp

Unilamp CONE 3 User manual

Popular Outdoor Light manuals by other brands

Kichler Lighting HELEN 37536 instructions

Kichler Lighting

Kichler Lighting HELEN 37536 instructions

Thorn OXANE L installation instructions

Thorn

Thorn OXANE L installation instructions

esotec Solar Globe Light multicolor 20 operating instructions

esotec

esotec Solar Globe Light multicolor 20 operating instructions

mitzi HL200201 ELLIS Assembly and mounting instructions

mitzi

mitzi HL200201 ELLIS Assembly and mounting instructions

HEPER TILA S AFX 3 Module Installation & maintenance instructions

HEPER

HEPER TILA S AFX 3 Module Installation & maintenance instructions

Designplan TRON 180 installation instructions

Designplan

Designplan TRON 180 installation instructions

Sealey LED37 instructions

Sealey

Sealey LED37 instructions

nordlux VEJERS Mounting instruction

nordlux

nordlux VEJERS Mounting instruction

SImx ELITE LED LHTC637 installation instructions

SImx

SImx ELITE LED LHTC637 installation instructions

GEV CAROLINE 10833 manual

GEV

GEV CAROLINE 10833 manual

WE-EF PFL540 LED Installation and maintenance instructions

WE-EF

WE-EF PFL540 LED Installation and maintenance instructions

HEPER DOGO Side LW6048.585-US Installation & maintenance instructions

HEPER

HEPER DOGO Side LW6048.585-US Installation & maintenance instructions

BEGA 84 253 Installation and technical information

BEGA

BEGA 84 253 Installation and technical information

HEPER LW8034.003-US Installation & maintenance instructions

HEPER

HEPER LW8034.003-US Installation & maintenance instructions

HEPER MINIMO Installation & maintenance instructions

HEPER

HEPER MINIMO Installation & maintenance instructions

LIGMAN BAMBOO 3 installation manual

LIGMAN

LIGMAN BAMBOO 3 installation manual

Maretti TUBE CUBE WALL 14.4998.04 quick start guide

Maretti

Maretti TUBE CUBE WALL 14.4998.04 quick start guide

Maxim Lighting Carriage House VX 40428WGOB installation instructions

Maxim Lighting

Maxim Lighting Carriage House VX 40428WGOB installation instructions

manuals.online logo
manuals.online logoBrands
  • About & Mission
  • Contact us
  • Privacy Policy
  • Terms and Conditions

Copyright 2025 Manuals.Online. All Rights Reserved.