UNITED UPC-8027 User manual

INSTRUCTIONS MANUAL
UPC-8027
PORTABLE AIR CONDITIONER
Read and save these instructions for future reference

Content
I. Notes
II. Features and Components
III. Installation and Adjustment
IV. Control Setting
V. Drainage Instructions
VI. Maintenance
VII. Troubleshooting
VIII. Appendix
Thank you for choosing the luxurious and elegant mobile air conditioning.
Please keep the manual for later review, and read the manual carefully before
use.

I. Notes
Notes:
*The air conditioning is only suitable for indoor use, and is not suitable for other
applications.
*Follow local grid interconnection rules while installing the air conditioning and ensure
that it is properly grounded. If you have any question on electrical installation, follow
the instructions of the manufacturer, and if necessary, ask a professional electrician to
install it.
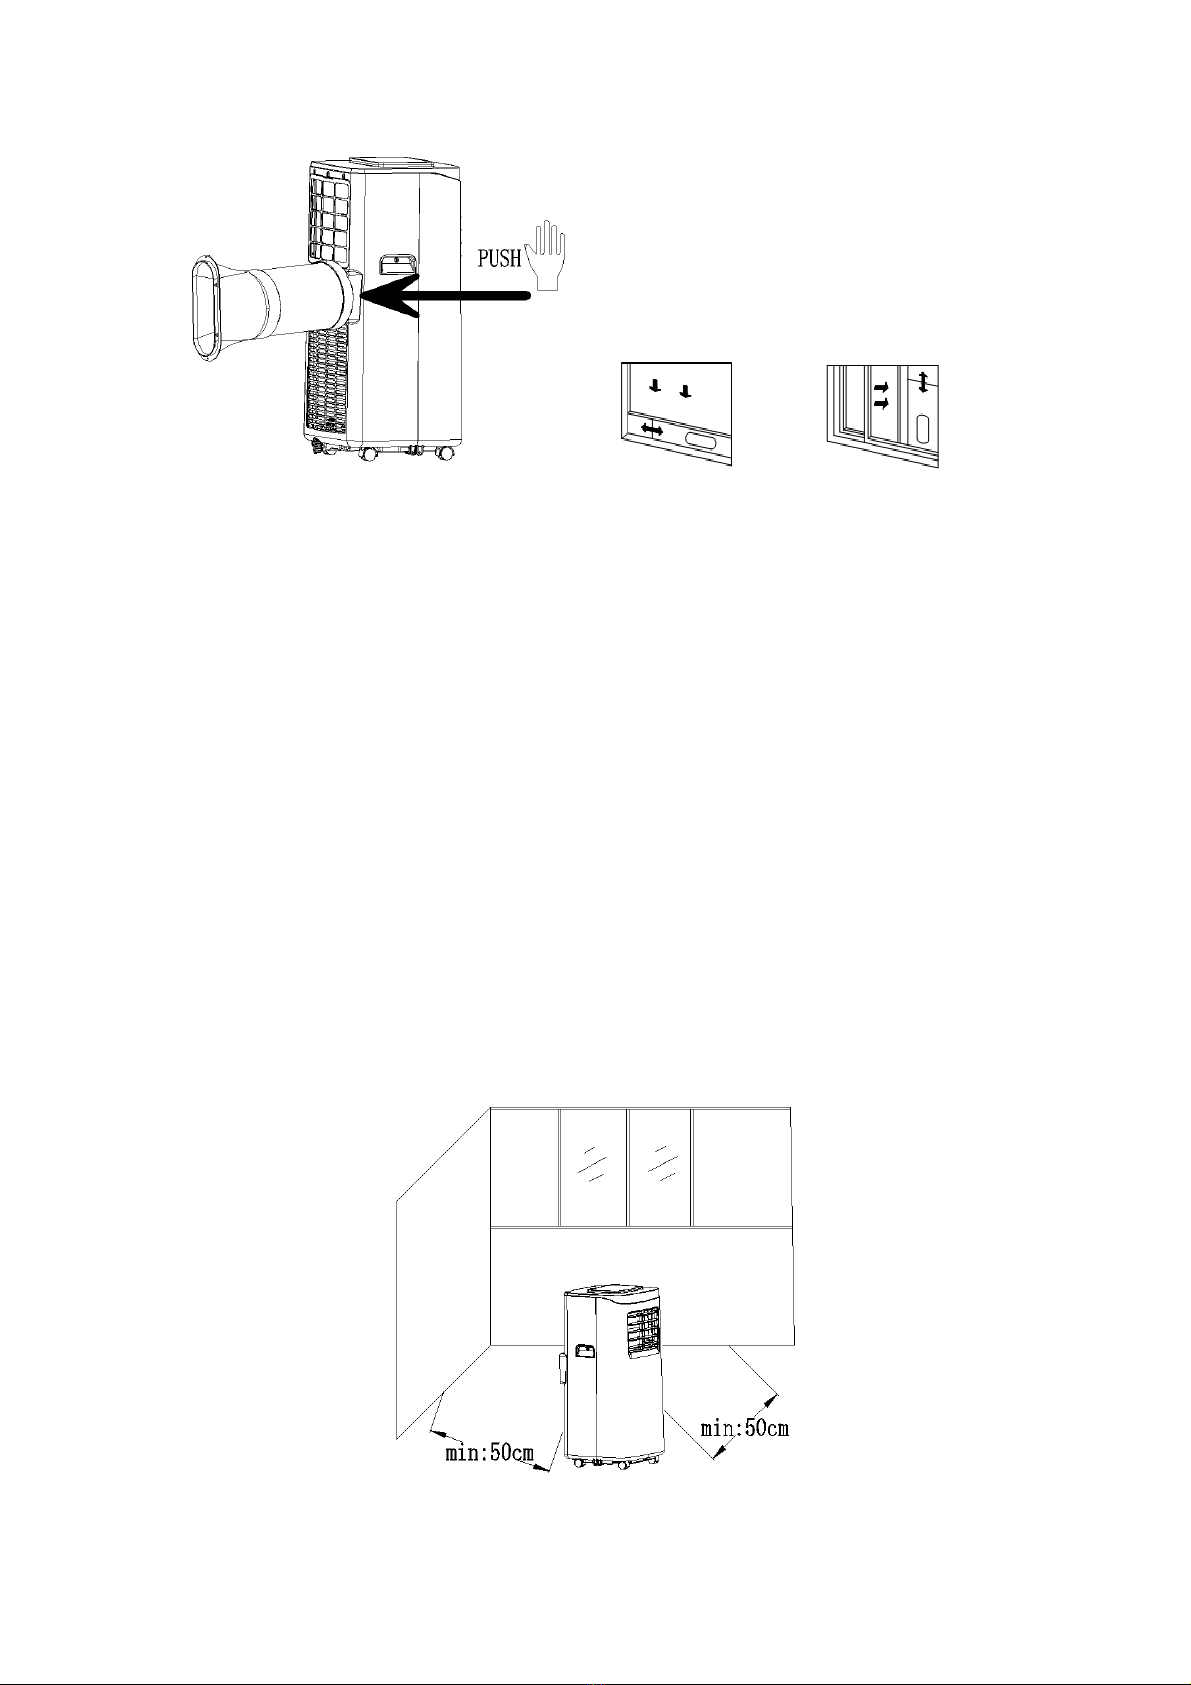
*Place the machine in a flat and dry place and keep a distance of above 50cm between
the machine and the surrounding objects or walls.
*After the air conditioning is installed, ensure that the power plug is intact and firmly
plugged into the power outlet, and place the power cord orderly to prevent someone
from being tripped or pulling out the plug.
*Do not put any object into the air inlet and outlet of the air conditioning. Keep the air
inlet and outlet free from obstructions.
*When drainage pipes are installed, ensure that the drainage pipes are properly
connected, and are not distorted or bended.
* While adjusting the upper and lower wind-guide strips of the air outlet, pluck it with
hands gently to avoid damaging wind-guide strips.
*When moving the machine, make sure that it is in an upright position.
*The machine should stay away from gasoline, flammable gas, stoves and other heat
sources.
* Don't disassemble, overhaul and modify the machine arbitrarily, otherwise it will
cause a machine malfunction or even bring harm to persons and properties. To avoid
danger, if a machine failure occurs, ask the manufacturer or professionals to repair it.
* Do not install and use the air conditioning in the bathroom or other humid
environments.
* Do not pull the plug to turn off the machine.
* Do not place cups or other objects on the body to prevent water or other liquids from
spilling into the air conditioning.
*Do not use insecticide sprays or other flammable substances near the air conditioning.
* Do not wipe or wash the air conditioning with chemical solvents such as gasoline and
alcohol. When you need to clean the air conditioning, you must disconnect the power
supply, and clean it with a half-wet soft cloth. If the machine is really dirty, scrub with
a mild detergent.

* The appliance can be used by children aged from 8 years and above and persons with
reduced physical, sensory or mental capabilities if they have been given supervision or
instruction concerning use of the appliance in a safe way and understand the hazards
involved. Children shall not play with the appliance. Cleaning and maintenance shall
not be made by children without supervision.
II. Features and Components
1. Features
New look, compact structure, streamlined machine, aristocratic atmosphere.
With cooling, dehumidification and fan function, Continuous Water Drainage
Functions.
LED displays the control panel. The machine is beautiful and elegant. High-quality
remote control is equipped to facilitate operation. It adopts a user-friendly remote
control design.
Outdoor interface is set high to facility assembly and keep the smooth flow of the heat
pipe.
Air filtration capability.
Timing switch function,
Protection function of automatically restarting the compressor after three minutes, a
variety of other protection functions.
Components:
Top Cover
Control Panel
Air Outlet / Louver
Handle
Front Housing
Rear Housing
Caster

III. Installation and Adjustment
1. Installation:
Warning: before using the mobile air conditioning, keep it upright for at least
two hours.
The air conditioning can be easily moved in the room. In the moving process, ensure
that the air conditioning is in the upright position and the air conditioning should be
placed on a flat surface. Do not install and use the air conditioning in the bathroom or
other humid environments.
1.1 Install the heat pipe assembly (as shown in Fig.1): screw the heat pipe assembly
(exhaust fitting end) into the exhaust port on the rear panel.
Front Housing
Handle
Rear Housing
EVA Filter
Continuous Drainage Hole
Air Vent
CON Filter
Drainage Hole
Exhaust Pipe Assembly
Window Sealing Plate Assembly

1.2 Install the window sealing plate assembly
1) Half open the window, and mount the window sealing plate assembly to the window
(as shown in Fig.2 and Fig.3); the assembly can be placed in horizontal and vertical
direction.
2) Pull various components of the window sealing plate assembly open, adjust their
opening distance to bring both ends of the assembly into contact with the window frame,
and fix various components of the assembly.1.2 Install the window sealing plate
assembly
1.3 Install the body
1) Move the machine with installed heat pipe and fittings before the window, and the
distance between the body and walls or other objects shall be least 50 cm (as shown in
Fig.4).
Fig.3
Fig.2
Fig.1
Fig.4

2) Elongate the exhaust pipe and snap the flat end of the exhaust pipe joints into the
hole of the window sealing plate assembly (as shown in Fig.5 and Fig.6) .
Notes: 1. the flat end of the exhaust pipe joints must be snapped into place.
2. The pipe cannot be distorted nor has substantial turning (greater than 45 °).
Keep the ventilation of the exhaust pipe not blocked.
Important Notice
The length of the exhaust hose shall be 280~1,500mm, and this length is based on the
specifications of the air conditioning. Do not use extension tubes or replace it with other
different hoses, or this may cause a malfunction. Exhaust host must be not blocked;
otherwise it may cause overheating.
IV. Control Panel Setting
I. Operating instructions:
LED Control Panel is as follows:
1. Timer Key 2. Up Key 3. Down Key 4. Display Window 5.
Fan Speed Selection Key 6. Mode Selection Key 7. Power Key
Fig.5
Fig.6

1: When the machine is powered on for the first time, the buzzer will play power-
on music, and then the machine will get into standby status.
2: Power Key: press the key to turn on and turn off the machine. In the case of
power on, press the key to turn off the machine; in the case of power off, press
the key to turn on the machine.
3: Mode Selection Key: In the case of power on, press the key to switch between
cooling → fan → dehumidifying mode.
4: Up Key and Down Key: press the two keys to change the setting temperature
or setting time, operate as follows:
While setting temperature, press up key or down key to select the required
temperature (not available in fan or dehumidifying mode).
While setting time, press up key or down key to select the required time.
5: Wind Speed Selection Key:
In cooling and fan mode, press the key to select high or low wind speed operation.
But limited by anti-cold conditions, under certain conditions, it may not run
according to the set wind speed.
In dehumidifying mode, pressing the key is invalid, and the fan will forcibly choose
low wind speed operation.
6: Timing Key:
In the case of power on, press the key to close timing; in the case of power off, press
the key to open timing.
Press the key, when the timing symbol flashes, press up and down key to select the
required timing value.
Timing values can be set in 1-24 hours and the timing value is adjusted up or down
by one hour.
7:Sleep Mode:
In the cooling Mode,Press the UP and Fan Key to turn on the sleep mode,then the
unit will work on Energy-Saving and quiet type.
Note: Can not turn on the sleep mode in the dehumidifying or Fan mode!

II. Operating Instructions of the Remote Control
The remote control Panel is as follows:
Instructions of key operation of the high-quality remote control are as follows:
1. Power: Press the key to turn on or turn off the machine.
2. Timer: press the key to set timing.
3. Down: press the key to reduce temperature and timing set value.
4. Mode: press the key to switch between cooling, fan, dehumidifying mode.
5. Up: press the key to increase temperature and timing set value.
6. Fan: press the key to select high, low wind speed.
7. Sleep Mode: Press the key to turn on the sleep mode.
III. A Variety of Protection Functions
3.1 Frost Protection Function:
In cooling, dehumidifying or economic power saving mode, if the temperature of
the exhaust pipe is too low, the machine will automatically enter protection status;
if the temperature of the exhaust pipe rises to a certain temperature, it can
automatically revert to normal operation.

3.2 Overflow Protection Function:
When water in the water pan exceeds the warning level, the machine will
automatically sound an alarm, and the "FULL" indicator light will flash. At this
point, you need to move the drainage pipe connecting the machine or the water
outlet to sewer or other drainage area to empty the water (details see Drainage
Instructions at the end of this chapter). After the water is emptied, the machine will
automatically return to the original state.
3.3 Automatic Defrosting (cooling models have this function):
The machine has automatic defrosting function.
3.4. Protection Function of the Compressor
To increase the service life of the compressor, it has a 3-minute delay booting
protection function after the compressor is turned off.
V. Drainage Instructions
1. Manual drainage:
1) When the machine stops after the water is full, turn off the machine power and unplug
the power plug.
Notes: Please move the machine carefully, so as not to spill the water in the water pan
at the bottom of the body.
2) Place the water container below the side water outlet behind the body.
3) Unscrew the drainage cover and unplug the water plug, the water will automatically
flow into the water container.
Notes:
1. Keep the drainage cover and the water plug properly.
2. During drainage, the body can be tilted slightly backwards.
3. If the water container cannot hold all the water, before the water container is full,
stuff the water outlet with the water plug as soon as possible to prevent water from
flowing to the floor or the carpet.

4) When the water is discharged, stuff the water plug, and tighten the drainage cover.
Notes: 1. Restart the machine after the water plug and drainage cover are installed,
otherwise condensate water of the machine will flow to the floor or the carpet.
1. Continuous drainage (Optional) (only applicable to cooling and dehumidifying
mode), as shown in figure:
1) Unscrew the drainage cover, and unplug the water plug.
2) Set the drainage pipe into the water outlet.
3) Connect the drainage pipe to the bucket.
VI. Maintenance
Cleaning: before cleaning and maintenance, turn off the machine and unplug the
plug.
1. Clean the surface
Clean with surface of machine with a wet soft cloth. Don't use chemicals, such as benzene,
alcohol, gasoline, etc.; otherwise, the surface of the air conditioning will be damaged or
even the whole machine will be damaged.

2. Clean the filter screen
If the filter screen is clogged with dust, and the effectiveness of the air conditioning is
reduced, be sure to clean the filter screen once every two weeks.
2.1: Clean the upper filter screen frame
1) Clasp the wedging block of the EVA filter screen frame with hands. Force down from
the outside to remove the EVA filter screen frame. Unscrew four screws fixing the EVA
filter screen and the rear housing to remove the EVA filter screen (as shown in the above
figure) .
2) Put the EVA filter screen into warm water with neutral detergent (about 40℃ / 104℃)
and dry it in the shade after rinsing clean.
Unit Storage:
1: Unscrew the drainage cover, unplug the water plug, and discharge the water in the water
pan into other water containers or directly tilt the body to discharge the water into other
containers.
2: Turn on the machine, adjust it to low-wind ventilation mode, and maintain this state until
the drainage pipe becomes dry, so as to keep the inside of the body in a dry state and prevent
it from mildewing.
3: Turn off the machine, unplug the power plug, and wrap the power cord around the
wrapping post; install the water plug and the drainage cover.
4: Remove the exhaust pipe and keep it properly.
5: Cover the air conditioning with a plastic bag. Put the air conditioning in a dry place,
keep it out of the reach of children, and take dust control measures.
6: Remove batteries of the remote control and keep them properly.
Note: ensure that the body is placed in a dry place and keep all machine components
properly.
Remove screws

VII. Troubleshooting
Do not repair or disassemble the air conditioning by yourself. Unqualified repair will
lead to failure of the warranty card, and may cause damage to users or their properties.
Problems
Reasons
Solutions
The air
conditioning
does not work.
There is no electricity.
Turn it on after connecting it to a socket with
electricity.
The overflow indicator displays "FL".
Discharge the water inside.
The ambient temperature is too low or
too high
Recommend to use the machine in at the
temperature of 7-35 ℃ (44-95 ℃).
In cooling mode, the room temperature
is lower than the set temperature; in
heating mode, the room temperature is
higher than the set temperature.
Change the set temperature.
In dehumidification mode, the ambient
temperature is low.
The machine is placed in a room with an
ambient temperature of greater than 17 ℃ (62
℃).
The cooling
effect is not good
There is direct sunlight.
Pull the Curtain.
Doors or windows are open; there are
a lot of people; or in cooling mode,
there are other sources of heat.
Close doors and windows, and add new air
conditioning.
The filter screen is dirty.
Clean or replace the filter screen.
The air inlet or outlet is blocked.
Clear obstructions.
Big Noise
The air conditioning is not placed on a
flat surface.
Put the air conditioning on a flat and hard
place (to reduce noise).
compressor does
not work.
Overheat protection starts.
Wait for 3 minutes until the temperature is
lowered, and then restart the machine.
The remote
control does not
work.
The distance between the machine and
the remote control is too far.
Let the remote control get close to the air
conditioning, and make sure that the remote
control directly faces to the direction of the
remote control receiver.
The remote control is not aligned with
the direction of the remote control
receiver.

Batteries are dead.
Replace batteries.
Displays 'E1'.
The pipe temperature sensor is
abnormal.
Check the pipe temperature sensor and related
circuitry.
Displays 'E2'
The room temperature sensor is
abnormal.
Check the room temperature sensor and
related circuitry.
Note: If problems not listed in the table occur or recommended solutions do not work,
please contact the professional service organization.
Appendix
Fuse Parameters
Type: FSD or 50F
Voltage: 250V
Current: 3.15A
Schematic Diagram
All the technical and specific parameters,please refer to product nameplate.
Due to continuous improvement,we reserve the right to change some design without
any notice.
Treatment: Don't put the abandoned machine with other unsorted waste
together. Such waste shall be placed separately for other special use.
Condenser
Compressor
Evaporator
Capillary

NOTICE ABOUT RECYCLING
Your product is designed and manufactured with high quality materials
and components which can be recycled and reused.
This symbol means that electrical and electronic equipment, at their
end-of-life, should be disposed of separately from your household
waste. Please dispose of this equipment at your local community waste
collection/ recycling centre.
In the European Union there are separate collection systems for used electrical and
electronic products.
Please help us to conserve the environment we live in!
DECLARATION OF CONFORMITY
Herewith, Amiridis-Savvidis S.A. states that this product, complies with the
requirements of below directives:
EMC-Directive: 14 / 30 / EU
Low Voltage Directive: 14/ 35 / EU
ErP Directive 09 / 125 / EC
CE Marking: 93 / 68 / EEC
RoHS Directive: 11 / 65 / EU
The detailed declaration of conformity can be found at www.fandu.gr
Exclusive importer in Greece:
Amiridis – Savvidis S.A.
87A, 17th Noemvriou str, P.C. 55534
Thessaloniki – Greece
T: +302310944944 | F: +302310944940
www.amiridis-savvidis.gr
Table of contents
Other UNITED Air Conditioner manuals
Popular Air Conditioner manuals by other brands

Daikin
Daikin EWAQ004BAVP Installer's reference guide

intensity
intensity IDUFCI60KC-3 installation manual

Pioneer
Pioneer FAB Series installation manual

GE
GE AEC14 Owner's manual and installation instructions

Frigidaire
Frigidaire FRS09PYW1 installation guide

Frigidaire
Frigidaire FFRE0533S1E0 Use & care guide

Hitachi
Hitachi RAS-E10HB instruction manual

MegaLife
MegaLife NEBULA GREEN R32 Use and Installation Instructions

TECHWOOD
TECHWOOD TRF-7008 instruction manual

Mitsubishi Electric
Mitsubishi Electric NTXFKs15a112a Series manual

Fujitsu
Fujitsu ART45L operating manual

Haier
Haier 1U71S2SS5FA installation manual