Unitek UNIBOND 2 User manual

Artisan Technology Group is your source for quality
new and certied-used/pre-owned equipment
• FAST SHIPPING AND
DELIVERY
• TENS OF THOUSANDS OF
IN-STOCK ITEMS
• EQUIPMENT DEMOS
• HUNDREDS OF
MANUFACTURERS
SUPPORTED
• LEASING/MONTHLY
RENTALS
• ITAR CERTIFIED
SECURE ASSET SOLUTIONS
SERVICE CENTER REPAIRS
Experienced engineers and technicians on staff
at our full-service, in-house repair center
WE BUY USED EQUIPMENT
Sell your excess, underutilized, and idle used equipment
We also offer credit for buy-backs and trade-ins
www.artisantg.com/WeBuyEquipment
REMOTE INSPECTION
Remotely inspect equipment before purchasing with
our interactive website at www.instraview.com
LOOKING FOR MORE INFORMATION?
Visit us on the web at www.artisantg.com for more
information on price quotations, drivers, technical
specications, manuals, and documentation
Contact us: (888) 88-SOURCE | sales@artisantg.com | www.artisantg.com
SM
View
Instra

USERS'S MANUAL UNITEK
No. 990-1-050 ‘.® EQUIPMENT INC.
UNIBOND II
Constant Power/Constant Voltage Power Supply
And Meter Accessory
LINII'FIC. UNIBOND -
0,0 40
dr-
too"
Model UB2
Model UB2/100
Model UB2/230
,41.0,611.
Stock No. 1-191-01
Stock No. 1-191-01-01
Stock No. 1-191-01-04
Model UBM Stock No. 10-266-01
•
Ohl
WARNNING
Contact with voltages present in this power supply may cause serious or fatal injuries.
Read manual completely before attempting to install or operate.

The engineering designs, drawings, and data contained herein are the proprietary work of UNITEK EQUIPMENT
INC. and may not be reproduced, copied, exhibited, or otherwise used without the written authorization of
UNITEK EQUIPMENT INC.
UNIBOND II
TABLE OF CONTENTS
1.00 DESCRIPTION 1
2.00 SPECIFICATIONS 2
3.00 MACHINE INSTALLATION 10
4.00 ELECTRODE INSTALLATION AND MAINTENANCE 11
5.00 OPERATION 13
6.00 PRINTED CIRCUIT BOARD TRACE REPAIR 21
7.00 THEORY OF OPERATION 23
8.00 CALIBRATION 27
9.00 REPAIR SERVICE 30
10.00 TROUBLE—SHOOTING 31
11.00 REPLACEMENT PARTS 36
12.00 SCHEMATICS AND DIAGRAMS 39
LIMITED WARRANTY - THE FOLLOWING CONSTITUTES THE ENTIRE WARRANTY BY UNITEK EQUIPMENT INC., AND
ALL OTHER EXPRESS OR IMPLIED WARRANTIES ARE SPECIFICALLY EXCLUDED
Equipment sold by UNITEK EQUIPMENT INC. (hereafter called UNITEK EQUIPMENT) is warranted as stated below. Subject to the
exceptions and upon the conditions specified below UNITEK EQUIPMENT agrees to correct, either by repair, or at its election, by
replacement, any defect of material or workmanship which develops within ONE (I) YEAR after delivery of the equipment (parts) to the
original PURCHASER by UNITEK EQUIPMENT or by an authorized representative of UNITEK EQUIPMENT, provided that
investigation and inspection by UNITEK EQUIPMENT discloses that such defect developed under normal and proper use. In no case
shall UNITEK EQUIPMENT's liability exceed the price of the equipment. The following conditions apply to this warranty:
(A) All equipment claimed defective must be returned to UNITEK EQUIPMENT, TRANSPORTATION CHARGES PREPAID, and will
subsequently be returned to the PURCHASER with the transportation charges prepaid.
(B) UNITEK EQUIPMENT makes no warranty concerning components or accessories not manufactured by it, such as transistors, fuses,
optics, batteries, etc. However, in the event of the failure of any component or accessory not manufactured by UNITEK EQUIPMENT,
UNITEK EQUIPMENT will assist the PURCHASER in obtaining, from the respective manufacturer, whatever adjustment is reasonable
in light of that manufacturer's warranty.
(C) All expendables, such as electrodes, are warranted only for defects in material or workmanship which are apparent upon receipt by
the customer. The warranty is negated after the initial use.
(D) UNITEK EQUIPMENT shall be released from all obligations under its warranty in the event repairs or modifications are made by
persons other than its own service personnel, or an authorized representative's personnel, unless such repairs are made with the written
consent of UNITEK EQUIPMENT in accordance with procedures outlined by UNITEK EQUIPMENT.
(E) UNITEK EQUIPMENT expressly disclaims any liability to its customers, representatives, or to users of its products, and/or to any
other person(s) for consequential damages of any kind or from any cause whatsoever arising out of, or in any way connected with, the
manufacture, sale, repair, replacement of, or use of its products.
(F) Representations and warranties made by any person, including representatives of UNITEK EQUIPMENT, which arc inconsistent or
in conflict with the terms of this warranty, including but not limited to the limitation of the liability of UNITEK EQUIPMENT as set forth
above, shall not be binding upon UNITEK EQUIPMENT unless reduced to writing and signed by an Officer of UNITEK EQUIPMENT
INC.
(G) This Warranty shall be governed by the Laws of the State of California. Claims for damage in shipment must be filed promptly with
the transportation company.

010*UNITEKMIYACHI
041c0R,0RATI0.
Oa : -Date Basis-v evisio
A16701 8/96 Correct the calibration procedure.
ERRATA
996-050, Rev A
Unibond II User's Manual
Manual Title
990-050 Unknown A 8/96
Manual Part No. Date Rev Addendum Date
REVISION RECORD
Unitek Miyachi Corp. • 1820 S. Myrtle Ave. • Monrovia • CA 91017 • (818) 303-5676
Page 1 of 2
ERRUB2WPD

ERRATA 996-050, REV A UNIBOND II USER'S MANUAL
IS:
Page 27, Paragraph 8.02.05,
Voltage Listing:
+14.25 to +15.57 volts at (+) side of C24.
-14.40 to -15.60 volts at (-) side of C23.
+16.75 to +19.25 volts at (+) side of C27.
+85.00 to +95.00 volts on collector (case) of
Q16 - Q22.
Page 27, Paragraph 8.02. Last sub-
paragraph is 8.02.05.
SHOULD BE:
+14.25 to +15.57 volts at (+) side of C24.
-14.40 to -15.60 volts at (-) side of C23.
+16.75 to +19.25 volts at (+) side of C27.
Add new sub-paragraph:
8.02.06. Set the pulse duration to ".07." Select
voltages and measure levels as follows:
SELECT VOLTS MEASURE 016 - 022
3.99
2.99
2.00
1.99
0.99
0.00
170V ±5V
143V ±5V
115V ±5V
170V ±5V
120V ±5V
70V ±5V
Unitek Miyachi Corp. ■1820 S. Myrtle Ave. ■Monrovia ■CA 91017 ■(818) 303-5676
Page 2 of 2
ERRUI32.wPO

1.00. DESCRIPTION
1.01. FEATURES - The Model UB2, Unibond II Power Supply, Stock No. 1-191-01, is
specifically designed for use with either the Unitek Model 40, 46, 86, 87, 127 or 147
Parallel-Gap Weld Heads. These systems are used to: terminate fine wire, on mi,144.417,
components; bond ribbons to microwave deVices; join flatpack leads to printed circuit
boards; or bond fine wire or ribbon to thin film or thick film substrates.
•—•
IjNrrEic.
1•••
MUM. WM.*
UNIBONO,. iI
•0161.61.61)
•
Figure 1 - Unibond II with Output Transformer and optional Meter Accessory.
1.02. The Unibond is a dual mode Constant Power/Constant Voltage Power Supply.
The output PULSE AMPLITUDE and DURATION are selected using the convenient digital
thumbwheel switches located on the front panel. The Unibond's exclusive solid state
design uses a capacitor bank as a low impedance current source rather than bulky and
expensive to maintain batteries. In the VOLTAGE FEEDBACK Mode, the output voltage is
regulated so that the preset PULSE AMPLITUDE is continuously maintained at the, remote
sensing point which is usually at the electrodes. In the VOLTAGE + CURRENT Feedhack_
Mode, the PULSE AMPLITUDE is increased or reduced by a maximum factor of two. in an
effort to maintvoltage,the current-voltage product defined by the PULSE AMPLIIUDE _and WELD
RESISTANCE Selectors. For a more detailed explanation. see the Theory of Operation.
Paragraphs 2.10 and 2.11. The VOLTAGE + CURRENT Feedback Mode dramatically improves
the consistency of the welding results in those applications where the physical para-
meters of the parts vary and/or the plastic zones of the materials are narrow with
respect to temperature. i.e. copper.
1.03 An OPTIONAL Model UBM, Meter Accessory, Stock No. 10-266-01, allows the user
to determine the resistance of the welding load, which includes the electrodes and
the weldments. This Meter is required if the user intends to correctly use the
Unibond II in the VOLTAGE + CURRENT Feedback Mode. The Meter is only used to deter-
mine or confirm the weld schedule for a given application. Since no particular pur-
pose is served by leaving the meter permanently connected to the Unibond II, it is
suggested that one or two meters be purchased for each production line.
-1 -

2.00. SPECIFICATIOW
2.01.
2.02.
19ms
10ms ims
39ma
9
ILi III I I
FEEDBACK MODES - VOLTAGE or VOLTAGE + CURRENT Feedback.
OUTPUT -
ALLOWABLE
SETTINGS
AMPLITUDE
volts
DURATION
milliseconds
0.01 - 0.99
1.00 - 1.99
2.00 - 3.99
1.0 - 79
1.0 - 39
1.0 - 19
2.03. RISE TIME - 0.5 milliseconds, nominal. Rise Time may typically vary from
0.4 to 0.6 ms depending upon the Pulse Amplitude and the impedance of the load. Rise
Time can increase to 1.5 ms under oxidized workpiece conditions and is indicative of
apoor weld. Rise Time is a critical parameter.
2.04. MAXIMUM OUTPUT CURRENT - 1000 amps, peak. 800 amps for 19 milliseconds.
400 amps for 39 milliseconds.
200 amps for 79 milliseconds.
2.05. MAXIMUM SECONDARY LOOP RESISTANCE - Which can be connected to the Output
Transformer is 1.7 milliohms, looking back into the Output Transformer from the sens-
ing point, usually the electrodes of the welding head. Therefore the resistance of
either the Model 40, 46, 86 87, 127, or 147 and any cabling must be less than 1.5
milliohms. Excessive weld head resistance may mean a reduction in the maximum output
voltage, since the Unibond cannot generate more than 5.2 volts at the terminals of
the Output Transformer.
2.06. REPETITION RATE - 30 to 250 welds per minute, continuous.
30 to 500 welds per minute, intermittent.
500
400
300
200
100
0
INTERMITTENT REP RITE
.02 .04.06.08 .1 .2.4 .6 .8 1.0 2
PULSE AMPLITUDE (VOLTS INTO .005A )
X
ca
500
400
300
200
100
50
20
10
0II I
CONTINUOUS REP RITE
IIll,-
.01.02.03 .05 .1 .2 .3.4.5 1 2 4 5
PULSE AMPLITUDE (VOLTS INTO .00511 )
Figure 2 - Repetition Rate vs. Output Voltage using a welding head and
cables, with a resistance of less than 1.5 milliohms, connected to a 5
milliohm load.
-2-
1
1

2.07. LINE/LOAD REGULATION - In the VOLTAGE FEEDBACK Mode, the Line Regulation of
the Unibond is 1% total for a t13% change in input line voltage. The Load Regulation
is 1% for an 800 amp change in output current. The response time is approximately
0.5 ms.
2.08. ACCURACY - The absolute accuracy of the PULSE AMPLITUDE Thumbwheel settings,
measured at the sensing point, is 13% of setting, 15 mv, in the VOLTAGE FEEDBACK
Mode. The output voltage for any given setting will repeat within 0.1%. The width
of the output pulse will be linear within 0.05 ms of the value set on the PULSE WIDTH
Thumbwheels.
2.09. VOLTAGE FEEDBACK MODE - In this mode, the Unibond will maintain constant
voltage, at the sensing point, as preset on the PULSE AMPLITUDE Thumbwheels. WHEN
THE UNIBOND II IS USED IN THE VOLTAGE FEEDBACK MODE ITS OUTPUT WILL BE IDENTICAL TO
THAT OF THE UNITEK UNIBOND I, Stock Numbers 01-124-01 through 05, AND OUTPUT
TRANSFORMER, Stock Numbers 9-001-01 or 10-105-01 through 04, OPERATED IN THE MANUAL
MODE.
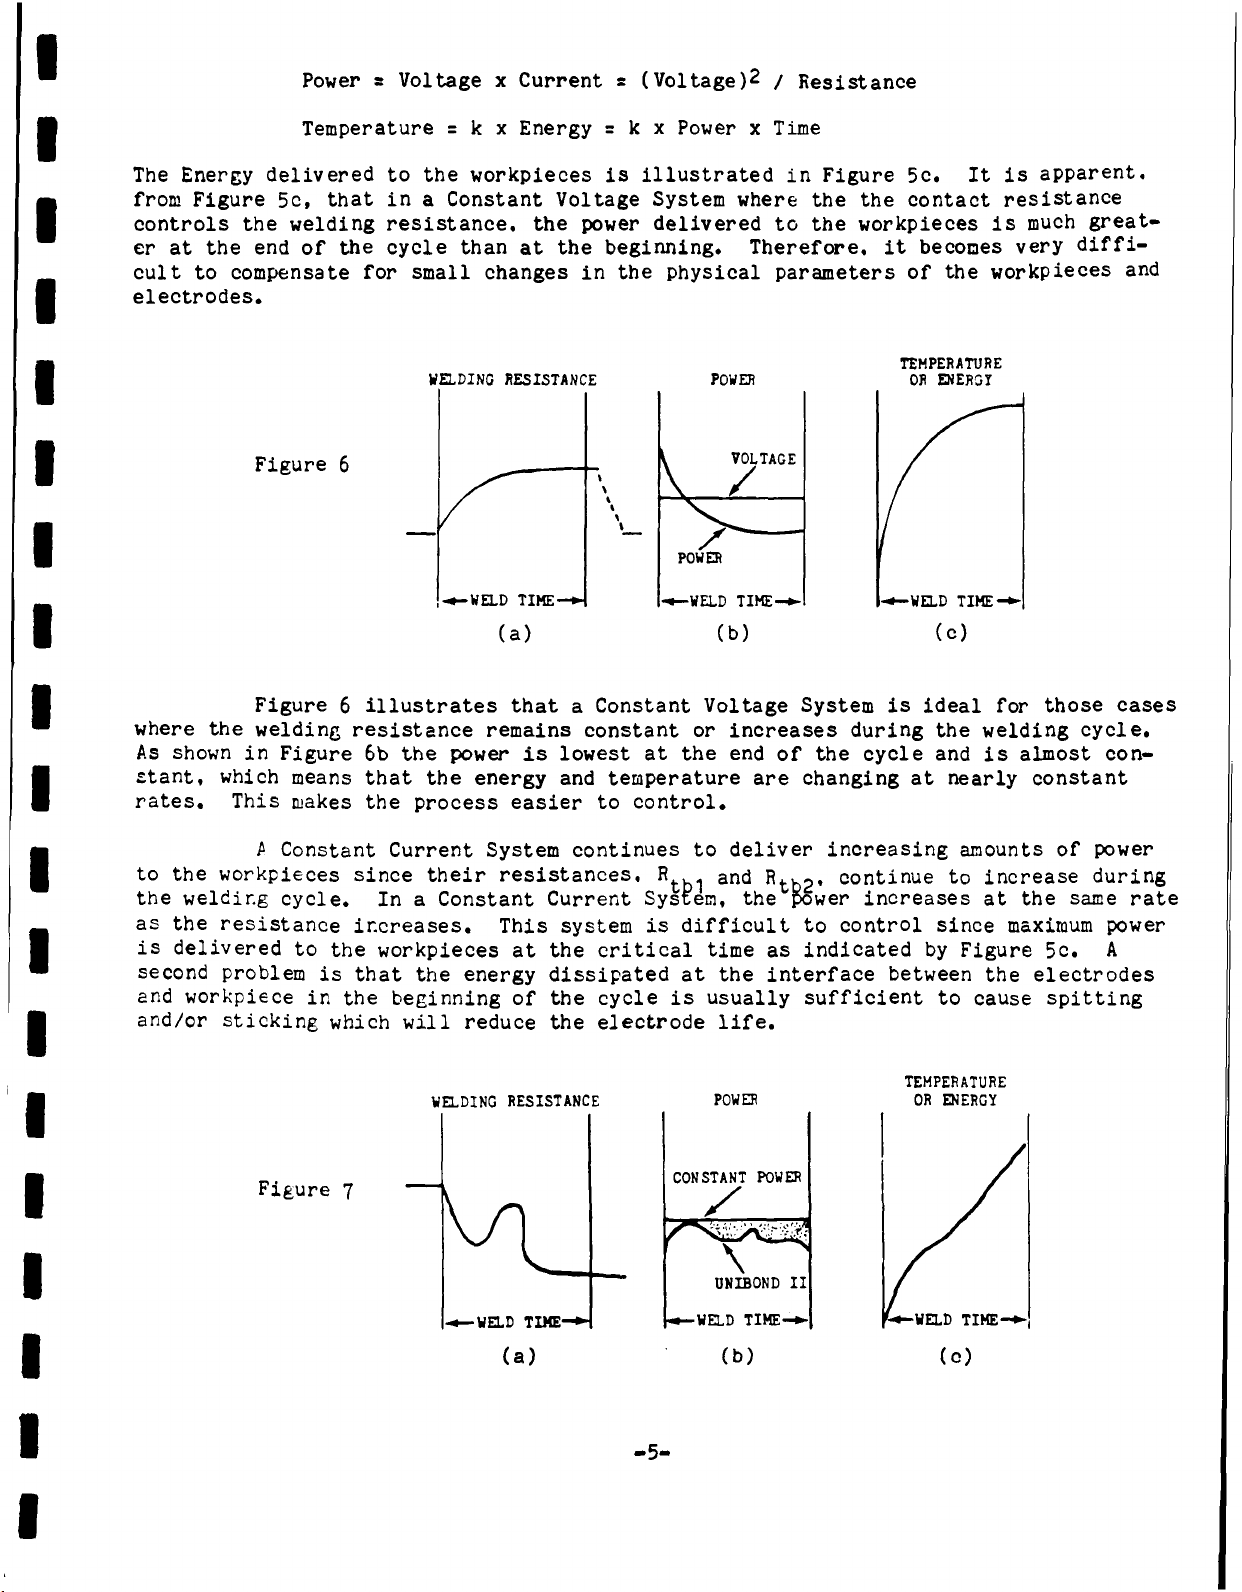
2.10. VOLTAGE + CURRENT FEEDBACK MODE - In this mode, the Unibond will continuous-
ly increase the Pulse Amplitude to a maximum of twice, or reduce it to a minimum of
one-half, of the value preset on the Pulse Amplitude Thumbwheels in an effort to
maintain the output voltage-current product as indicated in Figure 24. This Mode is
designed to be effective for Weld Resistances between 1 and 15 milliohms. The re-
sistance connected between the Output Transformer Terminals and the Welding Load
should not exceed 1.5 milliohms. The resistance of the Models 40, 46, 86, 87, 127,
and 147 Weld Heads are 1.5 milliohms or less. The performance of the system will be
reduced as the resistance between the Terminals of the Output Transformer and the
Sensing Point is increased or if the Weld Resistance is less than 5 milliohms.
2.11. VOLTAGE + CURRENT FEEDBACK MODE - HOW IT WORKS - The welding process uses
both heat and pressure to form a weld. Electrode pressure is used to force the metals
together. Heat, generated by the resistance of the workpieces to the flow of elec-
tricity, either melts the material at the interface or at least reduces its strength
to a level where the surface becomes plastic. When the flow of current stops, the
electrode force is maintained for the fraction of a second required for the weld to
cool and solidify.
Figure 3 illustrates why the workpieces melt at their inter-
face. The surfaces of metal are quite rough if they are ex-
amined on a molecular scale. When the metals are forced
together with a relatively small force some of the peaks make
contact. On those peaks where the contact pressure is suffi-
ciently high the oxide layer breaks, forming a limited number
of metal-to-metal bridges. The weld current is distributed
over a large area as it passes through the bulk metal. As it
approaches the interface, the current is forced to flow
through these metallic bridges. This "necking down" increases
the current density, generating enough heat to cause melting.
As the first of these bridges melt and collapse, new peaks
come into contact, forming new bridges and additional current
paths. The resistance of the molten metal is higher than that
of the new bridges, so that the current flow transfers from
bridge-to-bridge. This process continues until the entire
interface is molten. When the current stops, the electrodes
rapidly cool the molten metal which solidifies,
forming a weld.
CURRENT
Figure 3

WELDING RESISTANCE
Figure 4
Rtb 1
c1
e2
rc2
tb2
ArIZri
Figure 4 shows the mechanical and electrical equivalents of a typical weld.
The electrode force is relatively low so that the contact resistance between the elec-
trodes and the ribbon, R 1 and Rc2' remains high with respect to the resistance of the
workpieces, Rt and Rb. The contact resistances between the two workpieces. Rthi and
Rtb2• are also larger than Rt or Rb, but are usually of the same magnitude as Rcl and
Rc2* As the weld cycle progresses, the heat generated at the interface between the
electrodes and the ribbon causes this interface to become "plastic" and the electrodes
"seat" themselves into the material causing the contact resistance to become quite
low. Simultaneously the heat generated by current flowing through R4b1 and Rfh2 must
be sufficient to cause the faying surface of the workpieces to form bond. It is not
uncommon for the resistance between the electrodes at the end of the welding cycle to
be less than one-third of the initial resistance. In this case the change in contact
resistances masks the increase in the resistance of the workpieces caused by the in-
creased temperature. The welding resistance changes as indicated in Figure 5a.
Figure 5
WELDING RESISTANCE
(a)
POWER
(b)
TEMPERATURE
OR ENERGY
WELD TIME_..,
(c)
Figure 5a illustrates the resistance between the electrodes, as a function
of time. during a normal parallel gap weld. At the beginning of the weld. the contact
resistances between the electrodes and the top weldment and between the two weldments
are relatively high. As the materials begin to flow, these resistances drop consider-
ably more than the increase in resistance caused by the increase in temperature of the
weldments. In a constant voltage application. the current will continue to increase
as the total welding resistance decreases. Since temperature and energy are the inte-
gral of power with respect to time. the heating rate near the end of the welding cycle
is considerably greater than at the beginning of the cycle. as illustrated.
Figure 5b shows the power delivered to the workpieces in a Constant Voltage
System. Note that:
-4-

Power = Voltage x Current = (Voltage)2 / Resistance
Temperature = k x Energy = k x Power x Time
The Energy delivered to the workpieces is illustrated in Figure 5c. It is apparent.
from Figure 5c, that in a Constant Voltage System where the the contact resistance
controls the welding resistance. the power delivered to the workpieces is much great-
er at the end of the cycle than at the beginning. Therefore. it becomes very diffi-
cult to compensate for small changes in the physical parameters of the workpieces and
electrodes.
Figure 6
WELDING RESISTANCE
-up- WELD TIME -10-
(a)
TEMPERATURE
POWER OR ENERGY
(b)
+-WELD TIME
Figure 6 illustrates that a Constant Voltage System is ideal for those cases
where the welding resistance remains constant or increases during the welding cycle.
As shown in Figure 6b the power is lowest at the end of the cycle and is almost con-
stant. which means that the energy and temperature are changing at nearly constant
rates. This makes the process easier to control.
AConstant Current System continues to deliver increasing amounts of power
to the workpieces since their resistances, lithi and Rth2, continue to increase during
the welding cycle. In a Constant Current System, the'Mwer increases at the same rate
as the resistance increases. This system is difficult to control since maximum power
is delivered to the workpieces at the critical time as indicated by Figure 5c. A
second problem is that the energy dissipated at the interface between the electrodes
and workpiece in the beginning of the cycle is usually sufficient to cause spitting
and/or sticking which will reduce the electrode life.
Figure 7
WELDING RESISTANCE
(a)
—5—
POWER
CONSTANT POWER
UNIBOND II
WELD TIME-b-
(b)
TEMPERATURE
OR ENERGY
(c)

In a Constant Power System, Figure 7. the power will remain constant regard-
less of what changes occur in the welding resistance. This makes the process easier
to control whenever:
1. The contact resistance is large with respect to the resistance
of the workpieces.
2. The workpieces have very narrow "plastic zones" such as copper.
The Unibond II maintains Constant Power as illustrated in Figure 7. The
circuitry of the Unibond II is so unique that Unitek has applied for a patent. In
the VOLTAGE + CURRENT Mode. the Unibond II will dynamically increase or reduce the
amplitude of the welding pulse in an effort to maintain a constant voltage-current
product, constant power. at the electrodes.
2.12. WELD RESISTANCE COMPENSATION - Continuously adjustable from 1 to 15
milliohms.
2.13. WELD FIRE LOCKOUT FEATURE - Prevents the Unibond from firing if: (1) the
magnetic circuit of the Output Transformer Core has not been fully reset by the Uni-
bond's internal circuitry; or (2) the PULSE AMPLITUDE and PULSE DURATION Thumbwheels
are improperly set.
2.14. OVERLOAD PROTECTION FEATURE - If the welding load draws more than 1000 amps
or if the output transistors are caused to operate in an unsafe region as a result of
aradical change in load resistance. the Unibond will automatically terminate the out-
put pulse prior to the time preset on the PULSE DURATION Thumbwheels and illuminate
the OVERLOAD INDICATOR. Any attempt to fire the Unibond before the Output Transformer
has been reset by the Unibond, will also illuminate the OVERLOAD INDICATOR.
2.15. POWER REQUIREMENTS - 100. 115, 208 or 230 Volts ±13%. 50-60Hz
Uses 2 amp Circuit Breaker at 100 or 115 volts
or 1 amp Circuit Breaker at 208 or 230 volts.
2.16. PHYSICAL DATA -
HEIGHT WIDTH DEPTH WEIGHT
UNIBOND (inch) 7.4 11.7 9.2 20 lbs
(cm) 18.8 29.7 23.4 9 Kg
OUTPUT (inch) 7.5 6.6 8.8 36 lbs
TRANSFORMER (cm) 19.1 16.8 22.4 16 Kg
2.17. CONTROLS
2.17.1. FEEDBACK SELECTOR - Selects either the VOLTAGE FEEDBACK MODE or VOLTAGE +
CURRENT FEEDBACK MODE.
2.17.2. PULSE AMPLITUDE - Can be preset in 0.01 volt increments between 0.01 and
3.99 volts. Allowable settings are shown in 2.02. and on the Unibond's front panel.
2.17.3. PULSE WIDTH - Can be preset in 1 millisecond increments to any value between
1and 79 milliseconds. Allowable settings are shown in 2.02.
-6-

2.17. CONTROLS
'OUTPUT
CONNECTOR
IFIRING
SWITCH
CABLE
'POWER
'CORD
OUTPUT
TRANSFORMER
MIL LIO H M
METER
IMPROPER SETTING
INDICATOR
',now
AMPLITUDE DURATION
THUMBWHEEL THUMBWHEEL
••••••••••••11
9I
•••
••••••• op.
OVERLOAD
INDICATOR
VOM
41•44;•••
at.
0
MODE SELECTOR POWE
SWITCH SWITCH
Figure 8A - Unibond II with with optional Meter Accessory, front view.
MILLIO H M
METER
METER
SWITCH
•
SENSING CABLE
'RECEPTACLE
411111110.16 ale
CAUTION
111•11M1•••••et 0,040.
061/4.1.1. 11.1h.r•
IMM.111110 =11.1/1.112111110
CIRCUI
BREAKER
a.
4
III.
JAME,
WELD WELD RESISTANCE
RESISTANCE CONTROL TRANSFORME
RANGE
SELECTOR
••••••••••••••••
NOcUTPUT
ABLE
Figure 8B - Unibond II with with optional Meter Accessory, rear view.
-7-

2.17.4. IMPROPER SETTING INDICATOR - Will illuminate whenever the combination of
Pulse Amplitude and Pulse Width are not within the allowable settings as shown in
2.02. When this Indicator is illuminated, the Unibond will be inhibited from further
operation until the settings are corrected.
2.17.5. OVERLOAD INDICATOR - Will illuminate whenever the welding load or intermit-
tent rep rate causes the output transistors to operate in an unsafe region. See
2.14.
2.17.6. AUDIBLE WELD SIGNAL - Will sound whenever the Unibond's output meets the
parameters preset on the Pulse Amplitude and Pulse Duration Thumbwheels. If the
Overload Indicator is illuminated during the welding cycle, the Unibond will not
sound a tone. The loudness of the tone can be adjusted, within reasonable limits, by
adjusting the potentiometer R16 on the Control Board.
2.17.7. WELD RESISTANCE RANGE SELECTOR AND CONTROL (Rear Panel) - Allows the output
resistance of the Unibond to be matched to that of the welding load. By using the
Selector Switch and Control, the Resistance can be set to any value from 1 to 15
nilliohms. The Weld Resistance is measured at the sensing point,.. usually the
electrodes of either the Model 50, 86, or 87 Weld Heads..- This Control should be set
with the aid of the Unibond Meter Accessory or an oscilloscope.
2.17.8. METER SWITCH AND CONNECTOR - The Connector is used to connect the Unibond
Meter to the Unibond II. The Meter will display the resistance of the load connected
to the sensing point whenever the Meter Switch is pressed.
2.18. SENSING CABLE - Allows the Unibond to sense the voltage at the electrodes of
the Welding Head. If the Sensing Cable is disconnected or reversed, it will cause an
OVERLOAD which may destroy small electrodes such as Unitips.
2.19. METER ACCESSORY
2.19.1 The Meter Accessory is a direct reading milliohmmeter with a range of 1-30
milliohms. The range of the meter corresponds to the position of the Weld Resistance
Range Switch. An audible signal will sound to indicate that the Force Firing Pres-
sure Switch has closed in the Welding Head. The purpose of this Meter is to measure
the weld resistance, at the preset welding force, immediately before and after making
aweld. In order to obtain an accurate reading, the electrodes must not be removed
from the workpiece during the measurement process. The Meter serves no purpose ex-
cept to assist the user in correctly setting the Weld Resistance Control on the rear
of the Unibond II. The correct setting is the approximate average of the resistance
before and after the weld.
2.19.2. A second use for the Meter Accessory is to accurately measure the resistance
of the welding head and cables. This can be a valuable tool in critical applications
where small changes in contact or cable resistances effect the quality of the weld.
2.19.3. The Milliohmmeter is accurate within 5% of full scale when properly cali-
brated with a 10 milliohm 12% dumny load.
2.19.4. PHYSICAL DATA - 3.4 in High x 4.2 in Wide x. 5.3 in Deep x 2.1 lb.
METER ACCESSORY - 8.7 cm High x 10.7 cm Wide x 13.5 am Deep x 1 kg.

2.20. TYPICAL SYSTEMS
BL Stereo Zoom Scope
Unibond II
50F Weld Head
Figure 9A - Typical Unibond II System using Model 50F.
BL B & L Stereo Zoom Scope
Unibond Electrode
BPTL Base Plate
Thin Line
.....
.....0"
....00 ....1..... F...........°.
....• ........... re,
4.0.' „„.• .00 ..,
0, : ,,, .. • .. tr, : i I'.
0.,,,,,- ........." ?
f:••• :0-°_,, .0_,,.
,„,•• 2-, pe
,.., ........ 0...,
40, :•,-, .0.
41; 00*
7•.'
OMA Optic Mounting Assembly
OMMA Optic Mounting Assembly Adapter
(80 Series Thin-Line Weld Heads Only)
86F Weld Head
•
Unibond It
Figure 9B - Typical Unibond II System using Model 86F.
-9-
•
•

Space deliberately left blank
MACHINE INSTALLATION
3.01. The Unibond II is shipped in a single container which contains the Control
and the Output Transformer. The Meter Accessory is shipped in a separate carton.
3.02. CONNECT UNIBOND FOR PROPER LINE VOLTAGE - The Unibond is a multivoltage po-
wer supply. Refer to the Connection Diagrams shown in Figure 36. It can be connected
for 100. 115. 208 or 230 volts. 50 or 60 Hz. by changing (a) the Circuit Breaker (b)
the Plug on the end of the Line Cord and (c) the position of the jumpers on the Con-
trol Transformer (Figure 33) as indicated below:
TABLE I - Unibond II Control Transformer Connections
CIRCUIT TERMINAL NUMBER
VOLTAGE BREAKER 1 2 3 4 5 6
100 VOLTS 2 Amp LINE 1 TERM 5 N/C TERM 1 LINE 2 N/C
115 VOLTS 2 Amp LINE 1 N/C TERM 6 TERM 1 N/C LINE 2
208 VOLTS 1 Amp LINE 1 TERM 4 N/C TERM 2 LINE 2 N/C
220 VOLTS 1 Amp LINE 1 N/C TERM 4 TERM 3 LINE 2 N/C
230 VOLTS 1 Amp LINE 1 N/C TERM 4 TERM 3 N/C LINE 2
N/C = No Connection
Pilot Light is always connected between Terminals 4 and 6.
-10-

3.03. Connect the Output Transformer to the Unibond by attaching the cable from
the Output Transformer to the Transformer Output Connector located on the rear panel.
3.04. Install the Weld Head and Optics in accordance with the instructions found
in the Instruction Manual for the Weld Head.
3.05. Connect the Remote Sensing Cable from the Weld Head to the Sensing Cable
Connector on the rear of the Unibond. Connect the Firing Switch Cable from the Uni-
bond to the Firing Switch Cable from the Weld Head.
4.00. ELECTRODE INSTALLATION_ AID MAINTENANCE
I. /I INIII
UNITIP ADAPTER-1
(UM)
UNITIP
ELECTRODE
Figure 11 - Model 86 Electrode Holder
with Model UTA Unitip Adapter and Unitip
Electrode partially installation.
INSERT INTO HOLDER
UNITIP ELECTRODE
Figure 12 - Model 87 Electrode Holder
with Unitip Electrode fully installed.
ELECTRODE GAP
ADJUSTMENT KNOB

4.01 INSTALLATION OF UNIBOND(R) ELECTRODES - MODELS 5OUB AND 86
-0UTM111L 0.94 33
UTM112L 0.94 33
—11114152L 0.47 17
UTM222L 3.75 132
-.-UTM111C 0.94 33
---UTM112C 0.94 33
---).-UTM222C 3.75 132
UTM224C 3.75 132
UTM237C 4.57 161
4.01.1. Set the Weld Head Firing Force to the desired value. Use the Direct
Reading Force Indicator on the top of the Model 86 Weld Head. On the Model 5OUB
Weld Head Weld Head, use the Force Indicator and the Force Conversion Table located
on the weld head side panel.
4.01.2. Loosen the Electrode Holder Clamp Screws. Set the Electrode Gap Adjustment
Knob for maximum gap width (past 35) and insert the Unibond Electrodes into the
Holders until the shoulder of each Electrode contacts its holder. While loosely
holding the Electrodes in place, return the Electrode Gap Adjustment Knob to its
full counterclockwise position. Make sure the Electrodes are: parallel to each
other;perpendicular to the work positioner; and the Electrode Faces are at the same
level. Tighten the Clamp Screws. IF THE SCREWS ARE OVER-TORQUED, THE FLEXURES WILL
DEFORM AND CAUSE MISALIGNMENT OF THE ELECTRODES AND A DRAMATIC REDUCTION IN THE LIFE
OF THE FLEXURE.
4.01.3. Adjust the Electrode Gap Adjustment Knob to produce the desired Electrode
Gap.
4.02. INSTALLATION OF UNITIP(TM) ELECTRODES - MODELS 5OUB AND 86
4.02.1. Loosen the Electrode Holder Clamp Screws. Set the Electrode Gap Adjustment
Knob for maximum gap width (past 35) and insert the Model UTA Unitip Adapter into
the Electrode Holder in place of the Unibond Electrodes. Position it as shown in
Figure 11, with the flanged ends *down" and the half-round slots facing each other.
Insert the Unitip between the Adapter halves so that it fits snugly against the
curved inner surfaces of the UTA. Be certain that the gap in the Unitip is aligned
with the gap between the UTA Holders.
4.02.2. Return the Electrode Gap Adjustment Knob to its fully counterclockwise
position and tighten the Clamp Screws. IF THE SCREWS ARE OVER-TORQUED, THE FLEXURES
WILL DEFORM AND CAUSE MISALIGNMENT OF THE ELECTRODES AND A DRAMATIC REDUCTION IN THE
LIFE OF THE FLEXURE.
4.02.3. With the exception of the Models 50A and 50A/UB, the use of Unitip
Electrodes should be limited to pedal actuated weld heads. Their use in other air
actuated weld heads requires great caution in adjusting electrode force because of
the potential of damaging the electrodes by applying excessive force. Table II
gives the maximum permissible force for each Unitip.
TABLE II - MAXIMUM UNITIP FORCE
UNITIP MAX FORCE MAX FORCE
MODEL (kgf) (oz)
-12 -

4.03 INSTALLATION OF UNITIP(TM) ELECTRODES - MODELS 50 AND 87
4.03.1. Open the Electrode Clamping Thumbscrew on the Model 50. Set the Electrode
Gap Adjustment Knob on the Model 87 for maximum gap width (past 35). Insert the
Unitip between the concave inner surfaces of the electrode holder arms.
4.03.2. Rotate the Unitip so that the vertical line on the Unitip, formed by the
insulated electrode gap, is exactly between the two electrode holder arms.
4.03.3. Firmly tighten the Electrode Clamping Thumbscrew on the Model 50. Return
the Electrode Gap Adjustment Knob to its fully counterclockwise position. This
action will secure the Unitip in place.
4.04. VOLTAGE SENSOR CABLE
4.04.1. Be sure that the screws attaching the Sensing Cable to the Electrode
Holders are securely tightened. Erratic operation can result if they are loose.
Verify that the Red Sensing Lead is connected to the left-hand side of the Electrode
Holder and that the Black Sensing Lead is connected to the right-hand side of the
Electrode Holder. The Unibond II is the only Unitek Equipment Power Supply which
uses remote voltage sensing.
4.05. ELECTRODE MAINTENANCE
4.05.1. New Unibond and Unitip electrodes must be dressed to ensure that the
electrode face is parallel to the workpiece surfaces. Dress both electrode types by
following 4.05.2 through 4.05.4.
4.05.2. Periodic resurfacing is required to remove oxides and welding debris from
parallel gap electrodes. Intervals at which this service is performed is dependent
upon usage. Electrodes can be resurfaced using the following procedure.
4.05.3. Ensure that the Unibond II Power Supply "ON/OFF': Switch is in the "OFF"
position. Do not change the Electrode Gap Adjustment Knob from its normal setting.
4.05.4. Cleaning of electrodes or, the production line should be limited to the use
of •`600 grit emery paper or a piece of non-vitreous ceramic. Place emery paper
between the Electrodes and the Work Positioner or working surface. Actuate the
Footpedal to bring the Electrodes into light contact with the paper and then slowly
pull the paper out toward you, keeping the paper parallel to the Electrode Gap.
Repeat as necessary until the tracks on the paper are the same width when minimum
force is applied to the Electrodes. Clean polished electrode face with a small,
lint free, swab saturated in alcohol. A dental mirror is an excellent inspection
tool.
5.00 OPERATION
5.01. PARALLEL GAP WELDING - A certain amount of experimentation is necessary to
achieve the proper weld force and gap setting for a specific application. A typical
starting point with Unibond electrodes is an electrode force setting of 32 ounces
with a 0.010 inch electrode gap.

5.02. VARIABLES FOR PARALLEL GAP WELDING
5.02.1. GAP - The larger the distance between the electrodes. the Gap. the greater
the energy required to make a given bond.
5.02.2. FORCE - Increasing the electrode force lowers the contact resistance between
the weldments and between the weldments and the electrodes. therefore. more energy is
required to make a given weld. The Force. in most cases. should be in the knee of the
Force vs Contact Resistance Curve. See Figure 18.
5.02.3. AREA OF ELECTRODE FACE - The larger the electrode area in contact with the
weldments, the lower the pressure and the larger the size of the bond area. A larger
face requires more energy provided the contact resistances do not change drastically.
Lower pressure. force per unit of area, on the weldments is more likely to cause spit-
ting or sticking. For conductive materials. make that portion of the electrode face
which actually contacts the weldment as small as practical.
5.02.4. PULSE DURATION - the longer the Pulse Duration, the greater the penetration
of the bond into both weldments and the greater the effect of the heat upon the metal-
lurgical structure of the weldments. In general, use pulse durations less than 15 ms
for bonding and durations greater than 20 ms for brazing or reflow soldering. Pulse
Duration is critical, and should be kept to a minimum, for conductive materials. such
as copper. Pulse Duration is also critical when welding resistive materials in the
Voltage + Current Feedback Mode. See Figures 17 and 19.
5.02.5. ELECTRODE MATERIALS - use RWMA 2 copper electrodes for resistive and/or hard
materials such as gold plated Kovar and nichrome. Use molybdenum or tungsten elec-
trodes for conductive or soft materials such as copper and gold.
5.03. Select the appropriate electrodes. Place the Unibond in the VOLTAGE Mode.
5.04. Starting with an AMPLITUDE of
.5 volt and a DURATION of 2 ms, system-
atically determine the appropriate com-
bination for satisfactory bonds. For a
given AMPLITUDE. gradually increase the
DURATION until acceptable welds are made.
Increase the AMPLITUDE by .2V and repeat
the process. This method will determine
the DURATION range required to make welds
for several values of AMPLITUDE. The
Duration becomes more critical as the
Amplitude is increased. Plot the values
obtained as illustrated to the right:
Figure 13 illustrates combinations of
Pulse Amplitude, Duration and Force set-
tings which result in acceptable bonding
of .003 x .015 gold plated Kovar ribbon
to an unplated .015 inch wide. 1 oz cop-
per trace on a glass epoxy printed cir-
cuit board. Model EU1000 Copper Unibond
Electrodes were used with the Electrode
Gap set to .012 inch.
Amplitude
.9
.8
Poor Vel do
.7 -
.6
.5
510 15 20
Duration (ms)
Figure 13

5.05. Figure 14 shows the voltage and current waveforms obtained from welding gold
plated Kovar to an unplated copper trace in the Constant Voltage Mode using 35 oz
Electrode Force. .010 inch Gap with a Pulse Amplitude of .62 V with a Duration of (a)
10 ms and (b) 37 ms. The ripple on the voltage waveform, in 14(a). after 6 ms is
caused by melting. The Current in 14(b) started at 120 amps and decreased to 60 amps
within the first 15 ms after which time it remained constant. It is this characteris-
tic which makes the Constant Voltage Mode ideal for this type application.
'VOLTAGE
II
tiliP :
I
LMMI
VOLTAGE -.5
-120
-
volts/cm
amps/cm
2 ms/cm
CURRENT
DURATION
,
(CURRENT __--.
.....—
.
1---[
It11OLTAGE
1
_4
—4—Limmi
i1:
VOLTAGE
CURRENT
-
-
-
.5 volts/cm
60 amps/cm
5ms/cm
1
DURATION
(CURRENT
VOLTAGE
/
-.5
-120
-
volts/cm
amps
1ms/cm
/cm
—
VOLTAGE
CURRENT
DURATION .
CURRENT
A-
i1
I
VOLTAGE
VOLTAGE
CURRENT
-
-
-
.5 volts
60 amps/cm
1ms/cm
/cm
/DURATION
/CURRENT
1
1
Figure 14 - Gold plated Kovar ribbon welded to an unplated 1 oz copper
trace in the Constant Voltage Mode for (a) 10 ms and (b) 37 ms.
Figure 15 - Copper ribbon welded to an unplated 1 oz copper trace
in the Constant Voltage Mode for (a) 3 ms and (b) 4 ms.
5.06. Figure 15(a) and (b) show the waveforms obtained from welding .003 x .010
inch unplated copper ribbon to an .010 inch wide. 1 oz unplated copper trace in the
Constant Voltage Mode using Moly Unibond Electrodes. 35 oz Electrode Force and a .012
inch Gap. The Amplitude and Duration Settings were 0.79 V and 3 ms. respectively.
-15-
This manual suits for next models
4
Table of contents
Other Unitek Power Supply manuals
Popular Power Supply manuals by other brands

M2TECH
M2TECH EVO SUPPLY user manual

Bridge
Bridge BriPower ESA Series user manual

TDK-Lambda
TDK-Lambda G10-500 user manual

Rockwell Automation
Rockwell Automation Allen-Bradley 193-DNENCAT user manual

Miller
Miller Subarc DC 650 owner's manual

GEA
GEA DemaTron 40T instruction manual / installation instructions

Cleaver Scientific
Cleaver Scientific TPS150V instruction manual

Rockwell Automation
Rockwell Automation Allen-Bradley 1606-XLE120F Reference manual

Procon
Procon NP-9615 SERIES user manual

Cal Power
Cal Power Kepco HSP Series quick start guide

KEPCO
KEPCO FAW 5-30K instruction manual

COLORKINETICS
COLORKINETICS sPDS-60ca 24V user guide