manuals.online logo
Brands
  1. Home
  2. •
  3. Brands
  4. •
  5. Universal Woods
  6. •
  7. Household Hardware
  8. •
  9. Universal Woods ChromaLuxe Connections User manual

Universal Woods ChromaLuxe Connections User manual

Popular Household Hardware manuals by other brands

Kallista Per Se P77618-00-CP installation guide

Kallista

Kallista Per Se P77618-00-CP installation guide

Lefroy Brooks FLEETWOOD M2-5099 Installation, operating,  & maintenance instructions

Lefroy Brooks

Lefroy Brooks FLEETWOOD M2-5099 Installation, operating, & maintenance instructions

TESA Powerstrips 59782-00000-00 Product information

TESA

TESA Powerstrips 59782-00000-00 Product information

HAUTAU ATRIUM comfort close quick start guide

HAUTAU

HAUTAU ATRIUM comfort close quick start guide

HAUTAU ATRIUM HS Mounting instructions

HAUTAU

HAUTAU ATRIUM HS Mounting instructions

Stratco X-1 Steel Framing Design guide

Stratco

Stratco X-1 Steel Framing Design guide

Dorma PT 29 Installation instruction

Dorma

Dorma PT 29 Installation instruction

Lefroy Brooks K1-5101 Installation, operating,  & maintenance instructions

Lefroy Brooks

Lefroy Brooks K1-5101 Installation, operating, & maintenance instructions

Lefroy Brooks K1-5122 Installation, operating,  & maintenance instructions

Lefroy Brooks

Lefroy Brooks K1-5122 Installation, operating, & maintenance instructions

Aqara E1 user manual

Aqara

Aqara E1 user manual

Speakman SA-1203 instructions

Speakman

Speakman SA-1203 instructions

Siegenia Snapper ALU Installation instruction

Siegenia

Siegenia Snapper ALU Installation instruction

Miele APFD 203 operating instructions

Miele

Miele APFD 203 operating instructions

norix ATN-RR01K Assembly instructions

norix

norix ATN-RR01K Assembly instructions

Dorma ES61 installation guide

Dorma

Dorma ES61 installation guide

Stratco Gutters installation guide

Stratco

Stratco Gutters installation guide

Lefroy Brooks X1-3091 Installation, operating,  & maintenance instructions

Lefroy Brooks

Lefroy Brooks X1-3091 Installation, operating, & maintenance instructions

BLUM CLIP Cleaning and Maintenance Manual

BLUM

BLUM CLIP Cleaning and Maintenance Manual

manuals.online logo
manuals.online logoBrands
  • About & Mission
  • Contact us
  • Privacy Policy
  • Terms and Conditions

Copyright 2025 Manuals.Online. All Rights Reserved.

MATERIALS NEEDED:
• Template
• Sublimated panels with attached Connections Hangers
• Painter’s Tape
• Drill and/or screwdriver
• No. 10 Pan- or Round-Head Phillips Screws & Wall Anchors
• Mallet or hammer
OPTIONAL TOOLS:
• Level (or use the one on your phone!)
• Studfinder
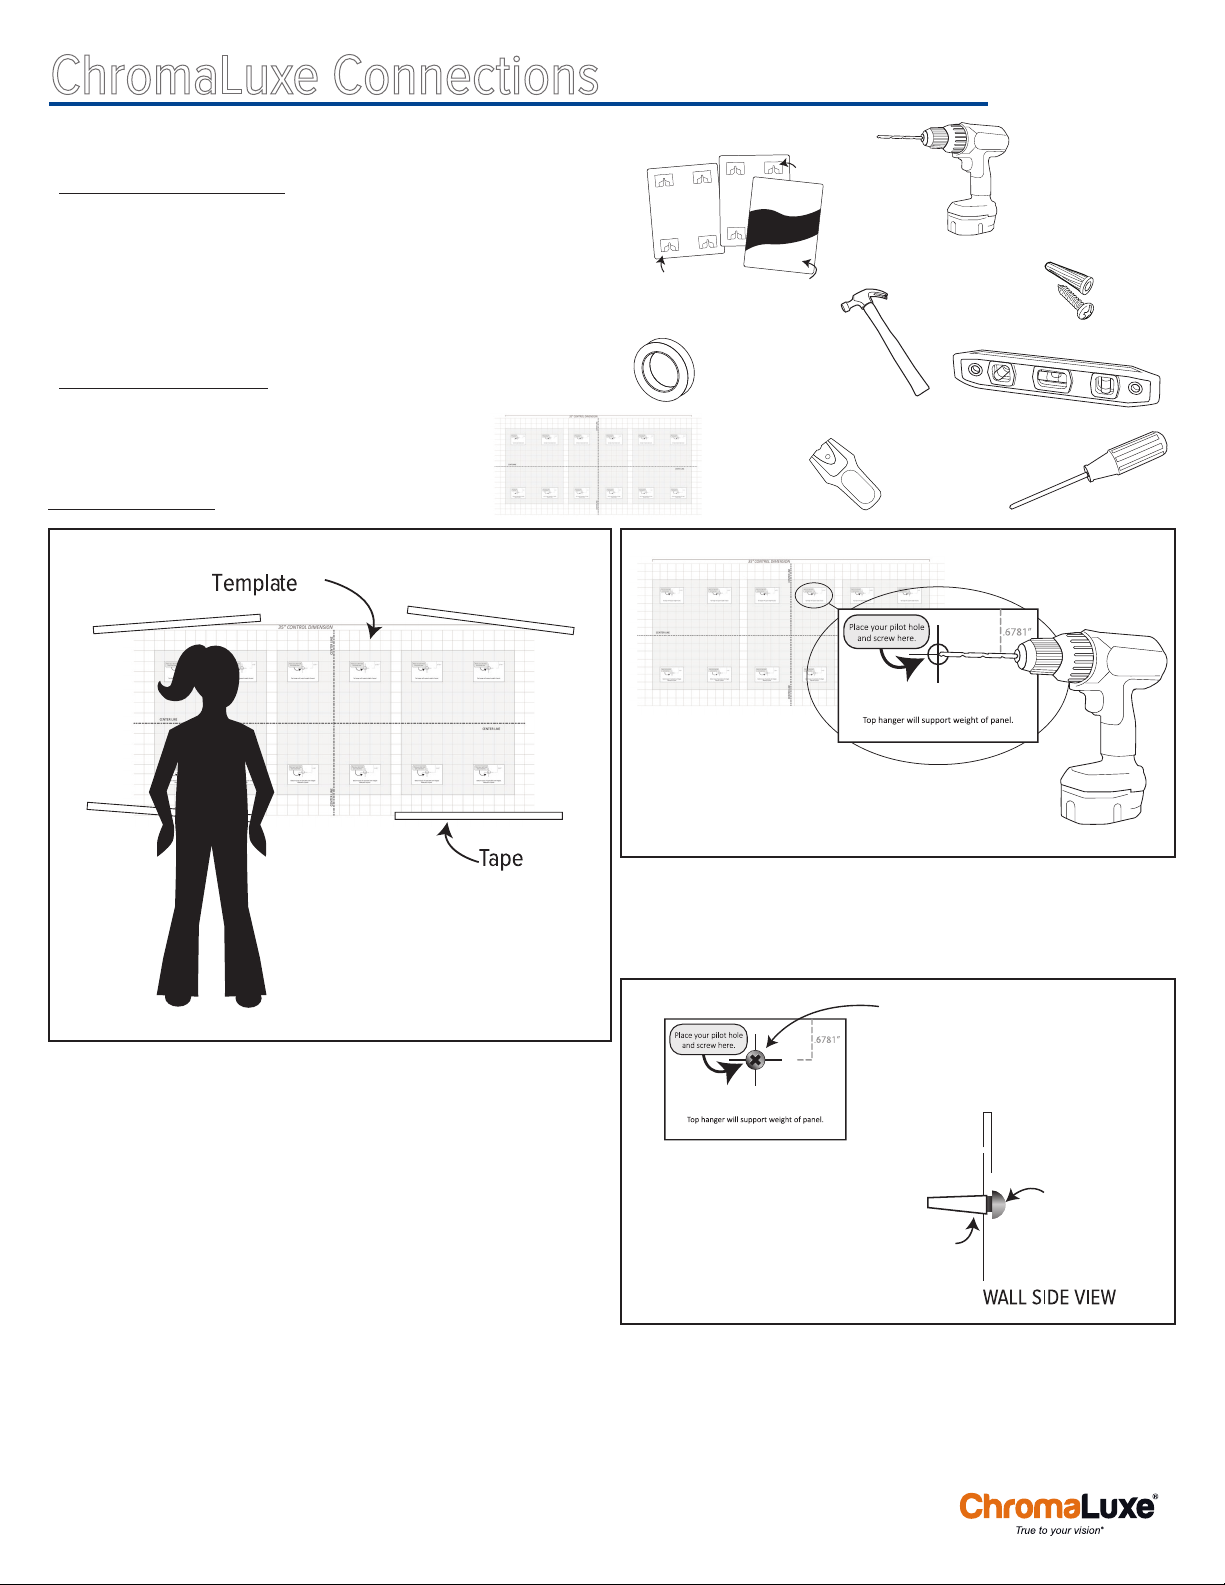
Step 1: HANG TEMPLATE
Gather materials and tools, and read through instructions.
Using painter’s tape, hang template on wall in the location that you
want to install your Connections collage. Using a bubble level, your
phone level*, or just your eyes, level template to make sure panels will
be straight on your wall. (Remember that sometimes a level reading
can still look unlevel due to irregular walls and trim. Trust your eyes!)
Step back and take a look at your collage location.
Make adjustments to template placement as needed.
TIP: *If you have an iPhone, launch the Compass app on your iPhone. (You may
need to calibrate it by spinning the phone around.) Next, swipe left on the screen
for the level tool. Turn your iPhone on its side or back to use the level.
For other phones, there are several free leveling apps available on GooglePlay.
Alternatively, you can eyeball your template’s levelness, or you can use a real
bubble level.
Step 2: DRILL HOLES
Identify the drill targets on your template. Check your Wall Anchor
packaging for correct drill bit size. Drill a hole in each target location.
Hit the target as closely as you can!
INSTRUCTIONS
ChromaLuxe Connections
Installing Connections Collages
Step 3: INSTALL SCREWS
Tap wall anchors into pilot holes. Install screws into wall anchors
using drill or screwdriver. Walls are not always completely flat, so
tighten and/or loosen the gap between the screw head and the wall to
customize the best fit for your location. Spacing heads 0.125” from the
wall is a good place to start.
NO. 10 SCREWS &
WALL ANCHORS
HAMMER
TEMPLATE
SUBLIMATED PANELS
HANGERS
PANEL BACK PANEL FRONT
DRILL
(For correct bit size, please
check manufacturer’s
recommendation on
screw/anchor packaging.)
STUDFINDER
PAINTER’S
TAPE
LEVEL
SCREWDRIVER
No. 10 Screw
Wall Anchor
Adjust spacing for best fit.
0.125” from wall is a good
place to start.
No. 10 Screw
ChromaLuxe® is a registered trademark of Universal Woods, Inc. ©2016
Step 4: HANG PANELS
When all screws are installed, gently tear away the template.
Starting at the bottom of your collage and working your way to the top,
hang your panels. You will feel a solid click as the top hangers fit
over the screws and settle into place.
TIP: Pencil a quick
note under the proper
screwhead if you think
you might have trouble
remembering which panel
goes in which spot!
Tip: Hang panels from bottom to top!
large open area to help
guide the screw into the
right location
channel fits over
screw shaft to hold
panel to wall
No. 10 Screw
Wall Anchor
Hanger
Panel
Note: The top hanger rests on the screw shaft. The bottom hanger
works to keep the corners flat, but does not support panel weight.
Enjoy your new collage!