UpDown Desk PRO Series User manual

PRO-Series Complete Guide to Simple
Setup and Operation

2
Table of Contents
Contents
Introduction ..........................................................................................................................................................3
Pro-Series Desk Frame Assembly .........................................................................................................................4
2.1. Contents ....................................................................................................................................................4
2.2 A note about screws/bolts .........................................................................................................................5
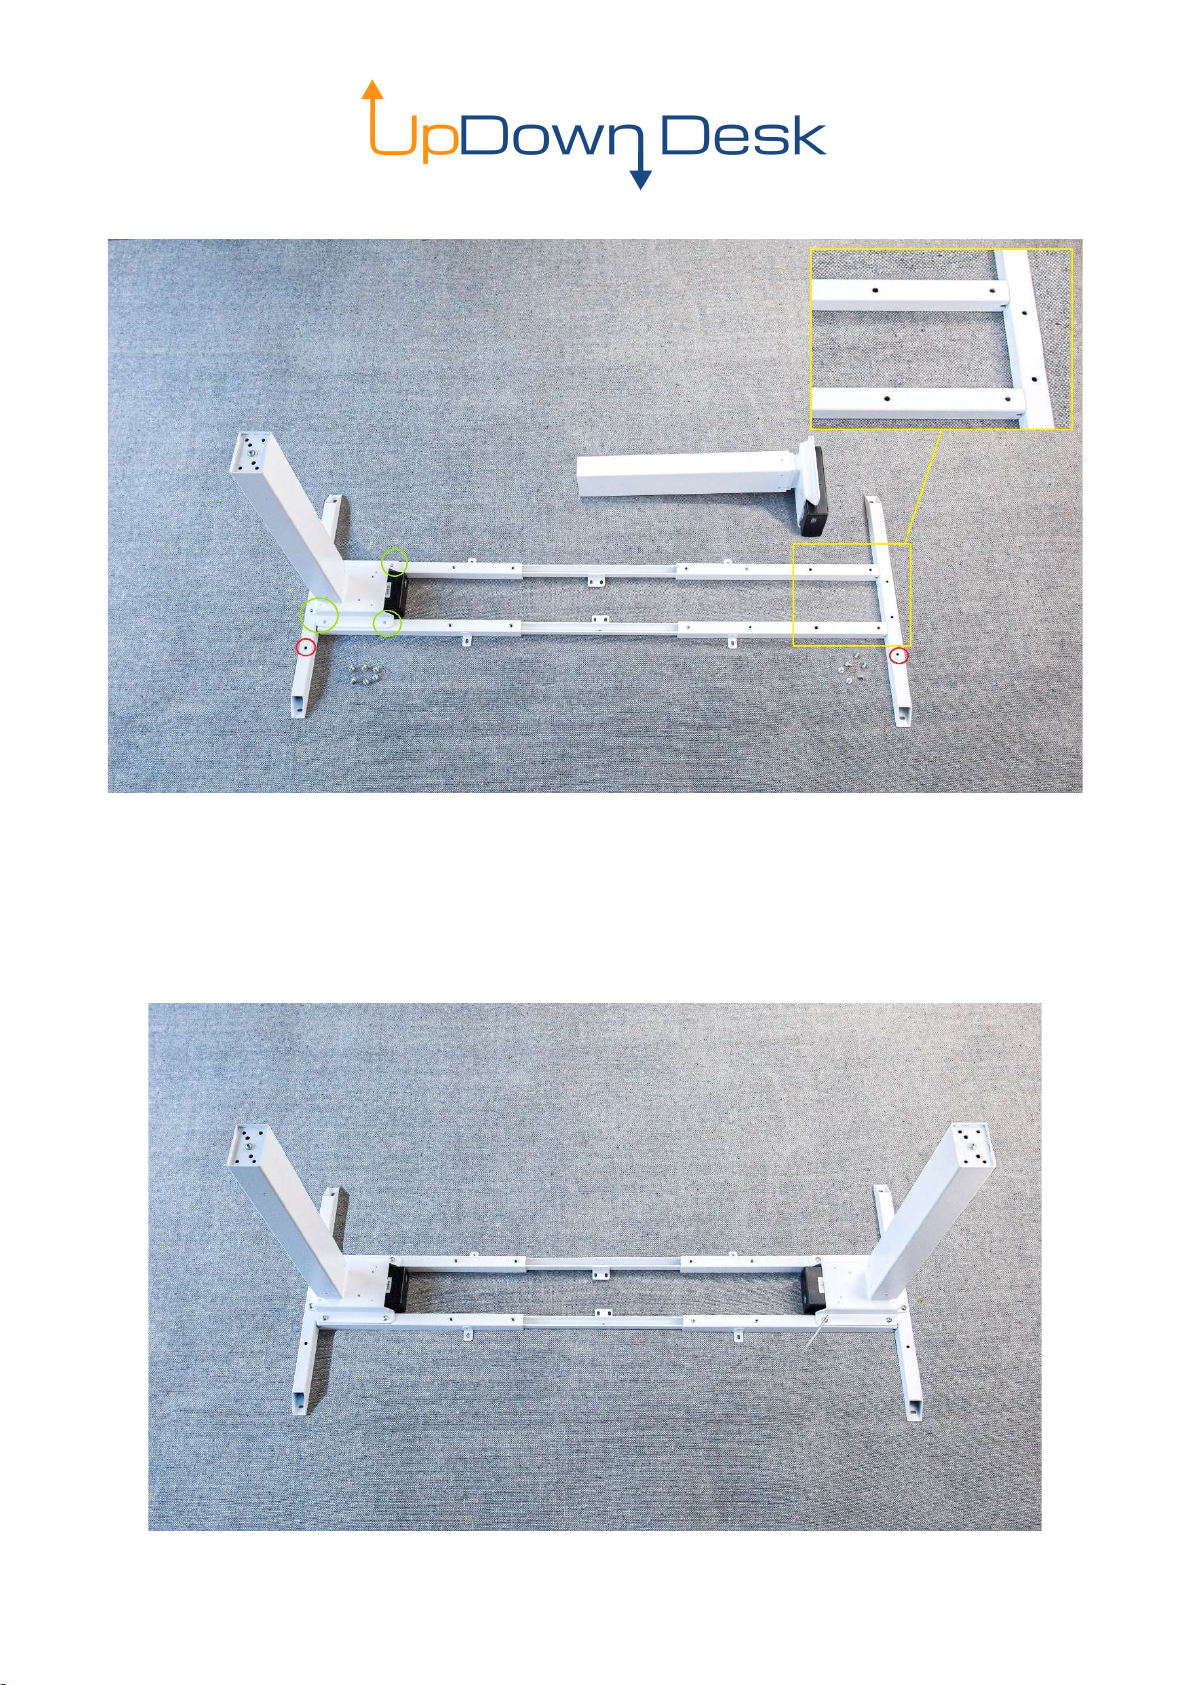
2.3 Step 1 ..........................................................................................................................................................6
2.4 Step 2 ..........................................................................................................................................................7
2.5 Step 3 ..........................................................................................................................................................8
2.6 Step 4 ..........................................................................................................................................................9
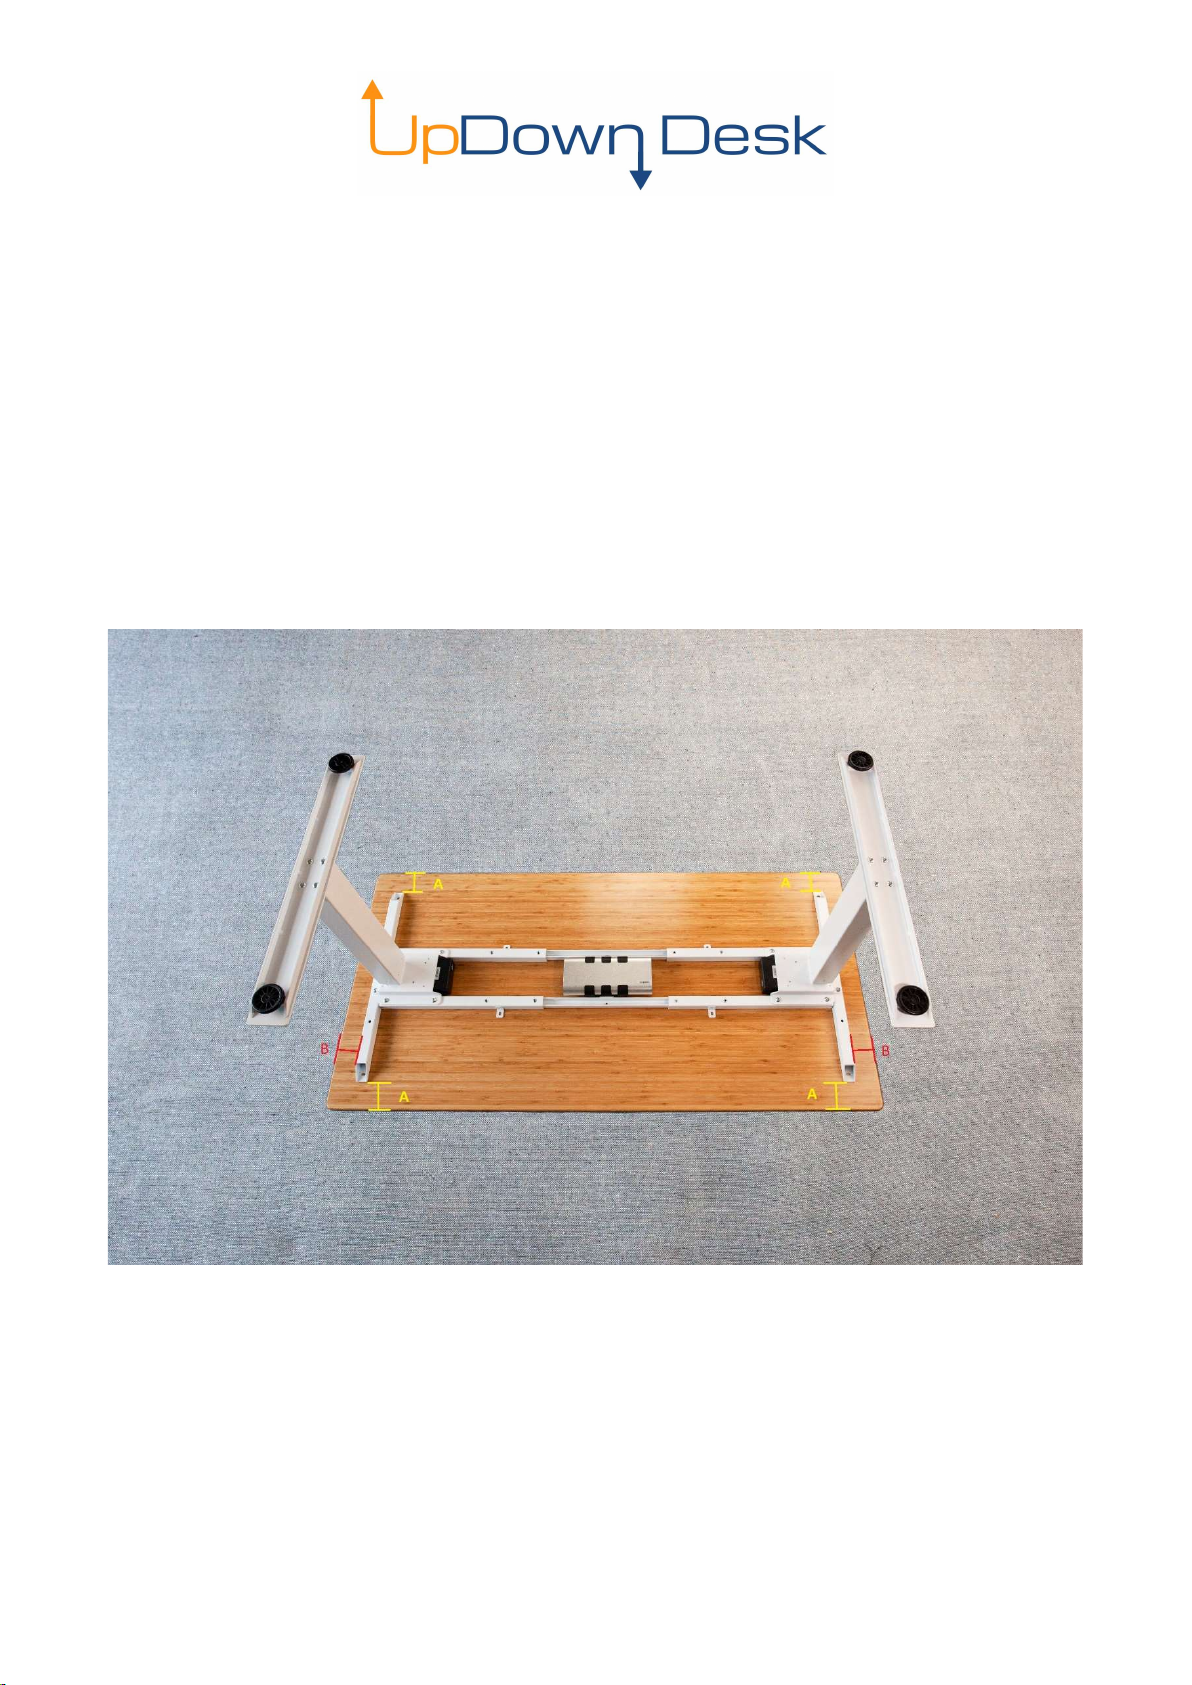
Desktop Installation ........................................................................................................................................... 10
Control Panel Installation .................................................................................................................................. 12
Cable Tray Installation (Optional Extra)............................................................................................................. 13
Cable Installation ............................................................................................................................................... 14
Control Panel Operation .................................................................................................................................... 15
Troubleshooting ................................................................................................................................................ 16

3
Introduction
Congratulations on the purchase of your Pro-Series UpDown Desk! You’ve made a significant
investment into your health and wellbeing and your body will thank you for it.
This instructional manual will guide you smoothly through the process of assembling the frame,
attaching the optional cable tray and installing the desktop with the control panel. Most people
should have the entire desk set up and operating in around 20-25 minutes (even if you are not a
handyperson!).
Required tools:
- Philips head screwdriver
- Measuring tape
Optional tools (not necessary):
- Power drill

4
Pro-Series Desk Frame Assembly
2.1. Contents
1. 2 x Legs
2. 2 x Feet
3. 2 x Wings
4. 2 x Adjustable tubes
5. 1 x Control box
6. 2 x Motor cables
7. 1 x Power cable
8. 1 x Allen key
9. 1 x Bag of bolts/screws
10. 1 x Bag of self-tapping screws
11. 1 x Control panel

5
2.2 A note about screws/bolts
The bag of bolts/screws (#9) is a generic package covering several desk models. Therefore, there
will be some unused bolts/screws once assembly/installation is complete. There may also be an
extra screw or two in the bag of self-tapping screws (#10).
Below we describe each bolt and what it’s used for. The are only 4 bolts/screws required to
assemble the Pro-Series frame and desktop.
M8 x 20mm
- 8 pieces in total
- Allen key required (supplied)
- Used to attach feet to the legs
M6 x 10mm
- 4 pieces in total
- Philips head screwdriver required (not supplied)
- Used to attach the control box to the adjustable tubes
M8 x 10mm
- 12 pieces in total
- Allen key required (supplied)
- Used to attach the legs to the wings and adjustable tubes
Self Tapping
- 10 pieces in total
- Philips head screwdriver required (not supplied)
- Used to attach the frame, control panel and optional cable tray to the desktop

6
2.3 Step 1
Note: The frame is being assembled upside-down at first as this is the simplest method.
Using the Allen key (#8) provided, loosen (don’t remove) the 8 pre-installed screws as indicated
above by the yellow circles.
Extend the adjustable tubes (#4) the appropriate length to suit your desktop.
- 120cm desktops require the tubes to be adjusted inwards, as close to the tabs (with
red/orange arrows) as possible.
- 150cm desktops require the tubes to be extended out to 130cm.
- 180cm desktops require a 150-160cm length. *
The adjusted tubes should be exactly the same length as one another, so that the centre tabs with
holes are directly opposite each other (red/orange arrows indicated in the image above) for control
box (#5) installation in Step 4. Tighten the 8 bolts using the Allen key (#8) firmly.
*Important: For desktops 180cm and greater in length, it’s crucial that you do not extend the
adjustable tubes longer than 160cm. Doing so will reduce the frames structural rigidity.

7
2.4 Step 2
Position the wings (#3) alongside the adjustable tubes (#4), ensuring they are roughly centred as
shown above (ignore the additional offset hole circled in red, which was just used for manufacture).
Place a leg (#1) on top of the adjustable tubes (#4) and wing (#3). You will notice that the holes line
up (as demonstrated by the green circles). Screw in ‘M8 x 10mm’ bolts (#9) in all 6 (six) holes in the
leg base using the Allen key (#8) and tighten firmly. Do the same for the other leg (#1).

8
2.5 Step 3
Install the feet (#2), keeping the black pads facing upwards as shown. Screw in four ‘M8 x 20mm’
bolts for the first foot using the Allen key (#8) and tighten firmly. Repeat on the other side.

9
2.6 Step 4
Flip the desk frame onto its feet. Install the control box (#5) as shown. Using a Philips head
screwdriver (not the Allen key), install the four ‘M6 x 10mm’ screws. Tighten the screws until they
are full seated on the steel bracket. DO NOT overtighten these screws or use excessive force once
they are seated.
It does not matter which direction you install the control box.

10
Desktop Installation
Installation of the desktop and control panel (#11) uses the same principles no matter what size
desktop you have. To reiterate, a drill is not required for this task.
If installed, unplug all cables from the control box and set aside. Do this to ensure cables are not
pinched in the process of the desktop installation.
Laying a soft cloth or carpet on the ground, put your preferred desktop side facing down. Some
models of desktop come with the UpDown Desk logo. It’s personal taste as to whether you have the
logo facing upwards for everyone to see or underneath.
Position the constructed frame in the centre of the desktop as shown. To ensure it’s square, the
distance from the wings to the edges of the desk must be identical (Items ‘A’ must all be equal and
items ‘B’ must all be equal). It’s best to double check each distance twice using a measuring tape.

11
Using a screwdriver and the provided self-tapping screws (#10), affix the frame in 8 (eight) places.
Start by screwing in one of the wings (#3) as indicated below. Re-measure, adjust if necessary and
then screw a second screw in the diagonally opposite corner wing to ensure the frame is locked in
position. All other screws can then be screwed in, in any order thereafter.

12
Control Panel Installation
One of the benefits of the electric Pro-Series desk is that it’s possible to locate the control panel
(#11) wherever you wish. Most people situate it on the leading edge to the far right or left
depending on their hand preference.
With the desk still upside down, simply align the top edge of the control panel (#11) with the edge
of the desk. Using 2 (two) self-tapping screws (#10) and a Philips head screwdriver, screw the
control panel to the timber.

13
Cable Tray Installation (Optional Extra)
The cable tray can go wherever is practicable, depending on the location of your power points, your
screen cables, your computer cables etc. It’s entirely up to you, however most people locate it
underneath the desk, to the rear and in the middle.
On one side of the cable tray, you will notice a thin, soft padding. This side always goes against the
desk. It’s to protect the desk from being scratched and prevent squeaking.
If you peer through each of the large holes of the cable tray, you will notice a small hole on the
other side. Using a screwdriver and a self-tapping screw, screw all the way through the soft padding
and into the timber. Screw both screws in firmly until they sit tight against the cable tray.
IMPORTANT: Before securing any part of the power cable to the cable tray, ensure you leave
enough cable for the desk to be raised to the standing position.

14
Cable Installation
Connecting cables from the installed control box (#5) to the legs and control panel (#11) is straight
forward and self-explanatory; only the correct plugs will fit. The same goes for the power cable.
Below are some images for reference. On the PRO-Series 2 legged desk, there will be 1 spare
unused port as indicated below on the control box; it is used only for 3 legged corner desks.

15
Control Panel Operation

16
Troubleshooting
Error Code Cause Solution
ER1 Motor stoppage
(1) Turn power off at the power point.
(2) Wait 15 seconds.
(3) Check cable connections.
(4) Turn power back on.
ER2 Legs not synchronised
(1) Turn power off at the power point.
(2) Wait 15 seconds.
(3) Check cable connections.
(4) Turn power back on.
(5) Using the down arrow, lower the desk to the minimum height to reset.
ER3 Cable connection fault
(1) Turn power off at the power point.
(2) Wait 15 seconds.
(3) Disconnect all cables and reconnect.
(4) Turn power back on.
ER4 Communication fault
(1) Turn power off at the power point.
(2) Wait 15 seconds.
(3) Check connection between control panel cable and the control box.
(4) Turn power back on.
ER5
Overload protection
(2 leg desk = 120kg)
(3 leg desk = 150kg)
(1) Reduce load on desk.
(2) Turn power off at the power point.
(3) Wait 15 seconds.
(4) Turn power back on and lower the desk to the minimum height to reset.
Hot
Continuous over usage
(approx. 1min continuous usage
every 10min)
(1) Reduce load on desk.
(2) Turn power off at the power point.
(3) Wait 5 minutes.
(4) Turn power back on and lower the desk to the minimum height to reset.
Desk stuck at a certain height
Follow the instructions above for“minimum height setting” or
“maximum height setting”. Set the minimum height to 64, and the
maximum height to 129. Please note that these heights have been
calculated using a standard 2.5cm thick desktop. If your desktop is thicker or
thinner, please add or subtract the relevant amount from the minimum and
maximum heights. (This is unclearly referring to that diagram on the previous
page “Desk Function Settings”, which is one of the worst diagrams I have
ever seen)
For any other troubleshooting issues, please visit the Support section of our website at
updowndesk.com.au.
Other manuals for PRO Series
3
Table of contents
Other UpDown Desk Indoor Furnishing manuals