URBOTANICA UrbiPod User manual

USER MANUALUSER MANUAL
Congratulations on joining the Urbotanica gardening community! This
booklet contains all steps needed to set up your UrbiPod. Your purchase comes with
2 years of free warranty: turn to page 9 for instructions on how to activate.

Starter Kit Contents
BOX CONTENTS
1x Reservoir base with tower
4x Pods
1x LED halo tted to tower
1x Water bottle (inside tower)
1x Power adapter & cord
1x 250ml nutrient bottle
1x Coir 4 pack
4x Seed packs
4x False oors
4x Short wicking rods
4x Long wicking rods
4x Round wicking discs
Additional box contents will dier depending on your UrbiPod’s model: UrbiPod FS, or UrbiPod Plus +.
UrbiPod FS UrbiPod Plus +
4x Multi-Flow wicks
4x Long wicking rods

URBIPOD COMPONENTSURBIPOD COMPONENTS
Water bottle
Adjustable
light halo can
be moved up
or down
Pod
Tower
Base reservoir
Adjustable LED light halo
Water bottle
cap
Power adapter (plugs into the
underside of the halo)
Important note!
Do not pour water directly into the tower.
Fill the water bottle and screw the bottle
cap back on before re-inserting in the
tower.
Water bottle

UrbiPod FS
UrbiPod Plus +
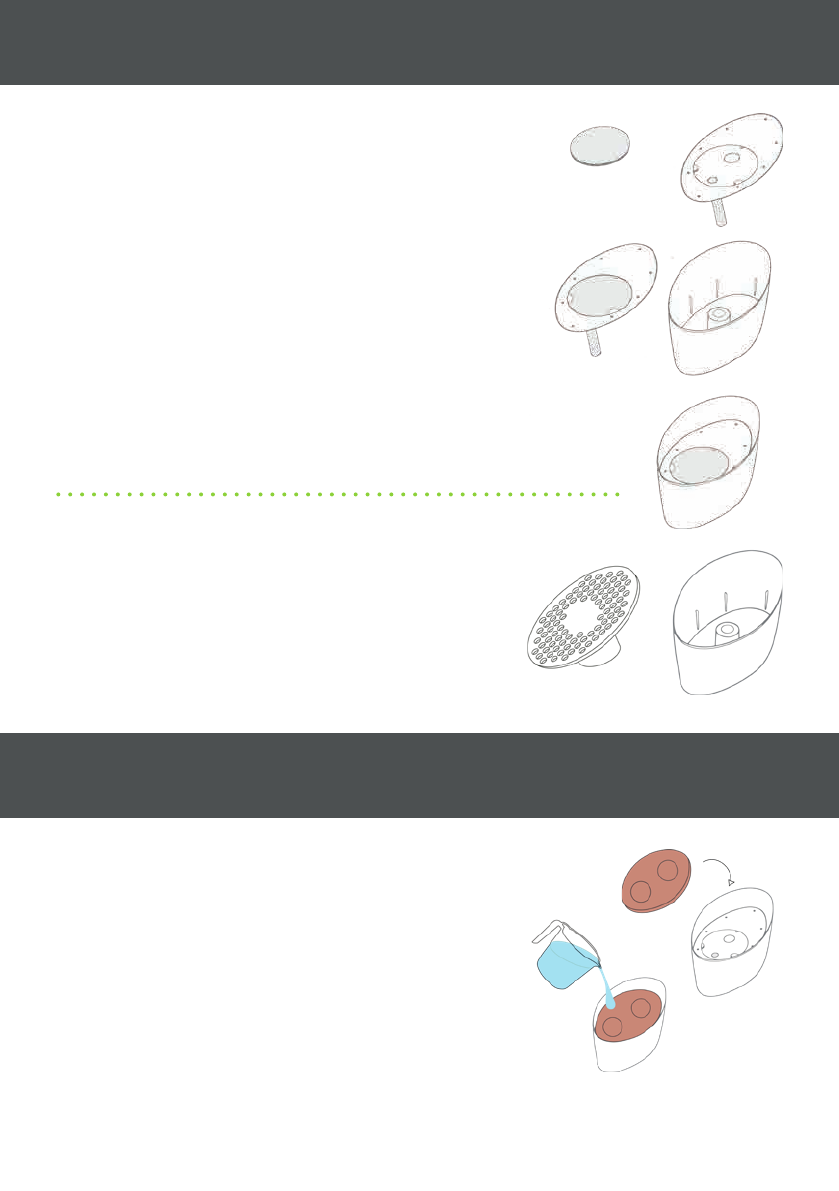
Insert the short wick into the false oor so as to
stick up 1-2mm above the false oor
1
1
1
Place the oval shaped false oor inside the pod,
resting on the grooves inside the pod. Ensure the
central recess is facing up.
2
2
2
Insert the Multi-Flow wick into the pod and press
the central section rmly into position. The wick
should slot easily over the pod’s base.
1
Place the round wicking disc onto the round
section of the false oor, making sure it touches
the short wick. This is important for drawing
water to the plants.
Repeat for each pod. If spillage occurs, don’t worry, it
will be conned to the recess in the base and you can
clean it with a sponge or cloth.
3
3
3
Repeat for each pod4
Repeat for each pod2
STEP 1: WICKING SYSTEMSTEP 1: WICKING SYSTEM
STEP 2: COIRSTEP 2: COIR
Unwrap coir discs with indent holes facing up and place
one into the pod, covering the round wicking disc.
Slowly pour about 400ml of water evenly into the
indent holes in the coir disc. Do not over water or
pour too fast, as this may cause spillage.
Wait until the water is absorbed and the coir disc expands towards the top of the pod. The coir disc may over-
expand or expand unevenly. We recommend to leave about a 10mm clearance to the top of the pod. Excess coir
can be easily removed and discarded. Place the pods into the grooves in the UrbiPod base.
Round wicking disc
Short wick
1
2

1
1
2
2
Lightly cover seeds with coir
3
3
4
First, gently rough up the moist coir with your nger or a fork
Add your seeds evenly to each pod as instructed by the seed packs
STEP 3: FILLING THE RESERVOIRSTEP 3: FILLING THE RESERVOIR
STEP 4: PLANT YOUR SEEDSSTEP 4: PLANT YOUR SEEDS
It is important to read these instructions carefully! Do not ll the tower
directly with water. The water bottle must be used to ll the UrbiPod.
Remove the water bottle from the tower
Unscrew the bottle cap
Fill the bottle with cold water. Add
5ml (a capful) of Urbotanica plant
nutrient to the bottle
Ret bottlecap. Turn bottle upside
down and (cap rst) place the
bottle back into the water tower.
You should start to hear the ow
of water from the bottle to the
base reservoir
Repeat! 2 bottles of water and nutrient are
required to ll the UrbiPod. When the bottle
is empty, you will see it visibly pop up from the tower.
This means it’s time to ll the bottle with water and
5ml of nutrient. Once your plants are mature, you can
increase this to 10ml nutrient. A full water bottle will last
approximately 1-2 weeks before needing to be relled.
5ml nutrient
ll with water
1 2 3

1
2
Firmly connect the power cable to the underside of the light halo
Plug the AC power cable into a nearby power point
STEP 5: PLUG INSTEP 5: PLUG IN
Power cable
Note that the lighting is pre-programmed to a cycle of 16 hours
on and 8 hours o. Restart the cycle simply by using the ON/OFF
switch at the power point.
We recommend that it’s best “ON” during daylight hours and “OFF”
during the night to support healthy plant growth & rest.
Plugging in at 6:00AM, for example, will provide a cycle as follows:
• 6:00AM (0:600) - 10:00PM (22:00) | “ON”
• 10:00PM (22:00) - 6:00AM (0:600) | “OFF”
STEP 6: ADJUST THE LIGHTSTEP 6: ADJUST THE LIGHT
1
2
Adjust the light halo by gently pushing down on it, until it rests 2-3cm above the canopy
top of your plants
Continue to adjust the height of the halo as the plants
grow by push up or down gently. We recommend
keeping the light halo 2-3cm above the canop
top of your plants at all times.
Push down
gently
2-3cm above
plants

NEED HELP?NEED HELP?
If you encounter any diculty with your
UrbiPod product, we are always happy
to help. Here’s how you can contact us:
• Go to the Contact Us page at
urbotanica.com and complete the
help form or email us
• Go to our website’s support page
for tips and instructions
• Go to our Youtube chanel for
detailed video walkthroughs
WARRANTYWARRANTY
Your UrbiPod is protected with 2 years of free warranty.
To activate your warranty, follow the QR code or visit the
following web page:
urbotanica.com/pages/warranty-registration

Distributed by:
URBOTANICA, Suite 13, 50 Oxford Close, West Leederville, WA 6007
GYO Solutions ABN 30 600 879 856
Proudly made and designed in Australia
Table of contents