urmet domus iPervoice max 1717 User manual

DS1717-020 LBT20144
Mod.
1717
IP 7” TOUCHSCREEN MONITOR
Ref. 1717/31 (White)
Ref. 1717/33 (Black)
COMPLETE USER MANUAL
All manuals and user guides at all-guides.com
all-guides.com

2 DS1717-020
The information contained in this manual has been carefully collected and checked; however, the
manufacturer may not be held responsible for any errors or omissions. The manufacturer reserves
the right to introduce at any time and without notice improvements or changes in the products and
services described in the manual.
This manual may also contain references to or information on products or services not yet
available commercially. Such references or information will not in any way imply that the company
intends to market such products or services.
All the trademarks mentioned in this document are the property of their respective owners.
All rights reserved. We hereby authorise the partial or total reproduction of this document for the
exclusive purpose of using the 1717/31 or /33 Monitor.
All manuals and user guides at all-guides.com

DS1717-020 3
Index
1General description 5
1.1 In a nutshell 5
1.2 How to turn on the screen and access the various functions 5
1.3 How to navigate between applications 7
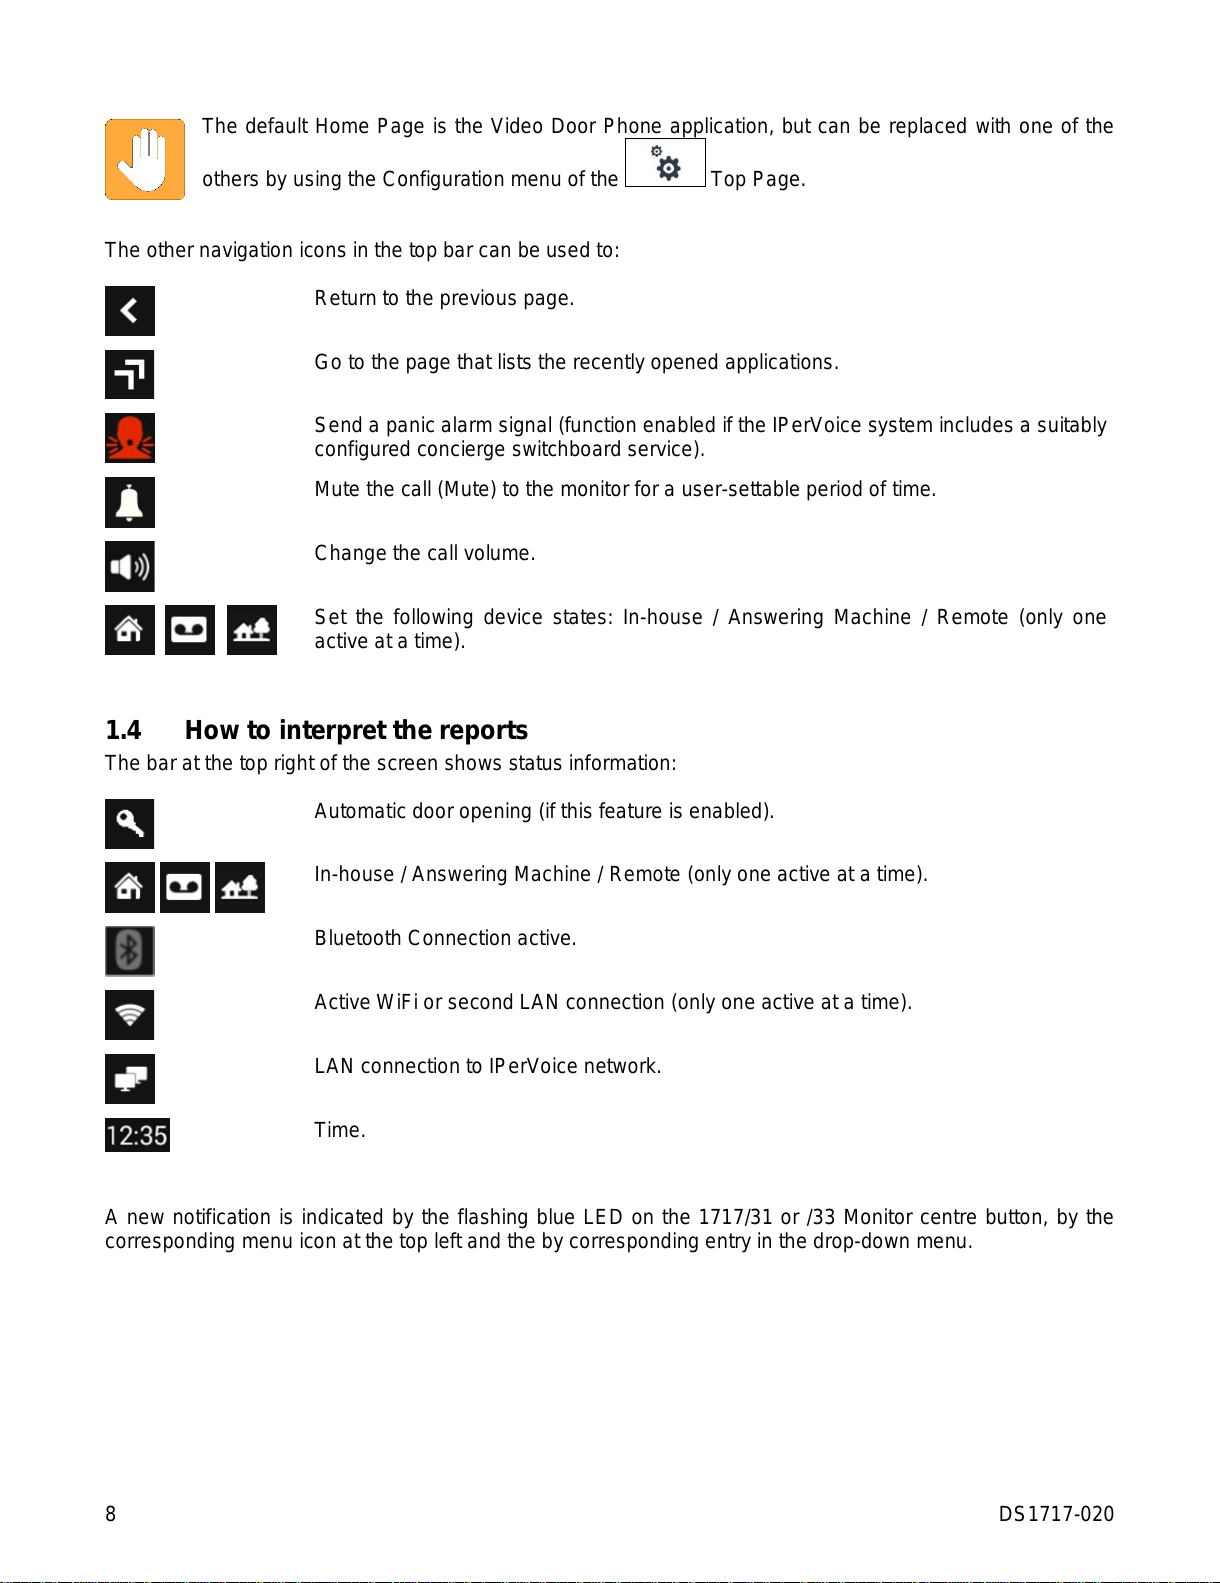
1.4 How to interpret the reports 8
1.5 How to turn off the screen 9
1.6 How to send a panic alarm 9
1.7 How to block the touchscreen feature 10
1.8 How to control a 1717/31 or /33 Monitor hardware reset 10
2Video Door Phone 11
2.1 How to answer an external call 11
2.1.1 How to answer a call with multiple monitors, or with an active "Remote" option 12
2.2 How to answer a call from the switchboard 13
2.3 How to answer an intercom call 14
2.4 How to access Video Door Phone functions 15
2.5 How to use audio messages (Voice "Post-its") 16
2.5.1 How to record an audio message 16
2.5.2 How to listen to an audio message 16
2.6 How to call the switchboard 17
2.7 How to activate an auxiliary function 18
2.8 How to open the entrance door without having been called 18
2.9 How to open the garage/driveway gate without having been called 19
2.10 How to activate the Video Door Phone Voicemail 19
2.11 How to turn off the Video Door Phone Voicemail 19
2.12 How to view voicemail calls 20
2.12.1 How to delete one or more voicemail recordings 20
2.13 How to mute the monitor ringtone 21
2.14 How to make an intercom call 21
2.15 How to check the call log 23
2.16 How to send a text message 24
2.17 How to search for a name in the address book 25
2.18 How to add new contacts to your address book 26
2.18.1 How to resend a contact request 28
3How to accept contact requests 28
3.1 How to delete contact requests 28
3.2 How to view images from the cameras 29
3.3 How to view snapshots 30
3.3.1 How to delete one or more snapshots 30
3.4 How to call the lift 31
All manuals and user guides at all-guides.com

4 DS1717-020
4Yokis Home Automation 32
5IPerHome Home Automation 34
6Android App 37
6.1 Preloaded Android Apps 39
7MIFARE (Access control Application) 40
7.1 How to change the access code for the administrator 41
7.2 How to create, delete, or replace a key for the administrator 43
7.2.1 How to delete the administrator key 44
7.2.2 How to replace the administrator key 44
7.3 How to manage users 45
7.3.1 How to add a user 45
7.3.2 How to delete a user or a key or change a user data 47
7.4 How to record accesses and exits 49
7.5 How to view a user's log 49
7.6 How to view all logs 51
8Configurations 52
8.1 How to change the Home Page 52
8.2 How to change the display wallpaper 53
8.3 How to change the monitor language 54
8.4 How to configure networks and connections 55
8.4.1 ETH1 Network 55
8.4.2 WiFi network 56
8.4.3 Bluetooth 56
8.5 How to display the general settings of the monitor 56
8.6 How to change video door phone tunes 57
8.7 How to change the audio volume 58
8.8 How to change screen settings 59
8.9 How to change video door phone voicemail settings 60
8.10 How to automatically open the door 61
8.11 How to enable or disable the Panic icon 62
8.12 How to check network settings 63
9Maintenance 64
9.1 How to clean the monitor 64
9.2 How to Reboot the monitor 64
9.3 How to carry out User Data Reset 65
9.4 How to reset monitor factory settings 66
9.5 How to display the firmware version of the monitor 67
All manuals and user guides at all-guides.com

DS1717-020 5
1 General description
1.1 In a nutshell
The Monitor 1717/31 or /33 is an IP touchscreen device of the IPerVoice system that can operate as:
•advanced IP Video Door Phone,
•Yokis Home Automation Terminal,
•IPerHome Home Automation Terminal,
•MIFARE Access Control,
•Android Applications Manager.
The monitor uses the Android operating system and is able to perform both the specific functions of Urmet
systems and the generic functions of Android devices. To optimise user-friendliness, the Monitor comes with
certain factory-preloaded applications.
1.2 How to turn on the screen and access the various functions
The 1717/31 or /33 Monitor screen is normally off and automatically lights up when it receives a video door
phone call (see section 2.1 How to answer an external call).
In this case, a screen page is displayed from which the user can answer the caller and open the entrance
door.
The screen can also be voluntarily turned on by the user, to access one of its many applications. To turn on
the screen simply:
•tap the screen at any point, or
•press the centre button at the bottom of the monitor to bring up the Home Page.
The default Home Page is the Video Door Phone application, from which you can access the various video
door phone functions (you can change this setting and choose another application as your Home Page, for
example one of the Home Automation ones).
Video Door Phone Home Page (default option)
All manuals and user guides at all-guides.com

6 DS1717-020
The video door phone functions are the following:
Recording short audio messages (Post.it)
Calling the switchboard (if the IPerVoice system is adequately pre-set)
Lift Control (if the IPerVoice system is adequately pre-set)
Activating an auxiliary function, e.g. turning on the stair lights (if the IperVoice system is
adequately pre-set).
Opening a driveway or garage gate.
Opening the door
WARNING! The functions' availability depends on how the video door phone system has been
designed and built. Some of the functions described below may not be available in your system.
You may want to check with your installer if a specific function is available or can be implemented.
The other navigation icons in the top bar can be used to:
View footage from the cameras present in the system
View recorded audio-video messages (video door phone Voicemail)
Display the address book and the call log
Send text messages (Chat)
Change audio/video screen settings and/or operation language
To change the default application tap the icon , provided in the top left corner, to access the Top
Page, then tap the Set-up icon and finally the Home Page menu.
All manuals and user guides at all-guides.com
all-guides.com

DS1717-020 7
1.3 How to navigate between applications
The various applications are accessible from the Top Page, by tapping the special icon.
Video Door Phone Applications Yokis IPerHome MIFARE Android App
Top Page
The key ‘’?’’ can be used to scan a QR Code and access with your smartphone a page on the Urmet website,
where you can check the datasheet of the product in question.
To return to the Home Page from any screen page, tap the icon in the middle of the bottom bar.
Video door phone
All manuals and user guides at all-guides.com

8 DS1717-020
The default Home Page is the Video Door Phone application, but can be replaced with one of the
others by using the Configuration menu of the Top Page.
The other navigation icons in the top bar can be used to:
Return to the previous page.
Go to the page that lists the recently opened applications.
Send a panic alarm signal (function enabled if the IPerVoice system includes a suitably
configured concierge switchboard service).
Mute the call (Mute) to the monitor for a user-settable period of time.
Change the call volume.
Set the following device states: In-house / Answering Machine / Remote (only one
active at a time).
1.4 How to interpret the reports
The bar at the top right of the screen shows status information:
Automatic door opening (if this feature is enabled).
In-house / Answering Machine / Remote (only one active at a time).
Bluetooth Connection active.
Active WiFi or second LAN connection (only one active at a time).
LAN connection to IPerVoice network.
Time.
A new notification is indicated by the flashing blue LED on the 1717/31 or /33 Monitor centre button, by the
corresponding menu icon at the top left and the by corresponding entry in the drop-down menu.
All manuals and user guides at all-guides.com

DS1717-020 9
The possible notifications are:
Micro SD Card in.
Presence of an unread text message (Chat).
New contact request.
New Post-it not yet listened to.
Missed Call.
Video message not yet viewed.
Panic Alarm sent/cancelled.
1.5 How to turn off the screen
To turn off the screen press the centre button of the 1717/31 or /33 Monitor.
The screen turns off automatically:
•when the user-programmable time-out delay has elapsed (see section 8.8 How to change screen
settings);
•at the end of an incoming call, if the screen was previously off.
1.6 How to send a panic alarm
WARNING! The Panic alarm function requires that:
•the video door phone system has a switchboard;
•the system has been properly set up (for more information, check the IPerVoice manual on
www.urmet.com );
•there is a switchboard operator on duty;
•the switchboard operator has been properly trained on what to do in the event that a panic
alarm is received.
How to send a panic alarm:
•Turn on the screen, if off, by tapping it at any point or by pressing the centre button on the 1717/31 or
/33 Monitor.
•Tap the icon , always visible in the bottom left corner of the screen, unless it had been disabled or
a switchboard is present in the system (see section 8 Configurations).
•In the pop-up page that opens tap the CONFIRM button to control the alarm.
WARNING! Even if unconfirmed, the alarm message will be sent in any case when the timeout
delay expires (after 5 seconds), unless sending is cancelled by tapping the ABORT button.
All manuals and user guides at all-guides.com

10 DS1717-020
On receiving the Panic Alarm message, the switchboard operator can listen to what is going on inside the
apartment, next to the monitor. Ambient listening can only be stopped by the switchboard operator and can
continue without any time limits. Ambient listening enabling in the apartment must be done by the installer (for
more information, refer to the IPerVoice manual on www.urmet.com).
The panic alarm can also be activated via an external device, such as a button, connected to the
terminal block behind the monitor.
1.7 How to block the touchscreen feature
To block the touchscreen feature hold down the 1717/31 or /33 Monitor centre button until the screen with the
padlock image appears.
The touchscreen is inhibited for 20 seconds, after which it is re-activated.
The screen touch functions can be unlocked before the pre-set time by pressing the centre button once again
or by following the instructions that will appear on the screen.
The touch feature block is particularly useful when you wish to clean the screen, so as not to activate the
monitor functions.
1.8 How to control a 1717/31 or /33 Monitor hardware reset
For a hardware reset of the 1717/31 or /33 Monitor, press and hold the centre button of the monitor until it
restarts.
All manuals and user guides at all-guides.com

DS1717-020 11
2 Video Door Phone
The Video Door Phone application is the main application of the 1717/31 or /33 Monitor and it is also the
default Home Page. The application turns the device into an advanced video door phone terminal.
2.1 How to answer an external call
When the monitor receives an outdoor door phone video call, it rings and the screen lights up from its default
switched-off state.
The image of the caller shows up on the screen, unless there are other 1717/31 or /33 Monitors (or other VoIP
terminals) in the apartment or the "Remote" option is not active (for more information, check the IPerVoice
manual on www.urmet.com) In these specific cases, the screen will not show the image of the caller, as
explained further on.
By tapping the various icons you can:
Reject the call. If the external calling station is a call module, a message is displayed informing
that the call has been rejected.
Answer the call and begin a hands-free conversation.
Open the door.
Open a driveway or garage gate.
Store a snapshot of the outdoor picture displayed on the screen.
Enlarge or shrink the image, also changing its format from 4:3 to 16:9.
Turn the monitor microphone off and then back on, to prevent the caller hearing what you are
saying. When the microphone is turned off, the corresponding icon is crossed out. The icon is
only displayed after the call has been answered.
All manuals and user guides at all-guides.com
all-guides.com

12 DS1717-020
Activate an auxiliary function, e.g. turning on the stair lights. Tapping the icon opens a pop-up
window that lists the possible controls. The icon is only displayed if the IPerVoice system
includes a correctly programmed special decoding function (for more information, check the
IPerVoice manual on www.urmet.com).
Close the call. The icon will only be active after the call has been answered.
Change the audio volume in the outdoor station-to-monitor direction (monitor speaker).
2.1.1 How to answer a call with multiple monitors, or with an active "Remote" option
If in the apartment:
•there are multiple monitors or VoIP terminals, or
•the option "Remote" has been enabled (for more information, check the IPerVoice manual on
www.urmet.com), even if there is only one 1717/31 or /33 Monitor, when a call is received the screens
do not show the image of the caller, as pictured here below.
On the monitor that you wish to use to answer, tap the stylized image. The video is displayed and you can
then proceed as described here above for incoming calls from outside.
All manuals and user guides at all-guides.com

DS1717-020 13
2.2 How to answer a call from the switchboard
When the 1717/31 or /33 Monitor receives a call from the switchboard, it rings and the screen lights up from its
default switched-off state. The on-screen image of the switchboard operator will only be displayed after the call
has been answered (if the switchboard is equipped with a camera).
To answer the call and begin a hands-free conversation tap the icon .
After answering, by tapping the various icons you can then:
Show the operator your own picture taken by the monitor camera. If you do not tap this icon, the
operator will only receive voice input.
Store a snapshot of the switchboard operator displayed on the screen.
Enlarge or shrink the image, also changing its format from 4:3 to 16:9.
Turn the monitor microphone off and then back on, to stop the switchboard operator hearing
what you are saying. When the microphone is turned off, the corresponding icon is crossed out.
The icon is only displayed after the call has been answered.
Close the call.
Change the audio volume in the switchboard-to-monitor direction (monitor speaker).
All manuals and user guides at all-guides.com

14 DS1717-020
2.3 How to answer an intercom call
When the 1717/31 or /33 Monitor receives an intercom call, it rings and the screen lights up from its default
switched-off state. The screen will display the image of the caller.
By tapping the various icons you can:
Reject the call. The message "Call rejected" will be displayed on the calling device.
Answer the call and begin a hands-free intercom conversation.
Show the caller your own picture taken by the monitor camera. If you do not tap this icon, the
caller will only receive voice input. This function will only be active after the call has been
answered.
Store a snapshot of the caller displayed on the screen. This function will only be active after the
call has been answered.
Enlarge or shrink the image, also changing its format from 4:3 to 16:9.
Turn the monitor microphone off and then back on, to stop the caller from hearing what you are
saying. When the microphone is turned off, the corresponding icon is crossed out. The icon is
only displayed after the call has been answered.
Close the call.
Change the RX audio volume. This function will only be active after the call has been answered.
All manuals and user guides at all-guides.com

DS1717-020 15
2.4 How to access Video Door Phone functions
Turn on the screen, if off, by tapping it at any point or by pressing the centre button on the 1717/31 or /33
Monitor. The Home Page, i.e. the Video Door Phone main page, is displayed if the default configuration has
been maintained.
If a different Video Door Phone Home Page has been selected, go to the Top Page and select the Video Door
Phone application.
The Video Door Phone page shows the functions that can be used. Select your required Video Door Phone
function by tapping the corresponding icon.
All manuals and user guides at all-guides.com

16 DS1717-020
2.5 How to use audio messages (Voice "Post-its")
The 1717/31 or /33 Monitor allows you to record short audio messages that can be subsequently listened to by
their recipients after they have returned home or to the office.
To record or listen to messages:
•Access the main page of the Video Door Phone application.
•Tap the icon .
A pop-up window will open that can be used to record and listen to messages.
To close the pop-up window tap the X icon at the top right.
2.5.1 How to record an audio message
To record a new message open the pop-up window, tap the RECORD icon and start recording. The
maximum permitted duration of the message is 10 seconds. The time to the end of recording is shown on a
scroll bar.
To stop recording before the end of the available time tap the STOP button.
After recording completion, your message will be automatically stored, with the recording date and time, the
centre button LED will flash and a message will be displayed on the corresponding icon.
The recorded message will be automatically deleted after 30 days.
2.5.2 How to listen to an audio message
The presence of new audio messages is signalled by:
•flashing blue LED on the centre button;
•a number in the bottom right corner in the icon of the Audio messages function
(the number refers to how many new messages there are).
All manuals and user guides at all-guides.com
all-guides.com

DS1717-020 17
To listen to a message open the pop-up window. Messages are listed by date and time.
Select your message by tapping it, and tap the PLAY icon to start message playback. Message playing
cannot be stopped before it ends.
Tap the icon to delete the message.
When there are no more new messages to listen to, the LED on the centre button will go off, and there will be
no number displayed in the bottom right corner in the icon of the Audio messages function.
2.6 How to call the switchboard
If the Video Door Phone system has a switchboard, to call it:
•Access the main page of the Video Door Phone application.
•Tap the icon .
The call is forwarded to the switchboard. If the switchboard operator cannot answer, for example, because
they are not there, the call is stored as a missed call.
All manuals and user guides at all-guides.com

18 DS1717-020
2.7 How to activate an auxiliary function
If the Video Door Phone system is equipped with a special decoder that is properly configured (for more
information, check the IPerVoice manual www.urmet.com), you can activate an auxiliary function (staircase
lights, garden lights, etc. ) in the following manner:
•Access the main page of the Video Door Phone application.
•Tap the icon .
•Tapping the icon opens a pop-up window that lists the possible functions. Tap your required function to
activate it.
•To close the pop-up window tap the X icon at the top right.
The same auxiliary functions can also be activated by tapping the corresponding icon present in the screen
page that is displayed when you answer an incoming external call.
2.8 How to open the entrance door without having been called
If properly configured, your entrance door can be opened even when you have not been called from an
outdoor station (for more information, check the IPerVoice manual on www.urmet.com).
To open the entrance door:
•Access the main page of the Video Door Phone application.
•tap the icon . Sending this control, and not its performance, is confirmed by a pop up message.
All manuals and user guides at all-guides.com

DS1717-020 19
2.9 How to open the garage/driveway gate without having been called
If properly configured, your garage or driveway gate can be opened even when you have not been called from
an outdoor station (for more information, check the IPerVoice manual on www.urmet.com).
To open the garage/driveway gate:
•Access the main page of the Video Door Phone application.
•Tap the icon . Sending this control, and not its performance, is confirmed by a pop up message.
2.10 How to activate the Video Door Phone Voicemail
To activate the Video Door Phone Voicemail:
•Tap the icon in the bottom right corner.
•Select the VOICEMAIL button.
•The displayed icon changes from to .
From this moment onwards, all calls from the outdoor station will ring the monitor and will be recorded. The
user may choose to answer the call while the voicemail message is being recorded. In this case, the recorded
message will not be stored.
The Video Door Phone Voicemail can be set up according to the 3 different operation modes:
•in the calling phase recording is immediately activated on the monitor;
•in the calling phase a customised audio message is played at the outdoor calling station;
•in the calling phase a customised audio message is played at the outdoor calling station and a beep is
heard after which to leave a message.
For more details see the section 8 Configurations.
2.11 How to turn off the Video Door Phone Voicemail
To turn off the Video Door Phone Voicemail:
•Tap the icon in the bottom right corner.
•Select the AT HOME button.
•The displayed icon changes from to .
From this moment onwards, all calls from the outdoor calling station will not be recorded.
All manuals and user guides at all-guides.com

20 DS1717-020
2.12 How to view voicemail calls
How to view calls stored as voicemail:
•Access the main page of the Video Door Phone application.
•Tap the icon . If there are new voicemail calls the corresponding number is circled in red.
•A list of voicemail calls opens; each call is identified by the name of the outdoor calling station and by
the call date and time.
•Select the call that you wish to view details. A pop-up window opens. Tap the button to listen to
the recorded message, the button to close the window.
2.12.1 How to delete one or more voicemail recordings
How to delete one or more recorded messages:
•Open the list of voicemail calls (see previous section)
•Tap the button .
•Select the recorded message(s) that you want to delete (the SELECT ALL button selects all recorded
messages).
•Tap the DELETE button to delete the recordings or CANCEL to cancel the operation without deleting
the recordings.
All manuals and user guides at all-guides.com
This manual suits for next models
2
Table of contents
Other urmet domus Touchscreen manuals
Popular Touchscreen manuals by other brands

Fireye
Fireye NXD410TS Installation and operation

Elo TouchSystems
Elo TouchSystems 3000 Series Quick installation guide

FDI
FDI uEZ GUI Series quick start guide

Elo TouchSystems
Elo TouchSystems E534869 user manual

Extron electronics
Extron electronics TLP Pro 725T Setup guide

Legamaster
Legamaster XTX-7500UHD user manual