Superior Xtreme XM Series User manual

Superior PAPER HANDLING SOLUTIONS 2
© 2005-2015 Superior-PHS
CONTENTS
POWER UP SCREEN ....................................................................................................................................... 3
RUN SCREEN.................................................................................................................................................. 4
JOB SET FUNCTION........................................................................................................................................ 6
MAIN SET-UP SCREEN ................................................................................................................................... 7
ERROR DETECT SET-UP SCREEN .................................................................................................................... 9
COUNTERS SCREEN ..................................................................................................................................... 10
DIAGNOSTICS SCREEN................................................................................................................................. 11
DROPPER SCREEN ....................................................................................................................................... 12
Have this information ready when calling in about your equipment:
Model: Serial #:
Warranty Start Date:
© Superior Paper Handling Solutions, Inc. All rights reserved.
Illustrations in this guide are for reference only and may depict optional features that are available
at additional costs.
Superior Paper Handling Solutions, Inc.
14414 21st Avenue North
Plymouth, Minnesota 55447 –USA
Tel. 763-546-9140
Fax. 763-546-8883
Email. info@Superior-PHS.com
Web. www.Superior-PHS.com

Superior Performance, Superior Value
© 2005-2013 Superior-PHS
3
POWER UP SCREEN
POWER UP SCREEN
1. Run Screen Button: Takes operator directly to Run Screen
NOTE: All settings from previous power down will be retained

Superior PAPER HANDLING SOLUTIONS 4
© 2005-2015 Superior-PHS
RUN SCREEN
1. Batch Size: (1-9999) Press the display to bring up Keypad. Enter required batch size,
press enter to save and return to Run Screen.
2. Actual Count: Displays the count as the feeder
is running. If batch completes the display will
show “0” zero indicating the batch is done and is
waiting for next cycle signal. If feeder stops
before completing the complete batch size,
display will show the number of pieces fed until
stopped. If the feeder is stopped because of a
Double Detect Error, jog the double through and
DO NOT include in the partial batch, press cycle to restage the product. Either a cycle or
photo eye trigger will finish the batch set. All other feeder stops can be restaged and the
batch count will complete.
3. Count Reset Button: When pressed sets Actual Count to “0” zero. You can press the
Count Reset Button at any time and the complete batch count request will re-issue.

Superior Performance, Superior Value
© 2005-2013 Superior-PHS
5
RUN SCREEN
4. Up/Down Screen Arrow Buttons: When pressed moves to the next or previous
screen.
5. Dropper Screen Button: Takes operator directly to Dropper screen.
6. Continuous ON/OFF: To run in ‘Continuous Mode’, turn ‘ON’ and press the CYCLE
button. Press the STOP button to pause/stop. In this operating mode:
a. First cycle stages product to the sheet sensor. Second cycle runs continuously.
b. Miss-detect, double detect, and time out functions work in conjunction with
continuous mode. Time out feature will not work if a jam blocks the sensor.
c. Ignores Pause/Resume function.
d. It will not batch count, but will perform ‘Total Count’ then stop. This mode will not
perform sub-batches or ‘Count to Total’. (See Job Set Function screen)
e. Works with ‘Piece Counter’ and ‘Total Piece Counter’. (See Counters screen)

Superior PAPER HANDLING SOLUTIONS 6
© 2005-2015 Superior-PHS
JOB SET FUNCTION
The Job Set Function screen is designed to
break down a set number of pieces into to
smaller batches. For this example: you to
have 200 pieces that need to be broken
down into sets of 5.
1. Set the Batch Size to 5 on the Run
Screen.
2. Press the ‘Total Count’ screen and
set it to 200. Press enter.
3. Press the center on/off button to ‘ON’
4. The circle above the on/off button will illuminate yellow during a job.
5. Cycle the feeder manually or by the trigger sensor.
6. The ‘Count to Total’ screen will count down showing how many pieces are left to
complete the job.
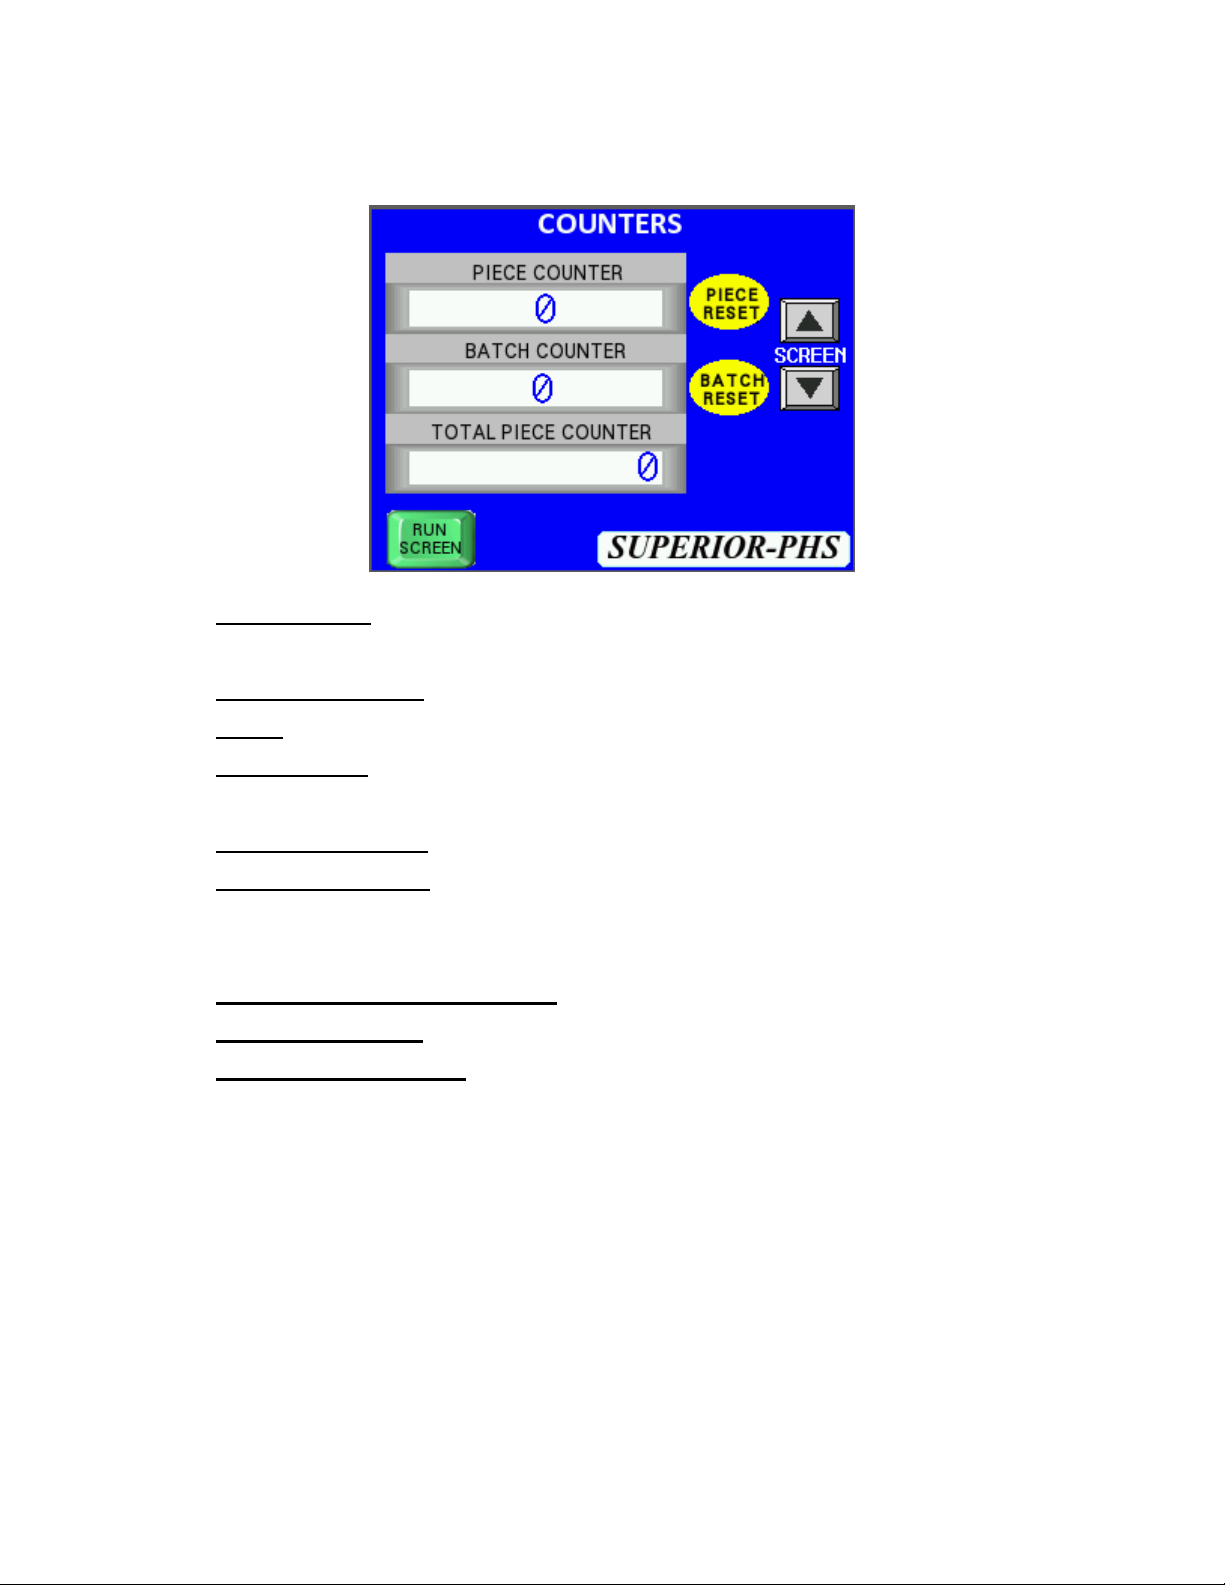
7. The ‘Batch Count’ screen will represent how many sets of 5 have been counted. This is
a mirror image on the ‘Counter Screen’.
8. The ‘Actual Count’ represents how many pieces in each 5 count set have been counted
out. Most likely, the count will happen too quickly to keep up, but in the event of a mis-
feed or miss-count, the ‘Actual Count’ will represent how many pieces in the 5 count set
have been completed. This count is a mirror image of the count on the ‘Run Screen’.
9. The yellow light will have turned blue when the total count is completed.
10. Press and hold the ‘Batch Reset’ to reset the ‘Batch Count’ to ‘0’.
11. Turn the on/off button to ‘OFF’ when not using this function.
At the end of a job, the yellow reset button and red stop button will illuminate and the
yellow light on the screen will turn blue. This means the job is complete. To reset, turn the
Job Set Function to ‘OFF’ then hit the ‘Reset Button’. The red and yellow button will turn off and
the green ready button will illuminate. You can then run in standard mode or start a new job.
For a video demonstration, watch the ‘Job Set Screen’ video at
http://www.superior-phs.com/setup.html

Superior Performance, Superior Value
© 2005-2013 Superior-PHS
7
MAIN SET-UP SCREEN
MAIN SET-UP SCREEN
1. Slow Down CNT: Slow Down Count is used to automatically slow down on the X to last
piece of the Batch Size, where X is the valued entered. Typically set to “0” or “1”. When
running a 1 count or 2 count, it is recommended to set the value to “0”. If running a
count of 3 or higher it is highly recommended the Slow Down Count value be set to 1. At
the maximum speeds of the XM High Speed feeder, the motor can coast on the last
piece, and for shorter pieces an extra piece can sometimes be dispensed. The Slow
Down Count is used to ensure the correct count is provided, and that the first piece of
the next Batch Size is staged in the correct position within the discharge of the feeder.
Press the value/number button to bring up keypad. Enter required value, press enter to
save and return to Main Set-up Screen.
2. Trigger Delay: The Trigger Delay is the time between receiving the Trigger Signal and
the time the feeder begins to feed. If you want to change where in the pocket the feeder
starts feeding, rather than move feeder or trigger photocell, you can add a Trigger delay
time. Press adjacent time button to bring up keypad. Enter required delay time, press
enter to save and return to Main Set-up Screen.

Superior PAPER HANDLING SOLUTIONS 8
© 2005-2015 Superior-PHS
3. Skip Flight: When running on a lugged/flighted conveyor you can add a Skip Count to
miss desired lug pockets. When set to “0”/zero the system will feed or drop into every
pocket. When set to 1 the system will feed/drop into the first pocket, then skip one
pocket, then feed the next pocket and repeat sequence. If Skip Flight is set to 2, then
system will feed first pocket and skip the next 2, and etc. Press the value/number
button to bring up keypad. Enter required value, press enter to save and return to Main
Set-up Screen.
4. Pause/Resume ON/OFF: Pause/Resume can operate in feeder only or with the
dropper on. When Pause/Resume mode is turned ON, press the cycle button to start the
first batch, then Feeder will automatically “Pause”at the end of the first batch for the
preset amount of Pause Time, then Automatically Resume the next batch. This creates
a gap on the shingling conveyor notifying the operator where the batches begin and end.
Press the ON/OFF button to toggle between ON and OFF. The pause time can be set
by using the pause/resume input ( #5 below ).
5. Pause/Resume Time: When Pause/Resume mode is turned ON, sets amount of
Pause time between end of a batch and the automatic starting of the next batch. Press
adjacent time button to bring up keypad. Enter required Pause time, press enter to save
and return to Main Set-up Screen.
6. Up/Down Screen Arrow Buttons: When pressed moves to the next screen.
7. Run Screen Button: Takes operator directly to Run Screen
8. Dropper Screen Button: Takes operator directly to Dropper screen.

Superior Performance, Superior Value
© 2005-2013 Superior-PHS
9
ERROR DETECT SET-UP SCREEN
1. Miss Detect: Miss Detect occurs when a new trigger signal or cycle signal is received
prior to finishing the current Batch Size, provided this error condition is turned ON.
Feeder and Dropper will stop and the Yellow Fault Light will flash. Press the ON/OFF
button to toggle between ON and OFF.
2. Double Detect: Double Detect occurs when the Double Detect Sensor is activated and
provided this error condition is turned ON. See Mechanical or Burn-Thru Double Detect
Setting Section of the manual, depending on type of Double Detect provided with feeder.
Feeder and Dropper will stop and the Yellow Fault Light will flash. Press the ON/OFF
button to toggle between ON and OFF.
3. Time Out Detect: Time Out Detect occurs when the feeder sheet sensor does not
change states (stays blocked or unblocked) for about 2 seconds, and provided this error
condition is turned ON. Typically used to determine if feeder runs out of product or has
a product jam. Feeder and Dropper will stop and the Yellow Fault Light will flash. Press
the ON/OFF button to toggle between ON and OFF.
4. Up/Down Screen Arrow Buttons: When pressed moves to the next screen.
5. Run Screen Button: Takes operator directly to Run Screen
6. Dropper Screen Button: Takes operator directly to Dropper screen.

Superior PAPER HANDLING SOLUTIONS 10
© 2005-2015 Superior-PHS
COUNTERS SCREEN
1. Piece Counter: Counts individual pieces fed. If Batch Size is set to 5 and the batch is
counted, the piece counter will increment by 5. Counter is resettable.
2. Piece Reset Button: Resets Piece Counter to “0”/zero.
3. Reset: Hold till count turns 0
4. Batch Counter: Counts completed batches. If Batch Size is set to 5 and the batch is
counted, the Batch Counter will increment by 1. Counter is resettable.
5. Batch Reset Button: Resets Batch Counter to “0”/zero.
6. Total Piece Counter: Counts total individual pieces fed on the feeder. If Batch Size is
set to 5 and the batch is counted, the piece counter will increment by 5. Counter is NOT
resettable.
7. Up/Down Screen Arrow Buttons: When pressed moves to the next screen.
8. Run Screen Button: Takes operator directly to Run Screen
9. Dropper Screen Button: Takes operator directly to Dropper screen.

Superior Performance, Superior Value
© 2005-2013 Superior-PHS
11
DIAGNOSTICS SCREEN
DIAGNOSTICS SCREEN
1. Sensor Diagnostics: Activate either the Sheet, Trigger, or Double Detect sensor.
When sensor is active, respective green light will come on. Green light indicates sensor,
all wiring, and PLC inputs are good.
2. Button Diagnostics: Press the Stop, Cycle, Jog, or Reset/Fault Button. When button
is active, respective green light will come on. Green light indicates button contact, all
wiring, and PLC inputs are good.
3. Up/Down Screen Arrow Buttons: When pressed moves to the next screen.
4. Run Screen Button: Takes operator directly to Run Screen
5. Dropper Screen Button: Takes operator directly to Dropper screen.

Superior PAPER HANDLING SOLUTIONS 12
© 2005-2015 Superior-PHS
DROPPER SCREEN
If You Did Not Purchase an Automatic Dropper,
Keep This Function In The ‘OFF’ Position And Disregard This Screen.
OVERVIEW OF DROPPER OPERATION:
1. Adjust Dropper Side Guide Plates for width of the product. Allow 1/8 to ¼ inch clearance
on each side for best operational results.
2. Adjust Dropper Back Stop Plate to length of product. Back stop plate is factory preset to
vibrate back and forth with each product fed. This helps to absorb energy from the
product and the vibration helps to square up the stack. Ensure back stop plate in the full
back position is inside the side guides of the conveyor below, otherwise product might
land on the side guide when dropped causing a jam. Back stop plate also holds the full
extend sensor. Dropper forks will extend until this sensor is blocked then they will stop.
3. Position dropper over the side guides of the lugged infeed, and verify the fixed, non-
adjustable dropper plate below the feeder discharge is inside of the side guide below,
otherwise product might land on the side guide when dropped causing a jam. Dropper
will need to be adjusted in and out when conveyor side guides are adjusted in and out.

Superior Performance, Superior Value
© 2005-2013 Superior-PHS
13
DROPPER SCREEN
4. Select Small Product or Large Product Deflector plate and install on Feeder Discharge
nose using screws provided. Brass hold down guide fingers should not hang
substantially below the dropper forks.
5. Turn Dropper ON in the Dropper Screen. See Dropper Screen settings below for details.
6. Make sure Dropper Cover is closed. Dropper and Feeder will not operate with cover
open. Dropper will operate in manual mode with the cover open.
7. When Dropper is turned ON, then when a Trigger Signal is received or the Cycle button
is pressed: the dropper forks will retract, then start to extend, then the feeder will start
next Batch Size and continue until Batch Size is complete. Sequence will repeat with
each new Trigger Signal or push of the Cycle button. When Dropper is Turned OFF,
Feeder will run as normal.

Superior PAPER HANDLING SOLUTIONS 14
© 2005-2015 Superior-PHS
1. Dropper Ext Delay: (.01 - .99) Dropper
Extend delay is used when the dropper
forks are full in/back (forks not showing)
and it is the delay between when the forks
are full back and before forks Extend back
out. Normally adjusted for greater delay
time when accumulating large stack
heights to allow time for stack to drop
before extending the dropper forks. Press
adjacent time button to bring up keypad.
Enter required delay time, press enter to save and return to Dropper Screen.
2. Feeder Delay Time: (.01-.99) Feeder
delay time between when the dropper
forks start to extend back out and the time
when the feeder begins to feed the next
batch. Normally adjusted so the first sheet
of the batch arrives in the dropper at the
same time the forks are fully extended.
Press adjacent time button to bring up
keypad. Enter required delay time, press
enter to save and return to Dropper
Screen.
3. Dropper On/Off Button: Press ON/OFF
button to toggle between dropper being
ON and dropper being OFF. When in the
OFF position, dropper forks will retract and
the feeder can be used as a standard
feeder.
4. Dropper Auto/Manual Button: Press
Auto/Manual button to toggle between
dropper being in Auto Mode and Manual
Mode. When in the Auto Mode, when
Feeder Cycle Button is pressed or a
Trigger Signal is received, the dropper will retract, then extend, then feeder will feed next

Superior Performance, Superior Value
© 2005-2013 Superior-PHS
15
DROPPER SCREEN
batch. When in the Manual Mode and Dropper is ON, system will not cycle as in Auto
Mode. System will ONLY allow operator to press Dropper Cycle Button. See Section 5
below.
5. Dropper Cycle and Open/Close Button: When Dropper is ON and Dropper is in Manual
Mode, this button will manually cycle the dropper forks one half of a cycle. If the button is
pressed when dropper forks are fully extended, forks will fully retract into the base. If the
button pressed with forks fully retracted into the base, forks will fully extend out. If the
button pressed with forks in between fully retracted and fully extended, dropper forks will
fully retract into base. This button will only activate the dropper forks and it will not activate
the feeder. Note: This feature is active with the cover open if it’s in manual mode.
6. Up/Down Screen Arrow Buttons: When pressed moves to the next or previous screen.
7. Run Screen Button: Takes operator directly to Run Screen
8. Dropper Screen Button: Takes operator directly to Dropper screen.
NOTE: Dropper is programmed with a safety fault. If for any reason the forks while
extending were to jam the feeder and dropper will reset to the retracted stage

Superior PAPER HANDLING SOLUTIONS 16
© 2005-2015 Superior-PHS

Superior Performance, Superior Value
© 2005-2013 Superior-PHS
17
DROPPER SCREEN
OPERATORS NOTE PAGE
Table of contents
Other Superior Touchscreen manuals