URSUS TROTTER UT-LEIF25 User manual

MANUAL DE U S U ARIO Y LETRA DE GARANTÍA
ELEKTRO-BACKOFEN
Horno eléctrico 25 L

Manual de Instrucciones
ELEKTRO BACKOFEN
UTLEIF
Especicaciones: 220V, 50Hz, 1500W
SOLO PARA USO DOMESTICO.
Guarde estas instrucciones
Importantes instrucciones de seguridad
Al usar el horno, siempre se deben seguir
indicaciones básicas de seguridad, entre las que
se incluyen las siguientes:
1. Lea atentamente todas las instrucciones.
2. No toque las supercies calientes. Use las manillas o
mangos.
3. Al usar el horno en lugares donde hay niños jugando
cerca, es necesario supervisarlos en todo momento.
4. Para evitar una descarga eléctrica, no sumerja el cable,
el enchufe ni ninguna pieza del horno en agua o en otros
líquidos.
5. No deje el cable eléctrico colgando sobre un mesón ni
tampoco en contacto con supercies calientes.
6. No use el horno si el cable o el enchufe están dañados.
Si el cable o el horno están dañados, llévelo a un Centro
de Servicio Técnico Autorizado para que lo revisen,
reparen o ajusten.
7. El uso de accesorios no recomendados por el
fabricante puede causar daños o accidentes.
8. No coloque el horno sobre o cerca de un quemador a
gas o eléctrico.
9. Al usar el horno, mantenga un espacio libre de por
lo menos 12 cm por lado para garantizar una buena
circulación de aire.
10. Desenchufe el horno cuando no lo use o antes de
limpiarlo. Déjelo enfriar antes de instalar o sacar piezas
o antes de limpiarlo.
11. Para desconectar el horno, gire la perilla de control
de tiempo a la posición ‘OFF’ y luego desenchufe. Para
desenchufar, siempre tome el enchufe y retire, no tire del
cable.
12. Se debe tener mucho cuidado al mover el horno si
contiene aceite u otros líquidos calientes.
13. No cubra la bandeja de migas ni ninguna pieza del
horno con papel aluminio ya que el horno se puede
sobrecalentar.
14. Tenga mucho cuidado al retirar las bandejas del horno
o al eliminar el aceite u otros líquidos calientes.
15. No limpie el horno con esponjas metálicas ya que se
pueden desprender virutas, tocar las partes eléctricas
del horno y generar el riesgo de una descarga eléctrica.
16. No se deben introducir trozos extremadamente
grandes de alimentos o utensilios metálicos dentro del
horno ya que se puede producir un incendio o riesgo de
descarga eléctrica.
17. Puede ocurrir un incendio si el horno se cubre o está
en contacto con materiales inamables como cortinas,
telas, muros y otros elementos similares mientras
se encuentra en funcionamiento. No guarde ningún
elemento dentro del horno cuando está encendido.
18. Tenga mucho cuidado al usar envases que no sean de
vidrio o metal.
19. Asegúrese de que no haya ningún elemento en
contacto con la parte superior o inferior del horno.
20. No coloque ninguno de los siguientes materiales
dentro del horno: cartón, plástico, papel u otros similares.
21. Cuando el horno no esté en uso, sólo guarde dentro
los accesorios recomendados por el fabricante.
22. Siempre use guantes aislantes al introducir o sacar
elementos cuando el horno está caliente.
23. El horno cuenta con una puerta de vidrio templado
que es más resistente que los vidrios comunes. El vidrio
templado se puede quebrar en los bordes; evite rayar la
supercie de la puerta o dañar los bordes.
24. El horno se desconecta cuando la perilla de control
de Tiempo está en la posición ‘OFF’.
25. No use el horno al aire libre.
26. Use el horno sólo para los nes para los cuales fue
diseñado.
Piezas del Horno
A: Carcasa
B: Placa Frontal
C: Mango Puerta
D: Puerta de Vidrio
E: Marco Inferior de la Puerta
F: Perilla de Control de
Temperatura
G: Perilla de Funciones
H: Perilla de Control de Tiempo
K: Indicador de Encendido
L: Patas de base
O: Rejilla
P: Bandeja
Q: Porta Bandeja

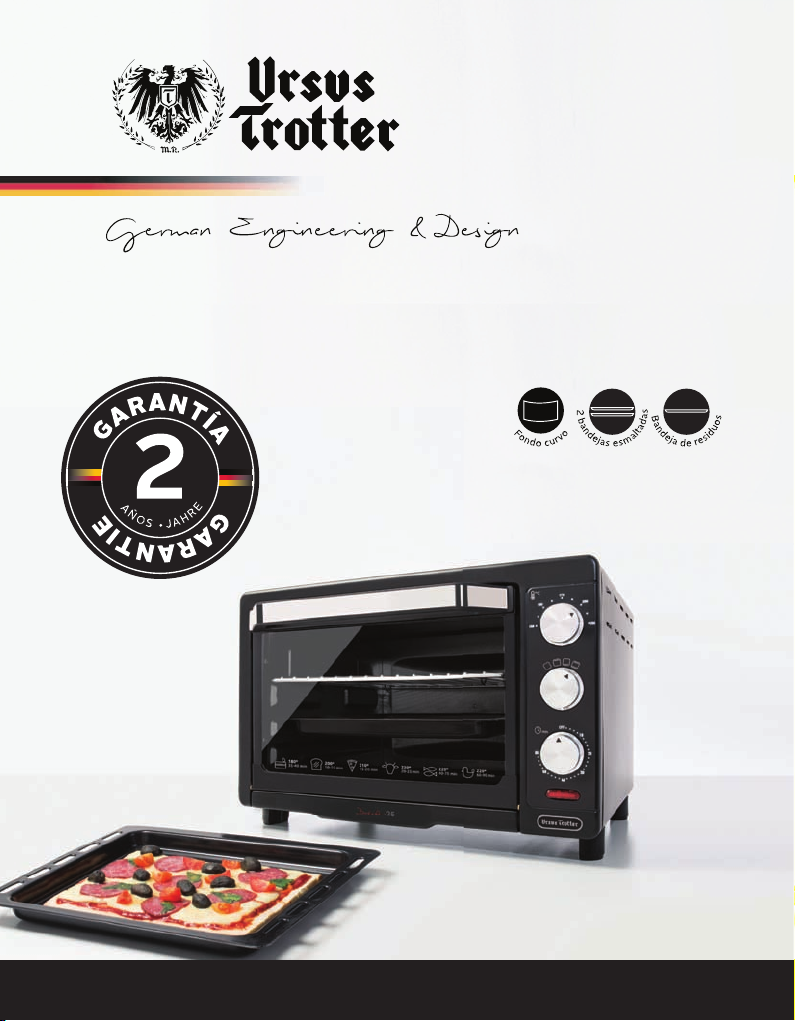
Especicaciones Técnicas
Voltaje: 220V,50Hz.
Potencia: 1500W
Las ilustraciones pueden diferir del producto real.
Lea todas las secciones del manual y siga
cuidadosamente las instrucciones indicadas.
Antes de Usar el Horno
▶ Antes de usar el horno de convección por primera vez
asegúrese de lo siguiente:
1. Lea todas las instrucciones contenidas en este manual.
2. Asegúrese de que el horno esté desenchufado y que
la perilla de Control de Tiempo esté en la posición ‘OFF’.
3. Lave todos los accesorios en agua caliente con jabón o
en el lavavajillas.
4. Seque bien todos los accesorios y vuelva a armar el
horno, enchúfelo y estará listo para usarlo.
5. Después de armar el horno, recomendamos hacerlo
funcionar a temperatura máxima (250ºC) en función
tostar por aproximadamente 15 minutos para eliminar los
residuos de embalaje que pueden quedar, esto también
eliminará los olores inicialmente presentes.
NOTA: Al operar el horno por primera vez es posible que
emita olores y humo (aprox. 15 minutos). Esto es normal
e inofensivo y se produce a consecuencia del material
de protección aplicado en las barras de calor durante el
proceso de fabricación.
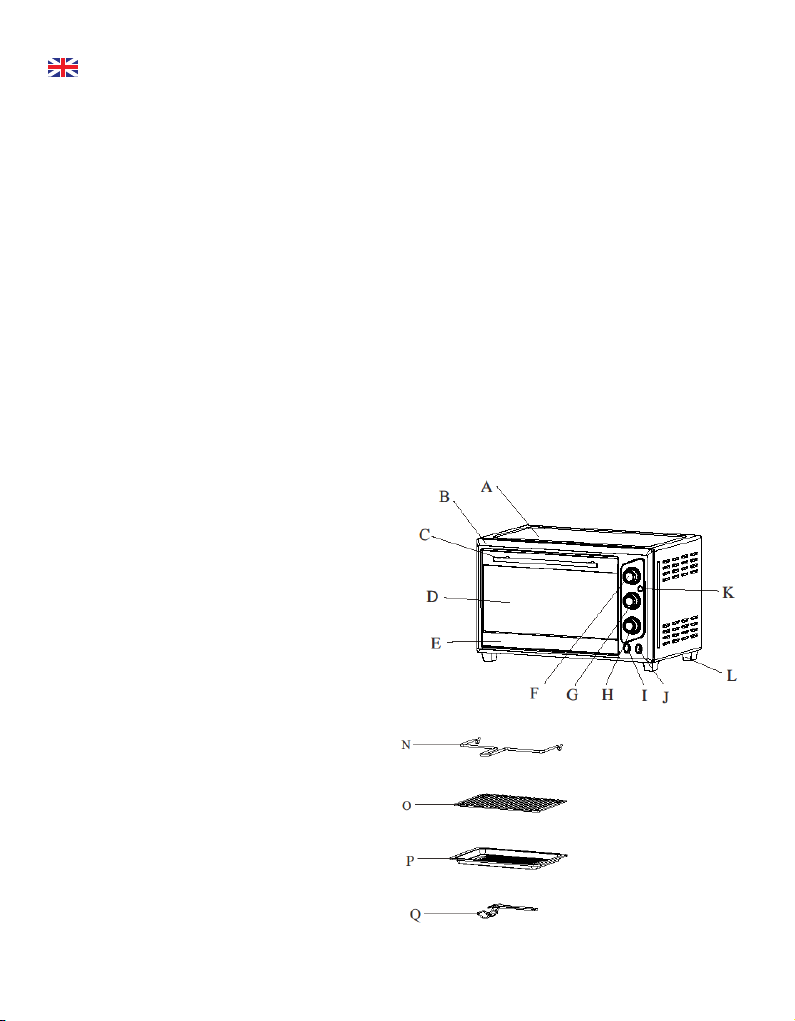
Operación
6. Introduzca la rejilla en la guía de apoyo del horno.
7. Coloque los alimentos en la bandeja.
8. Agregue aceite o salsa a los alimentos, según lo desee.
9. Los alimentos se deben colocar lo más cerca posible
de la barra de calor superior evitando tocarla.
10. Gire la perilla de control de tiempo de acuerdo a los
minutos que desee cocinar.
11. Gire los alimentos cuando haya transcurrido la mitad
del tiempo de cocción.
12. Una vez que los alimentos están asados, gire la perilla
de control de tiempo a la posición “OFF”.
ADVERTENCIA: Para evitar el riesgo de accidentes
o quemaduras, no toque las supercies calientes del
horno. Siempre use guantes termicos.
PRECAUCION: Tenga cuidado al sacar la bandeja,
rejilla o cualquier recipiente caliente del horno.
Use el porta-bandeja o un guante térmico al retirar
elementos calientes del horno.
Instrucciones para hornear
a) Instale la rejilla en la posición deseada.
b) Introduzca la bandeja y cierre la puerta del horno.
c) Gire la perilla de control de tiempo a la posición
deseada (minutos).
d) Gire la perilla de control de función a la posición de
HORNEAR.
e) Una vez transcurrido el tiempo de horneado, gire la
perilla de control de tiempo a la posición “OFF” para
desconectar el horno.
Instrucciones para asar
a) Introduzca la rejilla y la bandeja dentro del horno.
b) Mantenga la puerta del horno semi-abierta.
c) Gire la perilla de control de función a la posición de
ASAR.
d) Una vez transcurrido el tiempo de asar, gire la perilla de
control de tiempo a la posición “OFF” para desconectar
el horno.
Instrucciones para tostar
a) Gire la perilla de control de función a la posición de
TOSTAR.
b) Coloque los alimentos que desea tostar sobre la rejilla.
c) Gire la perilla de control de función a la posición “OFF”.
d) Una vez nalizado el ciclo de tostado, se escuchará una
alarma.
Nota: La rejilla se debe instalar en la posición del
medio del horno con las hendiduras hacia abajo.
PRECAUCION: Al retirar las bandejas del horno,
sostenga la rejilla y no la suelte hasta que se
encuentre en una posición rme y segura.
Instrucciones de Limpieza y Cuidado
Advertencia: Asegúrese de desenchufar el horno y
dejarlo enfriar antes de limpiarlo.
Si durante el proceso de cocción los alimentos salpican
y están en contacto con el revestimiento interior, éstos
se oxidarán mientras el horno se encuentra en operación.
Limpie las paredes del horno con una esponja o paño
húmedo y detergente. NO USE ESPONJAS DE ACERO
NI LIMPIADORES ABRASIVOS NI RASPE LAS PAREDES
CON UTENSILIOS METALICOS YA QUE SE DAÑARA EL
REVESTIMIENTO INTERIOR DEL HORNO.
Todos los accesorios del horno se deben lavar en agua
tibia y detergente o en un lavavajillas. La puerta se
puede limpiar con una esponja húmeda y luego secar
con un trapo o toalla de papel. Limpie el exterior del
horno con una esponja húmeda. NO USE LIMPIADORES
ABRASIVOS YA QUE PUEDEN DAÑAR EL ACABADO
EXTERIOR.
NO USE LIMPIADORES ABRASIVOS NI ESPONJAS DE
ACERO PARA LIMPIAR LA BANDEJA YA QUE PUEDEN
DAÑAR EL ESMALTADO.
DEJE QUE TODAS LAS PIEZAS Y SUPERFICIES SE
SEQUEN BIEN ANTES DE ENCHUFAR Y USAR EL
HORNO.

Instruction Manual
ELECTRIC OVEN
UTLEIF
Spec.: 220V, 50Hz, 1500W
HOUSEHOLD USE ONLY.
Getting To Know Your New Oven
Save these instructions
Important safety instructions
When using your Toast Oven, basic safety
precautions should always be observed, including
the following:
27. Read all instructions.
28. Do not touch hot surfaces. Always use handles or
knobs.
29. Close supervision is necessary when any appliance is
used by or near children.
30. To protect against electric shock, do not immerse
cord, plug or any parts of the oven in water or any other
liquids.
31. Do not let cord hang over edge of table or counter, or
touch hot surfaces.
32. Do not operate appliance with damaged cord or
plug or after the appliance malfunctions or has been
damage in any manner. Return appliance to the nearest
authorized service facility for examination, repair or
adjustment.
33. The use of accessory attachments not recommended
by the appliance manufacturer may cause hazard or
injury.
34. Do not place on or near a hot gas or electric burner.
35. When operating the oven, keep at least four inches of
free space on all sides of the oven to allow for adequate
air circulation.
36. Unplug from outlet when not in use and before
cleaning. Allow to cool before putting on or taking o
parts, and before cleaning.
37. To disconnect, turn the time control to OFF, then
remove the plug. Always hold the plug, and never pull
the cord.
38. Extreme caution must be used when moving a drip
pan containing hot oil or other hot liquids.
39. Do not cover crumb tray or any part of the oven with
metal foil. This may cause the oven to overheat.
40. Use extreme caution when removing the tray, racks
or disposing of hot grease or other hot liquids.
41. Do not clean the inside of the oven with metal
scouring pads, pieces can break o the pad and touch
electrical parts, creating a risk of electric shock.
42. Over sized foods or metal utensils must not be
inserted in a toaster oven as they may create a re or
risk of electric risk.
43. A re may occur if the oven is covered or touching
ammablematerial,includingthecurtains,draperies,walls,
and the like, when in operation. Do not store any item on
top of the appliance when in operation.
44. Extreme cautions should be exercised when using
cooking or baking containers constructed of anything
other than metal or ovenproof glass.
45. Be sure that nothing touches the top or bottom
elements of the oven.
46. Do not place any of the following materials in the
oven: cardboard, plastic, paper , or anything similar.
47. Do not store any materials other than manufacturer’s
recommended accessories in this oven when not in use.
48. Always wear protective, insulated oven gloves when
inserting or removing items from the hot oven.
49. This appliance has a tempered, safety glass door. The
glass in stronger than ordinary glass and more resistant
to breakage. Tempered glass can still break around
edges. Avoid scratching door surface or nicking edges.
50. This appliance is OFF when the Timer Control button
is in the “OFF” position.
51. Do not use outdoors.
52. Do not use appliance for other than intended use.
Main component
A: Housing
B: Front Plate
C: Door Handle
D: Glass Door
E: Lower Door Frame
F: Temperature Control Knob
G: Oven Switch Knob
H: Timer Control Knob
K: Oven Lamp
L: Foot
O: Wire Rack
P: Bake Tray
Q: Bake Tray handle

Technical Specications
Voltage: 220V,50Hz.
Power: 1500W.
Illustrations may dier from actual product.
Read all the sections of this booklet and follow all
the instructions carefully.
Before Using Your New Electric Oven
▶ Before using your toaster oven with convection for the
rst time, be sure to:
13. Read all of the instruction included in this manual.
14. Make sure that the oven is unplugged and the Time
control is in the “OFF” position.
15. Wash all the accessories in hot, soapy water or in the
dishwasher.
16. Thoroughly dry all accessories and re-assemble in
oven, plug oven into outlet and you are ready to use your
new toaster oven.
17. After re–assembling your oven, we recommend that
you run it at the highest temperature (250ºC) on the
toast function for approximately 15 minutes to eliminate
any packing residue that may remain after shipping. This
will also remove all traces of odor initially present.
PLEASE NOTE: Initial start-up operation may result
in minimal smell and smoke (about 15 minutes). This
is normal and harmless. It is due to burning of the
protective substance applied to the heating elements in
the factory.
Operation
18. Place the wire rack on the unit support guide.
19. Place food on the wire rack.
20. Brush food with sauces or oil, as desired.
21. Food should be placed as close as possible to the top
heating element without touching it.
22. Turn timer knob to the appreciate min.
23. Turn food over midway through the prescribed
cooking time.
24. When broiling is complete, turn the time control to
“OFF”.
WARNING: To avoid risk of injury or burns, do not
touch hot surfaces when oven is in use.Always use
oven mitts.
CAUTION: Always use extreme care when removing
bake tray, wire rack or a any hot container from a
hot oven. Always use the rack handle, or an oven
mitt when removing hot items from the oven.
How to bake
f) Place the removable rack into the desired position.
g) Insert the baking tray and close the oven door.
h) Turn the timer knob to the desired cooking time.
i) Turn the heater selector knob to BAKE.
j) When nished baking, turn the timer to “OFF” position
to switch o the oven.
How to broil
e) Insert the removable bake rack with food and bake
tray.
f) Keep the glass door half-open.
g) Turn the heat selector knob to BROIL.
h) When nished broiling, turn the timer to “OFF”
position to switch o the oven.
How to toast
e) Turn the function control knob to TOAST.
f) Place food to be toast onto the wire rack.
g) Turn the timer control knob to “OFF”.
h) Bell will ring to signal the end of the toast cycle.
Note: Wire Rack should be positioned in the middle of
the oven with the indentations pointing down.
CAUTION: When sliding trays out of oven, always
support the rack. Do not let go until you are sure the
rack is cold securely.
Care & Cleaning
Warning: Be sure to unplug the oven and allow it to
cool before cleaning.
Any spattering that occurs while cooking and comes into
contact with the continuous coating is oxidized while
the oven is in operation. If desired, wipe the walls with
a damp sponge, cloth or nylon scouring pad and mild
detergent. DO NOT USE STEEL WOOL SCOURING
PADS,ABRASIVE CLEANERS OR SCRAPE THE WALLS
WITH A METAL UTENSIL,AS ALL OF THESE METHODS
MAY DAMAGE THE CONTINUOUS CLEAN COATING.
All accessories should be washed in hot soapy water or
can be cleaned in a dishwasher. The door can be wiped
with a damp sponge and wiped dry with a paper or cloth
towel. Clean the outside with a damp sponge. DO NOT
USE AN ABRASIVE CLEANER AS IT MAY DAMAGE THE
EXTERIOR FINISH.
DO NOT USE AN ABRASIVE CLEANER OR STEEL
WOOL SCOURING PAD ON THE DRIP PAN AS IT MAY
DAMAGE THE PORCELAIN ENAMEL FINISH.
LET ALL PARTS AND SURFACES DRY THOROUGHLY
PRIOR TO PLUGGING OVEN IN AND USING.

POLIZA GARANTIA 24 MESES 2014 CR.ai 1 07-03-14 14:59
URSUS TROTTER SMALL APPLIANCES S.A.
Una empresa Chilena con precisión Alemana que da conanza
San Pablo - Tel.: - Fax.:
Casilla 3234- Santiago - Chile
ventas@ursustrotter.cl - www.ursustrotter.cl
Sujeto a alteración sin previo aviso.

POLIZA GARANTIA 24 MESES 2014 CR.ai 2 07-03-14 14:59

ursustrotter.cl
Table of contents
Languages:
Other URSUS TROTTER Oven manuals