URSUS TROTTER UT-SILENT1804 User manual

MANUAL DE USUARIO Y LETRA DE GARANTÍA
STAUBSAUGER ZIEHEN
Aspiradora arrastre

Manual de Instrucciones
ASPIRADORA
UTSILENT
VV, /HZ, W
Importantes instrucciones de seguridad
Al electrodomésticos, siempre se deben seguir
instrucciones básicas de seguridad, entre las que se
incluyen las siguientes:
LEA TODAS LAS INSTRUCCIONES
Antes de usar la aspiradora
ADVERTENCIA – Para reducir el riesgo de incendio,
descarga eléctrica o accidentes:
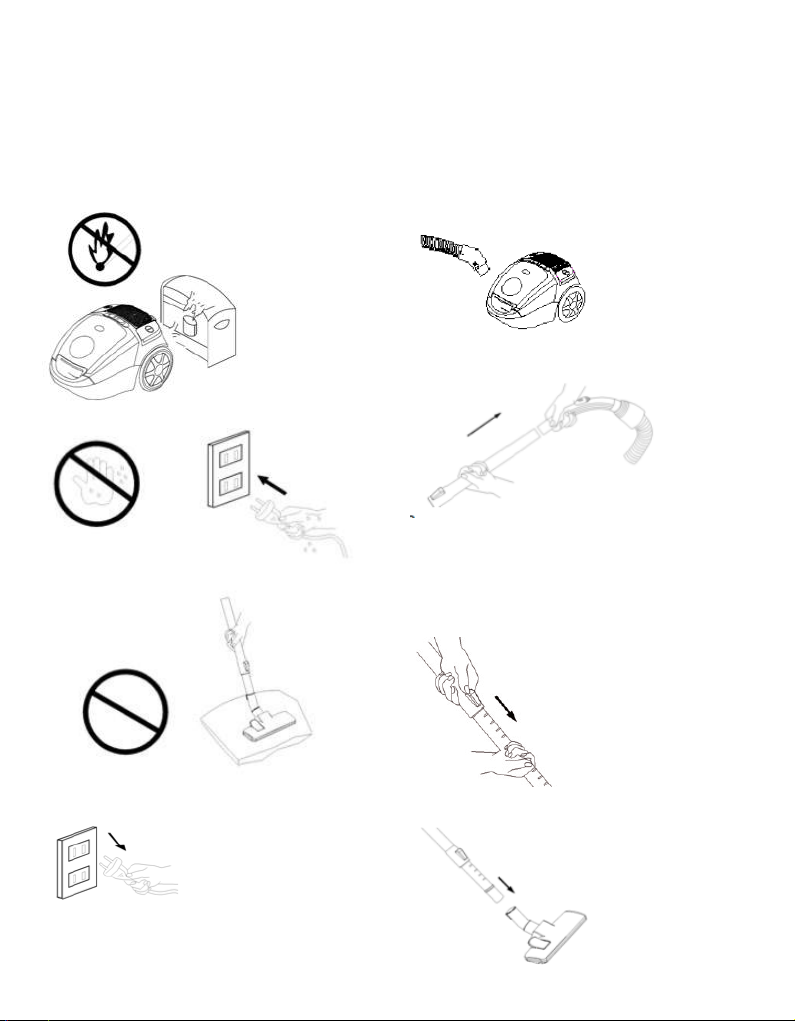
1. No deje la aspiradora enchufada cuando no esté en
uso. Desenchúfela antes de limpiarla.
2. Para reducir el riesgo de descarga eléctrica, no
use la aspiradora al aire libre ni sobre supercies
mojadas.
3. Use la aspiradora de acuerdo con las instrucciones
indicadas en este manual. Use sólo los accesorios
recomendados por el fabricante
4. No use la aspiradora si el cable eléctrico o el
enchufe están dañados. Si la aspiradora no está
funcionando correctamente, si se ha golpeado,
dañado, dejado al aire libre, o caído al agua, llévela
a un centro de servicio técnico para que la revisen
y reparen.
5. No tire ni deje colgando la aspiradora del cable
eléctrico; no permita que el cable pase por debajo
de una puerta o quede enrollado alrededor de
bordes ni puntas cortantes. No pase la aspiradora
sobre el cable eléctrico. Mantenga el cable lejos de
supercies calientes.
6. No desenchufe la aspiradora tirando del cable
eléctrico; tome el enchufe y tire.
7. No manipule el enchufe ni la aspiradora con las
manos mojadas.
8. No introduzca objetos dentro de las aberturas.
No use la aspiradora si alguna de las aberturas están
bloqueadas. Manténgalas libres de polvo, suciedad,
pelos y cualquier elemento que pueda reducir el ujo
de aire.
9. Mantenga el pelo, la ropa, dedos y todas las
partes del cuerpo lejos de las aberturas y piezas en
movimiento.
10. Apague todos los controles antes de enchufar o
desenchufar la aspiradora.
11. Tenga especial cuidado al usar la aspiradora sobre
escaleras.
12. No use la aspiradora para recoger líquidos
inamables o combustibles (p.ej., bencina) ni en
lugares donde estos líquidos podrían estar presente.
13. Sujete el enchufe al rebobinar el cable; evite que
el enchufe se golpee.
14. Desenchufe la aspiradora antes de conectar la
manguera.
15. No aspire ningún objeto que esté caliente o
humeante, p.ej., cigarrillos, fósforos o cenizas
calientes.
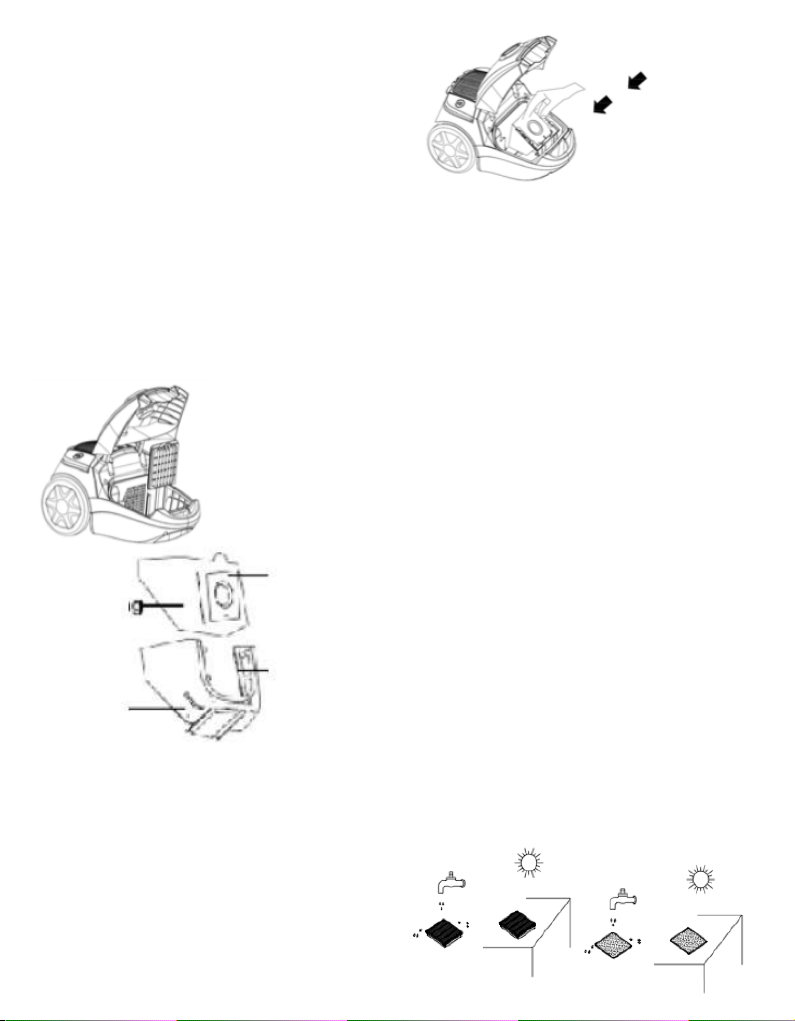
16. No use la aspiradora sin la bolsa para recoger el
polvo y/o el ltro correctamente instalados.
17. Si el cable está dañado, éste debe ser reemplazado
por el fabricante, por un técnico de servicio o por una
persona debidamente calicada para evitar riesgos.
GUARDE ESTAS INSTRUCCIONES
Piezas y equipo
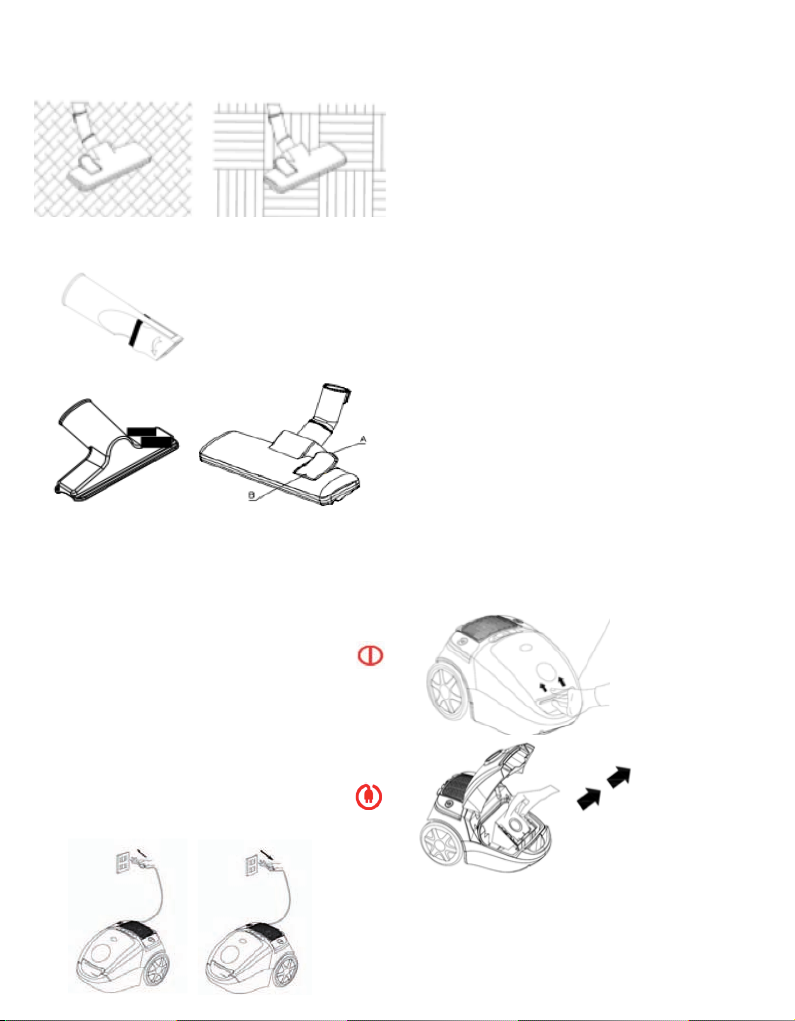
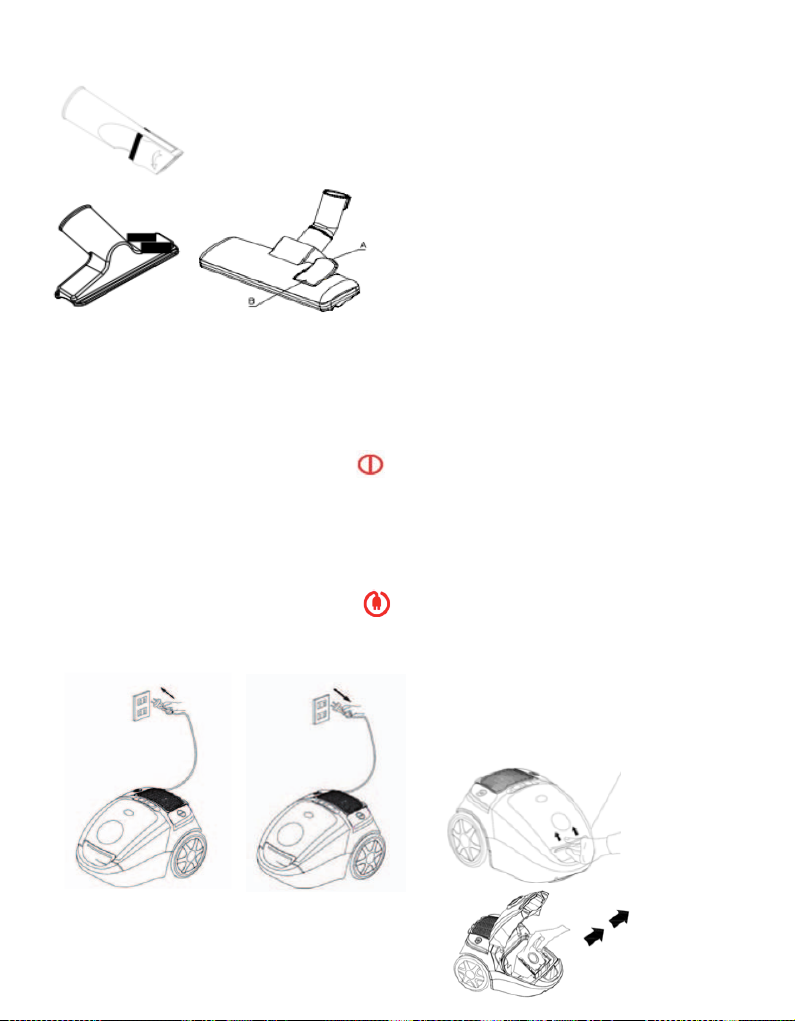
1. Boquilla para piso
2. Tubo Telescópico
3. Entrada de Aire
4. Manguera de Succión
5. Control de Velocidad del Motor
6. Rebobinador Automático del Cable
7. Placa Salida de Aire
8. Conexión de Manguera de Succión
9. Cierre de Cubierta de Bolsa
10. Mango para transportar
11. Boquilla para rincones
12. Cepillo para Tapices
13. Filtro del Motor
14. Bolsa de Polvo Desechable

Prevención
Apague inmediatamente la aspiradora si las entradas
de aire, las escobillas o el tubo telescópico están
bloqueados. Antes de volver a usar la aspiradora,
retire el elemento que está causando el bloqueo.
1. No use la aspiradora cerca de fuentes de calor y no
aspire objetos como colillas de cigarrillos ni cenizas.
2. Enchufe el cable sólo con las manos secas.
3. Retire objetos grandes o cortantes del piso antes
de pasar la aspiradora para evitar que se pueda
dañar.
4. Para desenchufar la aspiradora tome el enchufe y
tírelo, no tire del cable.
INSTRUCCIONES PARA ARMAR LA ASPIRADORA
1. Armado y desarmado del tubo
• Instalación:
Introduzca el tubo en la abertura de entrada de aire.
Empuje el tubo hasta que quede correctamente
encajado.
• Desarmado:
Desenchufe el cable eléctrico del tomacorriente y
tire el tubo de la entrada de aire.
2. Armado del tubo telescópico y accesorios
2.1: Separe el tubo telescópico del mango.
2.2:
• Regule el tubo telescópico al largo que desea.
• Deslice hacia adelante el botón regulador y tire
hacia afuera la parte inferior del tubo de acuerdo
al largo que desea. Luego, simplemente deslice el
botón y déjelo encajar en la posición correcta.
2.3: Introduzca la escobilla en el tubo telescópico.

Seguro
2.4: La escobilla sirve para limpiar alfombras y
pisos de madera.
Cepillo para Muebles
Boquilla para Tapices
Posición de la Boquilla para limpieza de alfombras,
pisos de cerámica, madera o similares:
A: Pisos duros = barra del cepillo abierta
B: Alfombras = barra del cepillo cerrada
Operación
Aspirado
1. Antes de usar la aspiradora, desenrolle una
cantidad suciente de cable eléctrico y enchúfelo
a un tomacorriente. La marca amarilla del cable
eléctrico indica el largo máximo – no se debe exceder.
Para encender la aspiradora, presione el botón de
pedal que está en la carcasa de la aspiradora
2. Para rebobinar el cable, presione con una
mano el botón y guíelo con la otra mano para
evitar que se golpee con algún otro objeto y cause
daños.
Instrucciones de mantenimiento
Las instrucciones que aparecen indicadas en este
manual sirven de guía para el mantenimiento de
rutina. Para evitar llamados innecesarios al centro de
servicio técnico, revise frecuentemente la manguera,
la bolsa y el ltro. Si la manguera está tapada, límpiela
con un soplador, cambie la bolsa cuando esté llena y
limpie el ltro del motor cuando esté sucio.
Bolsas y Filtros de Polvo Desechables
La bolsa y el ltro del motor son muy importantes
para la eciencia de la aspiradora. El propósito de
la bolsa es atrapar la suciedad; la bolsa debe ser lo
sucientemente porosa para permitir el paso de
aire. Si la bolsa o el ltro del motor se tapan, el
aire no puede pasar y la máquina no podrá aspirar,
independiente de la potencia. Para lograr que la
aspiradora aspire con máxima eciencia, cambie la
bolsa frecuentemente y limpie el ltro según sea
necesario. Algunas partículas nas pueden restringir
el ujo de aire disminuyendo el rendimiento de la
máquina, incluso antes de que la bolsa esté llena. Por
esta razón, al aspirar aromatizadores y limpiadores
de alfombras, polvo, yeso o sustancias similares, se
debe limpiar la bolsa y el ltro con mayor frecuencia.
Instrucciones para Sacar la Bolsa
NOTA: Apague y desenchufe la aspiradora antes de
cambiar la bolsa o limpiar el ltro del motor. No haga
funcionar la aspiradora sin la bolsa o el ltro.
1. Apague y desenchufe la aspiradora.
2. Abra el compartimento de la bolsa levantando el
seguro con los dedos y luego la tapa.
3. Ubique el mango del marco de la bolsa.
Saque la bolsa que está dentro del compartimento.
4. Retire la bolsa del marco.
Limpieza de Alfombras Limpieza de pisos de madera

Instrucciones para Instalar la Bolsa
NOTA: Apague y desenchufe la aspiradora antes de
cambiar la bolsa o limpiar el ltro del motor. No haga
funcionar la aspiradora sin la bolsa o el ltro.
1. Apague y desenchufe la aspiradora.
2. Abra el compartimento de la bolsa levantando el
seguro con los dedos y luego sacando la bolsa.
3. Saque el ltro del motor; si está muy sucio, lávelo
con agua tibia. Déjelo secar bien al aire antes de
instalarlo nuevamente.
4. Abra levemente los pliegues de la bolsa.
5. Introduzca la bolsa en el marco presionando el
collar de cartón dentro del riel que está en el marco
hasta que encaje en la posición correcta.
6. Coloque el marco dentro del compartimento
introduciéndolo en las guías que están en la parte de
adelante.
7. Vuelva a colocar la tapa y presione el seguro.
Instrucciones para regular la potencia de succión
La potencia de succión de la aspiradora se puede
regular de acuerdo con las necesidades del usuario,
usando el regulador de succión. Recomendamos
usar la potencia de succión mínima para materiales
delicados.
Seleccione la potencia de succión media para
colchones, tapices y alfombras. Seleccione la
potencia de succión máxima para maderas y otros
pisos duros.
Instrucciones de Limpieza del Filtro HEPA
Limpie frecuentemente el ltro y la tapa HEPA. Para
limpiar bien el ltro, vacíe el recolector de polvo.
Siga las instrucciones indicadas en la sección “Cómo
Vaciar el Colector de Polvo”.
1. Desconecte y desenchufe la aspiradora. Para
desenchufar, siempre tome el enchufe, no tire del
cable.
2. Puede sacar el colector de polvo junto con el
sistema de limpieza ayudándose con el mango que
está en el colector. Tome el mango y tírelo hacia
arriba., luego tire el colector y saque la tapa y el ltro
HEPA con la ayuda del botón de desenganche lateral.
3. Levante con cuidado la tapa del colector de polvo
hasta que se suelte y el ltro HEPA salga fácilmente.
4. Lave el ltro HEPA con agua y luego déjelo secar.
5. Vuelva a colocar el ltro HEPA en la tapa (o
cámbielo por uno nuevo) y encájelo dentro del
colector de polvo. Luego coloque el colector en la
posición correcta. La aspiradora está lista para ser
usada nuevamente.
Instrucciones de Limpieza del Filtro de Aire
El ltro de aire sirve para limpiar el aire una última
vez antes de salir por la aspiradora.
Limpie el ltro de la siguiente manera:
1. Apague y desenchufe la aspiradora. Para
desenchufar, siempre tome el enchufe y no tire del
cable.
2. Abra la rejilla de salida de aire (ubicada en la parte
trasera de la aspiradora).
3. El ltro se ve cuando la rejilla se abre.
4. Lave el ltro con agua fría y luego déjelo secar.
5. Vuelva a instalar el ltro (o cámbielo por uno
nuevo) y luego la rejilla.
6. Cierre la rejilla del ltro.
Filtro del motor
Collar de Cartón
Bolsa de Papel
Marco Bolsa
de Papel
Riel

Instruction Manual
BAGGED VACUUM CLEANER
UTSILENT
VV, /HZ, W
Important safety instructions
When using an electrical appliance, basic precaution
should always be followed, including the following:
READ ALL INSTRUCTIONS
BEFORE USING (THIS APPLIANCE)
WARNING-To reduce the risk of re, electric shock,
or injury:
1. Do not leave vacuum cleaner when plugged in.
Unplug from outlet when no use and before servicing.
2. To reduce the risk of electric shock, do not use
outdoors or on wet surfaces
3. Use only as described in this manual. Use only
manufactures recommend attachments.
4. Do not use with damaged cord or plug. If vacuum
cleaner is not working as it should, has been dropped,
damaged, left outdoors, or dropped into water, enter
it to a service center.
5. Do not pull or carry on cord, use cord as a handle,
close door on cord, or pull cord around sharp edges
or corners. Do not run vacuum cleaner over cord.
Keep cord away from heated surfaces.
6. Do not unplug by pulling on cord. To unplug, grasp
the plug, not the cord.
7. Do not handle plug or vacuum cleaner with wet
hands.
8. Do not put any object into openings. Do not use
with any opening blocked. Keep free of dust, lint, hair
and anything that may reduce airow.
9.Keep hair, loose clothing, ngers and all parts of
body away from openings and moving parts.
10.Turn all controls o before unplugging.
11.Use extra care when cleaning on stairs.
12.Do not use to pick up ammable or combustible
liquids, such as gasoline, or use in areas where they
may be present
13.Hold plug when rewinding onto cord reel. Do not
allow plug to whip when rewinding.
14.Unplug before connecting the hose
15.Do not pick up anything that is burning or smoking,
such as cigarettes, matches, or hot ashes.
16.Do not use without dust bag and/or lter in place.
17.If the supply cord is damaged, it must be replaced
by the manufacturer or its service agent or a similarly
qualied person in order to avoid a hazard.
SAVE THESE INSTRUCTIONS
1. Floor nozzle
2. Telescopic tube
3. Air slide
4. Suction hose
5. Motor speed regulator knob
6. Automatic cord rewind
7. Air out plate
8. Suction hose connection
9. Bag Cover Latch
10. Carrying Handle
11. Crevice tool
12. Upholstery brush
13. Motor Filter
14. Disposable Dust Bag
Prevention
Switch o the vacuum cleaner immediately if the
air intakes, the oor brushes or the telescopes
tube becomes blocked. Before starting the vacuum
cleaner up again remove the substance causing the
blockage:
1. Never use the vacuum cleaner in the immediate
vicinity of hot bodies and do not suck up hot objects
such as cigarette ends or ashes.

2. Only place the plug in the socket when your hands
are dry.
3. Please remove large of sharp objects from the
oor before using the vacuum cleaner to avoid any
possible damage to it.
4. Do not pull by the mains cable when pulling out
the plug.
Assembling the vacuum cleaner
1. Assembly and disassembly of the tube
- Montage:
Insert the tube in the air intake opening. Push the
tube in until it locks in place
Disassembly:
Take the tube from the air intake after disconnecting
from the mains socket.
2. Assembling the telescope tube and accessories
2.1: Remove the telescope tube from the hand
grip.
2.2 Set the telescope tube to the correct length.
Push the telescope tube slide forwards and pull out
the lower part of the tube to the extension length
required. Then simply let go of the slide and let it
snap into place
Set the telescope tube to the correct length.
- Push the telescope tube slide forwards and pull out
the lower part of the tube to the extension length
required. Then simply let go of the slide and let it
snap into place
2.3: Fix the oor brush to the telescope tube.
2.4: Suitable for everyday cleaning of the carpet
and of wooden oors.
Cleaning carpet Cleaning wooden oor

Latch
Furniture brush
Uholstery nozzle
Floor nozzle settings for carpets and tiled, wood-
block or
similar oors:
A: Hard oors = brush bar extended
B: Carpets = brush bar retracted
Operation
Vacuum cleaning
1:Before using the device rst roll out a sucient
length of electric ex cable and plug into the mains
socket. The yellow mark on the electric ex cable is
the maximum length that must not be exceeded.
To switch on the device press the foot pedal button
on the casing with your foot
2: To rewind the power cable,press the button
with one hand and guide the cable with the
other hand to ensure that it does not whip causing
damage.
How to maintain
The instructions given in this booklet serve as a
guide to routine maintenance. To avoid unnecessary
service calls, check the hose, bag and lter often.
Clear a clogged hose with the blower, change the
bag if it is full, and clean the motor lter when it is
dirty.
Disposable Dust Bags and Filters
The dust bag and motor lter play a very important
roll in the eciency of the vacuum cleaner. The
purpose of the dust bag is to trap dirt, but at the
same time, the paper bag must be porous enough
to allow air to pass through. If the bag or the motor
lter become clogged, no air can pass through the
cleaner and no cleaning can take place regardless
of how powerful the unit is. To keep the cleaner
operating at maximum eciency, change the dust
bag frequently and clean the lter as needed. Some
ne particles can restrict airow very quickly and will
decrease performance even before the bag appears
to be full. For that reason, when vacuuming carpet
fresheners or cleaners, powder, plaster dust, or
similar ne substances, the bag and lter may need
to be changed more often.
How to Remove Dust Bag
NOTE: Turn o vacuum and unplug the electrical
cord before changing dust bag or cleaning motor
lter. Never operate the vacuum cleaner without
the dust bag or lter.
1 . Turn o and unplug cleaner.
2. Open bag cover by pushing latch up with ngers
and lifting bag cover.
3. Locate dust bag frame handle. Raise dust bag out
of dust bag compartment.
Raise dust bag out of dust bag compartment.
4. Remove dust bag from dust bag frame.

How to Install Dust Bag
NOTE: Turn o vacuum and unplug the electrical
cord before changing dust bag or cleaning motor
lter. Never operate the vacuum cleaner without
the dust bag or lter.
1. Turn o and unplug cleaner.
2. Open bag cover by pushing latch up with ngers
and lifting bag cover.
3. Remove motor lter and clean by rinsing under
warm water, if heavily soiled. Let completely air dry
before reinstalling.
4. Open bag folds slightly.
5. Place dust bag in dust bag frame by pushing
cardboard collar into ledge
on dust bag frame until collar snaps into position.
6. Place dust bag frame inside dust bag
compartment placing dust bag frame into the
guides at the very front of
the dust bag compartment.
7. Swing bag cover lid closed and push to latch.
Regulating the suction power
You can set the suction power on the device
individually as you require it using the suction
regulator. We recommend using minimum suction
power for delicate materials.
Select medium suction power for mattresses,
upholstered furniture and carpets. Select maximum
suction power for tiled, wood and other robust
oors.
Cleaning the HEPA lter
The HEPA lter and the HEPA cover should be
cleaned regularly. Cleaning is best done when
emptying the dust container. To do this follow the
instructions in the Emptying dust container section.
1. Switch o the vacuum cleaner and disconnect the
plug from the mains. To do this always pull on the
plug and not on the cable.
2. You can pull the dust container together with the
cleaning system out of their anchoring with the aid
of the carrier handle on the dust container. Take
hold of the carrier handle on the dust container and
pull it upwards. Now pull the dust container out and
loosen the HEPA cover and HEPA lter out of the
dust container with the aid of the lateral unlocking
button.
3.Turn the dust container cover carefully until it is
released and the
HEPA lter will come away easily
4. Now rinse the HEPA lter under running water and
allow it to dry.
5. Place the HEPA lter back in the HEPA cover
(or replace with a new one) and t it into the dust
container.
Then t the dust container back into position in the
cyclone dust container until it snaps into place. Your
cyclone vacuum cleaner is now ready for use again.
Cleaning the exhaust air lter
The exhaust air lter cleans the air a nal time before
it leaves
the vacuum cleaner. You can clean the exhaust air
lter as follows:
1. Switch o the vacuum cleaner and disconnect the
plug from
the mains. To do this always pull on the plug and not
on the cable.
2. Open the exhaust air grill (this is at the rear of the
cyclone vacuum cleaner.)
3. The exhaust air lter is visible when the grill has
been opened.
4. Rinse the lter under cold running water and allow
dry.
5. Put the exhaust air lter back into place (or replace
with a new one) and place in the grill.
6. Close the exhaust air lter grill.

POLIZA GARANTIA 24 MESES 2014 CR.ai 1 07-03-14 14:59
URSUS TROTTER SMALL APPLIANCES S.A.
Una empresa Chilena con precisión Alemana que da conanza
San Pablo - Tel.: - Fax.:
Casilla 3234- Santiago - Chile
ventas@ursustrotter.cl - www.ursustrotter.cl
Sujeto a alteración sin previo aviso.

POLIZA GARANTIA 24 MESES 2014 CR.ai 2 07-03-14 14:59

ursustrotter.cl
Table of contents
Languages:
Other URSUS TROTTER Vacuum Cleaner manuals
Popular Vacuum Cleaner manuals by other brands

Fieldmann
Fieldmann FDU 2003-E operating instructions

Hoover
Hoover BH52210 user manual

Panasonic
Panasonic RULO mini operating instructions

Tineco
Tineco CARPET ONE PRO Series instruction manual

Dexter Power
Dexter Power VOD1420SF Assembly, Use, Maintenance Manual

Arzum
Arzum CLEAN FORCE AR 4071 instruction manual