Usconverters EZ50B User manual

www.usconverters.com
1
USconverters.com
Copyright © All rights reserved
Setup guide for EZ50B and EZ500B serial RS232 RF Radios
Establishing a link
Verifying communication
Configuring the parameters
Establishing a link in a test setup
Before connecting the serial radios to your equipment we strongly recommend you to
become familiar with the radios by making a test setup. This will also verify that the radios
are correctly setup and can communicate properly.
1. To make a test setup we need to connect two EZ50B radios to a PC as shown below. In
this example, our PC has one native serial COM port for connecting one EZ50B radio so
we need to use a USB to serial adapter for connecting the second radio to the PC; so in
this example a total of three USB ports are required to make this test.

www.usconverters.com
2
USconverters.com
Copyright © All rights reserved
2. In this example we first need to install the drivers for the USB serial adapter and in
Windows Device Manager check which COM port number has been assigned to the USB
serial adapter.
Notice: We highly recommend using quality USB serial adapters with a FTDI chipset such
as our part number UXS880U. Using a low-cost adapter will in many cases cause problems
when trying to communicate with the EZ50B.
In this example we use a USB to serial RS232 adapter for connecting the EZ50B to a PC.
The assigned COM port is COM 4. COM port 1 is a native COM port.

www.usconverters.com
3
USconverters.com
Copyright © All rights reserved
3. When you know which COM port number has been assigned to your USB serial adapter
you can connect the 9-pin serial connector on the EZ50B to your USB serial adapter (or
your computer’s COM port if you are not using a USB Serial adapter). The EZ50B needs
a 5VDC power supply to work, this is provided through the USB plug. Simply connect the
included USB/DC cable to your computer’s USB port, (Uthe USB connector is for power
only, not serial communicationU) and connect the 5V end to the radio.

www.usconverters.com
4
USconverters.com
Copyright © All rights reserved
4. Now connect the second EZ50B to the native COM port (or use a another USB to serial
adapter if you computer does not have any native COM ports) following the same
procedure as described above. Also connect the USB power wire to a USB port. Check in
Windows Device Manager which COM port the second USB serial port has been
assigned:
In this example the second COM port is a native COM port (COM 1).
You have now successfully connected the two radios to the computer, and you should now be
ready to verify communication.
Notice that since these radios cannot send and receive simultaneously a standard loop-back test
by looping TX to RX will UnotUwork with these radios. To fully verify that the radios are
communicating properly a test setup as described above must be performed.

www.usconverters.com
5
USconverters.com
Copyright © All rights reserved
Verifying Communication
You are now ready to verify that the two EZ50B units can communicate. Download
AccessPort from Uwww.USconverters.comU. Open two instances of AccessPort, one for each
COM port, in this case COM 4 and COM 1. In the menu line click Tools > Configuration and
set the correct COM port numbers and settings for both instances. The default settings of the
EZ50B are:
Baud: 9600
Parity: N
Data bits: 8
Stop bits: 1
Settings for the first EZ50B.

www.usconverters.com
6
USconverters.com
Copyright © All rights reserved
Settings for the second EZ50B.
In both instances of AccessPort click Tools > Port Switch which will open the ports for the units.
The COM ports to the EZ50B units are now open. If you are getting an error message saying
“Cannot open port” it usually means that either:
A. The virtual COM port created by the USB serial adapter’s driver has not been
created properly.
B. You choose an incorrect COM port, (check in Windows Device Manager).
C. 5VDC not connected to the EZ50B unit
D. Cables not properly connected

www.usconverters.com
7
USconverters.com
Copyright © All rights reserved
With both ports successfully opened, in the lower window of AccessPort for the first radio
enter a text string and click the “AutoSend” button.
Notice:
1. The two radios must be spaced at least 5 feet apart to have reliable
communication; otherwise interference might cause communication errors.
2. The antenna MUST be mounted on the converter. These units will not transmit data
properly without an antenna.

www.usconverters.com
8
USconverters.com
Copyright © All rights reserved
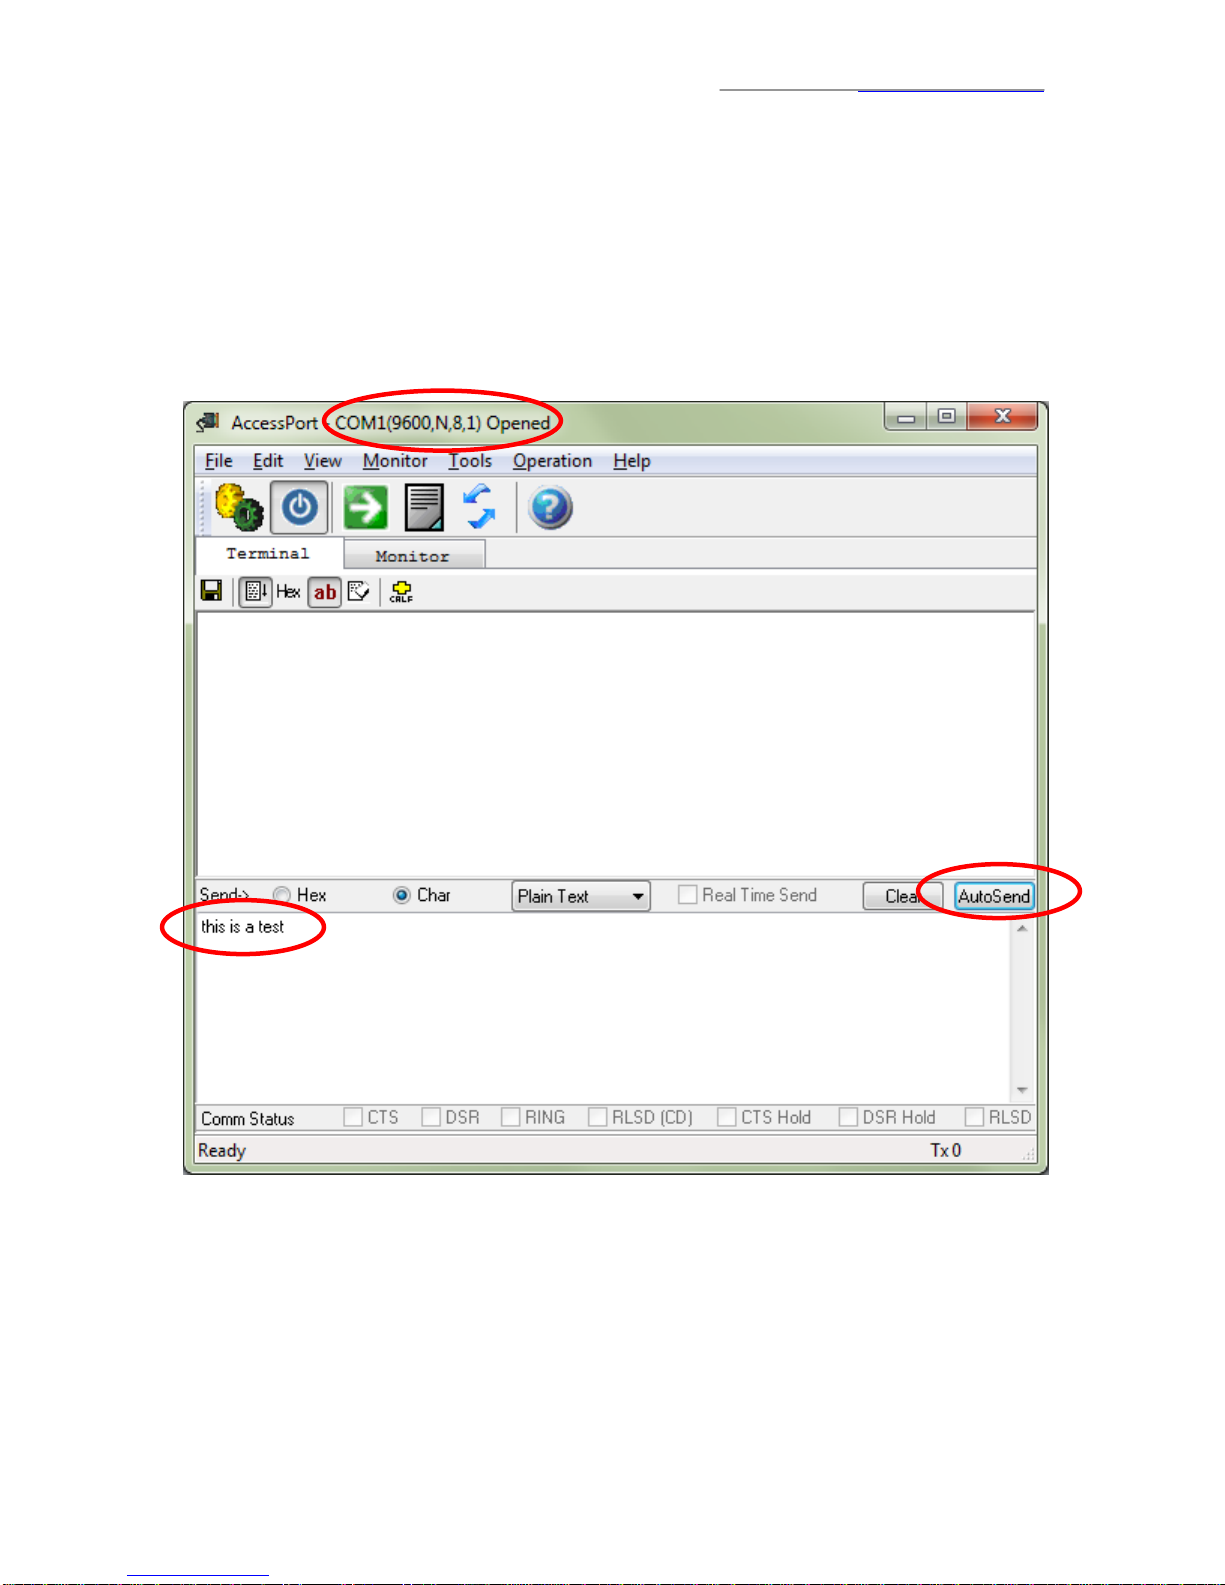
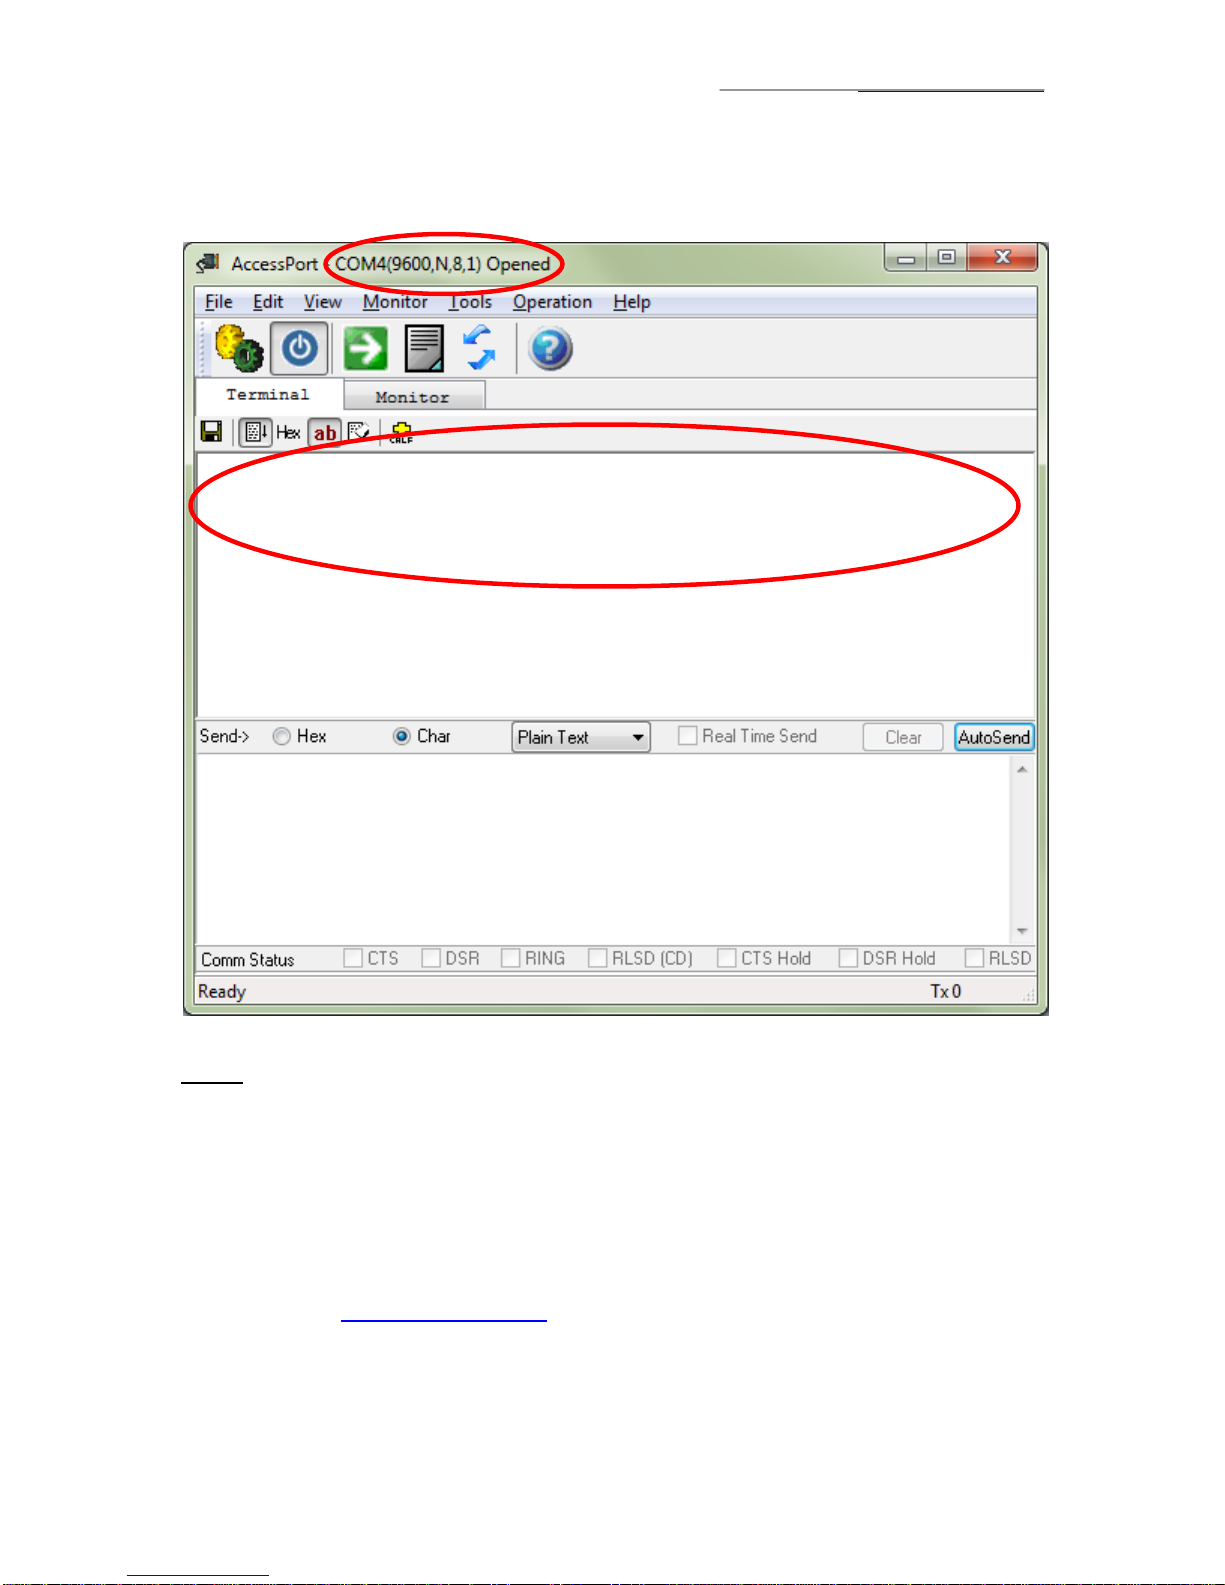
In the receive window for the second radio you should now be able to receive what you send out
from the first radio, and vice versa.
UNotice:UIf the transmission does not automatically start you might need to move the two EZ50B
radios at least 5 feet apart from each other, or in some cases you can simply touch the antenna
and the transmission will start. This is due to interference if the radios are too close together or if
there is a lot of environmental interference or noise.
After you have successfully made this test setup and verified that the radios can communicate
properly, you can connect the radios to your equipment.
If you are having problems communicating once you connect the radios to your equipment,
please refer to: “I can't communicate with my wireless serial adapter...why?” which can be
downloaded from Uwww.usconverters.comU.
Notice: If both units are trying to transmit and receive simultaneously the received data might be
garbled. These radios are made for transmitting and receiving, but not both at the same time
(half-duplex only).
this is a test this is a test this is a test this is a test this is a
test this is a test this is a test this is a test this is a test this is
a test this is a test this is a test

www.usconverters.com
9
USconverters.com
Copyright © All rights reserved
Configuring the parameters
To change the radios parameters you need to use a configuration utility. There are two versions
of the configuration utility available for the radios:
“1_Config utility_for new 32 channel radios purchased AFTER 05.16.2017”
and
“2_Config utility_for old 8 channel radios purchased BEFORE 05.16.2017”
Make sure you use the correct version, depending on when you purchased the radios. You can
download both versions from Uwww.USconverters.comU.
UConnecting with the configuration software
With the EZ50B radio connected to your computer’s COM port (read above how to connect the
radio using a USB serial adapter), open the Configuration Utility.
If you get one or both of the error messages shown below then its probably because your
computer’s COM port number does not match the COM port number the software is looking for.
You can simply disregard these messages by clicking the OK button.

www.usconverters.com
10
USconverters.com
Copyright © All rights reserved
Make sure to use the new 32 channel utility only for radios purchased AFTER 05.16.2017.
Below is shown the 32 channel configuration utility’s main screen, with the COM port open:
Below is shown the (old) 8 channel configuration utility’s main screen, with the COM port closed.
Use this software for radios purchased BEFORE 05.16.2017:

www.usconverters.com
11
USconverters.com
Copyright © All rights reserved
Click the “COM” button to open the COM port settings. Check in Device Manager which COM
port number your computer is using; in this example it is COM port 18:
Click the Open button. Below is shown the main screen with the COM port open:

www.usconverters.com
12
USconverters.com
Copyright © All rights reserved
Click the “Search” button to search for the radio:

www.usconverters.com
13
USconverters.com
Copyright © All rights reserved
Click the “Read” button to read all parameters currently stored in the radio:
DO NOT CHANGE THE RADIO’s FREQUENCY. CHANGING THE
FREQUENCY MAY DAMAGE THE RADIO.

www.usconverters.com
14
USconverters.com
Copyright © All rights reserved
The “Transmit Both Sides” and “Data transmit” tabs can be used for testing communication
however we recommend using AccessPort for testing, as described earlier in this setup guide.

www.usconverters.com
15
USconverters.com
Copyright © All rights reserved
This manual suits for next models
1
Table of contents
Other Usconverters Radio manuals