USP Wanderer Alert WA-900 User manual

SUPERVISED 900MHz Wireless
WORKS AUTOMATICALLY!
Detects patients wandering away and then sounds the alarm
and calls for help!
NOW YOU CAN PROTECT YOUR LOVED ONES AND
PATIENTS FROM WANDERING AWAY!
WANDERER ALERTTM
The pendant Transmitter automatically sends a signal every
seconds to the receiver-dialer. If the receiver doesn’t hear
from the pendant within an adjustable period, (indicating
patient has traveled a distance away) the receiver-dialer will
automatically sound the alarm
strobe and/or dial
emergency num-
bers and deliver
the emergency
message.
1 Transmitter Only Per
WA-900 System.
3

Federal Communications Commission Radio and
Television Interference Statement for A Class ‘B’
Device
This equipment generates and uses radio frequency energy and if not installed
and used properly, that is, in strict accordance with the manufacturer’s
instructions, may cause interference to radio and television reception. It has
been type tested and found to comply with the limits for a Class ‘B’ computing
device in accordance with the specifications in Subpart B of FCC Rules and
Regulations (as outlined in the Code of Federal Regulation, Title 47), which are
designed to provide reasonable protection against such interference in a
residential installation.
User Instructions:
If this equipment does cause interference to radio or television reception, which
can be determined by turning the equipment off, then on, the user is encouraged
to try to correct the interference by one or more of the following measures:
•Reorient or relocate radio or television.
•Increase the separation between the equipment and receiver.
•Connect the equipment into a different outlet so that the equipment and
receiver are on different branch circuits.
•Consult the dealer or an experienced radio/TV technician for help.
Changes or modifications not expressly approved by United Security Products,
Inc. could void the user’s authority to operate the equipment.
NOTE: This equipment has been tested and found to comply with the
limits for a Class B digital device, pursuant to Part 15 of the FCC Rules.
These limits are designed to provide reasonable protection against
harmful interference in a residential or commercial installation. This
equipment generates, uses, and can radiate radio frequency energy and, if
not installed and used in accordance with instructions, may cause harmful
interference to radio communications.

Thank You for Purchasing The WA-900 from USP/Emergency Caller Products!
We have made every effort to make The WA-900 the finest Personal Emergency
Response System on the market today. However, for your safety please take the
following precautions when using The WA-900:
•For High or Low Risk Patients, the WA-900 should be tested regularly to ensure proper
delivery of your pre-recorded emergency message when activated by the WPT-900 transmitter
or the Auxiliary input. This is your responsibility as the user of the product.
•Certain structures within a household may block the transmitter signal. It is up to the user to
test the transmitter within the area of use to determine if dead areas exist, and where they are
located.
•Environmental Conditions that affect wireless transmission distances
WA-900 / Pendant - Orientation
WA-900 / Pendant - Movements
WA-900 placed On/Near metal surfaces
Cross traffic
Furniture
Interior and Exterior Walls
Building Structures
•Holding the transmitter next to your body or the ground while in use may decrease the range
of the transmitter signal. For High Risk patients, the pendant may be worn on the ankle.
•Using The WA-900 does not guarantee that you will contact or receive help. The WA-900 is
only an aid to assist you in calling for help.
•The transmitter should be tested frequently to protect against undetected interference or fault.
•For U.S. installations only: The WA-900 is required to comply with Part 15 of the FCC Rules
and regulations. As such, it has limited transmitter power and therefore limited range.
•The dialer cannot respond to more than one transmitted signal at a time and may be blocked by
radio signals that occur on or near their operating frequencies, regardless of code setting.
•Changes or modifications to the device may void FCC compliance.
Important! Please Read This Page
2

Congratulations!
Thank you for purchasing our WA-900 - the “smartest”, most comprehensive automatic voice/pager emergency
dialer available. Representing an exciting new level of achievement, The WA-900 combines technologically
advanced features, ease of programming and reliable operation in a compact, unobtrusive dialer. Installation and
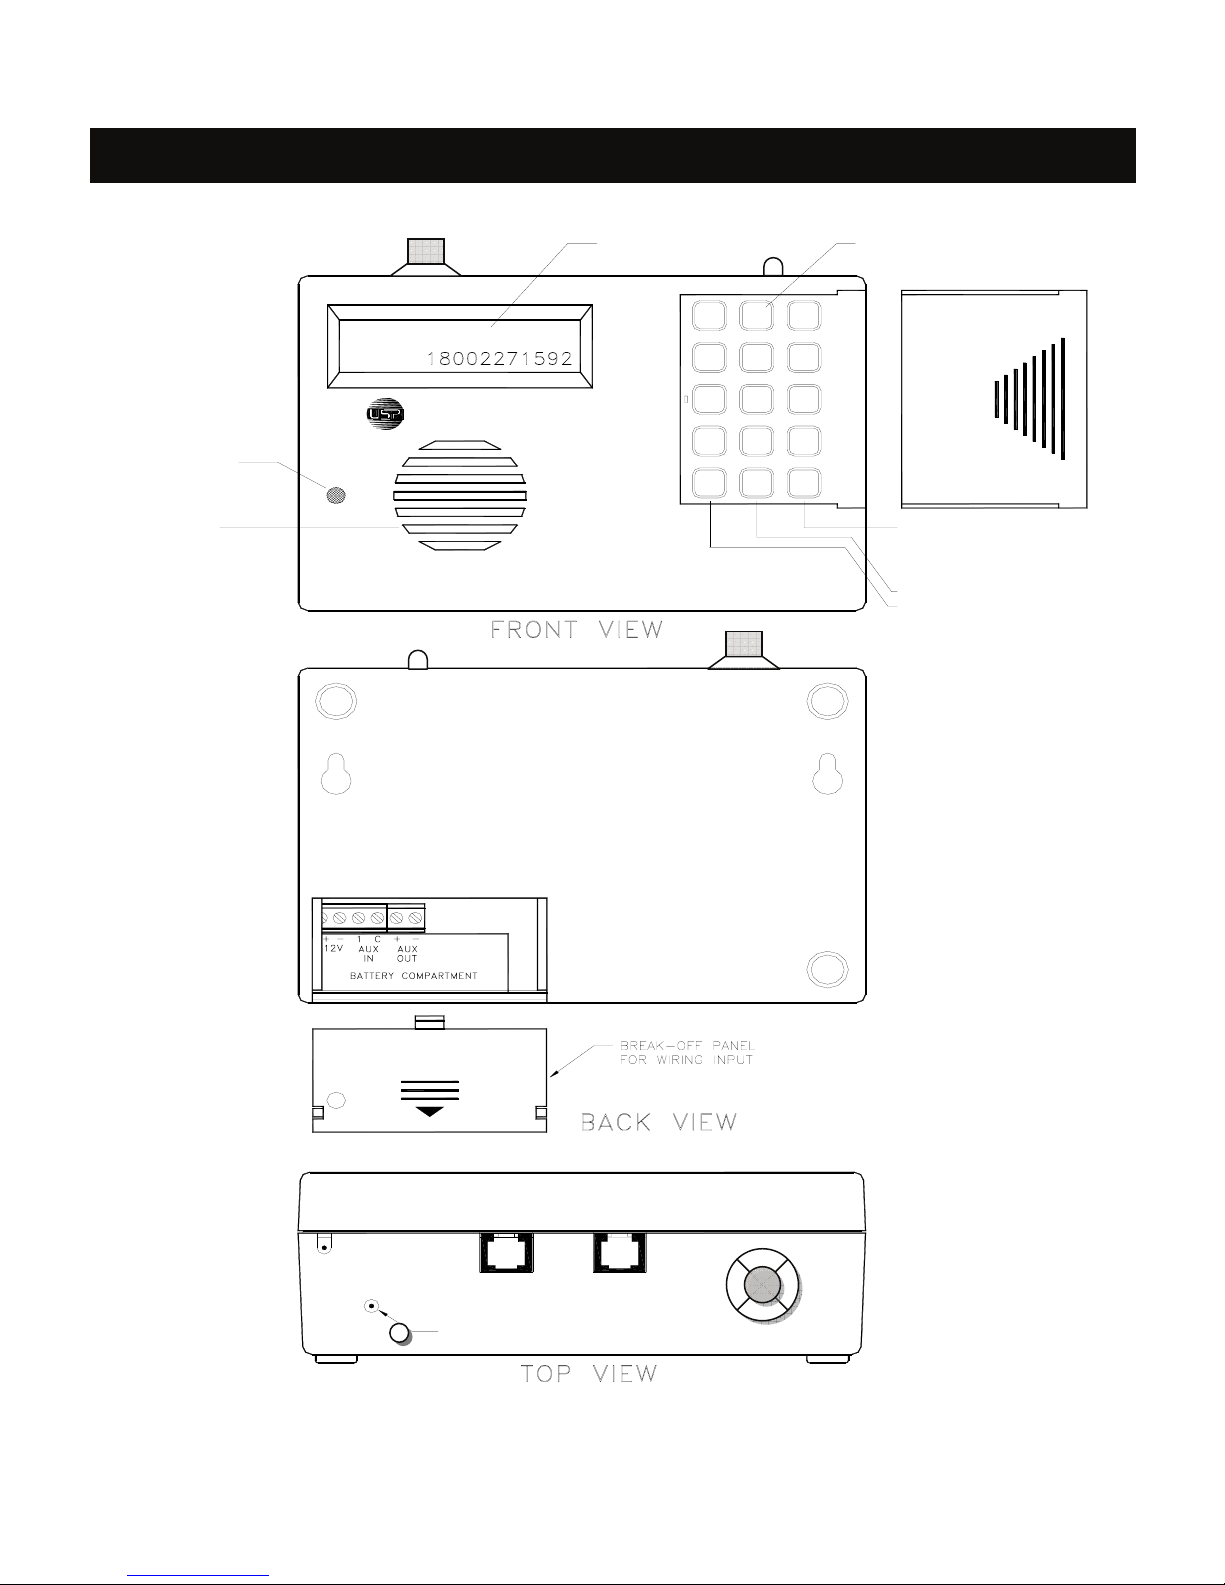
hookup are quick and easy. The unit is a stand-alone wireless device that simply connects to an ordinary
telephone jack. The keypad cover glides on and off for added security.
How It Works:
The WA-900 features busy-line and no-answer detection to ensure prompt transmission of the prerecorded
message to as many as 4 standard telephones, cellular phones, voice and/or numeric pagers. Message to both
local and long-distance calls can be transmitted. When activated, the dialer instantly begins calling the numbers
in sequence, in an attempt to deliver the message or pager code. The WA-900 is extensively programmable,
offering personalized customization to fulfill virtually any residence. Plain-English prompts walk the user
through the process.
Programming options abound, allowing the user to:
•Store up to 4 telephone/pager numbers.
•Store an emergency message (maximum: 20 sec.).
•Select Tone/Pulse dialing, Standard telephone line/PBX system and Momentary/Continuous activation.
Special Features:
•The dialer will “beep” every 30 seconds in the Program and Test mode. This is to warn the user that the
dialer is not in the Operate or Off mode.
•In the Test mode, when testing the input, the dialer will check to make sure that there is a dial tone. If no
dial tone is detected, the dialer will not continue testing the input and will display:
NO DIAL TONE!
(Connect the dialer to the telephone line and re-test the input). Note: Although the dialer checks for a dial
tone it will not actually dial out.
•The dialer will check to make sure that at least one telephone number and OGM (Out Going Message) or
one pager number is programmed before allowing the dialer to be switched to the Operate mode. If
programming is not complete, the dialer will display:
PROGRAMMING IS
NOT COMPLETE!
(After 2 seconds the dialer will automatically switch to the Programming mode).
Please Familiarize Yourself With These Instructions Before Installation/Operation. This guide describes how to
program and operate the dialer. We strongly recommend that you read the entire manual before attempting to
use the unit.
To enhance ease of programming and operation, this guide includes:
•A Programming Sample/Quick Setup review with a corresponding Program Planner.
•A Blank Program Planner. One copy of this Planner should be kept in a safe place by the end user. The
installer should also retain a separate copy.
The WA-900… Gets Help Fast!
3

Section Page number
Package contents…………………………………………………………………
Care and Precautions……………………………………………………………..
Panel Displays……………………………………………………………………
Installation Hookup………………………………………………………………
The WPT-900 Transmitter…………………………………………………..
The WPT-900 Transmitter Locking Band………….……………………………
Programming The WA-900…………………………………………….
Overview………………………………………………………………………
Programming Phone/Pager Numbers………………………………………….
Programming Auxiliary Information, OGM and Input.……………………….
Testing Your System…………………………………………………………..
Operating Your System and Additional Features………………………………..
Programming Example and Sample Program Planner…………………………..
Blank Program Planner…………………………………………………………..
Weekly Test Log…………………………………………………………………
Specifications and Dialer Accessories..………………………………………….
5
6
7
8
9
10
11
13
15
16
18
18
19
20
The WA-900, by USP/Emergency Caller Products, is a compact Personal Emergency Response System.
This full-featured unit provides fast, automatic emergency notification for Alzheimer patients, single residents,
latchkey children, elderly people, illness sufferers and others who desire the reassurance of 24-hour peace of
mind. Combined with the cordless WPT-900 Transmitter, The WA-900 will call for help even if you are unable
to reach the telephone yourself!
EASY
•Fast plug-in installation
•Programs in minutes
•Activates by patient wandering away, the unit automatically sends a signal sounding a local alarm strobe, in
addition to dialing out or by utilizing the Auxiliary input terminals for hardwire panic buttons.
VERSATILE
•Communicates with up to 4 telephones, cellular phones and/or pager destinations
•Can quickly change the 20-second personalized message and your programmed numbers
SECURE
•Provides automatic, emergency communication 24 hours a day
•Incorporates busy-line and no-answer detection, and will redial until the message is delivered
•Operates on 9v battery for momentary power losses. Note: Range may be reduced while on 9V backup
Table of Contents
4

Important: Save These Instructions
As you unpack your WA-900, check to make sure you have the following items:
1. WA-900 Main unit
2. Long telephone line cord
3. WPT-900 Cordless Transmitter
4. 14V AC/DC adaptor, with 3.5mm plug
5. WPT-900 Transmitter Locking Band (Not Shown)
6. Wanderer Alert Unit
7. Instructional Pack: Quick Start Guide, Range Adjustment Fold-out, Phone and Message Programming
Guide, Full User Guide (All Not Shown).
Packaging Contents
1
3
5
2
6
4

Place the dialer on a flat level surface or mount the unit on the wall, away from
extreme cold or heat, direct sunlight, excessive humidity and away from
equipment that generate strong magnetic fields. Avoid placing near large metal
objects and areas that produce smoke, dust and mechanical vibrations.
Clean the housing with a soft cloth lightly moistened with water or mild detergent
solution. Never use solvents such as alcohol or thinner. Do not allow liquids to
spill into the unit.
The 3-Volt Lithium battery (Sanyo CR2450, Renata CR2450N or equivalent)
are pre-installed with your WPT-900 Transmitter. Under normal use
transmitter battery should last 12-18 months. The transmitter battery is
always supervised and the dialer will emit beeps if the voltage drops to
indicate replacement. Transmitter battery should be replaced at least once a
year. After replacing the battery press either the internal or the external
reset button to re-initialize the transmitter and restore programming (either
the small black button located on the back of the outside of the pendant or
the silver colored button located on the inside of the pendant).
To ensure continuous operation during power outages, hookup to a 12VDC
backup battery pack is recommended. (PP-1) Available from USP/Emergency
Caller Products.
Do not use the dialer if a gas leak is suspected or during lightning. If liquid or a
foreign object penetrates the unit, disconnect it immediately and contact your
installer or other qualified technician.
When calling us for help (858-413-0149), we will be better able to help you if…
•You have read this manual
•Your phone line tied to the WA-900 is working.
•You call from a phone that is not on the same line as the WA-900
Care and Precautions
WARNING: DO NOT EXPOSE RECEIVER UNIT OR ITS COMPONENTS,
INCLUDING THE HORN STROBE, TO RAIN OR MOISTURE. DO NOT OPEN
HOUSING.
LOCATION
CARE
WPT-900
TRANSMITTER
BATTERY
OPTIONAL
BACKUP
CAUTION
PROBLEM
6

Panel Display
OUT
JACK FOR WANDERER ALERT HOOKUP
12VDC
IN
TEL
VOICE VERIFICATION
OGM AND 2-WAY
SPEAKER FOR
PLAYBACK MODE - PROGRAM
RECORD VOICE
PAUSE DIGIT (2S/DIGIT)
OPERATE
OFF
TEST
MICROPHONE
TO RECORD
VOICE MESSAGE
EASY TOUCH KEYPAD
EASY PROGRAMMING WITH
M
0
*
PR
7
#
89
PROMPT LCD DISPLAY
321
456
SLIDING KEYPAD COVER
7

Installation Hookup
8
Important:
This configuration
should only be setup
by a professional
technician that has
electrical wiring
experience.

Intended use: The WPT-900 portable transmitter
utilizes 900MHz Frequency Agile® technology.
The WPT-900 has a water-resistant housing that
protects the pendant when worn in the shower, rain,
or other environments where the pendant may be
splashed with water. It is not, however, designed to
be submerged.
WPT-900
Installation
Instructions
To activate the WPT-900, simply step out of the range radius of receiver unit.
Pendant Check-in signals are transmitted every 10 seconds, and are indicated by the blinking
transmit LED (the little light in the upper-left corner of pendant). When the WPT-900 comes back in
range of receiver unit, it will begin to check in with the receiver unit once again, and the alarm
condition will end.
Changing the battery: 1) Slip off clip from back of pendant 2) Remove 3 screws from the back of the
housing 3) Make sure that the battery is inserted with the positive (+) terminal facing up 4) After
replacing the battery, press the internal reset button to reset the transmitter to its most recent
programming 5) Replace back cover and carefully re-tighten screws evenly for tight seal 6)
Thoroughly test the unit before returning to service.
NOTE: WPT-900 transmitters retain programming data in non-volatile memory. They do not
require reprogramming after loss of power. Install new battery and press either the internal or the
external reset button to re-initialize the transmitter and restore programming.
Pendants should be tested at least once per week.
The WPT-900 can be carried in 4 convenient ways
•Around the neck as a pendant (standard).
•On a belt with the belt clip attachment (standard).
•On the arm with non-removable locking wristbands.
•On the ankle with a non-removable locking bands.
WARNING: The neck cord provided with the WPT-900 is designed for user safety. Substitution of
stronger cords or chains may result in injury to the wearer.
9
Dimensions: 2.22” x 1.925” x .725” Weight: 1.4 oz.
Battery: 3.0v Lithium Sanyo CR2450 or Renata CR2450N
Typical Battery Life: 1 to 2 years (Battery is always supervised. The receiver will
notify you when battery is running low).

Overview
Please study this section thoroughly before beginning to program the dialer, referring to the Sample Program
Planner page 17. Then, select from among the options for each feature, listing each choice in pencil on the blank
Program Planner page 18. Once the dialer is correctly programmed, list each choice in ink. One copy of the
Planner should be kept by the installer; one copy should remain with the end user.
A look At The Keypad
•The Numbers:
Press these keys to enter telephone numbers and other programming information as
specified in this manual. A maximum of 28 digits can be input in each phone/pager
location.
•The P (Pause) Button:
Press this key to program in a pause. Each “P” provides a 2-second pause. Pauses are
mainly used to compensate for connection lags, such as when calling cell phones and to
allow the dialer to “wait” for the right moment to start playing the OGM, such as when
calling phones where an answering maching or voice pager will pick up.
•The R (Record) Button:
Press this key to record the directional outgoing messages (OGMs). The total elapsed
OGM time cannot exceed 20 seconds.
•The M (Mode) Button:
Press this key to change the Mode of the dialer, in sequence:
PROGRAM - TEST - OPERATE - OFF.
Once the unit has been programmed, removing power or placing the dialer in the OFF mode will not affect the
programming.
Programming The WA-900
10

If this is the first time the dialer will be programmed, begin at Step 1A
If any programming has been previously done on the dialer, skip step 1A & 1B
Programming Telephone And/Or Pager Numbers
You are now ready to begin programming the dialer. All programming can be input before connecting the dialer
to a telephone line. Check the unit’s LCD screen as you program numbers in the dialer to ensure accuracy.
Please complete all programming instructions before attempting to operate the unit.
You can program up to four phone numbers into your WA. Each of these phone numbers can contain up to 28
digits.
*PROGRAM: NUMBERS Press 1 for Yes SELECT: 1-4
1(YES) 2(NO ) O (DONE)
STEP 1C: Press the 1 button to program the first number.
The LCD will read: PAGER
1(YES) 2(NO)
STEP 2: Press “1” if you wish to program in a numeric pager number (explained in step 3A).
Press “2” if you wish to program in a telephone number (explained in step 3B), cellular phone numer (explained
in step 3B), or a voice pager (explained in step 3C).
VERY IMPORTANT: When programming in the first number, whether it is a pager or not, it’s necessary to
program in 5 pauses (equivalent to 10 seconds) in advance of the digits of the phone number. These pauses will
act as a buffer so that your WA unit does not call out during early warning alarms, which occur when the person
being monitored is close to, but not yet out of range. These 5 pauses should only be added in advance of the
phone number you program into the first memory slot.
Example: To store phone number 555-1212, with 5 pauses ahead of the phone number.
Press:
Programming The WA-900
STEP 1A: Apply power to the unit. The LCD will read: NOT PROGRAMMED
PRESS KEYPAD #1
STEP 1B: Press 1. The LCD will change to read: Emergency Caller
USP (REVISION)
then: PROGRAM: NUMBERS
then: SELECT: 1-4
O (DONE)
Do not program your WA to call the police, fire dept, or 9-1-1 directly, unles you first get approval
from these a
g
encies to do so.
11
(the asterisk button is used to record the
number to memory)

STEP 3A: NUMERIC PAGERS
If you pressed “1” to program in a numeric pager…
Only if this is the 1st memory slot, enter in the five pauses by pressing the P button 5 times, otherwise…
Press the digits of the pager to be called. The numbers will appear on the LCD
Press “P” button to enter as many pauses as necessary to give the pager system enough time to answer the
phone call and get to the point where it can accept the numeric code you want to be delivered.
(Remember, each “P” provides a 2-second pause).
Press the digits of the numeric pager code.
Press “*” to store the sequence.
Example: To store numeric pager number 555-1212, a 4-second Pause and code 3456:
Press:
NOTE: SOME PAGER SERVICES REQUIRE A “#” SIGN FOR SEPARATION OF THE NUMERIC CODE
OR AT THE END OF THE NUMERIC CODE FOR PROPER TRANSMISSION.
STEP 3B: TELEPHONE NUMBERS
If you pressed “2” and wish to program in a telephone number…
Only if this is the 1st memory slot, enter in the five pauses by pressing the P button 5 times, otherwise…
Press the digits of the number to be dialed. For long-distance numbers, first press “1” followed by the area code
and then the number. For CELLPHONES enter 3 pauses (press P button 3 times) after the digits of the phone
number, but before pressing the asterisk to record. The number will appear on the LCD.
Press “*” to store the sequence.
Example: Store telephone number 1-800-555-1212:
Press:
REMEMBER/NOTE: Before programming your dialer to call the police, fire department 0r 9-1-1
directly, you must check with these agencies for their approval.
STEP 3C: VOICE PAGERS
If you pressed “2” and wish to program in a voice pager…
Only if this is the 1st memory slot, enter in the five pauses by pressing the P button 5 times, otherwise…
Press the digits of the pager to be called.
Press “P” one or more times in accordance with the number of seconds needed to accommodate the pager.
(Remember each “P” provides a 2-second pause).
Press “*” to store the sequence. The number will appear on the LCD.
Example: To store voice pager 555-1212 and a 4-second pause:
Press:
Programming The WA-900
IPORTANT: If you make a mistake while entering a phone number, simply press the *button.
This will bring you back to the screen that says Select: 1 – 4 or 0 for Done. Select the same
memory slot you were working on, and re-enter the number.
12

STEP 4: Once you enter a phone number, you will be brought back to the screen that says:
SELECT: 1-4
O (DONE)
Select the memory slot you would like to phone number into.
Repeat steps 1-3 for each number to be programmed in each memory location.
STEP 5: When you are done programming all desired telephone and/or pager numbers, press “0” to exit
this section.
Programming Auxiliary Information
The dialer is preset at the factory to typical telephone line (T-LINE), Tone/Pulse and PBX options. If you
choose to accept the following default prompts, simply press “2” to scroll to the next section. If your phone
system requires dialing a digit to get an outside line or dial tone, similar to PBX, then turn PBX on and
enter digit that is necessary to get outside line.
PRESETS
T-LINE…………….TONE
PBX………………….OFF
To change the presets, follow these steps.
Important: If the WA-900 is failing to get an outside line with the PBX feature activated, or if your phone
system requires more than one digit to get an outside line, it will be necessary to disable the PBX feature and
instead program in the digit(s) needed for an outside line along with your phone numbers (see page 11 for how
to enter phone numbers).
NOTE: IF YOU ENTER THE WRONG CHOICE, PRESS “M” KEY REPEATEDLY AND
RETURN TO THE “EMERGENCY CALLER – USP 1.0C” SCREEN, THEN SELECT THE
SECTION YOU WERE WORKING ON BY PRESSING “1” TO ENTER A SECTION, OR
PRESSING “2” TO GO ON TO THE NEXT SECTION, THEN ENTER CORRECT
INFORMATION AND IT WILL OVERWRITE THE OLD INFORMATION.
Programming The WA-900
PBX
The LCD will display: PROGRAM: PBX
1(ON) 2(OFF)
Press “1” for ON. Press “2” for OFF.
If “1” is entered, the LCD will display:
The LCD will display: PROGRAM: PBX
ENTER PBX NUMBER
Enter PBX number (1 digit).
T-LINE
The LCD will display: PROGRAM: T-LINE
1(YES) 2(NO)
Press “1” to program T-LINE.
Press “2” to scroll to the next section.
The LCD will display: PROGRAM: T-LINE
1(TONE) 2(PULSE)
Press “1” for TONE. Press “2” for PULSE.
13

Programming And Recording Your Outgoing Message
Follow these steps to program and record your outgoing message. Skip this portion if you have programmed in
only numeric pagers, which don’t require a voice message. As with all WA-900 programming, the unit need not
be connected to a phone line when information is programmed in. Remember that “OGM” stands for outgoing
message (total OGM time is 20 seconds).
Typically the dialer is programmed to notify family, friends or another responsible party. Before programming
your dialer to call the police, fire department or 9-1-1 directly, you must check with these agencies for their
approval.
STEP 1: Before programming, write down all your message. Time the message carefully to fit in the alotted
time frame. Practice saying the message, clearly enunciating the message for maximum clarity in case of an
emergency. Keep a final recording script.
STEP 2: Program your OGM.
A) The LCD will read: PROGRAM: OGM
1(YES) 2(NO)
B) Press “1” to program your OGM. Press “2” if you have already recorded your voice message or if you are
only calling numeric pagers that don’t require a voice message.
STEP 3: After selecting your option as explained in Step 2, record your message.
A) The LCD will read: PRESS R
B) Referring to your script and speaking in a normal voice at about 6-12 inches away from the unit., press and
hold R (the word RECORDING will be displayed), releasing the key after you have completed enunciating
your messages. The word DONE will appear on the LCD when the maximum alotted time has been reached.
C) The LCD will read: PLAY OGM
1(YES) 2(NO)
Press “1” to play back your recording and verify that it has recorded properly
D) The LCD will read: ACCEPT
1(YES) 2(NO)
Press “1” to accept the recorded OGM.
Press “2” if you wish to re-record the message, beginning with Step 3.
Changing The OGM
After your system is up and operating, you may change the recorded OGM. To do so, simply scroll to the
programming section on your display: PROGRAM: OGM
1(YES) 2(NO)
Select the option, then begin again from Step 3 above to record your new message.
Programming The WA-900
14

Programming The Input
In this section, “the input” refers to the small pendant transmitter that is worn by the person at risk of
wandering. The Receiver/Dialer is looking for check-in signals from the pendant transmitter at 10 second
intervals. Your setting on the range dial determines how many missing check-in signals can occur before the
Receiver/Dialer will go into alarm and will dial each phone/pager number selected, in sequence. When set in a
Continuous input setting, once transmitter comes back in range of Receiver/Dialer unit, the transmitter will
once again begin to communicate with the receiver and the alarm/dialing will stop. Under a Momentary input
setting activation, once the receiver goes into alarm (either because of an out of range transmitter or a trigger on
the hard wired input) it will remain in alarm until the unit calls all programmed phone numbers or the unit is
manually reset (even if the transmitter comes back in range).
STEP 1: The LCD will read: PROGRAM: INPUT
1(YES) 2(NO)
Press “1” to begin programming the input.
STEP 2: The LCD will read: PROGRAM: MOM/CONT
1(MOM) 2(CONT)
Press “1” for momentary activation.
Press “2” for continuous activation.
STEP 3: PRESS “M” TO EXIT PROGRAMMING MODE.
NOTE: IF YOU ENTER THE WRONG CHOICE, PRESS “M” KEY REPEATEDLY AND
RETURN TO THE “EMERGENCY CALLER – USP 1.0C” SCREEN, THEN SELECT THE
SECTION YOU WERE WORKING ON BY PRESSING “1” TO ENTER A SECTION, OR
PRESSING “2” TO GO ON TO THE NEXT SECTION, THEN ENTER CORRECT
INFORMATION AND IT WILL OVERWRITE THE OLD INFORMATION.
In the PROGRAM mode, a beep will be heard every 30 seconds. This is to indicate that the
dialer is not in the OFF or OPERATE mode.
15

Test your system before an emergency occurs.
Do not forget to review programmed information and verify all parts of your system thoroughly before relying
on the dialer to notify you about a wandering patient.
The test mode tests the stored information, not the full functionality of the dialer. To test the full functionality of
the dialer, the unit must be tested in the operate mode. In the test mode, the dialer will not make more than one
attempt per number dialed or play the OGM more than once.
STEP 1: Press the “M” Mode key until the screen reads: TEST: T-LINE
1(YES) 2(NO)
STEP 2: Press “1” to display the T-Line configuration. The data will scroll through all selections.
Press “2” to scroll to the next section.
STEP 3: The screen will read: TEST: INPUT
1(YES) 2(NO)
STEP 4: Press “1” to test input. Verify the settings as the screen scrolls through by comparing the information
displayed with that specified on your Program Planner. Listen to your recorded message to ensure that the
correct OGM (if programmed) is delivered.
Press “2” to scroll to the next section.
STEP 5: To test the operation of your entire system, set Mode to OPERATE and proceed as explained in the
next section: Operating Your System.
NOTE: IN ORDER TO TEST IN THE OPERATE MODE, AT LEAST, 1 PHONE NUMBER AND OGM OR
1 PAGER NUMBER MUST BE PROGRAMMED. IF PROGRAMMING IS NOT COMPLETE, THE
DIALER WILL DISPLAY: PROGRAMMING IS
NOT COMPLETE!
This message will be displayed for 2 seconds then the dialer will switch to the Program mode.
Test your system on a regular basis, at least once a week.
Make sure you notify the receiving party of your intent to call them, and tell them it is just a
test.
Note: To fully test the input, the dialer must be connected to a telephone line. If the dialer
does not detect a dial tone, it will not continue testing the programmed numbers and will
display: NO DIAL TONE!
If you have gotten the NO DIAL TONE! screen, connect the dialer to a telephone line and
press the “M” key until the TEST: T-LINE prompt appears. Continue testing the input by
selecting “2” in Step 1 and skip to Step 3.
In the TEST mode, a beep will be heard every 30 seconds. This is to indicate that the dialer is
not in the OFF or OPERATE mode.
Testing The WA-900
16

You are now ready to begin operating your system, relying on The WA-900 to provide 24-hour security
reassurance and peace of mind.
When in the OPERATE mode, the system will monitor the pendant transmitter and the auxiliary (hard wired)
input, initiating dialing when an alarm condition occurs. Upon activation the dialer will begin calling each
phone/pager number selected, in sequence. During each successful attempt, the voice message will be delivered
3 times (numeric messages will only be delivered one time). In unsuccessful attempts, the dialer will move on
to the next phone/pager number after receiving 8 busy or 8 rings without an answer. Once an attempt is
successful in delivering the OGM, it will not dial that number again (Numbers stored as pager numbers will be
dialed twice). The dialer will not play the voice message to numeric pager numbers.
If you send a message to a phone attached to an answering machine, it will consider this a successful attempt.
Make sure you designate the maximum number of message repeats to be sure that a complete message will be
left on the answering machine, because part or your entire emergency message may be “lost” while the
answering machine delivers its greeting message.
Placing your system in OPERATE can also be used as a final test of the full functionality of the WA-900. In the
OPERATE mode the OGM will not be heard through your dialer’s speaker but only by each party called.
To begin operating your system, simply press the “M” Mode key until the word OPERATE appears on the
screen. To disarm the dialer, switch the mode to OFF by pressing the same “M” key. For a local signal
sounding alarm strobe indication keep your Wander Alert Unit set in the Low or High volume setting.
All programming information will be retained
Input Activation
The receiver/dialer goes into alarm when either the check-in signals from the pendant transmitter are not
received for the time specified by your setting on the range dial, or when there is a trigger on the auxiliary (hard
wired) input terminals in the battery compartment of the receiver. Once the pendant is out of range, the WA-900
will be alarmed and begin the dialing the programmed phone numbers. The auxiliary (hard wired) input can be
activated by a normally open latching or momentary push button. Under a momentary activation, a single
violation of the input (either from the wireless pendant or the Aux. input) will cause the dialer to initiate
delivering the OGM to all programmed numbers.
Additional Features
The dialer offers innovative features that enhance the utility of the entire system.
Listen-In
While receiving an OGM on a touch-tone phone, the called party can press “1” to listen in to the activity at the
other end of the line for one minute. Pressing “1” again restarts the minute increment period and can be repeated
indefinitely. When “1” is pressed the OGM will stop playing and the listen in period will start.
Two-Way
After the called party is listening-in, that party can press “2” to begin a two-way conversation lasting for one
minute. This procedure also can be repeated indefinitely by pressing “2” again to restart the minute. Once you
are in two-way mode you cannot go back to only Listen-In.
Remote Turn-Off
The called party can remotely stop the call out sequence at any time during the OGM by pressing “1” then “#”
twice within one second. If already in listen-in or two-way, simply press “#” twice in one second, for remote
turn-off. Once the receiver is restored to a non-alarm state, it will re-arm and if a new alarm occurs, the dialing
sequence will begin again.
O
p
eratin
g
The WA-900
17

The Wanderer Alert and Alarm Option
The WA-900 has the additional feature of connecting a horn strobe device called the WANDERER ALERT to
provide local alarming in case in addition to or separately from the dial out notifications. The WANDERER
ALERT is a small horn strobe unit that plugs into the top of the WA-900 (see top diagram on page 8) and is
operated from a standard 9v alkaline battery at very low current drain during standby. It also reports a low
battery condition by the flashing LED. Nominal battery life should be one year. An option is provided for your
convenience of having just a local alarm or a combination of local alarm and dial out. When the receiver/dialer
is in the OFF MODE, with your horn strobe unit set to the Low or High volume setting, you will only get a
local alarm and NO dial out. When receiver/dialer is in the standby OPERATE MODE the unit will also dial out
in addition to the horn strobe local alarm. If you do not want the horn strobe local alarm to go off, simply move
the volume switch on the horn strobe to the off position. If you want to completely disable your WA-900, you
must both put the receiver/dialer into the OFF mode and move the volume switch on the horn strobe to the off
position. Check-in signals are transmitted every 10 seconds, and are indicated by the blinking transmit LED.
When the WPT-900 comes back in range of receiver unit, the transmitter will begin communicating with the
receiver/dialer and the alarm/dialing will stop.
Programming Example for Quick Setup
Before programming the dialer, study the example shown on this page. This “quick setup” example programs in
one telephone number, one numeric pager number, tone dialing, brief emergency message and continuous
activation. Once you understand the setup, use the blank Program Planner to begin programming your dialer.
We recommend making several blank copies of the Planner before beginning the process. It also is advisable to
fill in the Planner in pencil initially.
STEP 1: Press “1”. When the LCD reads SELECT 1-4, press “1” to install the first phone number in location 1;
press “2” to indicate no pager; then press, in sequence, (fictitious) phone number “2345678” followed by the
“*” sign to store the programming process for that number.
STEP 2: Press “3” to install the second phone number in location 3; press “1” to indicate numeric pager; then
press, in sequence, “3456789PP4455#” followed by the “*” sign. The first seven digits represent the pager
18
Sample Program Planner

STEP 2 (Continued): number dialed; each P stands for a 2-second pause; the next four digits followed by the #
sign represent the pager code and the * stores the programming process for that number.
STEP 3: Press “0” to exit PROGRAM NUMBERS.
STEP 4: Press “1” at the PROGRAM: T-LINE prompt.
STEP 5: Press “1” for TONE dialing; then press “2” to indicate no PBX.
STEP 6: Press “1” at the PROGRAM: OGM prompt.
STEP 7: Using a prepared script and speaking six-to-eight inches from the dialer’s microphone on the front of
the unit, press “R” when you are ready to enunciate your emergency message.
STEP 8: Press “1” to play back the recorded message. Press “1” again to accept.
STEP 9: Press “1” at the PROGRAM: INPUT prompt.
STEP 10: Press “2” to program input for CONTINUOUS activation.
STEP 11: Once a selection is entered for the activation of the input, the dialer will return to the PROGRAM:
NUMBERS prompt.
PRESS “M” TO EXIT PROGRAMMING MODE
.
Pro
g
ram Planner
19
Table of contents
Other USP Security System manuals